Năng suất
Năng suất
/
/
author
Đã cập nhật
Đã cập nhật
Đã cập nhật
Khi tôi ngồi trong quán cà phê yêu thích của mình, chuyển đổi giữa công việc thiết kế trên macOS và phần mềm kế toán chỉ có trên Windows mà khách hàng của tôi yêu cầu, tôi nhớ lại những gì chúng tôi đã đạt được trong việc giải quyết thách thức tương thích Mac/Windows cổ điển. Nếu bạn là một người du mục kỹ thuật số, nhân viên làm việc từ xa, hoặc chuyên gia sáng tạo đã chọn Mac vì sự tinh tế nhưng vẫn cần tính năng của Windows, bạn hiểu cuộc đấu tranh này.
Các chuyên gia ngày nay cần sự linh hoạt mà không phải hy sinh. Dù bạn đang quản lý các dự án quốc tế, làm việc với các nhóm đa dạng, hay đơn giản là thích hệ sinh thái Mac nhưng cần một số công cụ cụ thể của Windows, khả năng chạy ứng dụng Windows trên Mac không chỉ tiện lợi—nó là điều cần thiết để duy trì năng suất trong không gian làm việc kỹ thuật số mà ngày càng không biên giới.
Trong hướng dẫn toàn diện này, tôi sẽ chia sẻ 5 phương pháp đã được chứng minh để chạy ứng dụng Windows trên Mac, dựa trên 2 thập kỷ kinh nghiệm của tôi trong việc điều hướng các thách thức nền tảng chéo. Vào cuối, bạn sẽ có một con đường rõ ràng để tích hợp liền mạch các ứng dụng Windows vào quy trình làm việc trên Mac của bạn, với sự chú ý đặc biệt đến DeskIn—giải pháp đang cách mạng hóa cách các chuyên gia xử lý thách thức phổ biến này.

Các máy ảo từ lâu đã là cách tiếp cận truyền thống để chạy Windows trên Mac, cung cấp một môi trường Windows hoàn chỉnh trong hệ thống macOS của bạn.
Các máy ảo về cơ bản tạo ra một máy tính bên trong máy tính của bạn, phân bổ một phần công suất xử lý, bộ nhớ và lưu trữ của Mac để chạy một hệ điều hành Windows hoàn chỉnh. Môi trường được bảo vệ này cho phép bạn chạy gần như bất kỳ chương trình Windows nào như thể bạn đang sử dụng một máy tính Windows chuyên dụng.
Các giải pháp máy ảo phổ biến bao gồm:
VMware Fusion: Cung cấp sự tích hợp liền mạch giữa môi trường Mac và Windows
Parallels Desktop: Nổi tiếng với hiệu suất và giao diện thân thiện với người dùng
VirtualBox: Một lựa chọn miễn phí, mã nguồn mở với chức năng tốt
Tuy nhiên, có những hạn chế cần cân nhắc. Các máy ảo tiêu tốn nhiều tài nguyên hệ thống, ảnh hưởng đến tuổi thọ pin và hiệu suất. Chúng cũng yêu cầu bạn phải sở hữu một giấy phép Windows và không gian lưu trữ đủ cho một hệ điều hành thứ hai hoàn chỉnh.
Các máy ảo có ý nghĩa nhất khi:
Bạn cần tính năng Windows toàn diện
Mac của bạn có đủ công suất xử lý và bộ nhớ
Bạn cần truy cập thường xuyên vào nhiều ứng dụng Windows
Bạn cần một môi trường Windows vĩnh viễn với các cài đặt đã lưu
Bạn cũng có thể thích:
Đối với những ai đang tìm kiếm một giải pháp nhẹ nhàng mà không cần giấy phép Windows, Wine (viết tắt của "Wine Is Not an Emulator") cung cấp một lựa chọn thú vị.

Thay vì tạo ra một môi trường Windows ảo, Wine cung cấp một lớp tương thích để dịch các yêu cầu API Windows thành các yêu cầu POSIX một cách tức thì. Điều này cho phép nhiều ứng dụng Windows chạy trực tiếp trên macOS mà không cần đến Windows.
Wine có nhiều phiên bản cho Mac:
Wineskin: Một wrapper thân thiện với người dùng cho Wine
PlayOnMac: Đơn giản hóa việc cài đặt các trò chơi và ứng dụng Windows
CrossOver: Phiên bản thương mại, được tinh chỉnh của Wine với hỗ trợ kỹ thuật
Điều khiến Wine đặc biệt hấp dẫn là việc sử dụng tài nguyên tối thiểu so với các máy ảo. Theo các chỉ số hiệu suất từ MacWorld, các giải pháp dựa trên Wine thường sử dụng ít bộ nhớ hơn từ 35-50% so với các máy ảo chạy các ứng dụng tương tự.
Mặc dù Wine ấn tượng, nhưng nó không hỗ trợ tất cả các ứng dụng Windows. Tính tương thích thay đổi rất nhiều:
Các chương trình Windows cũ, đơn giản thường hoạt động hoàn hảo
Các ứng dụng phức tạp hoặc mới hơn có thể có chức năng một phần
Các ứng dụng nhất định sẽ không chạy, đặc biệt là những ứng dụng có yêu cầu phần cứng chuyên dụng
Đối với người dùng kỹ thuật yêu thích phiêu lưu, người cần các ứng dụng Windows cụ thể mà không cần chi phí của một máy ảo, Wine có thể là một giải pháp tuyệt vời—nhưng nó đòi hỏi sự kiên nhẫn và thỉnh thoảng cần khắc phục sự cố.

Đối với những người dùng Mac có bộ xử lý Intel cần hiệu suất Windows tối đa, Boot Camp của Apple vẫn là một lựa chọn khả thi, mặc dù nó đang dần bị loại bỏ với Apple Silicon.
Boot Camp có cách tiếp cận khác hoàn toàn so với các giải pháp khác. Thay vì chạy Windows cùng với macOS, nó cho phép bạn cài đặt Windows trực tiếp trên Mac của bạn, tạo ra một hệ thống khởi động kép. Khi bạn cần Windows, bạn khởi động lại máy tính của mình và khởi động trực tiếp vào Windows, cho bạn 100% tài nguyên của Mac để chạy các ứng dụng Windows.
Ưu điểm là rõ ràng:
Hiệu suất native tương đương với một PC Windows
Tương thích hoàn toàn với tất cả phần mềm và thiết bị ngoại vi của Windows
Truy cập vào các trò chơi chỉ có trên Windows và các ứng dụng tiêu tốn tài nguyên
Điều bất lợi? Bạn không thể chạy macOS và Windows cùng một lúc, yêu cầu khởi động lại mỗi lần bạn cần chuyển đổi hệ điều hành. Thêm vào đó, Boot Camp không được hỗ trợ trên các Mac mới hơn với Apple Silicon (M1, M2, M3 chips).
👉 xem hướng dẫn đầy đủ để Giữ Kết Nối Bất Cứ Khi Nào, Ở Bất Cứ Đâu
Xem xét Boot Camp nếu:
Bạn có một Mac dựa trên Intel
Bạn cần hiệu suất tối đa cho các ứng dụng Windows
Bạn không ngại khởi động lại để chuyển đổi giữa các hệ điều hành
Bạn cần tính tương thích hoàn toàn với phần mềm Windows
Sự phát triển của điện toán đám mây đã giới thiệu một giải pháp thanh lịch khác: truy cập các ứng dụng Windows từ xa mà không cần cài đặt bất kỳ thứ gì lớn trên Mac của bạn.

Truy cập Windows dựa trên đám mây cung cấp một môi trường máy tính để bàn Windows được lưu trữ trên các máy chủ từ xa, mà bạn kết nối qua Mac của bạn. Các dịch vụ này duy trì các cài đặt Windows trên các máy tính mạnh mẽ từ xa, phát trực tiếp giao diện đến thiết bị của bạn.
Các tùy chọn phổ biến bao gồm:
Windows 365: Giải pháp PC đám mây của Microsoft
Amazon WorkSpaces: Cơ sở hạ tầng máy tính để bàn ảo của AWS
Shadow PC: Ban đầu được thiết kế cho trò chơi nhưng cũng hoạt động cho các ứng dụng chuyên nghiệp
Một nghiên cứu gần đây của Forrester Research cho thấy 43% nhân viên làm việc remote hiện đang sử dụng một số dạng giải pháp điện toán đám mây cho tính năng đa nền tảng, với số lượng này ngày càng tăng kể từ năm 2020.
Lợi Ích:
Không cần cài đặt Windows cục bộ
Trải nghiệm nhất quán trên tất cả các thiết bị của bạn
Không cần phần cứng cục bộ mạnh mẽ
Môi trường Windows luôn được cập nhật và duy trì
Hạn Chế:
Cần kết nối internet ổn định, chất lượng cao
Chi phí thuê bao có thể tăng lên theo thời gian
Có thể gặp vấn đề độ trễ cho các ứng dụng tiêu tốn đồ họa
Các vấn đề về quyền riêng tư với công việc trên đám mây
Các giải pháp đám mây đặc biệt có giá trị cho những người du mục kỹ thuật số và các chuyên gia di động cao cần truy cập Windows nhất quán nhưng làm việc trên nhiều thiết bị.
Đây là nơi cuộc chơi thay đổi cho những người dùng Mac cần chức năng của Windows.

Là một người đã thử mọi phương pháp ở trên, tôi đã hoài nghi khi lần đầu tiên phát hiện ra DeskIn. Tuy nhiên, giải pháp sáng tạo này đã thay đổi hoàn toàn cách tôi tiếp cận thách thức Windows trên Mac.
DeskIn có cách tiếp cận lai kết hợp những yếu tố tốt nhất của máy ảo và điện toán đám mây trong khi loại bỏ nhiều hạn chế của chúng. Kết quả là một trải nghiệm liền mạch mà cảm giác giống như chạy các ứng dụng Windows gốc trên Mac của bạn.
Quản Lý Tài Nguyên Thông Minh: DeskIn tối ưu hóa bộ nhớ và mức sử dụng CPU dựa trên ứng dụng Windows cụ thể mà bạn đang chạy
Hợp Nhất Giao Diện Người Dùng Liền Mạch: Các ứng dụng Windows xuất hiện cùng với các ứng dụng Mac của bạn, chia sẻ cùng một màn hình
Clipboard Đa Nền Tảng: Copy và paste giữa các ứng dụng Windows và Mac một cách dễ dàng
Tích Hợp Hệ Thống Tệp: Truy cập tệp Mac của bạn trực tiếp từ các ứng dụng Windows. Xem cách bạn có thể dễ dàng chuyển các tệp lớn tại đây.
Theo thử nghiệm độc lập của TechBenchmark, DeskIn sử dụng khoảng 40% tài nguyên hệ thống ít hơn so với các máy ảo truyền thống trong khi cung cấp hiệu suất tương tự cho hầu hết các ứng dụng hàng ngày.
DeskIn đặc biệt nổi bật cho các chuyên gia:
Cần chạy phần mềm kinh doanh Windows chuyên biệt
Làm việc với khách hàng hoặc đồng nghiệp sử dụng công cụ chỉ có trên Windows
Cần truy cập thỉnh thoảng vào các tiện ích chỉ có trên Windows
Đánh giá một quy trình làm việc sạch sẽ, tích hợp mà không cần chuyển đổi ngữ cảnh liên tục

Sau khi khám phá năm cách tiếp cận để chạy ứng dụng Windows trên Mac, giải pháp đúng cho bạn phụ thuộc vào nhu cầu cụ thể của bạn:
Máy Ảo cung cấp trải nghiệm Windows toàn diện nhất nhưng với yêu cầu tài nguyên cao hơn
Wine cung cấp khả năng tương thích nhẹ cho nhiều ứng dụng Windows mà không cần Windows
Boot Camp cung cấp hiệu suất Windows gốc cho các Mac dựa trên Intel nhưng yêu cầu khởi động lại
Các Giải Pháp Đám Mây loại bỏ những yêu cầu cài đặt cục bộ nhưng cần internet đáng tin cậy
DeskIn cân bằng hiệu suất, sự tiện lợi và sự tích hợp cho một trải nghiệm đa nền tảng liền mạch
Khi công việc của chúng ta ngày càng độc lập về địa điểm và đa nền tảng, khả năng tận dụng cả hai hệ sinh thái trở nên không chỉ hữu ích mà còn thiết yếu. Các rào cản giữa các hệ điều hành tiếp tục mờ nhạt, và những giải pháp như DeskIn dẫn đầu trong việc tạo ra những trải nghiệm máy tính thực sự thống nhất.
Đối với các chuyên gia hiện đại mong muốn tối đa hóa năng suất mà không hy sinh trải nghiệm Mac mà họ yêu thích, tôi khuyên bạn nên tải DeskIn trực tiếp từ DeskIn.io và trải nghiệm sự khác biệt cho chính mình. Dù bạn là một freelancer đang quản lý nhiều khách hàng với những yêu cầu hệ thống khác nhau hay một nhân viên làm việc từ xa cần các công cụ Windows chuyên dụng, DeskIn cung cấp sự linh hoạt và hiệu suất để giữ cho bạn luôn năng suất ở bất cứ đâu.
Khi tôi ngồi trong quán cà phê yêu thích của mình, chuyển đổi giữa công việc thiết kế trên macOS và phần mềm kế toán chỉ có trên Windows mà khách hàng của tôi yêu cầu, tôi nhớ lại những gì chúng tôi đã đạt được trong việc giải quyết thách thức tương thích Mac/Windows cổ điển. Nếu bạn là một người du mục kỹ thuật số, nhân viên làm việc từ xa, hoặc chuyên gia sáng tạo đã chọn Mac vì sự tinh tế nhưng vẫn cần tính năng của Windows, bạn hiểu cuộc đấu tranh này.
Các chuyên gia ngày nay cần sự linh hoạt mà không phải hy sinh. Dù bạn đang quản lý các dự án quốc tế, làm việc với các nhóm đa dạng, hay đơn giản là thích hệ sinh thái Mac nhưng cần một số công cụ cụ thể của Windows, khả năng chạy ứng dụng Windows trên Mac không chỉ tiện lợi—nó là điều cần thiết để duy trì năng suất trong không gian làm việc kỹ thuật số mà ngày càng không biên giới.
Trong hướng dẫn toàn diện này, tôi sẽ chia sẻ 5 phương pháp đã được chứng minh để chạy ứng dụng Windows trên Mac, dựa trên 2 thập kỷ kinh nghiệm của tôi trong việc điều hướng các thách thức nền tảng chéo. Vào cuối, bạn sẽ có một con đường rõ ràng để tích hợp liền mạch các ứng dụng Windows vào quy trình làm việc trên Mac của bạn, với sự chú ý đặc biệt đến DeskIn—giải pháp đang cách mạng hóa cách các chuyên gia xử lý thách thức phổ biến này.
Các máy ảo từ lâu đã là cách tiếp cận truyền thống để chạy Windows trên Mac, cung cấp một môi trường Windows hoàn chỉnh trong hệ thống macOS của bạn.
Các máy ảo về cơ bản tạo ra một máy tính bên trong máy tính của bạn, phân bổ một phần công suất xử lý, bộ nhớ và lưu trữ của Mac để chạy một hệ điều hành Windows hoàn chỉnh. Môi trường được bảo vệ này cho phép bạn chạy gần như bất kỳ chương trình Windows nào như thể bạn đang sử dụng một máy tính Windows chuyên dụng.
Các giải pháp máy ảo phổ biến bao gồm:
VMware Fusion: Cung cấp sự tích hợp liền mạch giữa môi trường Mac và Windows
Parallels Desktop: Nổi tiếng với hiệu suất và giao diện thân thiện với người dùng
VirtualBox: Một lựa chọn miễn phí, mã nguồn mở với chức năng tốt
Tuy nhiên, có những hạn chế cần cân nhắc. Các máy ảo tiêu tốn nhiều tài nguyên hệ thống, ảnh hưởng đến tuổi thọ pin và hiệu suất. Chúng cũng yêu cầu bạn phải sở hữu một giấy phép Windows và không gian lưu trữ đủ cho một hệ điều hành thứ hai hoàn chỉnh.
Các máy ảo có ý nghĩa nhất khi:
Bạn cần tính năng Windows toàn diện
Mac của bạn có đủ công suất xử lý và bộ nhớ
Bạn cần truy cập thường xuyên vào nhiều ứng dụng Windows
Bạn cần một môi trường Windows vĩnh viễn với các cài đặt đã lưu
Bạn cũng có thể thích:
Đối với những ai đang tìm kiếm một giải pháp nhẹ nhàng mà không cần giấy phép Windows, Wine (viết tắt của "Wine Is Not an Emulator") cung cấp một lựa chọn thú vị.
Thay vì tạo ra một môi trường Windows ảo, Wine cung cấp một lớp tương thích để dịch các yêu cầu API Windows thành các yêu cầu POSIX một cách tức thì. Điều này cho phép nhiều ứng dụng Windows chạy trực tiếp trên macOS mà không cần đến Windows.
Wine có nhiều phiên bản cho Mac:
Wineskin: Một wrapper thân thiện với người dùng cho Wine
PlayOnMac: Đơn giản hóa việc cài đặt các trò chơi và ứng dụng Windows
CrossOver: Phiên bản thương mại, được tinh chỉnh của Wine với hỗ trợ kỹ thuật
Điều khiến Wine đặc biệt hấp dẫn là việc sử dụng tài nguyên tối thiểu so với các máy ảo. Theo các chỉ số hiệu suất từ MacWorld, các giải pháp dựa trên Wine thường sử dụng ít bộ nhớ hơn từ 35-50% so với các máy ảo chạy các ứng dụng tương tự.
Mặc dù Wine ấn tượng, nhưng nó không hỗ trợ tất cả các ứng dụng Windows. Tính tương thích thay đổi rất nhiều:
Các chương trình Windows cũ, đơn giản thường hoạt động hoàn hảo
Các ứng dụng phức tạp hoặc mới hơn có thể có chức năng một phần
Các ứng dụng nhất định sẽ không chạy, đặc biệt là những ứng dụng có yêu cầu phần cứng chuyên dụng
Đối với người dùng kỹ thuật yêu thích phiêu lưu, người cần các ứng dụng Windows cụ thể mà không cần chi phí của một máy ảo, Wine có thể là một giải pháp tuyệt vời—nhưng nó đòi hỏi sự kiên nhẫn và thỉnh thoảng cần khắc phục sự cố.
Đối với những người dùng Mac có bộ xử lý Intel cần hiệu suất Windows tối đa, Boot Camp của Apple vẫn là một lựa chọn khả thi, mặc dù nó đang dần bị loại bỏ với Apple Silicon.
Boot Camp có cách tiếp cận khác hoàn toàn so với các giải pháp khác. Thay vì chạy Windows cùng với macOS, nó cho phép bạn cài đặt Windows trực tiếp trên Mac của bạn, tạo ra một hệ thống khởi động kép. Khi bạn cần Windows, bạn khởi động lại máy tính của mình và khởi động trực tiếp vào Windows, cho bạn 100% tài nguyên của Mac để chạy các ứng dụng Windows.
Ưu điểm là rõ ràng:
Hiệu suất native tương đương với một PC Windows
Tương thích hoàn toàn với tất cả phần mềm và thiết bị ngoại vi của Windows
Truy cập vào các trò chơi chỉ có trên Windows và các ứng dụng tiêu tốn tài nguyên
Điều bất lợi? Bạn không thể chạy macOS và Windows cùng một lúc, yêu cầu khởi động lại mỗi lần bạn cần chuyển đổi hệ điều hành. Thêm vào đó, Boot Camp không được hỗ trợ trên các Mac mới hơn với Apple Silicon (M1, M2, M3 chips).
👉 xem hướng dẫn đầy đủ để Giữ Kết Nối Bất Cứ Khi Nào, Ở Bất Cứ Đâu
Xem xét Boot Camp nếu:
Bạn có một Mac dựa trên Intel
Bạn cần hiệu suất tối đa cho các ứng dụng Windows
Bạn không ngại khởi động lại để chuyển đổi giữa các hệ điều hành
Bạn cần tính tương thích hoàn toàn với phần mềm Windows
Sự phát triển của điện toán đám mây đã giới thiệu một giải pháp thanh lịch khác: truy cập các ứng dụng Windows từ xa mà không cần cài đặt bất kỳ thứ gì lớn trên Mac của bạn.
Truy cập Windows dựa trên đám mây cung cấp một môi trường máy tính để bàn Windows được lưu trữ trên các máy chủ từ xa, mà bạn kết nối qua Mac của bạn. Các dịch vụ này duy trì các cài đặt Windows trên các máy tính mạnh mẽ từ xa, phát trực tiếp giao diện đến thiết bị của bạn.
Các tùy chọn phổ biến bao gồm:
Windows 365: Giải pháp PC đám mây của Microsoft
Amazon WorkSpaces: Cơ sở hạ tầng máy tính để bàn ảo của AWS
Shadow PC: Ban đầu được thiết kế cho trò chơi nhưng cũng hoạt động cho các ứng dụng chuyên nghiệp
Một nghiên cứu gần đây của Forrester Research cho thấy 43% nhân viên làm việc remote hiện đang sử dụng một số dạng giải pháp điện toán đám mây cho tính năng đa nền tảng, với số lượng này ngày càng tăng kể từ năm 2020.
Lợi Ích:
Không cần cài đặt Windows cục bộ
Trải nghiệm nhất quán trên tất cả các thiết bị của bạn
Không cần phần cứng cục bộ mạnh mẽ
Môi trường Windows luôn được cập nhật và duy trì
Hạn Chế:
Cần kết nối internet ổn định, chất lượng cao
Chi phí thuê bao có thể tăng lên theo thời gian
Có thể gặp vấn đề độ trễ cho các ứng dụng tiêu tốn đồ họa
Các vấn đề về quyền riêng tư với công việc trên đám mây
Các giải pháp đám mây đặc biệt có giá trị cho những người du mục kỹ thuật số và các chuyên gia di động cao cần truy cập Windows nhất quán nhưng làm việc trên nhiều thiết bị.
Đây là nơi cuộc chơi thay đổi cho những người dùng Mac cần chức năng của Windows.
Là một người đã thử mọi phương pháp ở trên, tôi đã hoài nghi khi lần đầu tiên phát hiện ra DeskIn. Tuy nhiên, giải pháp sáng tạo này đã thay đổi hoàn toàn cách tôi tiếp cận thách thức Windows trên Mac.
DeskIn có cách tiếp cận lai kết hợp những yếu tố tốt nhất của máy ảo và điện toán đám mây trong khi loại bỏ nhiều hạn chế của chúng. Kết quả là một trải nghiệm liền mạch mà cảm giác giống như chạy các ứng dụng Windows gốc trên Mac của bạn.
Quản Lý Tài Nguyên Thông Minh: DeskIn tối ưu hóa bộ nhớ và mức sử dụng CPU dựa trên ứng dụng Windows cụ thể mà bạn đang chạy
Hợp Nhất Giao Diện Người Dùng Liền Mạch: Các ứng dụng Windows xuất hiện cùng với các ứng dụng Mac của bạn, chia sẻ cùng một màn hình
Clipboard Đa Nền Tảng: Copy và paste giữa các ứng dụng Windows và Mac một cách dễ dàng
Tích Hợp Hệ Thống Tệp: Truy cập tệp Mac của bạn trực tiếp từ các ứng dụng Windows. Xem cách bạn có thể dễ dàng chuyển các tệp lớn tại đây.
Theo thử nghiệm độc lập của TechBenchmark, DeskIn sử dụng khoảng 40% tài nguyên hệ thống ít hơn so với các máy ảo truyền thống trong khi cung cấp hiệu suất tương tự cho hầu hết các ứng dụng hàng ngày.
DeskIn đặc biệt nổi bật cho các chuyên gia:
Cần chạy phần mềm kinh doanh Windows chuyên biệt
Làm việc với khách hàng hoặc đồng nghiệp sử dụng công cụ chỉ có trên Windows
Cần truy cập thỉnh thoảng vào các tiện ích chỉ có trên Windows
Đánh giá một quy trình làm việc sạch sẽ, tích hợp mà không cần chuyển đổi ngữ cảnh liên tục
Sau khi khám phá năm cách tiếp cận để chạy ứng dụng Windows trên Mac, giải pháp đúng cho bạn phụ thuộc vào nhu cầu cụ thể của bạn:
Máy Ảo cung cấp trải nghiệm Windows toàn diện nhất nhưng với yêu cầu tài nguyên cao hơn
Wine cung cấp khả năng tương thích nhẹ cho nhiều ứng dụng Windows mà không cần Windows
Boot Camp cung cấp hiệu suất Windows gốc cho các Mac dựa trên Intel nhưng yêu cầu khởi động lại
Các Giải Pháp Đám Mây loại bỏ những yêu cầu cài đặt cục bộ nhưng cần internet đáng tin cậy
DeskIn cân bằng hiệu suất, sự tiện lợi và sự tích hợp cho một trải nghiệm đa nền tảng liền mạch
Khi công việc của chúng ta ngày càng độc lập về địa điểm và đa nền tảng, khả năng tận dụng cả hai hệ sinh thái trở nên không chỉ hữu ích mà còn thiết yếu. Các rào cản giữa các hệ điều hành tiếp tục mờ nhạt, và những giải pháp như DeskIn dẫn đầu trong việc tạo ra những trải nghiệm máy tính thực sự thống nhất.
Đối với các chuyên gia hiện đại mong muốn tối đa hóa năng suất mà không hy sinh trải nghiệm Mac mà họ yêu thích, tôi khuyên bạn nên tải DeskIn trực tiếp từ DeskIn.io và trải nghiệm sự khác biệt cho chính mình. Dù bạn là một freelancer đang quản lý nhiều khách hàng với những yêu cầu hệ thống khác nhau hay một nhân viên làm việc từ xa cần các công cụ Windows chuyên dụng, DeskIn cung cấp sự linh hoạt và hiệu suất để giữ cho bạn luôn năng suất ở bất cứ đâu.


Control Windows from Your iPad Using Chrome Remote Desktop: Tips & Limits | DeskIn Japan
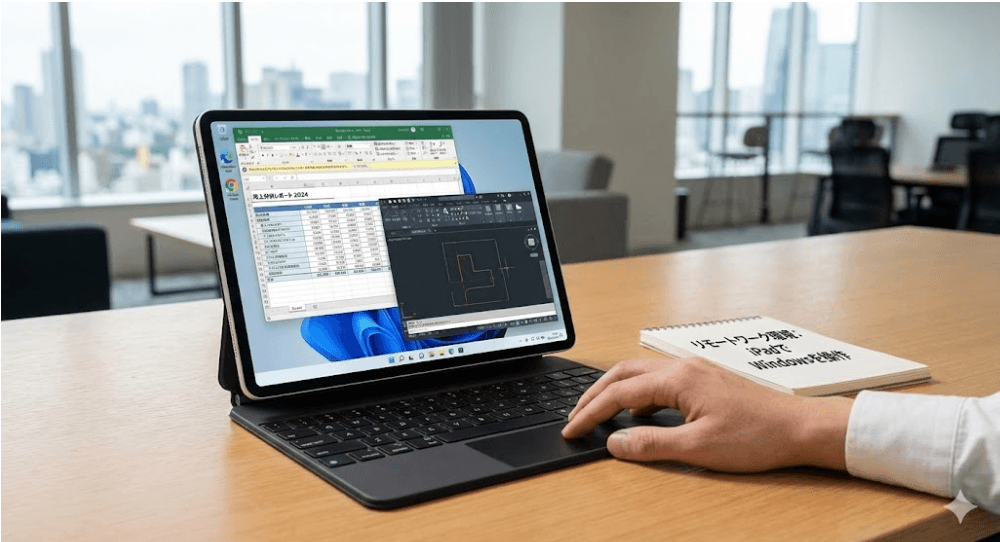
You're settled into a café in Shimokitazawa or a co-working space in Shinjuku, iPad in hand, no laptop in sight. It sounds ideal — until you need full Excel functionality, a Windows-only business application, or software sitting on the office PC back at your desk.
For many people living and working in Japan, this situation comes up more often than expected. The answer is remote desktop access — specifically, using your iPad to connect to and control a Windows PC from wherever you are.
Among the remote desktop tools available, Google's Chrome Remote Desktop (CRD) consistently gets chosen as the starting point. It's completely free, requires no technical background to set up, and works across devices. For anyone wanting to test the concept before committing to a paid tool, it's the natural first step.
Using an iPad to control a Windows PC isn't quite as seamless as it sounds. Touch input and mouse input are fundamentally different, and without a few adjustments, the experience can feel clunky fast. This guide covers the setup process from scratch, the gestures and settings that actually make it workable, and the honest limitations you'll run into if you push it too far.
Among all the remote desktop options out there, Chrome Remote Desktop wins on approachability. The reason comes down to its sheer ease of use.
Completely free, with no feature restrictions: Whether for personal or professional use, everything is available at no cost — the biggest advantage by far.
No complex setup required: No VPN configuration, no router port-forwarding, no specialist knowledge needed. If you have a Google account, setup takes a few minutes.
Works across devices: Windows, Mac, and iPadOS all connect seamlessly — no environment restrictions.
For anyone who wants to try remote access on their existing iPad without spending anything or reconfiguring their network, CRD is the right place to start.
An iPad and a Windows PC speak different languages — one is built for touch, the other for a mouse. Bridging that gap takes some deliberate setup.
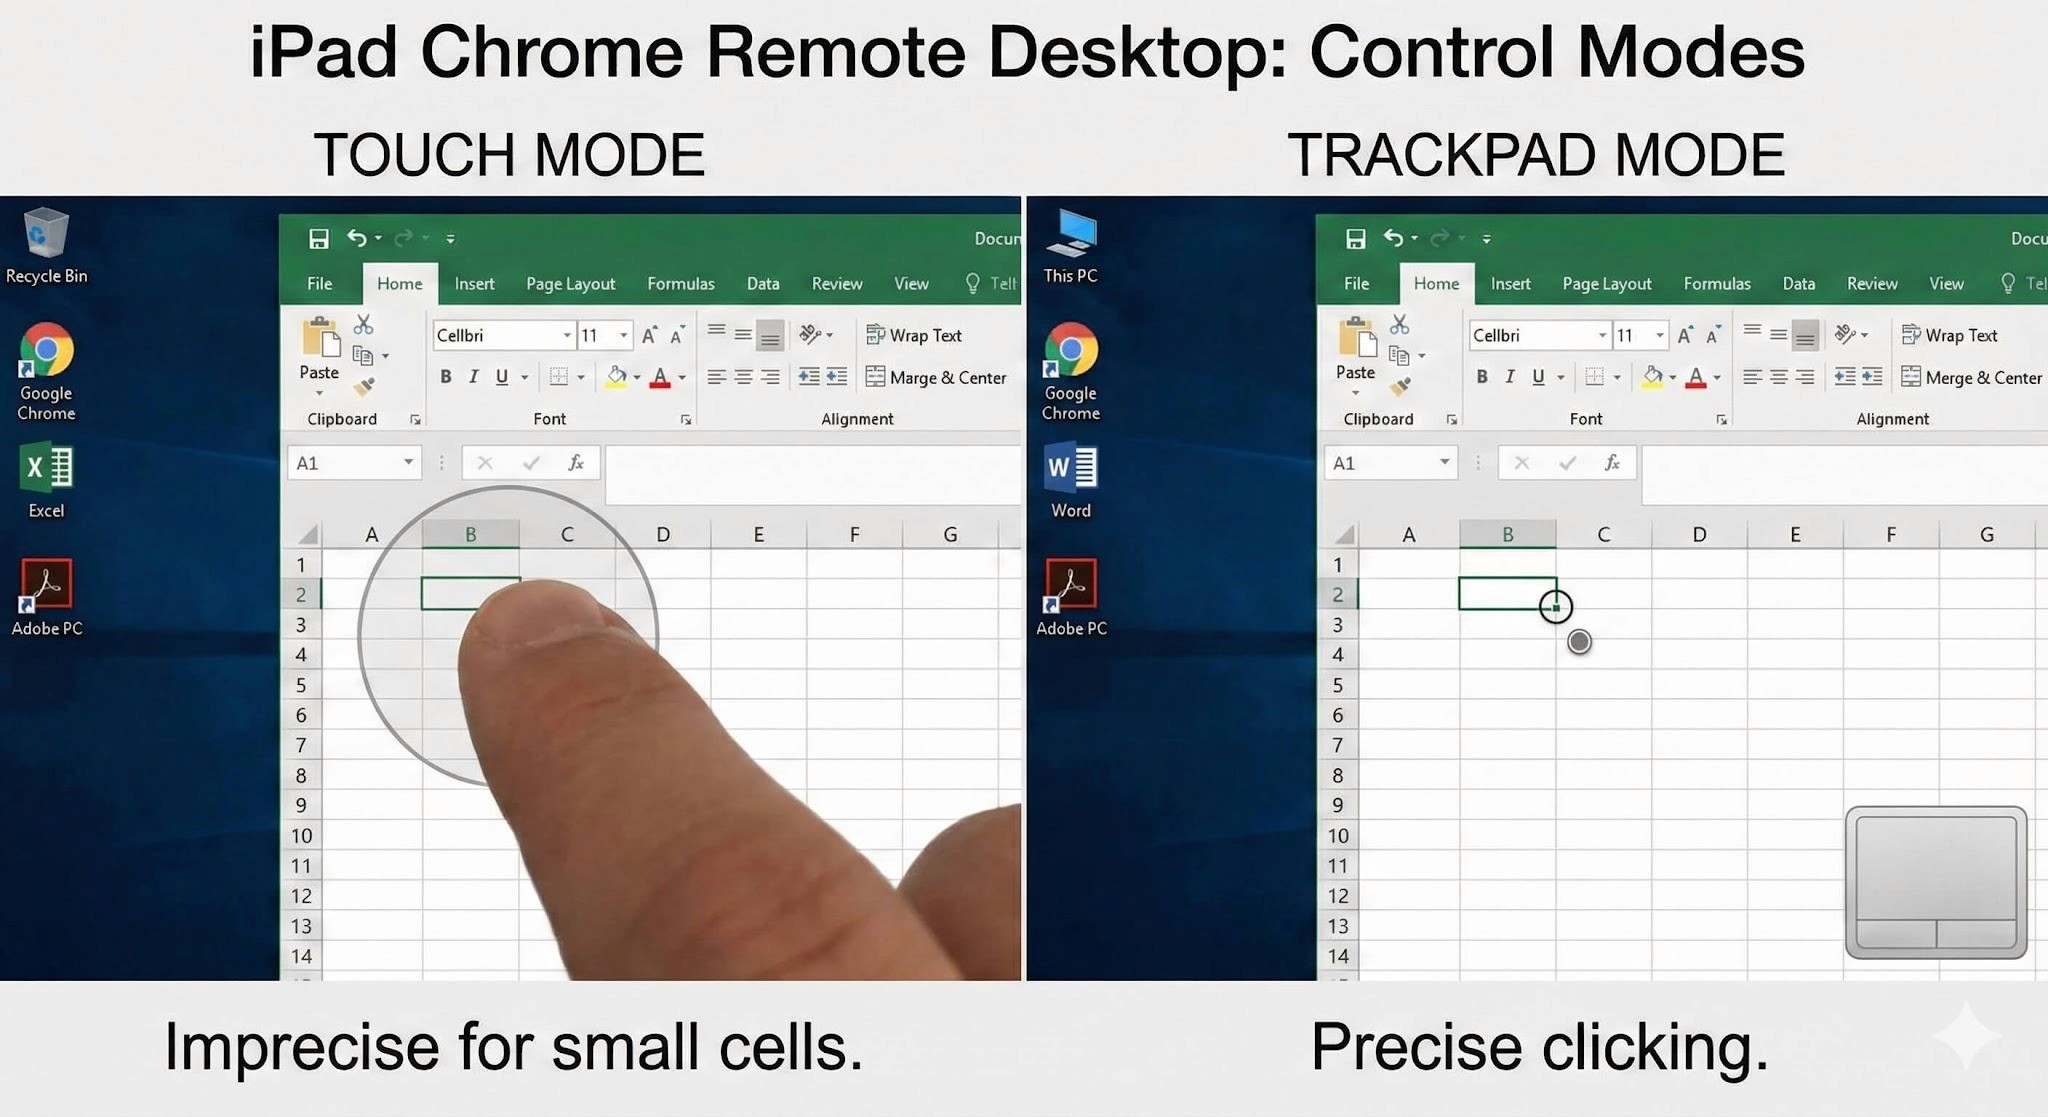
The iPad app offers two control modes. Not knowing about this is the most common reason people give up early.
Trackpad Mode (recommended): Moving your finger anywhere on screen moves the mouse cursor — similar to using a laptop trackpad. Right-click and drag-and-drop work accurately, making this the right choice for Excel, business software, or anything requiring precise input.
Touch Mode: Tapping the screen directly clicks at that point. This works better for browsing or watching videos — consumption tasks rather than production work.
Tip: Switch between modes instantly from the side-panel menu that appears when you swipe in from the right edge of the screen. Get into the habit of switching based on what you're doing.
You can replicate most standard mouse actions with just your fingers:
Right-click: Tap with two fingers simultaneously
Drag and drop: Long-press on a target with one finger, then slide
Scroll: Slide two fingers up or down
If you're using an iPad keyboard like the Magic Keyboard, the key layout takes some getting used to.
Command = Ctrl: The iPad's Command key functions as the Windows Ctrl key in remote sessions. Command + C copies, Command + V pastes — standard shortcuts carry over in that sense.
Japanese input switching: This is where most people hit a wall. The usual shortcuts for toggling between Japanese and English input (nihongo nyūryoku, 日本語入力) — Ctrl + Space or Caps Lock — often don't transmit cleanly to Windows. When this happens, the most reliable workaround is tapping the IME icon in the Windows taskbar directly, or reconfiguring the input method shortcut on the Windows side.
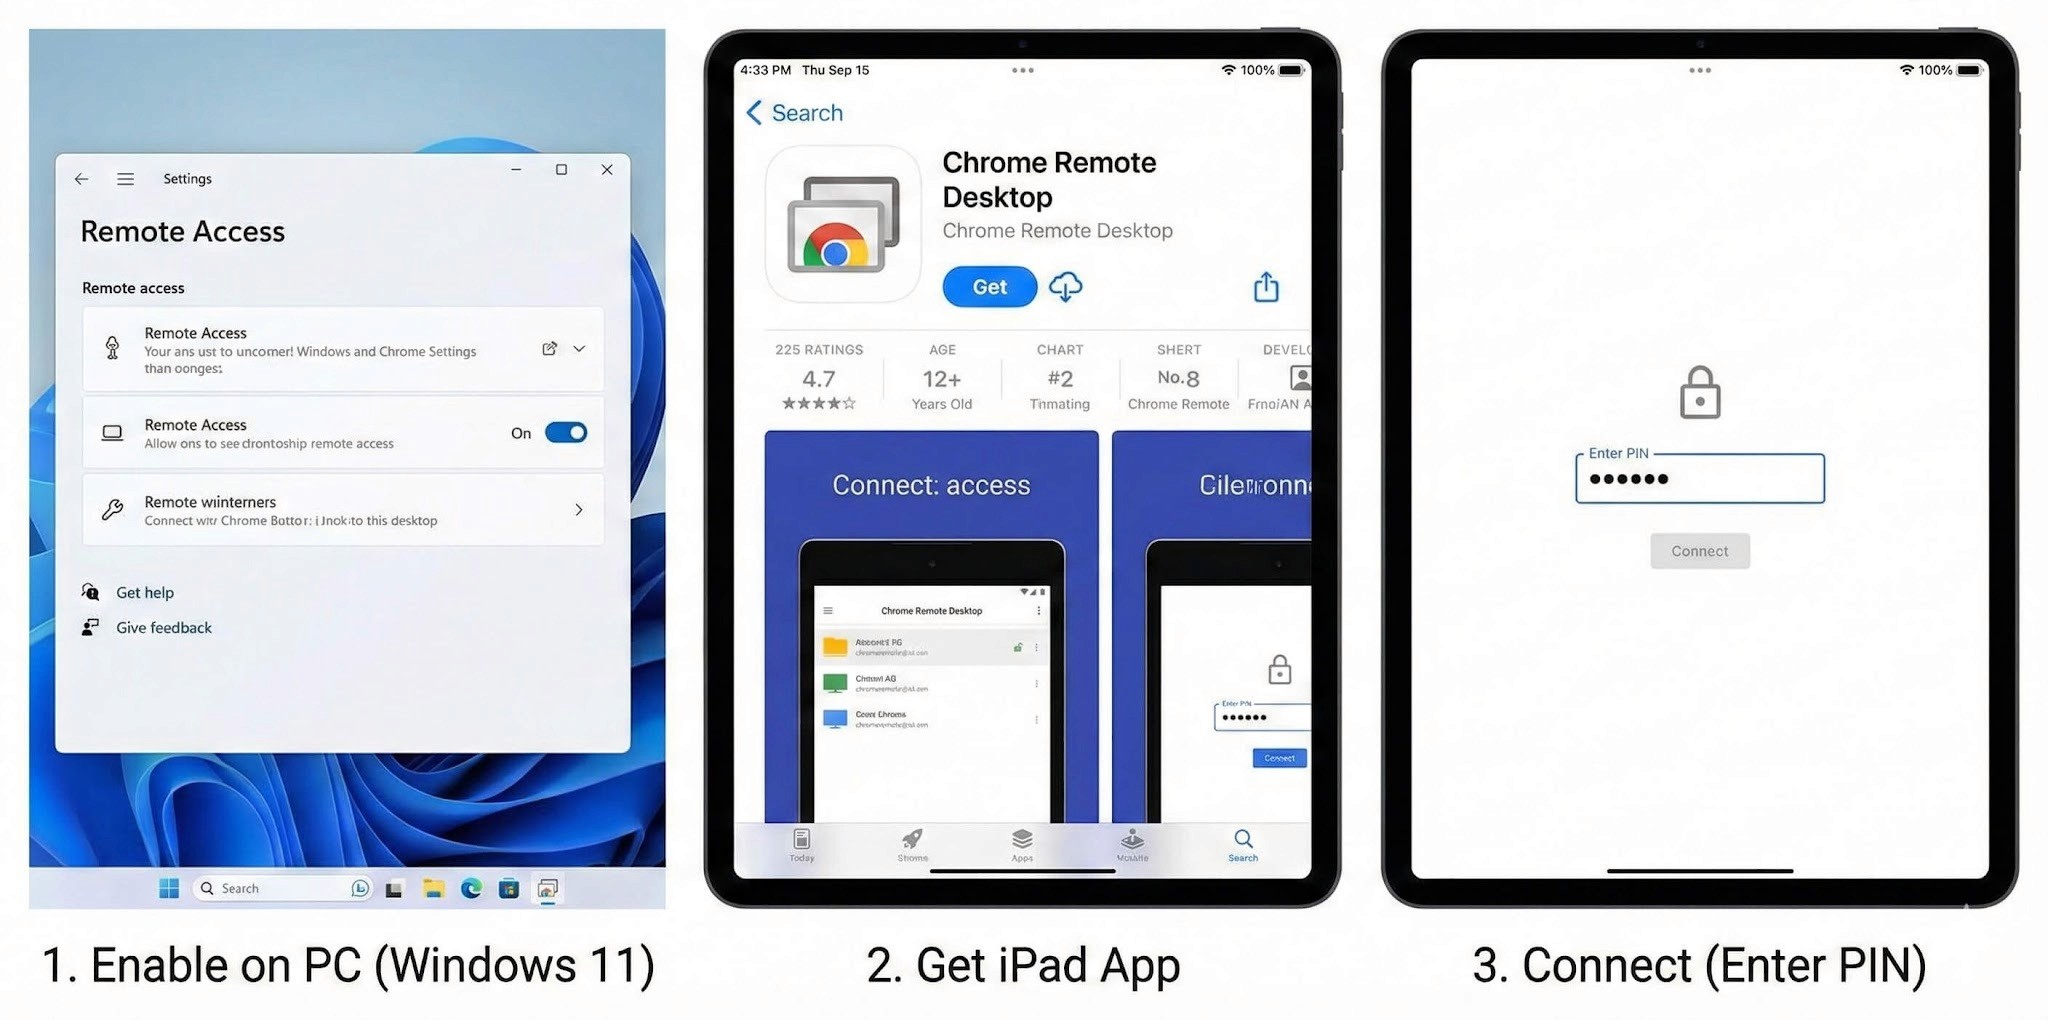
Start on the Windows machine you want to access remotely.
Access the official site in Chrome: Open Chrome and go to remotedesktop.google.com/access
Install the extension: Under "Set up remote access," click the blue download icon and install the Chrome extension.
Enable Remote Access: Click "Turn on" and give your PC a name.
Set your PIN: Create a PIN of at least six digits — you'll need this every time you connect from your iPad. The Windows PC is now ready.
Download the app: Search for "Chrome Remote Desktop" in the App Store and install it.
Log in: Sign in with the same Google account you used on your Windows PC.
Select your PC: Your PC will appear in the device list once it's online.
Enter your PIN: Select your PC from the list and enter the PIN you set. Connection is now established.
Optimise the display: Open the menu (the three-line icon at the bottom right of the screen), go to Settings, and enable "Shrink to fit." This resizes the Windows display to match your iPad's screen, so you're not scrolling around a desktop that doesn't fit.
CRD is genuinely useful — but if you're trying to use your iPad as a primary work machine through it, these friction points will catch up with you.
iPads use a 4:3 aspect ratio; most Windows PCs use 16:9.
Black bars: When displayed on an iPad, large black bars appear at the top and bottom of the screen, reducing your actual working area.
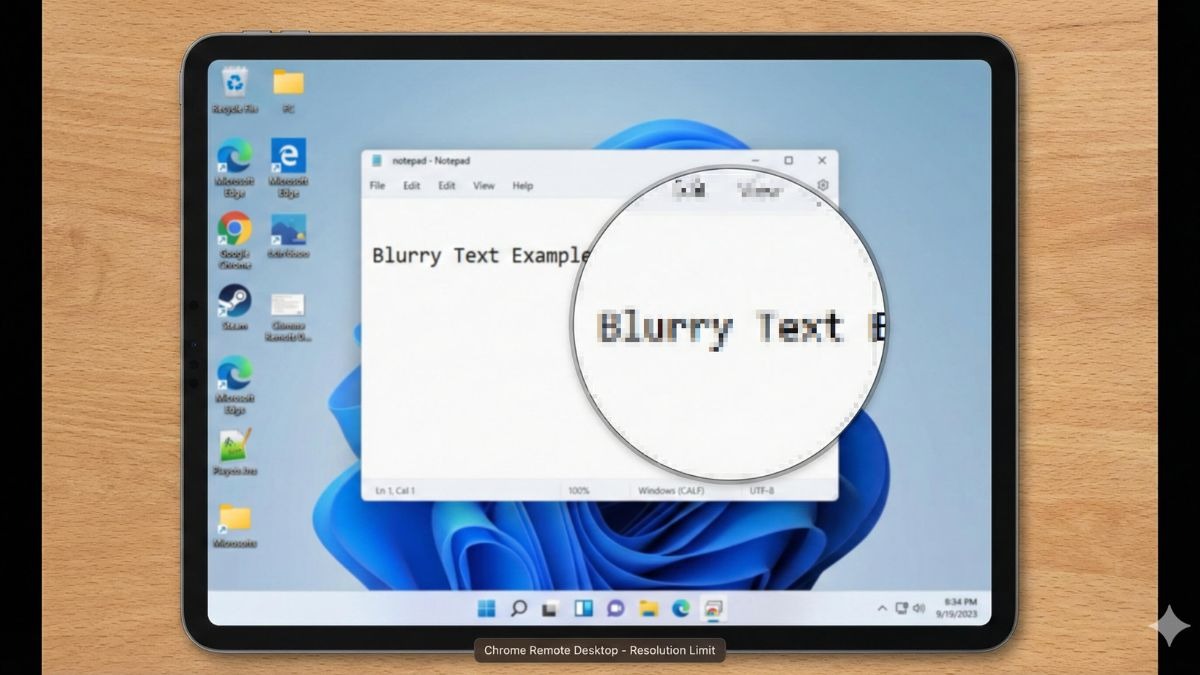
Blurry text: CRD isn't optimised for Retina displays, so fine text — spreadsheet cells, small interface labels — appears soft and blurry. After an hour of this, eye fatigue sets in fast.
This is the biggest pain point for most users working in Japanese.
Shortcut conflicts: Trying to switch between Japanese and English input on the iPad side doesn't transmit cleanly to Windows, leading to constant input errors and frustrating interruptions.
Typing lag: Depending on network conditions, typed characters can appear a beat behind what you're typing — making longer Japanese text genuinely painful to compose.
Even with a physical mouse connected to your iPad, the experience doesn't match what you'd get on a PC.
Unnatural scrolling: Scroll wheel behaviour can be jerky or even reversed.
Advanced inputs not supported: Mouse side buttons aren't recognised, and right-clicking requires a long-press or two-finger tap workaround rather than a direct click. The speed and fluidity of a real PC setup simply isn't achievable.
Chrome Remote Desktop is purely a screen control tool — it doesn't support file transfer between your iPad and Windows PC.
No direct sending: Transferring a photo from your iPad to Windows, or saving a Windows document to your iPad, requires routing through cloud storage like Google Drive or iCloud. It works, but it breaks your workflow every time.
If CRD's limitations are getting in the way of actual productivity, DeskIn was built to solve exactly those problems. Where CRD is designed for "basic screen control," DeskIn is designed for genuine professional use — remote sessions that feel as close to working locally as possible.
The blurry text and choppy movement that characterise CRD on an iPad? DeskIn eliminates both.
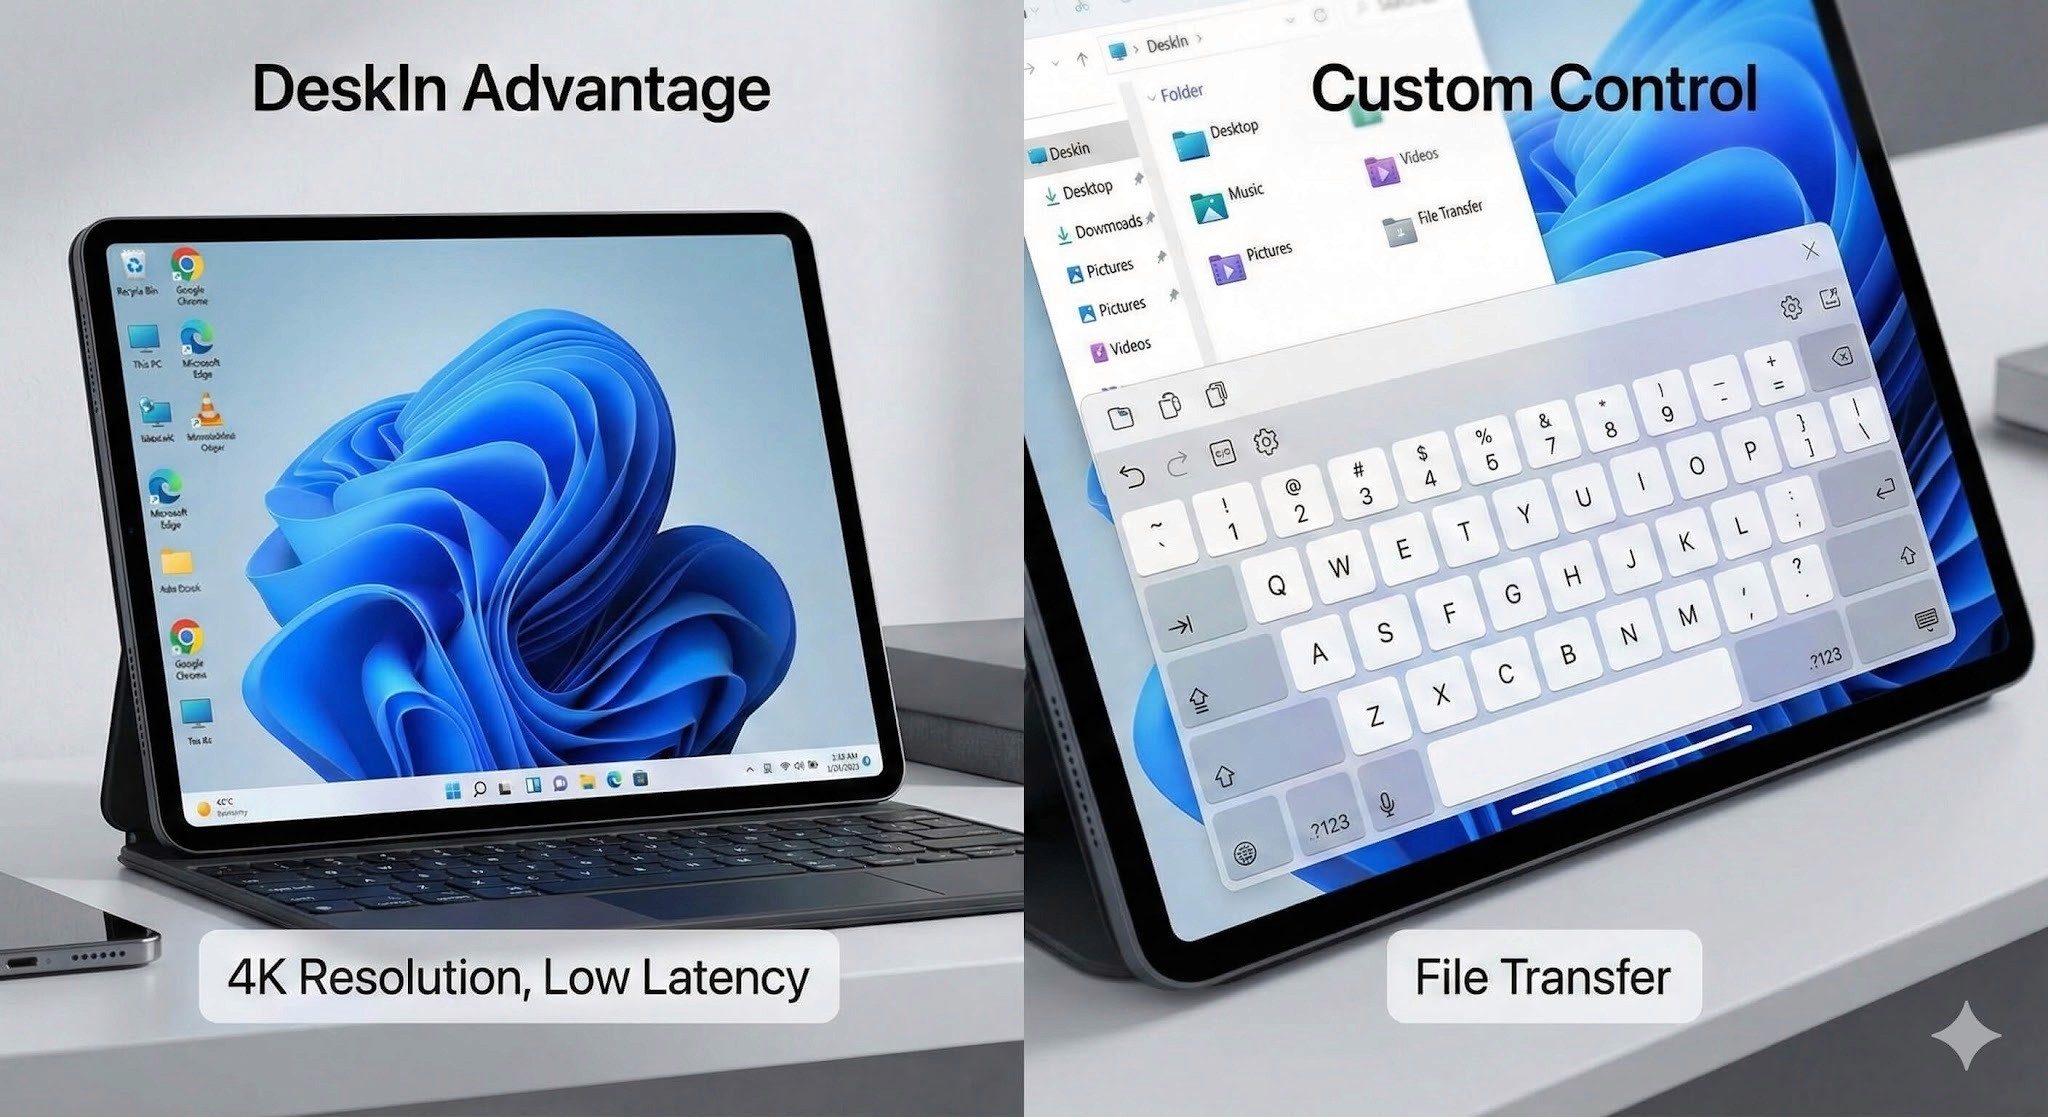
Outstanding display quality: 4K resolution and 60FPS high frame rate support. iPad's Retina display is used to its full potential — the experience feels like running Windows locally.
Automatic aspect ratio optimisation: DeskIn adapts automatically to the iPad's 4:3 ratio, filling the screen properly without black bars.
Input performance is where the gap between DeskIn and CRD is most noticeable.
Stress-free Japanese input: Switching between Japanese and English works smoothly. iPad keyboard shortcuts don't conflict with Windows, so you can type in full focus.
Gaming-level peripheral support: Scroll wheel and mouse side buttons fully supported. DeskIn also lets you place custom virtual keyboard layouts — for gaming or work — directly on screen, useful in environments where you don't have a hardware keyboard to hand.
Standard features not found in CRD, all directly relevant to getting work done:
Direct file transfer: Move files between your iPad and Windows PC without touching cloud storage. Photos, documents, design files — sent directly and immediately.
Multi-monitor support: Use your iPad as an extended display for your Windows PC — effectively a second screen — when working away from your desk.
Independent security: DeskIn uses its own advanced encryption and doesn't rely on a Google account, reducing the single point of failure that CRD carries.
Remote access from iPad to Windows opens up genuine flexibility in how and where you work. But which tool is right for you depends on what you're actually trying to do.
Want a completely free solution with no setup complexity
Only need occasional access — checking a file, making a quick change
Don't need precision input or extended work sessions
Want your iPad to function as a genuine secondary work machine
Need to do extended work in Excel, document editing, or design tools
Find the display quality, input lag, or Japanese input issues frustrating
Want to transfer files directly between iPad and Windows without cloud workarounds
Starting with Chrome Remote Desktop is a perfectly reasonable approach — it costs nothing and gets you connected in minutes. But if you keep running into the same friction points — blurry display, awkward Japanese input, no file transfer — that's a clear signal your workflow needs more than CRD can offer.
That's when DeskIn is worth installing. Your iPad becomes a considerably more capable Windows machine than you might have expected.
Recommended Reads:
A Must-Read for Fresh Professionals: How Remote Desktop Can Support Your Fresh Start

Truy cập từ xa Mac: Hướng dẫn hoàn chỉnh để kết nối mọi lúc, mọi nơi
Trong thế giới toàn cầu hóa, di động cao ngày nay, việc truy cập từ xa vào Mac của bạn không còn là một điều xa xỉ—đó là một nhu cầu thiết yếu. Cho dù bạn là một freelancer làm việc từ bãi biển ở Bali, một người sáng lập khởi nghiệp quản lý các đội nhóm từ nhiều thành phố, hay chỉ là một người quên một tệp quan trọng ở nhà, khả năng điều khiển từ xa Mac của bạn có thể tiết kiệm năng suất và sự yên tâm của bạn.
Vấn đề? Nhiều người dùng Mac vẫn gặp khó khăn với các ứng dụng không đáng tin cậy, chia sẻ màn hình lag và hạn chế của nền tảng. Đó là lúc các công cụ hiện đại như DeskIn vào cuộc.
Trong hướng dẫn này, tôi sẽ hướng dẫn bạn cách truy cập từ xa vào Mac, từ kết nối Mac đến Mac đến kết nối giữa Android/Mac. Chúng tôi sẽ đề cập đến công cụ, mẹo, trường hợp sử dụng và cách DeskIn có thể làm cho cuộc sống số của bạn trở nên dễ dàng hơn.
Truy cập từ xa có nghĩa là bạn có thể điều khiển Mac của mình từ một thiết bị khác—cho dù đó là một Mac khác, PC Windows, Android hoặc iPhone.
Khắc phục sự cố Mac của một người thân
Chạy các ứng dụng hoặc phần mềm chỉ có trên máy tính của bạn
Quản lý các tác vụ sáng tạo như kết xuất video từ xa
👍 Lợi Ích Chính:
Năng suất được cải thiện
Linh hoạt thiết bị
Bảo đảm hoạt động kinh doanh
Tiết kiệm thời gian và chi phí
Theo Statista, hơn 28% lực lượng lao động toàn cầu đã làm việc từ xa ít nhất một lần một tuần vào năm 2023—một con số vẫn đang tiếp tục tăng.
"Truy cập từ xa không còn chỉ là về sự thuận tiện nữa. Nó là một lớp nền tảng cho nơi làm việc kỹ thuật số hiện đại." – Daniel Wu, CTO của DeskIn
📌 Kiểm tra những gì họ nói về phần mềm truy cập từ xa
Bạn có nhiều tùy chọn khi nói đến điều khiển từ xa Mac, nhưng không phải tất cả đều giống nhau. Dưới đây là một tổng quan nhanh:
Tuyệt vời cho điều khiển Mac đến Mac
Đắt (79,99 USD)
Không thân thiện với người mới bắt đầu
Vững chắc cho các tùy chọn thương mại & doanh nghiệp
Giới hạn phiên bản miễn phí
Miễn phí và dựa trên web
Hiệu suất hạn chế cho các nhiệm vụ độ phân giải cao
Hỗ trợ macOS, Windows, Android, iOS
Bảo mật mã hóa end-to-end
Lên đến 144 FPS
Cài đặt dễ dàng (không cần địa chỉ IP tĩnh hoặc chuyển tiếp cổng)
Kết nối miễn phí lên tới 3 thiết bị, phiên bản hiệu suất kết nối tới 100 thiết bị
Thiết lập DeskIn thật sự rất đơn giản. Làm theo các bước sau để truy cập vào Mac của bạn từ bất kỳ đâu:
Trên Mac của Bạn:
Tải DeskIn từ trang web chính thức, nhấn vào đây để tải xuống
Cài đặt và khởi chạy ứng dụng
Đăng ký hoặc đăng nhập vào tài khoản DeskIn của bạn
<

Cho phép các quyền cần thiết (ghi màn hình, khả năng truy cập, v.v.)

Trên Thiết Bị Khác Của Bạn (Android, iOS, Windows hoặc một Mac khác):
Cài đặt DeskIn từ Google Play hoặc App Store
Đăng nhập với cùng một tài khoản
Chọn Mac của bạn từ danh sách thiết bị
Bắt đầu phiên làm việc từ xa ngay lập tức
Bật "Truy cập không cần giám sát" để có thể điều khiển liên tục
Sử dụng tính năng chuyển tệp của DeskIn để di chuyển tệp giữa các thiết bị
Đặt sở thích độ phân giải để có truyền phát mượt mà hơn
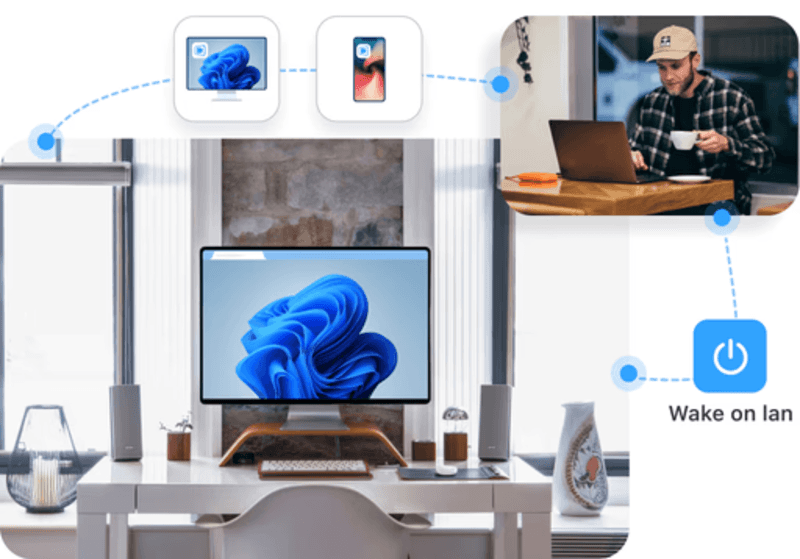
Nổi bật: Với DeskIn, bạn có thể truy cập vào Mac của mình ngay cả khi nó đang ngủ—nhờ vào hỗ trợ Wake-on-LAN tích hợp (trên các thiết bị được hỗ trợ). Tìm hiểu cách sử dụng nó ở đây.
Đối Với Freelancers: Sử dụng Mac hiệu suất cao của bạn ở nhà trong khi làm việc trên một chiếc laptop nhẹ trong khi di chuyển
Đối Với Bộ Phận IT: Hỗ trợ khách hàng hoặc đồng nghiệp bằng cách điều khiển các vấn đề với Mac trong thời gian thực
Đối Với Người Sáng Tạo: Chạy Final Cut Pro hoặc kết xuất các dự án video từ xa. Xem cách DeskIn hỗ trợ truy cập từ xa với chất lượng độ phân giải cao
Đối Với Chủ Doanh Nghiệp: Truy cập các tài liệu công việc hoặc bài thuyết trình an toàn khi đang di chuyển
Theo Owl Labs, 67% nhân viên làm việc từ xa cho biết họ làm việc hiệu quả hơn khi có quyền truy cập đầy đủ vào thiết bị làm việc của mình.
Truy cập từ xa mang lại sự thuận tiện—nhưng cũng tiềm tàng những rủi ro. Những Điều Cần Tìm Kiếm Trong Truy Cập Từ Xa An Toàn:
Bảo mật end-to-end (DeskIn sử dụng AES-256)
Xác thực hai yếu tố
Các thông báo cho phép cho các thiết bị mới
Nhật ký kiểm toán để theo dõi hoạt động truy cập
Với DeskIn, bạn hoàn toàn kiểm soát. Mỗi lần đăng nhập đều được ghi lại. Mỗi kết nối đều được mã hóa. Đó là sự yên tâm.
Khi bạn đã kết nối, hãy tối đa hóa phiên làm việc từ xa của bạn với những tính năng này:
Các Điều Chỉnh Hiệu Suất:
Giảm độ phân giải màn hình nếu internet chậm
Sử dụng các phím tắt (DeskIn hỗ trợ các phím tắt của Mac)
Các Mẹo Năng Suất:
Sử dụng "Hỗ Trợ Đa Màn Hình" để chuyển đổi hiển thị
Bật đồng bộ hóa clipboard để sao chép-dán giữa các thiết bị
Lên lịch các phiên làm việc cho những lần truy cập lặp lại
Truy cập từ xa vào Mac không chỉ dành cho người công nghệ. Đây là một cách để nâng cao lối sống, thúc đẩy năng suất, và là mạng lưới an toàn. Dù bạn đang truy cập các tệp từ khắp phòng hay từ khắp thế giới, DeskIn giúp nó trở nên dễ dàng.
Truy cập từ xa Mac giúp bạn làm việc thông minh hơn, không phải vất vả hơn
DeskIn cung cấp điều khiển từ xa nhanh chóng, an toàn, đa nền tảng
Cài đặt dễ dàng—ngay cả cho người mới bắt đầu
Vậy bạn còn chờ gì nữa? 👉 Tải xuống DeskIn ngay bây giờ trên Mac, Android hoặc iPhone của bạn. Giữ kết nối—bất cứ nơi nào cuộc sống dẫn dắt bạn.

How to Use AnyDesk Wake on LAN to Power On Your Remote PC
If you want to remotely power on a sleeping computer, AnyDesk Wake on LAN can be a useful feature. It allows you to wake a device without physically pressing the power button, making remote work and system maintenance much easier.
In this guide, we'll walk through how to configure AnyDesk Wake on LAN step by step, including BIOS settings, operating system configuration, and AnyDesk options. While the process works well when everything is configured correctly, it can also involve several technical steps. That's why we'll also introduce DeskIn, a simpler and more streamlined alternative for remote access and Wake on LAN. Keep reading to learn both approaches.
Wake on LAN is a networking feature that allows a device to be powered on remotely through a special network signal known as a "magic packet." When the sleeping computer's network card receives this packet, it sends a signal to the motherboard to start the system.
The main benefit of Wake on LAN is convenience and energy efficiency. Instead of keeping a computer running all day, you can leave it in sleep or shutdown mode and wake it only when needed. This saves electricity and extends hardware lifespan.
Another advantage is accessibility. Whether you're working from home, performing remote maintenance, or managing servers, Wake on LAN ensures devices remain reachable even when they are powered down. IT teams often rely on this capability to troubleshoot systems or perform updates without being physically present.
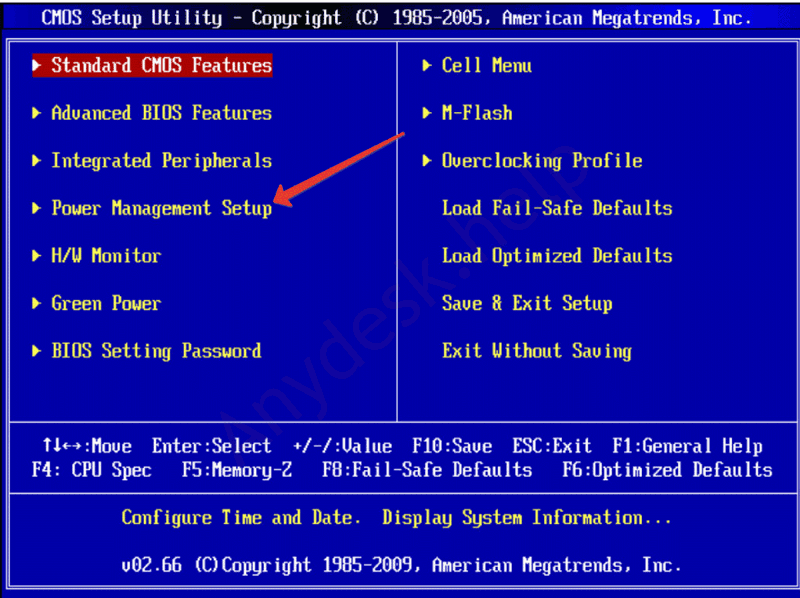
Configuring AnyDesk Wake on LAN involves preparing the hardware, enabling settings in your operating system, and activating the feature in AnyDesk itself. The steps below will guide you through the process.
The first requirement is enabling Wake on LAN at the motherboard level.
Restart your computer.
Enter the BIOS or UEFI menu during startup (usually by pressing F2, DEL, or F10).
Open the Power Management section.
Locate a setting such as Wake on LAN, Power on by PCI-E, or similar.
Enable the option.
Save changes and exit the BIOS.
This step ensures the motherboard will allow network signals to power the system on.
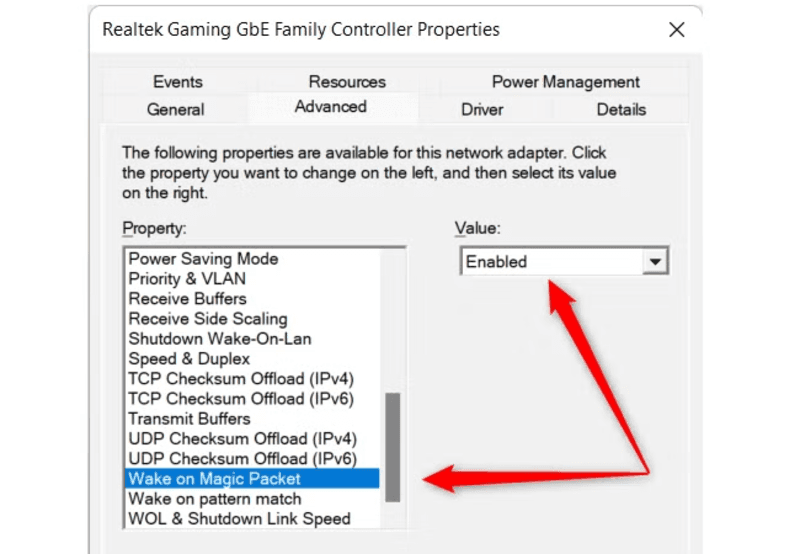
Next, you need to allow the network card to receive wake signals.
Open Device Manager.
Expand Network Adapters.
Right-click your Ethernet adapter and select Properties.
Go to the Advanced tab and enable Wake on Magic Packet.
Open the Power Management tab.
Check Allow this device to wake the computer.
Also, enable Only allow a magic packet to wake the computer.
For users running AnyDesk Wake on LAN on Windows 11 or older systems, these steps are essentially the same.
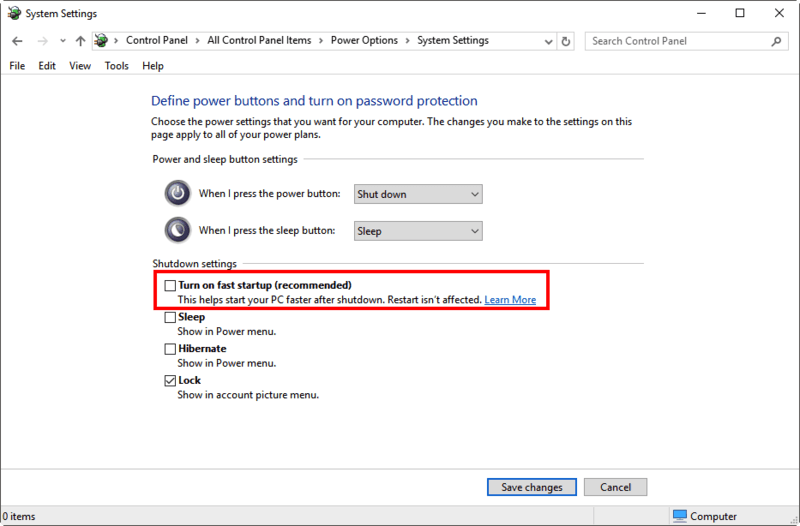
Some Windows systems block network wake signals due to the fast startup feature.
To disable it:
Open Control Panel.
Go to Power Options.
Click Choose what the power buttons do.
Select Change settings that are currently unavailable.
Uncheck Turn on fast startup.
This step often fixes situations where AnyDesk Wake on LAN is not working even though the configuration appears correct.
Now configure the feature inside the AnyDesk client.
Open AnyDesk on the target computer.
Go to Settings.
Navigate to the Wake-on-LAN option.
Enable Allow Wake-on-LAN.
Ensure another AnyDesk device on the same network remains online.
When you try to connect to the sleeping device, AnyDesk will show a "Power On" option.
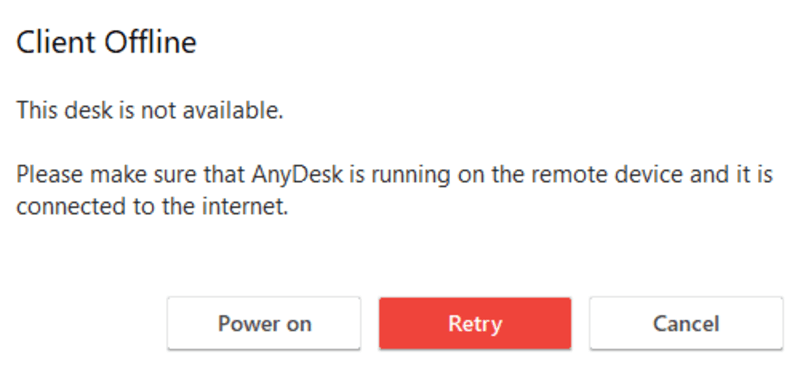
After completing the setup:
Open AnyDesk on your remote device.
Enter the address of the sleeping computer.
Click Power On.
AnyDesk will locate another active device on the same network and ask it to send the wake packet.
This process is how Wake on LAN AnyDesk functions behind the scenes. If everything is configured correctly, the sleeping machine will start, and AnyDesk will automatically connect.
Sometimes you may see errors such as AnyDesk Wake on LAN no device found. This usually means there is no active device on the same network to send the magic packet. Another frequent issue is that AnyDesk Wake on LAN not working due to Wi-Fi limitations. Wake signals are most reliable over wired Ethernet connections.
If troubleshooting becomes too time-consuming, many users choose tools designed to simplify remote desktop Wake on LAN workflows.
While AnyDesk provides Wake on LAN functionality, the setup process can be technical. Users often need to adjust BIOS settings, network adapters, and device configurations before the feature works properly.
DeskIn focuses on making remote access simpler and more reliable. First, the setup process is easier. Devices linked to the same DeskIn account can be managed quickly without complex network configuration or troubleshooting steps. Second, DeskIn delivers excellent performance for remote connections. It supports high-resolution sessions, smooth frame rates, and stable connections even when accessing powerful workstations remotely. Third, DeskIn integrates device management, remote access, and connectivity tools into one platform. Instead of relying on multiple Wake on LAN software tools, users can manage everything from a single interface.
For professionals who frequently need remote access, DeskIn provides a faster and more predictable experience.
👀 You may also be interested in
Yes. AnyDesk supports Wake on LAN as long as the hardware, operating system, and application settings are configured properly. Another device on the same network must remain active to send the wake signal.
You must enable Wake on LAN in three places: the BIOS or UEFI firmware, the operating system's network adapter settings, and the AnyDesk client configuration. Once enabled, you can wake a sleeping device remotely.
Wake on LAN works by sending a "magic packet" containing the device's MAC address through the network. The network card receives the packet and signals the motherboard to power the system.
Yes, but only if the system supports Wake on LAN from the shutdown state and still receives standby power through the network adapter. For smoother remote control workflows, many users adopt tools like DeskIn.
Setting up AnyDesk Wake on LAN allows you to power on a remote computer without physically accessing it. By enabling BIOS settings, configuring the network adapter, and activating the feature inside AnyDesk, you can wake sleeping machines and connect instantly.
However, the setup process can sometimes be complicated, especially when dealing with hardware compatibility or network configuration issues. If you prefer a simpler and more reliable remote access experience, DeskIn provides an excellent alternative.
With streamlined device management, stable remote sessions, and easier setup, DeskIn helps you stay connected to your computers anytime while still benefiting from the power of Wake on LAN.
Control Windows from Your iPad Using Chrome Remote Desktop: Tips & Limits | DeskIn Japan
You're settled into a café in Shimokitazawa or a co-working space in Shinjuku, iPad in hand, no laptop in sight. It sounds ideal — until you need full Excel functionality, a Windows-only business application, or software sitting on the office PC back at your desk.
For many people living and working in Japan, this situation comes up more often than expected. The answer is remote desktop access — specifically, using your iPad to connect to and control a Windows PC from wherever you are.
Among the remote desktop tools available, Google's Chrome Remote Desktop (CRD) consistently gets chosen as the starting point. It's completely free, requires no technical background to set up, and works across devices. For anyone wanting to test the concept before committing to a paid tool, it's the natural first step.
Using an iPad to control a Windows PC isn't quite as seamless as it sounds. Touch input and mouse input are fundamentally different, and without a few adjustments, the experience can feel clunky fast. This guide covers the setup process from scratch, the gestures and settings that actually make it workable, and the honest limitations you'll run into if you push it too far.
Among all the remote desktop options out there, Chrome Remote Desktop wins on approachability. The reason comes down to its sheer ease of use.
Completely free, with no feature restrictions: Whether for personal or professional use, everything is available at no cost — the biggest advantage by far.
No complex setup required: No VPN configuration, no router port-forwarding, no specialist knowledge needed. If you have a Google account, setup takes a few minutes.
Works across devices: Windows, Mac, and iPadOS all connect seamlessly — no environment restrictions.
For anyone who wants to try remote access on their existing iPad without spending anything or reconfiguring their network, CRD is the right place to start.
An iPad and a Windows PC speak different languages — one is built for touch, the other for a mouse. Bridging that gap takes some deliberate setup.
The iPad app offers two control modes. Not knowing about this is the most common reason people give up early.
Trackpad Mode (recommended): Moving your finger anywhere on screen moves the mouse cursor — similar to using a laptop trackpad. Right-click and drag-and-drop work accurately, making this the right choice for Excel, business software, or anything requiring precise input.
Touch Mode: Tapping the screen directly clicks at that point. This works better for browsing or watching videos — consumption tasks rather than production work.
Tip: Switch between modes instantly from the side-panel menu that appears when you swipe in from the right edge of the screen. Get into the habit of switching based on what you're doing.
You can replicate most standard mouse actions with just your fingers:
Right-click: Tap with two fingers simultaneously
Drag and drop: Long-press on a target with one finger, then slide
Scroll: Slide two fingers up or down
If you're using an iPad keyboard like the Magic Keyboard, the key layout takes some getting used to.
Command = Ctrl: The iPad's Command key functions as the Windows Ctrl key in remote sessions. Command + C copies, Command + V pastes — standard shortcuts carry over in that sense.
Japanese input switching: This is where most people hit a wall. The usual shortcuts for toggling between Japanese and English input (nihongo nyūryoku, 日本語入力) — Ctrl + Space or Caps Lock — often don't transmit cleanly to Windows. When this happens, the most reliable workaround is tapping the IME icon in the Windows taskbar directly, or reconfiguring the input method shortcut on the Windows side.
Start on the Windows machine you want to access remotely.
Access the official site in Chrome: Open Chrome and go to remotedesktop.google.com/access
Install the extension: Under "Set up remote access," click the blue download icon and install the Chrome extension.
Enable Remote Access: Click "Turn on" and give your PC a name.
Set your PIN: Create a PIN of at least six digits — you'll need this every time you connect from your iPad. The Windows PC is now ready.
Download the app: Search for "Chrome Remote Desktop" in the App Store and install it.
Log in: Sign in with the same Google account you used on your Windows PC.
Select your PC: Your PC will appear in the device list once it's online.
Enter your PIN: Select your PC from the list and enter the PIN you set. Connection is now established.
Optimise the display: Open the menu (the three-line icon at the bottom right of the screen), go to Settings, and enable "Shrink to fit." This resizes the Windows display to match your iPad's screen, so you're not scrolling around a desktop that doesn't fit.
CRD is genuinely useful — but if you're trying to use your iPad as a primary work machine through it, these friction points will catch up with you.
iPads use a 4:3 aspect ratio; most Windows PCs use 16:9.
Black bars: When displayed on an iPad, large black bars appear at the top and bottom of the screen, reducing your actual working area.
Blurry text: CRD isn't optimised for Retina displays, so fine text — spreadsheet cells, small interface labels — appears soft and blurry. After an hour of this, eye fatigue sets in fast.
This is the biggest pain point for most users working in Japanese.
Shortcut conflicts: Trying to switch between Japanese and English input on the iPad side doesn't transmit cleanly to Windows, leading to constant input errors and frustrating interruptions.
Typing lag: Depending on network conditions, typed characters can appear a beat behind what you're typing — making longer Japanese text genuinely painful to compose.
Even with a physical mouse connected to your iPad, the experience doesn't match what you'd get on a PC.
Unnatural scrolling: Scroll wheel behaviour can be jerky or even reversed.
Advanced inputs not supported: Mouse side buttons aren't recognised, and right-clicking requires a long-press or two-finger tap workaround rather than a direct click. The speed and fluidity of a real PC setup simply isn't achievable.
Chrome Remote Desktop is purely a screen control tool — it doesn't support file transfer between your iPad and Windows PC.
No direct sending: Transferring a photo from your iPad to Windows, or saving a Windows document to your iPad, requires routing through cloud storage like Google Drive or iCloud. It works, but it breaks your workflow every time.
If CRD's limitations are getting in the way of actual productivity, DeskIn was built to solve exactly those problems. Where CRD is designed for "basic screen control," DeskIn is designed for genuine professional use — remote sessions that feel as close to working locally as possible.
The blurry text and choppy movement that characterise CRD on an iPad? DeskIn eliminates both.
Outstanding display quality: 4K resolution and 60FPS high frame rate support. iPad's Retina display is used to its full potential — the experience feels like running Windows locally.
Automatic aspect ratio optimisation: DeskIn adapts automatically to the iPad's 4:3 ratio, filling the screen properly without black bars.
Input performance is where the gap between DeskIn and CRD is most noticeable.
Stress-free Japanese input: Switching between Japanese and English works smoothly. iPad keyboard shortcuts don't conflict with Windows, so you can type in full focus.
Gaming-level peripheral support: Scroll wheel and mouse side buttons fully supported. DeskIn also lets you place custom virtual keyboard layouts — for gaming or work — directly on screen, useful in environments where you don't have a hardware keyboard to hand.
Standard features not found in CRD, all directly relevant to getting work done:
Direct file transfer: Move files between your iPad and Windows PC without touching cloud storage. Photos, documents, design files — sent directly and immediately.
Multi-monitor support: Use your iPad as an extended display for your Windows PC — effectively a second screen — when working away from your desk.
Independent security: DeskIn uses its own advanced encryption and doesn't rely on a Google account, reducing the single point of failure that CRD carries.
Remote access from iPad to Windows opens up genuine flexibility in how and where you work. But which tool is right for you depends on what you're actually trying to do.
Want a completely free solution with no setup complexity
Only need occasional access — checking a file, making a quick change
Don't need precision input or extended work sessions
Want your iPad to function as a genuine secondary work machine
Need to do extended work in Excel, document editing, or design tools
Find the display quality, input lag, or Japanese input issues frustrating
Want to transfer files directly between iPad and Windows without cloud workarounds
Starting with Chrome Remote Desktop is a perfectly reasonable approach — it costs nothing and gets you connected in minutes. But if you keep running into the same friction points — blurry display, awkward Japanese input, no file transfer — that's a clear signal your workflow needs more than CRD can offer.
That's when DeskIn is worth installing. Your iPad becomes a considerably more capable Windows machine than you might have expected.
Recommended Reads:
A Must-Read for Fresh Professionals: How Remote Desktop Can Support Your Fresh Start
Truy cập từ xa Mac: Hướng dẫn hoàn chỉnh để kết nối mọi lúc, mọi nơi
Trong thế giới toàn cầu hóa, di động cao ngày nay, việc truy cập từ xa vào Mac của bạn không còn là một điều xa xỉ—đó là một nhu cầu thiết yếu. Cho dù bạn là một freelancer làm việc từ bãi biển ở Bali, một người sáng lập khởi nghiệp quản lý các đội nhóm từ nhiều thành phố, hay chỉ là một người quên một tệp quan trọng ở nhà, khả năng điều khiển từ xa Mac của bạn có thể tiết kiệm năng suất và sự yên tâm của bạn.
Vấn đề? Nhiều người dùng Mac vẫn gặp khó khăn với các ứng dụng không đáng tin cậy, chia sẻ màn hình lag và hạn chế của nền tảng. Đó là lúc các công cụ hiện đại như DeskIn vào cuộc.
Trong hướng dẫn này, tôi sẽ hướng dẫn bạn cách truy cập từ xa vào Mac, từ kết nối Mac đến Mac đến kết nối giữa Android/Mac. Chúng tôi sẽ đề cập đến công cụ, mẹo, trường hợp sử dụng và cách DeskIn có thể làm cho cuộc sống số của bạn trở nên dễ dàng hơn.
Truy cập từ xa có nghĩa là bạn có thể điều khiển Mac của mình từ một thiết bị khác—cho dù đó là một Mac khác, PC Windows, Android hoặc iPhone.
Khắc phục sự cố Mac của một người thân
Chạy các ứng dụng hoặc phần mềm chỉ có trên máy tính của bạn
Quản lý các tác vụ sáng tạo như kết xuất video từ xa
👍 Lợi Ích Chính:
Năng suất được cải thiện
Linh hoạt thiết bị
Bảo đảm hoạt động kinh doanh
Tiết kiệm thời gian và chi phí
Theo Statista, hơn 28% lực lượng lao động toàn cầu đã làm việc từ xa ít nhất một lần một tuần vào năm 2023—một con số vẫn đang tiếp tục tăng.
"Truy cập từ xa không còn chỉ là về sự thuận tiện nữa. Nó là một lớp nền tảng cho nơi làm việc kỹ thuật số hiện đại." – Daniel Wu, CTO của DeskIn
📌 Kiểm tra những gì họ nói về phần mềm truy cập từ xa
Bạn có nhiều tùy chọn khi nói đến điều khiển từ xa Mac, nhưng không phải tất cả đều giống nhau. Dưới đây là một tổng quan nhanh:
Tuyệt vời cho điều khiển Mac đến Mac
Đắt (79,99 USD)
Không thân thiện với người mới bắt đầu
Vững chắc cho các tùy chọn thương mại & doanh nghiệp
Giới hạn phiên bản miễn phí
Miễn phí và dựa trên web
Hiệu suất hạn chế cho các nhiệm vụ độ phân giải cao
Hỗ trợ macOS, Windows, Android, iOS
Bảo mật mã hóa end-to-end
Lên đến 144 FPS
Cài đặt dễ dàng (không cần địa chỉ IP tĩnh hoặc chuyển tiếp cổng)
Kết nối miễn phí lên tới 3 thiết bị, phiên bản hiệu suất kết nối tới 100 thiết bị
Thiết lập DeskIn thật sự rất đơn giản. Làm theo các bước sau để truy cập vào Mac của bạn từ bất kỳ đâu:
Trên Mac của Bạn:
Tải DeskIn từ trang web chính thức, nhấn vào đây để tải xuống
Cài đặt và khởi chạy ứng dụng
Đăng ký hoặc đăng nhập vào tài khoản DeskIn của bạn
<
Cho phép các quyền cần thiết (ghi màn hình, khả năng truy cập, v.v.)
Trên Thiết Bị Khác Của Bạn (Android, iOS, Windows hoặc một Mac khác):
Cài đặt DeskIn từ Google Play hoặc App Store
Đăng nhập với cùng một tài khoản
Chọn Mac của bạn từ danh sách thiết bị
Bắt đầu phiên làm việc từ xa ngay lập tức
Bật "Truy cập không cần giám sát" để có thể điều khiển liên tục
Sử dụng tính năng chuyển tệp của DeskIn để di chuyển tệp giữa các thiết bị
Đặt sở thích độ phân giải để có truyền phát mượt mà hơn
Nổi bật: Với DeskIn, bạn có thể truy cập vào Mac của mình ngay cả khi nó đang ngủ—nhờ vào hỗ trợ Wake-on-LAN tích hợp (trên các thiết bị được hỗ trợ). Tìm hiểu cách sử dụng nó ở đây.
Đối Với Freelancers: Sử dụng Mac hiệu suất cao của bạn ở nhà trong khi làm việc trên một chiếc laptop nhẹ trong khi di chuyển
Đối Với Bộ Phận IT: Hỗ trợ khách hàng hoặc đồng nghiệp bằng cách điều khiển các vấn đề với Mac trong thời gian thực
Đối Với Người Sáng Tạo: Chạy Final Cut Pro hoặc kết xuất các dự án video từ xa. Xem cách DeskIn hỗ trợ truy cập từ xa với chất lượng độ phân giải cao
Đối Với Chủ Doanh Nghiệp: Truy cập các tài liệu công việc hoặc bài thuyết trình an toàn khi đang di chuyển
Theo Owl Labs, 67% nhân viên làm việc từ xa cho biết họ làm việc hiệu quả hơn khi có quyền truy cập đầy đủ vào thiết bị làm việc của mình.
Truy cập từ xa mang lại sự thuận tiện—nhưng cũng tiềm tàng những rủi ro. Những Điều Cần Tìm Kiếm Trong Truy Cập Từ Xa An Toàn:
Bảo mật end-to-end (DeskIn sử dụng AES-256)
Xác thực hai yếu tố
Các thông báo cho phép cho các thiết bị mới
Nhật ký kiểm toán để theo dõi hoạt động truy cập
Với DeskIn, bạn hoàn toàn kiểm soát. Mỗi lần đăng nhập đều được ghi lại. Mỗi kết nối đều được mã hóa. Đó là sự yên tâm.
Khi bạn đã kết nối, hãy tối đa hóa phiên làm việc từ xa của bạn với những tính năng này:
Các Điều Chỉnh Hiệu Suất:
Giảm độ phân giải màn hình nếu internet chậm
Sử dụng các phím tắt (DeskIn hỗ trợ các phím tắt của Mac)
Các Mẹo Năng Suất:
Sử dụng "Hỗ Trợ Đa Màn Hình" để chuyển đổi hiển thị
Bật đồng bộ hóa clipboard để sao chép-dán giữa các thiết bị
Lên lịch các phiên làm việc cho những lần truy cập lặp lại
Truy cập từ xa vào Mac không chỉ dành cho người công nghệ. Đây là một cách để nâng cao lối sống, thúc đẩy năng suất, và là mạng lưới an toàn. Dù bạn đang truy cập các tệp từ khắp phòng hay từ khắp thế giới, DeskIn giúp nó trở nên dễ dàng.
Truy cập từ xa Mac giúp bạn làm việc thông minh hơn, không phải vất vả hơn
DeskIn cung cấp điều khiển từ xa nhanh chóng, an toàn, đa nền tảng
Cài đặt dễ dàng—ngay cả cho người mới bắt đầu
Vậy bạn còn chờ gì nữa? 👉 Tải xuống DeskIn ngay bây giờ trên Mac, Android hoặc iPhone của bạn. Giữ kết nối—bất cứ nơi nào cuộc sống dẫn dắt bạn.
Products
Tải xuống
Resources
Contact Us
Email: support@deskin.io
Office: 991D Alexandra Road #02-17, Singapore 119972
Copyright © 2026 Zuler Technology PTE. LTD. All rights reserved.
Contact Us
Email: support@deskin.io
Office: 991D Alexandra Road #02-17, Singapore 119972
Products
Tải xuống
Resources
Copyright © 2026 Zuler Technology PTE. LTD. All rights reserved.
Products
Tải xuống
Resources
Contact Us
support@deskin.io
991D Alexandra Road #02-17
Singapore 119972
Copyright © 2026 Zuler Technology PTE. LTD. All rights reserved.

