問題解決
問題解決
·
7 Mins
·
7 Mins
GA
已更新
已更新
已更新
如果你曾試著用 Windows Home 電腦遠端連線到另一台筆電,卻發現系統跳出「Home 版本不支援 Remote Desktop」的提示,你應該對這種挫折感不陌生。最讓人困擾的,通常有三點。第一,Windows Home 無法作為遠端桌面主機(Host),也就是說,不論是桌機還是筆電,都不能被其他裝置直接遠端連入。第二,官方提供的唯一解法,就是升級到 Windows Pro,而每台裝置都得額外支付 US$99 授權費。第三,Microsoft 自家的 Remote Desktop 用戶端 App 也將在 2025 到 2026 年間陸續停止支援,讓 Home 使用者可用的內建選項比以前更少。好消息是,現在其實已有價格更親民、甚至部分免費的替代方案。以下就帶你快速了解,到底改變了什麼、這些變化會如何影響一般使用者,以及有哪些工具能幫你重新把遠端控制權拿回來。
大多數人在購買 Windows 筆電時,通常會直覺認為自己拿到的是完整的 Windows 使用體驗。Remote Desktop Protocol(RDP,遠端桌面通訊協定)其實已經是 Windows 作業系統內建超過 20 年的功能之一。只是 Microsoft 將 RDP 的主機功能,也就是「接受其他裝置遠端連入」的能力,只保留給 Windows Pro、Enterprise 與 Education 版本。Windows Home 只能作為用戶端使用,代表你可以從這台電腦連出去到 Pro 版本裝置,但別人無法反向連進你的 Home 電腦。
對於需要用輕薄筆電遠端連回高效能桌機的設計師、把重要檔案留在家中電腦裡的學生,或是想遠端幫家人排除問題的人來說,這其實是很明顯的使用落差。原本大家以為「直接遠端連進去就好」,但實際上,Windows Home 會默默告訴你:不支援。
Microsoft 官方給出的解法,是購買 Windows 11 Pro 授權。全新 Pro 授權售價約為 US$199,而從 Home 直接升級到 Pro 則需額外支付 US$99。若你手上不只一台設備,例如家中桌機加個人筆電,這筆費用很快就會累積起來。對自由工作者、學生,或重視隱私的一般家庭使用者來說,只為了解鎖一項功能就多花這筆錢,其實門檻不低。
而且,即使完成升級,若你想在家中網路以外的環境使用 RDP,通常還是得另外設定 VPN 或進行 Port Forwarding(連接埠轉發)。這些步驟對多數一般使用者來說並不直覺,操作門檻也不算低。
更麻煩的是,Microsoft 已在 2025 年 5 月停用 Remote Desktop Store App,並將於 2026 年 3 月 27 日終止對獨立 MSI 版 Remote Desktop 用戶端的支援。這兩款工具之後都會由新的「Windows App」取代,而新版本的重心明顯放在 Azure Virtual Desktop、Windows 365 等雲端服務上。
雖然經典內建工具(mstsc.exe)目前仍可使用,但它依然無法讓 Windows Home 裝置變成可被遠端連入的主機。對原本仰賴 Microsoft 自家工具在不同裝置間切換工作的日常使用者來說,這樣的變化不只增加混亂,也進一步說明:對多數 Home 使用者而言,第三方遠端軟體已經成為更實際的解法。
最直接的做法,其實就是跳過 RDP,改用不受 Windows 版本限制的遠端存取工具。目前有三款產品特別值得比較。
AnyDesk 目前技術上仍提供個人使用的免費方案,但近來的限制已讓它越來越難作為穩定選擇。根據不少使用者回饋,現在免費版的連線最短可能在 5 分鐘內就被中斷,相比過去可使用 30 到 40 分鐘,限制明顯收緊。檔案傳輸功能也已完全從免費版中移除。除此之外,免費方案最多只能綁定 3 台裝置,且同一時間僅能維持 1 個連線工作階段。更麻煩的是,AnyDesk 的商業用途偵測機制常會誤判一般個人使用者,導致無預警斷線。付費方案則從每月 US$14.90 起。整體來看,AnyDesk 已不太適合作為可靠的免費方案。
TeamViewer 是遠端存取領域中知名度最高的品牌之一。它的免費方案涵蓋個人使用,也包含加密、檔案傳輸與跨平台支援等功能。由於使用者基礎龐大,相關教學與疑難排解資源也相對容易找到。不過,它和 AnyDesk 一樣,也面臨商業用途誤判的問題:不少個人使用者會被系統誤認為商業用途,必須提出申訴後才能恢復使用。至於付費方案,價格則較偏向企業預算,而非一般個人用戶,大約每月 US$58.90 左右。
DeskIn 採取的是不同路線。它的免費方案可讓你完整遠端控制最多 3 台裝置,支援 1080p、30 FPS,沒有連線時長限制,也不會因商業用途誤判而在工作途中被強制中斷。對 Windows Home 使用者來說,如果你的需求只是遠端拿另一台電腦裡的檔案、幫家中長輩排除問題,或旅行時查看家中電腦狀況,免費方案通常就已經夠用。DeskIn 透過自家的雲端中繼服務進行連線,因此不需要另外設定 VPN 或 Port Forwarding。即使是免費方案,也仍提供 AES-256 加密與 ISO 27001 認證。檔案傳輸速度最高可達 12 MB/s,且不設檔案大小上限,不過目前僅限電腦傳送到手機。跨平台能力方面,你可以直接用手機控制家中電腦,或把平板當成筆電延伸螢幕,全程都不需要 Windows Pro 授權。
如果你有更高階的需求,DeskIn 付費方案則從每月 US$9.90 起,提供更高解析度串流、更快的檔案傳輸速度,以及最多支援 100 台裝置的管理能力。
這三款工具都能補上 Windows Home 原本缺少的遠端控制能力。AnyDesk 和 TeamViewer 雖然是大家比較熟悉的品牌,但它們的免費方案近年限制越來越多,像是連線時間縮短、部分功能被移除,加上商業用途誤判的情況不穩定,對需要 नियमित使用的人來說,已經不太容易放心依賴。
如果你需要的是適合設計工作的色彩穩定度、每天傳輸大型專案檔案,或只是想要一套不用煩惱網路設定、連線穩定的遠端存取工具,DeskIn 以相對合理的價格提供更完整的功能組合,而且個人方案可免費開始使用。
當然,如果你本身確實需要 RDP 以及其他 Windows Pro 功能,升級到 Windows Pro 仍然是可行選擇。但如果你考慮花 US$99 升級的主要原因,只是為了取得遠端桌面功能,那麼 DeskIn 其實已提供一個免費、低延遲,而且適用於各種 Windows 版本的替代方案。
在決定是否花錢升級授權前,不妨先下載 DeskIn 試試遠端工作體驗,或進一步了解它的生產力功能,看看它是否更符合你的實際需求。


Control Windows from Your Mac with Chrome Remote Desktop: Setup Guide & Pitfalls | DeskIn Japan
For Mac users working in Japan, there's a recurring frustration: a piece of software you need exists only on Windows. Whether it's CAD tools, Japanese accounting software (kaikei sofuto, 会計ソフト) required by your company, Windows-exclusive business systems, or PC games — the need to run Windows doesn't go away just because you prefer Mac.
The good news is you don't need to buy a separate Windows machine. Google's free tool Chrome Remote Desktop lets you control a Windows PC remotely from your Mac, and the setup is simpler than most people expect.
This guide walks through the fastest path to getting connected, and then covers the cross-platform quirks that tend to catch Mac users off guard once they're actually in a session.
Chrome Remote Desktop's configuration is straightforward, but it requires preparation on both machines — the Windows PC being controlled (the host) and the Mac doing the controlling (the client). Here's the fastest path to a working connection.
Start by allowing remote access on the Windows machine.
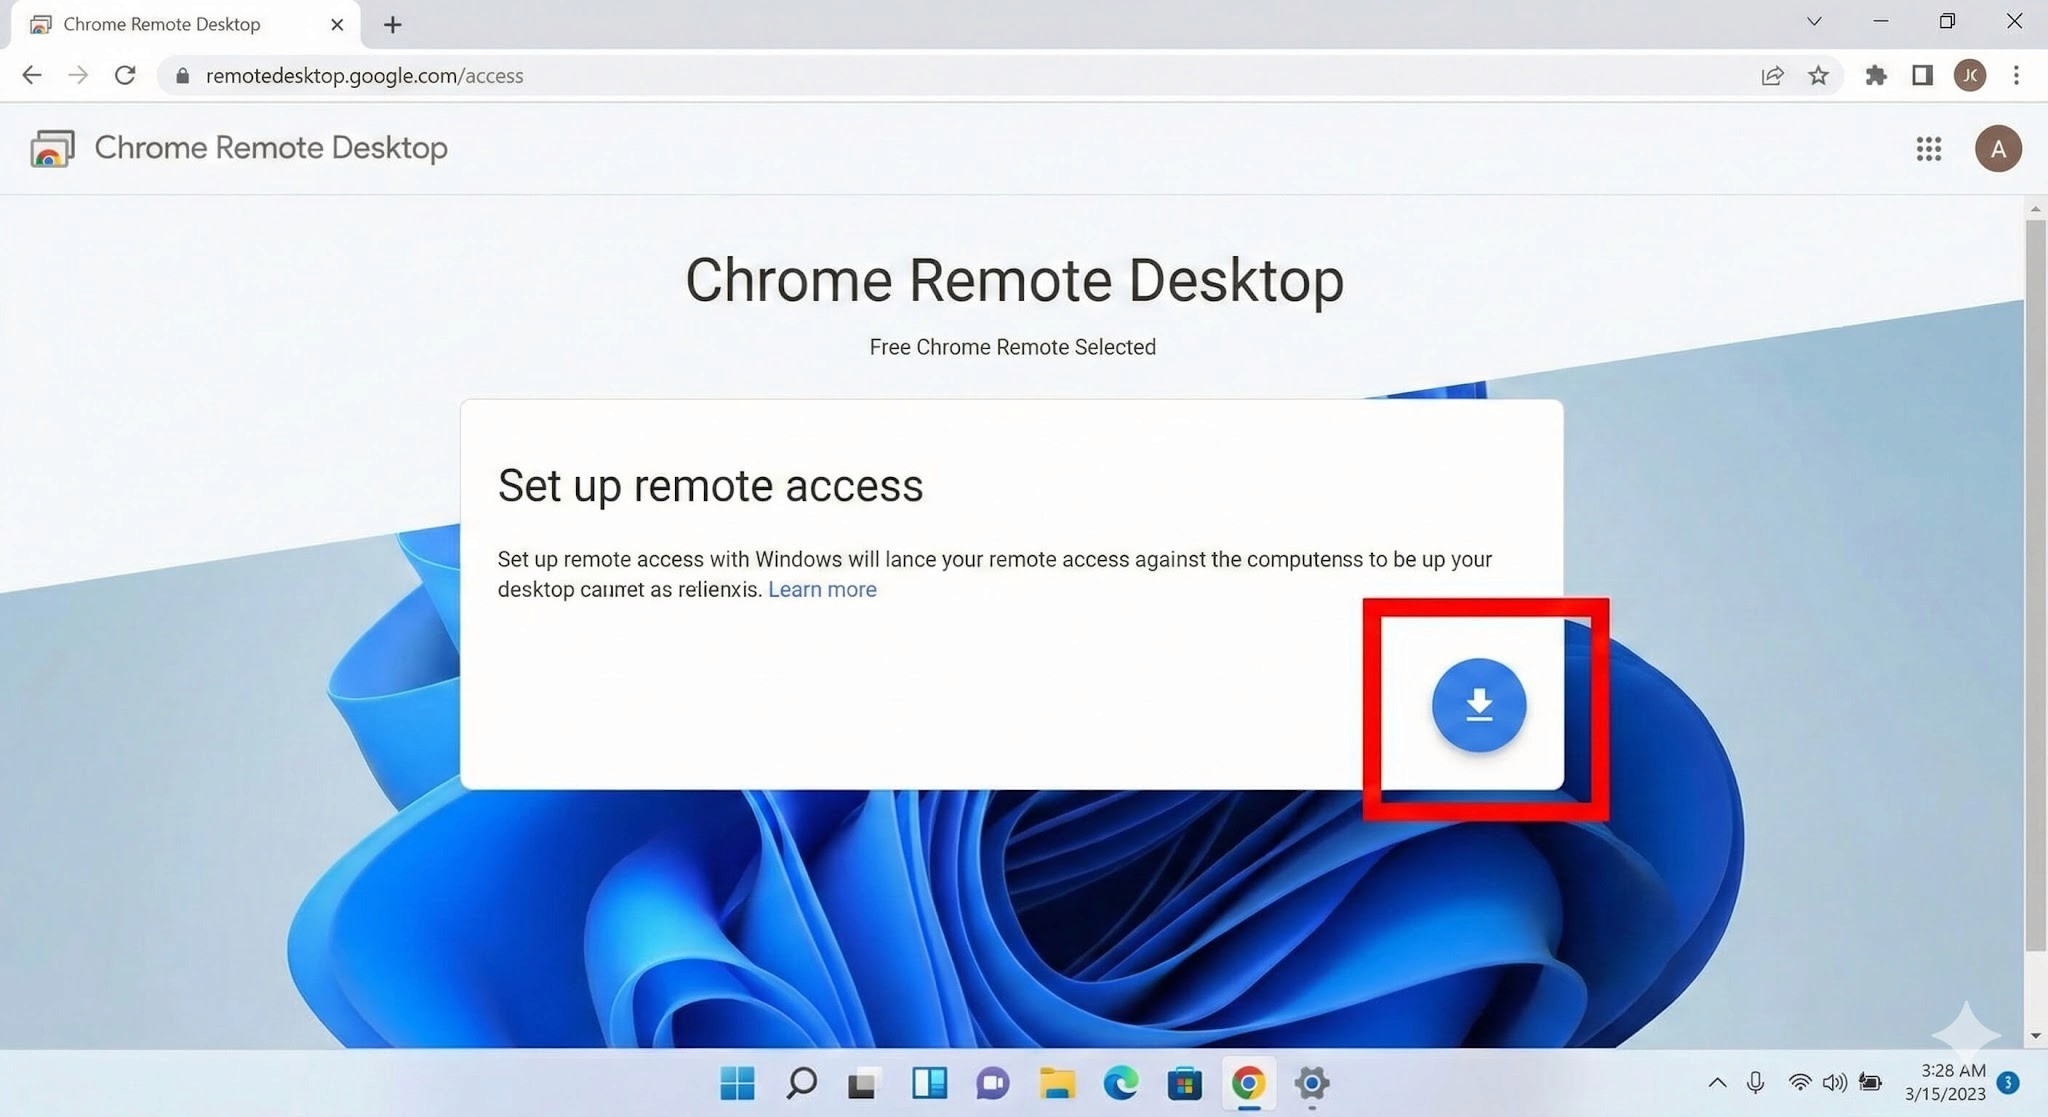
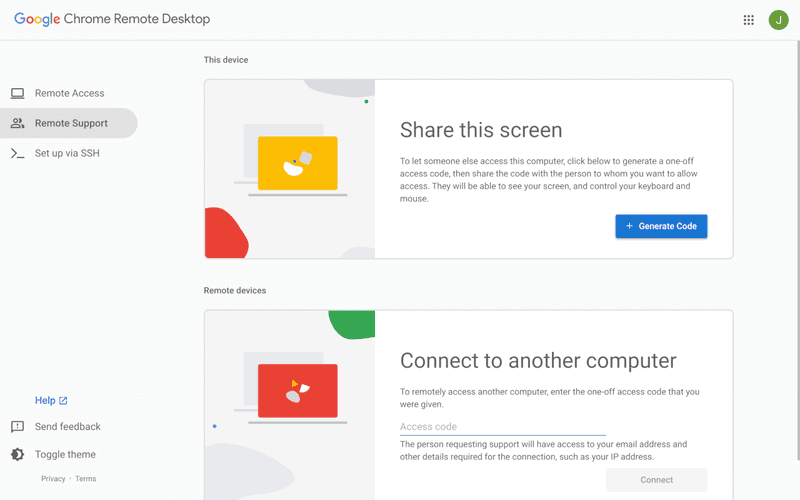
Install the extension and host software
Open Chrome and go to the Chrome Remote Desktop access page. Under "Set up remote access," click the blue download icon. Follow the prompts to add the Chrome extension and run the installer (.msi file).
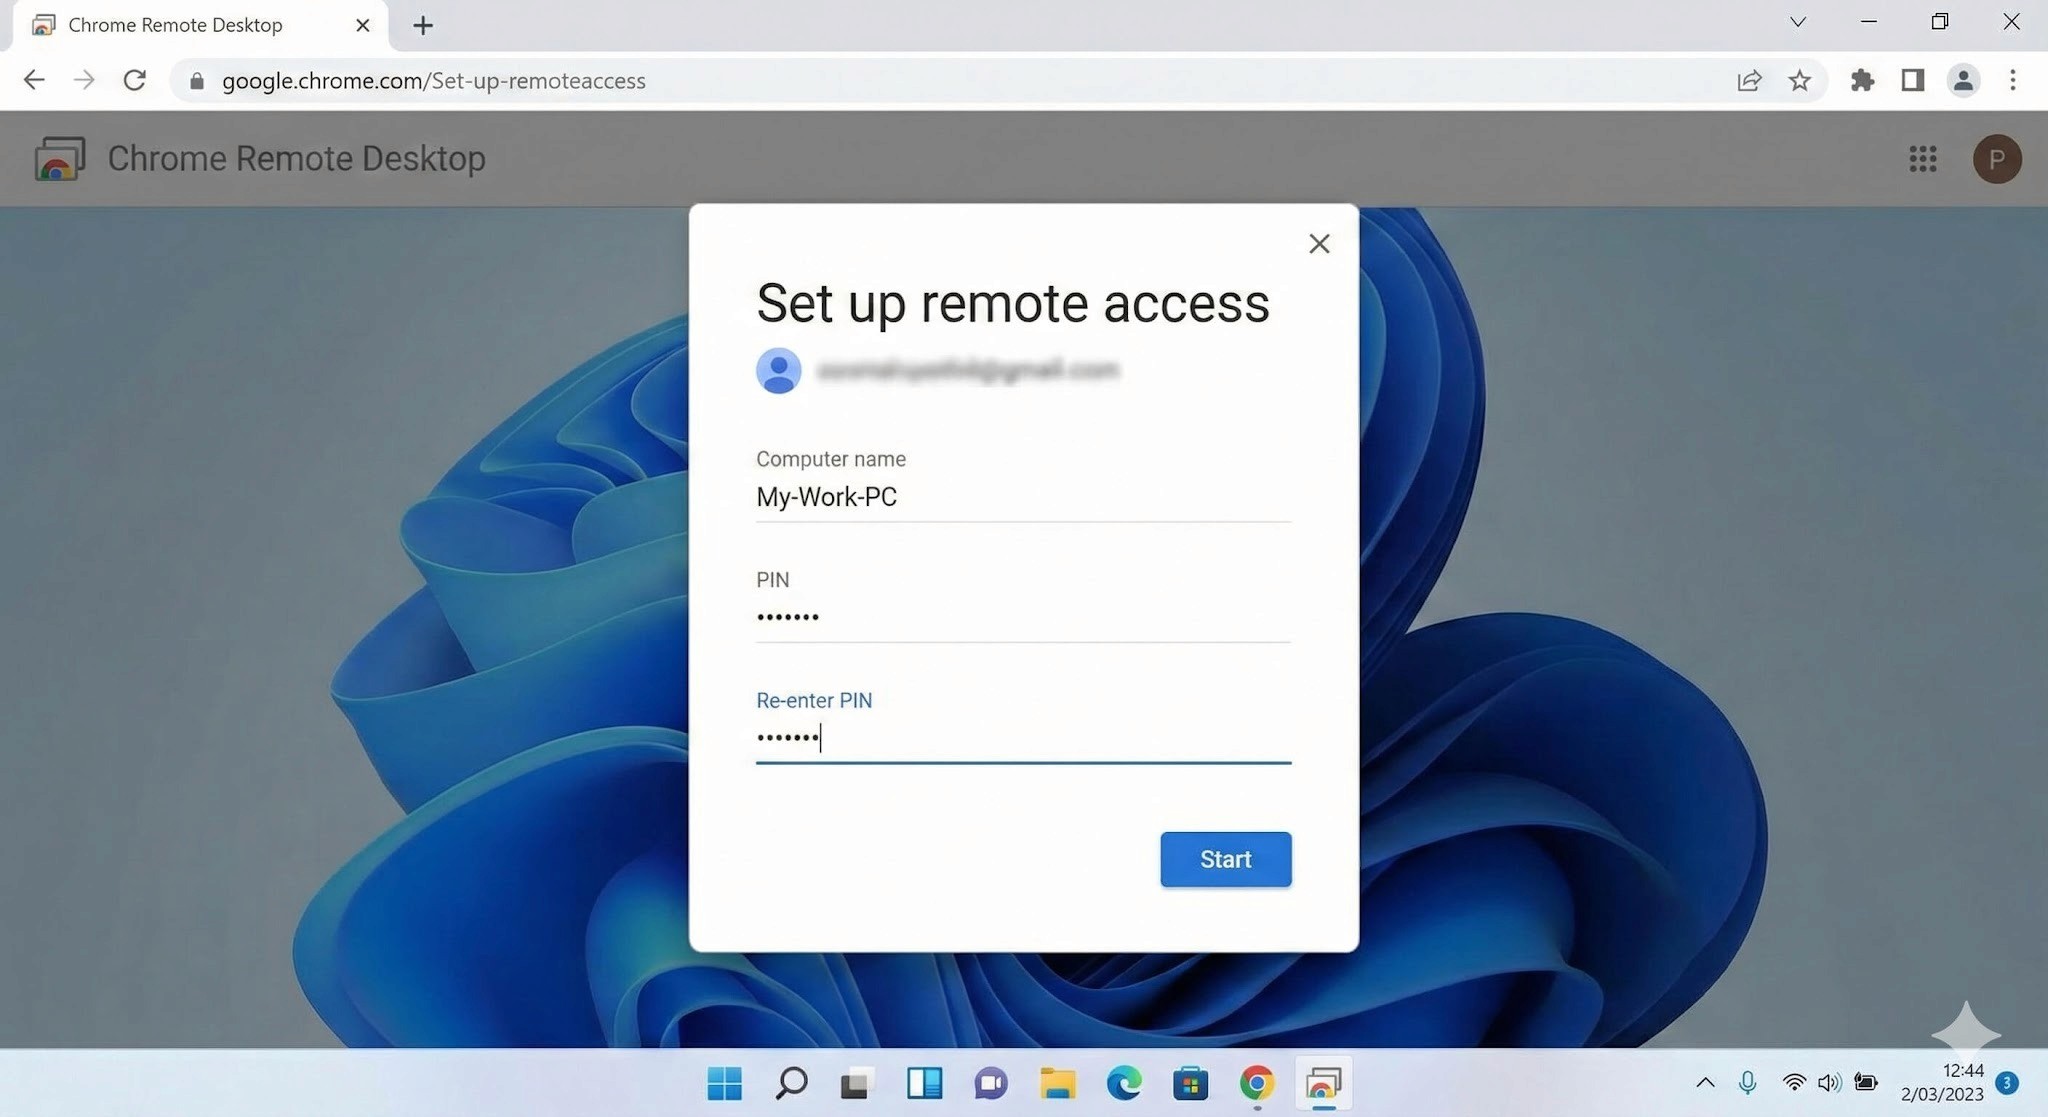
Name your PC and set a PIN
After installation, give the PC a name you'll recognise. Then set a PIN of at least six digits — you'll need to enter this every time you connect from your Mac, so write it somewhere safe.
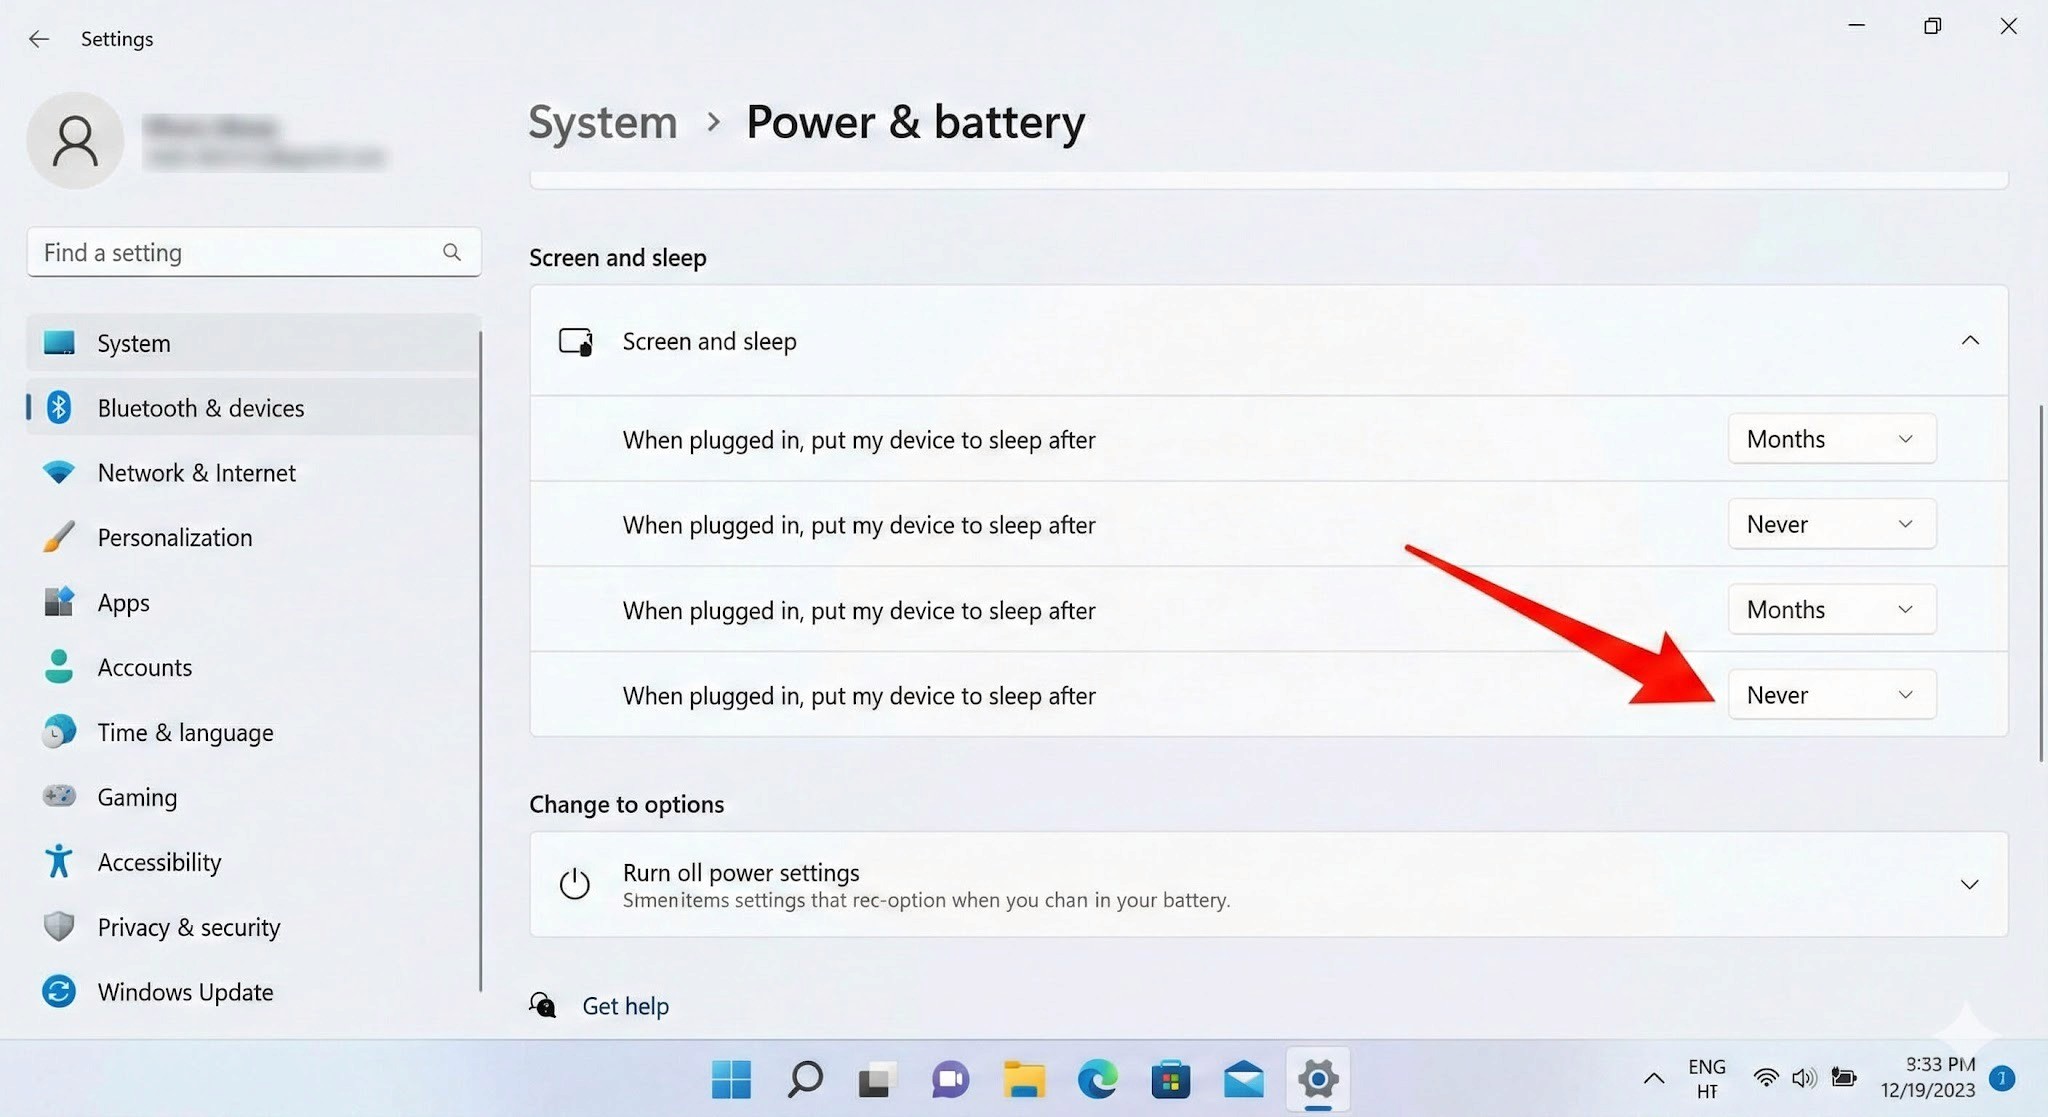
3. Important: Disable Sleep Mode
This is the step most people miss, and it will prevent connections entirely if skipped. A Windows PC in sleep mode cannot be reached remotely.
Go to Settings → System → Power & Battery
Under "Screen and Sleep," set "Put device to sleep after" to Never when plugged in
Once the Windows side is configured, connecting from your Mac is simple.
Log in to the access site
Open Chrome on your Mac and navigate to the same Chrome Remote Desktop access page. Make sure you're logged into the same Google account you used when setting up the Windows PC.
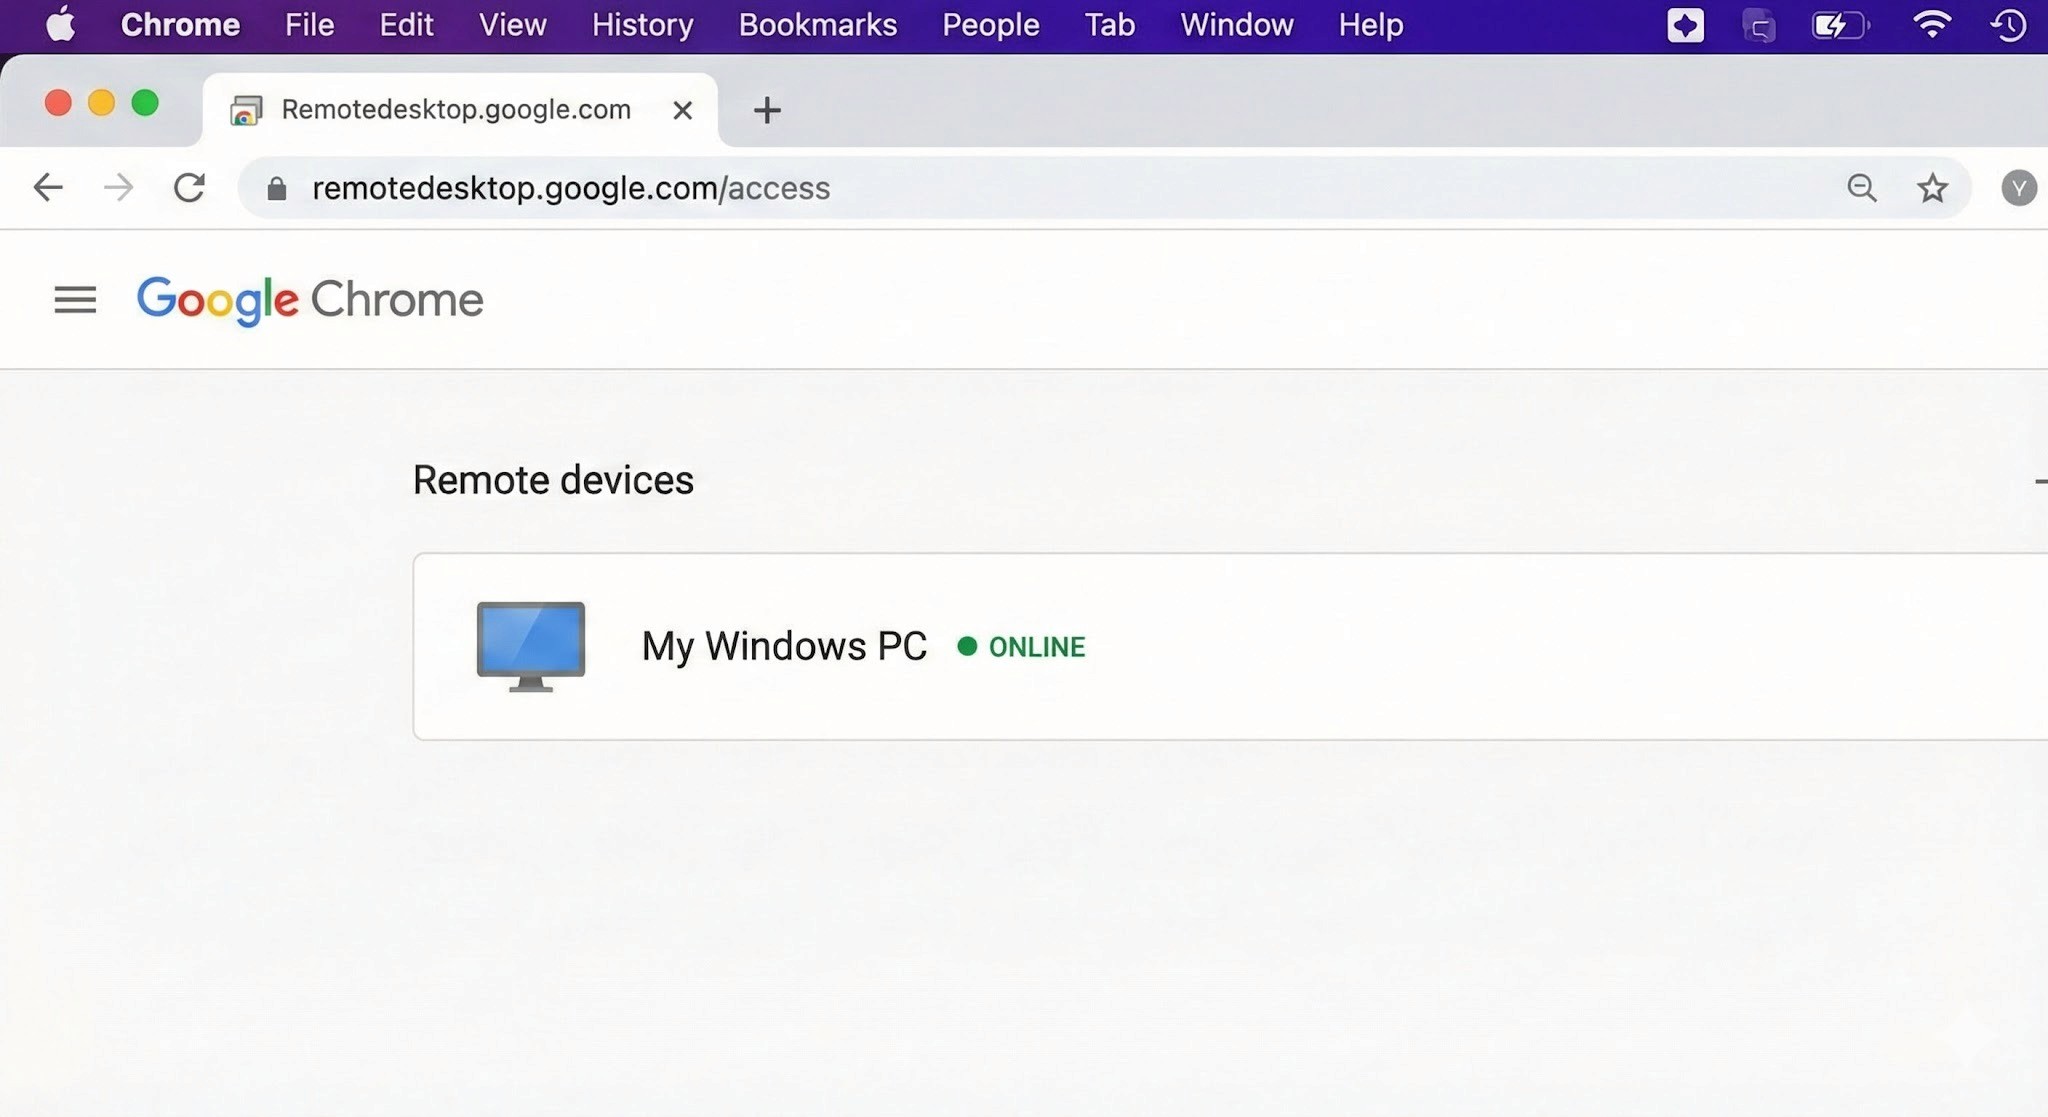
Select your PC and authenticate
Your Windows PC will appear under "Remote devices." Click it and enter your PIN — the Windows desktop will open inside your Chrome browser.
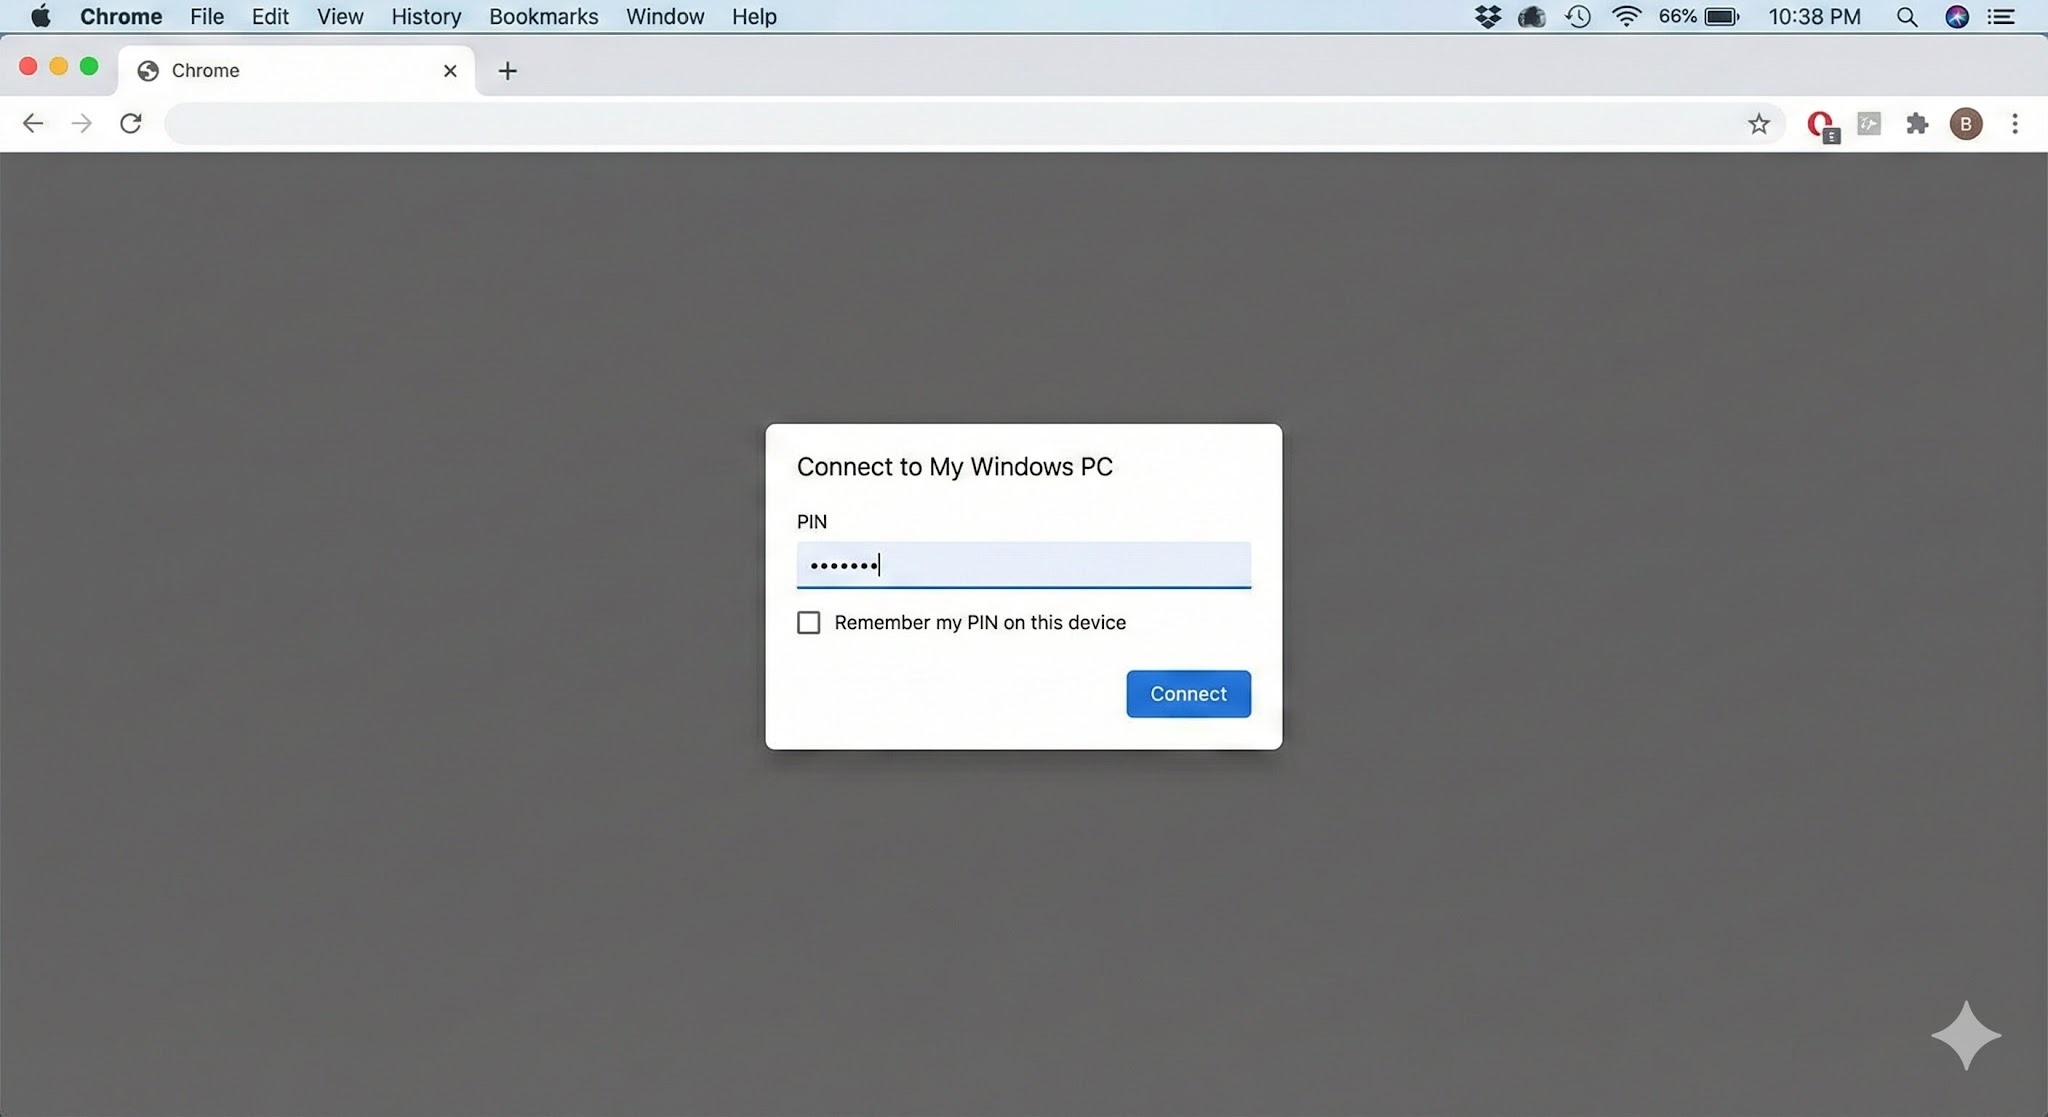
3. Connection complete
You can now control Windows using your Mac's keyboard and mouse.
Tip: For quicker access in the future, use Chrome's "Install as app" option to add Chrome Remote Desktop to your Mac's Dock — saves a few clicks every time.
H2: Cross-Platform Pitfalls: What Mac Users Run Into
Chrome Remote Desktop is easy to set up, but once you're inside a session, the Mac–Windows gap creates friction points that directly affect how much work you can actually get done. These are worth understanding before you depend on CRD for anything important.
H3: Keyboard Mapping Conflicts
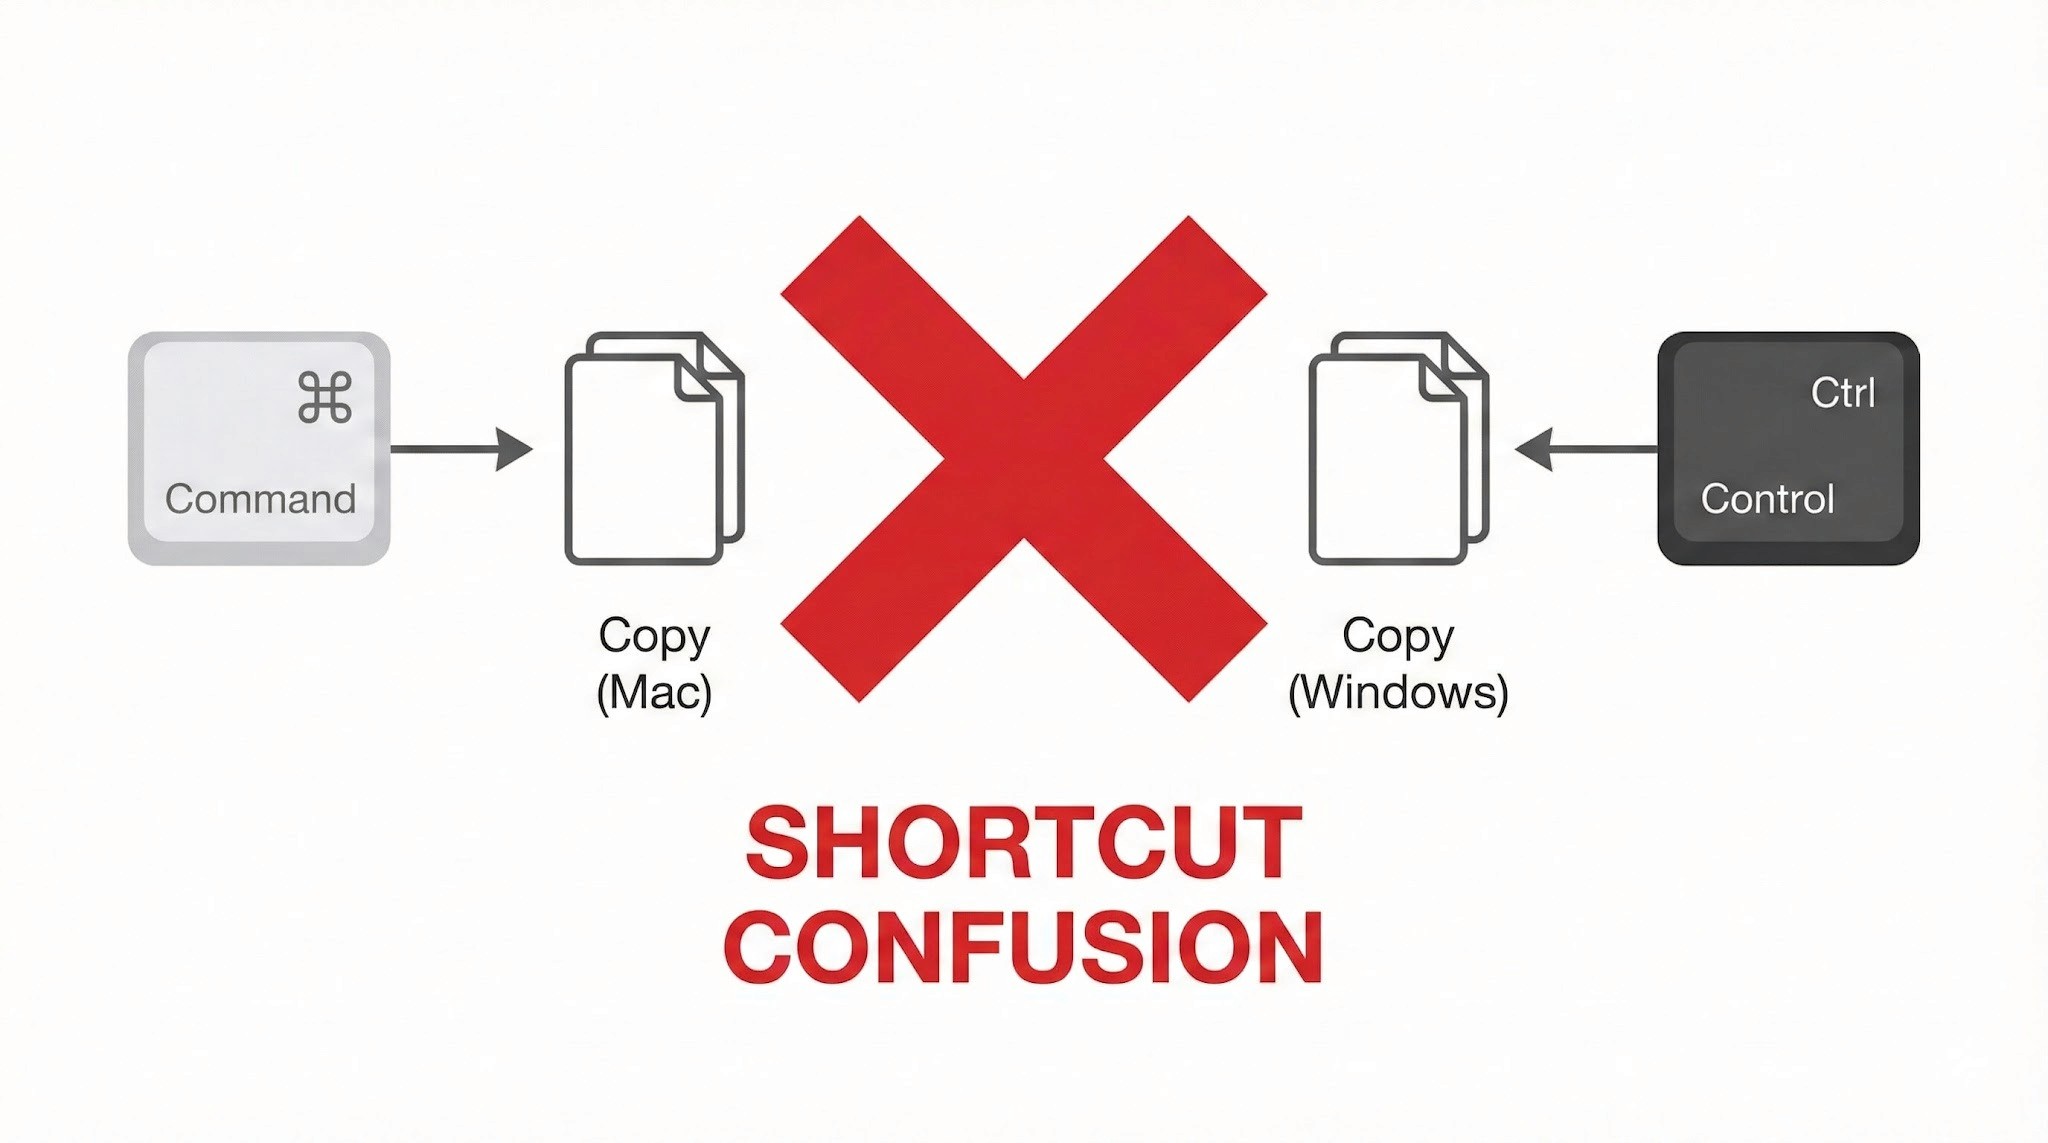
The biggest source of frustration for Mac users is the modifier key difference.
Command key vs Control key: On Mac, you copy with Command + C. On Windows, it's Control + C.. In a remote session, Mac's Command key is sometimes interpreted as the Windows key rather than Control — meaning the shortcuts your hands have memorised simply don't work as expected.
The Command + Q problem: This one catches people regularly. If you're working in a Windows application and instinctively press Command + Q to close it, you don't close the Windows app — you close Chrome on your Mac, ending the remote session entirely. It happens more than once before you break the habit.
This is a significant operational limitation, and worth understanding before you depend on CRD for regular remote access.
Wake on LAN (WoL) not supported: Chrome Remote Desktop cannot remotely power on or wake up a PC that is off or sleeping. To maintain reliable remote access, the Windows PC must be left powered on continuously.
Always-on requirement: For people living in Japan, where electricity costs are relatively high and there's a cultural awareness around energy waste (mottainai, もったいない — the Japanese concept of waste-aversion that runs through everyday life), leaving a PC running overnight when it doesn't need to be is a friction point both practically and psychologically.
No more struggling with key input or power management. Stop here and try DeskIn — built for Mac users. [Install DeskIn for free]
The smooth, precise feel that makes Mac trackpads enjoyable doesn't carry through to a remote Windows session cleanly.
Lost gestures: Mac-specific gestures — three-finger swipes to switch desktops, pinch-to-zoom — don't transmit to Windows correctly and either do nothing or trigger the wrong action.
Unnatural scrolling: Mac's inertial scrolling feels choppy in the remote environment. Right-click response has a slight lag. These are small things individually, but they add up over a full work session.
As a browser-based tool, Chrome Remote Desktop is constrained by what it can push through a browser window.
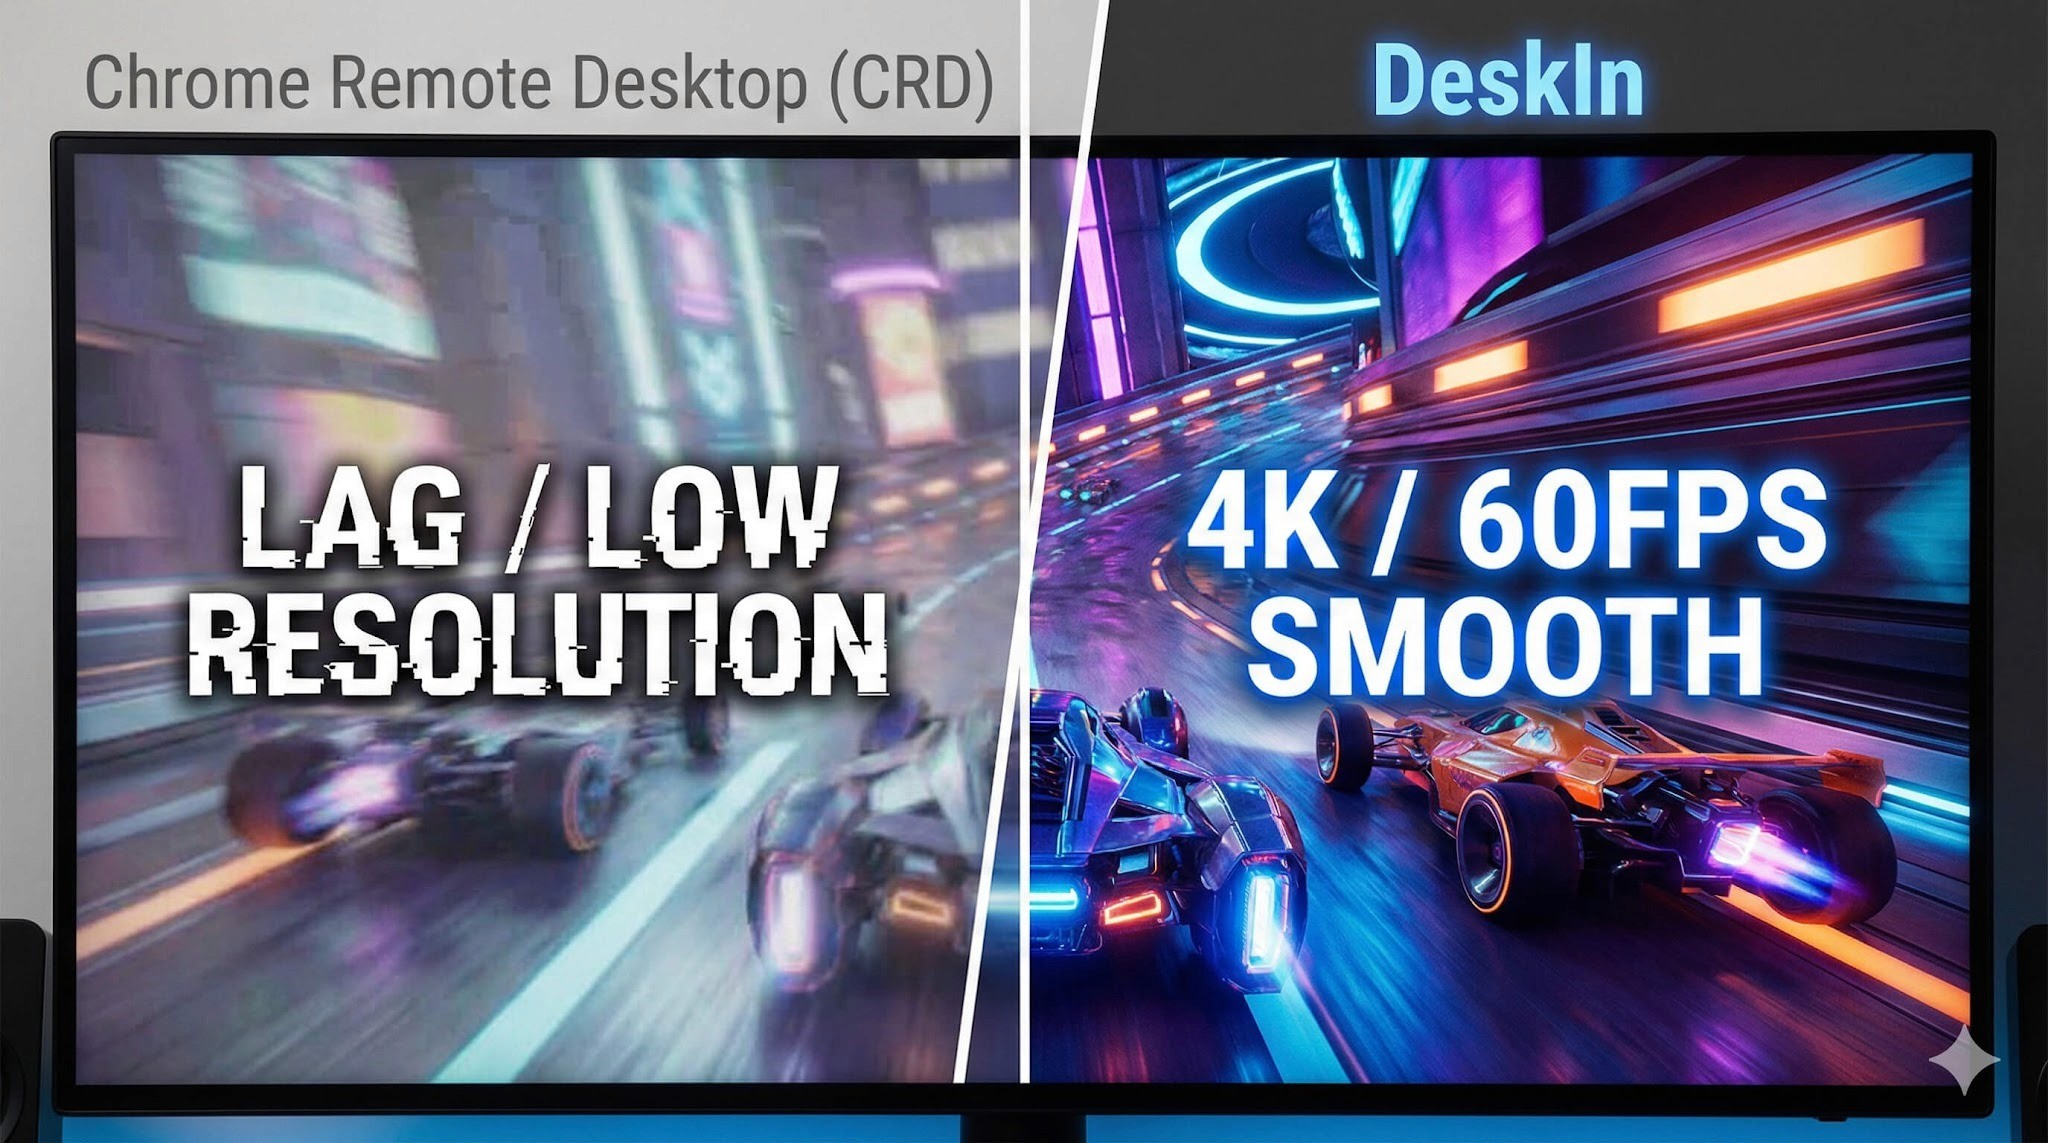
Frame rate cap: Chrome Remote Desktop typically runs at around 30FPS. For standard document editing this is fine, but anything with fast on-screen movement shows obvious lag and ghosting.
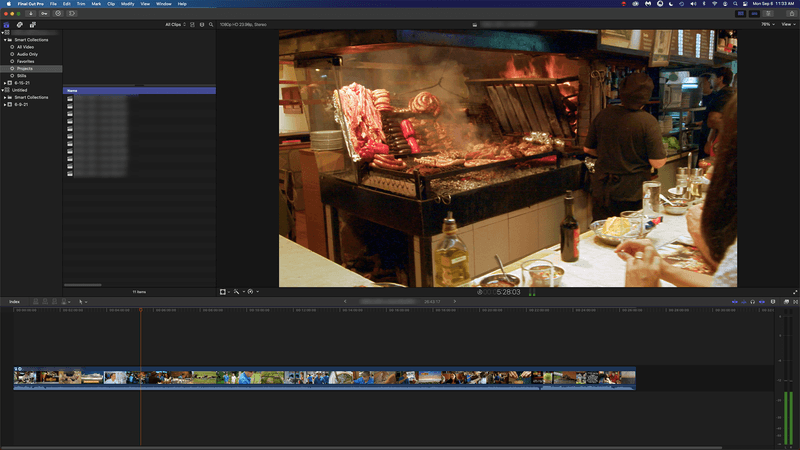
Not suited for demanding tasks: Video editing, FPS games, or any application requiring sub-second responsiveness — the latency is too significant to be practical.
Based on everything above, here's an honest assessment of where CRD works well and where it doesn't. Use this as a checklist before you decide.
✓ Recommended — CRD is a good fit for:
Quick file checks: Accessing a document on your home PC from the office or a café
Occasional admin tasks: Restarting a server, running a quick software update
Light office work: Simple browser-based data entry, sending emails — tasks where speed isn't critical
Zero-cost access: When "free and connected" is the overriding priority over performance
✗ Not recommended — CRD is a poor fit for:
Daily remote work: Working remotely for several hours at a stretch. Keyboard friction and choppy performance become a real source of stress.
Creative work: Video editing, graphic design, CAD. Accurate mouse movement, colour fidelity, and smooth rendering are all compromised.
Latency-sensitive tasks (gaming etc.): Any application where split-second responsiveness matters.
Professionals who need native performance: Not "can I connect" — but "does it feel like my own machine?"
In short: Chrome Remote Desktop is best treated as an emergency backup tool, not a primary workflow. If any of the "not recommended" scenarios describe your situation, a more capable tool is worth exploring.
There's a gap between "it connects" and "it feels like my own machine." If you've spent time with Chrome Remote Desktop and found yourself in that gap — frustrated by keyboard confusion, the always-on power requirement, or choppy performance — DeskIn is the purpose-built solution for exactly those problems.
One of DeskIn's standout features is its intelligent key mapping that bridges the OS divide automatically.
The Command/Control confusion that CRD leaves unresolved — and the "Command + Q closes Chrome" problem that ends remote sessions unexpectedly — are both solved. Your Mac keyboard layout works as expected in Windows, without workarounds. You can type at full speed without stopping to think about which key does what.
"I want to connect from outside, but I don't want to leave my PC running all day..." — DeskIn solves this.
With Wake on LAN (WoL) support, you can remotely power on a Windows PC from your Mac — even if it's shut down or sleeping. Start it when you need it, work, then let it sleep again. Less electricity, less wear on hardware, and a smarter way to work.
DeskIn streams at 4K resolution and up to 60FPS — far beyond what CRD's browser-based approach can achieve.
Whether you're doing fine-detail design work, editing video, or playing a game, the response feels close to native. The lag that makes CRD frustrating for demanding tasks effectively disappears.
DeskIn's performance advantage extends beyond Mac to mobile — connecting from an iPad or smartphone delivers the same quality experience.
Use your iPad as an extended display for Windows, or connect a mouse and keyboard for a complete remote work setup. Gesture support is optimised for touch in a way that CRD's mobile app isn't. If you move between Mac and iPad regularly, DeskIn handles both well.
Feature | Chrome Remote Desktop | DeskIn |
Primary use case | Occasional access / emergency use | Business, creative work, gaming |
Display quality | Up to 30FPS (choppy) | 4K / 60–144FPS (extremely smooth) |
Keyboard mapping | Basic — Command/Ctrl conflicts | Auto-optimised for Mac/Windows (no conflicts) |
Wake on LAN | Not supported — PC must stay on | Supported — start PC remotely |
Input feel | Noticeable lag, gesture loss | Low latency, Mac-native feel |
Cost | Free | Free tier available / Pro version |
Chrome Remote Desktop earns its place as an entry-level tool. Its ease of use and zero cost make it a great starting point for quick file access, occasional light tasks, and situations where budget is the overriding factor.
But if you're using a remote desktop regularly — for work, creative projects, or gaming — the accumulated frustrations of keyboard conflicts, always-on power requirements, and performance caps start to outweigh the convenience of free.
When that point arrives, DeskIn is the obvious next step: a tool designed from the ground up for people who need remote access to actually feel like working locally. Whether you're at your apartment, in a café in Kichioji, or somewhere further afield — your Windows machine should feel like it's right in front of you.
Experience professional-grade performance now — [Download DeskIn free and try it]

DeskIn vs Chrome Remote Desktop: Which One Fits Your Workflow Best?
When it comes to remote access tools, the comparison between DeskIn and Chrome Remote Desktop often comes down to one simple question: do you just need quick access, or do you need performance and control?
Both tools are reliable, secure, and widely used. But they are built for very different types of users. Chrome Remote Desktop focuses on simplicity and accessibility, while DeskIn is designed for users who need high performance, stability, and advanced features across multiple devices.
If you're deciding between the two, this guide breaks down not just what they offer, but which one actually fits your workflow.
Feature | DeskIn | Chrome Remote Desktop |
|---|---|---|
Performance | Up to 4K 60FPS/2K 240FPS, low latency | Standard performance |
Ease of Use | Requires app installation | Browser-based, very simple |
Device Support | Windows, macOS, iOS, Android | Works via Chrome browser |
File Transfer | Fast and stable | Limited |
Multi-device Management | Yes | No |
Mobile Experience | Optimized for iPad & iPhone | Basic |
Security | Privacy screens and granular black/whitelists | Basic |
Price | Free + paid plans | Completely free |
In short, Chrome Remote Desktop is great for quick, lightweight access, while DeskIn is built for users who expect more from their remote desktop experience.

Chrome Remote Desktop is one of the simplest remote access tools available. It runs directly through the Chrome browser and requires only a Google account to get started. This makes it especially popular among casual users and those already working within the Google ecosystem.
It works particularly well on devices like Chromebooks, where everything is already browser-based. It's also accessible across platforms, including mobile devices like iPhone and iPad, though the experience on mobile can feel limited compared to desktop use.
If you're wondering how to use Chrome Remote Desktop, the process is straightforward. You install the Chrome extension, sign in with your Google account, set up a PIN on the host device, and then connect from another device using the same account. The entire setup usually takes just a few minutes.
That said, simplicity comes with trade-offs. Chrome Remote Desktop lacks advanced features like high frame rate streaming, multi-monitor control, or professional-grade file transfer. For occasional access, it works well. But for more demanding tasks, users often start to feel its limitations.
👀You may also be interested in:
If Chrome Remote Desktop is a lightweight sketch, DeskIn is a full workstation painted in high resolution. DeskIn focuses on performance, stability, and flexibility. It supports up to 4K 60FPS streaming, making it suitable for tasks where visual clarity and responsiveness matter, such as design work, video editing, or even gaming.
As a Chrome remote desktop alternative, unlike browser-based tools, DeskIn is a dedicated remote desktop application. While this requires installation, it unlocks a much more stable and feature-rich experience. Users can manage multiple devices, transfer large files efficiently, and enjoy smoother control across different platforms.
DeskIn is also optimized for mobile workflows. Whether you're using an iPad or smartphone, the interaction feels more responsive and closer to a desktop experience, rather than a simplified viewer. For users who find Chrome Remote Desktop "good enough" at first but limiting over time, DeskIn often becomes the natural upgrade path.
The real difference between these two tools becomes clear when you look at how they perform in everyday scenarios.
If you only need to check files on your home computer or help a friend troubleshoot something quickly, Chrome Remote Desktop is more than enough. It's free, easy to set up, and doesn't require installing extra software beyond Chrome. In this case, DeskIn may feel like overkill.
For professionals working remotely on a daily basis, stability and efficiency matter much more. This is where DeskIn starts to stand out.
Tasks like editing documents, managing multiple screens, or transferring files between devices become smoother and faster. Chrome Remote Desktop can handle basic workflows, but it often struggles with responsiveness and lacks the tools needed for a seamless work environment.
This is where the gap becomes impossible to ignore. DeskIn's support for high resolution and high frame rates makes it suitable for visually demanding work. Whether you're editing videos, working with design software, or running simulations, performance consistency is critical. Chrome Remote Desktop, on the other hand, is not designed for these scenarios. It works, but not comfortably.
If you rely heavily on Google services or use a Chromebook, Chrome Remote Desktop integrates naturally into your workflow. It's lightweight, requires no additional setup, and feels like an extension of the browser itself. In this scenario, it remains a very practical choice.
Mobile usage highlights another important difference. While remote desktop Chrome iPhone, and Chrome Remote Desktop iPad are functional, they often feel like simplified versions of the desktop experience. Controls can be less intuitive, and performance may vary depending on the connection.
DeskIn, by contrast, is designed with cross-device interaction in mind, offering a smoother and more responsive mobile experience.
👀 You may also be interested in:
Yes. Tools like DeskIn offer better performance, more features, and improved stability, especially for professional use cases.
No, Chrome Remote Desktop is still actively maintained by Google. It continues to receive security updates and remains available for users needing simple, free remote access.
Yes, DeskIn is a legitimate remote desktop solution. It uses encryption to secure connections and provides access controls, making it safe for both personal and professional use.
When comparing DeskIn vs Chrome Remote Desktop, the choice depends on how demanding your remote access needs are. Chrome Remote Desktop is simple, free, and ideal for occasional use, especially if you just need quick access to a device without extra setup.
As your workflow becomes more intensive, the limitations start to surface. DeskIn offers a smoother, more stable experience with better performance and control, making it a strong long-term Chrome remote desktop alternative for users who rely on remote access every day.

8 Best Remote Desktops for Video Editing in 2026
Remote video editing is no longer a compromise; it's a workflow upgrade. Whether you're working in Adobe Premiere Pro, After Effects, or DaVinci Resolve, the right remote desktop can turn your laptop into a high-performance editing station.
But not all tools are built for remote video editing collaboration. Lag, poor color accuracy, and unstable connections can ruin productivity. In this guide, we'll break down the best remote desktop for video editing tools so that you can edit smoothly from anywhere.
Modern creators are no longer tied to a single workstation. With remote work software, you can access your powerful desktop from anywhere without investing in an expensive laptop. For many editors, especially freelancers and small teams, this solves a real problem: you already have a high-performance PC, but mobility is limited. Instead of duplicating hardware, video editing remote desktop tools let you stream your workflow in real time.
Another key benefit is remote collaboration. Teams can work on the same project across different locations, review edits instantly, and avoid large file transfers via remote collaboration tools. However, this only works if your remote desktop software supports high frame rates, low latency, and stable connections. Otherwise, editing becomes frustrating.
Here's a quick overview of the best tools and who they're for:
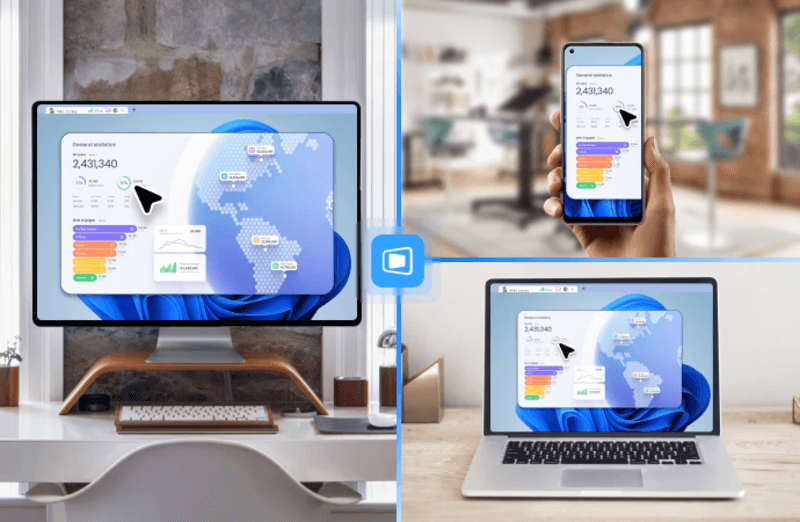
DeskIn – Best overall for performance + affordability + multi-device workflows
Parsec – Best for ultra-low latency editing
Splashtop – Best for high-resolution streaming
HP Anyware – Best for enterprise-level workflows
Jump Desktop – Best for Mac users
AnyDesk – Best lightweight remote access
Chrome Remote Desktop – Best free basic option
RustDesk – Best open-source alternative
Up to 4K 60FPS / 2K 240FPS performance
Ultra-low latency for smooth editing timelines
Multi-device support (PC, Mac, iPad, Android)
Affordable pricing with free plan available
Smaller brand awareness compared to legacy tools
DeskIn stands out as the best remote desktop for video editing by balancing performance, stability, and accessibility. Unlike many traditional remote support tools, it is designed for high-frame-rate tasks, making timeline scrubbing, preview playback, and effects editing feel responsive and fluid.
For creators working across devices, DeskIn enables seamless remote video editing collaboration. You can access your main editing PC from a laptop, tablet, or even a secondary workstation without noticeable lag. Compared to tools like Chrome Remote Desktop, which struggle with video-heavy workloads, DeskIn maintains consistent quality and responsiveness—making it a practical choice for both solo editors and distributed teams.
Extremely low latency
High frame rate streaming
Popular among creative professionals
Limited collaboration features
Setup can be complex for beginners
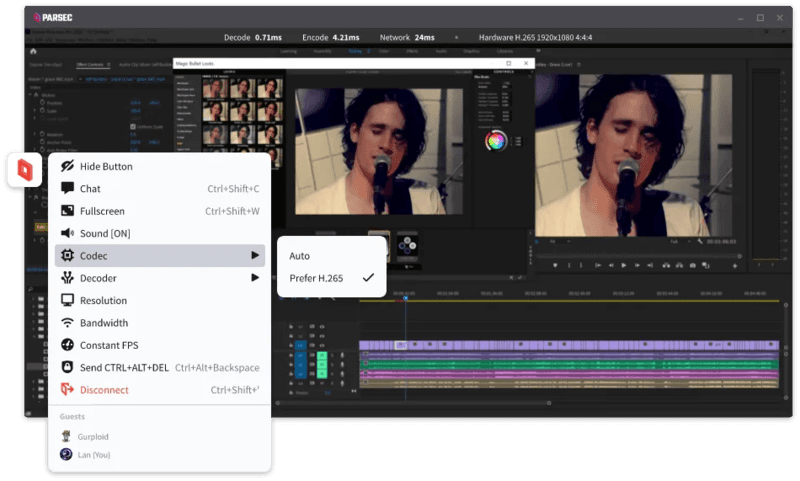
Parsec is widely recognized as a top choice for remote video editing, especially when latency is your biggest concern. Its streaming technology is optimized for real-time responsiveness, which makes it ideal for tasks like timeline scrubbing and motion graphics work in After Effects.
However, while Parsec excels in performance, it lacks some features needed for full remote video editing collaboration. Multi-user workflows and advanced access control are not as robust as some newer tools. For users who need both performance and flexibility, alternatives like DeskIn may provide a more balanced solution.
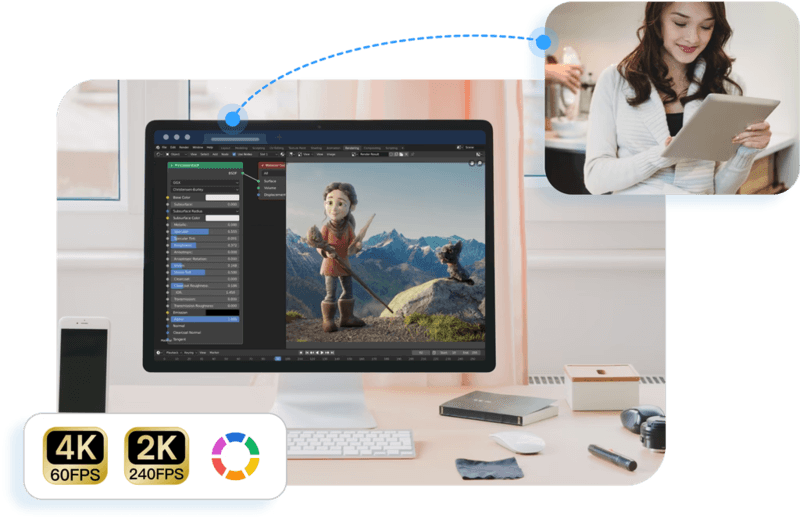
Supports 4K streaming
Strong color accuracy
Reliable for creative tasks
Higher cost for advanced features
Can experience latency over long distances

Splashtop is a solid option for editors who prioritize visual fidelity. Its support for high-resolution streaming and 4:4:4 color makes it suitable for color grading and detailed editing work.
That said, performance consistency can vary depending on network conditions. Some users report lag when working outside local networks. Compared to more optimized remote work software like DeskIn, Splashtop may require a stronger connection to maintain the same level of smoothness.
Industry-grade performance
Secure and scalable
Used in professional studios
Expensive
Complex setup
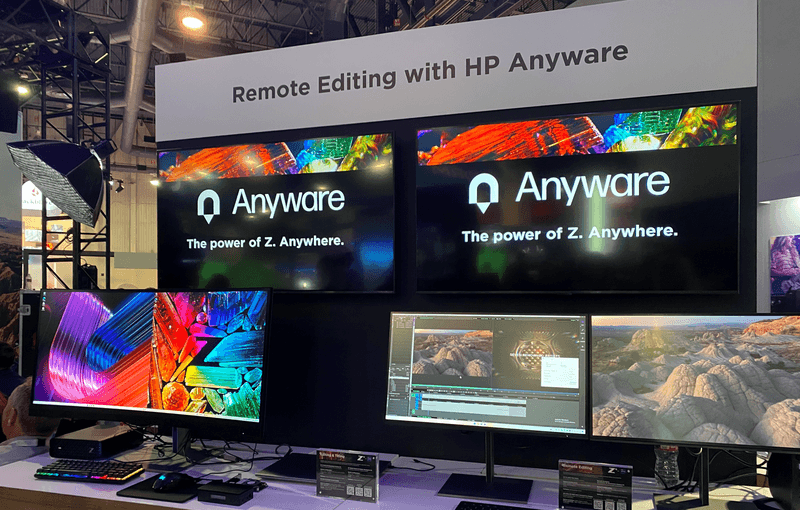
HP Anyware (formerly Teradici) is designed for high-end production environments. It uses advanced protocols to deliver excellent performance and security, making it a common choice in the media and entertainment industries.
However, for small teams or individual creators, it may be overkill. The cost and setup complexity make it less accessible compared to modern remote desktops for video editing tools that offer similar performance with easier deployment. The high cost and technical complexity create barriers that modern remote desktop solutions have eliminated, like DeskIn, offering comparable performance with far simpler deployment.
Great macOS integration
Smooth performance
Easy to use
Limited advanced features
Not ideal for heavy collaboration
Jump Desktop has earned a loyal following among Mac users seeking a straightforward, efficient remote desktop for video editing. Its Fluid Remote Desktop protocol provides smooth, responsive performance for most editing tasks without unnecessary complexity.
Where it falls short is in collaboration. Jump Desktop is built for individual use, lacking the team-oriented features that creative groups need. For solo professionals, it works well, but teams will quickly miss real-time collaboration tools found on other platforms.
Pros
Fast and lightweight
Easy to set up
Works on multiple devices
Cons
Limited performance for video editing
Lower visual quality

AnyDesk has built its reputation on lightweight design and remarkable ease of use for general remote access. It handles everyday tasks competently, connecting quickly and running smoothly on modest hardware.
The limitations become apparent with demanding creative work. Remote video editing requires consistent frame rates and crystal-clear visuals—areas where AnyDesk struggles. For professional editors who need precision, the performance gap becomes impossible to ignore.
Completely free
Easy browser-based setup
Works on any device
Poor performance for editing
Limited features
Chrome Remote Desktop is one of the most accessible remote support tools, offering a simple way to access your computer from anywhere. It's free, requires almost no setup, and lets you access your computer from anywhere with just a browser. For basic technical support or quick file grabs, it gets the job done.
However, it is not built for remote video editing. Users often experience lag, compression artifacts, and low frame rates. If you're working on professional projects, upgrading to a more capable solution is highly recommended.
Open-source
Self-hosting available
Free to use
Requires technical setup
Performance can vary
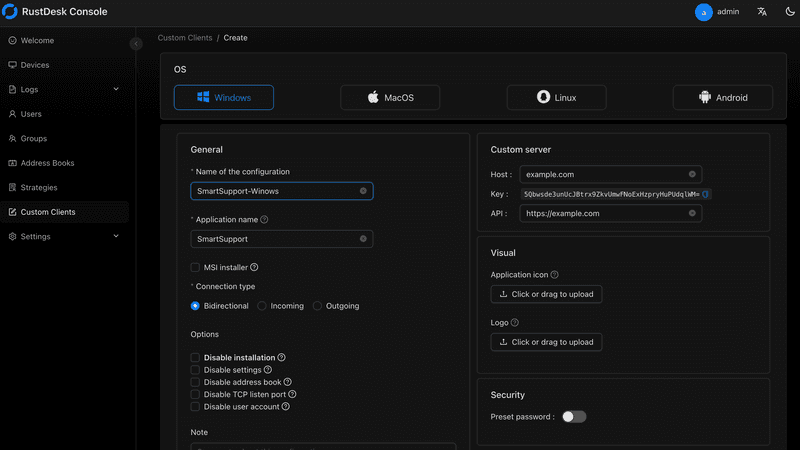
RustDesk appeals to users who prioritize open-source philosophy and want complete control over their remote access infrastructure. The flexibility to self-host and customize is genuinely valuable for privacy-conscious users. RustDesk is an interesting option for users who prefer open-source remote desktop not working alternatives or want full control over their infrastructure.
Performance, however, depends entirely on your configuration skills. Without technical expertise, achieving the smooth, low-latency experience required for professional editing is challenging. It's powerful for those who know how to tune it, but not plug-and-play.
Yes, with the right remote desktop for video editing, you can edit videos smoothly from anywhere. Tools like DeskIn and Parsec provide low latency and high frame rates for professional workflows.
Free options like Chrome Remote Desktop exist, but they lack performance. DeskIn offers a free plan with better performance, making it a stronger choice for real editing work.
Yes, Parsec is excellent for low-latency editing. However, it may lack collaboration features needed for team workflows.
Common issues include poor network connection, low bandwidth, or software limitations. Choosing optimized remote work software like DeskIn can significantly improve performance.
Choosing the best remote desktop for video editing depends on your workflow, budget, and performance needs. While tools like Parsec and Splashtop excel in specific areas, many solutions struggle to balance performance, stability, and usability.
If you're looking for a well-rounded solution, DeskIn offers a strong combination of high performance, smooth streaming, and cross-device flexibility. Whether you're working solo or collaborating remotely, it provides a reliable foundation for modern remote video editing workflows.
Control Windows from Your Mac with Chrome Remote Desktop: Setup Guide & Pitfalls | DeskIn Japan
For Mac users working in Japan, there's a recurring frustration: a piece of software you need exists only on Windows. Whether it's CAD tools, Japanese accounting software (kaikei sofuto, 会計ソフト) required by your company, Windows-exclusive business systems, or PC games — the need to run Windows doesn't go away just because you prefer Mac.
The good news is you don't need to buy a separate Windows machine. Google's free tool Chrome Remote Desktop lets you control a Windows PC remotely from your Mac, and the setup is simpler than most people expect.
This guide walks through the fastest path to getting connected, and then covers the cross-platform quirks that tend to catch Mac users off guard once they're actually in a session.
Chrome Remote Desktop's configuration is straightforward, but it requires preparation on both machines — the Windows PC being controlled (the host) and the Mac doing the controlling (the client). Here's the fastest path to a working connection.
Start by allowing remote access on the Windows machine.
Install the extension and host software
Open Chrome and go to the Chrome Remote Desktop access page. Under "Set up remote access," click the blue download icon. Follow the prompts to add the Chrome extension and run the installer (.msi file).
Name your PC and set a PIN
After installation, give the PC a name you'll recognise. Then set a PIN of at least six digits — you'll need to enter this every time you connect from your Mac, so write it somewhere safe.
3. Important: Disable Sleep Mode
This is the step most people miss, and it will prevent connections entirely if skipped. A Windows PC in sleep mode cannot be reached remotely.
Go to Settings → System → Power & Battery
Under "Screen and Sleep," set "Put device to sleep after" to Never when plugged in
Once the Windows side is configured, connecting from your Mac is simple.
Log in to the access site
Open Chrome on your Mac and navigate to the same Chrome Remote Desktop access page. Make sure you're logged into the same Google account you used when setting up the Windows PC.
Select your PC and authenticate
Your Windows PC will appear under "Remote devices." Click it and enter your PIN — the Windows desktop will open inside your Chrome browser.
3. Connection complete
You can now control Windows using your Mac's keyboard and mouse.
Tip: For quicker access in the future, use Chrome's "Install as app" option to add Chrome Remote Desktop to your Mac's Dock — saves a few clicks every time.
H2: Cross-Platform Pitfalls: What Mac Users Run Into
Chrome Remote Desktop is easy to set up, but once you're inside a session, the Mac–Windows gap creates friction points that directly affect how much work you can actually get done. These are worth understanding before you depend on CRD for anything important.
H3: Keyboard Mapping Conflicts
The biggest source of frustration for Mac users is the modifier key difference.
Command key vs Control key: On Mac, you copy with Command + C. On Windows, it's Control + C.. In a remote session, Mac's Command key is sometimes interpreted as the Windows key rather than Control — meaning the shortcuts your hands have memorised simply don't work as expected.
The Command + Q problem: This one catches people regularly. If you're working in a Windows application and instinctively press Command + Q to close it, you don't close the Windows app — you close Chrome on your Mac, ending the remote session entirely. It happens more than once before you break the habit.
This is a significant operational limitation, and worth understanding before you depend on CRD for regular remote access.
Wake on LAN (WoL) not supported: Chrome Remote Desktop cannot remotely power on or wake up a PC that is off or sleeping. To maintain reliable remote access, the Windows PC must be left powered on continuously.
Always-on requirement: For people living in Japan, where electricity costs are relatively high and there's a cultural awareness around energy waste (mottainai, もったいない — the Japanese concept of waste-aversion that runs through everyday life), leaving a PC running overnight when it doesn't need to be is a friction point both practically and psychologically.
No more struggling with key input or power management. Stop here and try DeskIn — built for Mac users. [Install DeskIn for free]
The smooth, precise feel that makes Mac trackpads enjoyable doesn't carry through to a remote Windows session cleanly.
Lost gestures: Mac-specific gestures — three-finger swipes to switch desktops, pinch-to-zoom — don't transmit to Windows correctly and either do nothing or trigger the wrong action.
Unnatural scrolling: Mac's inertial scrolling feels choppy in the remote environment. Right-click response has a slight lag. These are small things individually, but they add up over a full work session.
As a browser-based tool, Chrome Remote Desktop is constrained by what it can push through a browser window.
Frame rate cap: Chrome Remote Desktop typically runs at around 30FPS. For standard document editing this is fine, but anything with fast on-screen movement shows obvious lag and ghosting.
Not suited for demanding tasks: Video editing, FPS games, or any application requiring sub-second responsiveness — the latency is too significant to be practical.
Based on everything above, here's an honest assessment of where CRD works well and where it doesn't. Use this as a checklist before you decide.
✓ Recommended — CRD is a good fit for:
Quick file checks: Accessing a document on your home PC from the office or a café
Occasional admin tasks: Restarting a server, running a quick software update
Light office work: Simple browser-based data entry, sending emails — tasks where speed isn't critical
Zero-cost access: When "free and connected" is the overriding priority over performance
✗ Not recommended — CRD is a poor fit for:
Daily remote work: Working remotely for several hours at a stretch. Keyboard friction and choppy performance become a real source of stress.
Creative work: Video editing, graphic design, CAD. Accurate mouse movement, colour fidelity, and smooth rendering are all compromised.
Latency-sensitive tasks (gaming etc.): Any application where split-second responsiveness matters.
Professionals who need native performance: Not "can I connect" — but "does it feel like my own machine?"
In short: Chrome Remote Desktop is best treated as an emergency backup tool, not a primary workflow. If any of the "not recommended" scenarios describe your situation, a more capable tool is worth exploring.
There's a gap between "it connects" and "it feels like my own machine." If you've spent time with Chrome Remote Desktop and found yourself in that gap — frustrated by keyboard confusion, the always-on power requirement, or choppy performance — DeskIn is the purpose-built solution for exactly those problems.
One of DeskIn's standout features is its intelligent key mapping that bridges the OS divide automatically.
The Command/Control confusion that CRD leaves unresolved — and the "Command + Q closes Chrome" problem that ends remote sessions unexpectedly — are both solved. Your Mac keyboard layout works as expected in Windows, without workarounds. You can type at full speed without stopping to think about which key does what.
"I want to connect from outside, but I don't want to leave my PC running all day..." — DeskIn solves this.
With Wake on LAN (WoL) support, you can remotely power on a Windows PC from your Mac — even if it's shut down or sleeping. Start it when you need it, work, then let it sleep again. Less electricity, less wear on hardware, and a smarter way to work.
DeskIn streams at 4K resolution and up to 60FPS — far beyond what CRD's browser-based approach can achieve.
Whether you're doing fine-detail design work, editing video, or playing a game, the response feels close to native. The lag that makes CRD frustrating for demanding tasks effectively disappears.
DeskIn's performance advantage extends beyond Mac to mobile — connecting from an iPad or smartphone delivers the same quality experience.
Use your iPad as an extended display for Windows, or connect a mouse and keyboard for a complete remote work setup. Gesture support is optimised for touch in a way that CRD's mobile app isn't. If you move between Mac and iPad regularly, DeskIn handles both well.
Feature | Chrome Remote Desktop | DeskIn |
Primary use case | Occasional access / emergency use | Business, creative work, gaming |
Display quality | Up to 30FPS (choppy) | 4K / 60–144FPS (extremely smooth) |
Keyboard mapping | Basic — Command/Ctrl conflicts | Auto-optimised for Mac/Windows (no conflicts) |
Wake on LAN | Not supported — PC must stay on | Supported — start PC remotely |
Input feel | Noticeable lag, gesture loss | Low latency, Mac-native feel |
Cost | Free | Free tier available / Pro version |
Chrome Remote Desktop earns its place as an entry-level tool. Its ease of use and zero cost make it a great starting point for quick file access, occasional light tasks, and situations where budget is the overriding factor.
But if you're using a remote desktop regularly — for work, creative projects, or gaming — the accumulated frustrations of keyboard conflicts, always-on power requirements, and performance caps start to outweigh the convenience of free.
When that point arrives, DeskIn is the obvious next step: a tool designed from the ground up for people who need remote access to actually feel like working locally. Whether you're at your apartment, in a café in Kichioji, or somewhere further afield — your Windows machine should feel like it's right in front of you.
Experience professional-grade performance now — [Download DeskIn free and try it]
DeskIn vs Chrome Remote Desktop: Which One Fits Your Workflow Best?
When it comes to remote access tools, the comparison between DeskIn and Chrome Remote Desktop often comes down to one simple question: do you just need quick access, or do you need performance and control?
Both tools are reliable, secure, and widely used. But they are built for very different types of users. Chrome Remote Desktop focuses on simplicity and accessibility, while DeskIn is designed for users who need high performance, stability, and advanced features across multiple devices.
If you're deciding between the two, this guide breaks down not just what they offer, but which one actually fits your workflow.
Feature | DeskIn | Chrome Remote Desktop |
|---|---|---|
Performance | Up to 4K 60FPS/2K 240FPS, low latency | Standard performance |
Ease of Use | Requires app installation | Browser-based, very simple |
Device Support | Windows, macOS, iOS, Android | Works via Chrome browser |
File Transfer | Fast and stable | Limited |
Multi-device Management | Yes | No |
Mobile Experience | Optimized for iPad & iPhone | Basic |
Security | Privacy screens and granular black/whitelists | Basic |
Price | Free + paid plans | Completely free |
In short, Chrome Remote Desktop is great for quick, lightweight access, while DeskIn is built for users who expect more from their remote desktop experience.
Chrome Remote Desktop is one of the simplest remote access tools available. It runs directly through the Chrome browser and requires only a Google account to get started. This makes it especially popular among casual users and those already working within the Google ecosystem.
It works particularly well on devices like Chromebooks, where everything is already browser-based. It's also accessible across platforms, including mobile devices like iPhone and iPad, though the experience on mobile can feel limited compared to desktop use.
If you're wondering how to use Chrome Remote Desktop, the process is straightforward. You install the Chrome extension, sign in with your Google account, set up a PIN on the host device, and then connect from another device using the same account. The entire setup usually takes just a few minutes.
That said, simplicity comes with trade-offs. Chrome Remote Desktop lacks advanced features like high frame rate streaming, multi-monitor control, or professional-grade file transfer. For occasional access, it works well. But for more demanding tasks, users often start to feel its limitations.
👀You may also be interested in:
If Chrome Remote Desktop is a lightweight sketch, DeskIn is a full workstation painted in high resolution. DeskIn focuses on performance, stability, and flexibility. It supports up to 4K 60FPS streaming, making it suitable for tasks where visual clarity and responsiveness matter, such as design work, video editing, or even gaming.
As a Chrome remote desktop alternative, unlike browser-based tools, DeskIn is a dedicated remote desktop application. While this requires installation, it unlocks a much more stable and feature-rich experience. Users can manage multiple devices, transfer large files efficiently, and enjoy smoother control across different platforms.
DeskIn is also optimized for mobile workflows. Whether you're using an iPad or smartphone, the interaction feels more responsive and closer to a desktop experience, rather than a simplified viewer. For users who find Chrome Remote Desktop "good enough" at first but limiting over time, DeskIn often becomes the natural upgrade path.
The real difference between these two tools becomes clear when you look at how they perform in everyday scenarios.
If you only need to check files on your home computer or help a friend troubleshoot something quickly, Chrome Remote Desktop is more than enough. It's free, easy to set up, and doesn't require installing extra software beyond Chrome. In this case, DeskIn may feel like overkill.
For professionals working remotely on a daily basis, stability and efficiency matter much more. This is where DeskIn starts to stand out.
Tasks like editing documents, managing multiple screens, or transferring files between devices become smoother and faster. Chrome Remote Desktop can handle basic workflows, but it often struggles with responsiveness and lacks the tools needed for a seamless work environment.
This is where the gap becomes impossible to ignore. DeskIn's support for high resolution and high frame rates makes it suitable for visually demanding work. Whether you're editing videos, working with design software, or running simulations, performance consistency is critical. Chrome Remote Desktop, on the other hand, is not designed for these scenarios. It works, but not comfortably.
If you rely heavily on Google services or use a Chromebook, Chrome Remote Desktop integrates naturally into your workflow. It's lightweight, requires no additional setup, and feels like an extension of the browser itself. In this scenario, it remains a very practical choice.
Mobile usage highlights another important difference. While remote desktop Chrome iPhone, and Chrome Remote Desktop iPad are functional, they often feel like simplified versions of the desktop experience. Controls can be less intuitive, and performance may vary depending on the connection.
DeskIn, by contrast, is designed with cross-device interaction in mind, offering a smoother and more responsive mobile experience.
👀 You may also be interested in:
Yes. Tools like DeskIn offer better performance, more features, and improved stability, especially for professional use cases.
No, Chrome Remote Desktop is still actively maintained by Google. It continues to receive security updates and remains available for users needing simple, free remote access.
Yes, DeskIn is a legitimate remote desktop solution. It uses encryption to secure connections and provides access controls, making it safe for both personal and professional use.
When comparing DeskIn vs Chrome Remote Desktop, the choice depends on how demanding your remote access needs are. Chrome Remote Desktop is simple, free, and ideal for occasional use, especially if you just need quick access to a device without extra setup.
As your workflow becomes more intensive, the limitations start to surface. DeskIn offers a smoother, more stable experience with better performance and control, making it a strong long-term Chrome remote desktop alternative for users who rely on remote access every day.
聯絡我們
電子郵件: support@deskin.io
總部: 991D Alexandra Road #02-17, Singapore 119972
聯絡我們
電子郵件: support@deskin.io
總部: 991D Alexandra Road #02-17, Singapore 119972
聯絡我們
support@deskin.io
991D Alexandra Road #02-17, Singapore 119972

