部落格
搜尋...
全部
應用對比
遊戲娛樂
產品教學
問題解決

Is DeskIn Safe to Use? Everything You Need to Know
When considering a remote desktop tool, one question always comes first: Is DeskIn safe? After all, you're not just accessing a device; you're potentially exposing files, data, and even real-time activity across networks.
The short answer is yes, DeskIn is designed with strong security measures in place. But understanding why it's safe, and how that safety actually works in real-world use, is what truly matters. This guide breaks it down in a clear, practical way so you can decide with confidence.

What Does "Safe" Really Mean for Remote Desktop Software?
Before answering is DeskIn safe to use, it helps to define what "safe" actually means in the context of remote desktop software.
Security isn't just one feature. It's a layered system that protects different aspects of your connection. First, there's data security, which ensures that everything transmitted between devices is encrypted and unreadable to outsiders. Then comes access control, which determines who can connect to your device and under what conditions.
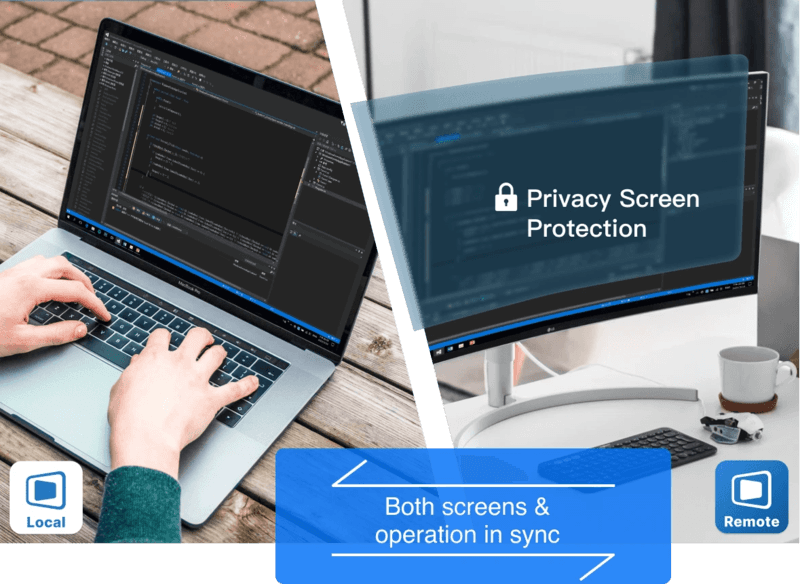
Privacy protection is another key layer. This includes features that prevent others from seeing your screen or accessing sensitive inputs without permission. Finally, account security ensures that even if someone tries to break in, additional verification steps stop unauthorized access. A remote desktop tool is only truly safe when all of these layers work together.
👀 What Is DeskIn Used For? (And Why Security Matters)
To fully understand whether DeskIn is safe, it helps to look at what DeskIn is used for. DeskIn is commonly used for remote work, IT support, cross-device file access, and even high-performance tasks like design or development. These scenarios often involve sensitive data, which makes security not just important, but essential.
Users benefit from DeskIn's stable connection and low-latency performance, but those advantages only matter if the connection is secure. That's why security features are deeply integrated into the platform rather than treated as optional extras.
How DeskIn Protects Your Data and Privacy
DeskIn approaches security as a complete system with multiple protective layers, addressing common concerns about whether the platform is safe and legit for daily use. Here's how it keeps your data secure.
1. End-to-End Encryption
All connections use AES-256 encryption, the same standard trusted by banks and financial institutions. This ensures your data remains protected during transmission, even on public or unsecured networks.
2. Multi-Layered Access Control
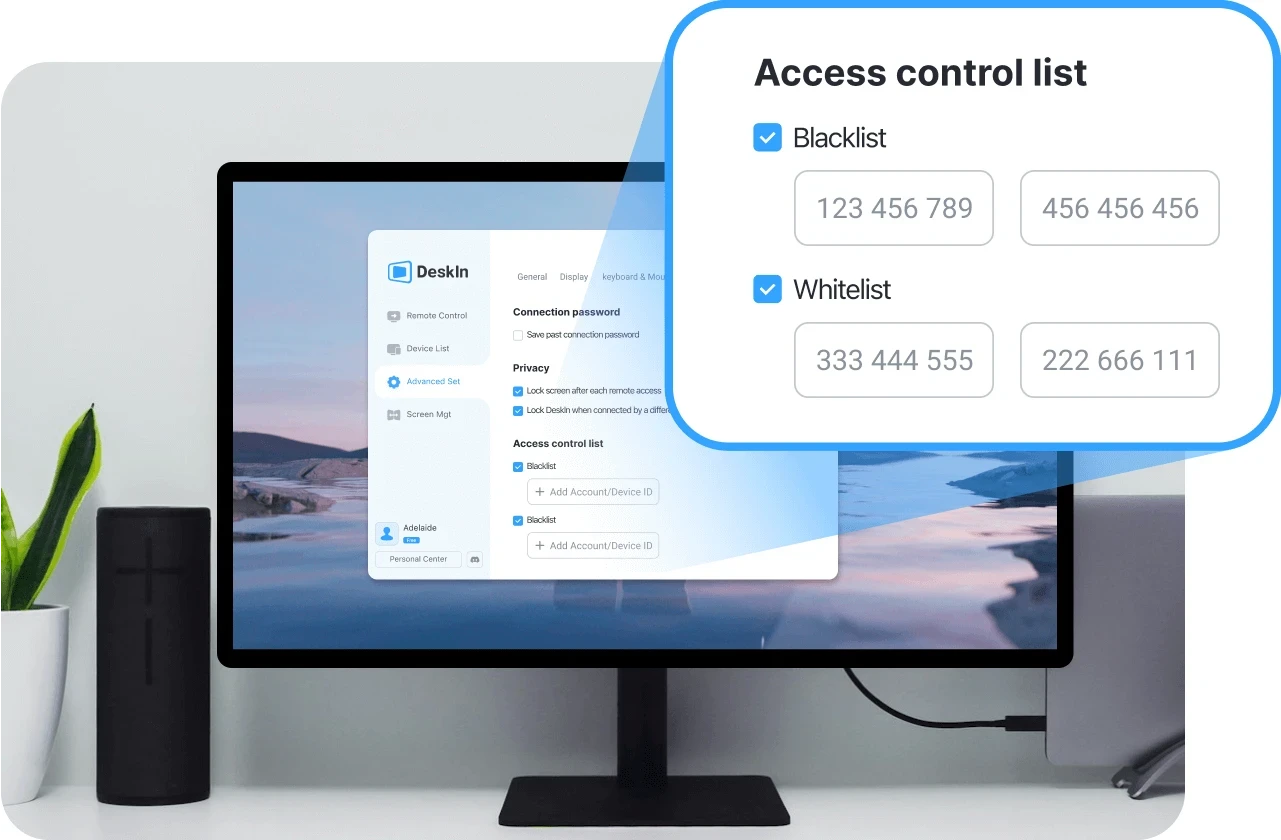
Beyond passwords, DeskIn requires various verifications: user access, blacklisting IP and device verification. Even if login credentials are compromised, unauthorized users cannot access your device without passing these additional checks.
3. Privacy-Focused Features
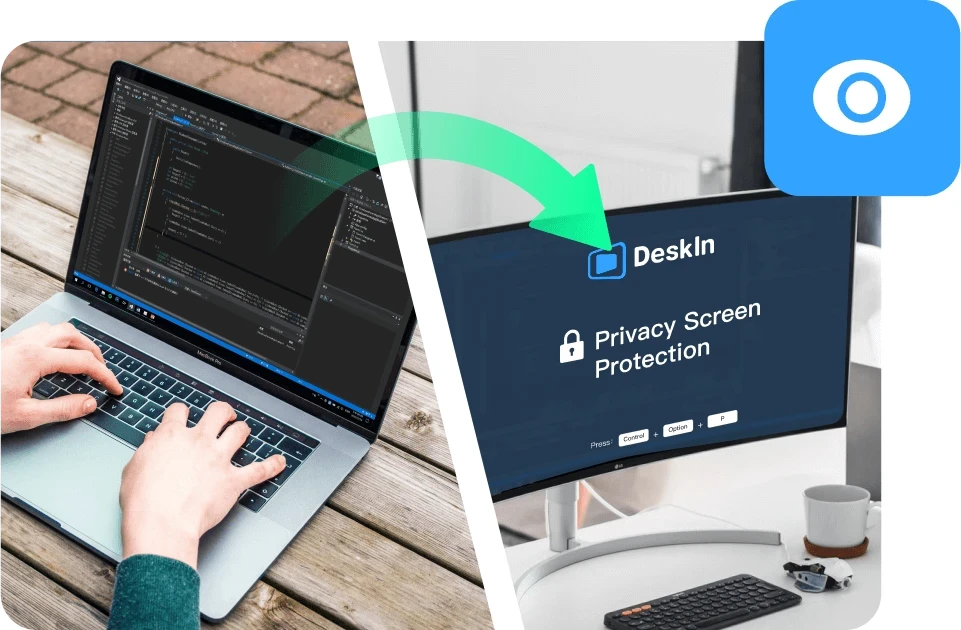
Privacy screen mode lets you black out the host display during sessions, preventing anyone nearby from viewing your activity. Granular permission settings also give you control over file, audio, and input access.
4. Proven Reliability for Daily Use
These security layers work together to make DeskIn a safe choice for everyday workflows, whether you're accessing personal files or managing professional systems remotely.
👀 You may also be interested in
Is DeskIn Safe from Hackers? (Real Risk Analysis)
A more specific concern many users have is: Is DeskIn safe from hackers?
The reality is that no remote desktop software is completely risk-free, but the level of risk depends heavily on how the software is designed and how it's used.
DeskIn minimizes risk through encryption, authentication, and access controls. These features make unauthorized access extremely difficult. However, like any online tool, user behavior still plays a role. Weak passwords, sharing access credentials, or using unsecured devices can introduce vulnerabilities.
In practice, High-definition Remote Desktop App DeskIn provides the tools needed for a secure environment. As long as users follow basic security practices, the likelihood of unauthorized access remains very low.
Is DeskIn Safe on Mobile Devices (iPhone & Android)?
Mobile access introduces another layer of concern, especially for users asking is DeskIn safe for iPhone or is DeskIn safe for Android.
DeskIn is designed to maintain the same level of security across devices. Data transmitted between your phone and remote computer is still encrypted, and login protection remains in place through authentication features.
Unlike some remote tools, DeskIn does not require risky system modifications such as rooting or jailbreaking. This significantly reduces potential vulnerabilities on mobile devices. Whether you're accessing a work computer from an iPad or managing files through your phone, the security model remains consistent, making it a safe option for cross-device use.
Is DeskIn Free to Use? And Does Free Mean Less Secure?
Another common question is whether DeskIn is free to use, and more importantly, does free access affects security. DeskIn does offer a free version, but security features are not reduced or removed in lower-tier plans. Encryption, authentication, and access control remain in place regardless of pricing.
Security is part of the core infrastructure, not a premium add-on. This means users can still benefit from a secure connection even when using the free version.
Tips to Use DeskIn Safely (Best Practices)
Even with strong built-in protection, safe usage also depends on your own habits. Following a few key practices can help you maintain control over your account and devices:
Use strong passwords: Create unique, complex passwords for your DeskIn account to prevent unauthorized access through credential guessing.
Enable two-factor authentication: Adding this extra verification step ensures that even compromised passwords won't grant access to your device.
Never share access credentials: Keep your login details private and avoid sharing them with others, even temporarily.
Always log out after sessions: End remote connections when they're no longer needed to prevent unattended access to your system.
Keep devices updated: Regular updates ensure you have the latest security patches and protection against emerging vulnerabilities.
Final Verdict: Is DeskIn Safe and Reliable?
So, is DeskIn safe?
In most practical scenarios, the answer is yes. Its combination of encryption, authentication, and access control creates a secure environment for remote access, whether you're working from home or managing devices across locations.
At the same time, security is always a shared responsibility. DeskIn provides the foundation, but safe usage habits ensure the best protection. When both work together, DeskIn becomes a reliable and secure choice for remote desktop access.

Control Windows from Your Mac with Chrome Remote Desktop: Setup Guide & Pitfalls | DeskIn Japan
Introduction: Getting Past the Mac–Windows Divide
For Mac users working in Japan, there's a recurring frustration: a piece of software you need exists only on Windows. Whether it's CAD tools, Japanese accounting software (kaikei sofuto, 会計ソフト) required by your company, Windows-exclusive business systems, or PC games — the need to run Windows doesn't go away just because you prefer Mac.
The good news is you don't need to buy a separate Windows machine. Google's free tool Chrome Remote Desktop lets you control a Windows PC remotely from your Mac, and the setup is simpler than most people expect.
This guide walks through the fastest path to getting connected, and then covers the cross-platform quirks that tend to catch Mac users off guard once they're actually in a session.
Setup: Connecting Your Mac to a Windows PC
Chrome Remote Desktop's configuration is straightforward, but it requires preparation on both machines — the Windows PC being controlled (the host) and the Mac doing the controlling (the client). Here's the fastest path to a working connection.
On the Windows PC (Host)
Start by allowing remote access on the Windows machine.
Install the extension and host software
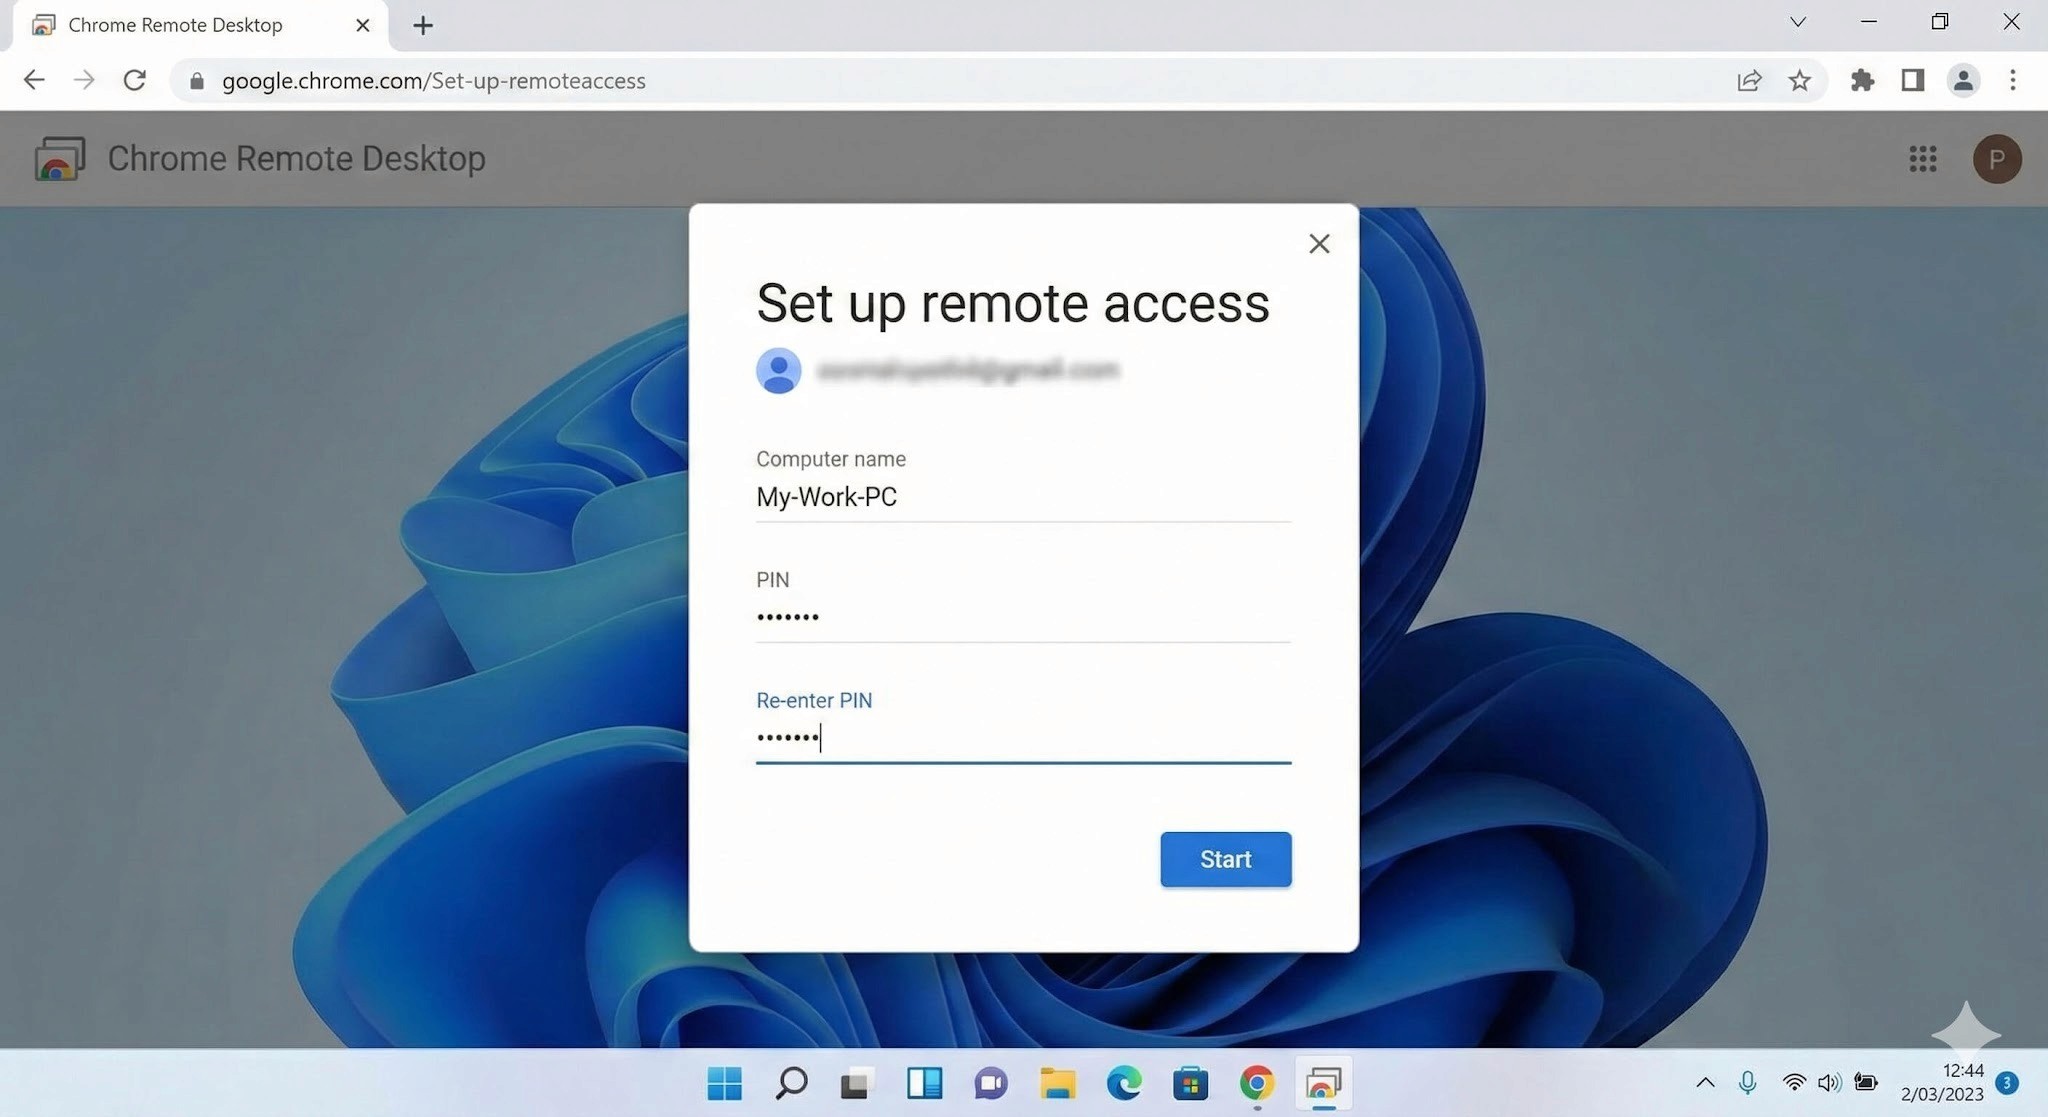
Open Chrome and go to the Chrome Remote Desktop access page. Under "Set up remote access," click the blue download icon. Follow the prompts to add the Chrome extension and run the installer (.msi file).
Name your PC and set a PIN
After installation, give the PC a name you'll recognise. Then set a PIN of at least six digits — you'll need to enter this every time you connect from your Mac, so write it somewhere safe.
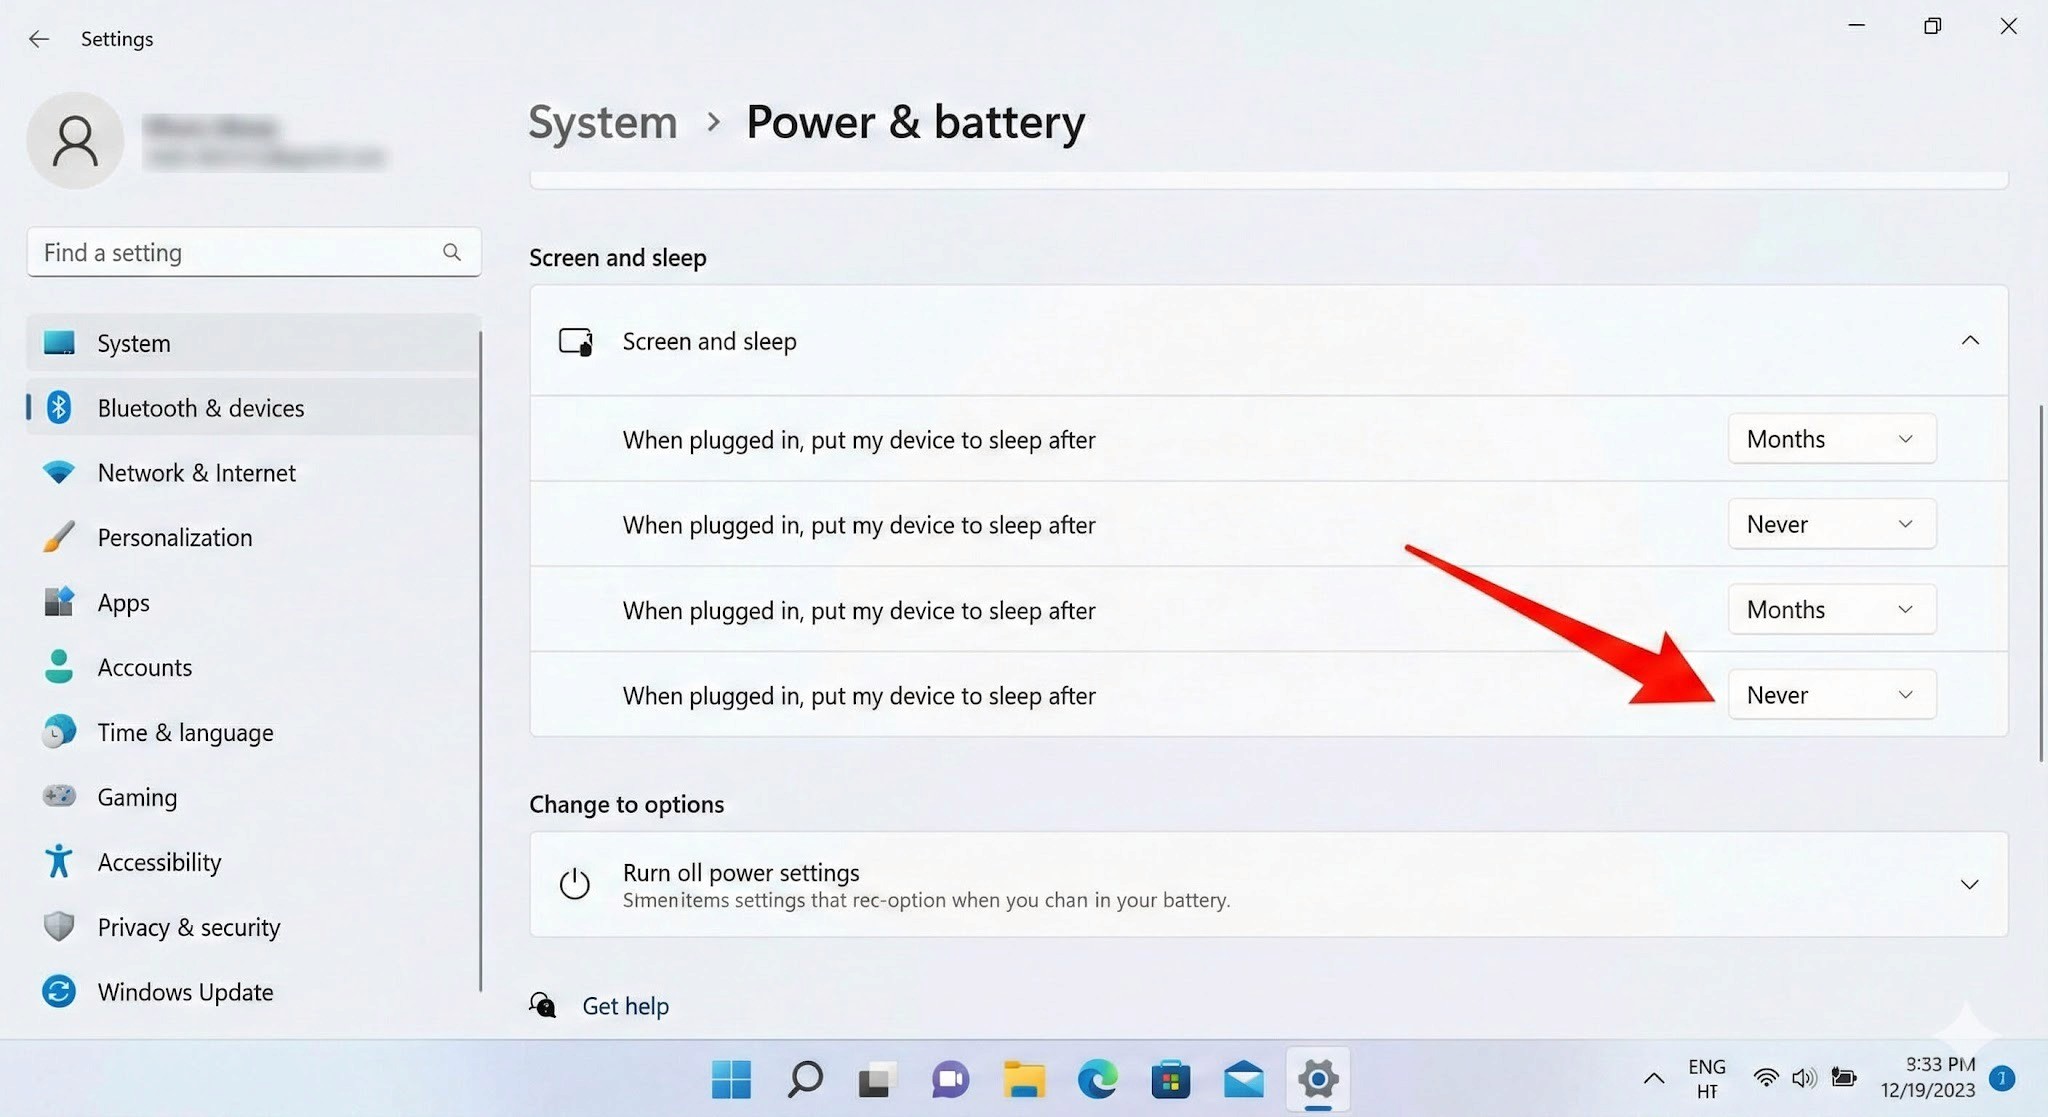
3. Important: Disable Sleep Mode
This is the step most people miss, and it will prevent connections entirely if skipped. A Windows PC in sleep mode cannot be reached remotely.
Go to Settings → System → Power & Battery
Under "Screen and Sleep," set "Put device to sleep after" to Never when plugged in
On the Mac (Client)
Once the Windows side is configured, connecting from your Mac is simple.
Log in to the access site
Open Chrome on your Mac and navigate to the same Chrome Remote Desktop access page. Make sure you're logged into the same Google account you used when setting up the Windows PC.
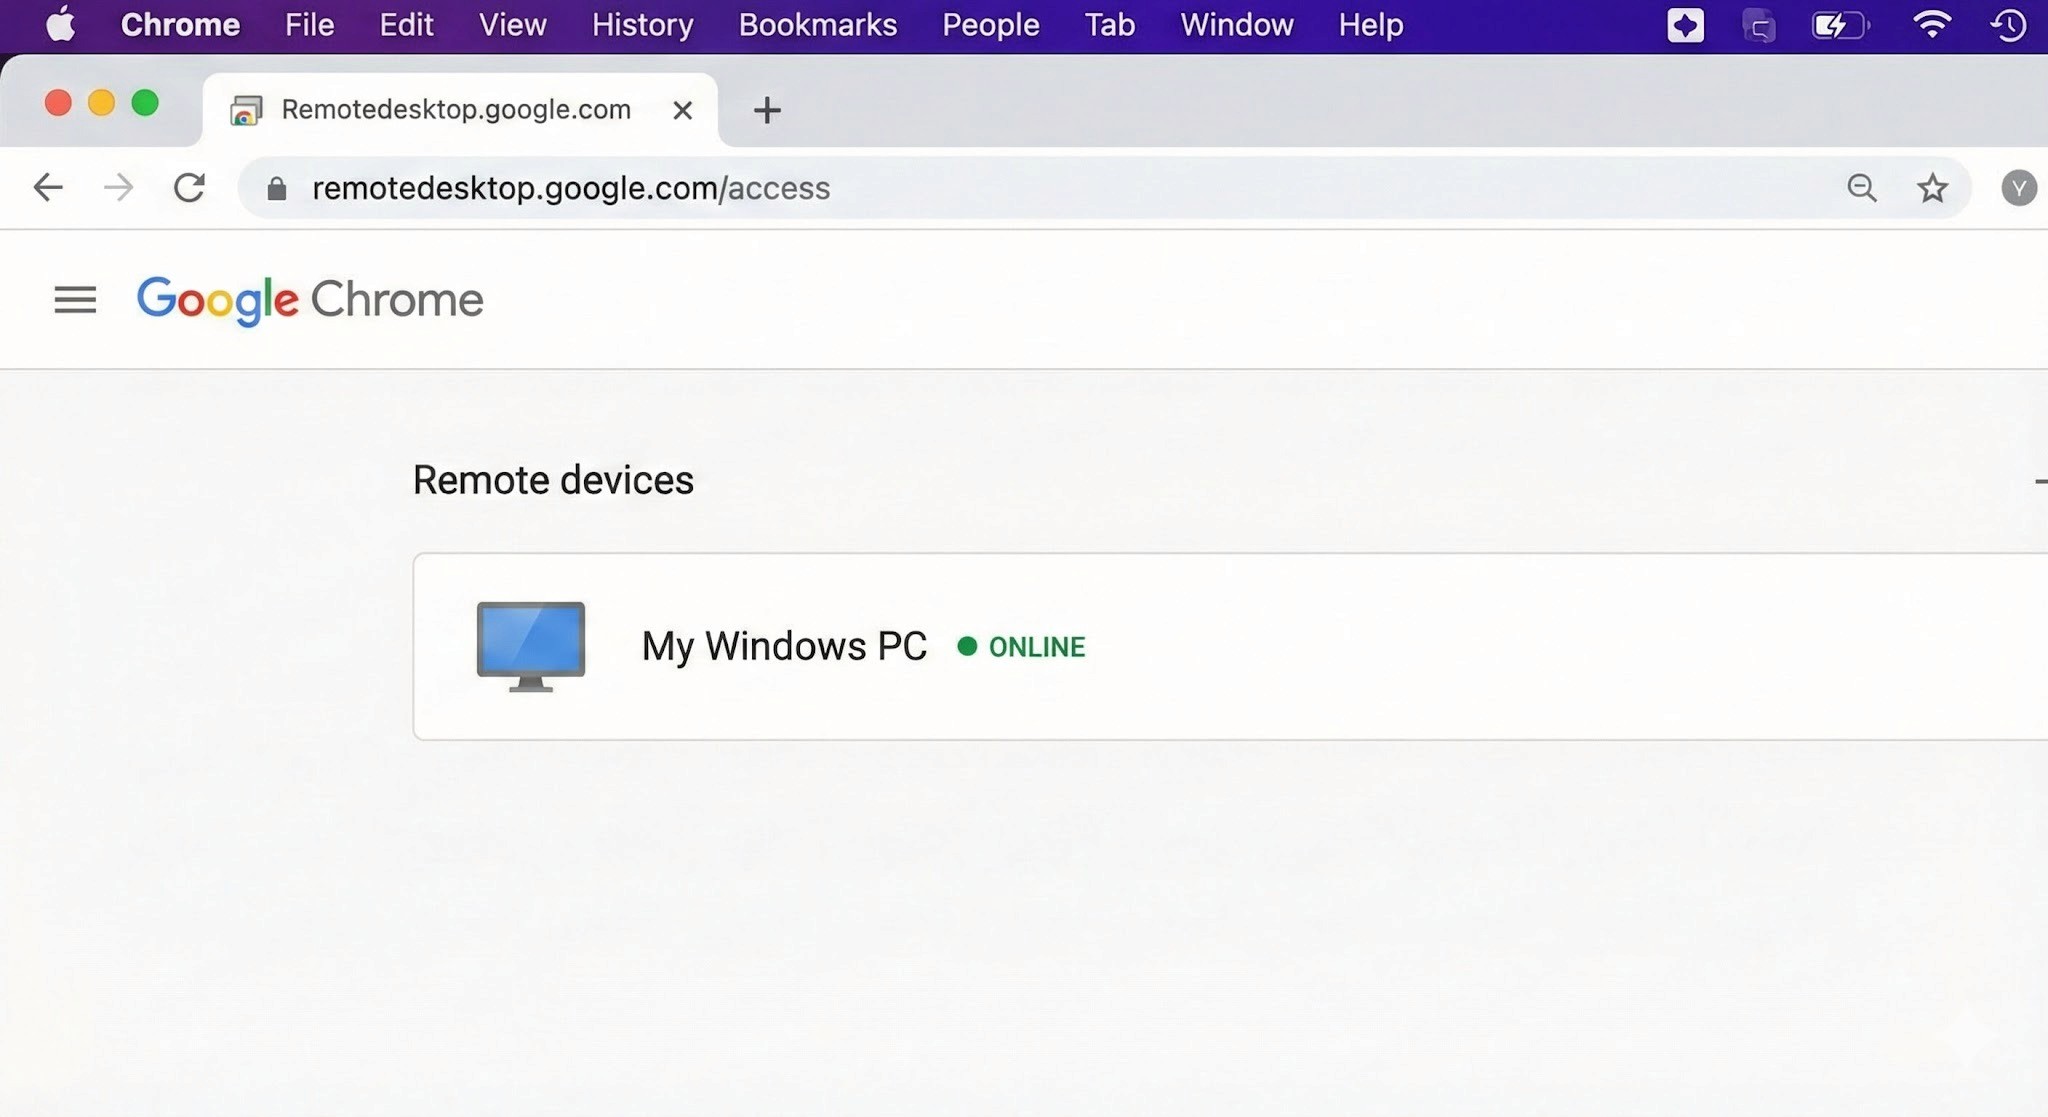
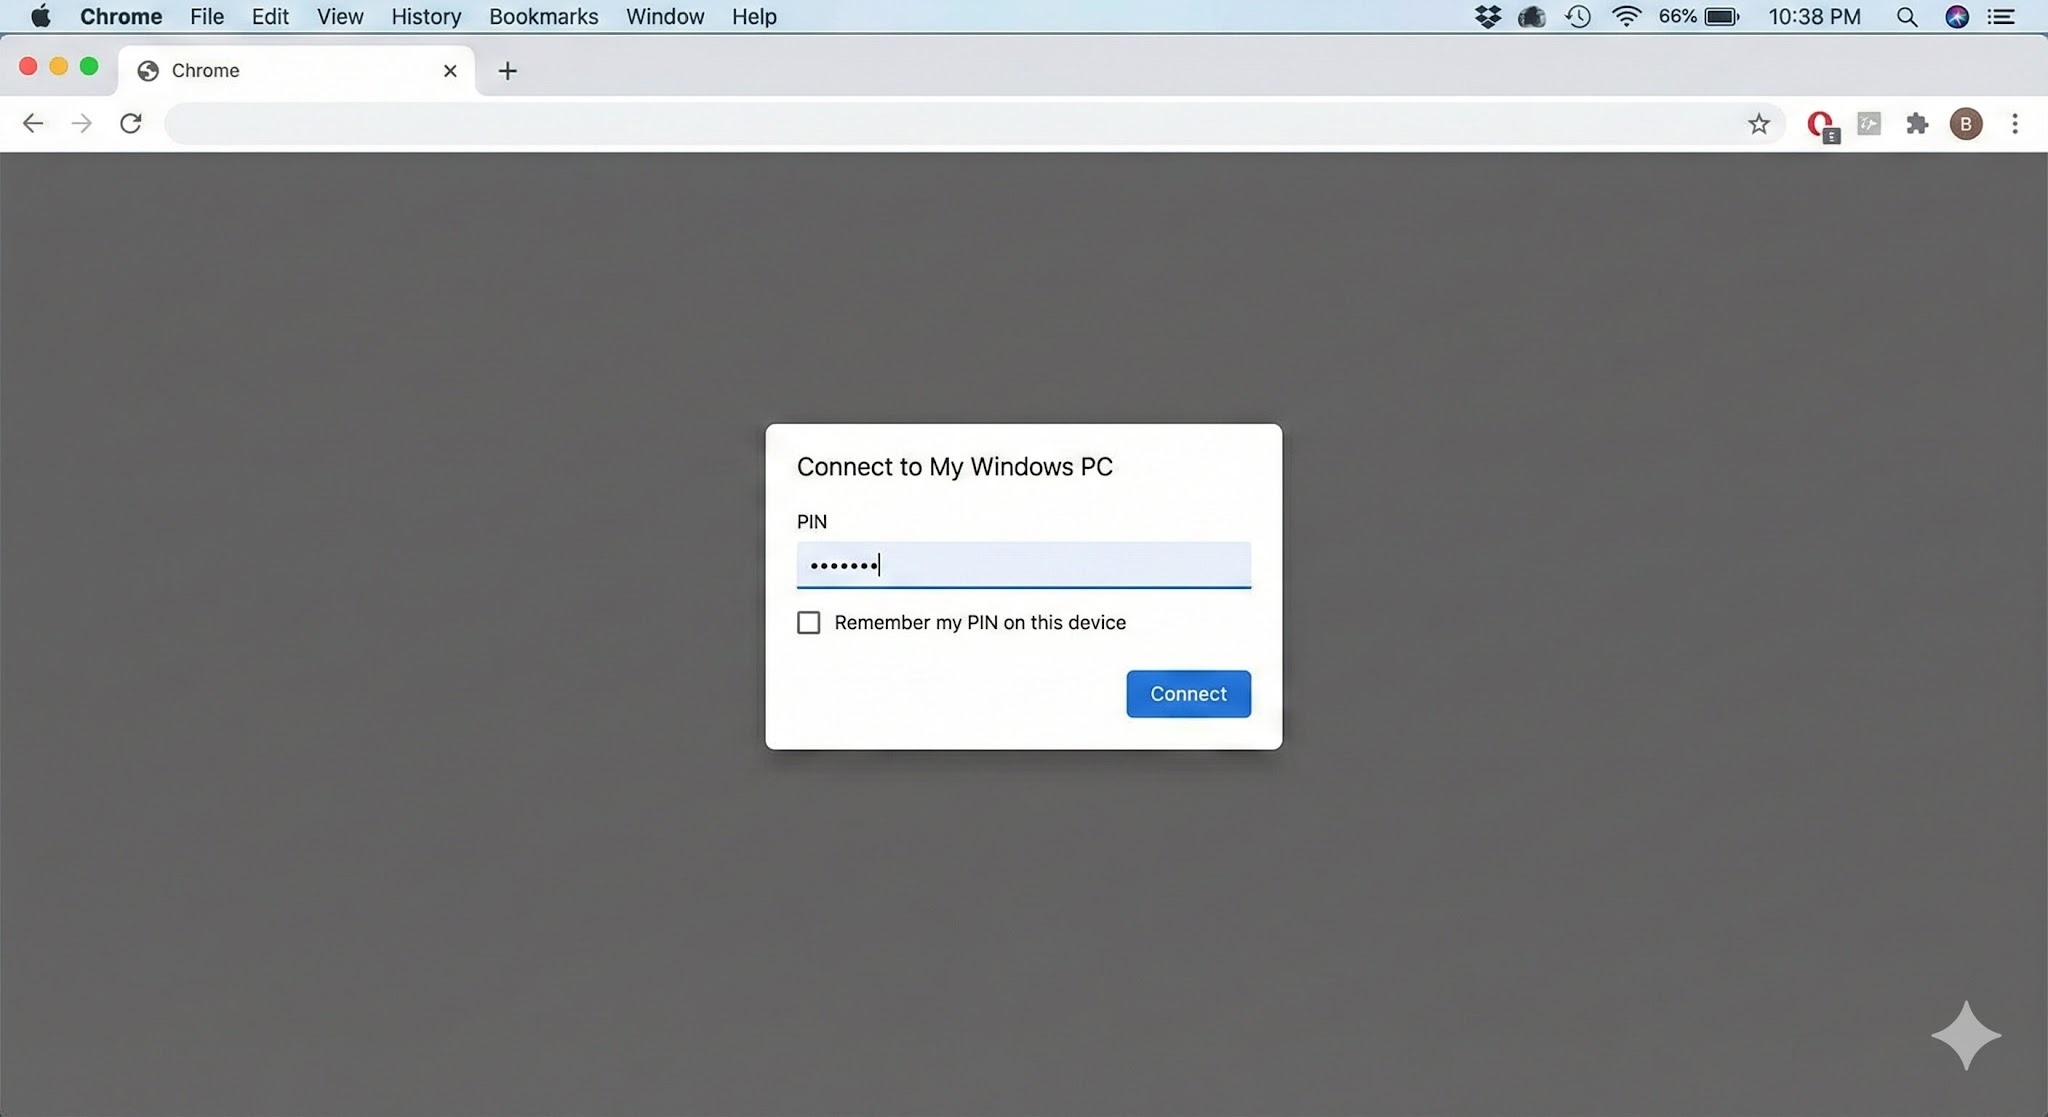
Select your PC and authenticate
Your Windows PC will appear under "Remote devices." Click it and enter your PIN — the Windows desktop will open inside your Chrome browser.
3. Connection complete
You can now control Windows using your Mac's keyboard and mouse.
Tip: For quicker access in the future, use Chrome's "Install as app" option to add Chrome Remote Desktop to your Mac's Dock — saves a few clicks every time.
H2: Cross-Platform Pitfalls: What Mac Users Run Into
Chrome Remote Desktop is easy to set up, but once you're inside a session, the Mac–Windows gap creates friction points that directly affect how much work you can actually get done. These are worth understanding before you depend on CRD for anything important.
H3: Keyboard Mapping Conflicts
The biggest source of frustration for Mac users is the modifier key difference.
Command key vs Control key: On Mac, you copy with
Command + C. On Windows, it'sControl + C.. In a remote session, Mac's Command key is sometimes interpreted as the Windows key rather than Control — meaning the shortcuts your hands have memorised simply don't work as expected.The Command + Q problem: This one catches people regularly. If you're working in a Windows application and instinctively press
Command + Qto close it, you don't close the Windows app — you close Chrome on your Mac, ending the remote session entirely. It happens more than once before you break the habit.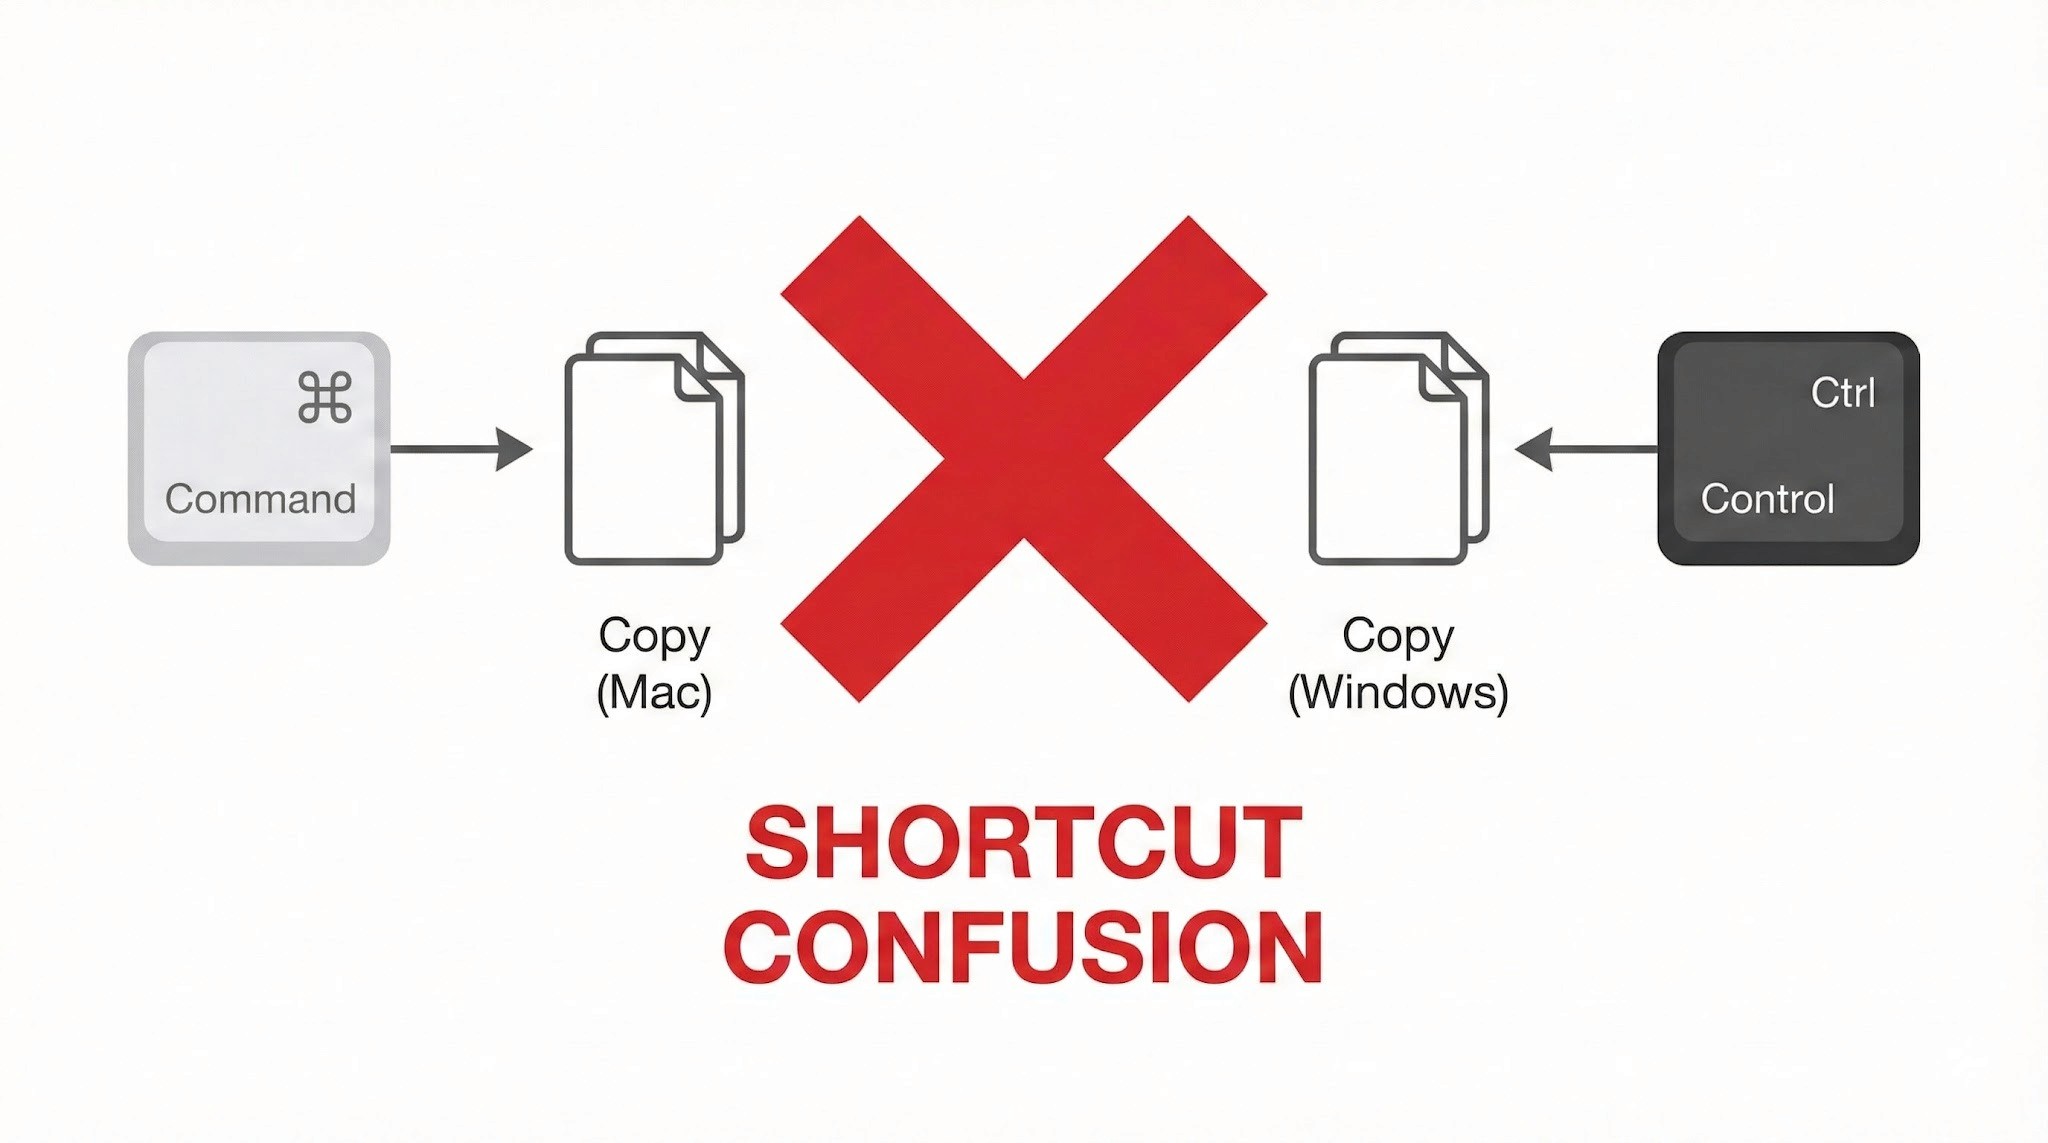
Power Management: No Wake on LAN Support
This is a significant operational limitation, and worth understanding before you depend on CRD for regular remote access.
Wake on LAN (WoL) not supported: Chrome Remote Desktop cannot remotely power on or wake up a PC that is off or sleeping. To maintain reliable remote access, the Windows PC must be left powered on continuously.
Always-on requirement: For people living in Japan, where electricity costs are relatively high and there's a cultural awareness around energy waste (mottainai, もったいない — the Japanese concept of waste-aversion that runs through everyday life), leaving a PC running overnight when it doesn't need to be is a friction point both practically and psychologically.
No more struggling with key input or power management. Stop here and try DeskIn — built for Mac users. [Install DeskIn for free]
Trackpad and Mouse Feel
The smooth, precise feel that makes Mac trackpads enjoyable doesn't carry through to a remote Windows session cleanly.
Lost gestures: Mac-specific gestures — three-finger swipes to switch desktops, pinch-to-zoom — don't transmit to Windows correctly and either do nothing or trigger the wrong action.
Unnatural scrolling: Mac's inertial scrolling feels choppy in the remote environment. Right-click response has a slight lag. These are small things individually, but they add up over a full work session.
Performance and Latency
As a browser-based tool, Chrome Remote Desktop is constrained by what it can push through a browser window.
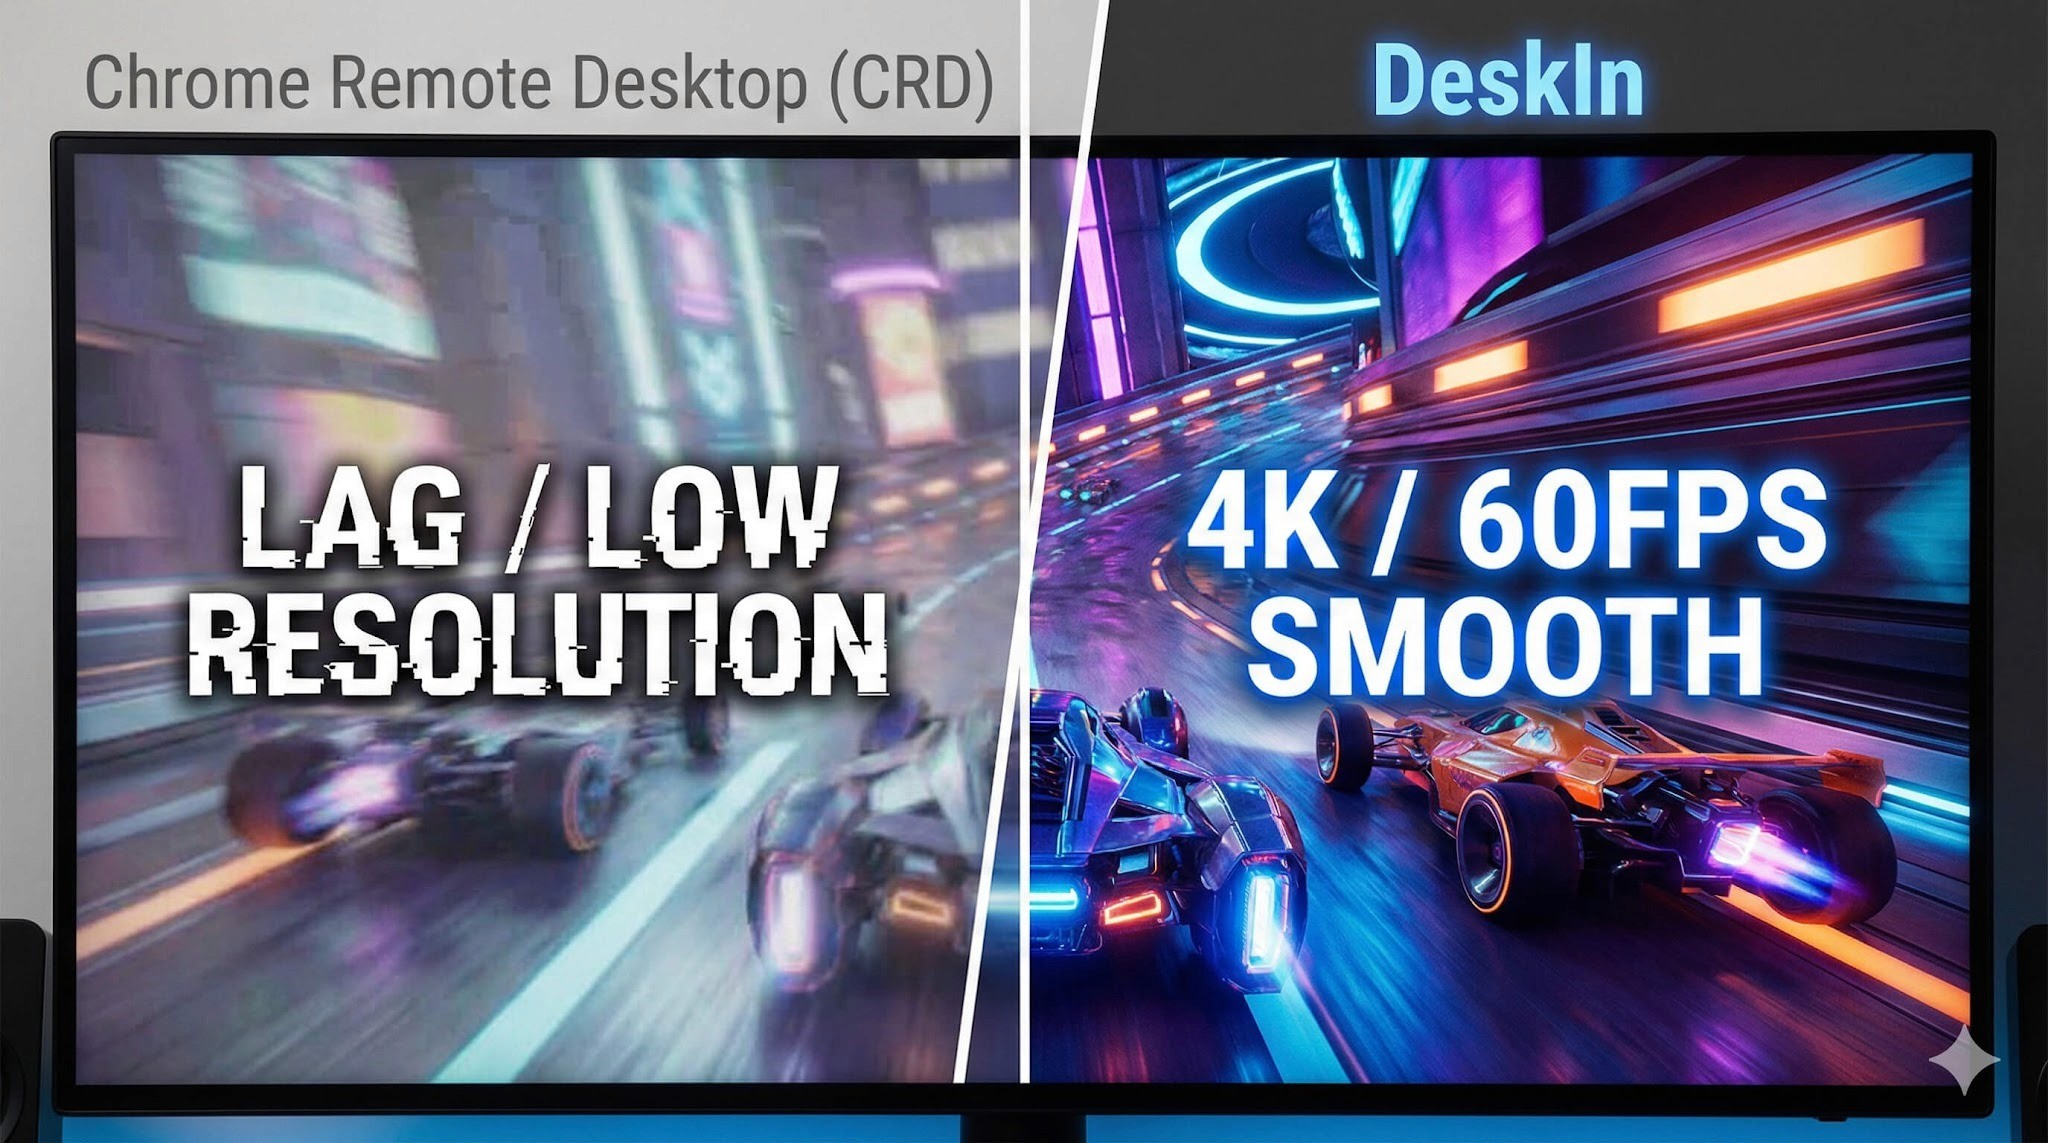
Frame rate cap: Chrome Remote Desktop typically runs at around 30FPS. For standard document editing this is fine, but anything with fast on-screen movement shows obvious lag and ghosting.
Not suited for demanding tasks: Video editing, FPS games, or any application requiring sub-second responsiveness — the latency is too significant to be practical.
Who Should Use Chrome Remote Desktop?
Based on everything above, here's an honest assessment of where CRD works well and where it doesn't. Use this as a checklist before you decide.
✓ Recommended — CRD is a good fit for:
Quick file checks: Accessing a document on your home PC from the office or a café
Occasional admin tasks: Restarting a server, running a quick software update
Light office work: Simple browser-based data entry, sending emails — tasks where speed isn't critical
Zero-cost access: When "free and connected" is the overriding priority over performance
✗ Not recommended — CRD is a poor fit for:
Daily remote work: Working remotely for several hours at a stretch. Keyboard friction and choppy performance become a real source of stress.
Creative work: Video editing, graphic design, CAD. Accurate mouse movement, colour fidelity, and smooth rendering are all compromised.
Latency-sensitive tasks (gaming etc.): Any application where split-second responsiveness matters.
Professionals who need native performance: Not "can I connect" — but "does it feel like my own machine?"
In short: Chrome Remote Desktop is best treated as an emergency backup tool, not a primary workflow. If any of the "not recommended" scenarios describe your situation, a more capable tool is worth exploring.
When You're Ready to Go Further: DeskIn
There's a gap between "it connects" and "it feels like my own machine." If you've spent time with Chrome Remote Desktop and found yourself in that gap — frustrated by keyboard confusion, the always-on power requirement, or choppy performance — DeskIn is the purpose-built solution for exactly those problems.
Smart Key Mapping: Command/Control Auto-Mapping for Mac
One of DeskIn's standout features is its intelligent key mapping that bridges the OS divide automatically.
The Command/Control confusion that CRD leaves unresolved — and the "Command + Q closes Chrome" problem that ends remote sessions unexpectedly — are both solved. Your Mac keyboard layout works as expected in Windows, without workarounds. You can type at full speed without stopping to think about which key does what.
Wake on LAN — Start Your PC Only When You Need It
"I want to connect from outside, but I don't want to leave my PC running all day..." — DeskIn solves this.
With Wake on LAN (WoL) support, you can remotely power on a Windows PC from your Mac — even if it's shut down or sleeping. Start it when you need it, work, then let it sleep again. Less electricity, less wear on hardware, and a smarter way to work.
4K/60FPS Performance: The "Local Machine" Feel
DeskIn streams at 4K resolution and up to 60FPS — far beyond what CRD's browser-based approach can achieve.
Whether you're doing fine-detail design work, editing video, or playing a game, the response feels close to native. The lag that makes CRD frustrating for demanding tasks effectively disappears.
iPad and Mobile: Fully Connected on the Go
DeskIn's performance advantage extends beyond Mac to mobile — connecting from an iPad or smartphone delivers the same quality experience.
Use your iPad as an extended display for Windows, or connect a mouse and keyboard for a complete remote work setup. Gesture support is optimised for touch in a way that CRD's mobile app isn't. If you move between Mac and iPad regularly, DeskIn handles both well.
Performance Comparison: Chrome Remote Desktop vs DeskIn
Feature | Chrome Remote Desktop | DeskIn |
Primary use case | Occasional access / emergency use | Business, creative work, gaming |
Display quality | Up to 30FPS (choppy) | 4K / 60–144FPS (extremely smooth) |
Keyboard mapping | Basic — Command/Ctrl conflicts | Auto-optimised for Mac/Windows (no conflicts) |
Wake on LAN | Not supported — PC must stay on | Supported — start PC remotely |
Input feel | Noticeable lag, gesture loss | Low latency, Mac-native feel |
Cost | Free | Free tier available / Pro version |
Summary
Chrome Remote Desktop earns its place as an entry-level tool. Its ease of use and zero cost make it a great starting point for quick file access, occasional light tasks, and situations where budget is the overriding factor.
But if you're using a remote desktop regularly — for work, creative projects, or gaming — the accumulated frustrations of keyboard conflicts, always-on power requirements, and performance caps start to outweigh the convenience of free.
When that point arrives, DeskIn is the obvious next step: a tool designed from the ground up for people who need remote access to actually feel like working locally. Whether you're at your apartment, in a café in Kichioji, or somewhere further afield — your Windows machine should feel like it's right in front of you.
Experience professional-grade performance now — [Download DeskIn free and try it]

Chrome遠端桌面無法安裝
當您需要遠端連線時,Chrome 遠端桌面是一個常見的選擇。然而,許多用戶在安裝 Chrome 遠端桌面時遇到困難,無法順利使用。本文將説明一些常見的無法安裝的原因,並給出可靠的解決方法。
Chrome 遠端桌面無法安裝的原因及解決方案
1、網絡連接問題:
網絡不穩定或速度過慢,導致下載的安裝包不完整或損壞。
解決辦法:檢查網絡狀況,確保網絡連接穩定且速度足够快。檢查防火牆和路由器設定,確保它們允許Chrome遠程桌面的下載和安裝。
2、系統兼容性問題:
操作系統版本不兼容Chrome遠程桌面的當前版本。系統沒有更新或缺少必要組件,無法支援安裝。
解決辦法:Chrome遠端桌面支援在iOS、macOS、Chrome OS、Android、Windows 、Linux上使用,請確保您的操作系統版本與Chrome遠程桌面的要求相匹配。檢查系統更新並安裝所有必要的組件。
系統要求:
Windows(搭載 Intel 處理器)-Windows 10及以上
Windows(搭載 ARM 處理器)-Windows 11 及以上
macOS-macOS 11 Big Sur 及以上
Linux-Wayland 和 X11 顯示協定,自動適配
Android-Android 8.0 Oreo 及以上
iOS/iPadOS-iOS 15 及以上
其他要求:
瀏覽器:需要最新版 Google Chrome 或 Chromium
網路:需穩定的網路連線以保證良好的遠端控制體驗
3、安全軟體干擾:
電腦上的殺毒軟體、防火牆或其他安全設定將Chrome遠程桌面識別為惡意軟體或未經授權的應用程式。
解決辦法:暫時禁用安全軟體:在安裝過程中,暫時禁用殺毒軟體、防火牆或其他可能干擾的安全設置。安裝完成後,重新啟用這些設置,並確保它們已正確配置以允許Chrome遠程桌面的運行。
4、權限不足:
當前用戶帳戶缺乏安裝新應用程式的權限。系統管理員設定了阻止安裝未經批准的應用程式。
解決辦法:以管理員身份運行安裝程式:右擊安裝程式,選擇“以管理員身份運行”。
如果系統提示輸入管理員密碼或確認,請輸入相應信息。
5、登記表問題:
舊版Chrome或Chrome遠程桌面的登記表殘留項干擾了新版的安裝。
解決辦法:清理登記表:使用regedit工具查找並刪除與Chrome或Chrome遠程桌面相關的舊登記表項(請先備份登記表)。
6、安裝包問題:
下載的安裝包本身存在缺陷或已損壞。
解決辦法:重新下載安裝包:從Chrome官方網站或其他可靠來源重新下載Chrome遠程桌面的安裝包。在下載過程中,確保網絡連接穩定,以避免下載的檔案損壞。
如果您嘗試解決後仍然無法正常使用Chrome遠端桌面,可以考慮一個更穩定的選擇。
DeskIn遠端桌面:更好的遠端連線選擇
DeskIn是一款專爲個人使用者設計的遠端桌面軟體,不僅安裝簡單,還提供了比Chrome遠端桌面更豐富的功能和更流暢的連缐體驗。
DeskIn 的特點:
簡單安裝,兼容性強:DeskIn 支援多種作業系統,包括 Windows、macOS、iOS 和 Android,也支援在web端發起連缐。安裝簡便,無需依賴特定瀏覽器或帳戶。
穩定流暢的操作:DeskIn 提供穩定的連線,沒有連缐時長限制,長時間連缐不斷連;延遲低至40ms,特別適合高效辦公和遠端支援需求。
靈活登入方式:DeskIn 除了可以只用信箱注冊帳號,也支援使用 Google 帳戶、Apple ID一鍵注冊登入,同時提供更多元的登入選擇,適合各種網路環境。
高安全性:DeskIn 使用256位元加密技術,確保資料傳輸安全,也有多種安全設定,如無人值守安全密碼、隱私螢幕、黑白名單等等,防止裝置被惡意連缐。
功能更豐富:DeskIn最高支援4K60FPF/2K144FPS,還支援手動調節,還有螢幕擴充,遠端CDM、投影、語音通話等免費功能,適合更多使用場景。
如何快速開始使用 DeskIn
下載並安裝 DeskIn:
在用於控制與被控制的裝置中分別安裝並開啓DeskIn,注冊一個免費賬戶並登入,如果你是首次在新裝置登入,需要到注冊信箱完成驗證。

2、快速連線:
在主控裝置上輸入被控制的裝置的ID,點擊連缐,使用密碼連缐或免密連缐方式完成連缐。

等待幾秒后,您就可以控制遠端裝置了,遠端裝置就好像在您身邊一樣。
總結
若您遇到 Chrome 遠端桌面無法安裝的問題,DeskIn 是更穩定且功能強大的替代方案。DeskIn 不僅安裝方便,還提供穩定的連線和高安全性,是遠端連線的理想選擇。

無法透過電子郵件傳輸大型檔案?探索三種簡單、安全的方法,輕鬆傳輸大型檔案。
很多人在傳輸檔案時會選擇郵件傳送,但大多數時候僅限於小型檔案傳送,需要傳送大型檔案時,發現郵箱傳送有大小限制,這時應該怎麽辦?以下教你三種方法,讓你輕鬆傳輸大型檔案。
方案一:壓縮檔案後再傳送檔案
電子郵箱通常對上傳的附件大小有限制(如Gmail 僅允許 25MB 或更小的檔案附件,而Outlook是20MB)。我們可以先壓縮大型檔案到合適的大小,然後再將它以附加檔案的形式上傳到郵件,最後發送。
優點:壓縮檔案是最簡單、直接的方法減小檔案尺寸以達到郵件附件大小要求,之後就可以直接透過附件直接傳輸檔案。
局限性:檔案壓縮通常只能將檔案壓縮為原來的一半,所以此方式只適合檔案超出大小限制不多的狀況,並且在發送郵件過程中,壓縮和解壓縮檔案可能會進一步減慢傳送進程,甚至可能導致檔案遺失或損壞,例如經壓縮後的大型影片的畫質會變差。

如Gmail 僅允許 25MB 或更小的檔案附件
方案二:使用雲端硬碟傳輸檔案
除了用郵件傳送外,還有其他傳送大型檔案的方法,例如使用雲端硬碟。先把大型檔案上傳到雲端硬碟(例如Google Drive),通過分享連結的方式傳送給對方。

優點:
這種方式可以比較好地保證檔案品質,而且檔案可以保存在雲端,隨時再做取用
局限性:
Google Drive的免費儲存空間只有15GB,其他的雲端硬碟也有類似的免費儲存空間限制,可能需要額外購買儲存空間。
將檔案上傳到硬碟、在硬碟下載檔案這兩個步驟的要先後進行,上傳和下載速度取決於您的網路狀況,耗時較長。
方案三:使用DeskIn遠端軟體傳送檔案(小編力薦)
目前市面上絕大部分的遠端軟體都支援檔案傳輸,DeskIn在普通的檔案傳輸功能基礎上進行了改進,讓檔案傳輸的使用體驗更好:
1.免費版已經支持不限大小、數量的檔案傳輸;
2.傳輸速度快,最高可達12MB/s;
3.使用 256 位元端對端加密,確保您的文件保持機密並防止未經授權的存取;
4.不需像雲端硬碟那樣上傳、下載檔案,可以從一台設備直接傳送到另一台設備,節省時間;
5.DeskIn支持在不同裝置和作業系統之間進行無縫檔案傳輸,無論您使用的是 Windows PC, Mac 還是行動設備,DeskIn 都可以讓您輕鬆地跨平台傳送檔案。

郵件傳送直接輸入對方的郵箱賬號進行傳輸,差一個字母或數字就會變成另一個郵箱,傳送出去還無法撤回,有一定的安全隱患。使用DeskIn傳送檔案時,輸入設備代碼進行連缐後還有密碼驗證,或是對方電腦手動認證,避免了傳錯對象的情況,安全性大大提高。
使用DeskIn進行檔案傳輸,既不用犧牲畫質,又不用花費更多的時間,還不用擔心跨平台的限制,安全性也更強,可謂是一舉多得。
如何使用DeskIn進行檔案傳輸?
1.在傳輸裝置和接受裝置上分別下载 DeskIn,注冊一個免費賬戶並分別登入,如果你是首次在新裝置登入,需要到注冊信箱完成驗證。

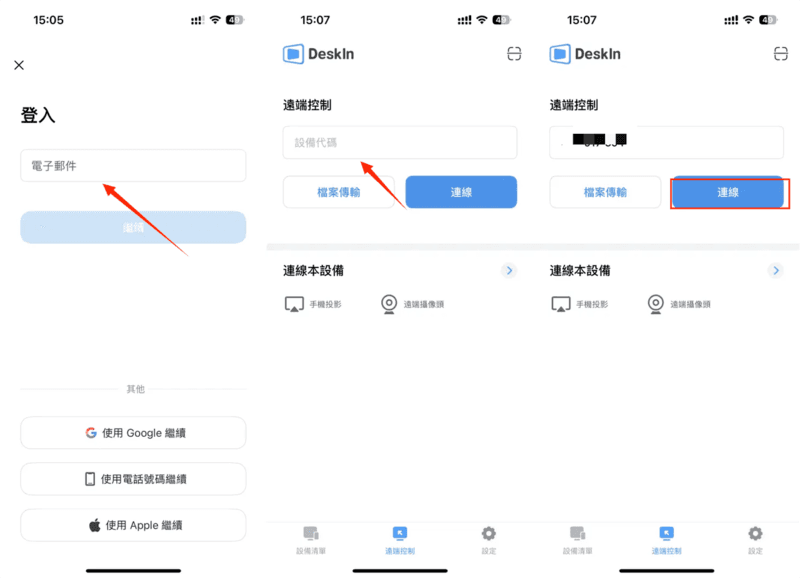
2.登入成功後,輸入接受檔案裝置的設備代碼,選擇檔案傳輸,然後選擇連缐,可以選擇密碼驗證或手動驗證。
3.電腦端有三種方式找到檔案傳輸:
(1)在「遠端控制」>> 輸入遠端控制設備代碼>>選擇「檔案傳輸」>>「連線」。

(2)在「設備列表」找到要傳輸檔案的設備,在右側功能區選擇「檔案傳輸」。

(3)在遠端控制頁面DeskIn圖標的工具欄裡找到「檔案傳輸」。

找到「檔案傳輸」後,點擊進行密碼或免密驗證連線,連線成功後就會出現檔案傳輸頁面。

在檔案傳輸的頁面裡,點選想要發送的檔案,並選好傳輸的目標位置,點擊發送方的「發送」按鍵,即可完成傳輸,你可以點擊發送以傳送,也可以直接拖拽需要傳輸的檔案完成傳送。
4.行動裝置端有三種方式找到「檔案傳輸」:
(1)「遠端控制」>> 輸入遠端控制設備代碼>>選擇「檔案傳輸」。

(2)在「設備清單」找到要傳輸檔案的設備,點擊進入後選擇「檔案傳輸」。

(3)遠端控制連線成功後,「互動」>>「檔案傳輸」。

找到「檔案傳輸」後,點擊進行密碼或免密驗證連線,連線成功後就會出現檔案傳輸頁面。

點擊「傳送檔案」,選擇行動裝置裡的檔案,「更改位置」可以選擇傳輸的目標位置,最後點擊「傳送」。

選擇「下載檔案」可以下載遠端裝置中的檔案,選中要下載的檔案點擊「下載」即可。
結論
本文介紹了傳送大型檔案的3種方法,分析了它們的優點和局限性。其中比較建議你使用第三種方法——使用DeskIn進行檔案傳送。它的免費版已經沒有檔案大小、數量的限制。傳輸速度也很快,傳送的影片畫質也不會打折扣,支持跨平台傳輸,安全性比郵件傳送更高,是傳送大型檔案的理想選擇。

三星平板變身第二螢幕完整攻略!無線設定與高效軟體2大方法一次掌握
你是否厭倦了在無數視窗、檔案與網頁間反覆切換,導致工作效率低下、思緒不斷被打斷?實現「無需切換視窗,資料對照一目了然」的高效多工作業,其實比你想象中更簡單。若不想額外購置硬體,你手上的平板就是最佳解答。大多數平板需要第三方軟件,但三星平板憑藉官方內建的「延伸螢幕」功能,提供比其他安卓平板更流暢無縫的體驗。只需要簡單的幾個步驟,就可以將三星平板當外接螢幕。
本文將一步步引導你,如何將三星平板輕鬆變身為 Windows 電腦的無線外接螢幕,無論是筆電或 PC 皆適用,助你立即擴展工作視野,釋放完整生產力。
尋找免費且快速將三星平板當外接螢幕的方法?、
DeskIn 支援將三星平板設定為電腦的雙螢幕,從而擴展您的工作或娛樂空間,顯著提升多工作業的效率。直接查看方法二獲取更多詳情。
直接下載DeskIn,體驗其流暢的螢幕擴充功能!

方法一:使用三星官方「延伸螢幕」功能無線連接
將三星平板作為電腦的外接顯示器,主要可以透過官方內建的「延伸螢幕」功能來實現。這項功能讓相容的三星平板能透過無線方式,直接變身為 Windows 電腦的第二螢幕。
不僅能夠充分利用閒置的平板裝置,無需額外花費購置專用螢幕,節約成本效益,同時無線連接讓它在會議演示或團隊協作時格外便利。不過,這項方案也有些許限制需要留意,它對設備有特定要求,需要相容的三星平板與較新版本的Windows系統才能使用,且在無線傳輸下可能產生些微延遲,流暢度表現可能不如專業外接顯示器或透過專業軟體的有線連接方案。
三星平板作爲延伸螢幕的要求
裝置要求:三星平板的延伸螢幕功能僅 One UI 3.1 以上版本的 Galaxy Tab S8 和 S7 系列產品支援。另需已安裝了「無線顯示器」功能的 Windows 10 v2004或以上版本電腦使用,如電腦沒有安裝,可以到「設定」→「系統」→「選用功能」→「新增功能」搜索「無線顯示器」點擊安裝。
網路要求:注意兩者需要連接到同一網路
【4 步】設定三星平板作爲 Windows 無線延伸螢幕
步驟一:打開三星平板電腦,從平板電腦螢幕頂部向下拉,開啟「快速設定面板」工具欄。找到「第二螢幕」,點擊進入。
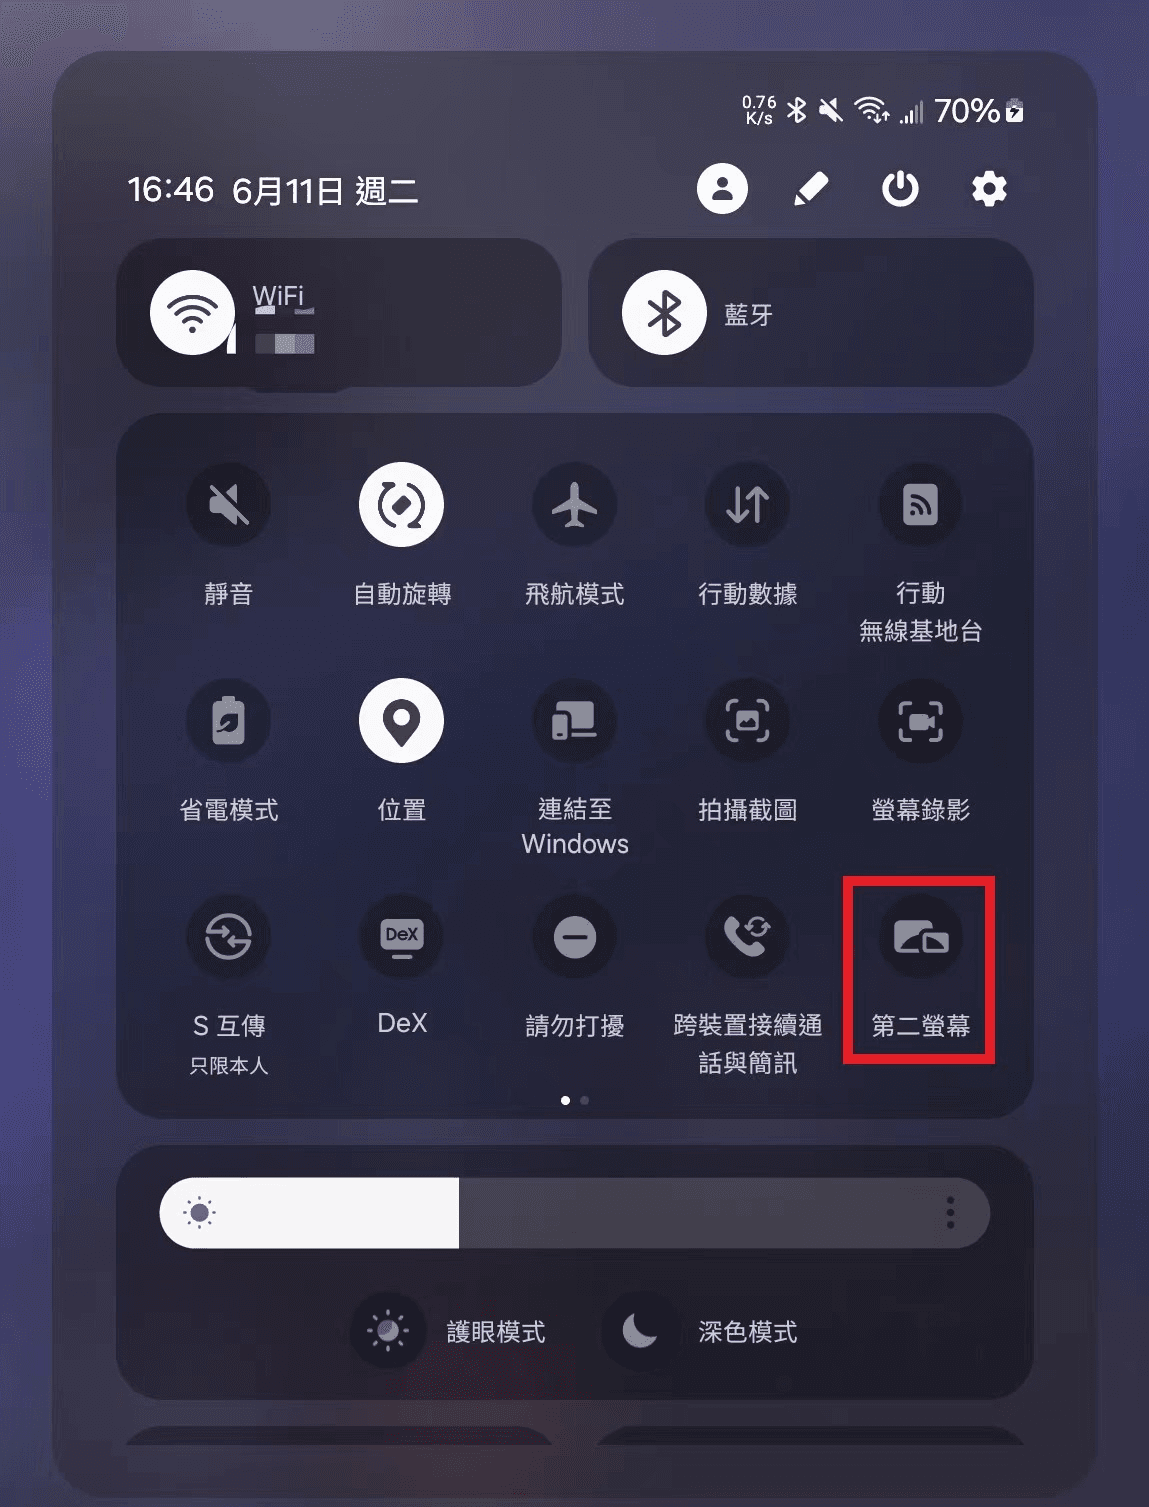
步驟二:保持平板停留在「第二螢幕」畫面中(如下圖)
注:若您的三星平板與 Galaxy Book 登入同一個三星帳號,可直接從步驟三開始透過 Galaxy Book 連線

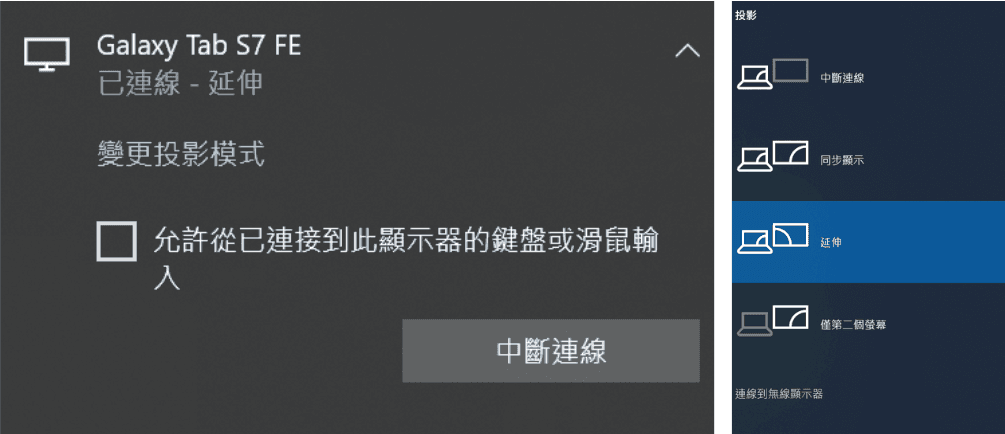
步驟三:在電腦同時按下「Windows鍵+K鍵」,從彈出的裝置清單面板找到您的三星平板並點選,您的電腦就會連接到平板。
步驟四:連接成功后,若您的平板只鏡像電腦的内容,可點擊「變更投影模式」,將投影模式切換至「延伸」即可。當連線成功後,您的平板就會變成電腦的無線第二螢幕,可以開始享受更高效的多工作業囉!
不過,萬一您在無線連線時覺得畫面有些延遲或不夠流暢。別擔心, 您可以直接試試下面更穩定的「方法二:使用專業軟體 DeskIn」,透過Wi-Fi或有線網路都能獲得媲美實體螢幕的流暢體驗!
你可能感興趣:
方法二:更簡單好用的跨系統延伸螢幕工具 DeskIn
上面介紹的方法設定相對比較簡單,但是需要兩者都在同一網路下才可以使用,而且僅適用三星平板和Windows電腦。若您在尋找更全面、更簡單易用的延伸螢幕解決方案,推薦你使用DeskIn遠端桌面。
DeskIn 是一款支援iOS、Android、Windows、Macbook之間跨平台延伸螢幕的效率提升工具,不僅可以免費使用,設定也超級簡單。DeskIn最强大的地方在於,它不僅可以幫你實現平板作爲第二螢幕,還可以讓你不花錢就能用平板遠端存取電腦、掃碼一鍵投影平板畫面到電腦、進行檔案存取甚至在平板上玩電腦PC遊戲,一個軟體滿足你所有場景需求!性價比超高!
DeskIn:更強大靈活,不限裝置型號,低延遲,功能豐富
低延遲高畫質,可手動調整幀率和解析度,最高支援 4K60fps,能讓游標移動、筆刷觸控近乎即時響應,即使進行文字處理或網頁瀏覽也倍感舒適。
全平台支援,無論你手邊的是三星 Galaxy Tab、iPad、Android 其他品牌平板,還是 Windows 筆電或 MacBook,都能直接使用,無需區分系統。
無須同一網路下即可延伸, 傳統延伸螢幕需依賴同一區域網,但 DeskIn 讓你能透過 4G/5G 行動網路或任何可上網的Wi-Fi,隨時隨地將平板變成電腦的延伸螢幕。
更多免費附加功能:除了使用平板變第二螢幕的功能,DeskIn還支援很多實用功能,如遠端操控、鏡像投影、跨裝置檔案傳輸等等,都讓你的雙螢幕工作流程更加完整順暢。
立即下載DeskIn遠端桌面!免費體驗高清順暢的延伸螢幕和遠端操控功能!
【3步】使用 DeskIn 把三星平板作爲 Windows 第二螢幕
步驟一:首先在平板和電腦上分別安裝DeskIn,注冊一個免費賬戶並登入,如果你是首次在新裝置登入,需要到注冊信箱完成驗證,更加安全。
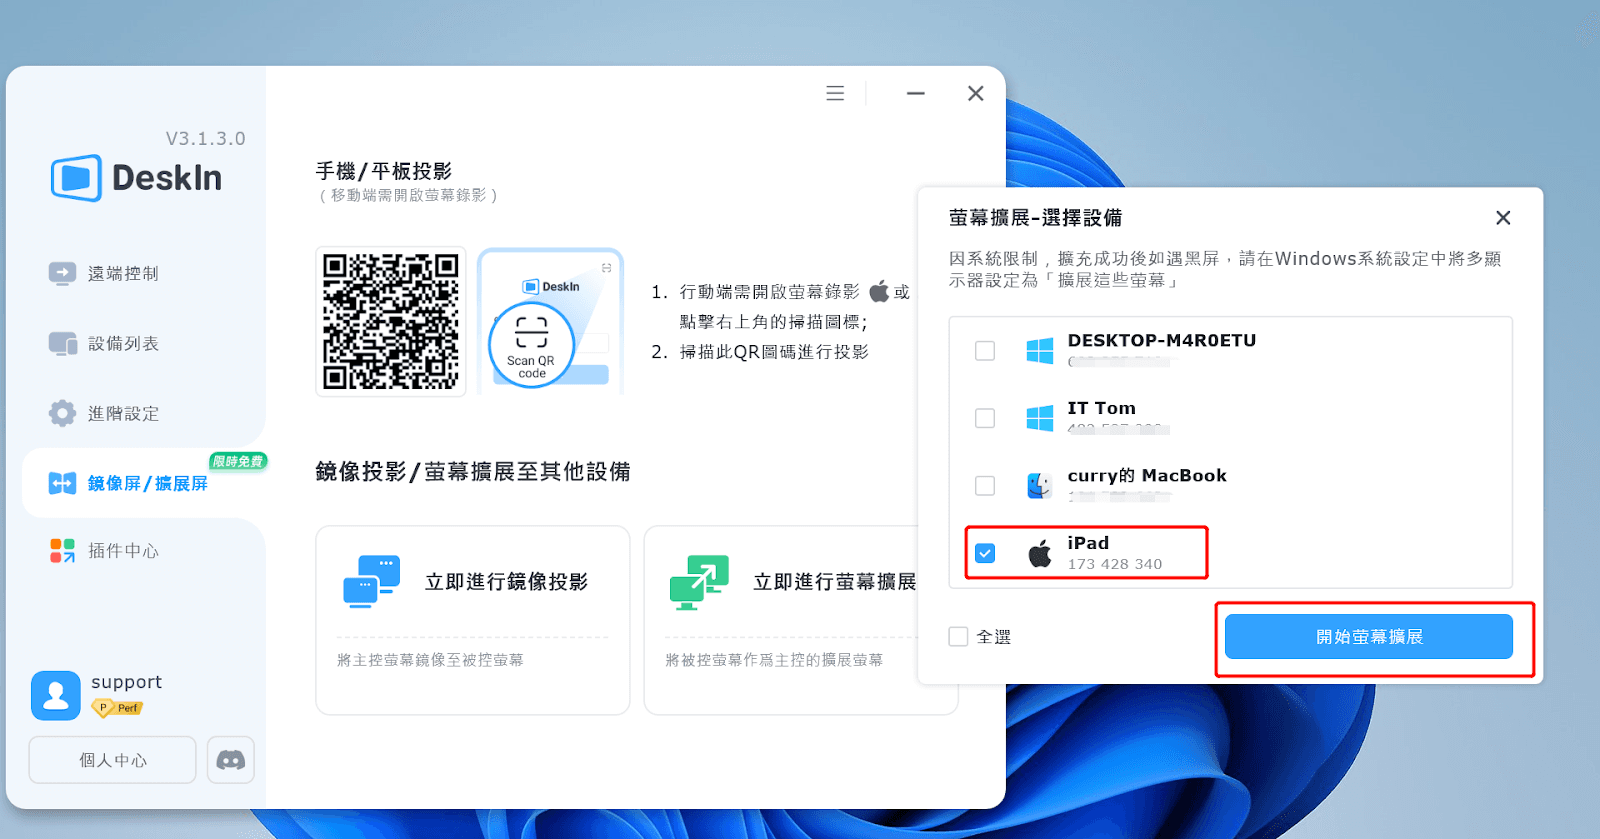
步驟二:在電腦端DeskIn上點擊左邊菜單「鏡像屏/擴展屏」,點選「立即進行螢幕擴展」>> 選擇你想要進行螢幕擴充的裝置比如您的三星平板,并點擊「開始螢幕擴展」,即可成功延伸螢幕,擁有一個完整的雙螢幕工作環境,在兩個螢幕間無縫拖曳視窗,實現高效多工處理。
步驟三(非必須):若進行螢幕擴充後,您發現平板只是鏡像電腦螢幕上的内容,請前往系統顯示器設定,將螢幕選項設定為「延伸這些顯示器」,你還可以根據您的使用習慣,透過拖拽修改1、2兩塊螢幕的左右順序。

更多閲讀
設定三星平板作爲第二螢幕的常見問題
使用三星内建方案無線延伸螢幕時感覺延遲嚴重,畫面卡頓,該如何改善?
首先,請確保電腦與平板連接至同一台 5GHz Wi-Fi 路由器,並避免網路中有其他裝置大量佔用頻寬。其次,關閉電腦與平板上的非必要背景應用程式,以釋放系統資源。
若追求極致流暢體驗,特別是在繪圖或遊戲等場景,建議切換至有線方案。上文提到的 DeskIn 等軟體支援無線連接,提供近乎零延遲的操作反應。
💻立即下載DeskIn遠端桌面!免費體驗高清順暢的延伸螢幕和遠端操控功能!
平板延伸螢幕軟體有哪些推薦?
根據用戶評價,下面為你推薦三款主流的平板延伸螢幕軟體,它們在連接方式和適用場景上各有側重:
DeskIn 支援無線連接,具備跨平台相容性與 4K 高畫質傳輸能力,特別適合需要遠端控制和檔案傳輸的遠距協作場景。
SuperDisplay 提供有線與無線雙模式連接,以其出色的低延遲表現和完整支援 S Pen 壓感功能見長,是繪圖與設計等創意工作的理想選擇。
SpaceDesk 採用無線連接技術,提供免費版本且設定簡單直覺,非常適合預算有限且需要快速設定延伸螢幕的輕度辦公使用者。
結論:我該選擇哪一種方法?
本文介紹了 2 種方法實現三星平板用作Windows的第二螢幕。若你追求設定的便利性,且裝置符合相容條件,那麼優先使用三星官方的「延伸螢幕」功能,會是最無縫、最直接的選擇。
但若你更重視效能與靈活性,例如使用的是舊款平板、需要更低的操作延遲,或是希望解鎖遠端控制等進階功能,那麼投資像 DeskIn 這類專業的跨系統軟體,無疑是效能更強大、應用場景更全面的解決方案。無論你選擇哪一種方法,都能輕鬆釋放平板的潛在價值,告別視窗切換的混亂,大幅提升你的多工作業效率。
立即下載DeskIn遠端桌面!免費體驗高清順暢的延伸螢幕和遠端操控功能!

如何知道有人遠端監控你的手機?7 大徵兆 + 實用解決方案
你是否曾經覺得手機怪怪的?沒有原因的自動重新開機、通話時聽到奇怪雜音、或是手機莫名被鎖,無法解鎖?這些看似平常的小狀況,其實可能是手機被監控的警訊。
根據資安統計,台灣地區每年因手機被駭導致的詐騙損失金額高達數億元,而長輩群體因對 3C 產品不熟悉,更容易成為詐騙集團鎖定的目標。詐騙手法日新月異,只要不小心點開一個看似正常的連結或網頁、下載了可疑軟體,手機就可能被遠端惡意監控,個人資料、銀行帳號、通訊內容全都暴露在風險之中。
這篇文章將帶你深入了解怎麼知道手機被監視的關鍵徵兆,以及發現異樣時該如何檢查並解除監控,同時分享如何使用安全的遠端工具協助長輩進行手機健檢,從根本預防手機被惡意入侵的風險。
手機被監控的 7 大可疑徵兆
懷疑手機被監控卻不確定?以下 7 個異常現象是最常見的電話被監聽徵兆,如果你的 iPhone 或 Android 手機出現多項狀況,就需要提高警覺了。
徵兆一:手機變得異常耗電或發熱
如果你的手機在正常使用下,電池消耗速度突然比平常快很多,或是沒在使用時機身也持續發熱,這很可能是手機被監視的第一個警訊。
監控軟體通常會長時間在後台悄悄運作,持續追蹤你的位置、通話記錄或訊息內容,這些動作都會大量佔用手機效能,導致電池快速消耗並產生熱能。當然,如果是電池健康度下降或正在玩高耗電遊戲,也可能出現類似狀況,但若排除這些因素後仍有異常,就要特別注意了。
徵兆二:手機運作突然變得很慢
你的 iPhone 原本運作流暢,最近卻經常卡頓、開 App 變慢?如果不是因為安裝太多軟體或照片占滿儲存空間,那麼手機突然變慢很可能是因為有監控程式在背景執行,占據了大量內存和處理效能。
這種效能下降通常不會立刻出現,可能要經過幾週才會逐漸察覺,這也是為什麼許多人被監控了還渾然不知。
徵兆三:手機出現自動異常行為
手機自動會動是最明顯的被駭徵兆之一。如果你發現手機會突然自己重新啟動、在有電的情況下無預警關機,或是螢幕在沒有通知時突然亮起,甚至偶爾看到螢幕好像自己在滑動,這都可能代表有人正在遠端操控你的手機。
現代智慧型手機不應該在沒有明確原因的情況下自行重啟或關機,如果經常發生這種狀況,建議立即進行全面檢查。
徵兆四:手機螢幕被鎖,無法自行解鎖
如果你發現手機螢幕突然被鎖定,無法用原本的密碼、指紋或 Face ID 解鎖,這是極高風險的被入侵或被遠端控制警訊。某些惡意監控軟體或駭客程式能夠強制修改鎖屏設定,甚至替換你的系統密碼,讓你完全無法進入手機主畫面。 這種情況往往代表裝置權限已被竊取,駭客可能正試圖鎖定資料或勒索贖金。
徵兆五:收到陌生訊息或好友邀請
如果你在社群媒體上收到陌生人的好友邀請或群組邀請,對方卻知道你的名字、電話或其他個人資訊,這很可能代表手機被遠端監控導致個資外洩。
此外,如果手機收到內容奇怪、充滿符號或亂碼的簡訊,千萬不要點擊裡面的連結,因為這些可能是針對監控軟體發送的控制訊息,或是試圖讓你下載惡意程式的釣魚訊息。

徵兆六:瀏覽器出現莫名的瀏覽記錄
養成定期檢查手機瀏覽記錄的習慣非常重要。如果發現瀏覽器歷史記錄中出現你從未造訪過的網站,或是下載了你沒印象的檔案,這可能表示有人曾經遠端操作你的手機。
同時也要小心莫名訊息中帶有連結的內容,盡量不要點開陌生訊息的連結,因為一旦點開,手機可能會迅速感染病毒程式。
徵兆七:通話過程中聽到奇怪的雜音或回音
現代通訊技術已經相當成熟,通話品質一般都很穩定。如果你在與他人通話時,經常聽到不明來源的雜音、回音、嗶嗶聲或其他人的聲音,即使切換網路或重撥也無法改善,這很可能是手機被監聽的明確徵兆。
傳統的電話竊聽雖然已不常見,但加密不良或間諜軟體仍可能造成通話干擾,尤其在使用 LINE、FaceTime 或其他通訊軟體時更容易出現異常。
如何檢查並解除手機被遠端監控?6 個實用方法幫到你
當你懷疑手機被遠端監視時,可以透過以下 6 個方法進行全面檢查,並採取相應的解除措施。這些方法同時適用於 iPhone 和 Android 手機。
💡溫馨提示:如果你需要協助長輩檢查手機但人不在身邊,可以使用安全的遠端軟體 DeskIn 直接操控他們的手機進行排查,避免電話溝通不清楚的困擾。
方法一:檢查手機是否有隱藏或可疑程式
不管是 Android 還是 iPhone,都提供了隱藏 App 的功能,這也成為監控軟體藏身的最佳位置。以下是檢查隱藏程式的詳細步驟:
iPhone 檢查步驟:
在手機主畫面一直向右滑到最後,進入「App 資料庫」
尋找「隱藏項目」或類似的分類資料夾
透過 Face ID 或密碼驗證後,檢查是否有不認識的 App
同時前往「設定」>「一般」>「iPhone 儲存空間」,查看所有已安裝的應用程式
Android 檢查步驟:
前往手機「設定」
點選「應用程式」或「應用程式管理」
找到「顯示隱藏的應用程式」選項
仔細檢查是否有不明來源的程式
如果發現任何陌生軟體或名稱可疑的 App(例如包含「spy」、「monitor」等字眼),請立即卸載。若發現有無法刪除的軟體,建議尋求專業資安人員協助。
方法二:調整應用程式定位權限,避免行蹤被追蹤
許多監控行為都是透過定位功能來追蹤你的行蹤。幸好 iPhone 和 Android 都提供了精細的定位權限管理,你可以透過以下方式加強防護:
iPhone 定位權限設定:
前往「設定」>「隱私權與安全性」>「定位服務」
逐一檢查每個 App 的定位權限設定
對於高風險程式(如瀏覽器、社交軟體),將「準確位置」選項關閉
在「定位服務」頁面向下滑到底部,點選「系統服務」
選擇「重要位置」,清除歷史定位記錄
這項「模糊定位」功能可以讓 App 只獲取你的大概位置,而非精確座標,有效降低被追蹤的風險。

Android 定位權限設定:
前往「設定」>「應用程式」
選擇「定位服務」或「位置資訊」
關閉「Google 定位精確度」中的「提高定位精準度」選項
逐一檢查各 App 的位置權限,設定為「僅在使用時允許」
方法三:安裝防毒軟體或反追蹤程式
安裝可靠的防毒軟體是預防手機被監視的有效方法,特別是 Android 裝置更需要額外防護。以下是幾款值得信賴的安全軟體:
Surfshark Antivirus:提供即時防護功能,可自動掃描下載內容和 App
Malwarebytes:專門偵測間諜軟體和惡意程式
Norton Mobile Security:整合防毒、防護和裝置追蹤功能
Avast Mobile Security:免費版本已包含基礎掃描功能
重要提醒:下載任何軟體時,務必前往官方 App Store 或 Google Play 商店,不要透過連結、QR Code 或第三方網站安裝程式,以免下載到假冒的惡意軟體。

方法四:定期清理瀏覽記錄與快取資料
定期清除瀏覽記錄不僅能保護隱私,也能移除潛藏的追蹤 Cookie 和惡意腳本。
Android 清理步驟:
打開 Google Chrome 瀏覽器
點選右上角的「⋮」按鈕
前往「設定」>「隱私權和安全性」
選擇「清除瀏覽資料」
勾選要清除的項目(建議全選),設定時間範圍後確認
iPhone 清理步驟:
前往「設定」
向下滑動找到「Safari」
點選「清除瀏覽記錄及網站資料」
確認清除
建議每週至少執行一次清理,養成良好的資安習慣。
方法五:更新 Google 帳號或 Apple ID 密碼
如果你的手機被監控,帳號密碼很可能也已經外洩。由於 Google 帳號和 Apple ID 連結了許多重要服務(包括雲端備份、電子郵件、支付資訊等),立即更改密碼能有效降低風險擴大。
更改 Google 帳號密碼:
開啟 Google 帳戶管理頁面
進入「安全性」選項
選擇「登入 Google」>「密碼」
輸入新密碼後點選「變更密碼」
建議同時啟用「兩步驟驗證」增加安全性
更改 Apple ID 密碼:
前往 iPhone「設定」
點選最上方的帳號名稱
選擇「密碼與安全性」>「更改密碼」
依照螢幕指示完成密碼更新
考慮開啟「雙重認證」功能
密碼設定建議:使用至少 12 位元的強密碼,結合大小寫字母、數字和符號,避免使用生日或常見詞彙。
方法六:重置手機為原廠設定(最後手段)
如果以上方法都無法解除監控,恢復原廠設定是最徹底的解決方式。這個操作會刪除所有資料、應用程式和設定,將手機恢復到出廠狀態。
重要警告:此方法會清除所有內容,使用前務必先備份重要資料!
Android 重置步驟:
前往「設定」>「系統」
選擇「重設」或「重設選項」
點選「清除所有資料(重設為原廠設定)」
確認執行並等待重置完成
iPhone 重置步驟:
前往「設定」>「一般」
選擇「移轉或重置 iPhone」
點選「清除所有內容和設定」
輸入密碼確認後執行
重置完成後,建議先更新到最新系統版本,再逐一安裝需要的 App,並仔細檢查每個程式的權限設定。
爲什麽要定期幫長輩檢查手機是否在被監控?
許多人可能會疑惑:為什麼特別強調要幫長輩檢查手機?以下兩個關鍵原因說明了長輩群體面臨的特殊風險。
原因一:高齡族群已成為詐騙集團的主要目標
根據警政署統計,台灣地區每天因詐騙造成的損失金額動輒數百萬元,其中 60 歲以上長者受騙比例高達 40% 以上。詐騙集團看準長輩手上握有「高額退休金與儲蓄」,透過各種手段接近他們。
除了傳統的電話詐騙,詐騙集團也會透過監控軟體入侵長輩的手機,竊取個人資訊、銀行帳戶、親友聯絡方式等,再根據這些資訊量身打造詐騙話術,成功率大幅提升。
原因二:長輩對數位科技不熟悉,防範意識較低
大部分長輩對智慧型手機和網路安全的認知有限,在使用 iPhone 或 Android 手機時,常會出現以下高風險行為:
隨意點擊陌生訊息中的連結
誤入詐騙群組或參加釣魚活動
下載來路不明的 App
將所有 App 權限都設為「允許」
使用過於簡單的密碼或與他人共用密碼
即使長輩感覺手機怪怪的,往往也不知道該如何檢查或處理,有些甚至堅信「我不會被騙」而不願承認問題。這時候就需要身邊的年輕人多關心,定期協助檢查手機安全狀態,及早發現並排除風險。
使用 DeskIn 遠端軟體,安全協助長輩排查手機監控問題
如果你經常不在長輩身邊,用電話口頭指導他們檢查手機往往事倍功半,長輩聽不懂專業術語,你也看不到實際操作畫面,溝通起來非常費力。
這時候,一款安全、易用的遠端控制軟體就能完美解決這個問題。DeskIn 是專為跨裝置遠端控制設計的軟體,可以讓你在長輩同意後,直接透過自己的手機或電腦操作長輩的裝置,幫他們進行手機健檢、排查可疑程式、調整安全設定等操作。此外,你也可以將 DeskIn 作為家長監控軟體來使用,接遠端幫孩子清除不良訊息,查看手機使用時間,進行軟體管控,保障一家老小的「電子衝浪」安全。
DeskIn 的核心安全防護機制:
銀行級 256 位元加密:所有遠端連線都經過軍規級加密保護
新裝置登入需信箱驗證:確保帳號不會被盜用
連線雙重驗證:每次遠端連線都需要臨時密碼、安全密碼或被控端手動確認
同帳號限制:只有登入同一個帳號的裝置才能進行遠端控制
自動隱私保護:輸入密碼或支付時螢幕會自動變黑,防止資料外洩
隱私螢幕模式:遠端操作時可開啟隱私螢幕,避免被旁人偷看
黑白名單機制:可設定允許或禁止的裝置,防止陌生連線
除了安全防護,DeskIn 還提供內建語音通話和螢幕標注功能,讓你在遠端操作時可以同步跟長輩講解,幫助他們理解操作步驟,真正做到「教會他們」而不只是「幫他們做」。
💻 立即下載 DeskIn 免費試用,為家中長輩建立一道安全防線!


如何使用 DeskIn 檢查長輩手機是否被監控?
以下是完整的操作步驟,整個過程只需 5 分鐘:
第一步:雙方裝置都安裝 DeskIn
在你和長輩的手機上都下載並安裝 DeskIn App,然後註冊一個免費帳戶並登入。iOS 用戶前往 App Store,Android 用戶前往 Google Play 商店搜尋「DeskIn」即可找到。
第二步:長輩端開啟遠端控制權限
請長輩在 DeskIn 中開啟「允許遠端控制本設備」選項,並選擇遠端控制的驗證方式(可設定連線密碼或手動確認)。這個步驟確保遠端控制必須經過長輩同意,不會被惡意使用。
第三步:從你的裝置發起連線
在你的裝置列表中找到長輩的手機,輸入連線密碼或請長輩手動通過驗證,即可開始遠端操作。你會看到長輩手機的即時畫面,所有操作都如同直接使用他們的手機一樣流暢。
第四步:邊操作邊講解
在檢查手機的過程中,你可以開啟語音通話功能與長輩對話,或使用標注工具在螢幕上圈選重點,讓長輩清楚了解你在做什麼、為什麼這樣做。這種互動式的教學方式,能大幅提升長輩的資安意識。

日常安全使用遠端軟體的 5 個建議
部分使用者可能擔心:使用遠端軟體本身會不會也有安全風險?確實,如果選用不安全的遠端工具或使用方式不當,可能反而帶來隱患。以下是安全使用遠端軟體的5個重要原則:
選擇高安全等級的遠端軟體:務必選用像 DeskIn 這類採用端對端加密、具備多重驗證機制的正規軟體,避免使用來路不明的程式
避免使用公共 Wi-Fi 進行遠端連線:公共網路容易被中間人攻擊,建議使用自家網路或手機行動數據進行遠端操作
只從官方管道下載軟體:前往官網或官方應用商店下載,切勿透過不明連結、第三方網站或 QR Code 安裝
絕對不要相信陌生人要求你下載遠端程式:這是詐騙集團常用的手法!無論對方自稱是銀行客服、警察、檢察官或任何單位,都不應該要求你安裝遠端軟體,這類要求 100% 是詐騙
定期更新密碼並妥善保管:每 1-3 個月更換一次連線密碼和帳號密碼,不要與他人共用帳號,也不要在陌生裝置上登入
善用軟體內建的安全設定:DeskIn 提供豐富的安全選項,例如黑白名單、強制手動驗證、隱私螢幕等,建議依照需求開啟相應功能
只要遵循這些原則,遠端軟體就能成為你守護家人資安的有力工具,而不是潛在風險。
關於手機被監控或監聽的常見問題
Q1:如何確認自己的 iPhone 是否被監控?
觀察手機是否出現異常耗電、發熱、變慢、自動重啟等現象,並檢查是否有不明 App、陌生瀏覽記錄或通話雜音。建議按照本文提供的 6 個方法進行全面檢查,包括查看隱藏程式、檢視定位權限、安裝防毒軟體等。如果發現多項異常徵兆,很可能已被監控。
Q2:電話被監聽會有什麼徵兆?
最明顯的徵兆是通話過程中聽到不明雜音、回音、嗶嗶聲或其他人的聲音,即使切換網路也無法改善。此外,通話後手機持續發熱、電池快速消耗,或是收到奇怪的簡訊,都可能是電話被監聽的警訊。
Q3:手機被監控後資料會外洩嗎?
是的,監控軟體可以竊取手機內的所有資料,包括通話記錄、簡訊內容、社交軟體對話、照片影片、定位資訊、銀行帳號密碼等。這些資料一旦落入詐騙集團手中,可能被用於量身打造詐騙話術,或直接盜用帳戶進行非法交易,風險極高。
Q4:使用 DeskIn 遠端軟體會不會也有被監控的風險?
DeskIn 採用銀行級 256 位元端對端加密,並具備多重驗證機制、同帳號限制、隱私保護等安全功能,是目前市面上安全等級最高的遠端軟體之一。所有連線都需要使用者主動授權,且可隨時中斷,不會有被惡意監控的風險。只要從官方管道下載並遵循安全使用原則,就能放心使用。
Q5:如果不確定手機是否被監控,該怎麼辦?
建議先執行本文提供的基礎檢查方法,包括查看隱藏程式、檢查行動數據用量、清理瀏覽記錄、更改帳號密碼等。如果仍不放心,可以安裝防毒軟體進行全面掃描,或是使用 DeskIn 請信任的家人朋友協助遠端檢查。最極端的方式是備份重要資料後恢復原廠設定,這能徹底清除所有可能的監控程式。
結論
手機被監控不只是隱私問題,更可能導致財產損失甚至人身安全威脅。了解如何知道手機被監控 iPhone 的徵兆,並掌握正確的檢查與解除方法,是現代人必備的資安知識。本文介紹了 7 大可疑徵兆、6 個實用檢查方法,以及如何使用 DeskIn 安全地協助長輩進行手機健檢。無論是為了保護自己還是家人,定期排查手機安全狀態都是不可或缺的防護措施。
記住預防永遠勝於治療。養成良好的手機使用習慣、提高資安意識、選用安全的工具,才能在這個數位時代有效守護個人隱私與財產安全。如果你需要一款安全、易用的遠端軟體來協助長輩處理手機問題,DeskIn 的全方位安全防護機制與直覺操作介面,絕對是你的最佳選擇!

iPhone/Android 老人模式設定教學,讓長輩輕鬆上手智慧手機
長輩拿著新手機卻不知道怎麼用,字太小看不清楚,按鈕太小常按錯,或是擔心誤觸到不該碰的設定?根據統計,台灣 65 歲以上長者使用智慧型手機的比例已超過 70%,但因操作不熟悉而產生的困擾也隨之增加。其實,無論是 iPhone 或 Android 手機,都內建了適合長輩使用的「老人模式」或「長輩模式」,能讓手機介面變得更直覺、字體圖標更大,操作起來也更簡單。
本文將完整介紹 iPhone 自訂輔助取用功能與 Android 簡易模式的設定方法,還會教你「防誤觸模式」、「一鍵撥號」、「SOS 緊急聯絡人」等實用功能。如果你不在長輩身邊,想要遠端協助完成設定,可以使用 DeskIn 遠端桌面直接操作長輩的手機,透過語音通話和白板標註即時指導,省時又方便。現在就一起來看看詳細的設定步驟吧!
iPhone「老人模式」完整設定教學
蘋果在 iOS 17 推出了全新的「自訂輔助取用」功能,這就是俗稱的 iPhone 老人模式。這項功能能將手機介面極度簡化,讓圖示變大、字體變清晰,非常適合視力退化或不常使用複雜功能的長輩。以下將帶你一步步完成設定。
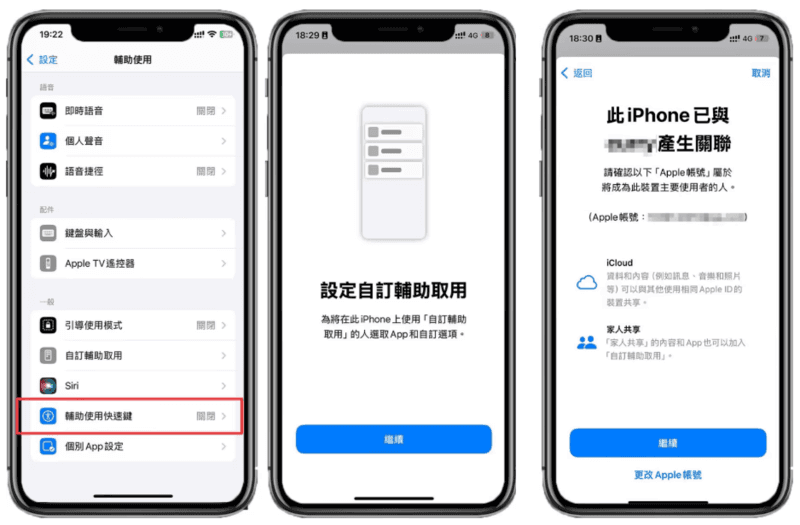
第一步:進入「輔助取用」設定頁面
首先,請確認你的 iPhone 系統版本為 iOS 17 或更新版本。前往手機「設定」>>「輔助使用」>>找到「自訂輔助取用」並進入,點選「設定自訂輔助取用」開始進行設定流程。
第二步:關聯 Apple 帳號確保資料安全
系統會要求你將裝置與目前登入的 Apple ID 帳號進行關聯。這個步驟是為了確保日後若忘記密碼,還能透過 Apple ID 來重置,請確認帳號正確後點擊「繼續」。
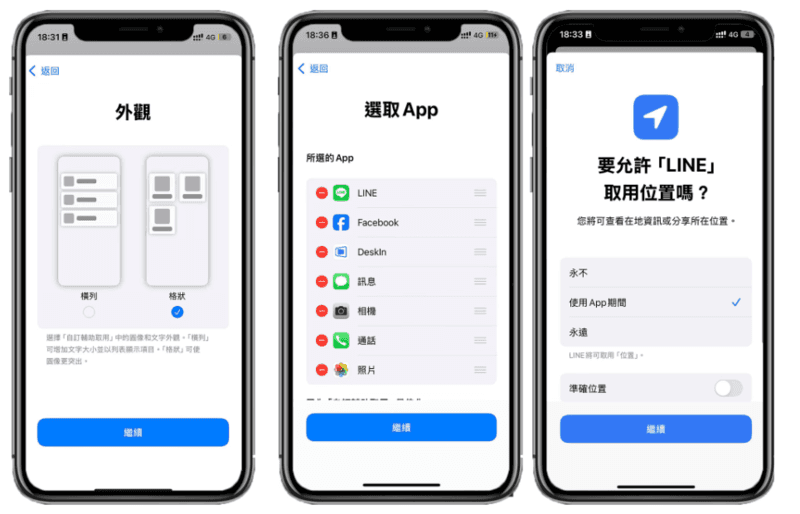
第三步:選擇適合長輩的外觀顯示方式
蘋果提供了兩種主畫面布局讓你選擇:
「橫列」模式: 以列表形式展示應用程式,文字部分更大更清楚,適合喜歡簡潔介面的長輩
「格狀」模式: 類似傳統的 App 圖示排列,icon 會更加突出,適合習慣傳統手機介面的使用者
建議根據長輩的使用習慣和視力狀況來選擇。一般來說,「橫列」模式因為文字較大,對視力不佳的長輩更友善。
第四步:精選長輩常用的應用程式
在這個步驟中,你可以選擇長輩平常會用到的 App。建議選擇電話、訊息、相機、照片、LINE 等基本功能即可。需要特別注意的是,沒有被選擇的應用程式在「老人模式」下將完全無法使用,所以請仔細評估長輩的實際需求再進行選擇。
第五步:設定退出密碼與閱讀重要提示
選好應用程式後,系統會顯示「老人模式」的功能限制說明:
緊急服務:只能透過按三下側邊按鈕啟動緊急電話,無法使用衛星 SOS 服務
系統通知:不會顯示數字提醒,只會在 App 右上角出現通知標記
軟體更新:無法在此模式下更新 iOS 系統
隱私權顯示:狀態列會隱藏部分隱私圖示(如 GPS 定位)
請務必詳細閱讀這些限制,確保不會影響長輩的使用需求。接著按照系統提示設定「自訂輔助取用」密碼(四位數字)以及「復原 Apple ID」,這組密碼是用來開啟和結束「老人模式」的重要憑證。
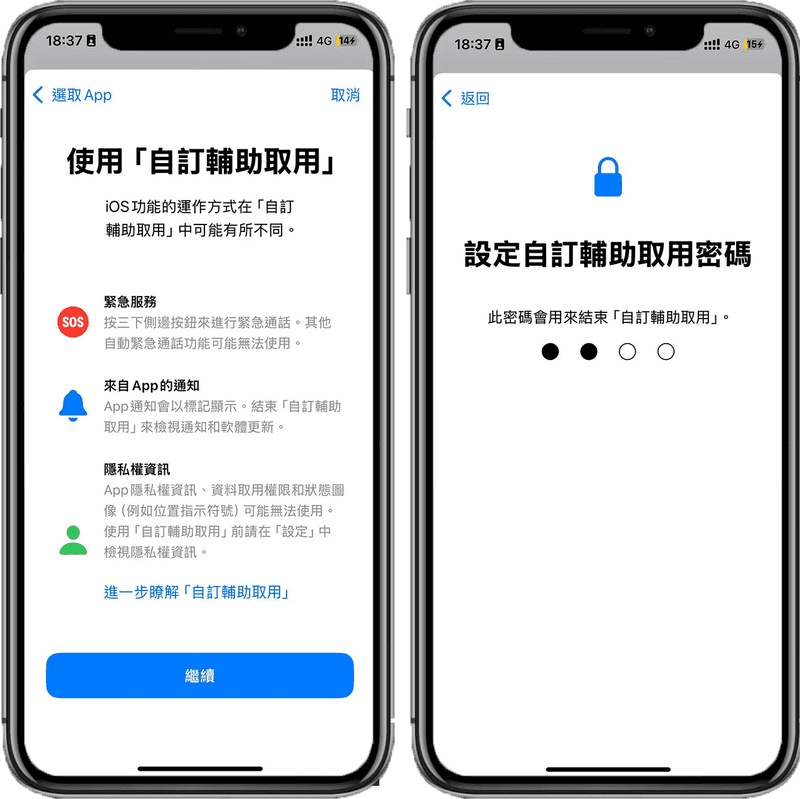
設定完成後,只要按三下 iPhone 側邊按鈕,輸入密碼就能啟動或關閉長輩模式。若要永久關閉,同樣按三下側邊按鈕,輸入「自訂輔助取用」密碼即可退出。
二、簡化版「老人模式」:調整 iPhone 圖標和字體大小
如果你覺得完整的 iPhone 老人模式限制太多,長輩只是需要更大的字體和圖標,那麼以下這些簡易設定可能更適合。這些方法不會大幅改變手機的使用方式,只是讓視覺呈現更友善,同時保留所有功能。
1. 調整桌面圖標大小
如果長輩覺得 iPhone 主畫面的 App 圖示太小不好點選,可以透過以下方式放大:
長按主螢幕進入編輯模式 >> 點擊左上角「編輯」>>「自訂」>> 選擇下方的「大」選項
這個方法會讓所有圖標變大,但不會顯示應用程式名稱。建議搭配下方的字體放大功能一起使用,達到最佳效果。
2. 放大系統字體
前往手機「設定」>>「輔助使用」>>「顯示與文字大小」>>「放大文字」。在這裡你可以自由調整字體大小,滑桿向右拖曳字體就會變大。同時建議開啟「粗體文字」選項,讓文字更清晰醒目,特別適合老花眼的長輩使用。
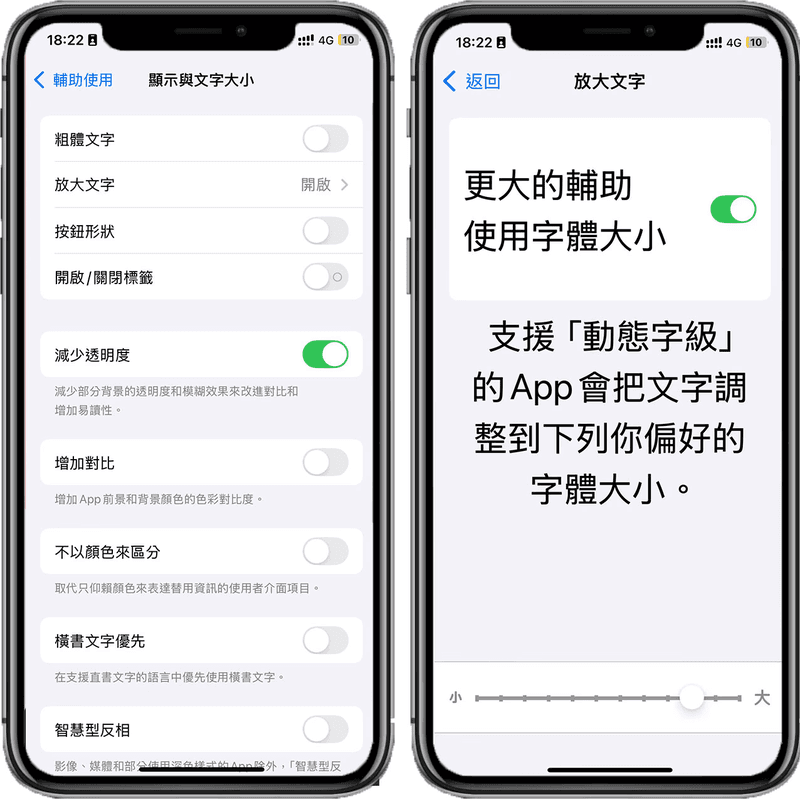
如果這些設定對長輩來說還是有點複雜,不妨使用 DeskIn 遠端桌面直接存取長輩的 iPhone 畫面,透過語音通話和白板標註功能即時指導,或直接幫長輩完成所有設定,省去來回溝通的麻煩!
三、Android「長輩模式」設定教學
Android 手機品牌眾多,但大多數都有內建「簡易模式」或類似的老人模式功能。這些模式能讓手機介面變得更簡潔、圖標更大、操作更直覺。以下以市佔率最高的三星手機為例進行說明,其他品牌如 OPPO、Vivo、小米等設定方式也大同小異。
三星「簡易模式」啟用方法
三星的簡易模式介面非常友善,主畫面會顯示常用聯絡人的快速撥號按鈕,應用程式圖示也會放大,整體畫面更加簡潔清爽。設定步驟如下:
前往手機「設定」>>「顯示螢幕」>>「簡易模式」>>「開啟」
若內建的簡易模式仍無法滿足需求,也可以到 Google Play 商店下載第三方的極簡桌面應用程式,例如「BIG Launcher」、「Simple Launcher」等,提供更客製化的長輩模式介面。
四、Android 手機其他實用的長輩友善設定
除了基本的簡易模式,Android 手機還有許多貼心功能,能讓長輩使用起來更安全、更方便。以下整理了幾個最實用的設定,建議一併完成。
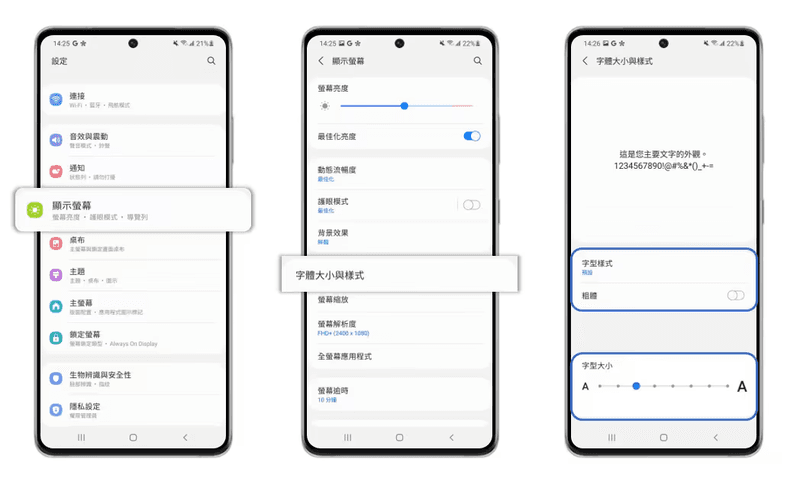
1. 調整字體大小
前往手機「設定」>>「顯示螢幕」>>「字體大小與樣式」>>依照長輩需求調整字號大小。也可以同時開啟「粗體文字」讓文字更加清晰醒目,減輕眼睛負擔。
2. 開啟「防誤觸防護」
長輩常會把手機放在口袋或包包裡,不小心誤觸螢幕導致撥號或傳送訊息。啟用防誤觸功能後,手機會自動偵測是否在口袋中,避免意外操作。
前往手機「設定」>>「顯示螢幕」>>「開啟誤觸防護」
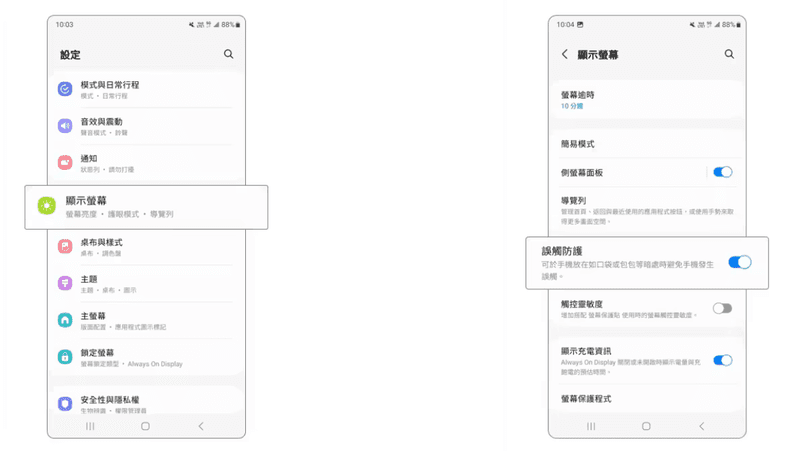
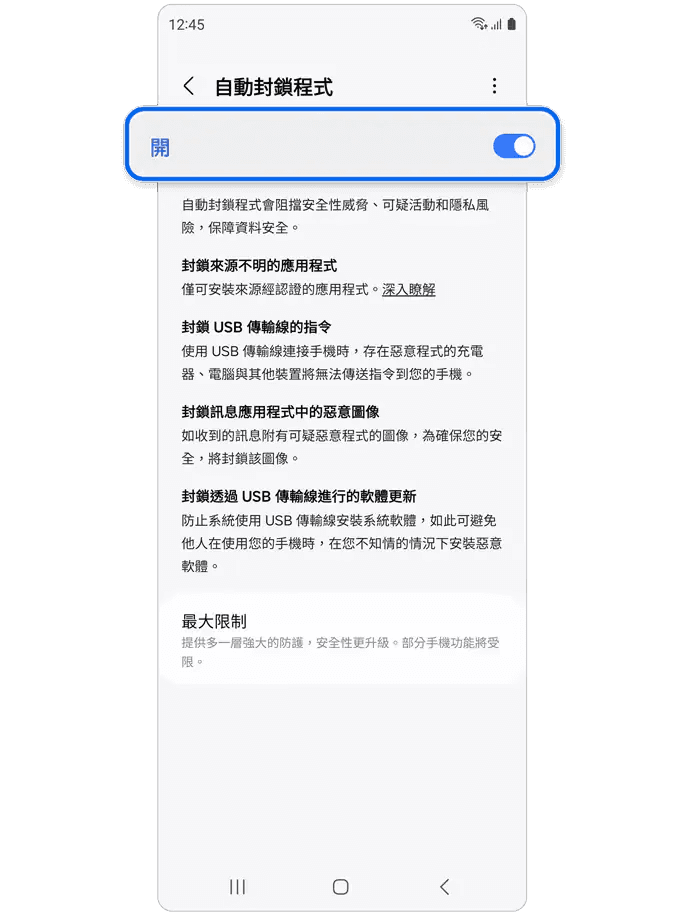
3. 開啟「自動封鎖」功能
近年來針對長輩的詐騙案件層出不窮,這個功能能自動封鎖來路不明的應用程式安裝,只允許從 Galaxy Store 或 Google Play 商店下載 App。同時也會封鎖 USB 傳輸的指令和軟體、訊息中的惡意圖片連結,大幅降低長輩受騙或中毒的風險。小米手機也有類似的「騷擾攔截」、「安全守護」功能可以使用。
三星設定步驟如下:
前往手機「設定」>>「安全性與隱私權」>>「自動封鎖程式」>>「開」
4. 設定快速撥號
讓長輩在主畫面就能快速撥打電話給家人,不用再翻找通訊錄。設定方式如下:
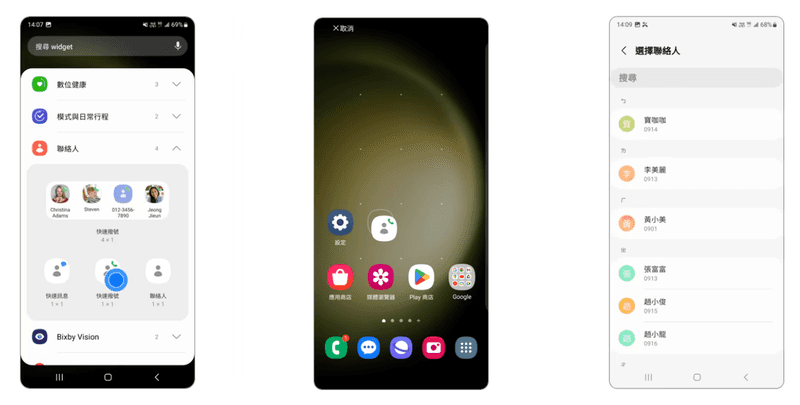
在手機主螢幕透過兩指縮放進入編輯模式 >> 點選「Widgets」>>「聯絡人」>> 長按「快速撥號 1x1」>> 拖移到想要的位置後放開 >> 選擇要撥號的聯絡人
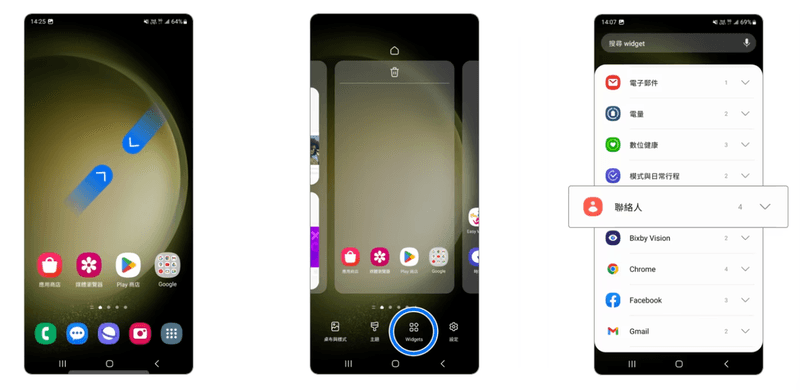
建議設定子女或配偶的快速撥號按鈕,放在主畫面最顯眼的位置,緊急時刻就能立即聯繫。
5. 設定 SOS 緊急聯絡人
這個功能能在長輩遇到緊急狀況時,快速撥號並發送簡訊給預設的緊急聯絡人。當長輩身體不適、發生意外或遇到危險時,只要連按電源鍵數次(依機型不同),就能自動撥號求救並傳送定位資訊,讓家人第一時間掌握狀況。
設定方法如下:
前往手機「設定」>>「安全與緊急狀況」>>「緊急聯絡人」>>「新增成員」>> 選取聯絡人 >>
你還可以選擇將此聯絡人資訊顯示在鎖定螢幕上,方便他人在緊急時刻協助撥打

五、長輩遠端支援神器 DeskIn:3C 問題、老人模式設定輕鬆解決
以上介紹的 iPhone 老人模式和 Android 長輩模式設定,步驟雖然不算太複雜,但對長輩來說仍可能感到困惑。如果你不在長輩身邊,光靠電話或視訊指導往往會遇到「找不到按鈕在哪」、「聽不懂術語」、「操作到一半就迷路」等問題,來回溝通非常耗時。
這時候你需要一個能直接遠端操作長輩手機的工具—— DeskIn 遠程控制工具。它能讓你從自己的手機或電腦,直接連線到長輩的手機進行操作,就像親自在長輩身邊幫忙一樣方便!
DeskIn 遠端桌面的六大優勢
跨平台全面支援: DeskIn 支援 Windows、Mac、iPhone、Android 等所有主流平台,無論你用什麼裝置,都能遠端控制長輩的手機或電腦,真正做到跨平台無障礙協助
內建語音通話與白板標註: 連線時可以同步進行語音通話,邊操作邊即時溝通。還能使用白板標註功能在螢幕上畫圈圈、箭頭指引,讓長輩清楚看到每個步驟,印象更深刻,下次遇到類似問題也能自己處理
連線流暢穩定不掉線: DeskIn 採用先進的連線技術,延遲低、操控順暢,而且沒有連線時長限制,不會像某些軟體用到一半就突然斷線,讓你能從容完成所有設定
高清畫質看得清楚: 免費版就支援 1080p 30fps 高清畫質,即使是小字小按鈕也能看得一清二楚,不會因為畫面模糊而誤操作
安全性高不怕被盜用: DeskIn 的手機遠端功能只能在同一個帳號下的裝置之間進行,避免長輩不小心洩露連線密碼給陌生人。連線時可以選擇讓長輩手動確認,也可以預先設定密碼快速連線,彈性又安全
操作直覺長輩也能上手: DeskIn 的介面設計非常簡潔,不需要複雜的技術知識,老人都能輕鬆學會如何允許連線
除了幫長輩設定老人模式,DeskIn 在日常生活中還有很多用途:遠端幫長輩安裝 App、檢查手機有無可疑訊息、協助處理網路銀行問題、教長輩使用新功能等等。真正做到一次安裝、終身受用,成為你照顧長輩的最佳數位助手!
使用 DeskIn 遠端操作長輩手機的三個簡單步驟
第 1 步: 在你的裝置和長輩手機上下載安裝 DeskIn,並使用同一個帳號登入(可以用 Google、Apple ID 或 Email 註冊,完全免費)。
第 2 步: 當需要遠端協助時,請長輩打開 DeskIn App,點擊「連線本設備」,勾選「允許連線設備」,選擇授權的功能,按提示完成授權,就能看到本機連線密碼。
第 3 步: 在你的 DeskIn 裝置列表中找到長輩的手機,點擊連線、輸入密碼後就能直接操作。你可以邊操作邊開啟語音通話,即時指導長輩,或使用白板標註功能圈出重點。
關於手機老人模式的常見問題
Q1:iPhone 老人模式如何關閉?
若要關閉 iPhone 的「老人模式(自訂輔助取用)」,只需按三下側邊按鈕,然後輸入當初設定的「自訂輔助取用」四位數密碼即可退出。如果忘記密碼,可以使用綁定的 Apple ID 進行重置。建議將密碼記錄在安全的地方,避免需要時找不到。
Q2:iPhone 老人模式可以使用 LINE 嗎?
可以!在設定 iPhone 老人模式時,第四步驟「選擇長輩需要用到的軟體」中,你可以加入 LINE 應用程式。不過需要注意的是,LINE 並非蘋果原生 App,因此在老人模式下介面會回到類似舊款 iPhone 的顯示方式,畫面會放到最大但功能依然完整可用。建議實際測試後再決定是否加入 LINE,確保長輩能順利使用。
Q3:三星手機有老人模式嗎?
有的!三星手機內建「簡易模式」,功能類似 iPhone 的老人模式。開啟後主畫面會顯示大圖示、大字體,還會新增快速撥號功能。
設定方式為:前往「設定」>>「顯示螢幕」>>「簡易模式」>>「開啟」。
其他 Android 品牌如 OPPO、Vivo、小米等也有類似功能,通常在「設定」>「顯示」或「系統」選單中可以找到,名稱可能叫「簡易模式」、「長輩模式」或「極簡模式」。
Q4:DeskIn 遠端軟體需要付費嗎?
DeskIn 提供免費版本,已包含基本的遠端控制、1080p 高清畫質、語音通話等核心功能,對於協助長輩設定手機來說完全足夠。若需要更高階的功能如 4K 畫質、檔案傳輸、多螢幕支援等,可以選擇付費方案。對大多數家庭用戶而言,免費版就能滿足日常遠端協助長輩的所有需求。
結論
本文完整介紹了 iPhone 老人模式和 Android 長輩模式的設定方法,還包括調整字體大小、防誤觸、快速撥號、SOS 緊急聯絡人等實用功能。這些設定能讓長輩更輕鬆地使用智慧型手機,減少誤觸和操作困擾,也能提升安全性。
如果你不在長輩身邊,強烈推薦使用 DeskIn 來協助設定。透過遠端連線,你可以直接操作長輩的手機,搭配語音通話和白板標註功能,就像親自在身邊指導一樣方便,再也不用重複解釋同樣的步驟。給長輩買了新手機,記得幫他們設定好老人模式和相關功能,讓他們也能享受科技帶來的便利!

家長監控孩子手機4大注意事項!監控軟體怎麽選?4款程式對比
現在越來越多小朋友也有智慧型手機,用來與家人聯絡或是娛樂。家長出於擔心孩子安全和防止孩子沉迷手機,會使用手機監控的程式管理孩子手機。
對於年齡較小的孩子,這些手機監控程式可以讓家長及時了解孩子的動態,當孩子遇到一些潛在危險、收到不良訊息,甚至遇到校園霸凌時可以及時察覺,介入並進行正確引導,以避免事情往更壞的方向發展。但這也涉及到一些倫理和隱私問題,不當使用可能影響家長和孩子的關係,適得其反。應該如何正確使用手機監控程式,如何選擇手機監控程式是一個對家長來説非常重要的問題。這篇文章介紹了4款手機監控程式,各有特點,可以根據自己的實際需求和情況進行選擇。如果你想要一款兼具觀看、操控手機,又很安全,孩子可接受的程式,推薦使用DeskIn。
家長需要監控孩子手機的五大原因
1、控制手機使用時間
小朋友對於時間的管控能力可能還不夠強,加之目前網路上的誘惑越來越多。玩遊戲、看短影音、社群聊天,都可能導致孩子沉迷導致無節制使用手機。這時候,監控程式能幫助家長了解孩子手機使用情況,並適當進行管控和調節。
2、甄別不良資訊或程式
網路上的資訊非常複雜,孩子可能還不太會分辨。定期查看孩子手機簡訊、網頁瀏覽記錄、社群媒體,可以及時察覺孩子是否有收到或觀看一些不良的資訊,如色情、暴力、賭博、欺詐、毒品等等。若有,則需要對孩子進行正確的教育和引導並刪除屏蔽不良資訊。
3、防止誤觸付費
目前手機上的支付和驗證流程越來越簡潔,帶來便利的同時也有一定的隱患。孩子可能會偷偷進行遊戲氪金,打賞直播主,又或是不小心按到了軟體的訂閲按鈕,如果沒有及時發現,可能會帶來經濟損失。
4、了解孩子,預防危險
家長無法隨時在孩子身邊,在學校或是和朋友之間的相處是否有出現一些狀況,家長可能無法百分之百知道。透過監控孩子手機的簡訊或是社群聊天記錄,我們可以更好地了解孩子,與同學有矛盾,校園霸凌(被霸凌或是實施霸凌),被侵害等等都可能及時知道。部分監控程式也可以看到手機定位,當知道孩子遇到危險時,也可以儘早趕到。
5、解決手機使用疑問
孩子手機使用的時間可能沒有家長長。當遇到一些技術問題、手機設定問題、或是作業的上傳備份問題無法解決的,部分手機監控程式譬如DeskIn可以幫助家長遠端操控孩子的手機幫忙解決,還有内建的語音通話功能,溝通更順暢。
監控孩子手機前的4大注意事項
1、尊重孩子
雖然我們知道父母都是出於關心而監控孩子手機。但請記住,孩子也是個獨立的個體,他也有自己的想法,小秘密和隱私,在使用監控程式前請記住這一點,尊重孩子以及他們的意見,避免過於强勢導致關係惡化。最好實在孩子知情的情況下再接入他們的手機。
2、提前與孩子溝通
提前告知孩子您監控手機的想法和目的,同時也了解他們的想法,溝通並達成共識,記得一定要在得到孩子同意之後再下載和使用手機監控程式哦。若是他們不同意,我們是不是也可以再尋求其他的方式以達到了解他們手機使用狀況以及安全的目的?
3、制定約定並遵守
對於監控程式的使用,若是孩子有一些想法和要求,比如不得監控某些程式、監控時間等等,在溝通之後,記得把這些約定記下,并在之後使用監控程式時遵守。記住,信任和溝通比一切都重要。
4、選擇安全的監控軟體
當您決定要使用監控程式是,記得一定要選擇一款安全的監控軟體。畢竟這些程式會獲得您手機的大部分權限,部分軟體還會記錄孩子手機的隱私資訊。選擇不安全的程式可能會造成信息泄露的風險,嚴重的,還可能會對孩子的安全帶來威脅。
4款家長監控軟體
DeskIn——全方位操控同時給孩子自主權
DeskIn是一款適用于web、安卓、ios、Windows和MacBook的遠端軟體,這意味著你既可以用手機,也可以用電腦遠端連線孩子的手機,應用情景更廣。你可以直接遠端幫孩子清除不良訊息,查看孩子的手機使用時間,進行軟體管控,DeskIn還支援語音通話和取用攝影鏡頭。相比其他程式,DeskIn不會抓取和記錄遠端手機的瀏覽記錄、位置和權限,只有在被控手機允許時才能觀看和操作被控手機,相對來説更加安全,也給孩子留有個人空間,更容易讓孩子接受。
👍優勢:
安全:DeskIn只允許同一帳號下的裝置遠端操控手機,避免孩子手機被陌生人監控。
跨系統適用:DeskIn適用安卓、ios、Windows和MacBook4個系統,你可以用電腦遠端監控孩子手機,也可以用手機遠端監控孩子的電腦。
語音通話:DeskIn允許您在跟孩子手機連缐時進行語音通話。當發現不良軟體或訊息,即使孩子不在身邊,也可以及時了解情況並進行引導、教育。需要幫孩子解決手機問題時也可以進行同步教學,更加方便,清晰。
使用攝影鏡頭:你也可以使用DeskIn取用還是手機前後2個攝影鏡頭,了解孩子的位置,當孩子遇到危險,可以及時了解現場狀況。
連缐方式靈活:DeskIn允許2種連缐方式,手動驗證和無人值守密碼連缐,對於孩子還説更容易接受。通常情況下可以使用手用驗證,在孩子知道的情況下進行連缐監控,緊急狀況下也可以使用密碼進行無人值守連缐
💻立即下載DeskIn體驗!
Family Link——管理孩子谷歌帳號
Family Link是谷歌開發的一類家長控制軟體,只能用戶管理安卓手機,本質上是透過管理孩子的谷歌帳號來進行孩子監控。它可以阻止或允許單個應用程序、隱藏應用程序、查找設備、設定就寝时间或者設定其他时间限制。但它也存在漏洞,當使用隱藏的瀏覽器時可以繞過所有網路瀏覽限制。也有網友反饋其時間限制功能容易被孩子繞開,管控的效果可能并不理想。
👍優勢:
時間管控:可以管理孩子使用軟體的「每日上限」时间以及「就寢時間」
封鎖不良軟體或網站:可以管理來自Playstore的程式的權限以及網站瀏覽權限,限制顯示成人內容,甚至只可瀏覽特定網站。
設定軟體下載管控:與Google Playstore綁定,在孩子下載軟體時需要家長審核
追蹤孩子定位:可以使用地圖追蹤孩子即時位置,也可以設定當孩子到達某一地點時收到提醒
不足:
只能管理安卓手機
無法對手機進行直接操控
存在漏洞:網站瀏覽限制和管控時間可能被孩子繞過
KidsGuard——記錄所有手機活動
KidsGuard更多的是一款手機監控程式,可以監控手機所有的操作動作,獲取手機所有的檔案並記錄聊天訊息,基本上被綁定的手機所有的使用資訊都會被掃到並記錄。但是他沒有更多的操作功能,比如設定使用時長限制、限制瀏覽的網頁等等。
👍優勢:
提供免費模擬演示畫面,可以先模擬使用再決定是否付費
可以透過iCloud監控iPhone,接收管理郵件、查看聯絡簿、相片、提醒事項等等
可以紀錄鍵盤活動記錄及查看社群媒體訊息,可透過關鍵字查詢訊息。
付款監控:可以記錄孩子在應用商店的訂閲消費狀況
可以透過網頁面板查看遠端手機所有的使用狀況和報表:使用時長、手機檔案、瀏覽記錄、聊天記錄等等。
不足:
需要付費才能解鎖高級功能
無法對手機進行直接操控和設定。
對手機獲取的權限較多,記錄内容過多,容易造成隱私泄露。
Airdroid——可以管控和限制孩子軟體、網頁使用
Airdroid是一款綜合的控制應用程式,可以透過家長版AirDroid Parental Control App來控制裝有的手機裝置。支援使用手機或網頁來監控遠端手機裝置。付費後支援管理最多10台裝置。
👍優勢:
可以使用Android裝置的相機和麥克風,查看及聆聽孩子周遭環境和聲音
同步接收孩子安卓手機上的上應用程式通知,如 Line、Facebook。
可以透過報表面板獲得孩子手機使用狀況日報/週報
可以對手機、軟體、網頁的使用時間或權限進行管理和限制
關鍵詞偵測:對社群軟體進行關鍵詞檢測,識別有害内容或潛在霸凌事件。
獲取手機位置和定位。
不足:
沒有免費版本,需要付費才能解鎖所有功能
對手機獲取的權限較多,記錄内容過多,容易造成隱私泄露。
如何使用DeskIn監控孩子手機
第一步:在你的裝置以及孩子手機上安裝DeskIn,並登入同一個帳號。
第二步:在孩子手機DeskIn,開啓允許連線設備並設定好連線密碼。
第三步:需要連線時,你可以在設備列表找到孩子的手機或使用設備ID連線孩子手機,孩子可以手動驗證,你也可以使用密碼進行連線。

📖你可能感興趣:
3個將iPhone/iPad螢幕鏡像投影到MacBook方法教學
結論
本文介紹了4款家長控制軟體,幫助家長管控孩子的手機使用情況,每款軟體都有他們的特點,你可以按需選擇。4款軟體中,DeskIn能夠對遠端的裝置行直接控制,無論是管控孩子手機還是技術支援都可以,而且所記錄的手機隱私資訊比較少,更加安全也更容易讓孩子接受。雖然家長監控孩子手機的出發點是好的,但家長的管控也應該把握尺度,給孩子適當的隱私空間和自我成長的空間,建立互信才更重要。

5個最適合Windows的遠端桌面軟體
Windows 電腦不像 Macbook 有完善的蘋果生態,可以輕鬆與其他蘋果電腦、手機裝置聯動。所以一款好用的遠端軟體對於 Windows 非常重要,不論是跨辦公室協作、存取檔案、支援協作,都可以隨時串聯其他裝置。可用的Windows遠端桌面眾多,今天一篇文章告訴你怎麽擇並介紹5款最適合 Windows 的遠端桌面軟體。其中小編最推薦的是DeskIn遠端桌面,一起來看看它爲什麽比其他遠端桌面軟體更適合Windows!
💻立即在您的Windows下載最好用的遠端桌面軟體DeskIn!
什麼是遠端桌面軟體?
遠端桌面軟體是一種可以讓使用者遠程訪問和控制其他計算機桌面的應用程式工具。透過遠端桌面軟體,使用者可以使用本地的裝置,如手機、平板、筆電,以及配件如滑鼠、鍵盤甚至麥克風、手把,來存取、操控其他計算機桌面的檔案、應用程序和設定。
你可能感興趣:
遠端桌面軟體的主要功能
遠程桌面連缐:遠程訪問和控制其他計算機裝置。
檔案傳輸:支援在遠程計算機裝置和本地裝置之間傳輸文件。
遠端協作:允許用戶在遠端和本地計算機之間同步剪貼簿內容。
遠端列印:支持用戶將遠端計算機檔案一鍵列印到本地或網絡打印機。
多人協作:允許多個用戶同時連接到同一台遠程計算機。
適合Windows的遠端桌面軟體應具備什麽條件
跨系統支援:可以從Windows存取Windows電腦,也可以跨系統存取Mac,甚至iOS和安卓。反過來也可以被Windows裝置或其他MacOS、iOS和安卓裝置存取和控制。
鍵鼠正常映射:不管是用Windows存取其他裝置,還是被存取,都需要鍵盤輸入、滑鼠點擊等能正確作用在遠端裝置,使用順手。
連線穩定順暢:在Windows上使用遠端桌面軟體,大多情況是要進行遠端辦公作業、技術支援甚至遊戲,對於連線品質要求較高,所以適合Windows的遠端桌面軟體必須足夠穩定,在跨網路環境也能保持低延遲。
簡單易用:不管是使用什麽軟體,我們都希望能夠輕鬆上手,尤其是對於這種有一定技術含量又的軟體,不需要複雜的誰
高性價比:為滿足不同情境的使用,Windows遠端桌面軟體應該具備豐富的功能來讓遠端辦公、遠端協作、技術支援甚至遊戲更加便利,而價格又不會造成太大的負擔。
5個最適合Windows的遠端桌面軟體
Top1:Deskln-高性能高性價比遠端桌面軟體
DeskIn 可以説是綜合實力最强的六邊形選手,在 Windows 系統上運行流暢,提供了無縫的跨系統遠端桌面體驗,功能多多價格合理,不管是個人遠端辦公還是企業遠端技術支援都有對應的解決方案,堪稱性價比之王,是最適合Windows的遠端桌面軟體Top1。
就算處理高解析度畫面也能保持高清晰度和低延遲,重點是穩定性好完全不會有掉缐的狀況,小編用Windows遠端Macbook,過了一晚上也沒有斷連!而且DeskIn 支援跨平台操作,無論是 Windows、Mac、iOS 還是 Android 系統,都能實現無縫連接,手機端的功能完整,操作也非常順手。除了遠端連缐,還有螢幕投影、延伸螢幕、語音通話等免費協作功能。
💻立即在您的Windows下載最好用的遠端桌面軟體DeskIn!

👍優點:
高性能與低延遲:高效編解碼技術 + 全球200+伺服器節點,可以根據網路環境自動優化品質,快速進行圖像傳輸,保證順暢和低延遲的遠端操控。
跨平台與兼容性:支援Windows、Mac、iOS 、Android 裝置任意互連,鍵鼠和輸入法完美支援,還可以從網頁發起遠端連缐,無需安裝軟體更靈活。
豐富的功能:提供了延伸螢幕、投影、語音通話、標注、共享剪貼板、遊戲鼠標、3D視角等多種功能,一個軟體滿足使用者多個情景使用需求。
高速檔案傳輸:支援不限大小、類型、數量的檔案傳輸,Windows裝置一鍵拖拽就可以完成傳檔,且傳輸速度高達12MB/s,可以隨時跨平臺存取檔案。
安全性高:採用256位元加密,還有多種安全措施,如新裝置首次登入驗證、密碼無人值守連線,螢幕遮罩、黑白名單、鎖定客戶端等,確保了使用者的資料安全。
局限性:
不支援Linux和Google TV使用
DeskIn的價格方案:
DeskIn 提供免費可商用的版本,功能相當豐富而且提供有官方客服。DeskIn也針對不同的使用場景推出了標準版、遊戲版和性能版。不僅可以按月訂閲,年度訂閲更低至$4.16美元/月,價格相當佛心。付費版可以管理高達100台裝置,對於小型團隊完全夠用了。想要更多管理功能也可以考慮其企業版方案。

TeamViewer - 高預算的大型企業可選
TeamViewer 是一款老牌,長資歷遠端控制與支援軟體,在 Windows 電腦上的使用確實展現出了其強大的功能性和靈活性,連線品質不錯而且有豐富的管理功能和安全保障,讓他成爲最適合Windows的遠端桌面軟體之一。
如果你是大型企業又有較多預算,主要的使用場景是辦公、技術支援。Teamviewer的確是個可靠的選擇。對於個人使用者,由於DeskIn免費版可能會被誤判商用,付費版價格太高,而且缺少客服支援、螢幕管理和遊戲相關功能,適用場景偏少,需要斟酌一下。

優點:
平台兼容性:除了常見的win、mac、ios、Android,還支援在Linux、Chrome OS上使用,為企業使用者尤其是技術支援工程師提供了無縫的遠端連接體驗。無論團隊成員使用哪種設備,都能實現遠端協作。
豐富管理功能:TeamViewer 除了遠端桌面、檔案傳輸、語音通話等多種實用功能,還有很多管理功能,滿足了企業對内部裝置進行統一管理。
安全性高:采取256位元加密技術,支援雙重驗證,在業内有較高的安全性口碑
連線品質穩定:預設會根據網速自動調整畫質與頻寬,用以維持穩定性。非高效能遊戲、設計串流的普通的辦公和支援足夠使用。
局限性:
商業版價格昂貴:TeamViewer 的商業版價格相對較高,部分高級功能還需額外付費解鎖,對於預算有限的個人使用者或中小企業而言,可能造成一定的經濟壓力。
檔案傳輸速度慢:對比過多個遠端軟體,Teamviewer的檔案傳輸速度相對較慢,而且對於檔案大小有限制,每次只能傳輸4GB或以下的檔案。
免費版缺少客服支援,遊戲等功能較少
Teamviewer價格方案:
Teamviewer免費版本不可商用,而且沒有客戶服務。付費方案都只可以按年訂閲,個人方案最低274.8美金/年,商用方案更高達上千美元。部分功能需要再額外采購插件。

AnyDesk - 實現靈活遠程訪問
AnyDesk是一款專為遠程工作與支援設計的軟體,也是很適合在Windows上使用的遠端桌面,其在Windows系統上的應用廣泛且深受用戶喜愛,最主要的原因是它比較輕巧、無需安裝、注冊即可使用,而且可以透過ip存取同一區域網内的裝置,比較容易上手。無論是企業級用戶、技術支援團隊,還是個人使用者為使用者,AnyDesk都提供了一個連線品質不錯且便捷的遠程操作環境。

優點:
輕量且高效:AnyDesk的安裝包僅為1.1 MB,是市場上最輕量的遠程訪問解決方案之一,這意味你可以快速在你的Windows上完成下載並使用。
免安裝注冊:Anydesk無須安裝注冊就可使用,對於臨時使用者來説非常方便
檔案傳輸速度快:Anydesk的檔案傳輸速度比較快,支援進行跨平台檔案傳輸。
不足:
分辨率調整問題:Anydesk的分辨率是自動調整的,這導致遠程桌面有時的顯示效果不佳,色彩和清晰度都比較一般,從而影響用戶的使用體驗。
安全問題:由於無需注冊即可使用,而且可以存取同ip的其他裝置,便利的同時犧牲掉了部分安全性,帶來了潛在風險,事實上Anydesk確實出過一些資安事故,注重安全的需斟酌
缺乏高級功能:DeskIn雖然比較易用,但功能相對還是比較簡單,缺乏一些進階的如遊戲、螢幕管理、語音協作相關的功能。
Anydesk價格方案
Anydesk的免費方案同樣不可商用,也缺少客服支援,付費方案也是只能按年訂閲。個人版方案價格與Teamviewer一致,其餘方案略低於Teamviewer,但方案中包含的功能豐富度對比DeskIn略顯不足,優勢在於管理的裝置數。

Chrome遠端桌面 - 最輕便簡單的遠端桌面
Chrome遠端桌面是谷歌提供的一款基於Chrome瀏覽器的遠程桌面控制工具,它允許用戶在任何時候、任何地點,通過Chrome瀏覽器或其他支援的設備(如iOS、Android)來遠程存取和控制Windows、Linux、MacOS、Chrome OS等系統的計算機。由於介面簡單,功能精簡,而且可以從瀏覽器發去遠端連線,讓他成爲適合Windows使用最輕便簡單的遠端桌面。

優點:
免費服務:完全免費,對於使用頻率不高,預算有限的個人用戶或小型企業來說,這是一個非常經濟的選擇。
跨平台兼容:Chrome遠端桌面支援多種操作系統,無論是用戶使用的是Windows、MacOS、Linux,還是iOS、Android,都可以實現無縫連接。
操作簡便:作為Chrome瀏覽器的一個擴展程序,可以從網頁發起遠端連缐,功能也比較簡潔,對於新手也很容易上手。
缺點:
依賴網頁瀏覽器:沒有Google帳號或不是使用Chrome瀏覽器的無法使用。
功能有限:相比於上述其他遠端桌面工具,Chrome遠端桌面的功能最少,缺乏高級功能。
無法調整畫質:Chrome遠端桌面只支援自動調整畫質,對於畫質、清晰度、色彩要求比較高的遠端作業需求,其表現可能不如其他遠端工具。
chrome遠端價格方案:完全免費使用。
📖你可能感興趣:
Microsoft 遠程桌面- Windows 内建遠端工具
Microsoft 遠端桌面(Remote Desktop)是一項內建於Windows操作系統的功能,特別適合企業環境中對於Windows Server的整合和管理。它允許用戶從一台計算機透過電腦IP地址遠端訪問另一台計算機,提供了便捷的操作方式,在多個工作站間實現高效協作。在企業層面有著良好的應用潛力。

優點
與Windows環境的高度整合:內建於Windows系統中,使用者無需額外安裝其他軟體,使用起來十分方便。
強大的功能性:支持多種功能,如打印重定向、剪貼簿共享等,提升了使用體驗,尤其適合商業用戶。
安全性較高:提供企業級的加密功能,確保數據傳輸的安全性,對於需要保護敏感信息的環境十分重要。
不足:
設定複雜性:對於非技術背景的使用者來說,初次設定可能會較為繁瑣,尤其是在配置防火牆和Port轉發時,需要具備一定的技術知識。
僅限於Windows平台:儘管有Windows版本,其他操作系統(如Mac或Linux)上的支持不如Windows本身那麼順暢,這在多平台同時使用時會帶來不便。
無法免費使用全部功能:雖然基本的遠端桌面功能是免費的,但在一些高級使用場景下,可能需要額外購買相關的Windows Server授權。
過於依賴Windows生態:如果使用戶希望在多種操作系統下都有一致的使用體驗,遠端桌面可能無法完全滿足需求,局限了多元化的工作環境。
Microsoft 遠程桌面價格方案
與Microsoft 365 訂閱方案綁定,並無單獨的遠端桌面價格。Windows 家用版 (Home Edition)、部分企業裝置不支援使用Microsoft 遠程桌面。
結論:DeskIn是最適合Windows的遠端桌面軟體
本文介紹了五款最適合Windows的遠端桌面軟體,包括DeskIn、TeamViewer、AnyDesk、Chrome遠端桌面和Microsoft遠端桌面。這些軟體都提供了遠程桌面連接、檔案傳輸傳輸、剪貼板同步等基本功能,但在性能性、定位和價格等方面各有不同。你可能需要評估您的主要使用場景以做選擇。
其中,DeskIn以其高連線品質、豐富的功能以及價格佛心等優點脫穎而出,兼具多場景使和性價比,是最適合Windows的遠端桌面軟體,立即在你的Windows電腦下載DeskIn體驗看看吧!

2大方法遠端控制一鍵開機:從關機狀態到連線操作,完整流程解析
您是否也曾遇過臨時需要存取家裡或辦公室的電腦,處理緊急文件、修改簡報,或是進行系統維護,卻發現電腦處於關機狀態?無論是遠端工作者、IT管理員,還是需要彈性辦公的您,都可能面臨無法立即啟動遠端電腦的困擾。
如果還在尋找最佳方式,別擔心,這篇文章就是為了解決您的困擾而寫的。我們將一步步引導您,如何透過更簡單穩定的方式,輕鬆實現遠端開機。無論您是科技新手還是專業人士,都能快速上手,從此不再受距離限制,隨時隨地都能喚醒您的電腦,讓遠端工作真正暢行無阻!
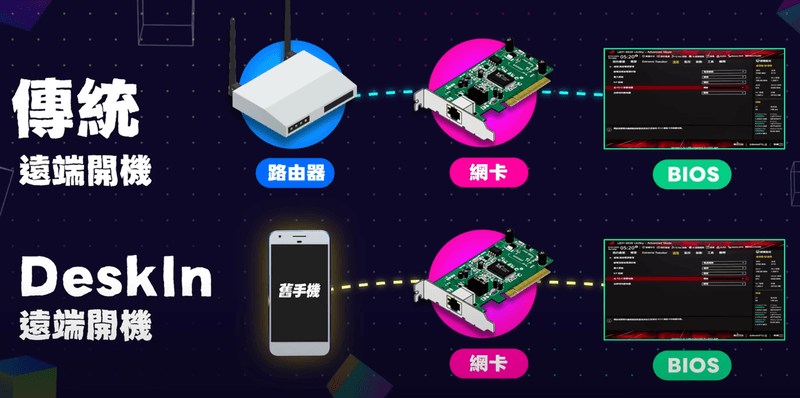
什麽是WOL?
WOL(Wake-on-LAN)簡單來說是一種用另一台電腦或手機發送「魔法封包」(Magic Packet),以透過網路遠端啓動電腦的技術。
實現遠端開機有 2 種方法,一是可以通過傳統的WOL 開機,但會經歷複雜的路由器設定,不僅對新手不友好,而且不太穩定,另一種方法就是使用 DeskIn 輔助喚醒,DeskIn 可以透過手機/電腦等裝置輔助的方式,免於複雜的路由器設定,輕鬆實現遠端開機,還能將你的就裝置利用起來。
2 大電腦遠端開機方法對比
傳統 WOL 功能 | ||
設定 | 設定簡單更穩定:免於複雜路由器設定,簡單2步就能完成,只要 DeskIn 在運作就能遠端喚醒。 | 設定步驟複雜:需要進入路由器後台進行連接埠轉發、固定IP分配等複雜的網路設定,對不熟悉網路技術的使用者來說門檻很高 |
靈活性 | 更靈活:對比其他遠端桌面只能用電腦作爲輔助喚醒裝置,DeskIn支援使用移動裝置甚至是舊手機,版本最低支援到 Android5.0。 | 裝置限制多:通常僅能透過同一區域網路下的電腦發送魔術封包。從外部網路喚醒需依賴DDNS或公共IP,且網路環境變動易導致失效。 |
其他功能 | 進階功能:除了遠端喚醒,DeskIn 也是一款穩定、低延遲的遠端桌面,遠端開機之後,你還可以用本地電腦操控遠端電腦,甚至進行檔案傳輸。 | 單一功能:WOL 僅負責「開機」這一個動作,後續的遠端操作必須依賴另一套獨立的遠端控制軟體. |
安全性 | 安全管理與維護:企業敏感資料存於本地電腦比存儲在雲端更安全,透過DeskIn企業可以隨時喚醒遠端電腦進行資料存取、裝置運維管理,DeskIn使用256位元加密技術,節省成本同時也更安全。 | 存在資安風險:WOL協定本身缺乏加密與身份驗證。只要知曉MAC位址與公網IP,理論上任何人都可嘗試喚醒您的電腦,有潛在風險。 |
【最佳方法】使用 DeskIn 遠程啓動你的 Windows 電腦
使用 DeskIn 遠端啟動你的 Windows 電腦,不僅能實現開機,更能無縫接軌後續的完整操作。不同于傳統 WOL 功能僅能做到喚醒,DeskIn 讓你在電腦啟動後直接進行遠端存取與控制。這意味著你可以隨時取得所需的檔案、與同事共享螢幕進行協作,或執行任何必要的 IT 維護工作。將複雜的開機程序與直覺的遠端控制合而為一,提供一個穩定且安全的整合性解決方案,大幅超越了傳統僅具單一功能的喚醒技術。
使用DeskIn設定WOL遠端啓動電腦需要什麽條件
主板要求:Windows電腦主機板需支援Wake-on-LAN(WOL)——可透過查看主機板説明書、檢查網卡型號、聯絡產品客服等方式確認。電腦提前安裝好DeskIn并接上網路線。
輔助裝置:需有一台正在運行 DeskIn 的輔助喚醒裝置與待開機的電腦在同一局域網內用於輔助喚醒。例如其他Windows/Mac電腦、iPhone、iPad、Android 手機、平板等,需提前安裝好DeskIn。
系統條件:Linux 裝置不支援發送 WOL 封包,而 Mac 和 Linux 裝置不支持遠程開機。
狀態條件:處於藍屏或崩潰等異常關機狀態的Windows裝置不裝置遠程開機。
❗注意:大部分的筆電(尤其無線網卡)或是較舊的電腦(10年前的)不支援使用WOL,無線網路通常不支援,推薦使用有線網路。
💻如果需要使用 DeskIn 進行遠程喚醒,提前完成簡單的無人值守連線設定,您的電腦就可以在遠端喚醒之後隨時連接並遠端操控,立即下載 DeskIn 試試!
在設定前,請確保你已經下載并安裝 DeskIn,建議注冊一個帳號並登入,可以在裝置列表找到你需要啓動的裝置。
📺超好用!在外「遠端開電腦」?設定免費遠端開機!Windows 11 無人值守訪問?華碩主機板遠端喚醒?你想要的功能盡在DeskIn!
步驟1:網卡設置
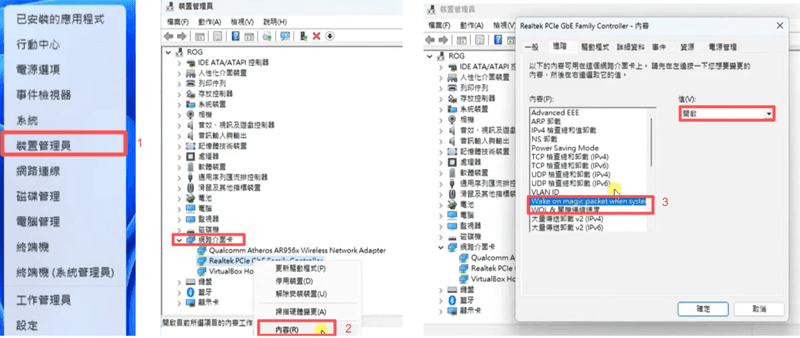
在 Windows 右鍵Windows Logo,打開「裝置管理員」
找到並展開「網絡介面卡」選項。
找到你的網路孔網卡(如Realtek Gaming GbE Family Controller),右鍵>>然後點「内容」。
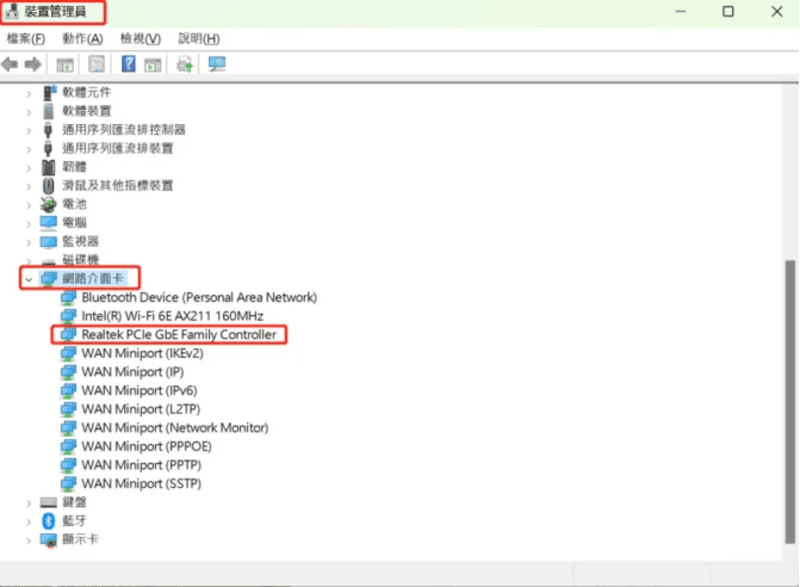
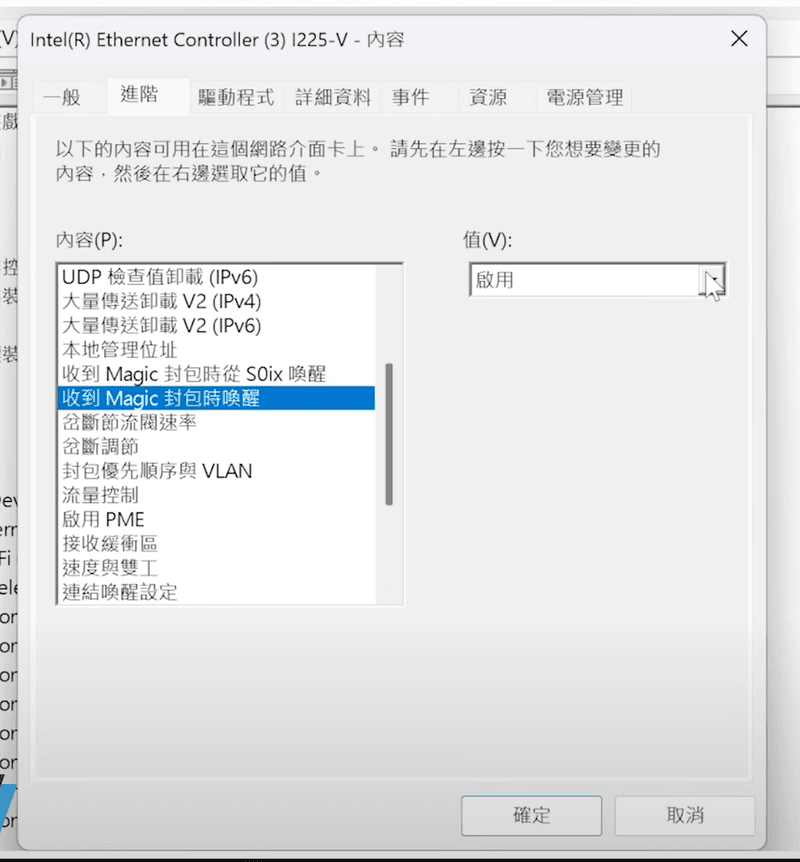
在下一個窗口中,導航至「電源管理」選項卡,並勾選打開「允許這個裝置喚醒電腦」
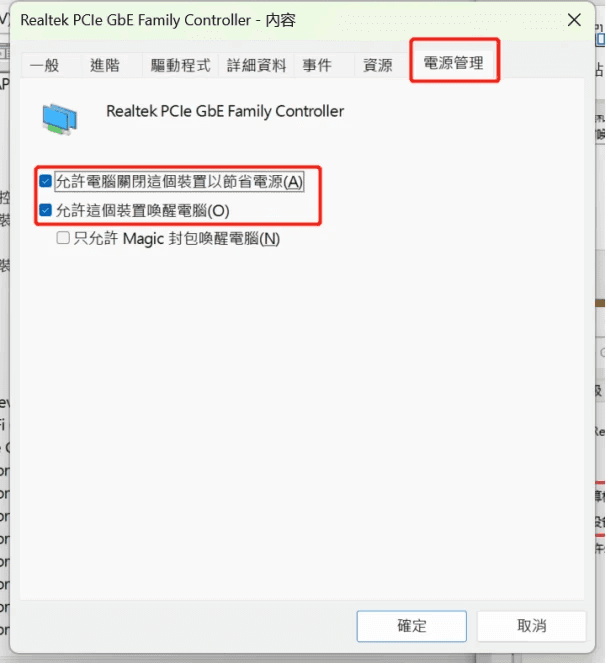
切換到「進階」選項卡,在内容中找到「收到Magic封包時喚醒」並啓用。若有「網路喚醒」相關選項,也請啓用
步驟2:主板 BIOS 設定
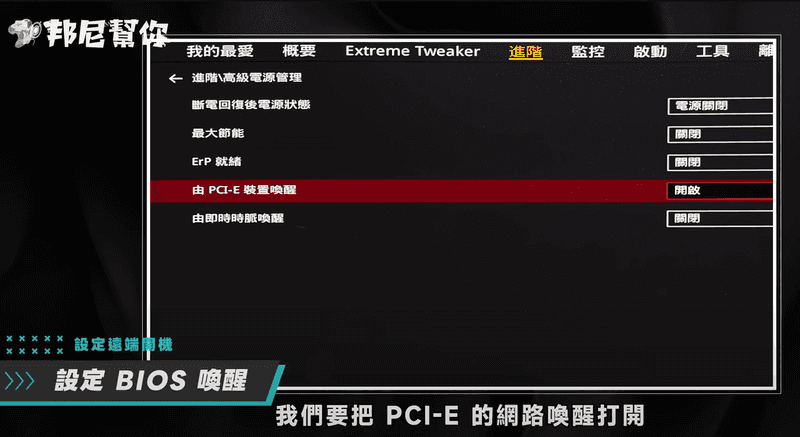
在電腦開機時,連續按 Delete 或是 F2 進入 BIOS
導航至「進階」選項卡 >> 「進階/高級電源管理」>> 開啓「PCI-E喚醒」,按 F10 儲存設定並重啟即可。可能為以下類似的名稱:
PCIE/PCI 設備開機
Power On By PCI-E
板載局域網開機
局域網喚醒
局域網恢復
PME 開機
注意:不用品牌的名稱可能有所差異,你可以Google你使用的主板的官方説明預計網路喚醒設定教學找到。
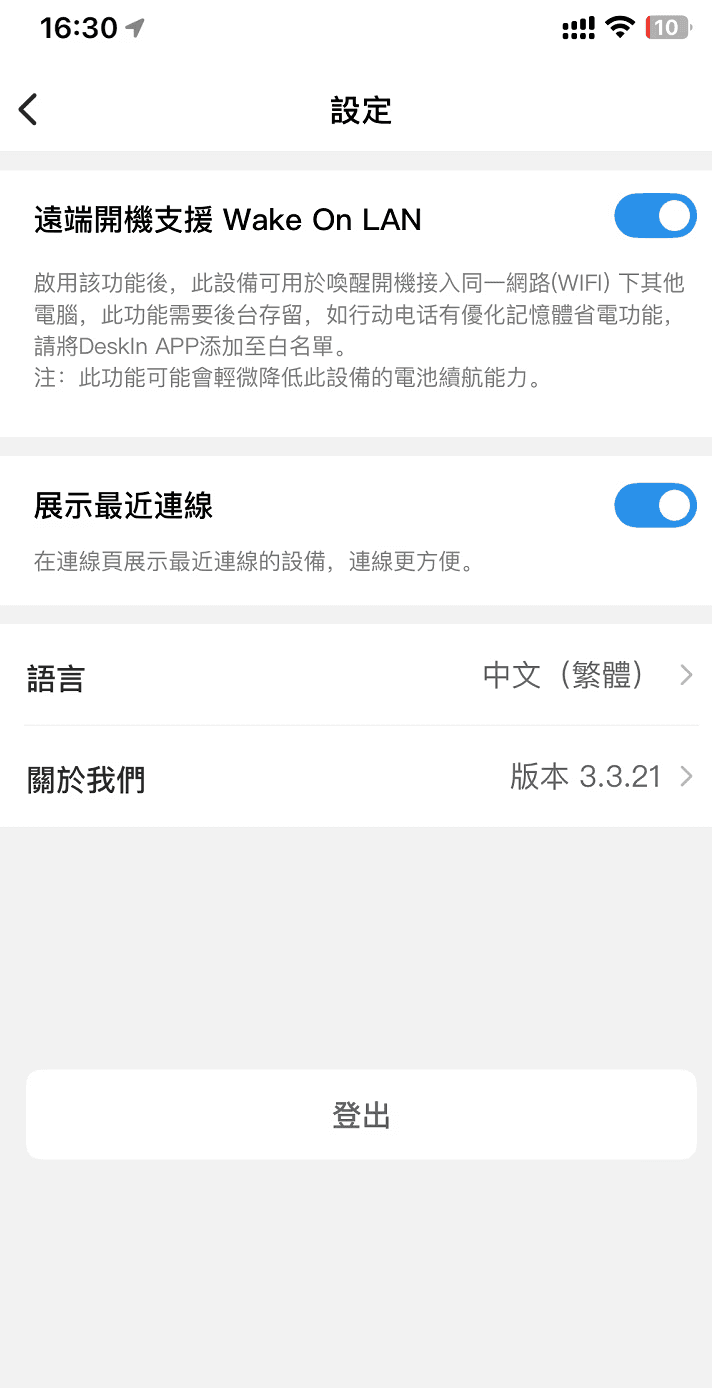
步驟3:在 DeskIn 設置中啟用遠程開機支持
若你使用行動裝置作爲輔助喚醒裝置,請前往DeskIn設定>>設定>>開啓「遠端開機支援Wake On LAN」
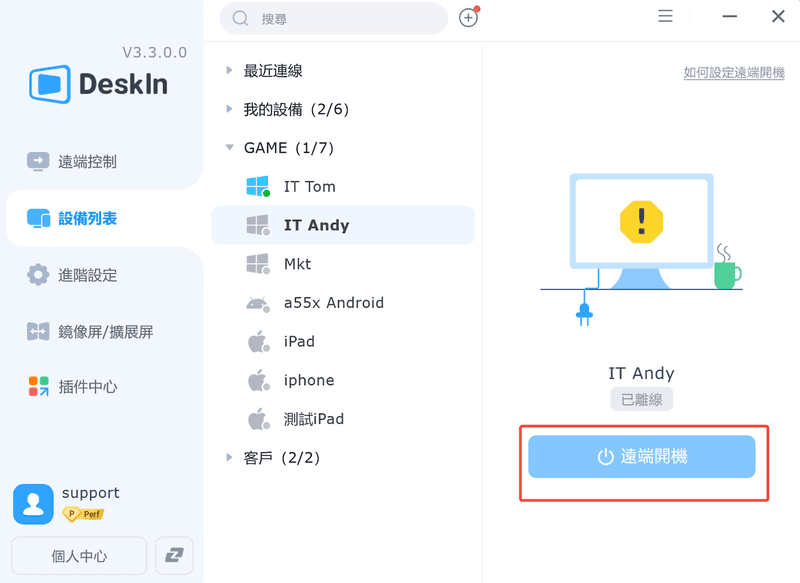
步驟四:遠端喚醒電腦
現在,你就可以使用DeskIn遠端啓動電腦了。只需在裝置列表找到你關機的裝置,會提醒「設備已離線」,按下「遠端開機」,等待數秒,你就能看到你的電腦已經開機並是可被連線的狀態了。
DeskIn:最安全、穩定的遠端桌面軟體,隨時隨地想連就連!
DeskIn是一款穩定、安全、高清無延遲的遠端軟體,支援Windows、Mac、iOS和Android系統,可以讓你隨時隨地用手機、筆電、平板就能連回遠端的電腦並進行存取和操作,是遠端辦公、遠端IT支援的必備軟體。就算您的電腦關機,您也可以使用DeskIn遠端啓動您的電腦,並透過設定安全的連線密碼,隨時隨地進行無人值守連線。DeskIn遠端桌面的優勢如下:
跨系統支援:支援Windows、Mac、iOS和Android跨平臺遠端操作,無縫串聯。
支援無人值守和遠端啓動功能,可用性超高。
超高連線品質:40ms超低延遲,支援最高4K60FPS&2K144FPS。
易用:界面直覺,使用簡單,無需複雜設定。
安全:256位元加密,端到端連線,保證資訊不外泄。還可以設定安全密碼、黑白名單,開啓螢幕遮罩保護操作内容不被看到。
更多閲讀:
【方法拓展】啓用 WOL 遠端喚醒家裏桌上型電腦
Wake-on-LAN(WOL)「網路喚醒」技術,是透過區域網路或網際網路,向目標電腦的網路卡發送一個特殊的「魔術封包」(Magic Packet),當遠端電腦收到網路訊號/訊息時,便可立即開機。這項功能最適合用於區域網路內的桌上型電腦,多數筆電較不支援此喚醒方式。
想透過 WOL 功能遠端啟動電腦,必須先完成一些基本設定。首先要在主控端設備上準備好傳送魔術封包的工具,然後在被控端電腦(也就是您想遠端開機的那台)中,開啟 BIOS 與作業系統中的「魔術封包喚醒」(Wake on Magic Packet)或 WOL 相關選項,然後再使用第三方軟體傳送網路訊號。不確定從哪裡開始,請直接跟著以下的詳細的 Wake on Lan 教學開始操作吧!
開始之前:事前準備與必備條件
請確認你的主機板必須具備網路喚醒(WOL)的功能。進入BIOS/UEFI設定畫面,在「電源管理」(Power Management)或「進階」(Advanced)等選單中,尋找如「Wake on LAN」、「Power on by PCI-E Device」等選項。如果存在該選項,即代表支援。再者,你家裡的分享器也要有支援網路喚醒的功能,最後是你家裡必須是固定 IP。
步驟一:配置操作系统中的网卡
單機右鍵找到「裝置管理員」,點擊「網路界面卡」> 「内容」
步驟二:開啓電源管理裏面的快速啓動和休眠功能
首先,找到「控制台」>「硬體和音效」。

從視窗左側點選「選擇按下電源按鈕時的行為」>「變更目前無法使用的設定」。
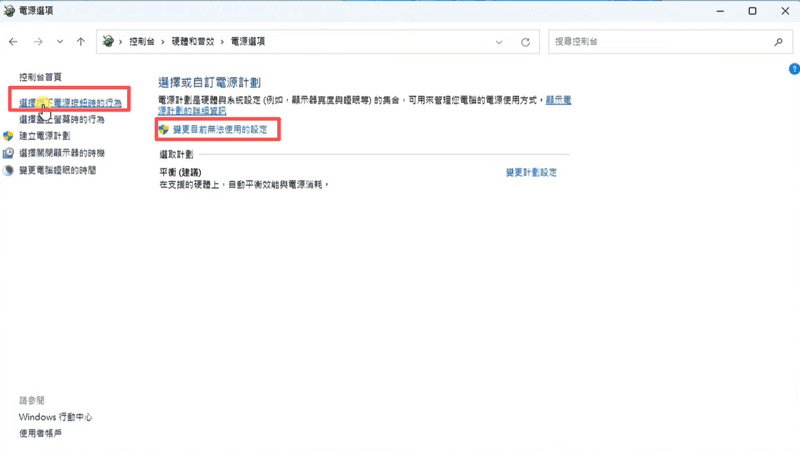
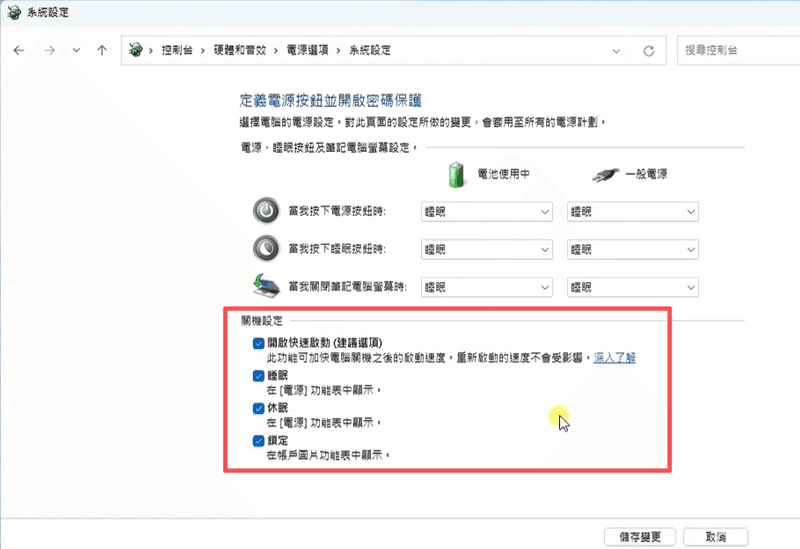
點選「開機設定」中所有選項都已勾選,這些選項允許裝置喚醒電腦,記得單擊儲存變更。
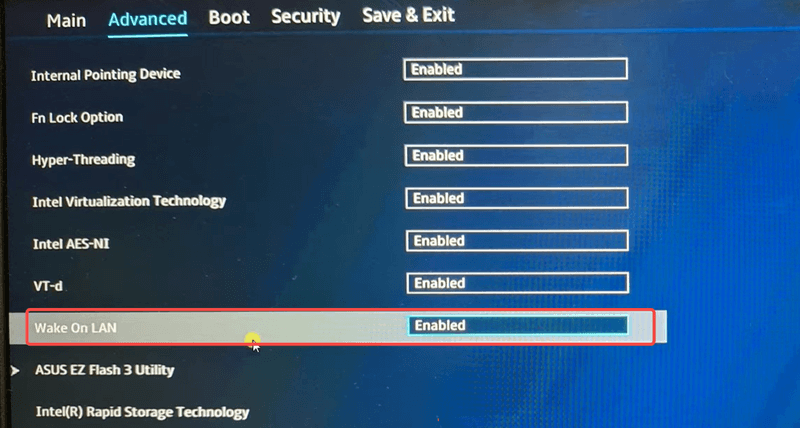
步驟三:進主机 BIOS 設定網路喚醒
接下來,您還需要在主機板的BIOS中啟用網路喚醒功能。開機並不斷按下 F2 或者 Del 鍵進入BIOS,在 「進階」、「电源管理」或「APM配置」 中,找到「Wake on LAN」、「Power On by PCI-E」 等相关选项,确保其状态为「開啟」,按 F10儲存並離開 BIOS。重新啟動電腦後,即可開啟網路喚醒功能。
各家主機介面不一,設定方式可能都不一樣,如果上述步驟不符,也自行可以搜尋「主機板廠商 網路喚醒」或是「筆電廠商 網路喚醒」。
步驟四:遠端喚醒電腦
接下來要使用工具來「發送」開機指令。前往 NirSoft 網站,下載並安裝NirSoft WakeMeOnLAN軟體。該軟體擁有直觀的視窗和按鈕,無需輸入指令,只需透過滑鼠點選,就能完成掃描區域網路內的電腦並發送魔法封包的操作。
開啟軟體後,點擊左上角的 「File」 選單,並選擇 「Start Scanning」,軟體便會自動掃描區域網路內所有支援網路喚醒的電腦。
如果您希望手動新增特定電腦,可以點擊 「File」 選單中的 「Add New Computer」 來進行設定。
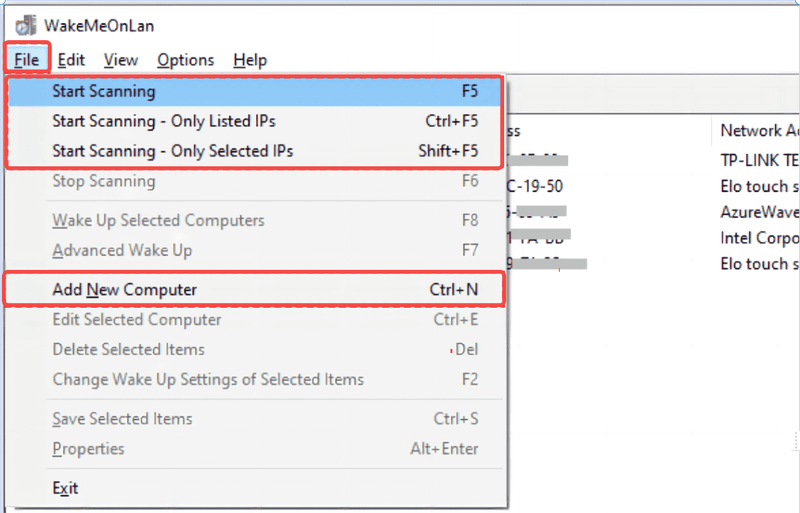
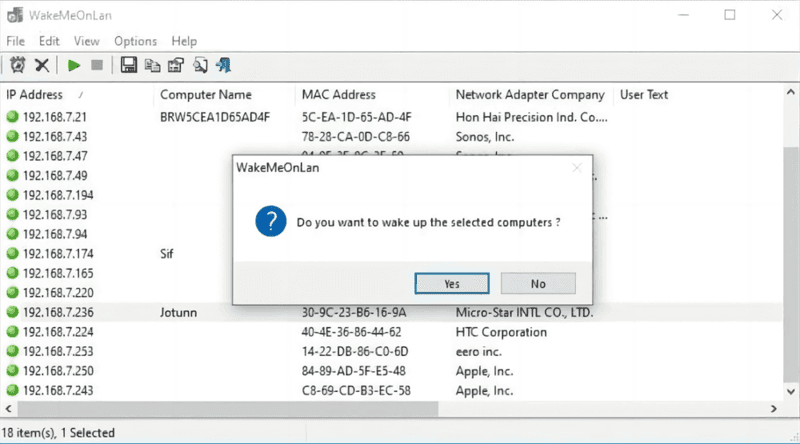
掃描完成後,所有找到的遠端電腦會顯示在清單中。在想喚醒的電腦上按一下滑鼠右鍵,並選擇 「Wake Up Selected Computers」。
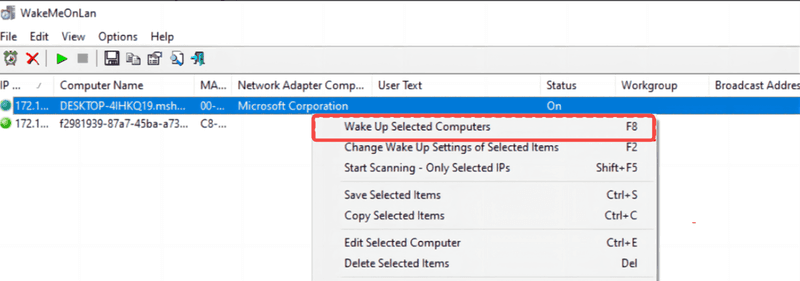
再單擊彈窗中的「Yes」進行確認,即可遠端喚醒電腦。
推薦閲讀:
遠端開啓電腦常見問題
Q1:電腦關機還可以遠端開機嗎?
電腦關機狀態下通常無法直接遠端開機,除非設備支援 Wake-on-LAN(WOL) 功能。但如果您想實現跨平台即時控制與螢幕操作,DeskIn 提供穩定的遠端桌面解決方案,讓您即便不在電腦旁,也能高效管理工作與多裝置協作。
Q2:我可以從世界任何地方喚醒家中的電腦嗎?
當然可以!您完全可以從世界任何地方喚醒家中的電腦。關鍵在於讓外部的開機指令能成功送達您家中的區域網路。
傳統方法是透過路由器設定「連接埠轉發」,並搭配動態域名服務,讓魔法封包能從外部網路正確轉送到您的電腦。不過這個方法需要一定的網路知識,設定較為複雜且可能不穩定。
現在有更簡單的解決方案!使用像 DeskIn 這樣的遠端控制軟體,您只需要在家中準備一台舊手機或平板作為輔助裝置。當您在外地想開機時,只需透過 App 發送指令,家中的輔助裝置就會自動在區域網路內幫您喚醒電腦,完全不需要複雜的路由器設定。
無論採用哪種方式,都能實現跨網域遠端開機,讓您隨時隨地都能存取家中電腦的資料。
Q3:電腦被遠端喚醒後,我該如何登入系統呢?
WOL 只負責「開機」,相當於您按下了電腦的電源鍵。要實際操作電腦,您需要另外搭配遠端桌面軟體,例如 DeskIn、Windows內建的「遠端桌面」、Chrome Remote Desktop,並將其設定為開機自動啟動。
>>延伸閲讀: Chrome遠端桌面可以進行無人值守嗎?
使用 DeskIn,隨時隨地想連就連!
總結來說,傳統 WOL 是透過網路傳送魔術封包的基礎技術,雖然免費但需要複雜的路由器設定與網路知識,穩定性較低且僅具單一開機功能。而 DeskIn 則是以 WOL 技術為基礎的現代化解決方案,免去路由器複雜設定,只需利用舊手機作為輔助裝置就能一鍵開機,並能無縫接軌後續的遠端控制操作。
對於追求效率與便利性的使用者,我們特別推薦 DeskIn 解決方案。它不僅完美解決了傳統 WOL 的設定門檻問題,更整合了完整的遠端桌面功能,讓您從開機到操作都能在同個平台上流暢完成,真正實現隨時隨地存取遠端電腦的無縫體驗。
💻 現在就免費下載 DeskIn,體驗這款真正適合每個人的遠端開機方案!
部落格
搜尋...
全部
應用對比
遊戲娛樂
產品教學
問題解決
Is DeskIn Safe to Use? Everything You Need to Know
When considering a remote desktop tool, one question always comes first: Is DeskIn safe? After all, you're not just accessing a device; you're potentially exposing files, data, and even real-time activity across networks.
The short answer is yes, DeskIn is designed with strong security measures in place. But understanding why it's safe, and how that safety actually works in real-world use, is what truly matters. This guide breaks it down in a clear, practical way so you can decide with confidence.
What Does "Safe" Really Mean for Remote Desktop Software?
Before answering is DeskIn safe to use, it helps to define what "safe" actually means in the context of remote desktop software.
Security isn't just one feature. It's a layered system that protects different aspects of your connection. First, there's data security, which ensures that everything transmitted between devices is encrypted and unreadable to outsiders. Then comes access control, which determines who can connect to your device and under what conditions.
Privacy protection is another key layer. This includes features that prevent others from seeing your screen or accessing sensitive inputs without permission. Finally, account security ensures that even if someone tries to break in, additional verification steps stop unauthorized access. A remote desktop tool is only truly safe when all of these layers work together.
👀 What Is DeskIn Used For? (And Why Security Matters)
To fully understand whether DeskIn is safe, it helps to look at what DeskIn is used for. DeskIn is commonly used for remote work, IT support, cross-device file access, and even high-performance tasks like design or development. These scenarios often involve sensitive data, which makes security not just important, but essential.
Users benefit from DeskIn's stable connection and low-latency performance, but those advantages only matter if the connection is secure. That's why security features are deeply integrated into the platform rather than treated as optional extras.
How DeskIn Protects Your Data and Privacy
DeskIn approaches security as a complete system with multiple protective layers, addressing common concerns about whether the platform is safe and legit for daily use. Here's how it keeps your data secure.
1. End-to-End Encryption
All connections use AES-256 encryption, the same standard trusted by banks and financial institutions. This ensures your data remains protected during transmission, even on public or unsecured networks.
2. Multi-Layered Access Control
Beyond passwords, DeskIn requires various verifications: user access, blacklisting IP and device verification. Even if login credentials are compromised, unauthorized users cannot access your device without passing these additional checks.
3. Privacy-Focused Features
Privacy screen mode lets you black out the host display during sessions, preventing anyone nearby from viewing your activity. Granular permission settings also give you control over file, audio, and input access.
4. Proven Reliability for Daily Use
These security layers work together to make DeskIn a safe choice for everyday workflows, whether you're accessing personal files or managing professional systems remotely.
👀 You may also be interested in
Is DeskIn Safe from Hackers? (Real Risk Analysis)
A more specific concern many users have is: Is DeskIn safe from hackers?
The reality is that no remote desktop software is completely risk-free, but the level of risk depends heavily on how the software is designed and how it's used.
DeskIn minimizes risk through encryption, authentication, and access controls. These features make unauthorized access extremely difficult. However, like any online tool, user behavior still plays a role. Weak passwords, sharing access credentials, or using unsecured devices can introduce vulnerabilities.
In practice, High-definition Remote Desktop App DeskIn provides the tools needed for a secure environment. As long as users follow basic security practices, the likelihood of unauthorized access remains very low.
Is DeskIn Safe on Mobile Devices (iPhone & Android)?
Mobile access introduces another layer of concern, especially for users asking is DeskIn safe for iPhone or is DeskIn safe for Android.
DeskIn is designed to maintain the same level of security across devices. Data transmitted between your phone and remote computer is still encrypted, and login protection remains in place through authentication features.
Unlike some remote tools, DeskIn does not require risky system modifications such as rooting or jailbreaking. This significantly reduces potential vulnerabilities on mobile devices. Whether you're accessing a work computer from an iPad or managing files through your phone, the security model remains consistent, making it a safe option for cross-device use.
Is DeskIn Free to Use? And Does Free Mean Less Secure?
Another common question is whether DeskIn is free to use, and more importantly, does free access affects security. DeskIn does offer a free version, but security features are not reduced or removed in lower-tier plans. Encryption, authentication, and access control remain in place regardless of pricing.
Security is part of the core infrastructure, not a premium add-on. This means users can still benefit from a secure connection even when using the free version.
Tips to Use DeskIn Safely (Best Practices)
Even with strong built-in protection, safe usage also depends on your own habits. Following a few key practices can help you maintain control over your account and devices:
Use strong passwords: Create unique, complex passwords for your DeskIn account to prevent unauthorized access through credential guessing.
Enable two-factor authentication: Adding this extra verification step ensures that even compromised passwords won't grant access to your device.
Never share access credentials: Keep your login details private and avoid sharing them with others, even temporarily.
Always log out after sessions: End remote connections when they're no longer needed to prevent unattended access to your system.
Keep devices updated: Regular updates ensure you have the latest security patches and protection against emerging vulnerabilities.
Final Verdict: Is DeskIn Safe and Reliable?
So, is DeskIn safe?
In most practical scenarios, the answer is yes. Its combination of encryption, authentication, and access control creates a secure environment for remote access, whether you're working from home or managing devices across locations.
At the same time, security is always a shared responsibility. DeskIn provides the foundation, but safe usage habits ensure the best protection. When both work together, DeskIn becomes a reliable and secure choice for remote desktop access.
Control Windows from Your Mac with Chrome Remote Desktop: Setup Guide & Pitfalls | DeskIn Japan
Introduction: Getting Past the Mac–Windows Divide
For Mac users working in Japan, there's a recurring frustration: a piece of software you need exists only on Windows. Whether it's CAD tools, Japanese accounting software (kaikei sofuto, 会計ソフト) required by your company, Windows-exclusive business systems, or PC games — the need to run Windows doesn't go away just because you prefer Mac.
The good news is you don't need to buy a separate Windows machine. Google's free tool Chrome Remote Desktop lets you control a Windows PC remotely from your Mac, and the setup is simpler than most people expect.
This guide walks through the fastest path to getting connected, and then covers the cross-platform quirks that tend to catch Mac users off guard once they're actually in a session.
Setup: Connecting Your Mac to a Windows PC
Chrome Remote Desktop's configuration is straightforward, but it requires preparation on both machines — the Windows PC being controlled (the host) and the Mac doing the controlling (the client). Here's the fastest path to a working connection.
On the Windows PC (Host)
Start by allowing remote access on the Windows machine.
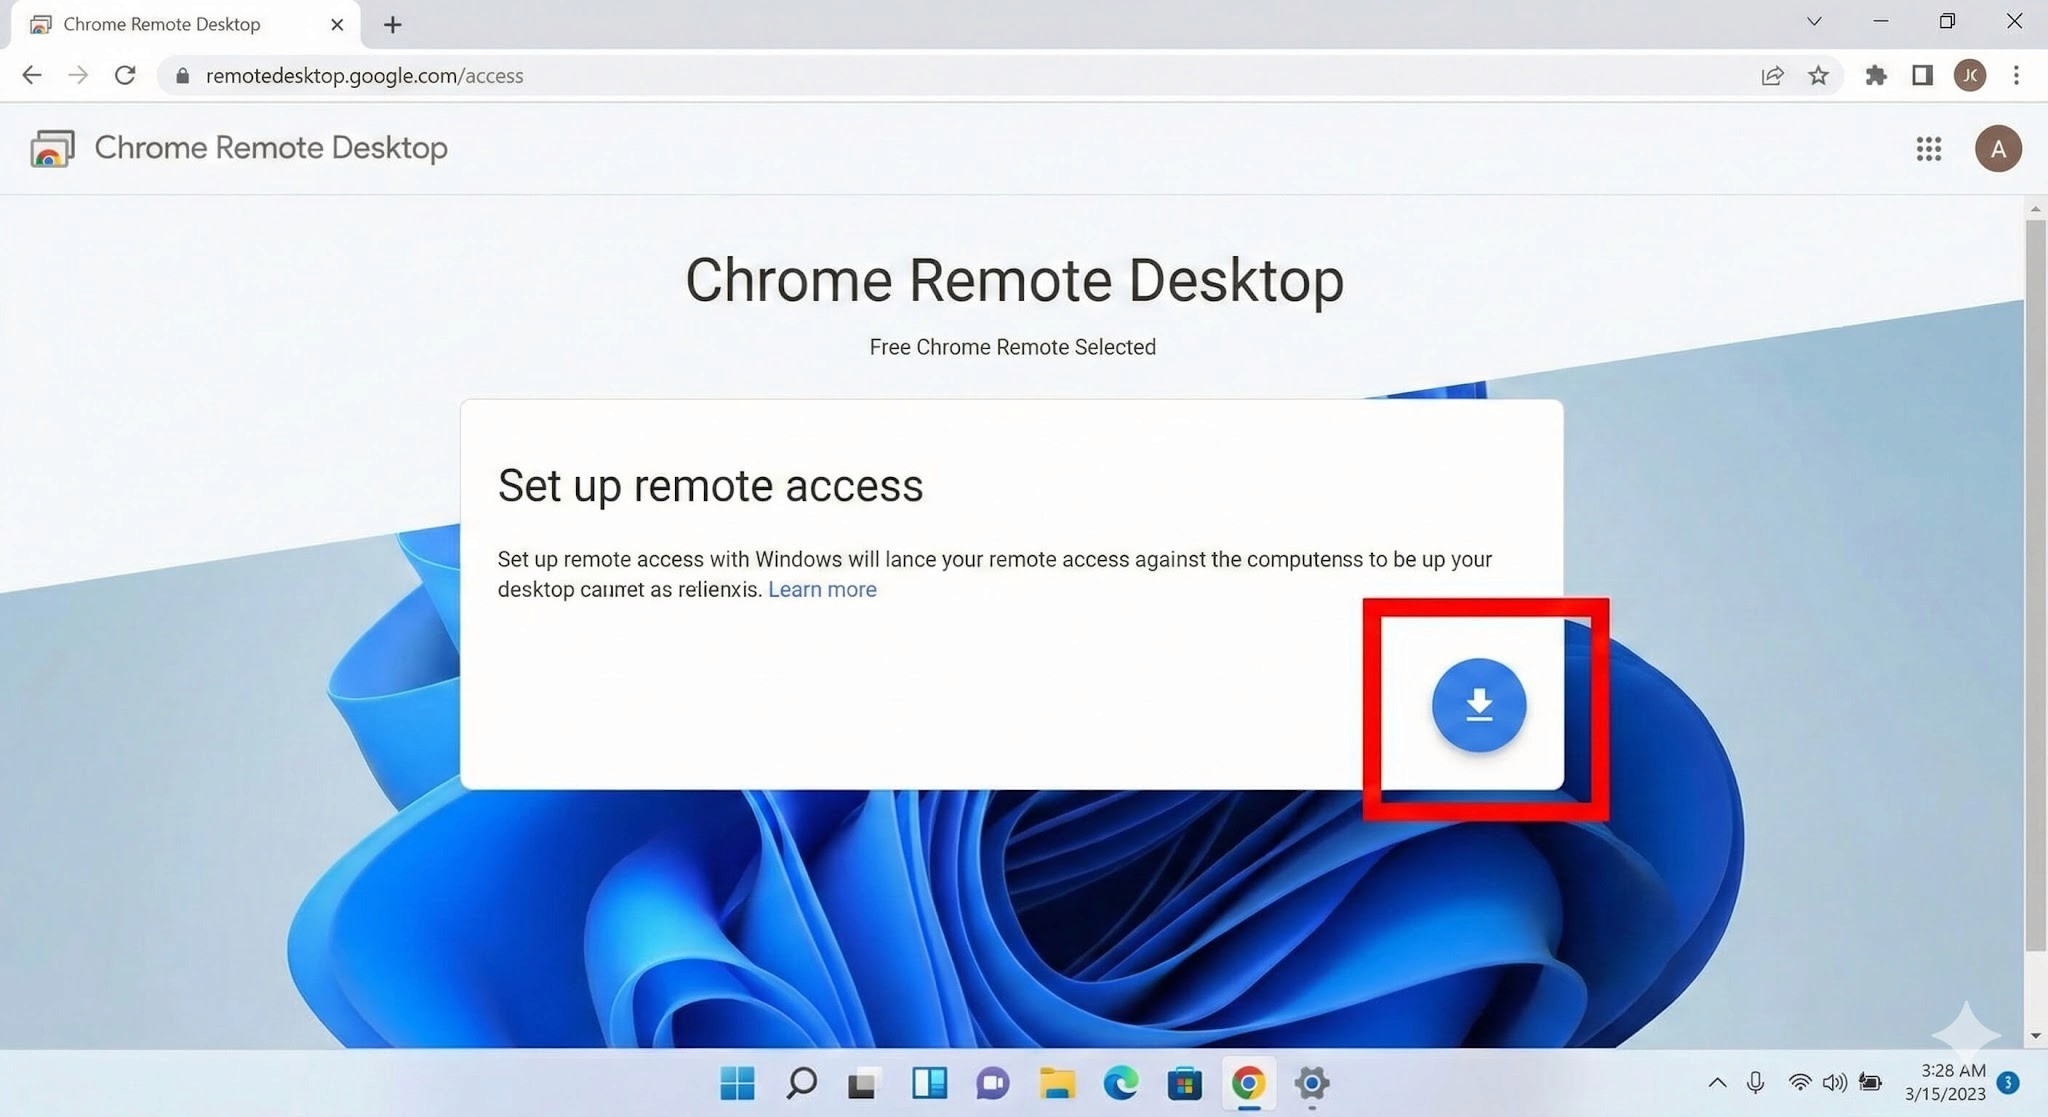
Install the extension and host software
Open Chrome and go to the Chrome Remote Desktop access page. Under "Set up remote access," click the blue download icon. Follow the prompts to add the Chrome extension and run the installer (.msi file).
Name your PC and set a PIN
After installation, give the PC a name you'll recognise. Then set a PIN of at least six digits — you'll need to enter this every time you connect from your Mac, so write it somewhere safe.
3. Important: Disable Sleep Mode
This is the step most people miss, and it will prevent connections entirely if skipped. A Windows PC in sleep mode cannot be reached remotely.
Go to Settings → System → Power & Battery
Under "Screen and Sleep," set "Put device to sleep after" to Never when plugged in
On the Mac (Client)
Once the Windows side is configured, connecting from your Mac is simple.
Log in to the access site
Open Chrome on your Mac and navigate to the same Chrome Remote Desktop access page. Make sure you're logged into the same Google account you used when setting up the Windows PC.
Select your PC and authenticate
Your Windows PC will appear under "Remote devices." Click it and enter your PIN — the Windows desktop will open inside your Chrome browser.
3. Connection complete
You can now control Windows using your Mac's keyboard and mouse.
Tip: For quicker access in the future, use Chrome's "Install as app" option to add Chrome Remote Desktop to your Mac's Dock — saves a few clicks every time.
H2: Cross-Platform Pitfalls: What Mac Users Run Into
Chrome Remote Desktop is easy to set up, but once you're inside a session, the Mac–Windows gap creates friction points that directly affect how much work you can actually get done. These are worth understanding before you depend on CRD for anything important.
H3: Keyboard Mapping Conflicts
The biggest source of frustration for Mac users is the modifier key difference.
Command key vs Control key: On Mac, you copy with
Command + C. On Windows, it'sControl + C.. In a remote session, Mac's Command key is sometimes interpreted as the Windows key rather than Control — meaning the shortcuts your hands have memorised simply don't work as expected.The Command + Q problem: This one catches people regularly. If you're working in a Windows application and instinctively press
Command + Qto close it, you don't close the Windows app — you close Chrome on your Mac, ending the remote session entirely. It happens more than once before you break the habit.
Power Management: No Wake on LAN Support
This is a significant operational limitation, and worth understanding before you depend on CRD for regular remote access.
Wake on LAN (WoL) not supported: Chrome Remote Desktop cannot remotely power on or wake up a PC that is off or sleeping. To maintain reliable remote access, the Windows PC must be left powered on continuously.
Always-on requirement: For people living in Japan, where electricity costs are relatively high and there's a cultural awareness around energy waste (mottainai, もったいない — the Japanese concept of waste-aversion that runs through everyday life), leaving a PC running overnight when it doesn't need to be is a friction point both practically and psychologically.
No more struggling with key input or power management. Stop here and try DeskIn — built for Mac users. [Install DeskIn for free]
Trackpad and Mouse Feel
The smooth, precise feel that makes Mac trackpads enjoyable doesn't carry through to a remote Windows session cleanly.
Lost gestures: Mac-specific gestures — three-finger swipes to switch desktops, pinch-to-zoom — don't transmit to Windows correctly and either do nothing or trigger the wrong action.
Unnatural scrolling: Mac's inertial scrolling feels choppy in the remote environment. Right-click response has a slight lag. These are small things individually, but they add up over a full work session.
Performance and Latency
As a browser-based tool, Chrome Remote Desktop is constrained by what it can push through a browser window.
Frame rate cap: Chrome Remote Desktop typically runs at around 30FPS. For standard document editing this is fine, but anything with fast on-screen movement shows obvious lag and ghosting.
Not suited for demanding tasks: Video editing, FPS games, or any application requiring sub-second responsiveness — the latency is too significant to be practical.
Who Should Use Chrome Remote Desktop?
Based on everything above, here's an honest assessment of where CRD works well and where it doesn't. Use this as a checklist before you decide.
✓ Recommended — CRD is a good fit for:
Quick file checks: Accessing a document on your home PC from the office or a café
Occasional admin tasks: Restarting a server, running a quick software update
Light office work: Simple browser-based data entry, sending emails — tasks where speed isn't critical
Zero-cost access: When "free and connected" is the overriding priority over performance
✗ Not recommended — CRD is a poor fit for:
Daily remote work: Working remotely for several hours at a stretch. Keyboard friction and choppy performance become a real source of stress.
Creative work: Video editing, graphic design, CAD. Accurate mouse movement, colour fidelity, and smooth rendering are all compromised.
Latency-sensitive tasks (gaming etc.): Any application where split-second responsiveness matters.
Professionals who need native performance: Not "can I connect" — but "does it feel like my own machine?"
In short: Chrome Remote Desktop is best treated as an emergency backup tool, not a primary workflow. If any of the "not recommended" scenarios describe your situation, a more capable tool is worth exploring.
When You're Ready to Go Further: DeskIn
There's a gap between "it connects" and "it feels like my own machine." If you've spent time with Chrome Remote Desktop and found yourself in that gap — frustrated by keyboard confusion, the always-on power requirement, or choppy performance — DeskIn is the purpose-built solution for exactly those problems.
Smart Key Mapping: Command/Control Auto-Mapping for Mac
One of DeskIn's standout features is its intelligent key mapping that bridges the OS divide automatically.
The Command/Control confusion that CRD leaves unresolved — and the "Command + Q closes Chrome" problem that ends remote sessions unexpectedly — are both solved. Your Mac keyboard layout works as expected in Windows, without workarounds. You can type at full speed without stopping to think about which key does what.
Wake on LAN — Start Your PC Only When You Need It
"I want to connect from outside, but I don't want to leave my PC running all day..." — DeskIn solves this.
With Wake on LAN (WoL) support, you can remotely power on a Windows PC from your Mac — even if it's shut down or sleeping. Start it when you need it, work, then let it sleep again. Less electricity, less wear on hardware, and a smarter way to work.
4K/60FPS Performance: The "Local Machine" Feel
DeskIn streams at 4K resolution and up to 60FPS — far beyond what CRD's browser-based approach can achieve.
Whether you're doing fine-detail design work, editing video, or playing a game, the response feels close to native. The lag that makes CRD frustrating for demanding tasks effectively disappears.
iPad and Mobile: Fully Connected on the Go
DeskIn's performance advantage extends beyond Mac to mobile — connecting from an iPad or smartphone delivers the same quality experience.
Use your iPad as an extended display for Windows, or connect a mouse and keyboard for a complete remote work setup. Gesture support is optimised for touch in a way that CRD's mobile app isn't. If you move between Mac and iPad regularly, DeskIn handles both well.
Performance Comparison: Chrome Remote Desktop vs DeskIn
Feature | Chrome Remote Desktop | DeskIn |
Primary use case | Occasional access / emergency use | Business, creative work, gaming |
Display quality | Up to 30FPS (choppy) | 4K / 60–144FPS (extremely smooth) |
Keyboard mapping | Basic — Command/Ctrl conflicts | Auto-optimised for Mac/Windows (no conflicts) |
Wake on LAN | Not supported — PC must stay on | Supported — start PC remotely |
Input feel | Noticeable lag, gesture loss | Low latency, Mac-native feel |
Cost | Free | Free tier available / Pro version |
Summary
Chrome Remote Desktop earns its place as an entry-level tool. Its ease of use and zero cost make it a great starting point for quick file access, occasional light tasks, and situations where budget is the overriding factor.
But if you're using a remote desktop regularly — for work, creative projects, or gaming — the accumulated frustrations of keyboard conflicts, always-on power requirements, and performance caps start to outweigh the convenience of free.
When that point arrives, DeskIn is the obvious next step: a tool designed from the ground up for people who need remote access to actually feel like working locally. Whether you're at your apartment, in a café in Kichioji, or somewhere further afield — your Windows machine should feel like it's right in front of you.
Experience professional-grade performance now — [Download DeskIn free and try it]
Chrome遠端桌面無法安裝
當您需要遠端連線時,Chrome 遠端桌面是一個常見的選擇。然而,許多用戶在安裝 Chrome 遠端桌面時遇到困難,無法順利使用。本文將説明一些常見的無法安裝的原因,並給出可靠的解決方法。
Chrome 遠端桌面無法安裝的原因及解決方案
1、網絡連接問題:
網絡不穩定或速度過慢,導致下載的安裝包不完整或損壞。
解決辦法:檢查網絡狀況,確保網絡連接穩定且速度足够快。檢查防火牆和路由器設定,確保它們允許Chrome遠程桌面的下載和安裝。
2、系統兼容性問題:
操作系統版本不兼容Chrome遠程桌面的當前版本。系統沒有更新或缺少必要組件,無法支援安裝。
解決辦法:Chrome遠端桌面支援在iOS、macOS、Chrome OS、Android、Windows 、Linux上使用,請確保您的操作系統版本與Chrome遠程桌面的要求相匹配。檢查系統更新並安裝所有必要的組件。
系統要求:
Windows(搭載 Intel 處理器)-Windows 10及以上
Windows(搭載 ARM 處理器)-Windows 11 及以上
macOS-macOS 11 Big Sur 及以上
Linux-Wayland 和 X11 顯示協定,自動適配
Android-Android 8.0 Oreo 及以上
iOS/iPadOS-iOS 15 及以上
其他要求:
瀏覽器:需要最新版 Google Chrome 或 Chromium
網路:需穩定的網路連線以保證良好的遠端控制體驗
3、安全軟體干擾:
電腦上的殺毒軟體、防火牆或其他安全設定將Chrome遠程桌面識別為惡意軟體或未經授權的應用程式。
解決辦法:暫時禁用安全軟體:在安裝過程中,暫時禁用殺毒軟體、防火牆或其他可能干擾的安全設置。安裝完成後,重新啟用這些設置,並確保它們已正確配置以允許Chrome遠程桌面的運行。
4、權限不足:
當前用戶帳戶缺乏安裝新應用程式的權限。系統管理員設定了阻止安裝未經批准的應用程式。
解決辦法:以管理員身份運行安裝程式:右擊安裝程式,選擇“以管理員身份運行”。
如果系統提示輸入管理員密碼或確認,請輸入相應信息。
5、登記表問題:
舊版Chrome或Chrome遠程桌面的登記表殘留項干擾了新版的安裝。
解決辦法:清理登記表:使用regedit工具查找並刪除與Chrome或Chrome遠程桌面相關的舊登記表項(請先備份登記表)。
6、安裝包問題:
下載的安裝包本身存在缺陷或已損壞。
解決辦法:重新下載安裝包:從Chrome官方網站或其他可靠來源重新下載Chrome遠程桌面的安裝包。在下載過程中,確保網絡連接穩定,以避免下載的檔案損壞。
如果您嘗試解決後仍然無法正常使用Chrome遠端桌面,可以考慮一個更穩定的選擇。
DeskIn遠端桌面:更好的遠端連線選擇
DeskIn是一款專爲個人使用者設計的遠端桌面軟體,不僅安裝簡單,還提供了比Chrome遠端桌面更豐富的功能和更流暢的連缐體驗。
DeskIn 的特點:
簡單安裝,兼容性強:DeskIn 支援多種作業系統,包括 Windows、macOS、iOS 和 Android,也支援在web端發起連缐。安裝簡便,無需依賴特定瀏覽器或帳戶。
穩定流暢的操作:DeskIn 提供穩定的連線,沒有連缐時長限制,長時間連缐不斷連;延遲低至40ms,特別適合高效辦公和遠端支援需求。
靈活登入方式:DeskIn 除了可以只用信箱注冊帳號,也支援使用 Google 帳戶、Apple ID一鍵注冊登入,同時提供更多元的登入選擇,適合各種網路環境。
高安全性:DeskIn 使用256位元加密技術,確保資料傳輸安全,也有多種安全設定,如無人值守安全密碼、隱私螢幕、黑白名單等等,防止裝置被惡意連缐。
功能更豐富:DeskIn最高支援4K60FPF/2K144FPS,還支援手動調節,還有螢幕擴充,遠端CDM、投影、語音通話等免費功能,適合更多使用場景。
如何快速開始使用 DeskIn
下載並安裝 DeskIn:
在用於控制與被控制的裝置中分別安裝並開啓DeskIn,注冊一個免費賬戶並登入,如果你是首次在新裝置登入,需要到注冊信箱完成驗證。
2、快速連線:
在主控裝置上輸入被控制的裝置的ID,點擊連缐,使用密碼連缐或免密連缐方式完成連缐。
等待幾秒后,您就可以控制遠端裝置了,遠端裝置就好像在您身邊一樣。
總結
若您遇到 Chrome 遠端桌面無法安裝的問題,DeskIn 是更穩定且功能強大的替代方案。DeskIn 不僅安裝方便,還提供穩定的連線和高安全性,是遠端連線的理想選擇。
無法透過電子郵件傳輸大型檔案?探索三種簡單、安全的方法,輕鬆傳輸大型檔案。
很多人在傳輸檔案時會選擇郵件傳送,但大多數時候僅限於小型檔案傳送,需要傳送大型檔案時,發現郵箱傳送有大小限制,這時應該怎麽辦?以下教你三種方法,讓你輕鬆傳輸大型檔案。
方案一:壓縮檔案後再傳送檔案
電子郵箱通常對上傳的附件大小有限制(如Gmail 僅允許 25MB 或更小的檔案附件,而Outlook是20MB)。我們可以先壓縮大型檔案到合適的大小,然後再將它以附加檔案的形式上傳到郵件,最後發送。
優點:壓縮檔案是最簡單、直接的方法減小檔案尺寸以達到郵件附件大小要求,之後就可以直接透過附件直接傳輸檔案。
局限性:檔案壓縮通常只能將檔案壓縮為原來的一半,所以此方式只適合檔案超出大小限制不多的狀況,並且在發送郵件過程中,壓縮和解壓縮檔案可能會進一步減慢傳送進程,甚至可能導致檔案遺失或損壞,例如經壓縮後的大型影片的畫質會變差。
如Gmail 僅允許 25MB 或更小的檔案附件
方案二:使用雲端硬碟傳輸檔案
除了用郵件傳送外,還有其他傳送大型檔案的方法,例如使用雲端硬碟。先把大型檔案上傳到雲端硬碟(例如Google Drive),通過分享連結的方式傳送給對方。
優點:
這種方式可以比較好地保證檔案品質,而且檔案可以保存在雲端,隨時再做取用
局限性:
Google Drive的免費儲存空間只有15GB,其他的雲端硬碟也有類似的免費儲存空間限制,可能需要額外購買儲存空間。
將檔案上傳到硬碟、在硬碟下載檔案這兩個步驟的要先後進行,上傳和下載速度取決於您的網路狀況,耗時較長。
方案三:使用DeskIn遠端軟體傳送檔案(小編力薦)
目前市面上絕大部分的遠端軟體都支援檔案傳輸,DeskIn在普通的檔案傳輸功能基礎上進行了改進,讓檔案傳輸的使用體驗更好:
1.免費版已經支持不限大小、數量的檔案傳輸;
2.傳輸速度快,最高可達12MB/s;
3.使用 256 位元端對端加密,確保您的文件保持機密並防止未經授權的存取;
4.不需像雲端硬碟那樣上傳、下載檔案,可以從一台設備直接傳送到另一台設備,節省時間;
5.DeskIn支持在不同裝置和作業系統之間進行無縫檔案傳輸,無論您使用的是 Windows PC, Mac 還是行動設備,DeskIn 都可以讓您輕鬆地跨平台傳送檔案。
郵件傳送直接輸入對方的郵箱賬號進行傳輸,差一個字母或數字就會變成另一個郵箱,傳送出去還無法撤回,有一定的安全隱患。使用DeskIn傳送檔案時,輸入設備代碼進行連缐後還有密碼驗證,或是對方電腦手動認證,避免了傳錯對象的情況,安全性大大提高。
使用DeskIn進行檔案傳輸,既不用犧牲畫質,又不用花費更多的時間,還不用擔心跨平台的限制,安全性也更強,可謂是一舉多得。
如何使用DeskIn進行檔案傳輸?
1.在傳輸裝置和接受裝置上分別下载 DeskIn,注冊一個免費賬戶並分別登入,如果你是首次在新裝置登入,需要到注冊信箱完成驗證。
2.登入成功後,輸入接受檔案裝置的設備代碼,選擇檔案傳輸,然後選擇連缐,可以選擇密碼驗證或手動驗證。
3.電腦端有三種方式找到檔案傳輸:
(1)在「遠端控制」>> 輸入遠端控制設備代碼>>選擇「檔案傳輸」>>「連線」。
(2)在「設備列表」找到要傳輸檔案的設備,在右側功能區選擇「檔案傳輸」。
(3)在遠端控制頁面DeskIn圖標的工具欄裡找到「檔案傳輸」。
找到「檔案傳輸」後,點擊進行密碼或免密驗證連線,連線成功後就會出現檔案傳輸頁面。
在檔案傳輸的頁面裡,點選想要發送的檔案,並選好傳輸的目標位置,點擊發送方的「發送」按鍵,即可完成傳輸,你可以點擊發送以傳送,也可以直接拖拽需要傳輸的檔案完成傳送。
4.行動裝置端有三種方式找到「檔案傳輸」:
(1)「遠端控制」>> 輸入遠端控制設備代碼>>選擇「檔案傳輸」。
(2)在「設備清單」找到要傳輸檔案的設備,點擊進入後選擇「檔案傳輸」。
(3)遠端控制連線成功後,「互動」>>「檔案傳輸」。
找到「檔案傳輸」後,點擊進行密碼或免密驗證連線,連線成功後就會出現檔案傳輸頁面。
點擊「傳送檔案」,選擇行動裝置裡的檔案,「更改位置」可以選擇傳輸的目標位置,最後點擊「傳送」。
選擇「下載檔案」可以下載遠端裝置中的檔案,選中要下載的檔案點擊「下載」即可。
結論
本文介紹了傳送大型檔案的3種方法,分析了它們的優點和局限性。其中比較建議你使用第三種方法——使用DeskIn進行檔案傳送。它的免費版已經沒有檔案大小、數量的限制。傳輸速度也很快,傳送的影片畫質也不會打折扣,支持跨平台傳輸,安全性比郵件傳送更高,是傳送大型檔案的理想選擇。
三星平板變身第二螢幕完整攻略!無線設定與高效軟體2大方法一次掌握
你是否厭倦了在無數視窗、檔案與網頁間反覆切換,導致工作效率低下、思緒不斷被打斷?實現「無需切換視窗,資料對照一目了然」的高效多工作業,其實比你想象中更簡單。若不想額外購置硬體,你手上的平板就是最佳解答。大多數平板需要第三方軟件,但三星平板憑藉官方內建的「延伸螢幕」功能,提供比其他安卓平板更流暢無縫的體驗。只需要簡單的幾個步驟,就可以將三星平板當外接螢幕。
本文將一步步引導你,如何將三星平板輕鬆變身為 Windows 電腦的無線外接螢幕,無論是筆電或 PC 皆適用,助你立即擴展工作視野,釋放完整生產力。
尋找免費且快速將三星平板當外接螢幕的方法?、
DeskIn 支援將三星平板設定為電腦的雙螢幕,從而擴展您的工作或娛樂空間,顯著提升多工作業的效率。直接查看方法二獲取更多詳情。
直接下載DeskIn,體驗其流暢的螢幕擴充功能!
方法一:使用三星官方「延伸螢幕」功能無線連接
將三星平板作為電腦的外接顯示器,主要可以透過官方內建的「延伸螢幕」功能來實現。這項功能讓相容的三星平板能透過無線方式,直接變身為 Windows 電腦的第二螢幕。
不僅能夠充分利用閒置的平板裝置,無需額外花費購置專用螢幕,節約成本效益,同時無線連接讓它在會議演示或團隊協作時格外便利。不過,這項方案也有些許限制需要留意,它對設備有特定要求,需要相容的三星平板與較新版本的Windows系統才能使用,且在無線傳輸下可能產生些微延遲,流暢度表現可能不如專業外接顯示器或透過專業軟體的有線連接方案。
三星平板作爲延伸螢幕的要求
裝置要求:三星平板的延伸螢幕功能僅 One UI 3.1 以上版本的 Galaxy Tab S8 和 S7 系列產品支援。另需已安裝了「無線顯示器」功能的 Windows 10 v2004或以上版本電腦使用,如電腦沒有安裝,可以到「設定」→「系統」→「選用功能」→「新增功能」搜索「無線顯示器」點擊安裝。
網路要求:注意兩者需要連接到同一網路
【4 步】設定三星平板作爲 Windows 無線延伸螢幕
步驟一:打開三星平板電腦,從平板電腦螢幕頂部向下拉,開啟「快速設定面板」工具欄。找到「第二螢幕」,點擊進入。
步驟二:保持平板停留在「第二螢幕」畫面中(如下圖)
注:若您的三星平板與 Galaxy Book 登入同一個三星帳號,可直接從步驟三開始透過 Galaxy Book 連線
步驟三:在電腦同時按下「Windows鍵+K鍵」,從彈出的裝置清單面板找到您的三星平板並點選,您的電腦就會連接到平板。
步驟四:連接成功后,若您的平板只鏡像電腦的内容,可點擊「變更投影模式」,將投影模式切換至「延伸」即可。當連線成功後,您的平板就會變成電腦的無線第二螢幕,可以開始享受更高效的多工作業囉!
不過,萬一您在無線連線時覺得畫面有些延遲或不夠流暢。別擔心, 您可以直接試試下面更穩定的「方法二:使用專業軟體 DeskIn」,透過Wi-Fi或有線網路都能獲得媲美實體螢幕的流暢體驗!
你可能感興趣:
方法二:更簡單好用的跨系統延伸螢幕工具 DeskIn
上面介紹的方法設定相對比較簡單,但是需要兩者都在同一網路下才可以使用,而且僅適用三星平板和Windows電腦。若您在尋找更全面、更簡單易用的延伸螢幕解決方案,推薦你使用DeskIn遠端桌面。
DeskIn 是一款支援iOS、Android、Windows、Macbook之間跨平台延伸螢幕的效率提升工具,不僅可以免費使用,設定也超級簡單。DeskIn最强大的地方在於,它不僅可以幫你實現平板作爲第二螢幕,還可以讓你不花錢就能用平板遠端存取電腦、掃碼一鍵投影平板畫面到電腦、進行檔案存取甚至在平板上玩電腦PC遊戲,一個軟體滿足你所有場景需求!性價比超高!
DeskIn:更強大靈活,不限裝置型號,低延遲,功能豐富
低延遲高畫質,可手動調整幀率和解析度,最高支援 4K60fps,能讓游標移動、筆刷觸控近乎即時響應,即使進行文字處理或網頁瀏覽也倍感舒適。
全平台支援,無論你手邊的是三星 Galaxy Tab、iPad、Android 其他品牌平板,還是 Windows 筆電或 MacBook,都能直接使用,無需區分系統。
無須同一網路下即可延伸, 傳統延伸螢幕需依賴同一區域網,但 DeskIn 讓你能透過 4G/5G 行動網路或任何可上網的Wi-Fi,隨時隨地將平板變成電腦的延伸螢幕。
更多免費附加功能:除了使用平板變第二螢幕的功能,DeskIn還支援很多實用功能,如遠端操控、鏡像投影、跨裝置檔案傳輸等等,都讓你的雙螢幕工作流程更加完整順暢。
立即下載DeskIn遠端桌面!免費體驗高清順暢的延伸螢幕和遠端操控功能!
【3步】使用 DeskIn 把三星平板作爲 Windows 第二螢幕
步驟一:首先在平板和電腦上分別安裝DeskIn,注冊一個免費賬戶並登入,如果你是首次在新裝置登入,需要到注冊信箱完成驗證,更加安全。
步驟二:在電腦端DeskIn上點擊左邊菜單「鏡像屏/擴展屏」,點選「立即進行螢幕擴展」>> 選擇你想要進行螢幕擴充的裝置比如您的三星平板,并點擊「開始螢幕擴展」,即可成功延伸螢幕,擁有一個完整的雙螢幕工作環境,在兩個螢幕間無縫拖曳視窗,實現高效多工處理。
步驟三(非必須):若進行螢幕擴充後,您發現平板只是鏡像電腦螢幕上的内容,請前往系統顯示器設定,將螢幕選項設定為「延伸這些顯示器」,你還可以根據您的使用習慣,透過拖拽修改1、2兩塊螢幕的左右順序。
更多閲讀
設定三星平板作爲第二螢幕的常見問題
使用三星内建方案無線延伸螢幕時感覺延遲嚴重,畫面卡頓,該如何改善?
首先,請確保電腦與平板連接至同一台 5GHz Wi-Fi 路由器,並避免網路中有其他裝置大量佔用頻寬。其次,關閉電腦與平板上的非必要背景應用程式,以釋放系統資源。
若追求極致流暢體驗,特別是在繪圖或遊戲等場景,建議切換至有線方案。上文提到的 DeskIn 等軟體支援無線連接,提供近乎零延遲的操作反應。
💻立即下載DeskIn遠端桌面!免費體驗高清順暢的延伸螢幕和遠端操控功能!
平板延伸螢幕軟體有哪些推薦?
根據用戶評價,下面為你推薦三款主流的平板延伸螢幕軟體,它們在連接方式和適用場景上各有側重:
DeskIn 支援無線連接,具備跨平台相容性與 4K 高畫質傳輸能力,特別適合需要遠端控制和檔案傳輸的遠距協作場景。
SuperDisplay 提供有線與無線雙模式連接,以其出色的低延遲表現和完整支援 S Pen 壓感功能見長,是繪圖與設計等創意工作的理想選擇。
SpaceDesk 採用無線連接技術,提供免費版本且設定簡單直覺,非常適合預算有限且需要快速設定延伸螢幕的輕度辦公使用者。
結論:我該選擇哪一種方法?
本文介紹了 2 種方法實現三星平板用作Windows的第二螢幕。若你追求設定的便利性,且裝置符合相容條件,那麼優先使用三星官方的「延伸螢幕」功能,會是最無縫、最直接的選擇。
但若你更重視效能與靈活性,例如使用的是舊款平板、需要更低的操作延遲,或是希望解鎖遠端控制等進階功能,那麼投資像 DeskIn 這類專業的跨系統軟體,無疑是效能更強大、應用場景更全面的解決方案。無論你選擇哪一種方法,都能輕鬆釋放平板的潛在價值,告別視窗切換的混亂,大幅提升你的多工作業效率。
立即下載DeskIn遠端桌面!免費體驗高清順暢的延伸螢幕和遠端操控功能!
如何知道有人遠端監控你的手機?7 大徵兆 + 實用解決方案
你是否曾經覺得手機怪怪的?沒有原因的自動重新開機、通話時聽到奇怪雜音、或是手機莫名被鎖,無法解鎖?這些看似平常的小狀況,其實可能是手機被監控的警訊。
根據資安統計,台灣地區每年因手機被駭導致的詐騙損失金額高達數億元,而長輩群體因對 3C 產品不熟悉,更容易成為詐騙集團鎖定的目標。詐騙手法日新月異,只要不小心點開一個看似正常的連結或網頁、下載了可疑軟體,手機就可能被遠端惡意監控,個人資料、銀行帳號、通訊內容全都暴露在風險之中。
這篇文章將帶你深入了解怎麼知道手機被監視的關鍵徵兆,以及發現異樣時該如何檢查並解除監控,同時分享如何使用安全的遠端工具協助長輩進行手機健檢,從根本預防手機被惡意入侵的風險。
手機被監控的 7 大可疑徵兆
懷疑手機被監控卻不確定?以下 7 個異常現象是最常見的電話被監聽徵兆,如果你的 iPhone 或 Android 手機出現多項狀況,就需要提高警覺了。
徵兆一:手機變得異常耗電或發熱
如果你的手機在正常使用下,電池消耗速度突然比平常快很多,或是沒在使用時機身也持續發熱,這很可能是手機被監視的第一個警訊。
監控軟體通常會長時間在後台悄悄運作,持續追蹤你的位置、通話記錄或訊息內容,這些動作都會大量佔用手機效能,導致電池快速消耗並產生熱能。當然,如果是電池健康度下降或正在玩高耗電遊戲,也可能出現類似狀況,但若排除這些因素後仍有異常,就要特別注意了。
徵兆二:手機運作突然變得很慢
你的 iPhone 原本運作流暢,最近卻經常卡頓、開 App 變慢?如果不是因為安裝太多軟體或照片占滿儲存空間,那麼手機突然變慢很可能是因為有監控程式在背景執行,占據了大量內存和處理效能。
這種效能下降通常不會立刻出現,可能要經過幾週才會逐漸察覺,這也是為什麼許多人被監控了還渾然不知。
徵兆三:手機出現自動異常行為
手機自動會動是最明顯的被駭徵兆之一。如果你發現手機會突然自己重新啟動、在有電的情況下無預警關機,或是螢幕在沒有通知時突然亮起,甚至偶爾看到螢幕好像自己在滑動,這都可能代表有人正在遠端操控你的手機。
現代智慧型手機不應該在沒有明確原因的情況下自行重啟或關機,如果經常發生這種狀況,建議立即進行全面檢查。
徵兆四:手機螢幕被鎖,無法自行解鎖
如果你發現手機螢幕突然被鎖定,無法用原本的密碼、指紋或 Face ID 解鎖,這是極高風險的被入侵或被遠端控制警訊。某些惡意監控軟體或駭客程式能夠強制修改鎖屏設定,甚至替換你的系統密碼,讓你完全無法進入手機主畫面。 這種情況往往代表裝置權限已被竊取,駭客可能正試圖鎖定資料或勒索贖金。
徵兆五:收到陌生訊息或好友邀請
如果你在社群媒體上收到陌生人的好友邀請或群組邀請,對方卻知道你的名字、電話或其他個人資訊,這很可能代表手機被遠端監控導致個資外洩。
此外,如果手機收到內容奇怪、充滿符號或亂碼的簡訊,千萬不要點擊裡面的連結,因為這些可能是針對監控軟體發送的控制訊息,或是試圖讓你下載惡意程式的釣魚訊息。
徵兆六:瀏覽器出現莫名的瀏覽記錄
養成定期檢查手機瀏覽記錄的習慣非常重要。如果發現瀏覽器歷史記錄中出現你從未造訪過的網站,或是下載了你沒印象的檔案,這可能表示有人曾經遠端操作你的手機。
同時也要小心莫名訊息中帶有連結的內容,盡量不要點開陌生訊息的連結,因為一旦點開,手機可能會迅速感染病毒程式。
徵兆七:通話過程中聽到奇怪的雜音或回音
現代通訊技術已經相當成熟,通話品質一般都很穩定。如果你在與他人通話時,經常聽到不明來源的雜音、回音、嗶嗶聲或其他人的聲音,即使切換網路或重撥也無法改善,這很可能是手機被監聽的明確徵兆。
傳統的電話竊聽雖然已不常見,但加密不良或間諜軟體仍可能造成通話干擾,尤其在使用 LINE、FaceTime 或其他通訊軟體時更容易出現異常。
如何檢查並解除手機被遠端監控?6 個實用方法幫到你
當你懷疑手機被遠端監視時,可以透過以下 6 個方法進行全面檢查,並採取相應的解除措施。這些方法同時適用於 iPhone 和 Android 手機。
💡溫馨提示:如果你需要協助長輩檢查手機但人不在身邊,可以使用安全的遠端軟體 DeskIn 直接操控他們的手機進行排查,避免電話溝通不清楚的困擾。
方法一:檢查手機是否有隱藏或可疑程式
不管是 Android 還是 iPhone,都提供了隱藏 App 的功能,這也成為監控軟體藏身的最佳位置。以下是檢查隱藏程式的詳細步驟:
iPhone 檢查步驟:
在手機主畫面一直向右滑到最後,進入「App 資料庫」
尋找「隱藏項目」或類似的分類資料夾
透過 Face ID 或密碼驗證後,檢查是否有不認識的 App
同時前往「設定」>「一般」>「iPhone 儲存空間」,查看所有已安裝的應用程式
Android 檢查步驟:
前往手機「設定」
點選「應用程式」或「應用程式管理」
找到「顯示隱藏的應用程式」選項
仔細檢查是否有不明來源的程式
如果發現任何陌生軟體或名稱可疑的 App(例如包含「spy」、「monitor」等字眼),請立即卸載。若發現有無法刪除的軟體,建議尋求專業資安人員協助。
方法二:調整應用程式定位權限,避免行蹤被追蹤
許多監控行為都是透過定位功能來追蹤你的行蹤。幸好 iPhone 和 Android 都提供了精細的定位權限管理,你可以透過以下方式加強防護:
iPhone 定位權限設定:
前往「設定」>「隱私權與安全性」>「定位服務」
逐一檢查每個 App 的定位權限設定
對於高風險程式(如瀏覽器、社交軟體),將「準確位置」選項關閉
在「定位服務」頁面向下滑到底部,點選「系統服務」
選擇「重要位置」,清除歷史定位記錄
這項「模糊定位」功能可以讓 App 只獲取你的大概位置,而非精確座標,有效降低被追蹤的風險。
Android 定位權限設定:
前往「設定」>「應用程式」
選擇「定位服務」或「位置資訊」
關閉「Google 定位精確度」中的「提高定位精準度」選項
逐一檢查各 App 的位置權限,設定為「僅在使用時允許」
方法三:安裝防毒軟體或反追蹤程式
安裝可靠的防毒軟體是預防手機被監視的有效方法,特別是 Android 裝置更需要額外防護。以下是幾款值得信賴的安全軟體:
Surfshark Antivirus:提供即時防護功能,可自動掃描下載內容和 App
Malwarebytes:專門偵測間諜軟體和惡意程式
Norton Mobile Security:整合防毒、防護和裝置追蹤功能
Avast Mobile Security:免費版本已包含基礎掃描功能
重要提醒:下載任何軟體時,務必前往官方 App Store 或 Google Play 商店,不要透過連結、QR Code 或第三方網站安裝程式,以免下載到假冒的惡意軟體。
方法四:定期清理瀏覽記錄與快取資料
定期清除瀏覽記錄不僅能保護隱私,也能移除潛藏的追蹤 Cookie 和惡意腳本。
Android 清理步驟:
打開 Google Chrome 瀏覽器
點選右上角的「⋮」按鈕
前往「設定」>「隱私權和安全性」
選擇「清除瀏覽資料」
勾選要清除的項目(建議全選),設定時間範圍後確認
iPhone 清理步驟:
前往「設定」
向下滑動找到「Safari」
點選「清除瀏覽記錄及網站資料」
確認清除
建議每週至少執行一次清理,養成良好的資安習慣。
方法五:更新 Google 帳號或 Apple ID 密碼
如果你的手機被監控,帳號密碼很可能也已經外洩。由於 Google 帳號和 Apple ID 連結了許多重要服務(包括雲端備份、電子郵件、支付資訊等),立即更改密碼能有效降低風險擴大。
更改 Google 帳號密碼:
開啟 Google 帳戶管理頁面
進入「安全性」選項
選擇「登入 Google」>「密碼」
輸入新密碼後點選「變更密碼」
建議同時啟用「兩步驟驗證」增加安全性
更改 Apple ID 密碼:
前往 iPhone「設定」
點選最上方的帳號名稱
選擇「密碼與安全性」>「更改密碼」
依照螢幕指示完成密碼更新
考慮開啟「雙重認證」功能
密碼設定建議:使用至少 12 位元的強密碼,結合大小寫字母、數字和符號,避免使用生日或常見詞彙。
方法六:重置手機為原廠設定(最後手段)
如果以上方法都無法解除監控,恢復原廠設定是最徹底的解決方式。這個操作會刪除所有資料、應用程式和設定,將手機恢復到出廠狀態。
重要警告:此方法會清除所有內容,使用前務必先備份重要資料!
Android 重置步驟:
前往「設定」>「系統」
選擇「重設」或「重設選項」
點選「清除所有資料(重設為原廠設定)」
確認執行並等待重置完成
iPhone 重置步驟:
前往「設定」>「一般」
選擇「移轉或重置 iPhone」
點選「清除所有內容和設定」
輸入密碼確認後執行
重置完成後,建議先更新到最新系統版本,再逐一安裝需要的 App,並仔細檢查每個程式的權限設定。
爲什麽要定期幫長輩檢查手機是否在被監控?
許多人可能會疑惑:為什麼特別強調要幫長輩檢查手機?以下兩個關鍵原因說明了長輩群體面臨的特殊風險。
原因一:高齡族群已成為詐騙集團的主要目標
根據警政署統計,台灣地區每天因詐騙造成的損失金額動輒數百萬元,其中 60 歲以上長者受騙比例高達 40% 以上。詐騙集團看準長輩手上握有「高額退休金與儲蓄」,透過各種手段接近他們。
除了傳統的電話詐騙,詐騙集團也會透過監控軟體入侵長輩的手機,竊取個人資訊、銀行帳戶、親友聯絡方式等,再根據這些資訊量身打造詐騙話術,成功率大幅提升。
原因二:長輩對數位科技不熟悉,防範意識較低
大部分長輩對智慧型手機和網路安全的認知有限,在使用 iPhone 或 Android 手機時,常會出現以下高風險行為:
隨意點擊陌生訊息中的連結
誤入詐騙群組或參加釣魚活動
下載來路不明的 App
將所有 App 權限都設為「允許」
使用過於簡單的密碼或與他人共用密碼
即使長輩感覺手機怪怪的,往往也不知道該如何檢查或處理,有些甚至堅信「我不會被騙」而不願承認問題。這時候就需要身邊的年輕人多關心,定期協助檢查手機安全狀態,及早發現並排除風險。
使用 DeskIn 遠端軟體,安全協助長輩排查手機監控問題
如果你經常不在長輩身邊,用電話口頭指導他們檢查手機往往事倍功半,長輩聽不懂專業術語,你也看不到實際操作畫面,溝通起來非常費力。
這時候,一款安全、易用的遠端控制軟體就能完美解決這個問題。DeskIn 是專為跨裝置遠端控制設計的軟體,可以讓你在長輩同意後,直接透過自己的手機或電腦操作長輩的裝置,幫他們進行手機健檢、排查可疑程式、調整安全設定等操作。此外,你也可以將 DeskIn 作為家長監控軟體來使用,接遠端幫孩子清除不良訊息,查看手機使用時間,進行軟體管控,保障一家老小的「電子衝浪」安全。
DeskIn 的核心安全防護機制:
銀行級 256 位元加密:所有遠端連線都經過軍規級加密保護
新裝置登入需信箱驗證:確保帳號不會被盜用
連線雙重驗證:每次遠端連線都需要臨時密碼、安全密碼或被控端手動確認
同帳號限制:只有登入同一個帳號的裝置才能進行遠端控制
自動隱私保護:輸入密碼或支付時螢幕會自動變黑,防止資料外洩
隱私螢幕模式:遠端操作時可開啟隱私螢幕,避免被旁人偷看
黑白名單機制:可設定允許或禁止的裝置,防止陌生連線
除了安全防護,DeskIn 還提供內建語音通話和螢幕標注功能,讓你在遠端操作時可以同步跟長輩講解,幫助他們理解操作步驟,真正做到「教會他們」而不只是「幫他們做」。
💻 立即下載 DeskIn 免費試用,為家中長輩建立一道安全防線!
如何使用 DeskIn 檢查長輩手機是否被監控?
以下是完整的操作步驟,整個過程只需 5 分鐘:
第一步:雙方裝置都安裝 DeskIn
在你和長輩的手機上都下載並安裝 DeskIn App,然後註冊一個免費帳戶並登入。iOS 用戶前往 App Store,Android 用戶前往 Google Play 商店搜尋「DeskIn」即可找到。
第二步:長輩端開啟遠端控制權限
請長輩在 DeskIn 中開啟「允許遠端控制本設備」選項,並選擇遠端控制的驗證方式(可設定連線密碼或手動確認)。這個步驟確保遠端控制必須經過長輩同意,不會被惡意使用。
第三步:從你的裝置發起連線
在你的裝置列表中找到長輩的手機,輸入連線密碼或請長輩手動通過驗證,即可開始遠端操作。你會看到長輩手機的即時畫面,所有操作都如同直接使用他們的手機一樣流暢。
第四步:邊操作邊講解
在檢查手機的過程中,你可以開啟語音通話功能與長輩對話,或使用標注工具在螢幕上圈選重點,讓長輩清楚了解你在做什麼、為什麼這樣做。這種互動式的教學方式,能大幅提升長輩的資安意識。
日常安全使用遠端軟體的 5 個建議
部分使用者可能擔心:使用遠端軟體本身會不會也有安全風險?確實,如果選用不安全的遠端工具或使用方式不當,可能反而帶來隱患。以下是安全使用遠端軟體的5個重要原則:
選擇高安全等級的遠端軟體:務必選用像 DeskIn 這類採用端對端加密、具備多重驗證機制的正規軟體,避免使用來路不明的程式
避免使用公共 Wi-Fi 進行遠端連線:公共網路容易被中間人攻擊,建議使用自家網路或手機行動數據進行遠端操作
只從官方管道下載軟體:前往官網或官方應用商店下載,切勿透過不明連結、第三方網站或 QR Code 安裝
絕對不要相信陌生人要求你下載遠端程式:這是詐騙集團常用的手法!無論對方自稱是銀行客服、警察、檢察官或任何單位,都不應該要求你安裝遠端軟體,這類要求 100% 是詐騙
定期更新密碼並妥善保管:每 1-3 個月更換一次連線密碼和帳號密碼,不要與他人共用帳號,也不要在陌生裝置上登入
善用軟體內建的安全設定:DeskIn 提供豐富的安全選項,例如黑白名單、強制手動驗證、隱私螢幕等,建議依照需求開啟相應功能
只要遵循這些原則,遠端軟體就能成為你守護家人資安的有力工具,而不是潛在風險。
關於手機被監控或監聽的常見問題
Q1:如何確認自己的 iPhone 是否被監控?
觀察手機是否出現異常耗電、發熱、變慢、自動重啟等現象,並檢查是否有不明 App、陌生瀏覽記錄或通話雜音。建議按照本文提供的 6 個方法進行全面檢查,包括查看隱藏程式、檢視定位權限、安裝防毒軟體等。如果發現多項異常徵兆,很可能已被監控。
Q2:電話被監聽會有什麼徵兆?
最明顯的徵兆是通話過程中聽到不明雜音、回音、嗶嗶聲或其他人的聲音,即使切換網路也無法改善。此外,通話後手機持續發熱、電池快速消耗,或是收到奇怪的簡訊,都可能是電話被監聽的警訊。
Q3:手機被監控後資料會外洩嗎?
是的,監控軟體可以竊取手機內的所有資料,包括通話記錄、簡訊內容、社交軟體對話、照片影片、定位資訊、銀行帳號密碼等。這些資料一旦落入詐騙集團手中,可能被用於量身打造詐騙話術,或直接盜用帳戶進行非法交易,風險極高。
Q4:使用 DeskIn 遠端軟體會不會也有被監控的風險?
DeskIn 採用銀行級 256 位元端對端加密,並具備多重驗證機制、同帳號限制、隱私保護等安全功能,是目前市面上安全等級最高的遠端軟體之一。所有連線都需要使用者主動授權,且可隨時中斷,不會有被惡意監控的風險。只要從官方管道下載並遵循安全使用原則,就能放心使用。
Q5:如果不確定手機是否被監控,該怎麼辦?
建議先執行本文提供的基礎檢查方法,包括查看隱藏程式、檢查行動數據用量、清理瀏覽記錄、更改帳號密碼等。如果仍不放心,可以安裝防毒軟體進行全面掃描,或是使用 DeskIn 請信任的家人朋友協助遠端檢查。最極端的方式是備份重要資料後恢復原廠設定,這能徹底清除所有可能的監控程式。
結論
手機被監控不只是隱私問題,更可能導致財產損失甚至人身安全威脅。了解如何知道手機被監控 iPhone 的徵兆,並掌握正確的檢查與解除方法,是現代人必備的資安知識。本文介紹了 7 大可疑徵兆、6 個實用檢查方法,以及如何使用 DeskIn 安全地協助長輩進行手機健檢。無論是為了保護自己還是家人,定期排查手機安全狀態都是不可或缺的防護措施。
記住預防永遠勝於治療。養成良好的手機使用習慣、提高資安意識、選用安全的工具,才能在這個數位時代有效守護個人隱私與財產安全。如果你需要一款安全、易用的遠端軟體來協助長輩處理手機問題,DeskIn 的全方位安全防護機制與直覺操作介面,絕對是你的最佳選擇!
iPhone/Android 老人模式設定教學,讓長輩輕鬆上手智慧手機
長輩拿著新手機卻不知道怎麼用,字太小看不清楚,按鈕太小常按錯,或是擔心誤觸到不該碰的設定?根據統計,台灣 65 歲以上長者使用智慧型手機的比例已超過 70%,但因操作不熟悉而產生的困擾也隨之增加。其實,無論是 iPhone 或 Android 手機,都內建了適合長輩使用的「老人模式」或「長輩模式」,能讓手機介面變得更直覺、字體圖標更大,操作起來也更簡單。
本文將完整介紹 iPhone 自訂輔助取用功能與 Android 簡易模式的設定方法,還會教你「防誤觸模式」、「一鍵撥號」、「SOS 緊急聯絡人」等實用功能。如果你不在長輩身邊,想要遠端協助完成設定,可以使用 DeskIn 遠端桌面直接操作長輩的手機,透過語音通話和白板標註即時指導,省時又方便。現在就一起來看看詳細的設定步驟吧!
iPhone「老人模式」完整設定教學
蘋果在 iOS 17 推出了全新的「自訂輔助取用」功能,這就是俗稱的 iPhone 老人模式。這項功能能將手機介面極度簡化,讓圖示變大、字體變清晰,非常適合視力退化或不常使用複雜功能的長輩。以下將帶你一步步完成設定。
第一步:進入「輔助取用」設定頁面
首先,請確認你的 iPhone 系統版本為 iOS 17 或更新版本。前往手機「設定」>>「輔助使用」>>找到「自訂輔助取用」並進入,點選「設定自訂輔助取用」開始進行設定流程。
第二步:關聯 Apple 帳號確保資料安全
系統會要求你將裝置與目前登入的 Apple ID 帳號進行關聯。這個步驟是為了確保日後若忘記密碼,還能透過 Apple ID 來重置,請確認帳號正確後點擊「繼續」。
第三步:選擇適合長輩的外觀顯示方式
蘋果提供了兩種主畫面布局讓你選擇:
「橫列」模式: 以列表形式展示應用程式,文字部分更大更清楚,適合喜歡簡潔介面的長輩
「格狀」模式: 類似傳統的 App 圖示排列,icon 會更加突出,適合習慣傳統手機介面的使用者
建議根據長輩的使用習慣和視力狀況來選擇。一般來說,「橫列」模式因為文字較大,對視力不佳的長輩更友善。
第四步:精選長輩常用的應用程式
在這個步驟中,你可以選擇長輩平常會用到的 App。建議選擇電話、訊息、相機、照片、LINE 等基本功能即可。需要特別注意的是,沒有被選擇的應用程式在「老人模式」下將完全無法使用,所以請仔細評估長輩的實際需求再進行選擇。
第五步:設定退出密碼與閱讀重要提示
選好應用程式後,系統會顯示「老人模式」的功能限制說明:
緊急服務:只能透過按三下側邊按鈕啟動緊急電話,無法使用衛星 SOS 服務
系統通知:不會顯示數字提醒,只會在 App 右上角出現通知標記
軟體更新:無法在此模式下更新 iOS 系統
隱私權顯示:狀態列會隱藏部分隱私圖示(如 GPS 定位)
請務必詳細閱讀這些限制,確保不會影響長輩的使用需求。接著按照系統提示設定「自訂輔助取用」密碼(四位數字)以及「復原 Apple ID」,這組密碼是用來開啟和結束「老人模式」的重要憑證。
設定完成後,只要按三下 iPhone 側邊按鈕,輸入密碼就能啟動或關閉長輩模式。若要永久關閉,同樣按三下側邊按鈕,輸入「自訂輔助取用」密碼即可退出。
二、簡化版「老人模式」:調整 iPhone 圖標和字體大小
如果你覺得完整的 iPhone 老人模式限制太多,長輩只是需要更大的字體和圖標,那麼以下這些簡易設定可能更適合。這些方法不會大幅改變手機的使用方式,只是讓視覺呈現更友善,同時保留所有功能。
1. 調整桌面圖標大小
如果長輩覺得 iPhone 主畫面的 App 圖示太小不好點選,可以透過以下方式放大:
長按主螢幕進入編輯模式 >> 點擊左上角「編輯」>>「自訂」>> 選擇下方的「大」選項
這個方法會讓所有圖標變大,但不會顯示應用程式名稱。建議搭配下方的字體放大功能一起使用,達到最佳效果。
2. 放大系統字體
前往手機「設定」>>「輔助使用」>>「顯示與文字大小」>>「放大文字」。在這裡你可以自由調整字體大小,滑桿向右拖曳字體就會變大。同時建議開啟「粗體文字」選項,讓文字更清晰醒目,特別適合老花眼的長輩使用。
如果這些設定對長輩來說還是有點複雜,不妨使用 DeskIn 遠端桌面直接存取長輩的 iPhone 畫面,透過語音通話和白板標註功能即時指導,或直接幫長輩完成所有設定,省去來回溝通的麻煩!
三、Android「長輩模式」設定教學
Android 手機品牌眾多,但大多數都有內建「簡易模式」或類似的老人模式功能。這些模式能讓手機介面變得更簡潔、圖標更大、操作更直覺。以下以市佔率最高的三星手機為例進行說明,其他品牌如 OPPO、Vivo、小米等設定方式也大同小異。
三星「簡易模式」啟用方法
三星的簡易模式介面非常友善,主畫面會顯示常用聯絡人的快速撥號按鈕,應用程式圖示也會放大,整體畫面更加簡潔清爽。設定步驟如下:
前往手機「設定」>>「顯示螢幕」>>「簡易模式」>>「開啟」
若內建的簡易模式仍無法滿足需求,也可以到 Google Play 商店下載第三方的極簡桌面應用程式,例如「BIG Launcher」、「Simple Launcher」等,提供更客製化的長輩模式介面。
四、Android 手機其他實用的長輩友善設定
除了基本的簡易模式,Android 手機還有許多貼心功能,能讓長輩使用起來更安全、更方便。以下整理了幾個最實用的設定,建議一併完成。
1. 調整字體大小
前往手機「設定」>>「顯示螢幕」>>「字體大小與樣式」>>依照長輩需求調整字號大小。也可以同時開啟「粗體文字」讓文字更加清晰醒目,減輕眼睛負擔。
2. 開啟「防誤觸防護」
長輩常會把手機放在口袋或包包裡,不小心誤觸螢幕導致撥號或傳送訊息。啟用防誤觸功能後,手機會自動偵測是否在口袋中,避免意外操作。
前往手機「設定」>>「顯示螢幕」>>「開啟誤觸防護」
3. 開啟「自動封鎖」功能
近年來針對長輩的詐騙案件層出不窮,這個功能能自動封鎖來路不明的應用程式安裝,只允許從 Galaxy Store 或 Google Play 商店下載 App。同時也會封鎖 USB 傳輸的指令和軟體、訊息中的惡意圖片連結,大幅降低長輩受騙或中毒的風險。小米手機也有類似的「騷擾攔截」、「安全守護」功能可以使用。
三星設定步驟如下:
前往手機「設定」>>「安全性與隱私權」>>「自動封鎖程式」>>「開」
4. 設定快速撥號
讓長輩在主畫面就能快速撥打電話給家人,不用再翻找通訊錄。設定方式如下:
在手機主螢幕透過兩指縮放進入編輯模式 >> 點選「Widgets」>>「聯絡人」>> 長按「快速撥號 1x1」>> 拖移到想要的位置後放開 >> 選擇要撥號的聯絡人
建議設定子女或配偶的快速撥號按鈕,放在主畫面最顯眼的位置,緊急時刻就能立即聯繫。
5. 設定 SOS 緊急聯絡人
這個功能能在長輩遇到緊急狀況時,快速撥號並發送簡訊給預設的緊急聯絡人。當長輩身體不適、發生意外或遇到危險時,只要連按電源鍵數次(依機型不同),就能自動撥號求救並傳送定位資訊,讓家人第一時間掌握狀況。
設定方法如下:
前往手機「設定」>>「安全與緊急狀況」>>「緊急聯絡人」>>「新增成員」>> 選取聯絡人 >>
你還可以選擇將此聯絡人資訊顯示在鎖定螢幕上,方便他人在緊急時刻協助撥打
五、長輩遠端支援神器 DeskIn:3C 問題、老人模式設定輕鬆解決
以上介紹的 iPhone 老人模式和 Android 長輩模式設定,步驟雖然不算太複雜,但對長輩來說仍可能感到困惑。如果你不在長輩身邊,光靠電話或視訊指導往往會遇到「找不到按鈕在哪」、「聽不懂術語」、「操作到一半就迷路」等問題,來回溝通非常耗時。
這時候你需要一個能直接遠端操作長輩手機的工具—— DeskIn 遠程控制工具。它能讓你從自己的手機或電腦,直接連線到長輩的手機進行操作,就像親自在長輩身邊幫忙一樣方便!
DeskIn 遠端桌面的六大優勢
跨平台全面支援: DeskIn 支援 Windows、Mac、iPhone、Android 等所有主流平台,無論你用什麼裝置,都能遠端控制長輩的手機或電腦,真正做到跨平台無障礙協助
內建語音通話與白板標註: 連線時可以同步進行語音通話,邊操作邊即時溝通。還能使用白板標註功能在螢幕上畫圈圈、箭頭指引,讓長輩清楚看到每個步驟,印象更深刻,下次遇到類似問題也能自己處理
連線流暢穩定不掉線: DeskIn 採用先進的連線技術,延遲低、操控順暢,而且沒有連線時長限制,不會像某些軟體用到一半就突然斷線,讓你能從容完成所有設定
高清畫質看得清楚: 免費版就支援 1080p 30fps 高清畫質,即使是小字小按鈕也能看得一清二楚,不會因為畫面模糊而誤操作
安全性高不怕被盜用: DeskIn 的手機遠端功能只能在同一個帳號下的裝置之間進行,避免長輩不小心洩露連線密碼給陌生人。連線時可以選擇讓長輩手動確認,也可以預先設定密碼快速連線,彈性又安全
操作直覺長輩也能上手: DeskIn 的介面設計非常簡潔,不需要複雜的技術知識,老人都能輕鬆學會如何允許連線
除了幫長輩設定老人模式,DeskIn 在日常生活中還有很多用途:遠端幫長輩安裝 App、檢查手機有無可疑訊息、協助處理網路銀行問題、教長輩使用新功能等等。真正做到一次安裝、終身受用,成為你照顧長輩的最佳數位助手!
使用 DeskIn 遠端操作長輩手機的三個簡單步驟
第 1 步: 在你的裝置和長輩手機上下載安裝 DeskIn,並使用同一個帳號登入(可以用 Google、Apple ID 或 Email 註冊,完全免費)。
第 2 步: 當需要遠端協助時,請長輩打開 DeskIn App,點擊「連線本設備」,勾選「允許連線設備」,選擇授權的功能,按提示完成授權,就能看到本機連線密碼。
第 3 步: 在你的 DeskIn 裝置列表中找到長輩的手機,點擊連線、輸入密碼後就能直接操作。你可以邊操作邊開啟語音通話,即時指導長輩,或使用白板標註功能圈出重點。
關於手機老人模式的常見問題
Q1:iPhone 老人模式如何關閉?
若要關閉 iPhone 的「老人模式(自訂輔助取用)」,只需按三下側邊按鈕,然後輸入當初設定的「自訂輔助取用」四位數密碼即可退出。如果忘記密碼,可以使用綁定的 Apple ID 進行重置。建議將密碼記錄在安全的地方,避免需要時找不到。
Q2:iPhone 老人模式可以使用 LINE 嗎?
可以!在設定 iPhone 老人模式時,第四步驟「選擇長輩需要用到的軟體」中,你可以加入 LINE 應用程式。不過需要注意的是,LINE 並非蘋果原生 App,因此在老人模式下介面會回到類似舊款 iPhone 的顯示方式,畫面會放到最大但功能依然完整可用。建議實際測試後再決定是否加入 LINE,確保長輩能順利使用。
Q3:三星手機有老人模式嗎?
有的!三星手機內建「簡易模式」,功能類似 iPhone 的老人模式。開啟後主畫面會顯示大圖示、大字體,還會新增快速撥號功能。
設定方式為:前往「設定」>>「顯示螢幕」>>「簡易模式」>>「開啟」。
其他 Android 品牌如 OPPO、Vivo、小米等也有類似功能,通常在「設定」>「顯示」或「系統」選單中可以找到,名稱可能叫「簡易模式」、「長輩模式」或「極簡模式」。
Q4:DeskIn 遠端軟體需要付費嗎?
DeskIn 提供免費版本,已包含基本的遠端控制、1080p 高清畫質、語音通話等核心功能,對於協助長輩設定手機來說完全足夠。若需要更高階的功能如 4K 畫質、檔案傳輸、多螢幕支援等,可以選擇付費方案。對大多數家庭用戶而言,免費版就能滿足日常遠端協助長輩的所有需求。
結論
本文完整介紹了 iPhone 老人模式和 Android 長輩模式的設定方法,還包括調整字體大小、防誤觸、快速撥號、SOS 緊急聯絡人等實用功能。這些設定能讓長輩更輕鬆地使用智慧型手機,減少誤觸和操作困擾,也能提升安全性。
如果你不在長輩身邊,強烈推薦使用 DeskIn 來協助設定。透過遠端連線,你可以直接操作長輩的手機,搭配語音通話和白板標註功能,就像親自在身邊指導一樣方便,再也不用重複解釋同樣的步驟。給長輩買了新手機,記得幫他們設定好老人模式和相關功能,讓他們也能享受科技帶來的便利!
家長監控孩子手機4大注意事項!監控軟體怎麽選?4款程式對比
現在越來越多小朋友也有智慧型手機,用來與家人聯絡或是娛樂。家長出於擔心孩子安全和防止孩子沉迷手機,會使用手機監控的程式管理孩子手機。
對於年齡較小的孩子,這些手機監控程式可以讓家長及時了解孩子的動態,當孩子遇到一些潛在危險、收到不良訊息,甚至遇到校園霸凌時可以及時察覺,介入並進行正確引導,以避免事情往更壞的方向發展。但這也涉及到一些倫理和隱私問題,不當使用可能影響家長和孩子的關係,適得其反。應該如何正確使用手機監控程式,如何選擇手機監控程式是一個對家長來説非常重要的問題。這篇文章介紹了4款手機監控程式,各有特點,可以根據自己的實際需求和情況進行選擇。如果你想要一款兼具觀看、操控手機,又很安全,孩子可接受的程式,推薦使用DeskIn。
家長需要監控孩子手機的五大原因
1、控制手機使用時間
小朋友對於時間的管控能力可能還不夠強,加之目前網路上的誘惑越來越多。玩遊戲、看短影音、社群聊天,都可能導致孩子沉迷導致無節制使用手機。這時候,監控程式能幫助家長了解孩子手機使用情況,並適當進行管控和調節。
2、甄別不良資訊或程式
網路上的資訊非常複雜,孩子可能還不太會分辨。定期查看孩子手機簡訊、網頁瀏覽記錄、社群媒體,可以及時察覺孩子是否有收到或觀看一些不良的資訊,如色情、暴力、賭博、欺詐、毒品等等。若有,則需要對孩子進行正確的教育和引導並刪除屏蔽不良資訊。
3、防止誤觸付費
目前手機上的支付和驗證流程越來越簡潔,帶來便利的同時也有一定的隱患。孩子可能會偷偷進行遊戲氪金,打賞直播主,又或是不小心按到了軟體的訂閲按鈕,如果沒有及時發現,可能會帶來經濟損失。
4、了解孩子,預防危險
家長無法隨時在孩子身邊,在學校或是和朋友之間的相處是否有出現一些狀況,家長可能無法百分之百知道。透過監控孩子手機的簡訊或是社群聊天記錄,我們可以更好地了解孩子,與同學有矛盾,校園霸凌(被霸凌或是實施霸凌),被侵害等等都可能及時知道。部分監控程式也可以看到手機定位,當知道孩子遇到危險時,也可以儘早趕到。
5、解決手機使用疑問
孩子手機使用的時間可能沒有家長長。當遇到一些技術問題、手機設定問題、或是作業的上傳備份問題無法解決的,部分手機監控程式譬如DeskIn可以幫助家長遠端操控孩子的手機幫忙解決,還有内建的語音通話功能,溝通更順暢。
監控孩子手機前的4大注意事項
1、尊重孩子
雖然我們知道父母都是出於關心而監控孩子手機。但請記住,孩子也是個獨立的個體,他也有自己的想法,小秘密和隱私,在使用監控程式前請記住這一點,尊重孩子以及他們的意見,避免過於强勢導致關係惡化。最好實在孩子知情的情況下再接入他們的手機。
2、提前與孩子溝通
提前告知孩子您監控手機的想法和目的,同時也了解他們的想法,溝通並達成共識,記得一定要在得到孩子同意之後再下載和使用手機監控程式哦。若是他們不同意,我們是不是也可以再尋求其他的方式以達到了解他們手機使用狀況以及安全的目的?
3、制定約定並遵守
對於監控程式的使用,若是孩子有一些想法和要求,比如不得監控某些程式、監控時間等等,在溝通之後,記得把這些約定記下,并在之後使用監控程式時遵守。記住,信任和溝通比一切都重要。
4、選擇安全的監控軟體
當您決定要使用監控程式是,記得一定要選擇一款安全的監控軟體。畢竟這些程式會獲得您手機的大部分權限,部分軟體還會記錄孩子手機的隱私資訊。選擇不安全的程式可能會造成信息泄露的風險,嚴重的,還可能會對孩子的安全帶來威脅。
4款家長監控軟體
DeskIn——全方位操控同時給孩子自主權
DeskIn是一款適用于web、安卓、ios、Windows和MacBook的遠端軟體,這意味著你既可以用手機,也可以用電腦遠端連線孩子的手機,應用情景更廣。你可以直接遠端幫孩子清除不良訊息,查看孩子的手機使用時間,進行軟體管控,DeskIn還支援語音通話和取用攝影鏡頭。相比其他程式,DeskIn不會抓取和記錄遠端手機的瀏覽記錄、位置和權限,只有在被控手機允許時才能觀看和操作被控手機,相對來説更加安全,也給孩子留有個人空間,更容易讓孩子接受。
👍優勢:
安全:DeskIn只允許同一帳號下的裝置遠端操控手機,避免孩子手機被陌生人監控。
跨系統適用:DeskIn適用安卓、ios、Windows和MacBook4個系統,你可以用電腦遠端監控孩子手機,也可以用手機遠端監控孩子的電腦。
語音通話:DeskIn允許您在跟孩子手機連缐時進行語音通話。當發現不良軟體或訊息,即使孩子不在身邊,也可以及時了解情況並進行引導、教育。需要幫孩子解決手機問題時也可以進行同步教學,更加方便,清晰。
使用攝影鏡頭:你也可以使用DeskIn取用還是手機前後2個攝影鏡頭,了解孩子的位置,當孩子遇到危險,可以及時了解現場狀況。
連缐方式靈活:DeskIn允許2種連缐方式,手動驗證和無人值守密碼連缐,對於孩子還説更容易接受。通常情況下可以使用手用驗證,在孩子知道的情況下進行連缐監控,緊急狀況下也可以使用密碼進行無人值守連缐
💻立即下載DeskIn體驗!
Family Link——管理孩子谷歌帳號
Family Link是谷歌開發的一類家長控制軟體,只能用戶管理安卓手機,本質上是透過管理孩子的谷歌帳號來進行孩子監控。它可以阻止或允許單個應用程序、隱藏應用程序、查找設備、設定就寝时间或者設定其他时间限制。但它也存在漏洞,當使用隱藏的瀏覽器時可以繞過所有網路瀏覽限制。也有網友反饋其時間限制功能容易被孩子繞開,管控的效果可能并不理想。
👍優勢:
時間管控:可以管理孩子使用軟體的「每日上限」时间以及「就寢時間」
封鎖不良軟體或網站:可以管理來自Playstore的程式的權限以及網站瀏覽權限,限制顯示成人內容,甚至只可瀏覽特定網站。
設定軟體下載管控:與Google Playstore綁定,在孩子下載軟體時需要家長審核
追蹤孩子定位:可以使用地圖追蹤孩子即時位置,也可以設定當孩子到達某一地點時收到提醒
不足:
只能管理安卓手機
無法對手機進行直接操控
存在漏洞:網站瀏覽限制和管控時間可能被孩子繞過
KidsGuard——記錄所有手機活動
KidsGuard更多的是一款手機監控程式,可以監控手機所有的操作動作,獲取手機所有的檔案並記錄聊天訊息,基本上被綁定的手機所有的使用資訊都會被掃到並記錄。但是他沒有更多的操作功能,比如設定使用時長限制、限制瀏覽的網頁等等。
👍優勢:
提供免費模擬演示畫面,可以先模擬使用再決定是否付費
可以透過iCloud監控iPhone,接收管理郵件、查看聯絡簿、相片、提醒事項等等
可以紀錄鍵盤活動記錄及查看社群媒體訊息,可透過關鍵字查詢訊息。
付款監控:可以記錄孩子在應用商店的訂閲消費狀況
可以透過網頁面板查看遠端手機所有的使用狀況和報表:使用時長、手機檔案、瀏覽記錄、聊天記錄等等。
不足:
需要付費才能解鎖高級功能
無法對手機進行直接操控和設定。
對手機獲取的權限較多,記錄内容過多,容易造成隱私泄露。
Airdroid——可以管控和限制孩子軟體、網頁使用
Airdroid是一款綜合的控制應用程式,可以透過家長版AirDroid Parental Control App來控制裝有的手機裝置。支援使用手機或網頁來監控遠端手機裝置。付費後支援管理最多10台裝置。
👍優勢:
可以使用Android裝置的相機和麥克風,查看及聆聽孩子周遭環境和聲音
同步接收孩子安卓手機上的上應用程式通知,如 Line、Facebook。
可以透過報表面板獲得孩子手機使用狀況日報/週報
可以對手機、軟體、網頁的使用時間或權限進行管理和限制
關鍵詞偵測:對社群軟體進行關鍵詞檢測,識別有害内容或潛在霸凌事件。
獲取手機位置和定位。
不足:
沒有免費版本,需要付費才能解鎖所有功能
對手機獲取的權限較多,記錄内容過多,容易造成隱私泄露。
如何使用DeskIn監控孩子手機
第一步:在你的裝置以及孩子手機上安裝DeskIn,並登入同一個帳號。
第二步:在孩子手機DeskIn,開啓允許連線設備並設定好連線密碼。
第三步:需要連線時,你可以在設備列表找到孩子的手機或使用設備ID連線孩子手機,孩子可以手動驗證,你也可以使用密碼進行連線。
📖你可能感興趣:
3個將iPhone/iPad螢幕鏡像投影到MacBook方法教學
結論
本文介紹了4款家長控制軟體,幫助家長管控孩子的手機使用情況,每款軟體都有他們的特點,你可以按需選擇。4款軟體中,DeskIn能夠對遠端的裝置行直接控制,無論是管控孩子手機還是技術支援都可以,而且所記錄的手機隱私資訊比較少,更加安全也更容易讓孩子接受。雖然家長監控孩子手機的出發點是好的,但家長的管控也應該把握尺度,給孩子適當的隱私空間和自我成長的空間,建立互信才更重要。
5個最適合Windows的遠端桌面軟體
Windows 電腦不像 Macbook 有完善的蘋果生態,可以輕鬆與其他蘋果電腦、手機裝置聯動。所以一款好用的遠端軟體對於 Windows 非常重要,不論是跨辦公室協作、存取檔案、支援協作,都可以隨時串聯其他裝置。可用的Windows遠端桌面眾多,今天一篇文章告訴你怎麽擇並介紹5款最適合 Windows 的遠端桌面軟體。其中小編最推薦的是DeskIn遠端桌面,一起來看看它爲什麽比其他遠端桌面軟體更適合Windows!
💻立即在您的Windows下載最好用的遠端桌面軟體DeskIn!
什麼是遠端桌面軟體?
遠端桌面軟體是一種可以讓使用者遠程訪問和控制其他計算機桌面的應用程式工具。透過遠端桌面軟體,使用者可以使用本地的裝置,如手機、平板、筆電,以及配件如滑鼠、鍵盤甚至麥克風、手把,來存取、操控其他計算機桌面的檔案、應用程序和設定。
你可能感興趣:
遠端桌面軟體的主要功能
遠程桌面連缐:遠程訪問和控制其他計算機裝置。
檔案傳輸:支援在遠程計算機裝置和本地裝置之間傳輸文件。
遠端協作:允許用戶在遠端和本地計算機之間同步剪貼簿內容。
遠端列印:支持用戶將遠端計算機檔案一鍵列印到本地或網絡打印機。
多人協作:允許多個用戶同時連接到同一台遠程計算機。
適合Windows的遠端桌面軟體應具備什麽條件
跨系統支援:可以從Windows存取Windows電腦,也可以跨系統存取Mac,甚至iOS和安卓。反過來也可以被Windows裝置或其他MacOS、iOS和安卓裝置存取和控制。
鍵鼠正常映射:不管是用Windows存取其他裝置,還是被存取,都需要鍵盤輸入、滑鼠點擊等能正確作用在遠端裝置,使用順手。
連線穩定順暢:在Windows上使用遠端桌面軟體,大多情況是要進行遠端辦公作業、技術支援甚至遊戲,對於連線品質要求較高,所以適合Windows的遠端桌面軟體必須足夠穩定,在跨網路環境也能保持低延遲。
簡單易用:不管是使用什麽軟體,我們都希望能夠輕鬆上手,尤其是對於這種有一定技術含量又的軟體,不需要複雜的誰
高性價比:為滿足不同情境的使用,Windows遠端桌面軟體應該具備豐富的功能來讓遠端辦公、遠端協作、技術支援甚至遊戲更加便利,而價格又不會造成太大的負擔。
5個最適合Windows的遠端桌面軟體
Top1:Deskln-高性能高性價比遠端桌面軟體
DeskIn 可以説是綜合實力最强的六邊形選手,在 Windows 系統上運行流暢,提供了無縫的跨系統遠端桌面體驗,功能多多價格合理,不管是個人遠端辦公還是企業遠端技術支援都有對應的解決方案,堪稱性價比之王,是最適合Windows的遠端桌面軟體Top1。
就算處理高解析度畫面也能保持高清晰度和低延遲,重點是穩定性好完全不會有掉缐的狀況,小編用Windows遠端Macbook,過了一晚上也沒有斷連!而且DeskIn 支援跨平台操作,無論是 Windows、Mac、iOS 還是 Android 系統,都能實現無縫連接,手機端的功能完整,操作也非常順手。除了遠端連缐,還有螢幕投影、延伸螢幕、語音通話等免費協作功能。
💻立即在您的Windows下載最好用的遠端桌面軟體DeskIn!
👍優點:
高性能與低延遲:高效編解碼技術 + 全球200+伺服器節點,可以根據網路環境自動優化品質,快速進行圖像傳輸,保證順暢和低延遲的遠端操控。
跨平台與兼容性:支援Windows、Mac、iOS 、Android 裝置任意互連,鍵鼠和輸入法完美支援,還可以從網頁發起遠端連缐,無需安裝軟體更靈活。
豐富的功能:提供了延伸螢幕、投影、語音通話、標注、共享剪貼板、遊戲鼠標、3D視角等多種功能,一個軟體滿足使用者多個情景使用需求。
高速檔案傳輸:支援不限大小、類型、數量的檔案傳輸,Windows裝置一鍵拖拽就可以完成傳檔,且傳輸速度高達12MB/s,可以隨時跨平臺存取檔案。
安全性高:採用256位元加密,還有多種安全措施,如新裝置首次登入驗證、密碼無人值守連線,螢幕遮罩、黑白名單、鎖定客戶端等,確保了使用者的資料安全。
局限性:
不支援Linux和Google TV使用
DeskIn的價格方案:
DeskIn 提供免費可商用的版本,功能相當豐富而且提供有官方客服。DeskIn也針對不同的使用場景推出了標準版、遊戲版和性能版。不僅可以按月訂閲,年度訂閲更低至$4.16美元/月,價格相當佛心。付費版可以管理高達100台裝置,對於小型團隊完全夠用了。想要更多管理功能也可以考慮其企業版方案。
TeamViewer - 高預算的大型企業可選
TeamViewer 是一款老牌,長資歷遠端控制與支援軟體,在 Windows 電腦上的使用確實展現出了其強大的功能性和靈活性,連線品質不錯而且有豐富的管理功能和安全保障,讓他成爲最適合Windows的遠端桌面軟體之一。
如果你是大型企業又有較多預算,主要的使用場景是辦公、技術支援。Teamviewer的確是個可靠的選擇。對於個人使用者,由於DeskIn免費版可能會被誤判商用,付費版價格太高,而且缺少客服支援、螢幕管理和遊戲相關功能,適用場景偏少,需要斟酌一下。
優點:
平台兼容性:除了常見的win、mac、ios、Android,還支援在Linux、Chrome OS上使用,為企業使用者尤其是技術支援工程師提供了無縫的遠端連接體驗。無論團隊成員使用哪種設備,都能實現遠端協作。
豐富管理功能:TeamViewer 除了遠端桌面、檔案傳輸、語音通話等多種實用功能,還有很多管理功能,滿足了企業對内部裝置進行統一管理。
安全性高:采取256位元加密技術,支援雙重驗證,在業内有較高的安全性口碑
連線品質穩定:預設會根據網速自動調整畫質與頻寬,用以維持穩定性。非高效能遊戲、設計串流的普通的辦公和支援足夠使用。
局限性:
商業版價格昂貴:TeamViewer 的商業版價格相對較高,部分高級功能還需額外付費解鎖,對於預算有限的個人使用者或中小企業而言,可能造成一定的經濟壓力。
檔案傳輸速度慢:對比過多個遠端軟體,Teamviewer的檔案傳輸速度相對較慢,而且對於檔案大小有限制,每次只能傳輸4GB或以下的檔案。
免費版缺少客服支援,遊戲等功能較少
Teamviewer價格方案:
Teamviewer免費版本不可商用,而且沒有客戶服務。付費方案都只可以按年訂閲,個人方案最低274.8美金/年,商用方案更高達上千美元。部分功能需要再額外采購插件。
AnyDesk - 實現靈活遠程訪問
AnyDesk是一款專為遠程工作與支援設計的軟體,也是很適合在Windows上使用的遠端桌面,其在Windows系統上的應用廣泛且深受用戶喜愛,最主要的原因是它比較輕巧、無需安裝、注冊即可使用,而且可以透過ip存取同一區域網内的裝置,比較容易上手。無論是企業級用戶、技術支援團隊,還是個人使用者為使用者,AnyDesk都提供了一個連線品質不錯且便捷的遠程操作環境。
優點:
輕量且高效:AnyDesk的安裝包僅為1.1 MB,是市場上最輕量的遠程訪問解決方案之一,這意味你可以快速在你的Windows上完成下載並使用。
免安裝注冊:Anydesk無須安裝注冊就可使用,對於臨時使用者來説非常方便
檔案傳輸速度快:Anydesk的檔案傳輸速度比較快,支援進行跨平台檔案傳輸。
不足:
分辨率調整問題:Anydesk的分辨率是自動調整的,這導致遠程桌面有時的顯示效果不佳,色彩和清晰度都比較一般,從而影響用戶的使用體驗。
安全問題:由於無需注冊即可使用,而且可以存取同ip的其他裝置,便利的同時犧牲掉了部分安全性,帶來了潛在風險,事實上Anydesk確實出過一些資安事故,注重安全的需斟酌
缺乏高級功能:DeskIn雖然比較易用,但功能相對還是比較簡單,缺乏一些進階的如遊戲、螢幕管理、語音協作相關的功能。
Anydesk價格方案
Anydesk的免費方案同樣不可商用,也缺少客服支援,付費方案也是只能按年訂閲。個人版方案價格與Teamviewer一致,其餘方案略低於Teamviewer,但方案中包含的功能豐富度對比DeskIn略顯不足,優勢在於管理的裝置數。
Chrome遠端桌面 - 最輕便簡單的遠端桌面
Chrome遠端桌面是谷歌提供的一款基於Chrome瀏覽器的遠程桌面控制工具,它允許用戶在任何時候、任何地點,通過Chrome瀏覽器或其他支援的設備(如iOS、Android)來遠程存取和控制Windows、Linux、MacOS、Chrome OS等系統的計算機。由於介面簡單,功能精簡,而且可以從瀏覽器發去遠端連線,讓他成爲適合Windows使用最輕便簡單的遠端桌面。
優點:
免費服務:完全免費,對於使用頻率不高,預算有限的個人用戶或小型企業來說,這是一個非常經濟的選擇。
跨平台兼容:Chrome遠端桌面支援多種操作系統,無論是用戶使用的是Windows、MacOS、Linux,還是iOS、Android,都可以實現無縫連接。
操作簡便:作為Chrome瀏覽器的一個擴展程序,可以從網頁發起遠端連缐,功能也比較簡潔,對於新手也很容易上手。
缺點:
依賴網頁瀏覽器:沒有Google帳號或不是使用Chrome瀏覽器的無法使用。
功能有限:相比於上述其他遠端桌面工具,Chrome遠端桌面的功能最少,缺乏高級功能。
無法調整畫質:Chrome遠端桌面只支援自動調整畫質,對於畫質、清晰度、色彩要求比較高的遠端作業需求,其表現可能不如其他遠端工具。
chrome遠端價格方案:完全免費使用。
📖你可能感興趣:
Microsoft 遠程桌面- Windows 内建遠端工具
Microsoft 遠端桌面(Remote Desktop)是一項內建於Windows操作系統的功能,特別適合企業環境中對於Windows Server的整合和管理。它允許用戶從一台計算機透過電腦IP地址遠端訪問另一台計算機,提供了便捷的操作方式,在多個工作站間實現高效協作。在企業層面有著良好的應用潛力。
優點
與Windows環境的高度整合:內建於Windows系統中,使用者無需額外安裝其他軟體,使用起來十分方便。
強大的功能性:支持多種功能,如打印重定向、剪貼簿共享等,提升了使用體驗,尤其適合商業用戶。
安全性較高:提供企業級的加密功能,確保數據傳輸的安全性,對於需要保護敏感信息的環境十分重要。
不足:
設定複雜性:對於非技術背景的使用者來說,初次設定可能會較為繁瑣,尤其是在配置防火牆和Port轉發時,需要具備一定的技術知識。
僅限於Windows平台:儘管有Windows版本,其他操作系統(如Mac或Linux)上的支持不如Windows本身那麼順暢,這在多平台同時使用時會帶來不便。
無法免費使用全部功能:雖然基本的遠端桌面功能是免費的,但在一些高級使用場景下,可能需要額外購買相關的Windows Server授權。
過於依賴Windows生態:如果使用戶希望在多種操作系統下都有一致的使用體驗,遠端桌面可能無法完全滿足需求,局限了多元化的工作環境。
Microsoft 遠程桌面價格方案
與Microsoft 365 訂閱方案綁定,並無單獨的遠端桌面價格。Windows 家用版 (Home Edition)、部分企業裝置不支援使用Microsoft 遠程桌面。
結論:DeskIn是最適合Windows的遠端桌面軟體
本文介紹了五款最適合Windows的遠端桌面軟體,包括DeskIn、TeamViewer、AnyDesk、Chrome遠端桌面和Microsoft遠端桌面。這些軟體都提供了遠程桌面連接、檔案傳輸傳輸、剪貼板同步等基本功能,但在性能性、定位和價格等方面各有不同。你可能需要評估您的主要使用場景以做選擇。
其中,DeskIn以其高連線品質、豐富的功能以及價格佛心等優點脫穎而出,兼具多場景使和性價比,是最適合Windows的遠端桌面軟體,立即在你的Windows電腦下載DeskIn體驗看看吧!
2大方法遠端控制一鍵開機:從關機狀態到連線操作,完整流程解析
您是否也曾遇過臨時需要存取家裡或辦公室的電腦,處理緊急文件、修改簡報,或是進行系統維護,卻發現電腦處於關機狀態?無論是遠端工作者、IT管理員,還是需要彈性辦公的您,都可能面臨無法立即啟動遠端電腦的困擾。
如果還在尋找最佳方式,別擔心,這篇文章就是為了解決您的困擾而寫的。我們將一步步引導您,如何透過更簡單穩定的方式,輕鬆實現遠端開機。無論您是科技新手還是專業人士,都能快速上手,從此不再受距離限制,隨時隨地都能喚醒您的電腦,讓遠端工作真正暢行無阻!
什麽是WOL?
WOL(Wake-on-LAN)簡單來說是一種用另一台電腦或手機發送「魔法封包」(Magic Packet),以透過網路遠端啓動電腦的技術。
實現遠端開機有 2 種方法,一是可以通過傳統的WOL 開機,但會經歷複雜的路由器設定,不僅對新手不友好,而且不太穩定,另一種方法就是使用 DeskIn 輔助喚醒,DeskIn 可以透過手機/電腦等裝置輔助的方式,免於複雜的路由器設定,輕鬆實現遠端開機,還能將你的就裝置利用起來。
2 大電腦遠端開機方法對比
傳統 WOL 功能 | ||
設定 | 設定簡單更穩定:免於複雜路由器設定,簡單2步就能完成,只要 DeskIn 在運作就能遠端喚醒。 | 設定步驟複雜:需要進入路由器後台進行連接埠轉發、固定IP分配等複雜的網路設定,對不熟悉網路技術的使用者來說門檻很高 |
靈活性 | 更靈活:對比其他遠端桌面只能用電腦作爲輔助喚醒裝置,DeskIn支援使用移動裝置甚至是舊手機,版本最低支援到 Android5.0。 | 裝置限制多:通常僅能透過同一區域網路下的電腦發送魔術封包。從外部網路喚醒需依賴DDNS或公共IP,且網路環境變動易導致失效。 |
其他功能 | 進階功能:除了遠端喚醒,DeskIn 也是一款穩定、低延遲的遠端桌面,遠端開機之後,你還可以用本地電腦操控遠端電腦,甚至進行檔案傳輸。 | 單一功能:WOL 僅負責「開機」這一個動作,後續的遠端操作必須依賴另一套獨立的遠端控制軟體. |
安全性 | 安全管理與維護:企業敏感資料存於本地電腦比存儲在雲端更安全,透過DeskIn企業可以隨時喚醒遠端電腦進行資料存取、裝置運維管理,DeskIn使用256位元加密技術,節省成本同時也更安全。 | 存在資安風險:WOL協定本身缺乏加密與身份驗證。只要知曉MAC位址與公網IP,理論上任何人都可嘗試喚醒您的電腦,有潛在風險。 |
【最佳方法】使用 DeskIn 遠程啓動你的 Windows 電腦
使用 DeskIn 遠端啟動你的 Windows 電腦,不僅能實現開機,更能無縫接軌後續的完整操作。不同于傳統 WOL 功能僅能做到喚醒,DeskIn 讓你在電腦啟動後直接進行遠端存取與控制。這意味著你可以隨時取得所需的檔案、與同事共享螢幕進行協作,或執行任何必要的 IT 維護工作。將複雜的開機程序與直覺的遠端控制合而為一,提供一個穩定且安全的整合性解決方案,大幅超越了傳統僅具單一功能的喚醒技術。
使用DeskIn設定WOL遠端啓動電腦需要什麽條件
主板要求:Windows電腦主機板需支援Wake-on-LAN(WOL)——可透過查看主機板説明書、檢查網卡型號、聯絡產品客服等方式確認。電腦提前安裝好DeskIn并接上網路線。
輔助裝置:需有一台正在運行 DeskIn 的輔助喚醒裝置與待開機的電腦在同一局域網內用於輔助喚醒。例如其他Windows/Mac電腦、iPhone、iPad、Android 手機、平板等,需提前安裝好DeskIn。
系統條件:Linux 裝置不支援發送 WOL 封包,而 Mac 和 Linux 裝置不支持遠程開機。
狀態條件:處於藍屏或崩潰等異常關機狀態的Windows裝置不裝置遠程開機。
❗注意:大部分的筆電(尤其無線網卡)或是較舊的電腦(10年前的)不支援使用WOL,無線網路通常不支援,推薦使用有線網路。
💻如果需要使用 DeskIn 進行遠程喚醒,提前完成簡單的無人值守連線設定,您的電腦就可以在遠端喚醒之後隨時連接並遠端操控,立即下載 DeskIn 試試!
在設定前,請確保你已經下載并安裝 DeskIn,建議注冊一個帳號並登入,可以在裝置列表找到你需要啓動的裝置。
📺超好用!在外「遠端開電腦」?設定免費遠端開機!Windows 11 無人值守訪問?華碩主機板遠端喚醒?你想要的功能盡在DeskIn!
步驟1:網卡設置
在 Windows 右鍵Windows Logo,打開「裝置管理員」
找到並展開「網絡介面卡」選項。
找到你的網路孔網卡(如Realtek Gaming GbE Family Controller),右鍵>>然後點「内容」。
在下一個窗口中,導航至「電源管理」選項卡,並勾選打開「允許這個裝置喚醒電腦」
切換到「進階」選項卡,在内容中找到「收到Magic封包時喚醒」並啓用。若有「網路喚醒」相關選項,也請啓用
步驟2:主板 BIOS 設定
在電腦開機時,連續按 Delete 或是 F2 進入 BIOS
導航至「進階」選項卡 >> 「進階/高級電源管理」>> 開啓「PCI-E喚醒」,按 F10 儲存設定並重啟即可。可能為以下類似的名稱:
PCIE/PCI 設備開機
Power On By PCI-E
板載局域網開機
局域網喚醒
局域網恢復
PME 開機
注意:不用品牌的名稱可能有所差異,你可以Google你使用的主板的官方説明預計網路喚醒設定教學找到。
步驟3:在 DeskIn 設置中啟用遠程開機支持
若你使用行動裝置作爲輔助喚醒裝置,請前往DeskIn設定>>設定>>開啓「遠端開機支援Wake On LAN」
步驟四:遠端喚醒電腦
現在,你就可以使用DeskIn遠端啓動電腦了。只需在裝置列表找到你關機的裝置,會提醒「設備已離線」,按下「遠端開機」,等待數秒,你就能看到你的電腦已經開機並是可被連線的狀態了。
DeskIn:最安全、穩定的遠端桌面軟體,隨時隨地想連就連!
DeskIn是一款穩定、安全、高清無延遲的遠端軟體,支援Windows、Mac、iOS和Android系統,可以讓你隨時隨地用手機、筆電、平板就能連回遠端的電腦並進行存取和操作,是遠端辦公、遠端IT支援的必備軟體。就算您的電腦關機,您也可以使用DeskIn遠端啓動您的電腦,並透過設定安全的連線密碼,隨時隨地進行無人值守連線。DeskIn遠端桌面的優勢如下:
跨系統支援:支援Windows、Mac、iOS和Android跨平臺遠端操作,無縫串聯。
支援無人值守和遠端啓動功能,可用性超高。
超高連線品質:40ms超低延遲,支援最高4K60FPS&2K144FPS。
易用:界面直覺,使用簡單,無需複雜設定。
安全:256位元加密,端到端連線,保證資訊不外泄。還可以設定安全密碼、黑白名單,開啓螢幕遮罩保護操作内容不被看到。
更多閲讀:
【方法拓展】啓用 WOL 遠端喚醒家裏桌上型電腦
Wake-on-LAN(WOL)「網路喚醒」技術,是透過區域網路或網際網路,向目標電腦的網路卡發送一個特殊的「魔術封包」(Magic Packet),當遠端電腦收到網路訊號/訊息時,便可立即開機。這項功能最適合用於區域網路內的桌上型電腦,多數筆電較不支援此喚醒方式。
想透過 WOL 功能遠端啟動電腦,必須先完成一些基本設定。首先要在主控端設備上準備好傳送魔術封包的工具,然後在被控端電腦(也就是您想遠端開機的那台)中,開啟 BIOS 與作業系統中的「魔術封包喚醒」(Wake on Magic Packet)或 WOL 相關選項,然後再使用第三方軟體傳送網路訊號。不確定從哪裡開始,請直接跟著以下的詳細的 Wake on Lan 教學開始操作吧!
開始之前:事前準備與必備條件
請確認你的主機板必須具備網路喚醒(WOL)的功能。進入BIOS/UEFI設定畫面,在「電源管理」(Power Management)或「進階」(Advanced)等選單中,尋找如「Wake on LAN」、「Power on by PCI-E Device」等選項。如果存在該選項,即代表支援。再者,你家裡的分享器也要有支援網路喚醒的功能,最後是你家裡必須是固定 IP。
步驟一:配置操作系统中的网卡
單機右鍵找到「裝置管理員」,點擊「網路界面卡」> 「内容」
步驟二:開啓電源管理裏面的快速啓動和休眠功能
首先,找到「控制台」>「硬體和音效」。
從視窗左側點選「選擇按下電源按鈕時的行為」>「變更目前無法使用的設定」。
點選「開機設定」中所有選項都已勾選,這些選項允許裝置喚醒電腦,記得單擊儲存變更。
步驟三:進主机 BIOS 設定網路喚醒
接下來,您還需要在主機板的BIOS中啟用網路喚醒功能。開機並不斷按下 F2 或者 Del 鍵進入BIOS,在 「進階」、「电源管理」或「APM配置」 中,找到「Wake on LAN」、「Power On by PCI-E」 等相关选项,确保其状态为「開啟」,按 F10儲存並離開 BIOS。重新啟動電腦後,即可開啟網路喚醒功能。
各家主機介面不一,設定方式可能都不一樣,如果上述步驟不符,也自行可以搜尋「主機板廠商 網路喚醒」或是「筆電廠商 網路喚醒」。
步驟四:遠端喚醒電腦
接下來要使用工具來「發送」開機指令。前往 NirSoft 網站,下載並安裝NirSoft WakeMeOnLAN軟體。該軟體擁有直觀的視窗和按鈕,無需輸入指令,只需透過滑鼠點選,就能完成掃描區域網路內的電腦並發送魔法封包的操作。
開啟軟體後,點擊左上角的 「File」 選單,並選擇 「Start Scanning」,軟體便會自動掃描區域網路內所有支援網路喚醒的電腦。
如果您希望手動新增特定電腦,可以點擊 「File」 選單中的 「Add New Computer」 來進行設定。
掃描完成後,所有找到的遠端電腦會顯示在清單中。在想喚醒的電腦上按一下滑鼠右鍵,並選擇 「Wake Up Selected Computers」。
再單擊彈窗中的「Yes」進行確認,即可遠端喚醒電腦。
推薦閲讀:
遠端開啓電腦常見問題
Q1:電腦關機還可以遠端開機嗎?
電腦關機狀態下通常無法直接遠端開機,除非設備支援 Wake-on-LAN(WOL) 功能。但如果您想實現跨平台即時控制與螢幕操作,DeskIn 提供穩定的遠端桌面解決方案,讓您即便不在電腦旁,也能高效管理工作與多裝置協作。
Q2:我可以從世界任何地方喚醒家中的電腦嗎?
當然可以!您完全可以從世界任何地方喚醒家中的電腦。關鍵在於讓外部的開機指令能成功送達您家中的區域網路。
傳統方法是透過路由器設定「連接埠轉發」,並搭配動態域名服務,讓魔法封包能從外部網路正確轉送到您的電腦。不過這個方法需要一定的網路知識,設定較為複雜且可能不穩定。
現在有更簡單的解決方案!使用像 DeskIn 這樣的遠端控制軟體,您只需要在家中準備一台舊手機或平板作為輔助裝置。當您在外地想開機時,只需透過 App 發送指令,家中的輔助裝置就會自動在區域網路內幫您喚醒電腦,完全不需要複雜的路由器設定。
無論採用哪種方式,都能實現跨網域遠端開機,讓您隨時隨地都能存取家中電腦的資料。
Q3:電腦被遠端喚醒後,我該如何登入系統呢?
WOL 只負責「開機」,相當於您按下了電腦的電源鍵。要實際操作電腦,您需要另外搭配遠端桌面軟體,例如 DeskIn、Windows內建的「遠端桌面」、Chrome Remote Desktop,並將其設定為開機自動啟動。
>>延伸閲讀: Chrome遠端桌面可以進行無人值守嗎?
使用 DeskIn,隨時隨地想連就連!
總結來說,傳統 WOL 是透過網路傳送魔術封包的基礎技術,雖然免費但需要複雜的路由器設定與網路知識,穩定性較低且僅具單一開機功能。而 DeskIn 則是以 WOL 技術為基礎的現代化解決方案,免去路由器複雜設定,只需利用舊手機作為輔助裝置就能一鍵開機,並能無縫接軌後續的遠端控制操作。
對於追求效率與便利性的使用者,我們特別推薦 DeskIn 解決方案。它不僅完美解決了傳統 WOL 的設定門檻問題,更整合了完整的遠端桌面功能,讓您從開機到操作都能在同個平台上流暢完成,真正實現隨時隨地存取遠端電腦的無縫體驗。
💻 現在就免費下載 DeskIn,體驗這款真正適合每個人的遠端開機方案!
部落格
搜尋...
全部
應用對比
遊戲娛樂
產品教學
問題解決
Is DeskIn Safe to Use? Everything You Need to Know
When considering a remote desktop tool, one question always comes first: Is DeskIn safe? After all, you're not just accessing a device; you're potentially exposing files, data, and even real-time activity across networks.
The short answer is yes, DeskIn is designed with strong security measures in place. But understanding why it's safe, and how that safety actually works in real-world use, is what truly matters. This guide breaks it down in a clear, practical way so you can decide with confidence.
What Does "Safe" Really Mean for Remote Desktop Software?
Before answering is DeskIn safe to use, it helps to define what "safe" actually means in the context of remote desktop software.
Security isn't just one feature. It's a layered system that protects different aspects of your connection. First, there's data security, which ensures that everything transmitted between devices is encrypted and unreadable to outsiders. Then comes access control, which determines who can connect to your device and under what conditions.
Privacy protection is another key layer. This includes features that prevent others from seeing your screen or accessing sensitive inputs without permission. Finally, account security ensures that even if someone tries to break in, additional verification steps stop unauthorized access. A remote desktop tool is only truly safe when all of these layers work together.
👀 What Is DeskIn Used For? (And Why Security Matters)
To fully understand whether DeskIn is safe, it helps to look at what DeskIn is used for. DeskIn is commonly used for remote work, IT support, cross-device file access, and even high-performance tasks like design or development. These scenarios often involve sensitive data, which makes security not just important, but essential.
Users benefit from DeskIn's stable connection and low-latency performance, but those advantages only matter if the connection is secure. That's why security features are deeply integrated into the platform rather than treated as optional extras.
How DeskIn Protects Your Data and Privacy
DeskIn approaches security as a complete system with multiple protective layers, addressing common concerns about whether the platform is safe and legit for daily use. Here's how it keeps your data secure.
1. End-to-End Encryption
All connections use AES-256 encryption, the same standard trusted by banks and financial institutions. This ensures your data remains protected during transmission, even on public or unsecured networks.
2. Multi-Layered Access Control
Beyond passwords, DeskIn requires various verifications: user access, blacklisting IP and device verification. Even if login credentials are compromised, unauthorized users cannot access your device without passing these additional checks.
3. Privacy-Focused Features
Privacy screen mode lets you black out the host display during sessions, preventing anyone nearby from viewing your activity. Granular permission settings also give you control over file, audio, and input access.
4. Proven Reliability for Daily Use
These security layers work together to make DeskIn a safe choice for everyday workflows, whether you're accessing personal files or managing professional systems remotely.
👀 You may also be interested in
Is DeskIn Safe from Hackers? (Real Risk Analysis)
A more specific concern many users have is: Is DeskIn safe from hackers?
The reality is that no remote desktop software is completely risk-free, but the level of risk depends heavily on how the software is designed and how it's used.
DeskIn minimizes risk through encryption, authentication, and access controls. These features make unauthorized access extremely difficult. However, like any online tool, user behavior still plays a role. Weak passwords, sharing access credentials, or using unsecured devices can introduce vulnerabilities.
In practice, High-definition Remote Desktop App DeskIn provides the tools needed for a secure environment. As long as users follow basic security practices, the likelihood of unauthorized access remains very low.
Is DeskIn Safe on Mobile Devices (iPhone & Android)?
Mobile access introduces another layer of concern, especially for users asking is DeskIn safe for iPhone or is DeskIn safe for Android.
DeskIn is designed to maintain the same level of security across devices. Data transmitted between your phone and remote computer is still encrypted, and login protection remains in place through authentication features.
Unlike some remote tools, DeskIn does not require risky system modifications such as rooting or jailbreaking. This significantly reduces potential vulnerabilities on mobile devices. Whether you're accessing a work computer from an iPad or managing files through your phone, the security model remains consistent, making it a safe option for cross-device use.
Is DeskIn Free to Use? And Does Free Mean Less Secure?
Another common question is whether DeskIn is free to use, and more importantly, does free access affects security. DeskIn does offer a free version, but security features are not reduced or removed in lower-tier plans. Encryption, authentication, and access control remain in place regardless of pricing.
Security is part of the core infrastructure, not a premium add-on. This means users can still benefit from a secure connection even when using the free version.
Tips to Use DeskIn Safely (Best Practices)
Even with strong built-in protection, safe usage also depends on your own habits. Following a few key practices can help you maintain control over your account and devices:
Use strong passwords: Create unique, complex passwords for your DeskIn account to prevent unauthorized access through credential guessing.
Enable two-factor authentication: Adding this extra verification step ensures that even compromised passwords won't grant access to your device.
Never share access credentials: Keep your login details private and avoid sharing them with others, even temporarily.
Always log out after sessions: End remote connections when they're no longer needed to prevent unattended access to your system.
Keep devices updated: Regular updates ensure you have the latest security patches and protection against emerging vulnerabilities.
Final Verdict: Is DeskIn Safe and Reliable?
So, is DeskIn safe?
In most practical scenarios, the answer is yes. Its combination of encryption, authentication, and access control creates a secure environment for remote access, whether you're working from home or managing devices across locations.
At the same time, security is always a shared responsibility. DeskIn provides the foundation, but safe usage habits ensure the best protection. When both work together, DeskIn becomes a reliable and secure choice for remote desktop access.
Control Windows from Your Mac with Chrome Remote Desktop: Setup Guide & Pitfalls | DeskIn Japan
Introduction: Getting Past the Mac–Windows Divide
For Mac users working in Japan, there's a recurring frustration: a piece of software you need exists only on Windows. Whether it's CAD tools, Japanese accounting software (kaikei sofuto, 会計ソフト) required by your company, Windows-exclusive business systems, or PC games — the need to run Windows doesn't go away just because you prefer Mac.
The good news is you don't need to buy a separate Windows machine. Google's free tool Chrome Remote Desktop lets you control a Windows PC remotely from your Mac, and the setup is simpler than most people expect.
This guide walks through the fastest path to getting connected, and then covers the cross-platform quirks that tend to catch Mac users off guard once they're actually in a session.
Setup: Connecting Your Mac to a Windows PC
Chrome Remote Desktop's configuration is straightforward, but it requires preparation on both machines — the Windows PC being controlled (the host) and the Mac doing the controlling (the client). Here's the fastest path to a working connection.
On the Windows PC (Host)
Start by allowing remote access on the Windows machine.
Install the extension and host software
Open Chrome and go to the Chrome Remote Desktop access page. Under "Set up remote access," click the blue download icon. Follow the prompts to add the Chrome extension and run the installer (.msi file).
Name your PC and set a PIN
After installation, give the PC a name you'll recognise. Then set a PIN of at least six digits — you'll need to enter this every time you connect from your Mac, so write it somewhere safe.
3. Important: Disable Sleep Mode
This is the step most people miss, and it will prevent connections entirely if skipped. A Windows PC in sleep mode cannot be reached remotely.
Go to Settings → System → Power & Battery
Under "Screen and Sleep," set "Put device to sleep after" to Never when plugged in
On the Mac (Client)
Once the Windows side is configured, connecting from your Mac is simple.
Log in to the access site
Open Chrome on your Mac and navigate to the same Chrome Remote Desktop access page. Make sure you're logged into the same Google account you used when setting up the Windows PC.
Select your PC and authenticate
Your Windows PC will appear under "Remote devices." Click it and enter your PIN — the Windows desktop will open inside your Chrome browser.
3. Connection complete
You can now control Windows using your Mac's keyboard and mouse.
Tip: For quicker access in the future, use Chrome's "Install as app" option to add Chrome Remote Desktop to your Mac's Dock — saves a few clicks every time.
H2: Cross-Platform Pitfalls: What Mac Users Run Into
Chrome Remote Desktop is easy to set up, but once you're inside a session, the Mac–Windows gap creates friction points that directly affect how much work you can actually get done. These are worth understanding before you depend on CRD for anything important.
H3: Keyboard Mapping Conflicts
The biggest source of frustration for Mac users is the modifier key difference.
Command key vs Control key: On Mac, you copy with
Command + C. On Windows, it'sControl + C.. In a remote session, Mac's Command key is sometimes interpreted as the Windows key rather than Control — meaning the shortcuts your hands have memorised simply don't work as expected.The Command + Q problem: This one catches people regularly. If you're working in a Windows application and instinctively press
Command + Qto close it, you don't close the Windows app — you close Chrome on your Mac, ending the remote session entirely. It happens more than once before you break the habit.
Power Management: No Wake on LAN Support
This is a significant operational limitation, and worth understanding before you depend on CRD for regular remote access.
Wake on LAN (WoL) not supported: Chrome Remote Desktop cannot remotely power on or wake up a PC that is off or sleeping. To maintain reliable remote access, the Windows PC must be left powered on continuously.
Always-on requirement: For people living in Japan, where electricity costs are relatively high and there's a cultural awareness around energy waste (mottainai, もったいない — the Japanese concept of waste-aversion that runs through everyday life), leaving a PC running overnight when it doesn't need to be is a friction point both practically and psychologically.
No more struggling with key input or power management. Stop here and try DeskIn — built for Mac users. [Install DeskIn for free]
Trackpad and Mouse Feel
The smooth, precise feel that makes Mac trackpads enjoyable doesn't carry through to a remote Windows session cleanly.
Lost gestures: Mac-specific gestures — three-finger swipes to switch desktops, pinch-to-zoom — don't transmit to Windows correctly and either do nothing or trigger the wrong action.
Unnatural scrolling: Mac's inertial scrolling feels choppy in the remote environment. Right-click response has a slight lag. These are small things individually, but they add up over a full work session.
Performance and Latency
As a browser-based tool, Chrome Remote Desktop is constrained by what it can push through a browser window.
Frame rate cap: Chrome Remote Desktop typically runs at around 30FPS. For standard document editing this is fine, but anything with fast on-screen movement shows obvious lag and ghosting.
Not suited for demanding tasks: Video editing, FPS games, or any application requiring sub-second responsiveness — the latency is too significant to be practical.
Who Should Use Chrome Remote Desktop?
Based on everything above, here's an honest assessment of where CRD works well and where it doesn't. Use this as a checklist before you decide.
✓ Recommended — CRD is a good fit for:
Quick file checks: Accessing a document on your home PC from the office or a café
Occasional admin tasks: Restarting a server, running a quick software update
Light office work: Simple browser-based data entry, sending emails — tasks where speed isn't critical
Zero-cost access: When "free and connected" is the overriding priority over performance
✗ Not recommended — CRD is a poor fit for:
Daily remote work: Working remotely for several hours at a stretch. Keyboard friction and choppy performance become a real source of stress.
Creative work: Video editing, graphic design, CAD. Accurate mouse movement, colour fidelity, and smooth rendering are all compromised.
Latency-sensitive tasks (gaming etc.): Any application where split-second responsiveness matters.
Professionals who need native performance: Not "can I connect" — but "does it feel like my own machine?"
In short: Chrome Remote Desktop is best treated as an emergency backup tool, not a primary workflow. If any of the "not recommended" scenarios describe your situation, a more capable tool is worth exploring.
When You're Ready to Go Further: DeskIn
There's a gap between "it connects" and "it feels like my own machine." If you've spent time with Chrome Remote Desktop and found yourself in that gap — frustrated by keyboard confusion, the always-on power requirement, or choppy performance — DeskIn is the purpose-built solution for exactly those problems.
Smart Key Mapping: Command/Control Auto-Mapping for Mac
One of DeskIn's standout features is its intelligent key mapping that bridges the OS divide automatically.
The Command/Control confusion that CRD leaves unresolved — and the "Command + Q closes Chrome" problem that ends remote sessions unexpectedly — are both solved. Your Mac keyboard layout works as expected in Windows, without workarounds. You can type at full speed without stopping to think about which key does what.
Wake on LAN — Start Your PC Only When You Need It
"I want to connect from outside, but I don't want to leave my PC running all day..." — DeskIn solves this.
With Wake on LAN (WoL) support, you can remotely power on a Windows PC from your Mac — even if it's shut down or sleeping. Start it when you need it, work, then let it sleep again. Less electricity, less wear on hardware, and a smarter way to work.
4K/60FPS Performance: The "Local Machine" Feel
DeskIn streams at 4K resolution and up to 60FPS — far beyond what CRD's browser-based approach can achieve.
Whether you're doing fine-detail design work, editing video, or playing a game, the response feels close to native. The lag that makes CRD frustrating for demanding tasks effectively disappears.
iPad and Mobile: Fully Connected on the Go
DeskIn's performance advantage extends beyond Mac to mobile — connecting from an iPad or smartphone delivers the same quality experience.
Use your iPad as an extended display for Windows, or connect a mouse and keyboard for a complete remote work setup. Gesture support is optimised for touch in a way that CRD's mobile app isn't. If you move between Mac and iPad regularly, DeskIn handles both well.
Performance Comparison: Chrome Remote Desktop vs DeskIn
Feature | Chrome Remote Desktop | DeskIn |
Primary use case | Occasional access / emergency use | Business, creative work, gaming |
Display quality | Up to 30FPS (choppy) | 4K / 60–144FPS (extremely smooth) |
Keyboard mapping | Basic — Command/Ctrl conflicts | Auto-optimised for Mac/Windows (no conflicts) |
Wake on LAN | Not supported — PC must stay on | Supported — start PC remotely |
Input feel | Noticeable lag, gesture loss | Low latency, Mac-native feel |
Cost | Free | Free tier available / Pro version |
Summary
Chrome Remote Desktop earns its place as an entry-level tool. Its ease of use and zero cost make it a great starting point for quick file access, occasional light tasks, and situations where budget is the overriding factor.
But if you're using a remote desktop regularly — for work, creative projects, or gaming — the accumulated frustrations of keyboard conflicts, always-on power requirements, and performance caps start to outweigh the convenience of free.
When that point arrives, DeskIn is the obvious next step: a tool designed from the ground up for people who need remote access to actually feel like working locally. Whether you're at your apartment, in a café in Kichioji, or somewhere further afield — your Windows machine should feel like it's right in front of you.
Experience professional-grade performance now — [Download DeskIn free and try it]
Chrome遠端桌面無法安裝
當您需要遠端連線時,Chrome 遠端桌面是一個常見的選擇。然而,許多用戶在安裝 Chrome 遠端桌面時遇到困難,無法順利使用。本文將説明一些常見的無法安裝的原因,並給出可靠的解決方法。
Chrome 遠端桌面無法安裝的原因及解決方案
1、網絡連接問題:
網絡不穩定或速度過慢,導致下載的安裝包不完整或損壞。
解決辦法:檢查網絡狀況,確保網絡連接穩定且速度足够快。檢查防火牆和路由器設定,確保它們允許Chrome遠程桌面的下載和安裝。
2、系統兼容性問題:
操作系統版本不兼容Chrome遠程桌面的當前版本。系統沒有更新或缺少必要組件,無法支援安裝。
解決辦法:Chrome遠端桌面支援在iOS、macOS、Chrome OS、Android、Windows 、Linux上使用,請確保您的操作系統版本與Chrome遠程桌面的要求相匹配。檢查系統更新並安裝所有必要的組件。
系統要求:
Windows(搭載 Intel 處理器)-Windows 10及以上
Windows(搭載 ARM 處理器)-Windows 11 及以上
macOS-macOS 11 Big Sur 及以上
Linux-Wayland 和 X11 顯示協定,自動適配
Android-Android 8.0 Oreo 及以上
iOS/iPadOS-iOS 15 及以上
其他要求:
瀏覽器:需要最新版 Google Chrome 或 Chromium
網路:需穩定的網路連線以保證良好的遠端控制體驗
3、安全軟體干擾:
電腦上的殺毒軟體、防火牆或其他安全設定將Chrome遠程桌面識別為惡意軟體或未經授權的應用程式。
解決辦法:暫時禁用安全軟體:在安裝過程中,暫時禁用殺毒軟體、防火牆或其他可能干擾的安全設置。安裝完成後,重新啟用這些設置,並確保它們已正確配置以允許Chrome遠程桌面的運行。
4、權限不足:
當前用戶帳戶缺乏安裝新應用程式的權限。系統管理員設定了阻止安裝未經批准的應用程式。
解決辦法:以管理員身份運行安裝程式:右擊安裝程式,選擇“以管理員身份運行”。
如果系統提示輸入管理員密碼或確認,請輸入相應信息。
5、登記表問題:
舊版Chrome或Chrome遠程桌面的登記表殘留項干擾了新版的安裝。
解決辦法:清理登記表:使用regedit工具查找並刪除與Chrome或Chrome遠程桌面相關的舊登記表項(請先備份登記表)。
6、安裝包問題:
下載的安裝包本身存在缺陷或已損壞。
解決辦法:重新下載安裝包:從Chrome官方網站或其他可靠來源重新下載Chrome遠程桌面的安裝包。在下載過程中,確保網絡連接穩定,以避免下載的檔案損壞。
如果您嘗試解決後仍然無法正常使用Chrome遠端桌面,可以考慮一個更穩定的選擇。
DeskIn遠端桌面:更好的遠端連線選擇
DeskIn是一款專爲個人使用者設計的遠端桌面軟體,不僅安裝簡單,還提供了比Chrome遠端桌面更豐富的功能和更流暢的連缐體驗。
DeskIn 的特點:
簡單安裝,兼容性強:DeskIn 支援多種作業系統,包括 Windows、macOS、iOS 和 Android,也支援在web端發起連缐。安裝簡便,無需依賴特定瀏覽器或帳戶。
穩定流暢的操作:DeskIn 提供穩定的連線,沒有連缐時長限制,長時間連缐不斷連;延遲低至40ms,特別適合高效辦公和遠端支援需求。
靈活登入方式:DeskIn 除了可以只用信箱注冊帳號,也支援使用 Google 帳戶、Apple ID一鍵注冊登入,同時提供更多元的登入選擇,適合各種網路環境。
高安全性:DeskIn 使用256位元加密技術,確保資料傳輸安全,也有多種安全設定,如無人值守安全密碼、隱私螢幕、黑白名單等等,防止裝置被惡意連缐。
功能更豐富:DeskIn最高支援4K60FPF/2K144FPS,還支援手動調節,還有螢幕擴充,遠端CDM、投影、語音通話等免費功能,適合更多使用場景。
如何快速開始使用 DeskIn
下載並安裝 DeskIn:
在用於控制與被控制的裝置中分別安裝並開啓DeskIn,注冊一個免費賬戶並登入,如果你是首次在新裝置登入,需要到注冊信箱完成驗證。
2、快速連線:
在主控裝置上輸入被控制的裝置的ID,點擊連缐,使用密碼連缐或免密連缐方式完成連缐。
等待幾秒后,您就可以控制遠端裝置了,遠端裝置就好像在您身邊一樣。
總結
若您遇到 Chrome 遠端桌面無法安裝的問題,DeskIn 是更穩定且功能強大的替代方案。DeskIn 不僅安裝方便,還提供穩定的連線和高安全性,是遠端連線的理想選擇。
無法透過電子郵件傳輸大型檔案?探索三種簡單、安全的方法,輕鬆傳輸大型檔案。
很多人在傳輸檔案時會選擇郵件傳送,但大多數時候僅限於小型檔案傳送,需要傳送大型檔案時,發現郵箱傳送有大小限制,這時應該怎麽辦?以下教你三種方法,讓你輕鬆傳輸大型檔案。
方案一:壓縮檔案後再傳送檔案
電子郵箱通常對上傳的附件大小有限制(如Gmail 僅允許 25MB 或更小的檔案附件,而Outlook是20MB)。我們可以先壓縮大型檔案到合適的大小,然後再將它以附加檔案的形式上傳到郵件,最後發送。
優點:壓縮檔案是最簡單、直接的方法減小檔案尺寸以達到郵件附件大小要求,之後就可以直接透過附件直接傳輸檔案。
局限性:檔案壓縮通常只能將檔案壓縮為原來的一半,所以此方式只適合檔案超出大小限制不多的狀況,並且在發送郵件過程中,壓縮和解壓縮檔案可能會進一步減慢傳送進程,甚至可能導致檔案遺失或損壞,例如經壓縮後的大型影片的畫質會變差。
如Gmail 僅允許 25MB 或更小的檔案附件
方案二:使用雲端硬碟傳輸檔案
除了用郵件傳送外,還有其他傳送大型檔案的方法,例如使用雲端硬碟。先把大型檔案上傳到雲端硬碟(例如Google Drive),通過分享連結的方式傳送給對方。
優點:
這種方式可以比較好地保證檔案品質,而且檔案可以保存在雲端,隨時再做取用
局限性:
Google Drive的免費儲存空間只有15GB,其他的雲端硬碟也有類似的免費儲存空間限制,可能需要額外購買儲存空間。
將檔案上傳到硬碟、在硬碟下載檔案這兩個步驟的要先後進行,上傳和下載速度取決於您的網路狀況,耗時較長。
方案三:使用DeskIn遠端軟體傳送檔案(小編力薦)
目前市面上絕大部分的遠端軟體都支援檔案傳輸,DeskIn在普通的檔案傳輸功能基礎上進行了改進,讓檔案傳輸的使用體驗更好:
1.免費版已經支持不限大小、數量的檔案傳輸;
2.傳輸速度快,最高可達12MB/s;
3.使用 256 位元端對端加密,確保您的文件保持機密並防止未經授權的存取;
4.不需像雲端硬碟那樣上傳、下載檔案,可以從一台設備直接傳送到另一台設備,節省時間;
5.DeskIn支持在不同裝置和作業系統之間進行無縫檔案傳輸,無論您使用的是 Windows PC, Mac 還是行動設備,DeskIn 都可以讓您輕鬆地跨平台傳送檔案。
郵件傳送直接輸入對方的郵箱賬號進行傳輸,差一個字母或數字就會變成另一個郵箱,傳送出去還無法撤回,有一定的安全隱患。使用DeskIn傳送檔案時,輸入設備代碼進行連缐後還有密碼驗證,或是對方電腦手動認證,避免了傳錯對象的情況,安全性大大提高。
使用DeskIn進行檔案傳輸,既不用犧牲畫質,又不用花費更多的時間,還不用擔心跨平台的限制,安全性也更強,可謂是一舉多得。
如何使用DeskIn進行檔案傳輸?
1.在傳輸裝置和接受裝置上分別下载 DeskIn,注冊一個免費賬戶並分別登入,如果你是首次在新裝置登入,需要到注冊信箱完成驗證。
2.登入成功後,輸入接受檔案裝置的設備代碼,選擇檔案傳輸,然後選擇連缐,可以選擇密碼驗證或手動驗證。
3.電腦端有三種方式找到檔案傳輸:
(1)在「遠端控制」>> 輸入遠端控制設備代碼>>選擇「檔案傳輸」>>「連線」。
(2)在「設備列表」找到要傳輸檔案的設備,在右側功能區選擇「檔案傳輸」。
(3)在遠端控制頁面DeskIn圖標的工具欄裡找到「檔案傳輸」。
找到「檔案傳輸」後,點擊進行密碼或免密驗證連線,連線成功後就會出現檔案傳輸頁面。
在檔案傳輸的頁面裡,點選想要發送的檔案,並選好傳輸的目標位置,點擊發送方的「發送」按鍵,即可完成傳輸,你可以點擊發送以傳送,也可以直接拖拽需要傳輸的檔案完成傳送。
4.行動裝置端有三種方式找到「檔案傳輸」:
(1)「遠端控制」>> 輸入遠端控制設備代碼>>選擇「檔案傳輸」。
(2)在「設備清單」找到要傳輸檔案的設備,點擊進入後選擇「檔案傳輸」。
(3)遠端控制連線成功後,「互動」>>「檔案傳輸」。
找到「檔案傳輸」後,點擊進行密碼或免密驗證連線,連線成功後就會出現檔案傳輸頁面。
點擊「傳送檔案」,選擇行動裝置裡的檔案,「更改位置」可以選擇傳輸的目標位置,最後點擊「傳送」。
選擇「下載檔案」可以下載遠端裝置中的檔案,選中要下載的檔案點擊「下載」即可。
結論
本文介紹了傳送大型檔案的3種方法,分析了它們的優點和局限性。其中比較建議你使用第三種方法——使用DeskIn進行檔案傳送。它的免費版已經沒有檔案大小、數量的限制。傳輸速度也很快,傳送的影片畫質也不會打折扣,支持跨平台傳輸,安全性比郵件傳送更高,是傳送大型檔案的理想選擇。
三星平板變身第二螢幕完整攻略!無線設定與高效軟體2大方法一次掌握
你是否厭倦了在無數視窗、檔案與網頁間反覆切換,導致工作效率低下、思緒不斷被打斷?實現「無需切換視窗,資料對照一目了然」的高效多工作業,其實比你想象中更簡單。若不想額外購置硬體,你手上的平板就是最佳解答。大多數平板需要第三方軟件,但三星平板憑藉官方內建的「延伸螢幕」功能,提供比其他安卓平板更流暢無縫的體驗。只需要簡單的幾個步驟,就可以將三星平板當外接螢幕。
本文將一步步引導你,如何將三星平板輕鬆變身為 Windows 電腦的無線外接螢幕,無論是筆電或 PC 皆適用,助你立即擴展工作視野,釋放完整生產力。
尋找免費且快速將三星平板當外接螢幕的方法?、
DeskIn 支援將三星平板設定為電腦的雙螢幕,從而擴展您的工作或娛樂空間,顯著提升多工作業的效率。直接查看方法二獲取更多詳情。
直接下載DeskIn,體驗其流暢的螢幕擴充功能!
方法一:使用三星官方「延伸螢幕」功能無線連接
將三星平板作為電腦的外接顯示器,主要可以透過官方內建的「延伸螢幕」功能來實現。這項功能讓相容的三星平板能透過無線方式,直接變身為 Windows 電腦的第二螢幕。
不僅能夠充分利用閒置的平板裝置,無需額外花費購置專用螢幕,節約成本效益,同時無線連接讓它在會議演示或團隊協作時格外便利。不過,這項方案也有些許限制需要留意,它對設備有特定要求,需要相容的三星平板與較新版本的Windows系統才能使用,且在無線傳輸下可能產生些微延遲,流暢度表現可能不如專業外接顯示器或透過專業軟體的有線連接方案。
三星平板作爲延伸螢幕的要求
裝置要求:三星平板的延伸螢幕功能僅 One UI 3.1 以上版本的 Galaxy Tab S8 和 S7 系列產品支援。另需已安裝了「無線顯示器」功能的 Windows 10 v2004或以上版本電腦使用,如電腦沒有安裝,可以到「設定」→「系統」→「選用功能」→「新增功能」搜索「無線顯示器」點擊安裝。
網路要求:注意兩者需要連接到同一網路
【4 步】設定三星平板作爲 Windows 無線延伸螢幕
步驟一:打開三星平板電腦,從平板電腦螢幕頂部向下拉,開啟「快速設定面板」工具欄。找到「第二螢幕」,點擊進入。
步驟二:保持平板停留在「第二螢幕」畫面中(如下圖)
注:若您的三星平板與 Galaxy Book 登入同一個三星帳號,可直接從步驟三開始透過 Galaxy Book 連線
步驟三:在電腦同時按下「Windows鍵+K鍵」,從彈出的裝置清單面板找到您的三星平板並點選,您的電腦就會連接到平板。
步驟四:連接成功后,若您的平板只鏡像電腦的内容,可點擊「變更投影模式」,將投影模式切換至「延伸」即可。當連線成功後,您的平板就會變成電腦的無線第二螢幕,可以開始享受更高效的多工作業囉!
不過,萬一您在無線連線時覺得畫面有些延遲或不夠流暢。別擔心, 您可以直接試試下面更穩定的「方法二:使用專業軟體 DeskIn」,透過Wi-Fi或有線網路都能獲得媲美實體螢幕的流暢體驗!
你可能感興趣:
方法二:更簡單好用的跨系統延伸螢幕工具 DeskIn
上面介紹的方法設定相對比較簡單,但是需要兩者都在同一網路下才可以使用,而且僅適用三星平板和Windows電腦。若您在尋找更全面、更簡單易用的延伸螢幕解決方案,推薦你使用DeskIn遠端桌面。
DeskIn 是一款支援iOS、Android、Windows、Macbook之間跨平台延伸螢幕的效率提升工具,不僅可以免費使用,設定也超級簡單。DeskIn最强大的地方在於,它不僅可以幫你實現平板作爲第二螢幕,還可以讓你不花錢就能用平板遠端存取電腦、掃碼一鍵投影平板畫面到電腦、進行檔案存取甚至在平板上玩電腦PC遊戲,一個軟體滿足你所有場景需求!性價比超高!
DeskIn:更強大靈活,不限裝置型號,低延遲,功能豐富
低延遲高畫質,可手動調整幀率和解析度,最高支援 4K60fps,能讓游標移動、筆刷觸控近乎即時響應,即使進行文字處理或網頁瀏覽也倍感舒適。
全平台支援,無論你手邊的是三星 Galaxy Tab、iPad、Android 其他品牌平板,還是 Windows 筆電或 MacBook,都能直接使用,無需區分系統。
無須同一網路下即可延伸, 傳統延伸螢幕需依賴同一區域網,但 DeskIn 讓你能透過 4G/5G 行動網路或任何可上網的Wi-Fi,隨時隨地將平板變成電腦的延伸螢幕。
更多免費附加功能:除了使用平板變第二螢幕的功能,DeskIn還支援很多實用功能,如遠端操控、鏡像投影、跨裝置檔案傳輸等等,都讓你的雙螢幕工作流程更加完整順暢。
立即下載DeskIn遠端桌面!免費體驗高清順暢的延伸螢幕和遠端操控功能!
【3步】使用 DeskIn 把三星平板作爲 Windows 第二螢幕
步驟一:首先在平板和電腦上分別安裝DeskIn,注冊一個免費賬戶並登入,如果你是首次在新裝置登入,需要到注冊信箱完成驗證,更加安全。
步驟二:在電腦端DeskIn上點擊左邊菜單「鏡像屏/擴展屏」,點選「立即進行螢幕擴展」>> 選擇你想要進行螢幕擴充的裝置比如您的三星平板,并點擊「開始螢幕擴展」,即可成功延伸螢幕,擁有一個完整的雙螢幕工作環境,在兩個螢幕間無縫拖曳視窗,實現高效多工處理。
步驟三(非必須):若進行螢幕擴充後,您發現平板只是鏡像電腦螢幕上的内容,請前往系統顯示器設定,將螢幕選項設定為「延伸這些顯示器」,你還可以根據您的使用習慣,透過拖拽修改1、2兩塊螢幕的左右順序。
更多閲讀
設定三星平板作爲第二螢幕的常見問題
使用三星内建方案無線延伸螢幕時感覺延遲嚴重,畫面卡頓,該如何改善?
首先,請確保電腦與平板連接至同一台 5GHz Wi-Fi 路由器,並避免網路中有其他裝置大量佔用頻寬。其次,關閉電腦與平板上的非必要背景應用程式,以釋放系統資源。
若追求極致流暢體驗,特別是在繪圖或遊戲等場景,建議切換至有線方案。上文提到的 DeskIn 等軟體支援無線連接,提供近乎零延遲的操作反應。
💻立即下載DeskIn遠端桌面!免費體驗高清順暢的延伸螢幕和遠端操控功能!
平板延伸螢幕軟體有哪些推薦?
根據用戶評價,下面為你推薦三款主流的平板延伸螢幕軟體,它們在連接方式和適用場景上各有側重:
DeskIn 支援無線連接,具備跨平台相容性與 4K 高畫質傳輸能力,特別適合需要遠端控制和檔案傳輸的遠距協作場景。
SuperDisplay 提供有線與無線雙模式連接,以其出色的低延遲表現和完整支援 S Pen 壓感功能見長,是繪圖與設計等創意工作的理想選擇。
SpaceDesk 採用無線連接技術,提供免費版本且設定簡單直覺,非常適合預算有限且需要快速設定延伸螢幕的輕度辦公使用者。
結論:我該選擇哪一種方法?
本文介紹了 2 種方法實現三星平板用作Windows的第二螢幕。若你追求設定的便利性,且裝置符合相容條件,那麼優先使用三星官方的「延伸螢幕」功能,會是最無縫、最直接的選擇。
但若你更重視效能與靈活性,例如使用的是舊款平板、需要更低的操作延遲,或是希望解鎖遠端控制等進階功能,那麼投資像 DeskIn 這類專業的跨系統軟體,無疑是效能更強大、應用場景更全面的解決方案。無論你選擇哪一種方法,都能輕鬆釋放平板的潛在價值,告別視窗切換的混亂,大幅提升你的多工作業效率。
立即下載DeskIn遠端桌面!免費體驗高清順暢的延伸螢幕和遠端操控功能!
如何知道有人遠端監控你的手機?7 大徵兆 + 實用解決方案
你是否曾經覺得手機怪怪的?沒有原因的自動重新開機、通話時聽到奇怪雜音、或是手機莫名被鎖,無法解鎖?這些看似平常的小狀況,其實可能是手機被監控的警訊。
根據資安統計,台灣地區每年因手機被駭導致的詐騙損失金額高達數億元,而長輩群體因對 3C 產品不熟悉,更容易成為詐騙集團鎖定的目標。詐騙手法日新月異,只要不小心點開一個看似正常的連結或網頁、下載了可疑軟體,手機就可能被遠端惡意監控,個人資料、銀行帳號、通訊內容全都暴露在風險之中。
這篇文章將帶你深入了解怎麼知道手機被監視的關鍵徵兆,以及發現異樣時該如何檢查並解除監控,同時分享如何使用安全的遠端工具協助長輩進行手機健檢,從根本預防手機被惡意入侵的風險。
手機被監控的 7 大可疑徵兆
懷疑手機被監控卻不確定?以下 7 個異常現象是最常見的電話被監聽徵兆,如果你的 iPhone 或 Android 手機出現多項狀況,就需要提高警覺了。
徵兆一:手機變得異常耗電或發熱
如果你的手機在正常使用下,電池消耗速度突然比平常快很多,或是沒在使用時機身也持續發熱,這很可能是手機被監視的第一個警訊。
監控軟體通常會長時間在後台悄悄運作,持續追蹤你的位置、通話記錄或訊息內容,這些動作都會大量佔用手機效能,導致電池快速消耗並產生熱能。當然,如果是電池健康度下降或正在玩高耗電遊戲,也可能出現類似狀況,但若排除這些因素後仍有異常,就要特別注意了。
徵兆二:手機運作突然變得很慢
你的 iPhone 原本運作流暢,最近卻經常卡頓、開 App 變慢?如果不是因為安裝太多軟體或照片占滿儲存空間,那麼手機突然變慢很可能是因為有監控程式在背景執行,占據了大量內存和處理效能。
這種效能下降通常不會立刻出現,可能要經過幾週才會逐漸察覺,這也是為什麼許多人被監控了還渾然不知。
徵兆三:手機出現自動異常行為
手機自動會動是最明顯的被駭徵兆之一。如果你發現手機會突然自己重新啟動、在有電的情況下無預警關機,或是螢幕在沒有通知時突然亮起,甚至偶爾看到螢幕好像自己在滑動,這都可能代表有人正在遠端操控你的手機。
現代智慧型手機不應該在沒有明確原因的情況下自行重啟或關機,如果經常發生這種狀況,建議立即進行全面檢查。
徵兆四:手機螢幕被鎖,無法自行解鎖
如果你發現手機螢幕突然被鎖定,無法用原本的密碼、指紋或 Face ID 解鎖,這是極高風險的被入侵或被遠端控制警訊。某些惡意監控軟體或駭客程式能夠強制修改鎖屏設定,甚至替換你的系統密碼,讓你完全無法進入手機主畫面。 這種情況往往代表裝置權限已被竊取,駭客可能正試圖鎖定資料或勒索贖金。
徵兆五:收到陌生訊息或好友邀請
如果你在社群媒體上收到陌生人的好友邀請或群組邀請,對方卻知道你的名字、電話或其他個人資訊,這很可能代表手機被遠端監控導致個資外洩。
此外,如果手機收到內容奇怪、充滿符號或亂碼的簡訊,千萬不要點擊裡面的連結,因為這些可能是針對監控軟體發送的控制訊息,或是試圖讓你下載惡意程式的釣魚訊息。
徵兆六:瀏覽器出現莫名的瀏覽記錄
養成定期檢查手機瀏覽記錄的習慣非常重要。如果發現瀏覽器歷史記錄中出現你從未造訪過的網站,或是下載了你沒印象的檔案,這可能表示有人曾經遠端操作你的手機。
同時也要小心莫名訊息中帶有連結的內容,盡量不要點開陌生訊息的連結,因為一旦點開,手機可能會迅速感染病毒程式。
徵兆七:通話過程中聽到奇怪的雜音或回音
現代通訊技術已經相當成熟,通話品質一般都很穩定。如果你在與他人通話時,經常聽到不明來源的雜音、回音、嗶嗶聲或其他人的聲音,即使切換網路或重撥也無法改善,這很可能是手機被監聽的明確徵兆。
傳統的電話竊聽雖然已不常見,但加密不良或間諜軟體仍可能造成通話干擾,尤其在使用 LINE、FaceTime 或其他通訊軟體時更容易出現異常。
如何檢查並解除手機被遠端監控?6 個實用方法幫到你
當你懷疑手機被遠端監視時,可以透過以下 6 個方法進行全面檢查,並採取相應的解除措施。這些方法同時適用於 iPhone 和 Android 手機。
💡溫馨提示:如果你需要協助長輩檢查手機但人不在身邊,可以使用安全的遠端軟體 DeskIn 直接操控他們的手機進行排查,避免電話溝通不清楚的困擾。
方法一:檢查手機是否有隱藏或可疑程式
不管是 Android 還是 iPhone,都提供了隱藏 App 的功能,這也成為監控軟體藏身的最佳位置。以下是檢查隱藏程式的詳細步驟:
iPhone 檢查步驟:
在手機主畫面一直向右滑到最後,進入「App 資料庫」
尋找「隱藏項目」或類似的分類資料夾
透過 Face ID 或密碼驗證後,檢查是否有不認識的 App
同時前往「設定」>「一般」>「iPhone 儲存空間」,查看所有已安裝的應用程式
Android 檢查步驟:
前往手機「設定」
點選「應用程式」或「應用程式管理」
找到「顯示隱藏的應用程式」選項
仔細檢查是否有不明來源的程式
如果發現任何陌生軟體或名稱可疑的 App(例如包含「spy」、「monitor」等字眼),請立即卸載。若發現有無法刪除的軟體,建議尋求專業資安人員協助。
方法二:調整應用程式定位權限,避免行蹤被追蹤
許多監控行為都是透過定位功能來追蹤你的行蹤。幸好 iPhone 和 Android 都提供了精細的定位權限管理,你可以透過以下方式加強防護:
iPhone 定位權限設定:
前往「設定」>「隱私權與安全性」>「定位服務」
逐一檢查每個 App 的定位權限設定
對於高風險程式(如瀏覽器、社交軟體),將「準確位置」選項關閉
在「定位服務」頁面向下滑到底部,點選「系統服務」
選擇「重要位置」,清除歷史定位記錄
這項「模糊定位」功能可以讓 App 只獲取你的大概位置,而非精確座標,有效降低被追蹤的風險。
Android 定位權限設定:
前往「設定」>「應用程式」
選擇「定位服務」或「位置資訊」
關閉「Google 定位精確度」中的「提高定位精準度」選項
逐一檢查各 App 的位置權限,設定為「僅在使用時允許」
方法三:安裝防毒軟體或反追蹤程式
安裝可靠的防毒軟體是預防手機被監視的有效方法,特別是 Android 裝置更需要額外防護。以下是幾款值得信賴的安全軟體:
Surfshark Antivirus:提供即時防護功能,可自動掃描下載內容和 App
Malwarebytes:專門偵測間諜軟體和惡意程式
Norton Mobile Security:整合防毒、防護和裝置追蹤功能
Avast Mobile Security:免費版本已包含基礎掃描功能
重要提醒:下載任何軟體時,務必前往官方 App Store 或 Google Play 商店,不要透過連結、QR Code 或第三方網站安裝程式,以免下載到假冒的惡意軟體。
方法四:定期清理瀏覽記錄與快取資料
定期清除瀏覽記錄不僅能保護隱私,也能移除潛藏的追蹤 Cookie 和惡意腳本。
Android 清理步驟:
打開 Google Chrome 瀏覽器
點選右上角的「⋮」按鈕
前往「設定」>「隱私權和安全性」
選擇「清除瀏覽資料」
勾選要清除的項目(建議全選),設定時間範圍後確認
iPhone 清理步驟:
前往「設定」
向下滑動找到「Safari」
點選「清除瀏覽記錄及網站資料」
確認清除
建議每週至少執行一次清理,養成良好的資安習慣。
方法五:更新 Google 帳號或 Apple ID 密碼
如果你的手機被監控,帳號密碼很可能也已經外洩。由於 Google 帳號和 Apple ID 連結了許多重要服務(包括雲端備份、電子郵件、支付資訊等),立即更改密碼能有效降低風險擴大。
更改 Google 帳號密碼:
開啟 Google 帳戶管理頁面
進入「安全性」選項
選擇「登入 Google」>「密碼」
輸入新密碼後點選「變更密碼」
建議同時啟用「兩步驟驗證」增加安全性
更改 Apple ID 密碼:
前往 iPhone「設定」
點選最上方的帳號名稱
選擇「密碼與安全性」>「更改密碼」
依照螢幕指示完成密碼更新
考慮開啟「雙重認證」功能
密碼設定建議:使用至少 12 位元的強密碼,結合大小寫字母、數字和符號,避免使用生日或常見詞彙。
方法六:重置手機為原廠設定(最後手段)
如果以上方法都無法解除監控,恢復原廠設定是最徹底的解決方式。這個操作會刪除所有資料、應用程式和設定,將手機恢復到出廠狀態。
重要警告:此方法會清除所有內容,使用前務必先備份重要資料!
Android 重置步驟:
前往「設定」>「系統」
選擇「重設」或「重設選項」
點選「清除所有資料(重設為原廠設定)」
確認執行並等待重置完成
iPhone 重置步驟:
前往「設定」>「一般」
選擇「移轉或重置 iPhone」
點選「清除所有內容和設定」
輸入密碼確認後執行
重置完成後,建議先更新到最新系統版本,再逐一安裝需要的 App,並仔細檢查每個程式的權限設定。
爲什麽要定期幫長輩檢查手機是否在被監控?
許多人可能會疑惑:為什麼特別強調要幫長輩檢查手機?以下兩個關鍵原因說明了長輩群體面臨的特殊風險。
原因一:高齡族群已成為詐騙集團的主要目標
根據警政署統計,台灣地區每天因詐騙造成的損失金額動輒數百萬元,其中 60 歲以上長者受騙比例高達 40% 以上。詐騙集團看準長輩手上握有「高額退休金與儲蓄」,透過各種手段接近他們。
除了傳統的電話詐騙,詐騙集團也會透過監控軟體入侵長輩的手機,竊取個人資訊、銀行帳戶、親友聯絡方式等,再根據這些資訊量身打造詐騙話術,成功率大幅提升。
原因二:長輩對數位科技不熟悉,防範意識較低
大部分長輩對智慧型手機和網路安全的認知有限,在使用 iPhone 或 Android 手機時,常會出現以下高風險行為:
隨意點擊陌生訊息中的連結
誤入詐騙群組或參加釣魚活動
下載來路不明的 App
將所有 App 權限都設為「允許」
使用過於簡單的密碼或與他人共用密碼
即使長輩感覺手機怪怪的,往往也不知道該如何檢查或處理,有些甚至堅信「我不會被騙」而不願承認問題。這時候就需要身邊的年輕人多關心,定期協助檢查手機安全狀態,及早發現並排除風險。
使用 DeskIn 遠端軟體,安全協助長輩排查手機監控問題
如果你經常不在長輩身邊,用電話口頭指導他們檢查手機往往事倍功半,長輩聽不懂專業術語,你也看不到實際操作畫面,溝通起來非常費力。
這時候,一款安全、易用的遠端控制軟體就能完美解決這個問題。DeskIn 是專為跨裝置遠端控制設計的軟體,可以讓你在長輩同意後,直接透過自己的手機或電腦操作長輩的裝置,幫他們進行手機健檢、排查可疑程式、調整安全設定等操作。此外,你也可以將 DeskIn 作為家長監控軟體來使用,接遠端幫孩子清除不良訊息,查看手機使用時間,進行軟體管控,保障一家老小的「電子衝浪」安全。
DeskIn 的核心安全防護機制:
銀行級 256 位元加密:所有遠端連線都經過軍規級加密保護
新裝置登入需信箱驗證:確保帳號不會被盜用
連線雙重驗證:每次遠端連線都需要臨時密碼、安全密碼或被控端手動確認
同帳號限制:只有登入同一個帳號的裝置才能進行遠端控制
自動隱私保護:輸入密碼或支付時螢幕會自動變黑,防止資料外洩
隱私螢幕模式:遠端操作時可開啟隱私螢幕,避免被旁人偷看
黑白名單機制:可設定允許或禁止的裝置,防止陌生連線
除了安全防護,DeskIn 還提供內建語音通話和螢幕標注功能,讓你在遠端操作時可以同步跟長輩講解,幫助他們理解操作步驟,真正做到「教會他們」而不只是「幫他們做」。
💻 立即下載 DeskIn 免費試用,為家中長輩建立一道安全防線!
如何使用 DeskIn 檢查長輩手機是否被監控?
以下是完整的操作步驟,整個過程只需 5 分鐘:
第一步:雙方裝置都安裝 DeskIn
在你和長輩的手機上都下載並安裝 DeskIn App,然後註冊一個免費帳戶並登入。iOS 用戶前往 App Store,Android 用戶前往 Google Play 商店搜尋「DeskIn」即可找到。
第二步:長輩端開啟遠端控制權限
請長輩在 DeskIn 中開啟「允許遠端控制本設備」選項,並選擇遠端控制的驗證方式(可設定連線密碼或手動確認)。這個步驟確保遠端控制必須經過長輩同意,不會被惡意使用。
第三步:從你的裝置發起連線
在你的裝置列表中找到長輩的手機,輸入連線密碼或請長輩手動通過驗證,即可開始遠端操作。你會看到長輩手機的即時畫面,所有操作都如同直接使用他們的手機一樣流暢。
第四步:邊操作邊講解
在檢查手機的過程中,你可以開啟語音通話功能與長輩對話,或使用標注工具在螢幕上圈選重點,讓長輩清楚了解你在做什麼、為什麼這樣做。這種互動式的教學方式,能大幅提升長輩的資安意識。
日常安全使用遠端軟體的 5 個建議
部分使用者可能擔心:使用遠端軟體本身會不會也有安全風險?確實,如果選用不安全的遠端工具或使用方式不當,可能反而帶來隱患。以下是安全使用遠端軟體的5個重要原則:
選擇高安全等級的遠端軟體:務必選用像 DeskIn 這類採用端對端加密、具備多重驗證機制的正規軟體,避免使用來路不明的程式
避免使用公共 Wi-Fi 進行遠端連線:公共網路容易被中間人攻擊,建議使用自家網路或手機行動數據進行遠端操作
只從官方管道下載軟體:前往官網或官方應用商店下載,切勿透過不明連結、第三方網站或 QR Code 安裝
絕對不要相信陌生人要求你下載遠端程式:這是詐騙集團常用的手法!無論對方自稱是銀行客服、警察、檢察官或任何單位,都不應該要求你安裝遠端軟體,這類要求 100% 是詐騙
定期更新密碼並妥善保管:每 1-3 個月更換一次連線密碼和帳號密碼,不要與他人共用帳號,也不要在陌生裝置上登入
善用軟體內建的安全設定:DeskIn 提供豐富的安全選項,例如黑白名單、強制手動驗證、隱私螢幕等,建議依照需求開啟相應功能
只要遵循這些原則,遠端軟體就能成為你守護家人資安的有力工具,而不是潛在風險。
關於手機被監控或監聽的常見問題
Q1:如何確認自己的 iPhone 是否被監控?
觀察手機是否出現異常耗電、發熱、變慢、自動重啟等現象,並檢查是否有不明 App、陌生瀏覽記錄或通話雜音。建議按照本文提供的 6 個方法進行全面檢查,包括查看隱藏程式、檢視定位權限、安裝防毒軟體等。如果發現多項異常徵兆,很可能已被監控。
Q2:電話被監聽會有什麼徵兆?
最明顯的徵兆是通話過程中聽到不明雜音、回音、嗶嗶聲或其他人的聲音,即使切換網路也無法改善。此外,通話後手機持續發熱、電池快速消耗,或是收到奇怪的簡訊,都可能是電話被監聽的警訊。
Q3:手機被監控後資料會外洩嗎?
是的,監控軟體可以竊取手機內的所有資料,包括通話記錄、簡訊內容、社交軟體對話、照片影片、定位資訊、銀行帳號密碼等。這些資料一旦落入詐騙集團手中,可能被用於量身打造詐騙話術,或直接盜用帳戶進行非法交易,風險極高。
Q4:使用 DeskIn 遠端軟體會不會也有被監控的風險?
DeskIn 採用銀行級 256 位元端對端加密,並具備多重驗證機制、同帳號限制、隱私保護等安全功能,是目前市面上安全等級最高的遠端軟體之一。所有連線都需要使用者主動授權,且可隨時中斷,不會有被惡意監控的風險。只要從官方管道下載並遵循安全使用原則,就能放心使用。
Q5:如果不確定手機是否被監控,該怎麼辦?
建議先執行本文提供的基礎檢查方法,包括查看隱藏程式、檢查行動數據用量、清理瀏覽記錄、更改帳號密碼等。如果仍不放心,可以安裝防毒軟體進行全面掃描,或是使用 DeskIn 請信任的家人朋友協助遠端檢查。最極端的方式是備份重要資料後恢復原廠設定,這能徹底清除所有可能的監控程式。
結論
手機被監控不只是隱私問題,更可能導致財產損失甚至人身安全威脅。了解如何知道手機被監控 iPhone 的徵兆,並掌握正確的檢查與解除方法,是現代人必備的資安知識。本文介紹了 7 大可疑徵兆、6 個實用檢查方法,以及如何使用 DeskIn 安全地協助長輩進行手機健檢。無論是為了保護自己還是家人,定期排查手機安全狀態都是不可或缺的防護措施。
記住預防永遠勝於治療。養成良好的手機使用習慣、提高資安意識、選用安全的工具,才能在這個數位時代有效守護個人隱私與財產安全。如果你需要一款安全、易用的遠端軟體來協助長輩處理手機問題,DeskIn 的全方位安全防護機制與直覺操作介面,絕對是你的最佳選擇!
iPhone/Android 老人模式設定教學,讓長輩輕鬆上手智慧手機
長輩拿著新手機卻不知道怎麼用,字太小看不清楚,按鈕太小常按錯,或是擔心誤觸到不該碰的設定?根據統計,台灣 65 歲以上長者使用智慧型手機的比例已超過 70%,但因操作不熟悉而產生的困擾也隨之增加。其實,無論是 iPhone 或 Android 手機,都內建了適合長輩使用的「老人模式」或「長輩模式」,能讓手機介面變得更直覺、字體圖標更大,操作起來也更簡單。
本文將完整介紹 iPhone 自訂輔助取用功能與 Android 簡易模式的設定方法,還會教你「防誤觸模式」、「一鍵撥號」、「SOS 緊急聯絡人」等實用功能。如果你不在長輩身邊,想要遠端協助完成設定,可以使用 DeskIn 遠端桌面直接操作長輩的手機,透過語音通話和白板標註即時指導,省時又方便。現在就一起來看看詳細的設定步驟吧!
iPhone「老人模式」完整設定教學
蘋果在 iOS 17 推出了全新的「自訂輔助取用」功能,這就是俗稱的 iPhone 老人模式。這項功能能將手機介面極度簡化,讓圖示變大、字體變清晰,非常適合視力退化或不常使用複雜功能的長輩。以下將帶你一步步完成設定。
第一步:進入「輔助取用」設定頁面
首先,請確認你的 iPhone 系統版本為 iOS 17 或更新版本。前往手機「設定」>>「輔助使用」>>找到「自訂輔助取用」並進入,點選「設定自訂輔助取用」開始進行設定流程。
第二步:關聯 Apple 帳號確保資料安全
系統會要求你將裝置與目前登入的 Apple ID 帳號進行關聯。這個步驟是為了確保日後若忘記密碼,還能透過 Apple ID 來重置,請確認帳號正確後點擊「繼續」。
第三步:選擇適合長輩的外觀顯示方式
蘋果提供了兩種主畫面布局讓你選擇:
「橫列」模式: 以列表形式展示應用程式,文字部分更大更清楚,適合喜歡簡潔介面的長輩
「格狀」模式: 類似傳統的 App 圖示排列,icon 會更加突出,適合習慣傳統手機介面的使用者
建議根據長輩的使用習慣和視力狀況來選擇。一般來說,「橫列」模式因為文字較大,對視力不佳的長輩更友善。
第四步:精選長輩常用的應用程式
在這個步驟中,你可以選擇長輩平常會用到的 App。建議選擇電話、訊息、相機、照片、LINE 等基本功能即可。需要特別注意的是,沒有被選擇的應用程式在「老人模式」下將完全無法使用,所以請仔細評估長輩的實際需求再進行選擇。
第五步:設定退出密碼與閱讀重要提示
選好應用程式後,系統會顯示「老人模式」的功能限制說明:
緊急服務:只能透過按三下側邊按鈕啟動緊急電話,無法使用衛星 SOS 服務
系統通知:不會顯示數字提醒,只會在 App 右上角出現通知標記
軟體更新:無法在此模式下更新 iOS 系統
隱私權顯示:狀態列會隱藏部分隱私圖示(如 GPS 定位)
請務必詳細閱讀這些限制,確保不會影響長輩的使用需求。接著按照系統提示設定「自訂輔助取用」密碼(四位數字)以及「復原 Apple ID」,這組密碼是用來開啟和結束「老人模式」的重要憑證。
設定完成後,只要按三下 iPhone 側邊按鈕,輸入密碼就能啟動或關閉長輩模式。若要永久關閉,同樣按三下側邊按鈕,輸入「自訂輔助取用」密碼即可退出。
二、簡化版「老人模式」:調整 iPhone 圖標和字體大小
如果你覺得完整的 iPhone 老人模式限制太多,長輩只是需要更大的字體和圖標,那麼以下這些簡易設定可能更適合。這些方法不會大幅改變手機的使用方式,只是讓視覺呈現更友善,同時保留所有功能。
1. 調整桌面圖標大小
如果長輩覺得 iPhone 主畫面的 App 圖示太小不好點選,可以透過以下方式放大:
長按主螢幕進入編輯模式 >> 點擊左上角「編輯」>>「自訂」>> 選擇下方的「大」選項
這個方法會讓所有圖標變大,但不會顯示應用程式名稱。建議搭配下方的字體放大功能一起使用,達到最佳效果。
2. 放大系統字體
前往手機「設定」>>「輔助使用」>>「顯示與文字大小」>>「放大文字」。在這裡你可以自由調整字體大小,滑桿向右拖曳字體就會變大。同時建議開啟「粗體文字」選項,讓文字更清晰醒目,特別適合老花眼的長輩使用。
如果這些設定對長輩來說還是有點複雜,不妨使用 DeskIn 遠端桌面直接存取長輩的 iPhone 畫面,透過語音通話和白板標註功能即時指導,或直接幫長輩完成所有設定,省去來回溝通的麻煩!
三、Android「長輩模式」設定教學
Android 手機品牌眾多,但大多數都有內建「簡易模式」或類似的老人模式功能。這些模式能讓手機介面變得更簡潔、圖標更大、操作更直覺。以下以市佔率最高的三星手機為例進行說明,其他品牌如 OPPO、Vivo、小米等設定方式也大同小異。
三星「簡易模式」啟用方法
三星的簡易模式介面非常友善,主畫面會顯示常用聯絡人的快速撥號按鈕,應用程式圖示也會放大,整體畫面更加簡潔清爽。設定步驟如下:
前往手機「設定」>>「顯示螢幕」>>「簡易模式」>>「開啟」
若內建的簡易模式仍無法滿足需求,也可以到 Google Play 商店下載第三方的極簡桌面應用程式,例如「BIG Launcher」、「Simple Launcher」等,提供更客製化的長輩模式介面。
四、Android 手機其他實用的長輩友善設定
除了基本的簡易模式,Android 手機還有許多貼心功能,能讓長輩使用起來更安全、更方便。以下整理了幾個最實用的設定,建議一併完成。
1. 調整字體大小
前往手機「設定」>>「顯示螢幕」>>「字體大小與樣式」>>依照長輩需求調整字號大小。也可以同時開啟「粗體文字」讓文字更加清晰醒目,減輕眼睛負擔。
2. 開啟「防誤觸防護」
長輩常會把手機放在口袋或包包裡,不小心誤觸螢幕導致撥號或傳送訊息。啟用防誤觸功能後,手機會自動偵測是否在口袋中,避免意外操作。
前往手機「設定」>>「顯示螢幕」>>「開啟誤觸防護」
3. 開啟「自動封鎖」功能
近年來針對長輩的詐騙案件層出不窮,這個功能能自動封鎖來路不明的應用程式安裝,只允許從 Galaxy Store 或 Google Play 商店下載 App。同時也會封鎖 USB 傳輸的指令和軟體、訊息中的惡意圖片連結,大幅降低長輩受騙或中毒的風險。小米手機也有類似的「騷擾攔截」、「安全守護」功能可以使用。
三星設定步驟如下:
前往手機「設定」>>「安全性與隱私權」>>「自動封鎖程式」>>「開」
4. 設定快速撥號
讓長輩在主畫面就能快速撥打電話給家人,不用再翻找通訊錄。設定方式如下:
在手機主螢幕透過兩指縮放進入編輯模式 >> 點選「Widgets」>>「聯絡人」>> 長按「快速撥號 1x1」>> 拖移到想要的位置後放開 >> 選擇要撥號的聯絡人
建議設定子女或配偶的快速撥號按鈕,放在主畫面最顯眼的位置,緊急時刻就能立即聯繫。
5. 設定 SOS 緊急聯絡人
這個功能能在長輩遇到緊急狀況時,快速撥號並發送簡訊給預設的緊急聯絡人。當長輩身體不適、發生意外或遇到危險時,只要連按電源鍵數次(依機型不同),就能自動撥號求救並傳送定位資訊,讓家人第一時間掌握狀況。
設定方法如下:
前往手機「設定」>>「安全與緊急狀況」>>「緊急聯絡人」>>「新增成員」>> 選取聯絡人 >>
你還可以選擇將此聯絡人資訊顯示在鎖定螢幕上,方便他人在緊急時刻協助撥打
五、長輩遠端支援神器 DeskIn:3C 問題、老人模式設定輕鬆解決
以上介紹的 iPhone 老人模式和 Android 長輩模式設定,步驟雖然不算太複雜,但對長輩來說仍可能感到困惑。如果你不在長輩身邊,光靠電話或視訊指導往往會遇到「找不到按鈕在哪」、「聽不懂術語」、「操作到一半就迷路」等問題,來回溝通非常耗時。
這時候你需要一個能直接遠端操作長輩手機的工具—— DeskIn 遠程控制工具。它能讓你從自己的手機或電腦,直接連線到長輩的手機進行操作,就像親自在長輩身邊幫忙一樣方便!
DeskIn 遠端桌面的六大優勢
跨平台全面支援: DeskIn 支援 Windows、Mac、iPhone、Android 等所有主流平台,無論你用什麼裝置,都能遠端控制長輩的手機或電腦,真正做到跨平台無障礙協助
內建語音通話與白板標註: 連線時可以同步進行語音通話,邊操作邊即時溝通。還能使用白板標註功能在螢幕上畫圈圈、箭頭指引,讓長輩清楚看到每個步驟,印象更深刻,下次遇到類似問題也能自己處理
連線流暢穩定不掉線: DeskIn 採用先進的連線技術,延遲低、操控順暢,而且沒有連線時長限制,不會像某些軟體用到一半就突然斷線,讓你能從容完成所有設定
高清畫質看得清楚: 免費版就支援 1080p 30fps 高清畫質,即使是小字小按鈕也能看得一清二楚,不會因為畫面模糊而誤操作
安全性高不怕被盜用: DeskIn 的手機遠端功能只能在同一個帳號下的裝置之間進行,避免長輩不小心洩露連線密碼給陌生人。連線時可以選擇讓長輩手動確認,也可以預先設定密碼快速連線,彈性又安全
操作直覺長輩也能上手: DeskIn 的介面設計非常簡潔,不需要複雜的技術知識,老人都能輕鬆學會如何允許連線
除了幫長輩設定老人模式,DeskIn 在日常生活中還有很多用途:遠端幫長輩安裝 App、檢查手機有無可疑訊息、協助處理網路銀行問題、教長輩使用新功能等等。真正做到一次安裝、終身受用,成為你照顧長輩的最佳數位助手!
使用 DeskIn 遠端操作長輩手機的三個簡單步驟
第 1 步: 在你的裝置和長輩手機上下載安裝 DeskIn,並使用同一個帳號登入(可以用 Google、Apple ID 或 Email 註冊,完全免費)。
第 2 步: 當需要遠端協助時,請長輩打開 DeskIn App,點擊「連線本設備」,勾選「允許連線設備」,選擇授權的功能,按提示完成授權,就能看到本機連線密碼。
第 3 步: 在你的 DeskIn 裝置列表中找到長輩的手機,點擊連線、輸入密碼後就能直接操作。你可以邊操作邊開啟語音通話,即時指導長輩,或使用白板標註功能圈出重點。
關於手機老人模式的常見問題
Q1:iPhone 老人模式如何關閉?
若要關閉 iPhone 的「老人模式(自訂輔助取用)」,只需按三下側邊按鈕,然後輸入當初設定的「自訂輔助取用」四位數密碼即可退出。如果忘記密碼,可以使用綁定的 Apple ID 進行重置。建議將密碼記錄在安全的地方,避免需要時找不到。
Q2:iPhone 老人模式可以使用 LINE 嗎?
可以!在設定 iPhone 老人模式時,第四步驟「選擇長輩需要用到的軟體」中,你可以加入 LINE 應用程式。不過需要注意的是,LINE 並非蘋果原生 App,因此在老人模式下介面會回到類似舊款 iPhone 的顯示方式,畫面會放到最大但功能依然完整可用。建議實際測試後再決定是否加入 LINE,確保長輩能順利使用。
Q3:三星手機有老人模式嗎?
有的!三星手機內建「簡易模式」,功能類似 iPhone 的老人模式。開啟後主畫面會顯示大圖示、大字體,還會新增快速撥號功能。
設定方式為:前往「設定」>>「顯示螢幕」>>「簡易模式」>>「開啟」。
其他 Android 品牌如 OPPO、Vivo、小米等也有類似功能,通常在「設定」>「顯示」或「系統」選單中可以找到,名稱可能叫「簡易模式」、「長輩模式」或「極簡模式」。
Q4:DeskIn 遠端軟體需要付費嗎?
DeskIn 提供免費版本,已包含基本的遠端控制、1080p 高清畫質、語音通話等核心功能,對於協助長輩設定手機來說完全足夠。若需要更高階的功能如 4K 畫質、檔案傳輸、多螢幕支援等,可以選擇付費方案。對大多數家庭用戶而言,免費版就能滿足日常遠端協助長輩的所有需求。
結論
本文完整介紹了 iPhone 老人模式和 Android 長輩模式的設定方法,還包括調整字體大小、防誤觸、快速撥號、SOS 緊急聯絡人等實用功能。這些設定能讓長輩更輕鬆地使用智慧型手機,減少誤觸和操作困擾,也能提升安全性。
如果你不在長輩身邊,強烈推薦使用 DeskIn 來協助設定。透過遠端連線,你可以直接操作長輩的手機,搭配語音通話和白板標註功能,就像親自在身邊指導一樣方便,再也不用重複解釋同樣的步驟。給長輩買了新手機,記得幫他們設定好老人模式和相關功能,讓他們也能享受科技帶來的便利!
家長監控孩子手機4大注意事項!監控軟體怎麽選?4款程式對比
現在越來越多小朋友也有智慧型手機,用來與家人聯絡或是娛樂。家長出於擔心孩子安全和防止孩子沉迷手機,會使用手機監控的程式管理孩子手機。
對於年齡較小的孩子,這些手機監控程式可以讓家長及時了解孩子的動態,當孩子遇到一些潛在危險、收到不良訊息,甚至遇到校園霸凌時可以及時察覺,介入並進行正確引導,以避免事情往更壞的方向發展。但這也涉及到一些倫理和隱私問題,不當使用可能影響家長和孩子的關係,適得其反。應該如何正確使用手機監控程式,如何選擇手機監控程式是一個對家長來説非常重要的問題。這篇文章介紹了4款手機監控程式,各有特點,可以根據自己的實際需求和情況進行選擇。如果你想要一款兼具觀看、操控手機,又很安全,孩子可接受的程式,推薦使用DeskIn。
家長需要監控孩子手機的五大原因
1、控制手機使用時間
小朋友對於時間的管控能力可能還不夠強,加之目前網路上的誘惑越來越多。玩遊戲、看短影音、社群聊天,都可能導致孩子沉迷導致無節制使用手機。這時候,監控程式能幫助家長了解孩子手機使用情況,並適當進行管控和調節。
2、甄別不良資訊或程式
網路上的資訊非常複雜,孩子可能還不太會分辨。定期查看孩子手機簡訊、網頁瀏覽記錄、社群媒體,可以及時察覺孩子是否有收到或觀看一些不良的資訊,如色情、暴力、賭博、欺詐、毒品等等。若有,則需要對孩子進行正確的教育和引導並刪除屏蔽不良資訊。
3、防止誤觸付費
目前手機上的支付和驗證流程越來越簡潔,帶來便利的同時也有一定的隱患。孩子可能會偷偷進行遊戲氪金,打賞直播主,又或是不小心按到了軟體的訂閲按鈕,如果沒有及時發現,可能會帶來經濟損失。
4、了解孩子,預防危險
家長無法隨時在孩子身邊,在學校或是和朋友之間的相處是否有出現一些狀況,家長可能無法百分之百知道。透過監控孩子手機的簡訊或是社群聊天記錄,我們可以更好地了解孩子,與同學有矛盾,校園霸凌(被霸凌或是實施霸凌),被侵害等等都可能及時知道。部分監控程式也可以看到手機定位,當知道孩子遇到危險時,也可以儘早趕到。
5、解決手機使用疑問
孩子手機使用的時間可能沒有家長長。當遇到一些技術問題、手機設定問題、或是作業的上傳備份問題無法解決的,部分手機監控程式譬如DeskIn可以幫助家長遠端操控孩子的手機幫忙解決,還有内建的語音通話功能,溝通更順暢。
監控孩子手機前的4大注意事項
1、尊重孩子
雖然我們知道父母都是出於關心而監控孩子手機。但請記住,孩子也是個獨立的個體,他也有自己的想法,小秘密和隱私,在使用監控程式前請記住這一點,尊重孩子以及他們的意見,避免過於强勢導致關係惡化。最好實在孩子知情的情況下再接入他們的手機。
2、提前與孩子溝通
提前告知孩子您監控手機的想法和目的,同時也了解他們的想法,溝通並達成共識,記得一定要在得到孩子同意之後再下載和使用手機監控程式哦。若是他們不同意,我們是不是也可以再尋求其他的方式以達到了解他們手機使用狀況以及安全的目的?
3、制定約定並遵守
對於監控程式的使用,若是孩子有一些想法和要求,比如不得監控某些程式、監控時間等等,在溝通之後,記得把這些約定記下,并在之後使用監控程式時遵守。記住,信任和溝通比一切都重要。
4、選擇安全的監控軟體
當您決定要使用監控程式是,記得一定要選擇一款安全的監控軟體。畢竟這些程式會獲得您手機的大部分權限,部分軟體還會記錄孩子手機的隱私資訊。選擇不安全的程式可能會造成信息泄露的風險,嚴重的,還可能會對孩子的安全帶來威脅。
4款家長監控軟體
DeskIn——全方位操控同時給孩子自主權
DeskIn是一款適用于web、安卓、ios、Windows和MacBook的遠端軟體,這意味著你既可以用手機,也可以用電腦遠端連線孩子的手機,應用情景更廣。你可以直接遠端幫孩子清除不良訊息,查看孩子的手機使用時間,進行軟體管控,DeskIn還支援語音通話和取用攝影鏡頭。相比其他程式,DeskIn不會抓取和記錄遠端手機的瀏覽記錄、位置和權限,只有在被控手機允許時才能觀看和操作被控手機,相對來説更加安全,也給孩子留有個人空間,更容易讓孩子接受。
👍優勢:
安全:DeskIn只允許同一帳號下的裝置遠端操控手機,避免孩子手機被陌生人監控。
跨系統適用:DeskIn適用安卓、ios、Windows和MacBook4個系統,你可以用電腦遠端監控孩子手機,也可以用手機遠端監控孩子的電腦。
語音通話:DeskIn允許您在跟孩子手機連缐時進行語音通話。當發現不良軟體或訊息,即使孩子不在身邊,也可以及時了解情況並進行引導、教育。需要幫孩子解決手機問題時也可以進行同步教學,更加方便,清晰。
使用攝影鏡頭:你也可以使用DeskIn取用還是手機前後2個攝影鏡頭,了解孩子的位置,當孩子遇到危險,可以及時了解現場狀況。
連缐方式靈活:DeskIn允許2種連缐方式,手動驗證和無人值守密碼連缐,對於孩子還説更容易接受。通常情況下可以使用手用驗證,在孩子知道的情況下進行連缐監控,緊急狀況下也可以使用密碼進行無人值守連缐
💻立即下載DeskIn體驗!
Family Link——管理孩子谷歌帳號
Family Link是谷歌開發的一類家長控制軟體,只能用戶管理安卓手機,本質上是透過管理孩子的谷歌帳號來進行孩子監控。它可以阻止或允許單個應用程序、隱藏應用程序、查找設備、設定就寝时间或者設定其他时间限制。但它也存在漏洞,當使用隱藏的瀏覽器時可以繞過所有網路瀏覽限制。也有網友反饋其時間限制功能容易被孩子繞開,管控的效果可能并不理想。
👍優勢:
時間管控:可以管理孩子使用軟體的「每日上限」时间以及「就寢時間」
封鎖不良軟體或網站:可以管理來自Playstore的程式的權限以及網站瀏覽權限,限制顯示成人內容,甚至只可瀏覽特定網站。
設定軟體下載管控:與Google Playstore綁定,在孩子下載軟體時需要家長審核
追蹤孩子定位:可以使用地圖追蹤孩子即時位置,也可以設定當孩子到達某一地點時收到提醒
不足:
只能管理安卓手機
無法對手機進行直接操控
存在漏洞:網站瀏覽限制和管控時間可能被孩子繞過
KidsGuard——記錄所有手機活動
KidsGuard更多的是一款手機監控程式,可以監控手機所有的操作動作,獲取手機所有的檔案並記錄聊天訊息,基本上被綁定的手機所有的使用資訊都會被掃到並記錄。但是他沒有更多的操作功能,比如設定使用時長限制、限制瀏覽的網頁等等。
👍優勢:
提供免費模擬演示畫面,可以先模擬使用再決定是否付費
可以透過iCloud監控iPhone,接收管理郵件、查看聯絡簿、相片、提醒事項等等
可以紀錄鍵盤活動記錄及查看社群媒體訊息,可透過關鍵字查詢訊息。
付款監控:可以記錄孩子在應用商店的訂閲消費狀況
可以透過網頁面板查看遠端手機所有的使用狀況和報表:使用時長、手機檔案、瀏覽記錄、聊天記錄等等。
不足:
需要付費才能解鎖高級功能
無法對手機進行直接操控和設定。
對手機獲取的權限較多,記錄内容過多,容易造成隱私泄露。
Airdroid——可以管控和限制孩子軟體、網頁使用
Airdroid是一款綜合的控制應用程式,可以透過家長版AirDroid Parental Control App來控制裝有的手機裝置。支援使用手機或網頁來監控遠端手機裝置。付費後支援管理最多10台裝置。
👍優勢:
可以使用Android裝置的相機和麥克風,查看及聆聽孩子周遭環境和聲音
同步接收孩子安卓手機上的上應用程式通知,如 Line、Facebook。
可以透過報表面板獲得孩子手機使用狀況日報/週報
可以對手機、軟體、網頁的使用時間或權限進行管理和限制
關鍵詞偵測:對社群軟體進行關鍵詞檢測,識別有害内容或潛在霸凌事件。
獲取手機位置和定位。
不足:
沒有免費版本,需要付費才能解鎖所有功能
對手機獲取的權限較多,記錄内容過多,容易造成隱私泄露。
如何使用DeskIn監控孩子手機
第一步:在你的裝置以及孩子手機上安裝DeskIn,並登入同一個帳號。
第二步:在孩子手機DeskIn,開啓允許連線設備並設定好連線密碼。
第三步:需要連線時,你可以在設備列表找到孩子的手機或使用設備ID連線孩子手機,孩子可以手動驗證,你也可以使用密碼進行連線。
📖你可能感興趣:
3個將iPhone/iPad螢幕鏡像投影到MacBook方法教學
結論
本文介紹了4款家長控制軟體,幫助家長管控孩子的手機使用情況,每款軟體都有他們的特點,你可以按需選擇。4款軟體中,DeskIn能夠對遠端的裝置行直接控制,無論是管控孩子手機還是技術支援都可以,而且所記錄的手機隱私資訊比較少,更加安全也更容易讓孩子接受。雖然家長監控孩子手機的出發點是好的,但家長的管控也應該把握尺度,給孩子適當的隱私空間和自我成長的空間,建立互信才更重要。
5個最適合Windows的遠端桌面軟體
Windows 電腦不像 Macbook 有完善的蘋果生態,可以輕鬆與其他蘋果電腦、手機裝置聯動。所以一款好用的遠端軟體對於 Windows 非常重要,不論是跨辦公室協作、存取檔案、支援協作,都可以隨時串聯其他裝置。可用的Windows遠端桌面眾多,今天一篇文章告訴你怎麽擇並介紹5款最適合 Windows 的遠端桌面軟體。其中小編最推薦的是DeskIn遠端桌面,一起來看看它爲什麽比其他遠端桌面軟體更適合Windows!
💻立即在您的Windows下載最好用的遠端桌面軟體DeskIn!
什麼是遠端桌面軟體?
遠端桌面軟體是一種可以讓使用者遠程訪問和控制其他計算機桌面的應用程式工具。透過遠端桌面軟體,使用者可以使用本地的裝置,如手機、平板、筆電,以及配件如滑鼠、鍵盤甚至麥克風、手把,來存取、操控其他計算機桌面的檔案、應用程序和設定。
你可能感興趣:
遠端桌面軟體的主要功能
遠程桌面連缐:遠程訪問和控制其他計算機裝置。
檔案傳輸:支援在遠程計算機裝置和本地裝置之間傳輸文件。
遠端協作:允許用戶在遠端和本地計算機之間同步剪貼簿內容。
遠端列印:支持用戶將遠端計算機檔案一鍵列印到本地或網絡打印機。
多人協作:允許多個用戶同時連接到同一台遠程計算機。
適合Windows的遠端桌面軟體應具備什麽條件
跨系統支援:可以從Windows存取Windows電腦,也可以跨系統存取Mac,甚至iOS和安卓。反過來也可以被Windows裝置或其他MacOS、iOS和安卓裝置存取和控制。
鍵鼠正常映射:不管是用Windows存取其他裝置,還是被存取,都需要鍵盤輸入、滑鼠點擊等能正確作用在遠端裝置,使用順手。
連線穩定順暢:在Windows上使用遠端桌面軟體,大多情況是要進行遠端辦公作業、技術支援甚至遊戲,對於連線品質要求較高,所以適合Windows的遠端桌面軟體必須足夠穩定,在跨網路環境也能保持低延遲。
簡單易用:不管是使用什麽軟體,我們都希望能夠輕鬆上手,尤其是對於這種有一定技術含量又的軟體,不需要複雜的誰
高性價比:為滿足不同情境的使用,Windows遠端桌面軟體應該具備豐富的功能來讓遠端辦公、遠端協作、技術支援甚至遊戲更加便利,而價格又不會造成太大的負擔。
5個最適合Windows的遠端桌面軟體
Top1:Deskln-高性能高性價比遠端桌面軟體
DeskIn 可以説是綜合實力最强的六邊形選手,在 Windows 系統上運行流暢,提供了無縫的跨系統遠端桌面體驗,功能多多價格合理,不管是個人遠端辦公還是企業遠端技術支援都有對應的解決方案,堪稱性價比之王,是最適合Windows的遠端桌面軟體Top1。
就算處理高解析度畫面也能保持高清晰度和低延遲,重點是穩定性好完全不會有掉缐的狀況,小編用Windows遠端Macbook,過了一晚上也沒有斷連!而且DeskIn 支援跨平台操作,無論是 Windows、Mac、iOS 還是 Android 系統,都能實現無縫連接,手機端的功能完整,操作也非常順手。除了遠端連缐,還有螢幕投影、延伸螢幕、語音通話等免費協作功能。
💻立即在您的Windows下載最好用的遠端桌面軟體DeskIn!
👍優點:
高性能與低延遲:高效編解碼技術 + 全球200+伺服器節點,可以根據網路環境自動優化品質,快速進行圖像傳輸,保證順暢和低延遲的遠端操控。
跨平台與兼容性:支援Windows、Mac、iOS 、Android 裝置任意互連,鍵鼠和輸入法完美支援,還可以從網頁發起遠端連缐,無需安裝軟體更靈活。
豐富的功能:提供了延伸螢幕、投影、語音通話、標注、共享剪貼板、遊戲鼠標、3D視角等多種功能,一個軟體滿足使用者多個情景使用需求。
高速檔案傳輸:支援不限大小、類型、數量的檔案傳輸,Windows裝置一鍵拖拽就可以完成傳檔,且傳輸速度高達12MB/s,可以隨時跨平臺存取檔案。
安全性高:採用256位元加密,還有多種安全措施,如新裝置首次登入驗證、密碼無人值守連線,螢幕遮罩、黑白名單、鎖定客戶端等,確保了使用者的資料安全。
局限性:
不支援Linux和Google TV使用
DeskIn的價格方案:
DeskIn 提供免費可商用的版本,功能相當豐富而且提供有官方客服。DeskIn也針對不同的使用場景推出了標準版、遊戲版和性能版。不僅可以按月訂閲,年度訂閲更低至$4.16美元/月,價格相當佛心。付費版可以管理高達100台裝置,對於小型團隊完全夠用了。想要更多管理功能也可以考慮其企業版方案。
TeamViewer - 高預算的大型企業可選
TeamViewer 是一款老牌,長資歷遠端控制與支援軟體,在 Windows 電腦上的使用確實展現出了其強大的功能性和靈活性,連線品質不錯而且有豐富的管理功能和安全保障,讓他成爲最適合Windows的遠端桌面軟體之一。
如果你是大型企業又有較多預算,主要的使用場景是辦公、技術支援。Teamviewer的確是個可靠的選擇。對於個人使用者,由於DeskIn免費版可能會被誤判商用,付費版價格太高,而且缺少客服支援、螢幕管理和遊戲相關功能,適用場景偏少,需要斟酌一下。
優點:
平台兼容性:除了常見的win、mac、ios、Android,還支援在Linux、Chrome OS上使用,為企業使用者尤其是技術支援工程師提供了無縫的遠端連接體驗。無論團隊成員使用哪種設備,都能實現遠端協作。
豐富管理功能:TeamViewer 除了遠端桌面、檔案傳輸、語音通話等多種實用功能,還有很多管理功能,滿足了企業對内部裝置進行統一管理。
安全性高:采取256位元加密技術,支援雙重驗證,在業内有較高的安全性口碑
連線品質穩定:預設會根據網速自動調整畫質與頻寬,用以維持穩定性。非高效能遊戲、設計串流的普通的辦公和支援足夠使用。
局限性:
商業版價格昂貴:TeamViewer 的商業版價格相對較高,部分高級功能還需額外付費解鎖,對於預算有限的個人使用者或中小企業而言,可能造成一定的經濟壓力。
檔案傳輸速度慢:對比過多個遠端軟體,Teamviewer的檔案傳輸速度相對較慢,而且對於檔案大小有限制,每次只能傳輸4GB或以下的檔案。
免費版缺少客服支援,遊戲等功能較少
Teamviewer價格方案:
Teamviewer免費版本不可商用,而且沒有客戶服務。付費方案都只可以按年訂閲,個人方案最低274.8美金/年,商用方案更高達上千美元。部分功能需要再額外采購插件。
AnyDesk - 實現靈活遠程訪問
AnyDesk是一款專為遠程工作與支援設計的軟體,也是很適合在Windows上使用的遠端桌面,其在Windows系統上的應用廣泛且深受用戶喜愛,最主要的原因是它比較輕巧、無需安裝、注冊即可使用,而且可以透過ip存取同一區域網内的裝置,比較容易上手。無論是企業級用戶、技術支援團隊,還是個人使用者為使用者,AnyDesk都提供了一個連線品質不錯且便捷的遠程操作環境。
優點:
輕量且高效:AnyDesk的安裝包僅為1.1 MB,是市場上最輕量的遠程訪問解決方案之一,這意味你可以快速在你的Windows上完成下載並使用。
免安裝注冊:Anydesk無須安裝注冊就可使用,對於臨時使用者來説非常方便
檔案傳輸速度快:Anydesk的檔案傳輸速度比較快,支援進行跨平台檔案傳輸。
不足:
分辨率調整問題:Anydesk的分辨率是自動調整的,這導致遠程桌面有時的顯示效果不佳,色彩和清晰度都比較一般,從而影響用戶的使用體驗。
安全問題:由於無需注冊即可使用,而且可以存取同ip的其他裝置,便利的同時犧牲掉了部分安全性,帶來了潛在風險,事實上Anydesk確實出過一些資安事故,注重安全的需斟酌
缺乏高級功能:DeskIn雖然比較易用,但功能相對還是比較簡單,缺乏一些進階的如遊戲、螢幕管理、語音協作相關的功能。
Anydesk價格方案
Anydesk的免費方案同樣不可商用,也缺少客服支援,付費方案也是只能按年訂閲。個人版方案價格與Teamviewer一致,其餘方案略低於Teamviewer,但方案中包含的功能豐富度對比DeskIn略顯不足,優勢在於管理的裝置數。
Chrome遠端桌面 - 最輕便簡單的遠端桌面
Chrome遠端桌面是谷歌提供的一款基於Chrome瀏覽器的遠程桌面控制工具,它允許用戶在任何時候、任何地點,通過Chrome瀏覽器或其他支援的設備(如iOS、Android)來遠程存取和控制Windows、Linux、MacOS、Chrome OS等系統的計算機。由於介面簡單,功能精簡,而且可以從瀏覽器發去遠端連線,讓他成爲適合Windows使用最輕便簡單的遠端桌面。
優點:
免費服務:完全免費,對於使用頻率不高,預算有限的個人用戶或小型企業來說,這是一個非常經濟的選擇。
跨平台兼容:Chrome遠端桌面支援多種操作系統,無論是用戶使用的是Windows、MacOS、Linux,還是iOS、Android,都可以實現無縫連接。
操作簡便:作為Chrome瀏覽器的一個擴展程序,可以從網頁發起遠端連缐,功能也比較簡潔,對於新手也很容易上手。
缺點:
依賴網頁瀏覽器:沒有Google帳號或不是使用Chrome瀏覽器的無法使用。
功能有限:相比於上述其他遠端桌面工具,Chrome遠端桌面的功能最少,缺乏高級功能。
無法調整畫質:Chrome遠端桌面只支援自動調整畫質,對於畫質、清晰度、色彩要求比較高的遠端作業需求,其表現可能不如其他遠端工具。
chrome遠端價格方案:完全免費使用。
📖你可能感興趣:
Microsoft 遠程桌面- Windows 内建遠端工具
Microsoft 遠端桌面(Remote Desktop)是一項內建於Windows操作系統的功能,特別適合企業環境中對於Windows Server的整合和管理。它允許用戶從一台計算機透過電腦IP地址遠端訪問另一台計算機,提供了便捷的操作方式,在多個工作站間實現高效協作。在企業層面有著良好的應用潛力。
優點
與Windows環境的高度整合:內建於Windows系統中,使用者無需額外安裝其他軟體,使用起來十分方便。
強大的功能性:支持多種功能,如打印重定向、剪貼簿共享等,提升了使用體驗,尤其適合商業用戶。
安全性較高:提供企業級的加密功能,確保數據傳輸的安全性,對於需要保護敏感信息的環境十分重要。
不足:
設定複雜性:對於非技術背景的使用者來說,初次設定可能會較為繁瑣,尤其是在配置防火牆和Port轉發時,需要具備一定的技術知識。
僅限於Windows平台:儘管有Windows版本,其他操作系統(如Mac或Linux)上的支持不如Windows本身那麼順暢,這在多平台同時使用時會帶來不便。
無法免費使用全部功能:雖然基本的遠端桌面功能是免費的,但在一些高級使用場景下,可能需要額外購買相關的Windows Server授權。
過於依賴Windows生態:如果使用戶希望在多種操作系統下都有一致的使用體驗,遠端桌面可能無法完全滿足需求,局限了多元化的工作環境。
Microsoft 遠程桌面價格方案
與Microsoft 365 訂閱方案綁定,並無單獨的遠端桌面價格。Windows 家用版 (Home Edition)、部分企業裝置不支援使用Microsoft 遠程桌面。
結論:DeskIn是最適合Windows的遠端桌面軟體
本文介紹了五款最適合Windows的遠端桌面軟體,包括DeskIn、TeamViewer、AnyDesk、Chrome遠端桌面和Microsoft遠端桌面。這些軟體都提供了遠程桌面連接、檔案傳輸傳輸、剪貼板同步等基本功能,但在性能性、定位和價格等方面各有不同。你可能需要評估您的主要使用場景以做選擇。
其中,DeskIn以其高連線品質、豐富的功能以及價格佛心等優點脫穎而出,兼具多場景使和性價比,是最適合Windows的遠端桌面軟體,立即在你的Windows電腦下載DeskIn體驗看看吧!
2大方法遠端控制一鍵開機:從關機狀態到連線操作,完整流程解析
您是否也曾遇過臨時需要存取家裡或辦公室的電腦,處理緊急文件、修改簡報,或是進行系統維護,卻發現電腦處於關機狀態?無論是遠端工作者、IT管理員,還是需要彈性辦公的您,都可能面臨無法立即啟動遠端電腦的困擾。
如果還在尋找最佳方式,別擔心,這篇文章就是為了解決您的困擾而寫的。我們將一步步引導您,如何透過更簡單穩定的方式,輕鬆實現遠端開機。無論您是科技新手還是專業人士,都能快速上手,從此不再受距離限制,隨時隨地都能喚醒您的電腦,讓遠端工作真正暢行無阻!
什麽是WOL?
WOL(Wake-on-LAN)簡單來說是一種用另一台電腦或手機發送「魔法封包」(Magic Packet),以透過網路遠端啓動電腦的技術。
實現遠端開機有 2 種方法,一是可以通過傳統的WOL 開機,但會經歷複雜的路由器設定,不僅對新手不友好,而且不太穩定,另一種方法就是使用 DeskIn 輔助喚醒,DeskIn 可以透過手機/電腦等裝置輔助的方式,免於複雜的路由器設定,輕鬆實現遠端開機,還能將你的就裝置利用起來。
2 大電腦遠端開機方法對比
傳統 WOL 功能 | ||
設定 | 設定簡單更穩定:免於複雜路由器設定,簡單2步就能完成,只要 DeskIn 在運作就能遠端喚醒。 | 設定步驟複雜:需要進入路由器後台進行連接埠轉發、固定IP分配等複雜的網路設定,對不熟悉網路技術的使用者來說門檻很高 |
靈活性 | 更靈活:對比其他遠端桌面只能用電腦作爲輔助喚醒裝置,DeskIn支援使用移動裝置甚至是舊手機,版本最低支援到 Android5.0。 | 裝置限制多:通常僅能透過同一區域網路下的電腦發送魔術封包。從外部網路喚醒需依賴DDNS或公共IP,且網路環境變動易導致失效。 |
其他功能 | 進階功能:除了遠端喚醒,DeskIn 也是一款穩定、低延遲的遠端桌面,遠端開機之後,你還可以用本地電腦操控遠端電腦,甚至進行檔案傳輸。 | 單一功能:WOL 僅負責「開機」這一個動作,後續的遠端操作必須依賴另一套獨立的遠端控制軟體. |
安全性 | 安全管理與維護:企業敏感資料存於本地電腦比存儲在雲端更安全,透過DeskIn企業可以隨時喚醒遠端電腦進行資料存取、裝置運維管理,DeskIn使用256位元加密技術,節省成本同時也更安全。 | 存在資安風險:WOL協定本身缺乏加密與身份驗證。只要知曉MAC位址與公網IP,理論上任何人都可嘗試喚醒您的電腦,有潛在風險。 |
【最佳方法】使用 DeskIn 遠程啓動你的 Windows 電腦
使用 DeskIn 遠端啟動你的 Windows 電腦,不僅能實現開機,更能無縫接軌後續的完整操作。不同于傳統 WOL 功能僅能做到喚醒,DeskIn 讓你在電腦啟動後直接進行遠端存取與控制。這意味著你可以隨時取得所需的檔案、與同事共享螢幕進行協作,或執行任何必要的 IT 維護工作。將複雜的開機程序與直覺的遠端控制合而為一,提供一個穩定且安全的整合性解決方案,大幅超越了傳統僅具單一功能的喚醒技術。
使用DeskIn設定WOL遠端啓動電腦需要什麽條件
主板要求:Windows電腦主機板需支援Wake-on-LAN(WOL)——可透過查看主機板説明書、檢查網卡型號、聯絡產品客服等方式確認。電腦提前安裝好DeskIn并接上網路線。
輔助裝置:需有一台正在運行 DeskIn 的輔助喚醒裝置與待開機的電腦在同一局域網內用於輔助喚醒。例如其他Windows/Mac電腦、iPhone、iPad、Android 手機、平板等,需提前安裝好DeskIn。
系統條件:Linux 裝置不支援發送 WOL 封包,而 Mac 和 Linux 裝置不支持遠程開機。
狀態條件:處於藍屏或崩潰等異常關機狀態的Windows裝置不裝置遠程開機。
❗注意:大部分的筆電(尤其無線網卡)或是較舊的電腦(10年前的)不支援使用WOL,無線網路通常不支援,推薦使用有線網路。
💻如果需要使用 DeskIn 進行遠程喚醒,提前完成簡單的無人值守連線設定,您的電腦就可以在遠端喚醒之後隨時連接並遠端操控,立即下載 DeskIn 試試!
在設定前,請確保你已經下載并安裝 DeskIn,建議注冊一個帳號並登入,可以在裝置列表找到你需要啓動的裝置。
📺超好用!在外「遠端開電腦」?設定免費遠端開機!Windows 11 無人值守訪問?華碩主機板遠端喚醒?你想要的功能盡在DeskIn!
步驟1:網卡設置
在 Windows 右鍵Windows Logo,打開「裝置管理員」
找到並展開「網絡介面卡」選項。
找到你的網路孔網卡(如Realtek Gaming GbE Family Controller),右鍵>>然後點「内容」。
在下一個窗口中,導航至「電源管理」選項卡,並勾選打開「允許這個裝置喚醒電腦」
切換到「進階」選項卡,在内容中找到「收到Magic封包時喚醒」並啓用。若有「網路喚醒」相關選項,也請啓用
步驟2:主板 BIOS 設定
在電腦開機時,連續按 Delete 或是 F2 進入 BIOS
導航至「進階」選項卡 >> 「進階/高級電源管理」>> 開啓「PCI-E喚醒」,按 F10 儲存設定並重啟即可。可能為以下類似的名稱:
PCIE/PCI 設備開機
Power On By PCI-E
板載局域網開機
局域網喚醒
局域網恢復
PME 開機
注意:不用品牌的名稱可能有所差異,你可以Google你使用的主板的官方説明預計網路喚醒設定教學找到。
步驟3:在 DeskIn 設置中啟用遠程開機支持
若你使用行動裝置作爲輔助喚醒裝置,請前往DeskIn設定>>設定>>開啓「遠端開機支援Wake On LAN」
步驟四:遠端喚醒電腦
現在,你就可以使用DeskIn遠端啓動電腦了。只需在裝置列表找到你關機的裝置,會提醒「設備已離線」,按下「遠端開機」,等待數秒,你就能看到你的電腦已經開機並是可被連線的狀態了。
DeskIn:最安全、穩定的遠端桌面軟體,隨時隨地想連就連!
DeskIn是一款穩定、安全、高清無延遲的遠端軟體,支援Windows、Mac、iOS和Android系統,可以讓你隨時隨地用手機、筆電、平板就能連回遠端的電腦並進行存取和操作,是遠端辦公、遠端IT支援的必備軟體。就算您的電腦關機,您也可以使用DeskIn遠端啓動您的電腦,並透過設定安全的連線密碼,隨時隨地進行無人值守連線。DeskIn遠端桌面的優勢如下:
跨系統支援:支援Windows、Mac、iOS和Android跨平臺遠端操作,無縫串聯。
支援無人值守和遠端啓動功能,可用性超高。
超高連線品質:40ms超低延遲,支援最高4K60FPS&2K144FPS。
易用:界面直覺,使用簡單,無需複雜設定。
安全:256位元加密,端到端連線,保證資訊不外泄。還可以設定安全密碼、黑白名單,開啓螢幕遮罩保護操作内容不被看到。
更多閲讀:
【方法拓展】啓用 WOL 遠端喚醒家裏桌上型電腦
Wake-on-LAN(WOL)「網路喚醒」技術,是透過區域網路或網際網路,向目標電腦的網路卡發送一個特殊的「魔術封包」(Magic Packet),當遠端電腦收到網路訊號/訊息時,便可立即開機。這項功能最適合用於區域網路內的桌上型電腦,多數筆電較不支援此喚醒方式。
想透過 WOL 功能遠端啟動電腦,必須先完成一些基本設定。首先要在主控端設備上準備好傳送魔術封包的工具,然後在被控端電腦(也就是您想遠端開機的那台)中,開啟 BIOS 與作業系統中的「魔術封包喚醒」(Wake on Magic Packet)或 WOL 相關選項,然後再使用第三方軟體傳送網路訊號。不確定從哪裡開始,請直接跟著以下的詳細的 Wake on Lan 教學開始操作吧!
開始之前:事前準備與必備條件
請確認你的主機板必須具備網路喚醒(WOL)的功能。進入BIOS/UEFI設定畫面,在「電源管理」(Power Management)或「進階」(Advanced)等選單中,尋找如「Wake on LAN」、「Power on by PCI-E Device」等選項。如果存在該選項,即代表支援。再者,你家裡的分享器也要有支援網路喚醒的功能,最後是你家裡必須是固定 IP。
步驟一:配置操作系统中的网卡
單機右鍵找到「裝置管理員」,點擊「網路界面卡」> 「内容」
步驟二:開啓電源管理裏面的快速啓動和休眠功能
首先,找到「控制台」>「硬體和音效」。
從視窗左側點選「選擇按下電源按鈕時的行為」>「變更目前無法使用的設定」。
點選「開機設定」中所有選項都已勾選,這些選項允許裝置喚醒電腦,記得單擊儲存變更。
步驟三:進主机 BIOS 設定網路喚醒
接下來,您還需要在主機板的BIOS中啟用網路喚醒功能。開機並不斷按下 F2 或者 Del 鍵進入BIOS,在 「進階」、「电源管理」或「APM配置」 中,找到「Wake on LAN」、「Power On by PCI-E」 等相关选项,确保其状态为「開啟」,按 F10儲存並離開 BIOS。重新啟動電腦後,即可開啟網路喚醒功能。
各家主機介面不一,設定方式可能都不一樣,如果上述步驟不符,也自行可以搜尋「主機板廠商 網路喚醒」或是「筆電廠商 網路喚醒」。
步驟四:遠端喚醒電腦
接下來要使用工具來「發送」開機指令。前往 NirSoft 網站,下載並安裝NirSoft WakeMeOnLAN軟體。該軟體擁有直觀的視窗和按鈕,無需輸入指令,只需透過滑鼠點選,就能完成掃描區域網路內的電腦並發送魔法封包的操作。
開啟軟體後,點擊左上角的 「File」 選單,並選擇 「Start Scanning」,軟體便會自動掃描區域網路內所有支援網路喚醒的電腦。
如果您希望手動新增特定電腦,可以點擊 「File」 選單中的 「Add New Computer」 來進行設定。
掃描完成後,所有找到的遠端電腦會顯示在清單中。在想喚醒的電腦上按一下滑鼠右鍵,並選擇 「Wake Up Selected Computers」。
再單擊彈窗中的「Yes」進行確認,即可遠端喚醒電腦。
推薦閲讀:
遠端開啓電腦常見問題
Q1:電腦關機還可以遠端開機嗎?
電腦關機狀態下通常無法直接遠端開機,除非設備支援 Wake-on-LAN(WOL) 功能。但如果您想實現跨平台即時控制與螢幕操作,DeskIn 提供穩定的遠端桌面解決方案,讓您即便不在電腦旁,也能高效管理工作與多裝置協作。
Q2:我可以從世界任何地方喚醒家中的電腦嗎?
當然可以!您完全可以從世界任何地方喚醒家中的電腦。關鍵在於讓外部的開機指令能成功送達您家中的區域網路。
傳統方法是透過路由器設定「連接埠轉發」,並搭配動態域名服務,讓魔法封包能從外部網路正確轉送到您的電腦。不過這個方法需要一定的網路知識,設定較為複雜且可能不穩定。
現在有更簡單的解決方案!使用像 DeskIn 這樣的遠端控制軟體,您只需要在家中準備一台舊手機或平板作為輔助裝置。當您在外地想開機時,只需透過 App 發送指令,家中的輔助裝置就會自動在區域網路內幫您喚醒電腦,完全不需要複雜的路由器設定。
無論採用哪種方式,都能實現跨網域遠端開機,讓您隨時隨地都能存取家中電腦的資料。
Q3:電腦被遠端喚醒後,我該如何登入系統呢?
WOL 只負責「開機」,相當於您按下了電腦的電源鍵。要實際操作電腦,您需要另外搭配遠端桌面軟體,例如 DeskIn、Windows內建的「遠端桌面」、Chrome Remote Desktop,並將其設定為開機自動啟動。
>>延伸閲讀: Chrome遠端桌面可以進行無人值守嗎?
使用 DeskIn,隨時隨地想連就連!
總結來說,傳統 WOL 是透過網路傳送魔術封包的基礎技術,雖然免費但需要複雜的路由器設定與網路知識,穩定性較低且僅具單一開機功能。而 DeskIn 則是以 WOL 技術為基礎的現代化解決方案,免去路由器複雜設定,只需利用舊手機作為輔助裝置就能一鍵開機,並能無縫接軌後續的遠端控制操作。
對於追求效率與便利性的使用者,我們特別推薦 DeskIn 解決方案。它不僅完美解決了傳統 WOL 的設定門檻問題,更整合了完整的遠端桌面功能,讓您從開機到操作都能在同個平台上流暢完成,真正實現隨時隨地存取遠端電腦的無縫體驗。
💻 現在就免費下載 DeskIn,體驗這款真正適合每個人的遠端開機方案!


聯絡我們
電子郵件: support@deskin.io
總部: 991D Alexandra Road #02-17, Singapore 119972
聯絡我們
support@deskin.io
991D Alexandra Road #02-17, Singapore 119972
聯絡我們
電子郵件: support@deskin.io
總部: 991D Alexandra Road #02-17, Singapore 119972