生産性
生産性
/
/
author
更新済み
更新済み
更新済み
シニアや高齢の方が家族にいると、スマートフォンに関して色々と問題が発生します。彼らの質問は通常非常に簡単で、解決するのにそれほど時間はかかりません。しかし、もし私たちが彼らから離れた場所にいる場合は話が変わります。ここでは、自宅にいないときに高齢者のスマホの問題を支援するための最良のソリューション——DeskIn リモートデスクトップをご紹介します。
高齢者はしばしばスマホのフォントやアイコンが小さすぎる、音が小さすぎて聞こえないと感じます。また、誤っていくつかの設定に触れてしまい、スマホが正常に使えなくなることもあります。しかし、スマートフォンの設定は彼らにとって複雑すぎるかもしれません。この時、彼らは通常あなたの助けを必要としています。
高齢者は写真や動画を撮ってグループチャットで共有するのが好きで、長期間続けるとスマホのメモリがいっぱいになり、スマホが遅くなったり、ロボット的な動作が多くなったりします。写真を削除するだけでは不十分で、アプリのキャッシュをクリアするのに助けが必要です。
高齢者が新しいスマホを購入すると、通常はWhatsApp、地図、Facebookなどの様々なプログラムをインストールするのに私たちの助けを必要とします。また、誤って疑わしいアプリをダウンロードし、ポップアップ広告を受け取り続けることがあるため、確認して削除する手助けをする必要があります。
誰もが経験したことがあると思います。毎回ホテルに行くたびに、高齢者はスマホを渡して、Wifiネットワークに接続を頼んできますね!
上記以外にも、高齢者が怪しいWhatsAppグループやFacebookグループに参加していないかや、リンク付きの怪しいメッセージを受け取っていないか注意を払うべきです。これらのグループやメッセージを定期的にチェックし、ブロックする手助けをしましょう。
これらの問題は通常、家にいれば1〜2分で解決できます。しかし、家にいない場合、電話越しに問題を解決する方法を教えるのはイライラするものです。30分以上説明しても、問題が解決しないかもしれません。
いい知らせは、iOS 18が他のiPhoneをFacebook経由で操作する機能をサポートしていることです。これにより、iPhoneを使う人々にとって大いに役立ちます。ただし、あなたや家族がAndroidのスマホを使っている場合、これは適していません。
iPhoneとAndroidの両方にアクセスできるリモートソフトウェアを探しているのなら、DeskInが最良のソリューションです。
安全性:
リモートデスクトップソフトウェアを選ぶ際の最も重要な要素です。DeskInは256ビット暗号化を使用し、DeskInの電話操作機能は同じアカウントでのみ実行できます。これにより、高齢者の電話が知らない人にアクセスされるのを防ぎます。
音声通話と注釈機能を許可:
DeskInは組み込み音声通話機能を持ち、接続セッション中に高齢者の質問をよりよく理解できるようにします。注釈機能により、電話操作中にステップを示し、高齢者により印象を与えます。
クロスシステム接続:
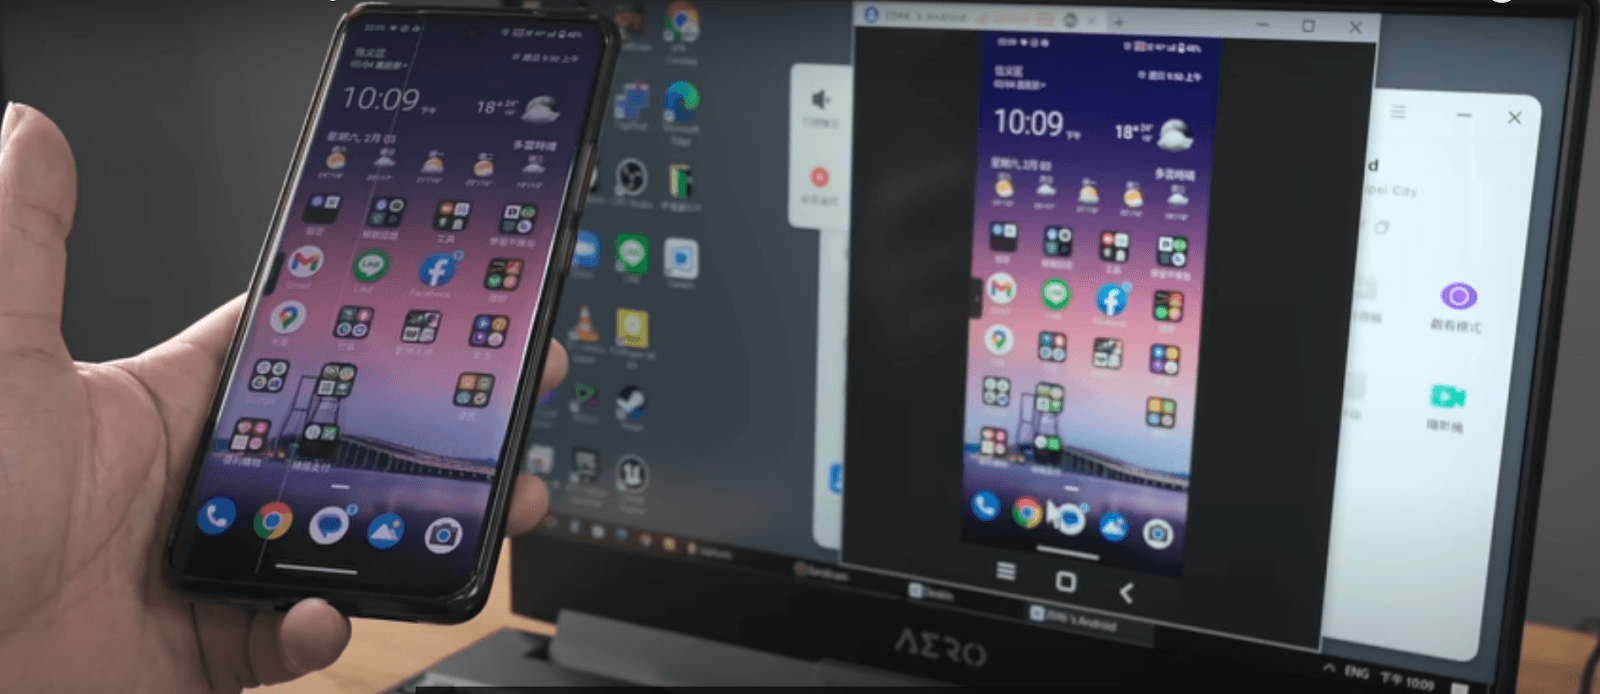
DeskInはiOS、Android、mac、Windows間のクロスプラットフォーム接続をサポートしています。これは、iPhone、コンピュータ、Android電話、またはタブレットを使用してAndroid電話にリモート接続できることを意味し、非常に便利です。
非常にスムーズ:
DeskInの接続は非常に安定しており、時間制限はありません。無料版でも1080pの表示をサポートしており、リモート操作がローカル操作と同様にスムーズです。
使いやすい:
DeskInのインターフェースは非常にシンプルで、接続を開始するには数回クリックするだけです。高齢者でも簡単に始められます。
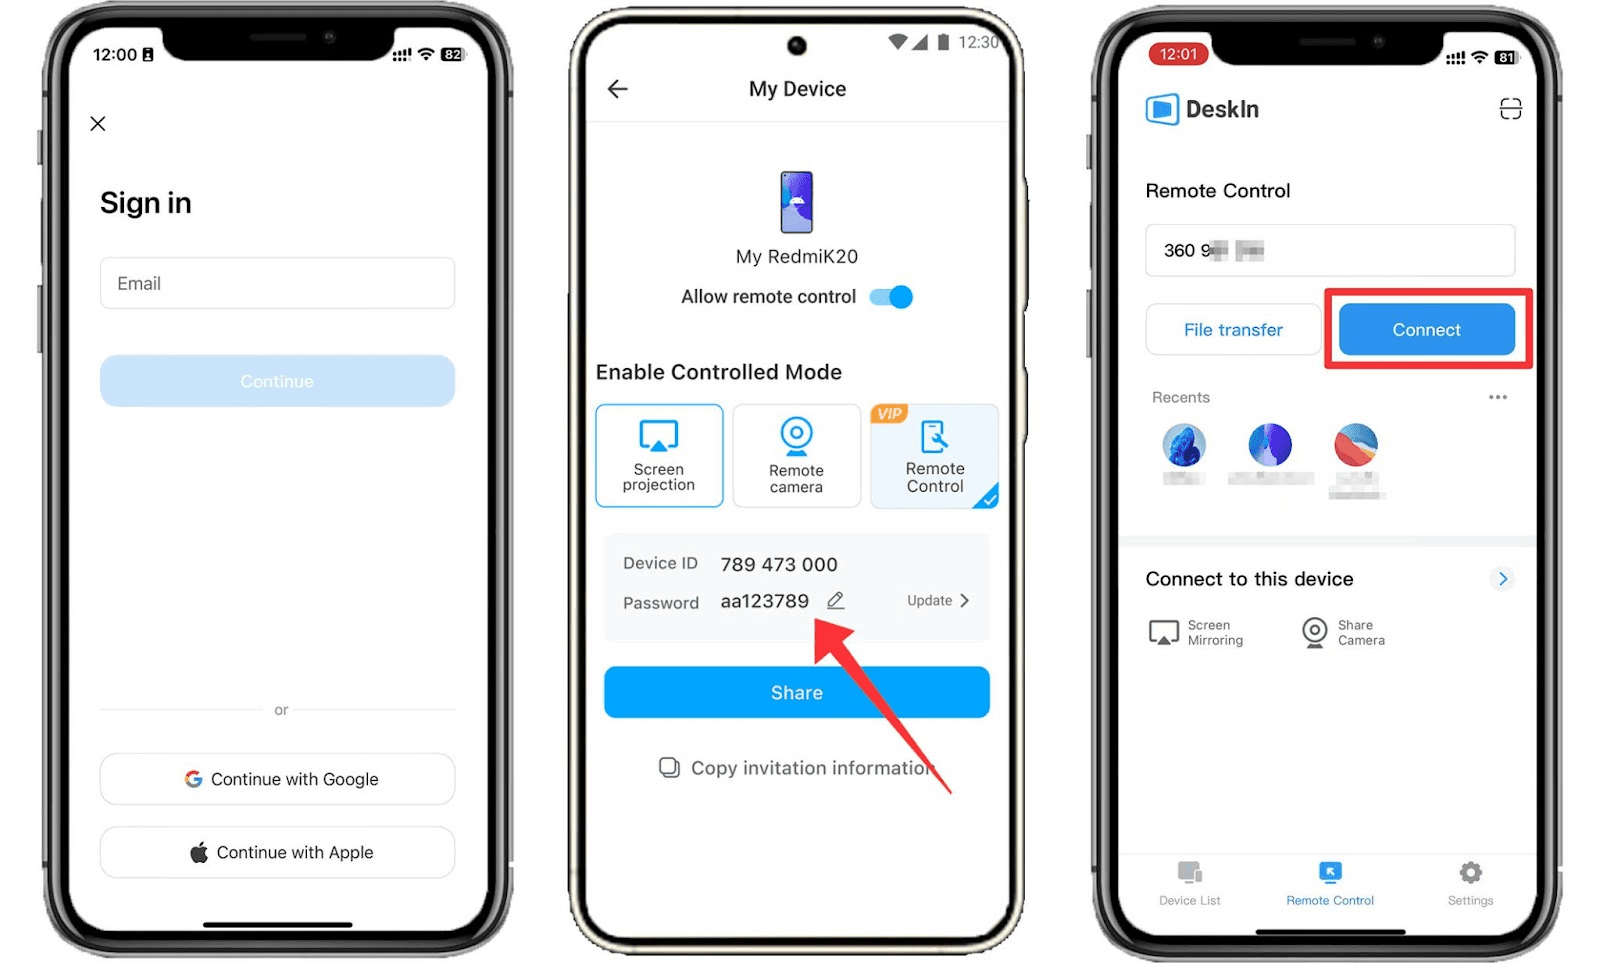
ステップ1: デバイスと高齢者の電話にDeskInをインストールし、同じアカウントでログインします。
ステップ2: アクセスが必要なとき、高齢者はDeskInアプリを開いて「リモート制御を許可」ボタンをオンにします。
ステップ3: 次に、デバイスリストで高齢者の電話を見つけてアクセスできます。
高齢者に手動確認をお願いするか、あらかじめパスワードを設定し、パスワードで接続確認を行うこともできます。
この記事では、DeskInという、安全で使いやすいリモートソフトウェアをご紹介しました。これにより私たちは高齢者のスマホにリモートアクセスして問題を解決することができます。多くの指導時間が節約され、高齢者が3Cの問題をより迅速に解決できるようになり、現代技術の便利さをより良く体験してもらえます。距離が遠くても、高齢者は私たちの配慮と意図を感じることができるでしょう。今すぐ試してみてください!
シニアや高齢の方が家族にいると、スマートフォンに関して色々と問題が発生します。彼らの質問は通常非常に簡単で、解決するのにそれほど時間はかかりません。しかし、もし私たちが彼らから離れた場所にいる場合は話が変わります。ここでは、自宅にいないときに高齢者のスマホの問題を支援するための最良のソリューション——DeskIn リモートデスクトップをご紹介します。
高齢者はしばしばスマホのフォントやアイコンが小さすぎる、音が小さすぎて聞こえないと感じます。また、誤っていくつかの設定に触れてしまい、スマホが正常に使えなくなることもあります。しかし、スマートフォンの設定は彼らにとって複雑すぎるかもしれません。この時、彼らは通常あなたの助けを必要としています。
高齢者は写真や動画を撮ってグループチャットで共有するのが好きで、長期間続けるとスマホのメモリがいっぱいになり、スマホが遅くなったり、ロボット的な動作が多くなったりします。写真を削除するだけでは不十分で、アプリのキャッシュをクリアするのに助けが必要です。
高齢者が新しいスマホを購入すると、通常はWhatsApp、地図、Facebookなどの様々なプログラムをインストールするのに私たちの助けを必要とします。また、誤って疑わしいアプリをダウンロードし、ポップアップ広告を受け取り続けることがあるため、確認して削除する手助けをする必要があります。
誰もが経験したことがあると思います。毎回ホテルに行くたびに、高齢者はスマホを渡して、Wifiネットワークに接続を頼んできますね!
上記以外にも、高齢者が怪しいWhatsAppグループやFacebookグループに参加していないかや、リンク付きの怪しいメッセージを受け取っていないか注意を払うべきです。これらのグループやメッセージを定期的にチェックし、ブロックする手助けをしましょう。
これらの問題は通常、家にいれば1〜2分で解決できます。しかし、家にいない場合、電話越しに問題を解決する方法を教えるのはイライラするものです。30分以上説明しても、問題が解決しないかもしれません。
いい知らせは、iOS 18が他のiPhoneをFacebook経由で操作する機能をサポートしていることです。これにより、iPhoneを使う人々にとって大いに役立ちます。ただし、あなたや家族がAndroidのスマホを使っている場合、これは適していません。
iPhoneとAndroidの両方にアクセスできるリモートソフトウェアを探しているのなら、DeskInが最良のソリューションです。
安全性:
リモートデスクトップソフトウェアを選ぶ際の最も重要な要素です。DeskInは256ビット暗号化を使用し、DeskInの電話操作機能は同じアカウントでのみ実行できます。これにより、高齢者の電話が知らない人にアクセスされるのを防ぎます。
音声通話と注釈機能を許可:
DeskInは組み込み音声通話機能を持ち、接続セッション中に高齢者の質問をよりよく理解できるようにします。注釈機能により、電話操作中にステップを示し、高齢者により印象を与えます。
クロスシステム接続:
DeskInはiOS、Android、mac、Windows間のクロスプラットフォーム接続をサポートしています。これは、iPhone、コンピュータ、Android電話、またはタブレットを使用してAndroid電話にリモート接続できることを意味し、非常に便利です。
非常にスムーズ:
DeskInの接続は非常に安定しており、時間制限はありません。無料版でも1080pの表示をサポートしており、リモート操作がローカル操作と同様にスムーズです。
使いやすい:
DeskInのインターフェースは非常にシンプルで、接続を開始するには数回クリックするだけです。高齢者でも簡単に始められます。
ステップ1: デバイスと高齢者の電話にDeskInをインストールし、同じアカウントでログインします。
ステップ2: アクセスが必要なとき、高齢者はDeskInアプリを開いて「リモート制御を許可」ボタンをオンにします。
ステップ3: 次に、デバイスリストで高齢者の電話を見つけてアクセスできます。
高齢者に手動確認をお願いするか、あらかじめパスワードを設定し、パスワードで接続確認を行うこともできます。
この記事では、DeskInという、安全で使いやすいリモートソフトウェアをご紹介しました。これにより私たちは高齢者のスマホにリモートアクセスして問題を解決することができます。多くの指導時間が節約され、高齢者が3Cの問題をより迅速に解決できるようになり、現代技術の便利さをより良く体験してもらえます。距離が遠くても、高齢者は私たちの配慮と意図を感じることができるでしょう。今すぐ試してみてください!


iPadでWindowsを操作!Chromeリモートデスクトップの設定と操作のコツ【完全版】 | DeskIn
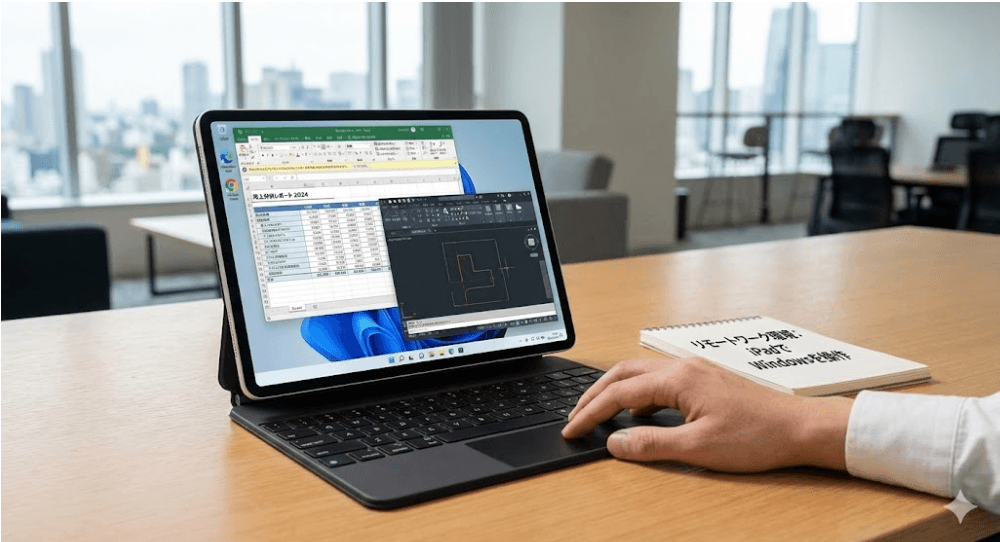
「カフェでiPadだけで仕事をこなしたい」——そう思っても、Excelのフル機能やWindows専用ソフトが必要になり、結局重いノートPCをカバンに詰め直している方は多いはずです。
そこで注目されるのが、iPadからWindowsにリモートアクセスして操作する方法です。
その中でも、Googleが提供する「Chromeリモートデスクトップ」は、無料で手軽に導入できるため、多くのユーザーに選ばれています。iPadの機動力とWindowsの作業効率を両立させるための、最も身近なツールと言えるでしょう。
しかし、iPadをWindowsの完全な代わりにするには、いくつかの操作のコツと、避けては通れない機能の限界を理解しておく必要があります。
本記事では、スムーズな設定手順から生産性を高めるテクニック、そして「本当に仕事で使えるのか?」という現実的な視点まで、簡潔に解説します。
数あるリモートデスクトップソフトの中で、なぜ多くのiPadユーザーが最初に「Chromeリモートデスクトップ」を選ぶのでしょうか。その理由は、圧倒的な「手軽さ」にあります。
完全無料で制限なし: 個人利用・商用利用を問わず、すべての機能を無料で利用できる点は最大のメリットです。
複雑な設定が不要: VPNの設定やルーターのポート開放といった専門知識は必要ありません。Googleアカウントさえあれば、初心者でも数分でセットアップが完了します。
マルチデバイス対応: Windows、Mac、そしてiPadOSなど、デバイスを問わずシームレスに連携できるため、環境を選びません。
「まずはコストをかけずに、手持ちのiPadでリモート操作を試してみたい」という方にとって、まず試してみるツールとしては、非常に始めやすい選択肢です。。
iPadとWindowsは、そもそも「タッチ操作」と「マウス操作」という異なる言語で動いています。この溝を埋めて、iPadでWindowsを快適に操作するためのテクニックを解説します。
iPad版アプリには、2つの操作モードがあります。これを知らずに使うと「操作しにくい!」と挫折してしまいます。
トラックパッドモード(推奨): 画面上のどこを触っても、マウスカーソルを動かす操作になります。「右クリック」や「ドラッグ」が正確に行えるため、Excelや業務システムの操作にはこちらが必須です。
タッチモード: 画面を直接タップした場所がクリックされます。ブラウジングや動画再生など、消費系の作業に向いています。
コツ: 右端からスワイプして表示されるメニューから、作業内容に合わせて瞬時に切り替えましょう。

物理マウスがなくても、指先だけでWindowsの複雑な操作を再現できます。
右クリック: 2本の指で同時に画面をタップします。
ドラッグ&ドロップ: 1本指で対象を長押しし、そのまま指をスライドさせます。
スクロール: 2本の指で上下にスライドさせます。
iPad用のキーボード(Magic Keyboardなど)を使う場合、キーの役割に戸惑うことがあります。
Command = Ctrl: 基本的にiPadの「Command」キーが、Windowsの「Ctrl」として機能します。つまり、Command + C でコピー、Command + V で貼り付けが可能です。
日本語入力の切り替え: これが最大の難所です。iPad側の Ctrl + Space や Caps Lock がWindows側にうまく伝わらないことがあります。その場合は、Windows側のタスクバーにあるIMEアイコンを直接タップするか、ショートカットキーの再設定を検討しましょう。
それでは、実際にiPadからWindowsへ接続するための設定をステップバイステップで解説します。
まずは、操作される側のPC(Windows)を設定します。
Chromeで公式サイトにアクセス: Chromeブラウザで remotedesktop.google.com/access にアクセスします。
拡張機能をインストール: 「リモートアクセスの設定」から青いダウンロードアイコンをクリックし、Chrome拡張機能をインストールします。
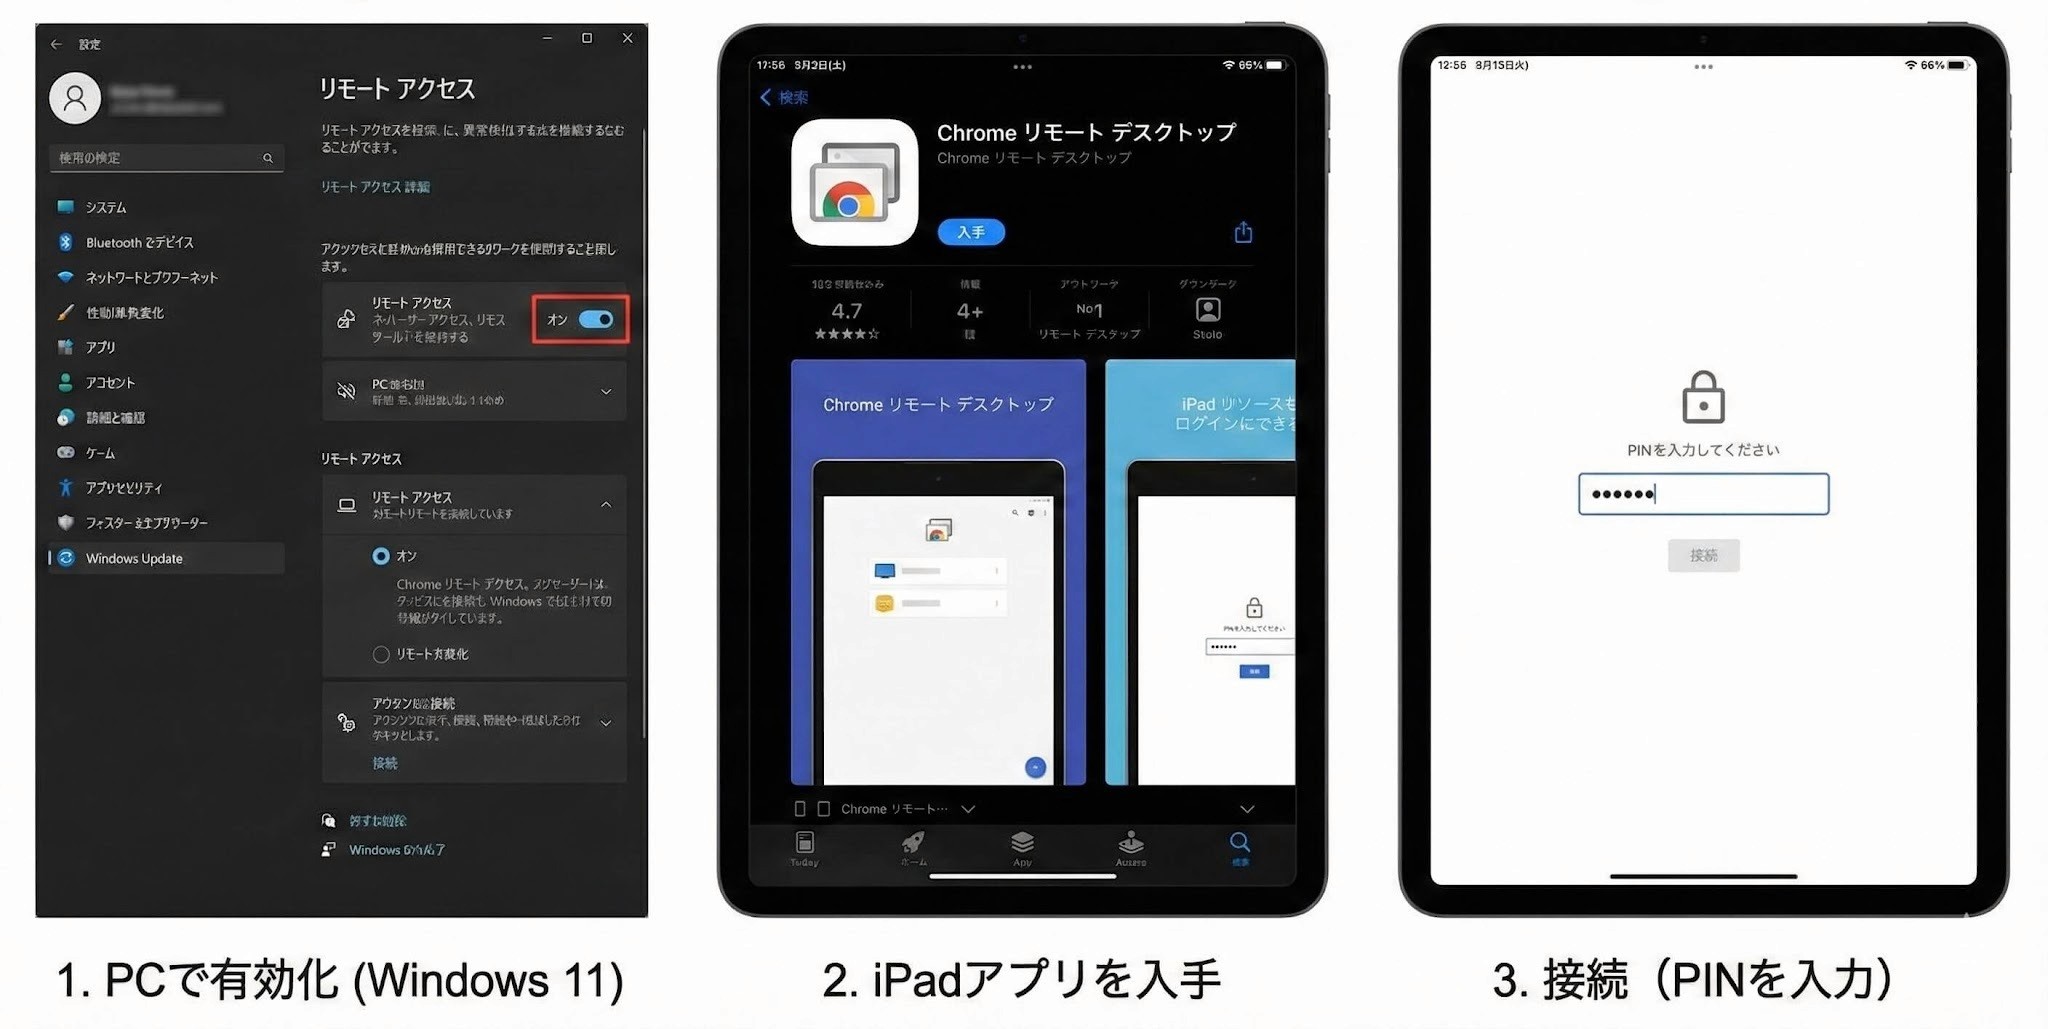
リモートアクセスを有効化: 「オンにする」をクリックし、PCに任意の名前を付けます。
PINの設定: 接続時に必要な6桁以上の**PIN(接続用パスワード)**を設定します。これでPC側のスタンバイは完了です。
次に、手元のiPadを準備します。
アプリをダウンロード: App Storeで「Chrome Remote Desktop」を検索し、アプリをインストールします。
ログイン: PC側で使用した際と同じGoogleアカウントでログインします。
PCの選択: ログインすると、オンライン状態のPC名がリストに表示されます。
PINの入力: リストからPC名を選択し、先ほど設定したPINを入力すれば接続完了です。
表示の最適化: 画面右下のメニュー(三本線アイコン)から「設定」を開き、「画面をサイズに合わせて変更」をオンにしましょう。これでiPadの画面解像度に合わせてWindowsが表示されます。
Chromeリモートデスクトップは非常に便利なツールですが、iPadを「仕事のメイン機」として使おうとすると、いくつかいくつかの制限にぶつかります。
iPadの画面比率は 4:3 ですが、多くのWindows PCは 16:9 です。
黒帯の発生: iPadで表示すると上下に大きな黒い余白ができてしまい、表示エリアが狭くなります。
文字のボケ: iPadのRetinaディスプレイに最適化されていないため、細かいExcelの文字などがボケて見え、長時間作業すると目が非常に疲れやすいのが難点です。
これが最も多くのユーザーを悩ませるポイントです。
ショートカットの競合: iPad側で日本語と英語を切り替えようとしても、Windows側にそのコマンドがうまく伝わらず、日本語と英語の切り替えがスムーズにできず、ストレスが溜まります。
タイピングの遅延: ネットワーク環境によっては、入力した文字がワンテンポ遅れて表示されるため、長文作成には不向きです。
iPadでマウスを使っても、PCと同じ感覚とはいきません。
スクロールの不自然さ: マウスホイールでのスクロールがカクついたり、逆方向に動いたりすることがあります。
高度な操作の不可: マウスのサイドボタンは認識されず、右クリックも「長押し」や「二本指タップ」で代用する必要があるため、PCのようなスピード感は出せません。
Chromeリモートデスクトップは、あくまで「画面を操作する」だけのツールです。
直接送れない: 「iPadで撮った写真をWindowsに送る」「Windowsの資料をiPadに保存する」といった直接的なファイル転送ができません。クラウドストレージを経由する手間が発生し、作業の流れが止まってしまいます。

「Chromeリモートデスクトップでは、どうしても仕事の効率が上がらない……」と感じた方にこそ試してほしいのが、次世代のリモートデスクトップソフトDeskIn(デスクイン)です。
CRDが「簡易的な操作」を目的にしているのに対し、DeskInは「リモートでの本格的な業務」を想定して設計されています。
CRDで感じた「画面のボケ」や「カクつき」は、DeskInで解消できます。
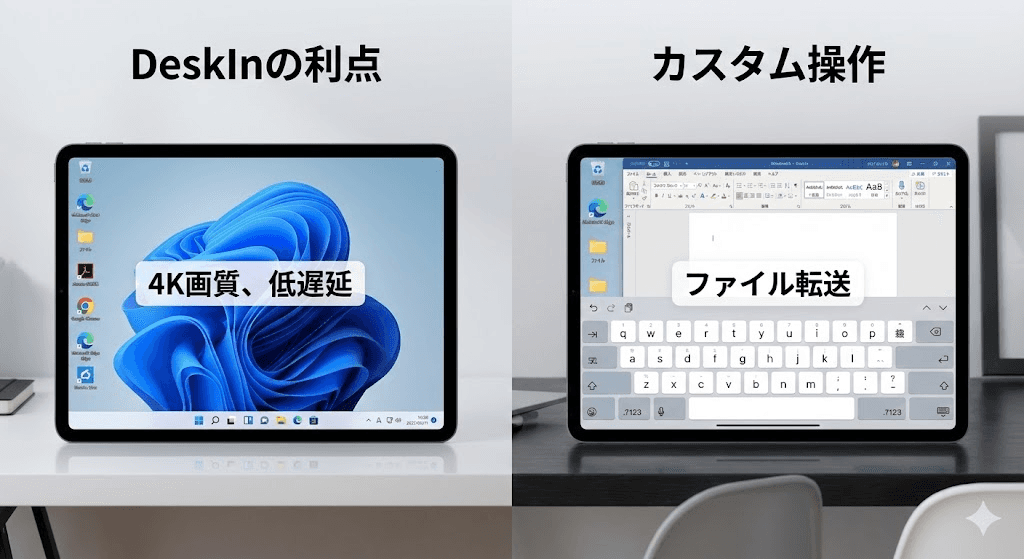
圧倒的な高画質: 4K解像度と60FPSの高フレームレートに対応。iPadの美しいRetinaディスプレイをフルに活かし、まるでローカルでWindowsを動かしているような鮮明な操作感を実現します。
アスペクト比の自動最適化: iPadの 4:3 画面に完璧にフィット。無駄な黒帯を排除し、作業領域を最大限に広げます。
「操作性」こそが、DeskInとCRDの最大の差です。
ストレスのない日本語入力: 日本語/英語の切り替えもスムーズ。iPad専用のキーボードショートカットがWindows側と競合せず、タイピングに集中できます。
ゲーミングレベルの周辺機器対応: マウスのホイール操作やサイドボタンも完全にサポート。さらに、画面上に「ゲーム用」や「仕事用」のカスタム仮想キーボードを配置できるため、キーボードがない環境でも高度な操作が可能です。
CRDにはない、実務に直結する機能が標準搭載されています。
高速なファイル転送: クラウドを経由せず、iPadとWindows間で直接ファイルを送受信可能。写真や資料のやり取りが劇的に速くなります。
マルチモニター対応: iPadをWindowsの「2台目のモニター」として拡張する機能もあり、出先でのマルチタスクも思いのままです。
安全かつ簡単: Googleアカウントに依存せず、独自の高度な暗号化技術によりセキュリティも万全。グローバルなネットワーク加速技術により、通信環境が不安定な場所でも安定した接続を維持します。
iPadからWindowsにリモートアクセスすることで、場所を選ばない自由な働き方が手に入ります。しかし、どのツールを選ぶべきかは、あなたの「作業内容」によって異なります。
完全に無料で済ませたい。
外出先から数分程度、ファイルの中身を少し確認するだけ。
複雑な作業はせず、クリック程度の操作で済む。
iPadを「第2の仕事用PC」として本気で活用したい。
Excelの入力、資料作成、デザイン作業など、長時間の精密な操作が必要。
画質やタイピングの遅延にストレスを感じたくない。
iPadとWindows間で直接ファイルをやり取りし、作業を完結させたい。
まずは手軽なChromeリモートデスクトップから試してみるのも良いでしょう。しかし、もし操作感や画質に「限界」を感じたなら、それはあなたの生産性がさらに向上するサインです。
その時は、ぜひDeskInをインストールして、その圧倒的なスピードと快適さを体感してみてください。あなたのiPadが、想像以上に強力なWindowsマシンに生まれ変わるはずです。

How to Use AnyDesk Wake on LAN to Power On Your Remote PC
If you want to remotely power on a sleeping computer, AnyDesk Wake on LAN can be a useful feature. It allows you to wake a device without physically pressing the power button, making remote work and system maintenance much easier.
In this guide, we'll walk through how to configure AnyDesk Wake on LAN step by step, including BIOS settings, operating system configuration, and AnyDesk options. While the process works well when everything is configured correctly, it can also involve several technical steps. That's why we'll also introduce DeskIn, a simpler and more streamlined alternative for remote access and Wake on LAN. Keep reading to learn both approaches.
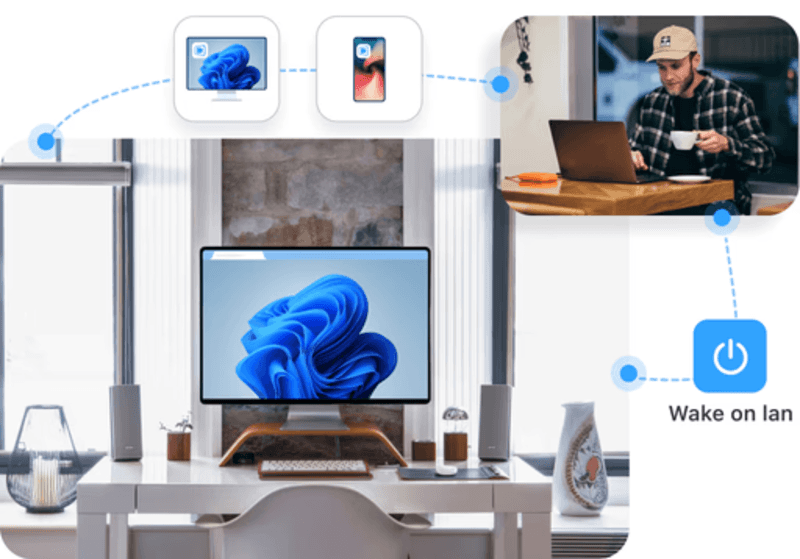
Wake on LAN is a networking feature that allows a device to be powered on remotely through a special network signal known as a "magic packet." When the sleeping computer's network card receives this packet, it sends a signal to the motherboard to start the system.
The main benefit of Wake on LAN is convenience and energy efficiency. Instead of keeping a computer running all day, you can leave it in sleep or shutdown mode and wake it only when needed. This saves electricity and extends hardware lifespan.
Another advantage is accessibility. Whether you're working from home, performing remote maintenance, or managing servers, Wake on LAN ensures devices remain reachable even when they are powered down. IT teams often rely on this capability to troubleshoot systems or perform updates without being physically present.
Configuring AnyDesk Wake on LAN involves preparing the hardware, enabling settings in your operating system, and activating the feature in AnyDesk itself. The steps below will guide you through the process.
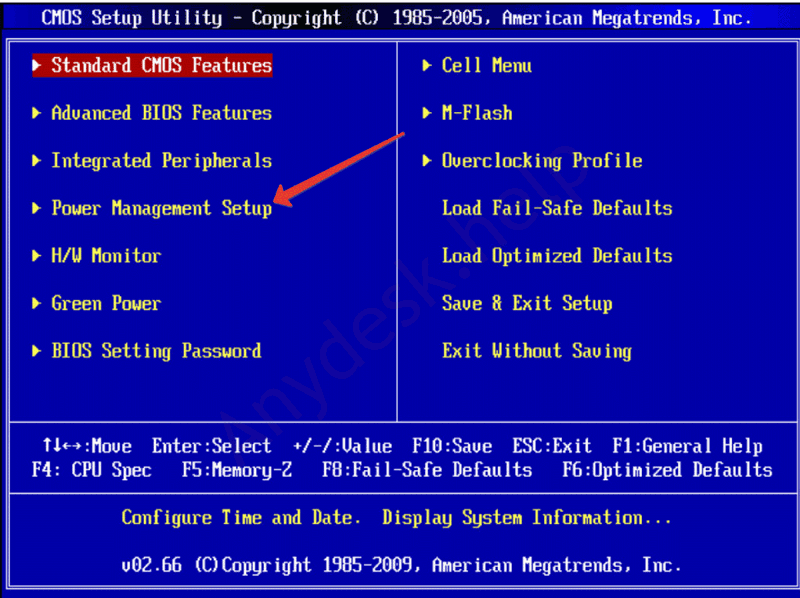
The first requirement is enabling Wake on LAN at the motherboard level.
Restart your computer.
Enter the BIOS or UEFI menu during startup (usually by pressing F2, DEL, or F10).
Open the Power Management section.
Locate a setting such as Wake on LAN, Power on by PCI-E, or similar.
Enable the option.
Save changes and exit the BIOS.
This step ensures the motherboard will allow network signals to power the system on.
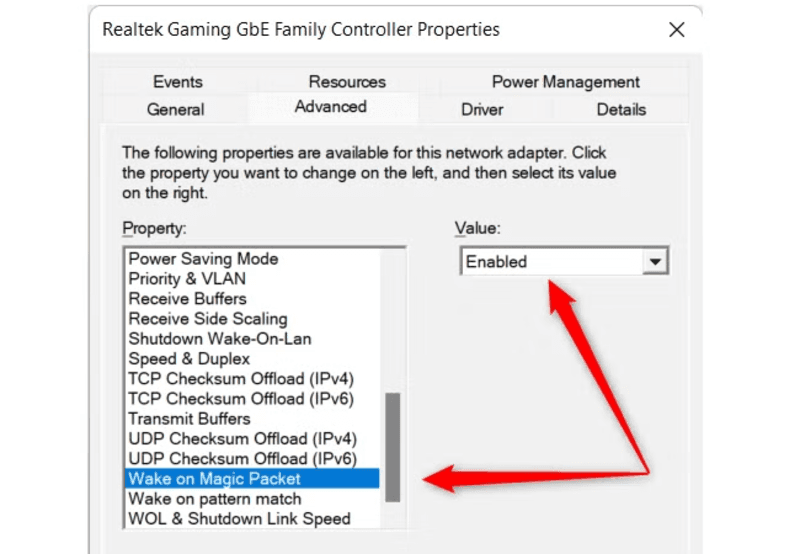
Next, you need to allow the network card to receive wake signals.
Open Device Manager.
Expand Network Adapters.
Right-click your Ethernet adapter and select Properties.
Go to the Advanced tab and enable Wake on Magic Packet.
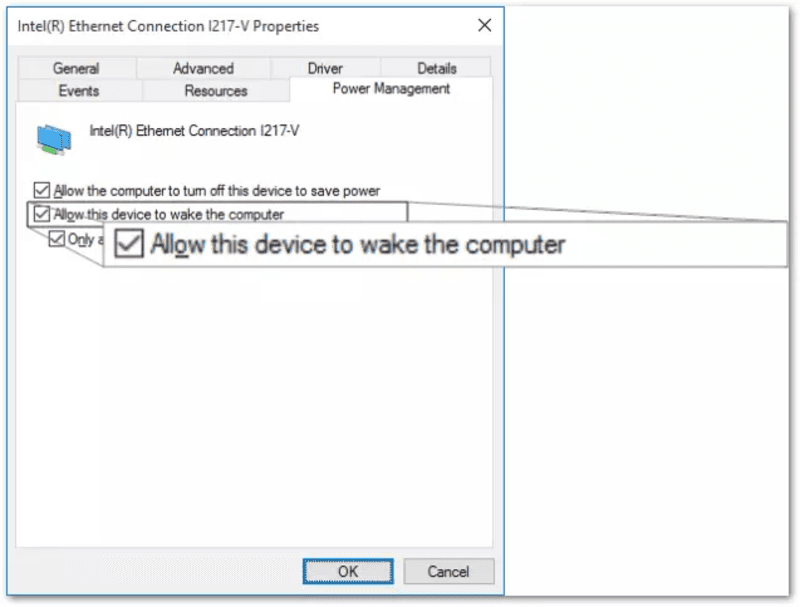
Open the Power Management tab.
Check Allow this device to wake the computer.
Also, enable Only allow a magic packet to wake the computer.
For users running AnyDesk Wake on LAN on Windows 11 or older systems, these steps are essentially the same.
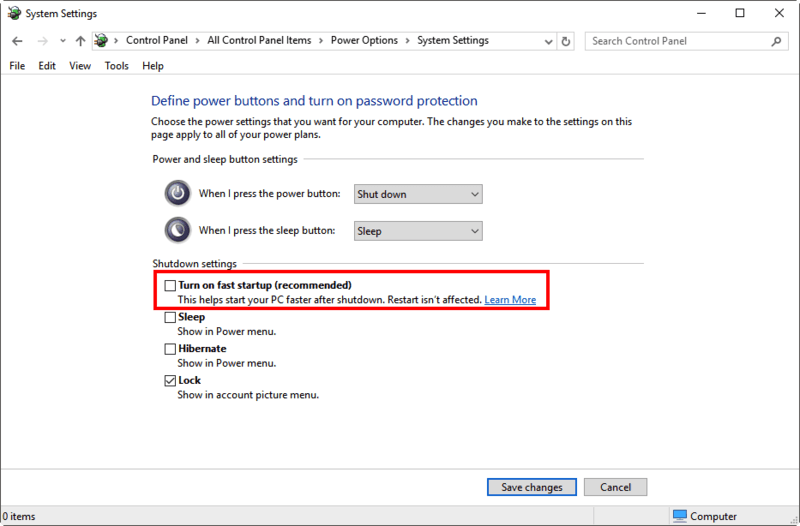
Some Windows systems block network wake signals due to the fast startup feature.
To disable it:
Open Control Panel.
Go to Power Options.
Click Choose what the power buttons do.
Select Change settings that are currently unavailable.
Uncheck Turn on fast startup.
This step often fixes situations where AnyDesk Wake on LAN is not working even though the configuration appears correct.
Now configure the feature inside the AnyDesk client.
Open AnyDesk on the target computer.
Go to Settings.
Navigate to the Wake-on-LAN option.
Enable Allow Wake-on-LAN.
Ensure another AnyDesk device on the same network remains online.
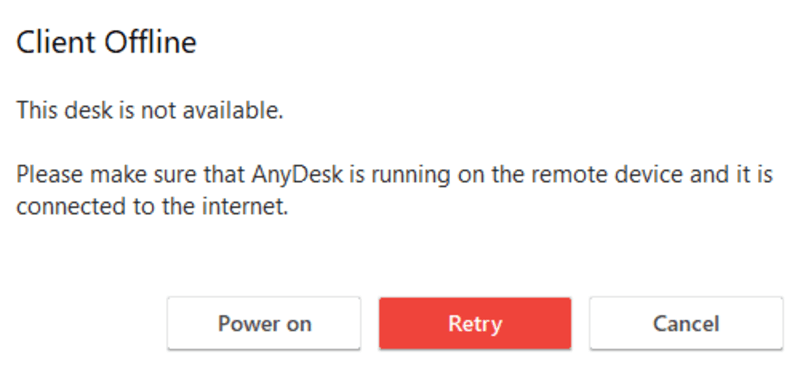
When you try to connect to the sleeping device, AnyDesk will show a "Power On" option.
After completing the setup:
Open AnyDesk on your remote device.
Enter the address of the sleeping computer.
Click Power On.
AnyDesk will locate another active device on the same network and ask it to send the wake packet.
This process is how Wake on LAN AnyDesk functions behind the scenes. If everything is configured correctly, the sleeping machine will start, and AnyDesk will automatically connect.
Sometimes you may see errors such as AnyDesk Wake on LAN no device found. This usually means there is no active device on the same network to send the magic packet. Another frequent issue is that AnyDesk Wake on LAN not working due to Wi-Fi limitations. Wake signals are most reliable over wired Ethernet connections.
If troubleshooting becomes too time-consuming, many users choose tools designed to simplify remote desktop Wake on LAN workflows.
While AnyDesk provides Wake on LAN functionality, the setup process can be technical. Users often need to adjust BIOS settings, network adapters, and device configurations before the feature works properly.
DeskIn focuses on making remote access simpler and more reliable. First, the setup process is easier. Devices linked to the same DeskIn account can be managed quickly without complex network configuration or troubleshooting steps. Second, DeskIn delivers excellent performance for remote connections. It supports high-resolution sessions, smooth frame rates, and stable connections even when accessing powerful workstations remotely. Third, DeskIn integrates device management, remote access, and connectivity tools into one platform. Instead of relying on multiple Wake on LAN software tools, users can manage everything from a single interface.
For professionals who frequently need remote access, DeskIn provides a faster and more predictable experience.
👀 You may also be interested in
Yes. AnyDesk supports Wake on LAN as long as the hardware, operating system, and application settings are configured properly. Another device on the same network must remain active to send the wake signal.
You must enable Wake on LAN in three places: the BIOS or UEFI firmware, the operating system's network adapter settings, and the AnyDesk client configuration. Once enabled, you can wake a sleeping device remotely.
Wake on LAN works by sending a "magic packet" containing the device's MAC address through the network. The network card receives the packet and signals the motherboard to power the system.
Yes, but only if the system supports Wake on LAN from the shutdown state and still receives standby power through the network adapter. For smoother remote control workflows, many users adopt tools like DeskIn.
Setting up AnyDesk Wake on LAN allows you to power on a remote computer without physically accessing it. By enabling BIOS settings, configuring the network adapter, and activating the feature inside AnyDesk, you can wake sleeping machines and connect instantly.
However, the setup process can sometimes be complicated, especially when dealing with hardware compatibility or network configuration issues. If you prefer a simpler and more reliable remote access experience, DeskIn provides an excellent alternative.
With streamlined device management, stable remote sessions, and easier setup, DeskIn helps you stay connected to your computers anytime while still benefiting from the power of Wake on LAN.
How to Set Up TeamViewer Wake on LAN (Step-by-Step Complete Guide)
Turning on your computer remotely can save time, energy, and frustration. Many users rely on TeamViewer Wake on LAN to start a sleeping computer without physically pressing the power button. Whether you want to access your office PC from home or wake a server in another room, Wake on LAN makes remote work much easier.
In this guide, we'll walk through how to configure TeamViewer Wake on LAN step by step. We'll also introduce DeskIn, a simpler remote access solution that can make remote wake and control smoother and more reliable. If you've ever struggled with complicated configuration or TeamViewer Wake on LAN not working, keep reading to discover an easier approach.
Wake on LAN (WoL) is a network technology that allows a computer to power on or wake from sleep when it receives a special network signal called a "magic packet." This packet is sent through the network to the computer's network interface card, which remains partially active even when the system is powered down.
When configured correctly, tools like TeamViewer send that packet from another device on the same network or through the internet. The target computer's motherboard and network adapter detect the signal and trigger the system to start up.
This process is often used for remote work, server management, or accessing a home PC while traveling. Many people combine remote desktop Wake on LAN features with remote control software so they can both power on and operate their computer from anywhere.
Setting up TeamViewer Wake on LAN involves configuring your hardware, operating system, and TeamViewer settings. Follow the steps below carefully to ensure everything works properly.
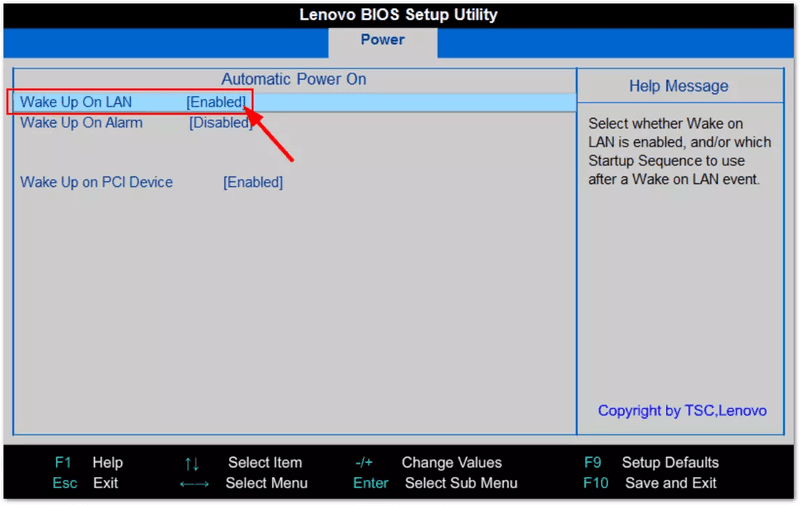
First, you need to activate Wake on LAN at the hardware level. Restart your computer and enter the BIOS or UEFI setup menu. This is usually done by pressing keys like F2, F12, Delete, or Esc during startup. Inside the BIOS interface, navigate to the Power Management section.
Look for an option such as Wake on LAN, Power On by PCI-E, or Resume by LAN and enable it. Save the settings and exit the BIOS. Without this configuration, no Wake on LAN software will be able to power on your computer remotely.
Next, you need to allow your network adapter to receive wake signals. Open Device Manager and locate your network adapter under the Network Adapters category. Right-click the adapter and open its Properties panel.
In the Power Management tab, enable the option allowing the device to wake the computer. In the Advanced settings, ensure Wake on Magic Packet is enabled. These steps are essential for both Wake on LAN Windows 10 and Windows 11 configurations. If your adapter does not support WoL, the feature will not work.
Windows Fast Startup can sometimes interfere with WoL signals. Open Control Panel, go to Power Options, and locate the settings for what the power button does. From there, disable the fast startup feature and save your changes. This small adjustment often fixes problems when Wake on LAN Windows 11 or older Windows versions fail to respond to wake requests.
If these configuration steps start to feel complex, this is where DeskIn stands out. DeskIn integrates remote wake and remote access into a more streamlined workflow with fewer configuration hurdles.
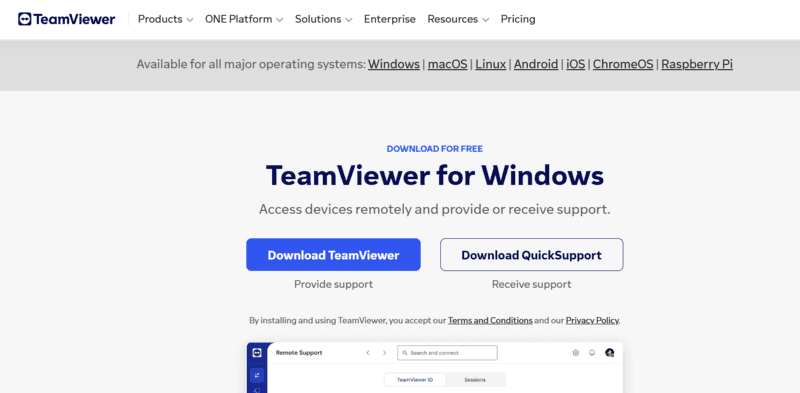
To use TeamViewer Wake on LAN, your computer must be linked to your TeamViewer account. Install the TeamViewer Host application on the computer you want to wake remotely. After installation, sign in and assign the device to your TeamViewer account. Once the computer appears in your device list, you will be able to configure wake options and manage the device remotely.
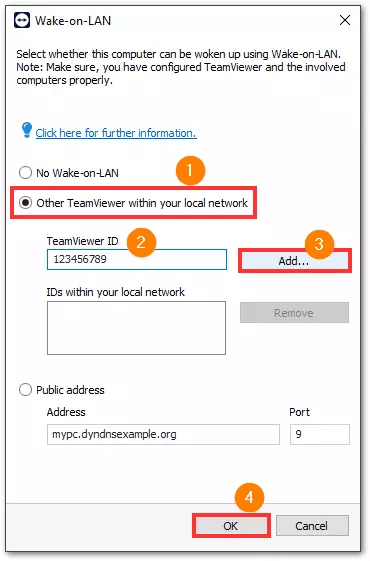
Now you can configure the WoL settings inside TeamViewer. Open the application settings. Under the Device menu, go to Network, click Wake-on-LAN, click "Other TeamViewer within your local network", enter the TeamViewer ID of the device waking up the remote computer, click "Add...", and confirm by clicking "OK".
After configuration, open your TeamViewer device list. Locate the offline computer and select the option to wake it. TeamViewer will send a magic packet through the network and start the remote computer. This method works on different systems, including TeamViewer Wake on LAN Mac, although Mac devices typically only wake from sleep mode rather than from a full shutdown.
If the device does not wake up, the issue may relate to network configuration, router settings, or incorrect BIOS settings. Many users searching for Wake on LAN not working run into these common problems.
While TeamViewer Wake on LAN works for many users, the setup process can be complicated. BIOS configuration, network adapter settings, and router port forwarding can make the process frustrating.
DeskIn offers a more streamlined approach for Wake on LAN and device management. Instead of juggling multiple configuration layers, DeskIn focuses on simplicity and reliability. Once your devices are connected to the same account, you can quickly access and manage them from anywhere without dealing with complicated networking rules. Another advantage is performance. DeskIn supports high-resolution remote sessions with smooth frame delivery, making it suitable not only for office work but also for creative tasks and high-performance workflows. This means you can wake your device, connect instantly, and continue working without interruptions.
DeskIn also integrates device management and remote control into one unified platform. Instead of using separate tools for wake, connection, and control, everything is handled in one place, which reduces troubleshooting time and improves reliability for daily remote work. If you frequently rely on remote desktop Wake on LAN functionality, DeskIn can provide a smoother and more predictable experience compared to traditional setups.
Want to see a detailed DeskIn walkthrough? Read our complete guide on setting up Wake on LAN.
👀 You may also be interested in:
To use Wake on LAN with TeamViewer, you must enable Wake on LAN in BIOS, configure the network adapter, install TeamViewer Host, and set up the WoL settings in the application.
Many users ask if TeamViewer Wake on LAN is free. The feature is available in TeamViewer, but commercial usage may require a paid license depending on how the software is used.
To enable remote wake functionality, the target computer must support Wake on LAN, be connected via Ethernet, and have WoL activated in both hardware and operating system settings.
If TeamViewer Wake on LAN is not working, check BIOS settings, network adapter configuration, router port forwarding, and Windows power settings. If the process becomes too complicated, solutions like DeskIn provide simpler remote access alternatives.
Setting up TeamViewer Wake on LAN allows you to power on your computer remotely and access it whenever needed. By enabling Wake on LAN in BIOS, configuring your network adapter, and linking the device to TeamViewer, you can wake your PC from another device across the network.
However, the configuration process can sometimes be complex, especially when dealing with router settings or troubleshooting wake failures. If you want a more streamlined remote access experience, DeskIn offers a powerful alternative with smoother connectivity and easier device management. With DeskIn, you can spend less time configuring systems and more time getting work done remotely.
iPadでWindowsを操作!Chromeリモートデスクトップの設定と操作のコツ【完全版】 | DeskIn
「カフェでiPadだけで仕事をこなしたい」——そう思っても、Excelのフル機能やWindows専用ソフトが必要になり、結局重いノートPCをカバンに詰め直している方は多いはずです。
そこで注目されるのが、iPadからWindowsにリモートアクセスして操作する方法です。
その中でも、Googleが提供する「Chromeリモートデスクトップ」は、無料で手軽に導入できるため、多くのユーザーに選ばれています。iPadの機動力とWindowsの作業効率を両立させるための、最も身近なツールと言えるでしょう。
しかし、iPadをWindowsの完全な代わりにするには、いくつかの操作のコツと、避けては通れない機能の限界を理解しておく必要があります。
本記事では、スムーズな設定手順から生産性を高めるテクニック、そして「本当に仕事で使えるのか?」という現実的な視点まで、簡潔に解説します。
数あるリモートデスクトップソフトの中で、なぜ多くのiPadユーザーが最初に「Chromeリモートデスクトップ」を選ぶのでしょうか。その理由は、圧倒的な「手軽さ」にあります。
完全無料で制限なし: 個人利用・商用利用を問わず、すべての機能を無料で利用できる点は最大のメリットです。
複雑な設定が不要: VPNの設定やルーターのポート開放といった専門知識は必要ありません。Googleアカウントさえあれば、初心者でも数分でセットアップが完了します。
マルチデバイス対応: Windows、Mac、そしてiPadOSなど、デバイスを問わずシームレスに連携できるため、環境を選びません。
「まずはコストをかけずに、手持ちのiPadでリモート操作を試してみたい」という方にとって、まず試してみるツールとしては、非常に始めやすい選択肢です。。
iPadとWindowsは、そもそも「タッチ操作」と「マウス操作」という異なる言語で動いています。この溝を埋めて、iPadでWindowsを快適に操作するためのテクニックを解説します。
iPad版アプリには、2つの操作モードがあります。これを知らずに使うと「操作しにくい!」と挫折してしまいます。
トラックパッドモード(推奨): 画面上のどこを触っても、マウスカーソルを動かす操作になります。「右クリック」や「ドラッグ」が正確に行えるため、Excelや業務システムの操作にはこちらが必須です。
タッチモード: 画面を直接タップした場所がクリックされます。ブラウジングや動画再生など、消費系の作業に向いています。
コツ: 右端からスワイプして表示されるメニューから、作業内容に合わせて瞬時に切り替えましょう。
物理マウスがなくても、指先だけでWindowsの複雑な操作を再現できます。
右クリック: 2本の指で同時に画面をタップします。
ドラッグ&ドロップ: 1本指で対象を長押しし、そのまま指をスライドさせます。
スクロール: 2本の指で上下にスライドさせます。
iPad用のキーボード(Magic Keyboardなど)を使う場合、キーの役割に戸惑うことがあります。
Command = Ctrl: 基本的にiPadの「Command」キーが、Windowsの「Ctrl」として機能します。つまり、Command + C でコピー、Command + V で貼り付けが可能です。
日本語入力の切り替え: これが最大の難所です。iPad側の Ctrl + Space や Caps Lock がWindows側にうまく伝わらないことがあります。その場合は、Windows側のタスクバーにあるIMEアイコンを直接タップするか、ショートカットキーの再設定を検討しましょう。
それでは、実際にiPadからWindowsへ接続するための設定をステップバイステップで解説します。
まずは、操作される側のPC(Windows)を設定します。
Chromeで公式サイトにアクセス: Chromeブラウザで remotedesktop.google.com/access にアクセスします。
拡張機能をインストール: 「リモートアクセスの設定」から青いダウンロードアイコンをクリックし、Chrome拡張機能をインストールします。
リモートアクセスを有効化: 「オンにする」をクリックし、PCに任意の名前を付けます。
PINの設定: 接続時に必要な6桁以上の**PIN(接続用パスワード)**を設定します。これでPC側のスタンバイは完了です。
次に、手元のiPadを準備します。
アプリをダウンロード: App Storeで「Chrome Remote Desktop」を検索し、アプリをインストールします。
ログイン: PC側で使用した際と同じGoogleアカウントでログインします。
PCの選択: ログインすると、オンライン状態のPC名がリストに表示されます。
PINの入力: リストからPC名を選択し、先ほど設定したPINを入力すれば接続完了です。
表示の最適化: 画面右下のメニュー(三本線アイコン)から「設定」を開き、「画面をサイズに合わせて変更」をオンにしましょう。これでiPadの画面解像度に合わせてWindowsが表示されます。
Chromeリモートデスクトップは非常に便利なツールですが、iPadを「仕事のメイン機」として使おうとすると、いくつかいくつかの制限にぶつかります。
iPadの画面比率は 4:3 ですが、多くのWindows PCは 16:9 です。
黒帯の発生: iPadで表示すると上下に大きな黒い余白ができてしまい、表示エリアが狭くなります。
文字のボケ: iPadのRetinaディスプレイに最適化されていないため、細かいExcelの文字などがボケて見え、長時間作業すると目が非常に疲れやすいのが難点です。
これが最も多くのユーザーを悩ませるポイントです。
ショートカットの競合: iPad側で日本語と英語を切り替えようとしても、Windows側にそのコマンドがうまく伝わらず、日本語と英語の切り替えがスムーズにできず、ストレスが溜まります。
タイピングの遅延: ネットワーク環境によっては、入力した文字がワンテンポ遅れて表示されるため、長文作成には不向きです。
iPadでマウスを使っても、PCと同じ感覚とはいきません。
スクロールの不自然さ: マウスホイールでのスクロールがカクついたり、逆方向に動いたりすることがあります。
高度な操作の不可: マウスのサイドボタンは認識されず、右クリックも「長押し」や「二本指タップ」で代用する必要があるため、PCのようなスピード感は出せません。
Chromeリモートデスクトップは、あくまで「画面を操作する」だけのツールです。
直接送れない: 「iPadで撮った写真をWindowsに送る」「Windowsの資料をiPadに保存する」といった直接的なファイル転送ができません。クラウドストレージを経由する手間が発生し、作業の流れが止まってしまいます。
「Chromeリモートデスクトップでは、どうしても仕事の効率が上がらない……」と感じた方にこそ試してほしいのが、次世代のリモートデスクトップソフトDeskIn(デスクイン)です。
CRDが「簡易的な操作」を目的にしているのに対し、DeskInは「リモートでの本格的な業務」を想定して設計されています。
CRDで感じた「画面のボケ」や「カクつき」は、DeskInで解消できます。
圧倒的な高画質: 4K解像度と60FPSの高フレームレートに対応。iPadの美しいRetinaディスプレイをフルに活かし、まるでローカルでWindowsを動かしているような鮮明な操作感を実現します。
アスペクト比の自動最適化: iPadの 4:3 画面に完璧にフィット。無駄な黒帯を排除し、作業領域を最大限に広げます。
「操作性」こそが、DeskInとCRDの最大の差です。
ストレスのない日本語入力: 日本語/英語の切り替えもスムーズ。iPad専用のキーボードショートカットがWindows側と競合せず、タイピングに集中できます。
ゲーミングレベルの周辺機器対応: マウスのホイール操作やサイドボタンも完全にサポート。さらに、画面上に「ゲーム用」や「仕事用」のカスタム仮想キーボードを配置できるため、キーボードがない環境でも高度な操作が可能です。
CRDにはない、実務に直結する機能が標準搭載されています。
高速なファイル転送: クラウドを経由せず、iPadとWindows間で直接ファイルを送受信可能。写真や資料のやり取りが劇的に速くなります。
マルチモニター対応: iPadをWindowsの「2台目のモニター」として拡張する機能もあり、出先でのマルチタスクも思いのままです。
安全かつ簡単: Googleアカウントに依存せず、独自の高度な暗号化技術によりセキュリティも万全。グローバルなネットワーク加速技術により、通信環境が不安定な場所でも安定した接続を維持します。
iPadからWindowsにリモートアクセスすることで、場所を選ばない自由な働き方が手に入ります。しかし、どのツールを選ぶべきかは、あなたの「作業内容」によって異なります。
完全に無料で済ませたい。
外出先から数分程度、ファイルの中身を少し確認するだけ。
複雑な作業はせず、クリック程度の操作で済む。
iPadを「第2の仕事用PC」として本気で活用したい。
Excelの入力、資料作成、デザイン作業など、長時間の精密な操作が必要。
画質やタイピングの遅延にストレスを感じたくない。
iPadとWindows間で直接ファイルをやり取りし、作業を完結させたい。
まずは手軽なChromeリモートデスクトップから試してみるのも良いでしょう。しかし、もし操作感や画質に「限界」を感じたなら、それはあなたの生産性がさらに向上するサインです。
その時は、ぜひDeskInをインストールして、その圧倒的なスピードと快適さを体感してみてください。あなたのiPadが、想像以上に強力なWindowsマシンに生まれ変わるはずです。
How to Use AnyDesk Wake on LAN to Power On Your Remote PC
If you want to remotely power on a sleeping computer, AnyDesk Wake on LAN can be a useful feature. It allows you to wake a device without physically pressing the power button, making remote work and system maintenance much easier.
In this guide, we'll walk through how to configure AnyDesk Wake on LAN step by step, including BIOS settings, operating system configuration, and AnyDesk options. While the process works well when everything is configured correctly, it can also involve several technical steps. That's why we'll also introduce DeskIn, a simpler and more streamlined alternative for remote access and Wake on LAN. Keep reading to learn both approaches.
Wake on LAN is a networking feature that allows a device to be powered on remotely through a special network signal known as a "magic packet." When the sleeping computer's network card receives this packet, it sends a signal to the motherboard to start the system.
The main benefit of Wake on LAN is convenience and energy efficiency. Instead of keeping a computer running all day, you can leave it in sleep or shutdown mode and wake it only when needed. This saves electricity and extends hardware lifespan.
Another advantage is accessibility. Whether you're working from home, performing remote maintenance, or managing servers, Wake on LAN ensures devices remain reachable even when they are powered down. IT teams often rely on this capability to troubleshoot systems or perform updates without being physically present.
Configuring AnyDesk Wake on LAN involves preparing the hardware, enabling settings in your operating system, and activating the feature in AnyDesk itself. The steps below will guide you through the process.
The first requirement is enabling Wake on LAN at the motherboard level.
Restart your computer.
Enter the BIOS or UEFI menu during startup (usually by pressing F2, DEL, or F10).
Open the Power Management section.
Locate a setting such as Wake on LAN, Power on by PCI-E, or similar.
Enable the option.
Save changes and exit the BIOS.
This step ensures the motherboard will allow network signals to power the system on.
Next, you need to allow the network card to receive wake signals.
Open Device Manager.
Expand Network Adapters.
Right-click your Ethernet adapter and select Properties.
Go to the Advanced tab and enable Wake on Magic Packet.
Open the Power Management tab.
Check Allow this device to wake the computer.
Also, enable Only allow a magic packet to wake the computer.
For users running AnyDesk Wake on LAN on Windows 11 or older systems, these steps are essentially the same.
Some Windows systems block network wake signals due to the fast startup feature.
To disable it:
Open Control Panel.
Go to Power Options.
Click Choose what the power buttons do.
Select Change settings that are currently unavailable.
Uncheck Turn on fast startup.
This step often fixes situations where AnyDesk Wake on LAN is not working even though the configuration appears correct.
Now configure the feature inside the AnyDesk client.
Open AnyDesk on the target computer.
Go to Settings.
Navigate to the Wake-on-LAN option.
Enable Allow Wake-on-LAN.
Ensure another AnyDesk device on the same network remains online.
When you try to connect to the sleeping device, AnyDesk will show a "Power On" option.
After completing the setup:
Open AnyDesk on your remote device.
Enter the address of the sleeping computer.
Click Power On.
AnyDesk will locate another active device on the same network and ask it to send the wake packet.
This process is how Wake on LAN AnyDesk functions behind the scenes. If everything is configured correctly, the sleeping machine will start, and AnyDesk will automatically connect.
Sometimes you may see errors such as AnyDesk Wake on LAN no device found. This usually means there is no active device on the same network to send the magic packet. Another frequent issue is that AnyDesk Wake on LAN not working due to Wi-Fi limitations. Wake signals are most reliable over wired Ethernet connections.
If troubleshooting becomes too time-consuming, many users choose tools designed to simplify remote desktop Wake on LAN workflows.
While AnyDesk provides Wake on LAN functionality, the setup process can be technical. Users often need to adjust BIOS settings, network adapters, and device configurations before the feature works properly.
DeskIn focuses on making remote access simpler and more reliable. First, the setup process is easier. Devices linked to the same DeskIn account can be managed quickly without complex network configuration or troubleshooting steps. Second, DeskIn delivers excellent performance for remote connections. It supports high-resolution sessions, smooth frame rates, and stable connections even when accessing powerful workstations remotely. Third, DeskIn integrates device management, remote access, and connectivity tools into one platform. Instead of relying on multiple Wake on LAN software tools, users can manage everything from a single interface.
For professionals who frequently need remote access, DeskIn provides a faster and more predictable experience.
👀 You may also be interested in
Yes. AnyDesk supports Wake on LAN as long as the hardware, operating system, and application settings are configured properly. Another device on the same network must remain active to send the wake signal.
You must enable Wake on LAN in three places: the BIOS or UEFI firmware, the operating system's network adapter settings, and the AnyDesk client configuration. Once enabled, you can wake a sleeping device remotely.
Wake on LAN works by sending a "magic packet" containing the device's MAC address through the network. The network card receives the packet and signals the motherboard to power the system.
Yes, but only if the system supports Wake on LAN from the shutdown state and still receives standby power through the network adapter. For smoother remote control workflows, many users adopt tools like DeskIn.
Setting up AnyDesk Wake on LAN allows you to power on a remote computer without physically accessing it. By enabling BIOS settings, configuring the network adapter, and activating the feature inside AnyDesk, you can wake sleeping machines and connect instantly.
However, the setup process can sometimes be complicated, especially when dealing with hardware compatibility or network configuration issues. If you prefer a simpler and more reliable remote access experience, DeskIn provides an excellent alternative.
With streamlined device management, stable remote sessions, and easier setup, DeskIn helps you stay connected to your computers anytime while still benefiting from the power of Wake on LAN.
連絡先
メール: support@deskin.io
オフィスの住所:
991D Alexandra Road #02-17
シンガポール 119972
著作権 © 2026 Zuler Technology PTE. LTD. 無断複写・転載を禁じます。
お問い合わせ
Eメール: support@deskin.io
本社: 991D Alexandra Road #02-17, シンガポール 119972
著作権 © 2026 Zuler Technology PTE. LTD. 無断複写・転載を禁じます。
連絡先
support@deskin.io
991D Alexandra Road #02-17
シンガポール 119972
著作権 © 2026 Zuler Technology PTE. LTD. 無断複写・転載を禁じます。

