ブログ
検索
すべてのトピック
比較
ゲーム
生産性
トラブルシューティング

WindowsとMacコンピュータをiPadでセカンドモニターに!
マルチタスクをこなすにとっ社員にとって、セカンドモニターを使用することは生産性を大幅に向上させることができます。ホームオフィスの方やデュアルスクリーンを持っていない学生の方へ。使用していないiPadを簡単にコンピュータのセカンドモニターに変える方法をご紹介します。
iPadを第二画面として使用するメリット:
1. 画面スペースを増やして同時により多く表示できます。マルチタスクユーザーは、ウィンドウの切り替えを避けることで時間を節約できます。
2. 各画面が独立して動作するため、作業スペースがより整理されます。
ビデオ編集では、一つの画面を編集に、もう一つの画面を素材置き場に。論文を書く場合、片方の画面で執筆、もう片方で情報を検索などです。
3. iPadの画面サイズは十分大きく、表示品質も非常に良好です。デザイン作業のニーズがあるユーザーやMacBookユーザーにとって、追加のスクリーンを購入するよりもコスト効率が高く、色差の問題もありません。
4. 多くの人が家にiPadを持っています。この手持ちのデバイスをデュアルスクリーンとして使用することで、別のスクリーンを購入するコストや置くスペースを節約できます。
MacでiPadをセカンドスクリーンとして使用する方法は?
Appleのネイティブ機能であるApple Sidecarを使用すると、iPadをMacBookやiMacの外部ディスプレイとして使用できます。簡単な設定を行うだけで、iPadとコンピュータ間のシームレスな接続が可能です。
注意:Apple Sidecarを使用するには、2台のデバイスが同じApple IDにログインしているか、同じネットワークに接続していることが必要です。両方のデバイスにBluetooth、Wi-Fiがオンになっており、距離は10メートル以内である必要があります。
ステップ1 ディスプレイ設定:
Macシステム設定を開き、サイドバーの「ディスプレイ」クリック >> 右側の「+」ポップアップメニューをクリックし、iPadを選択します。
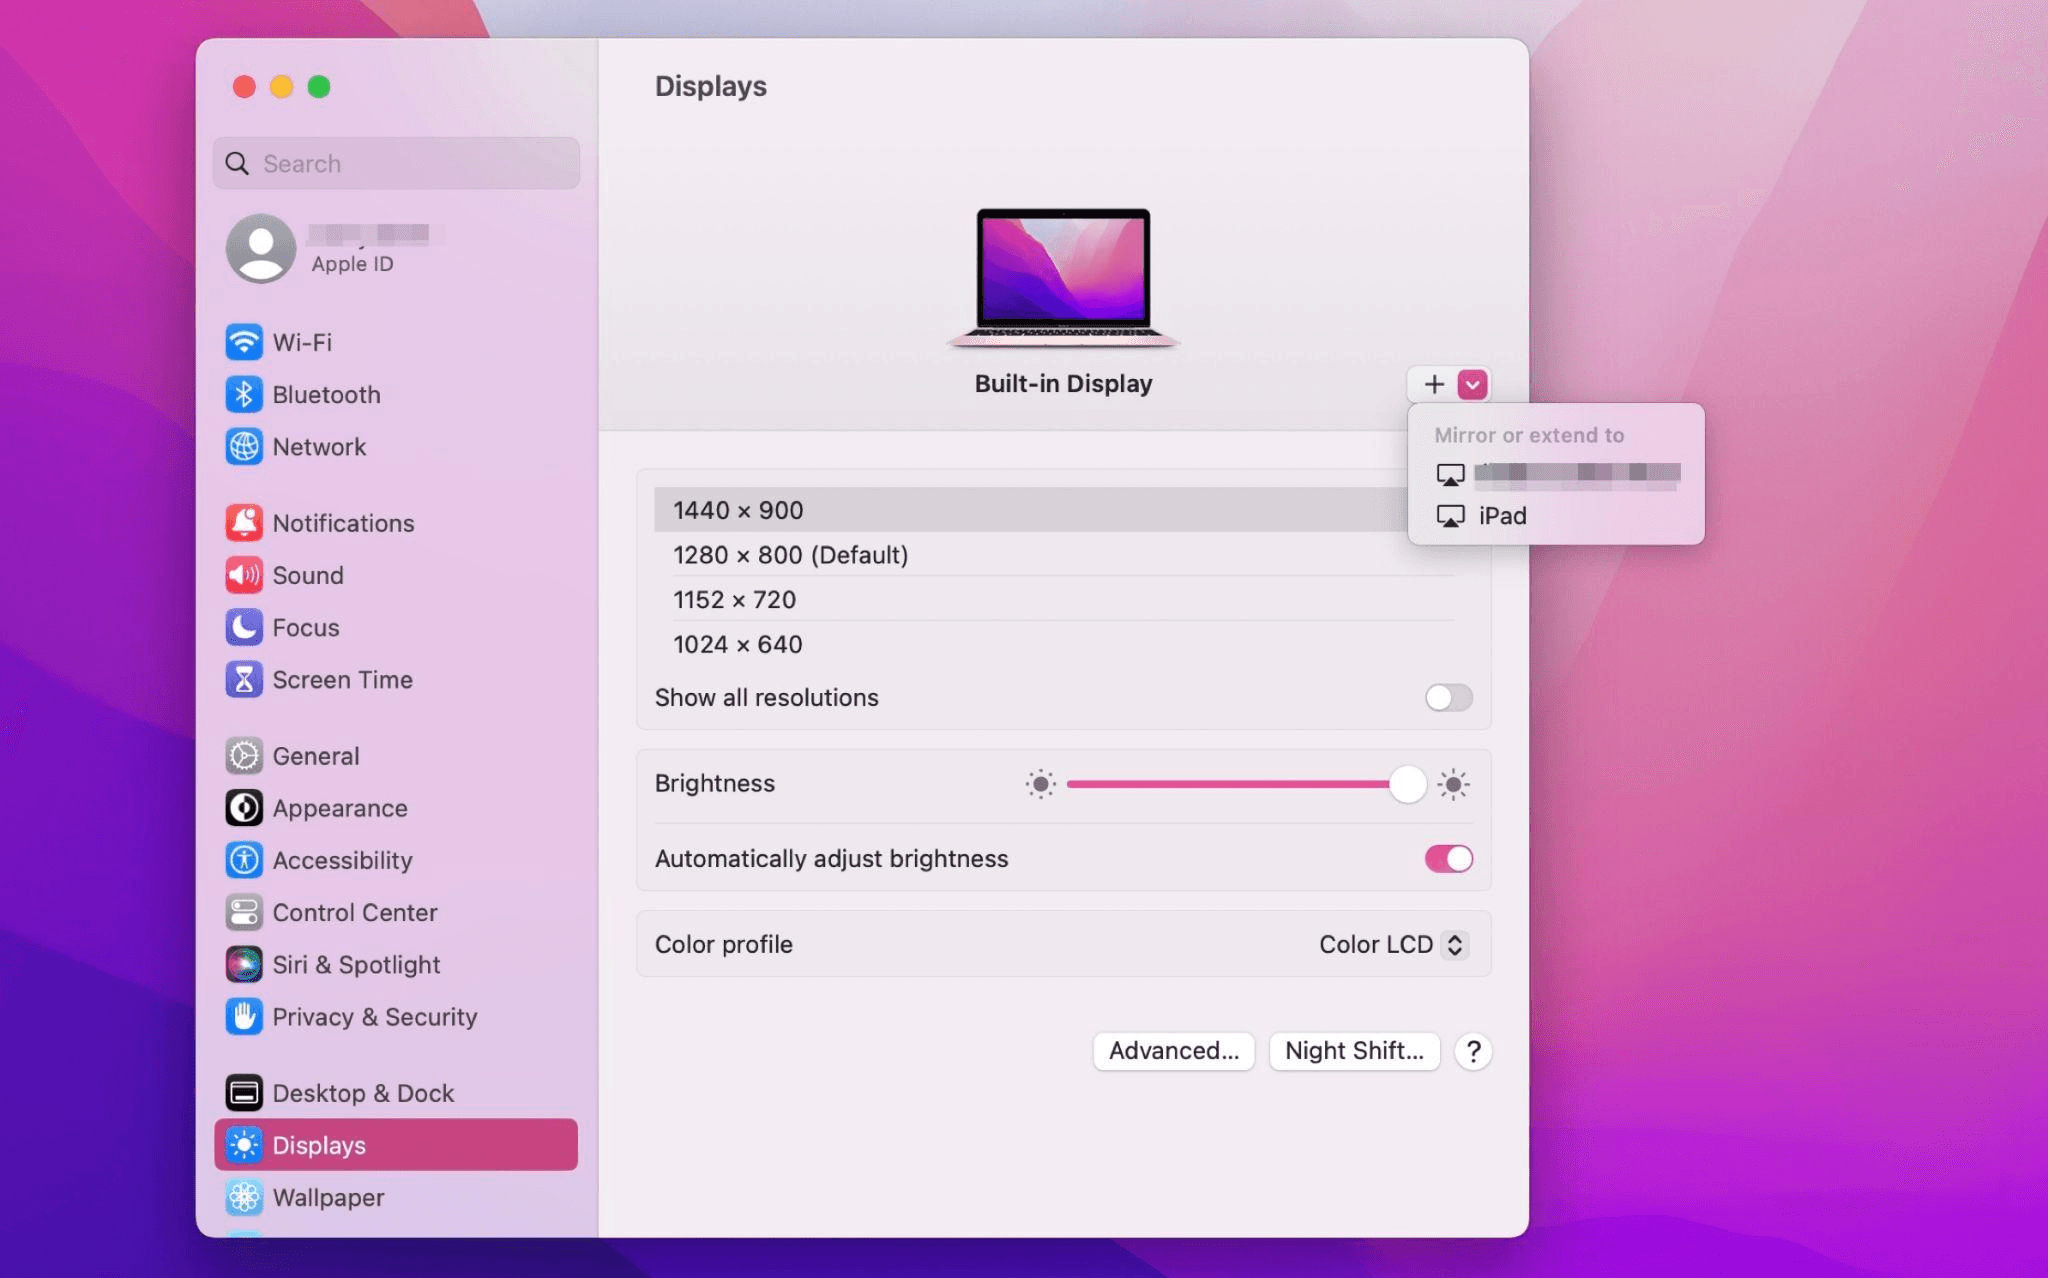
iPadを選択し、使用設定を「拡張ディスプレイ」に変更します。Macの上部ツールバーのAirplay設定を確認し、iPadを「別のディスプレイとして使用」に設定します。
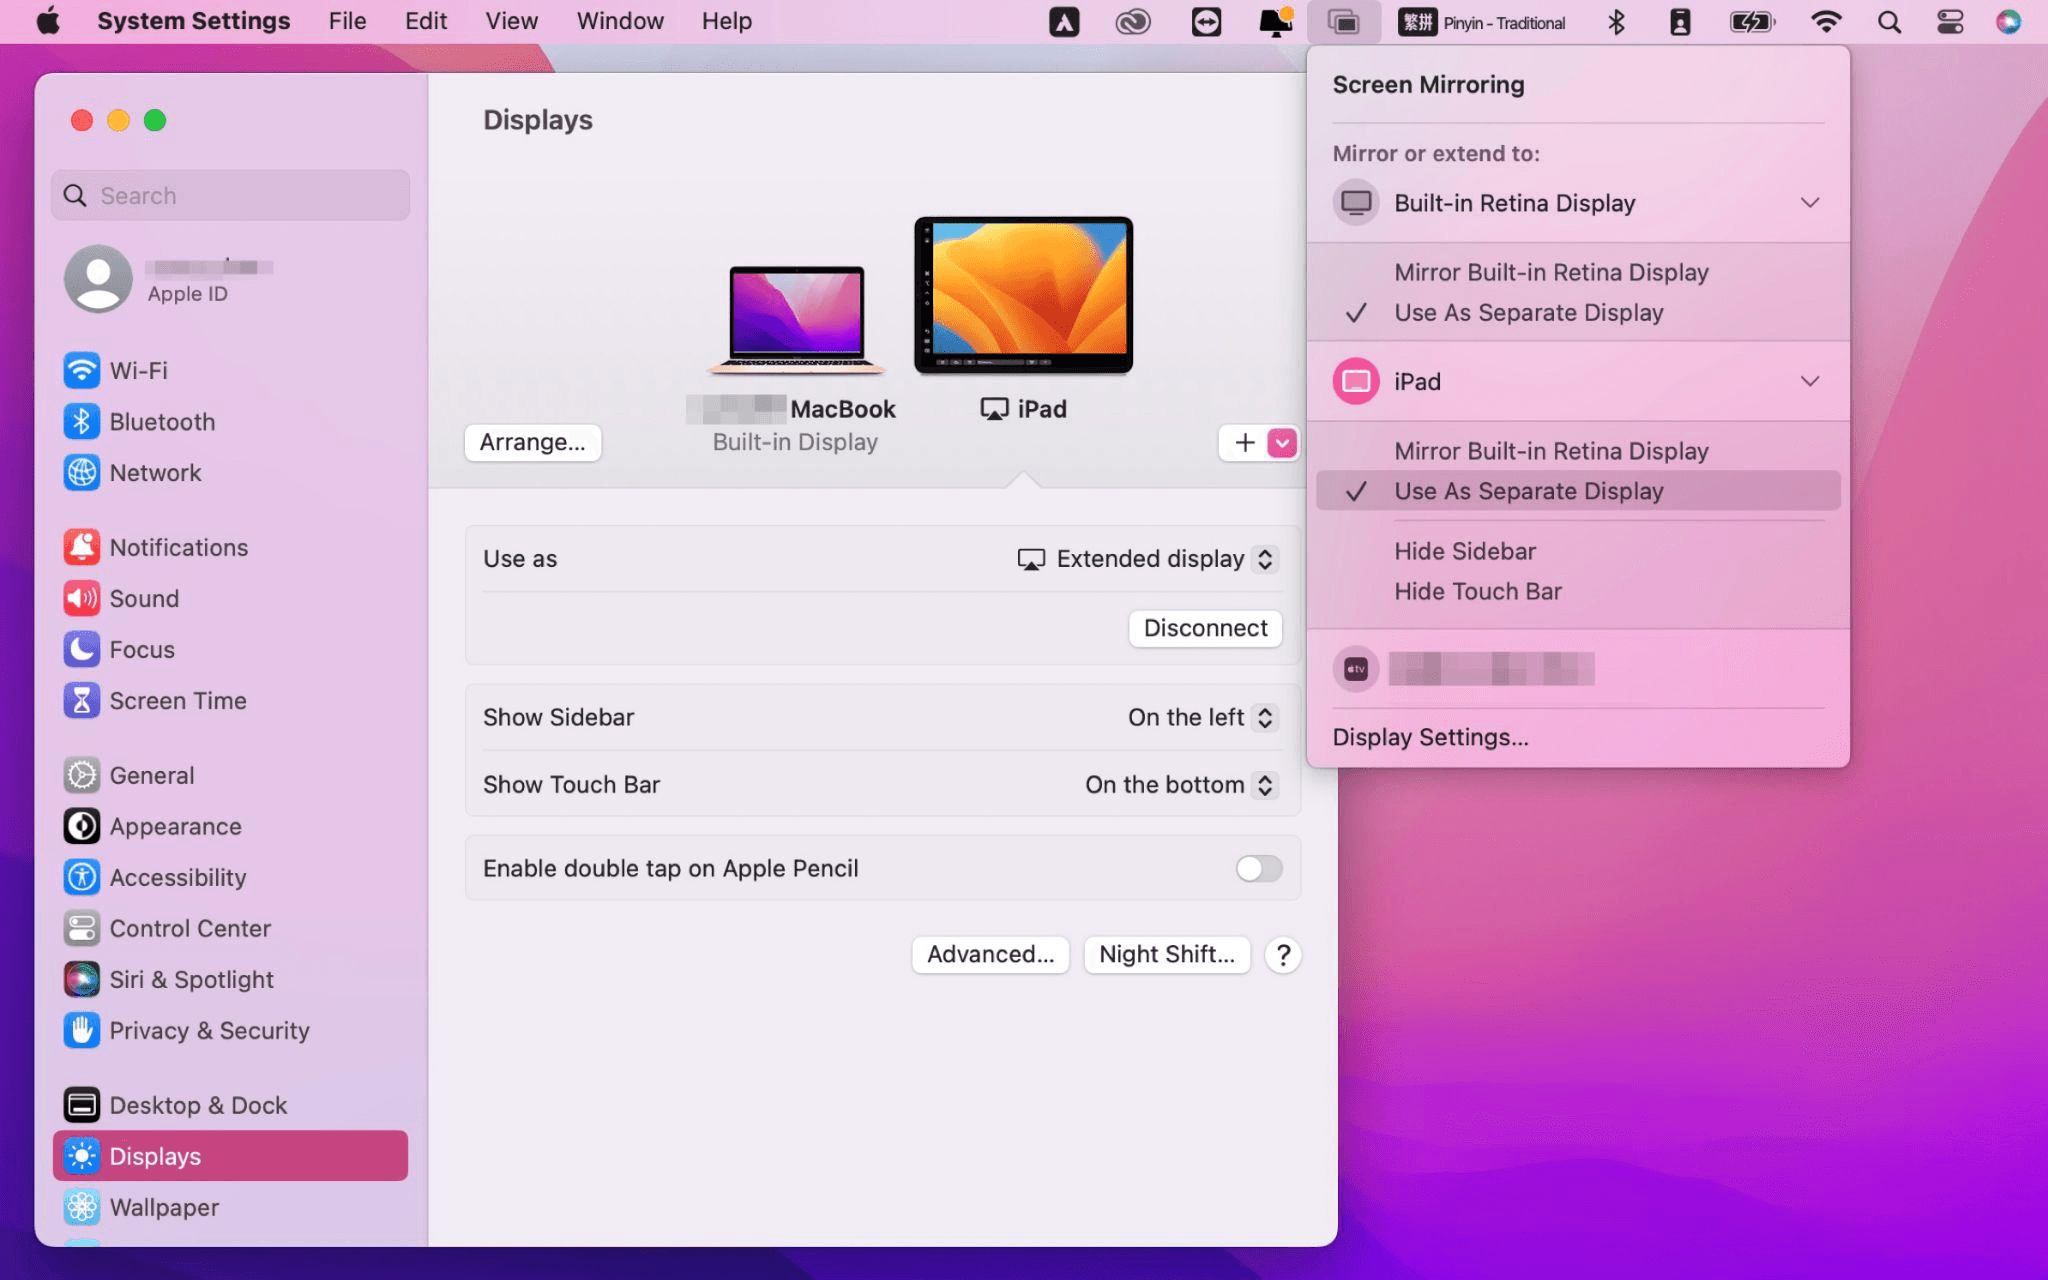
ステップ2:画面を拡張する
設定が完了すると、iPadがMacのセカンドディスプレイとなります。MacからiPadにウィンドウをスムーズにドラッグすることができます。また、iPadのサイドバーを使用したり、システムディスプレイ設定でサイドバーの位置を変更したりできます。
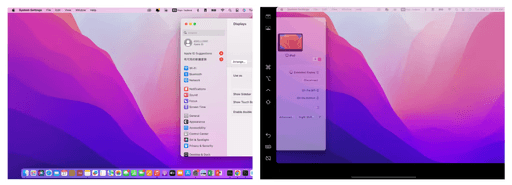
MacBookスクリーン(左)とiPadスクリーン(右)
WindowsでiPadをセカンドスクリーンとして使用する方法は?
Apple Sidecarは、2016年以降に発売されたMacとiPadOS13以上のみをサポートします。古いAppleデバイスやWindowsデバイスを使用している場合でも、DeskInリモートソフトウェアを利用して画面拡張を行うことができます。iPadをMacやWindowsのセカンドディスプレイとして使用でき、その滑らかさはSidecarに劣りません。
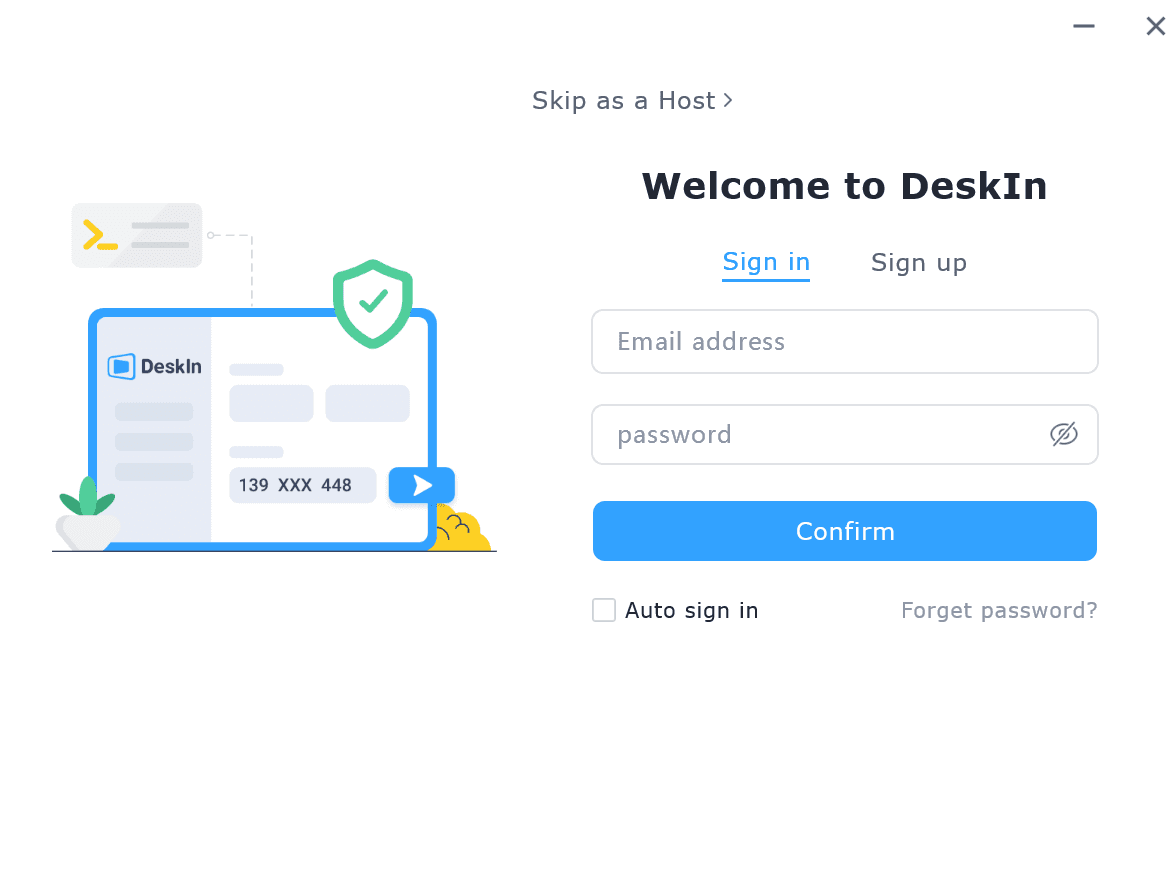
ステップ1:DeskInアカウントをダウンロードして登録する
コンピューターとiPadにDeskInをダウンロードし、無料アカウントを登録して別々にログインします。

注意: 新しいデバイスに初めてログインする際には、アカウントのセキュリティを保護するためにメール認証を完了する必要があります。
ステップ2:画面を拡張する
Windows/MacコンピュータでDeskInアプリを開き、「スクリーン管理」タブに行き、「画面を拡張する」をクリックします。
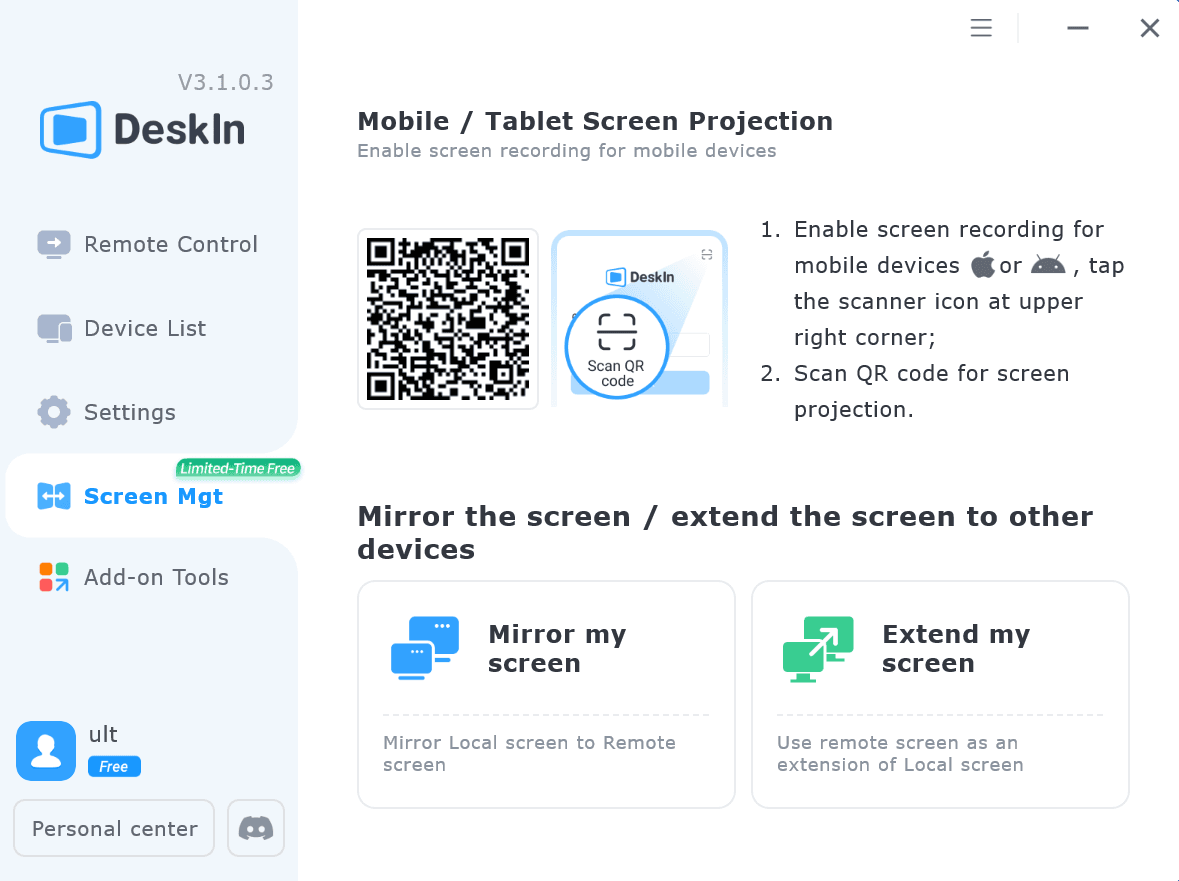
iPadを選択し、「拡張を開始」をクリックします。接続が完了すると、iPadはWindows/Macコンピューターのセカンドディスプレイとなり、2つのスクリーンを1つのもののようにウィンドウを移動できます。
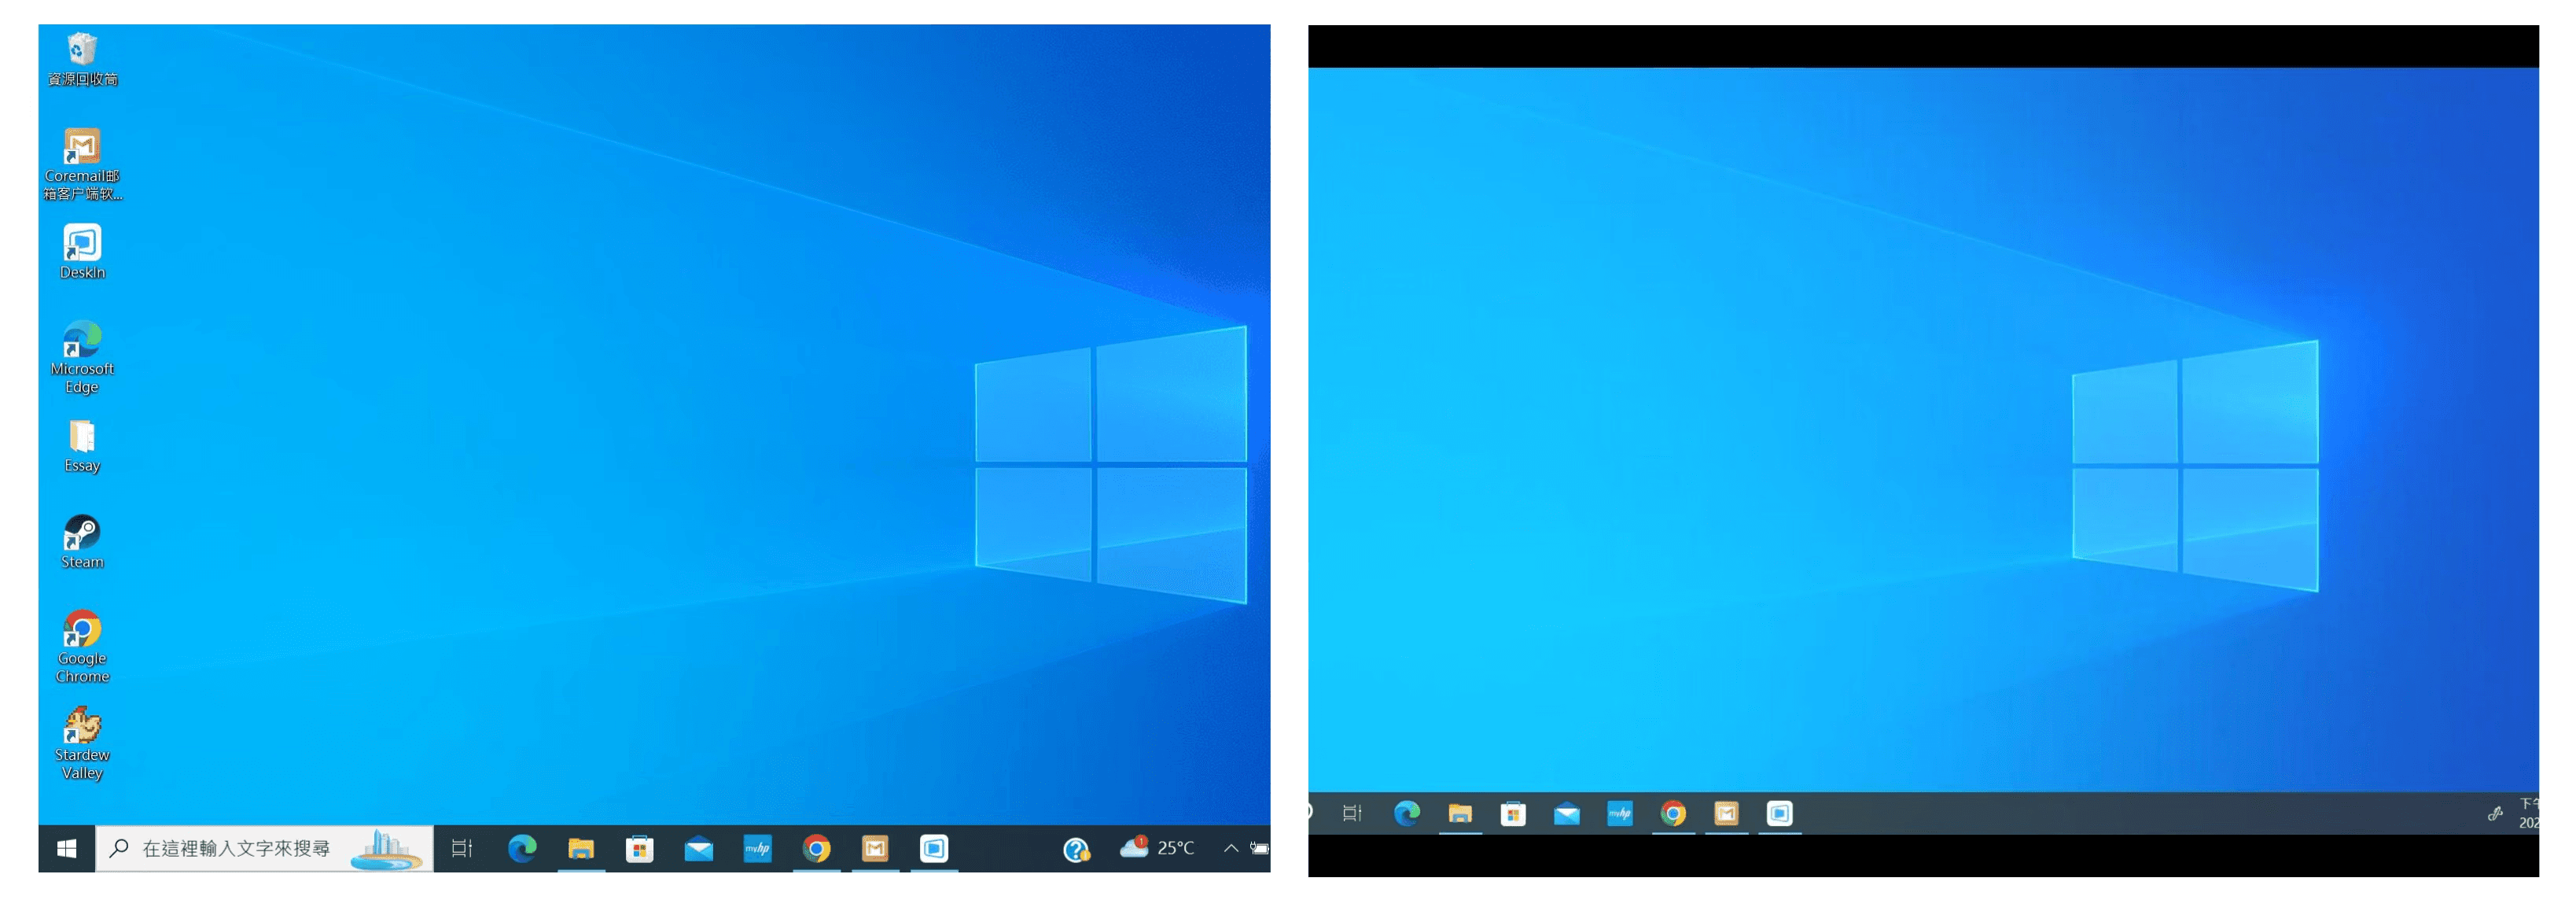
コンピュータスクリーン(左)とiPadスクリーン(右)
ステップ3:システムディスプレイ設定
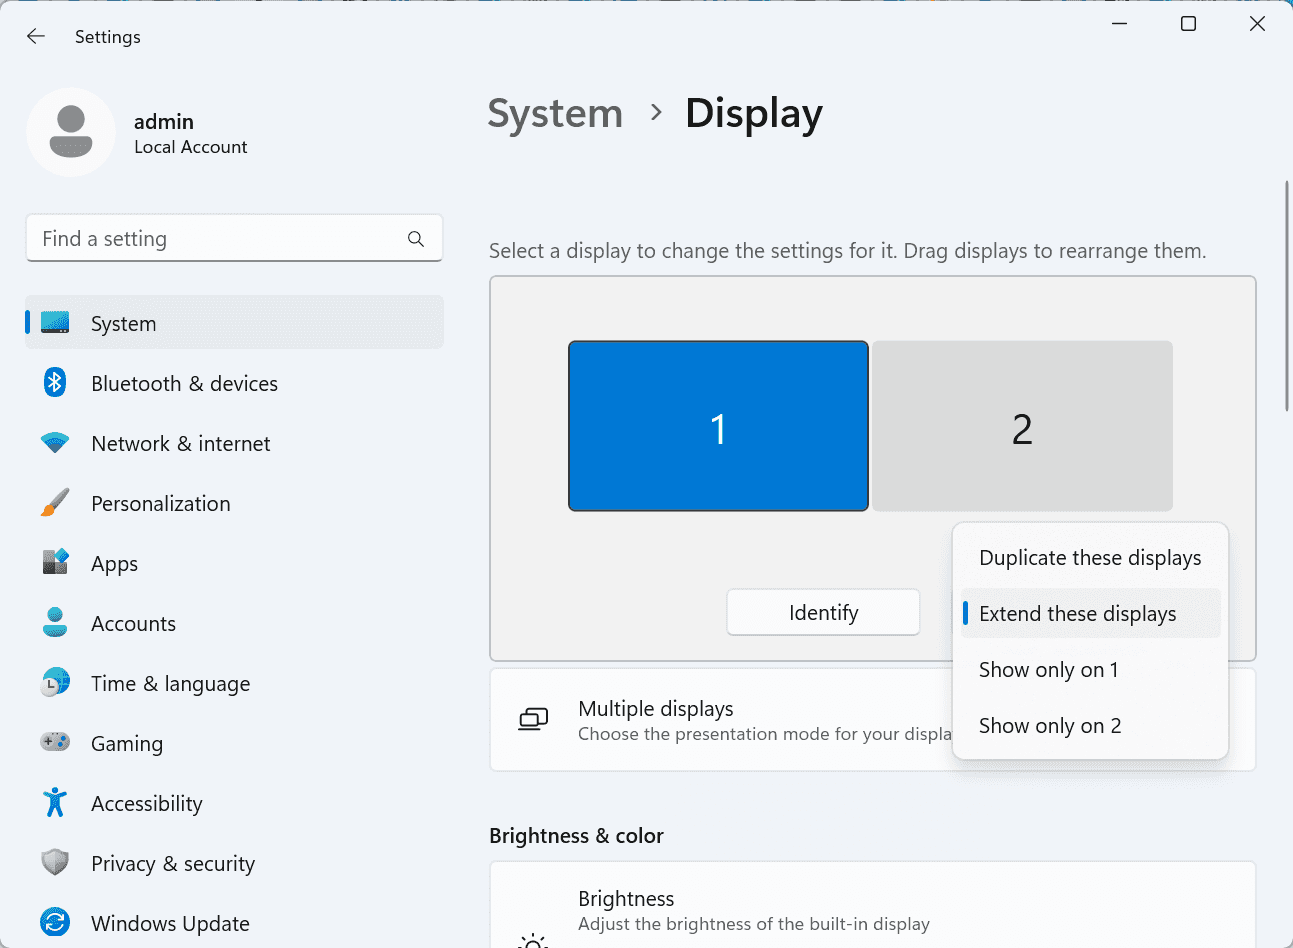
拡張後、iPadがコンピュータ画面の内容をミラーリングしているだけの場合はWindowsシステム設定 >>ディスプレイ設定に行き、「これらのディスプレイを拡張」を選択してください。2つの画面をドラッグして画面の位置を変更することもできます。
まとめ
この記事では、DeskInリモートデスクトップソフトウェアを使用してiPadをMacおよびWindowsコンピューターの「セカンドスクリーン」にする方法を紹介します。これは、同時に複数のタスクを処理し、生産性を向上させたい方に特に有用です。MacBook、iPad、Androidタブレット、およびWindows PCで動作する画面拡張ツールを探している場合、DeskInリモートデスクトップは最適なソリューションです。DeskInをダウンロードして、ぜひお試しください!

Top 6 RustDesk Alternative Tools for Faster, Easier Remote Access
Remote access should feel like flipping a light switch, not decoding a control panel. Yet many users exploring RustDesk eventually run into friction: connection IDs, server setup, or occasional lag. While RustDesk is powerful, it’s not always the easiest or smoothest option, especially for non-technical users.
That’s why more people are actively searching for a reliable RustDesk alternative that combines performance, simplicity, and flexibility. Whether you want a plug-and-play solution or something more advanced, this guide will help you find the best fit.
Why You Need a RustDesk Alternative (and How to Choose One)
RustDesk stands out as a privacy-friendly, self-hosted remote desktop tool. However, real-world usage reveals a few common challenges:
Complicated setup for the RustDesk self-hosted environments
Manual connection steps requiring IDs and passwords
Occasional latency or unstable connections
Limited user-friendly features out of the box
For many users, especially those helping family or managing multiple devices, simplicity matters just as much as control.
How to Choose the Right RustDesk Alternative
When evaluating a RustDesk alternative, focus on these key factors:
Ease of use: Quick setup without technical overhead
Performance: Smooth, low-latency remote sessions
Compatibility: Support for Windows, macOS, Linux, and mobile
Security: Strong encryption and access controls
Flexibility: Options ranging from cloud-based to open source
The ideal tool strikes a balance between power and convenience, something many modern solutions now deliver better than traditional setups.
Quick Comparison of the Best RustDesk Alternatives
Here’s a quick breakdown of the top tools and where they shine:
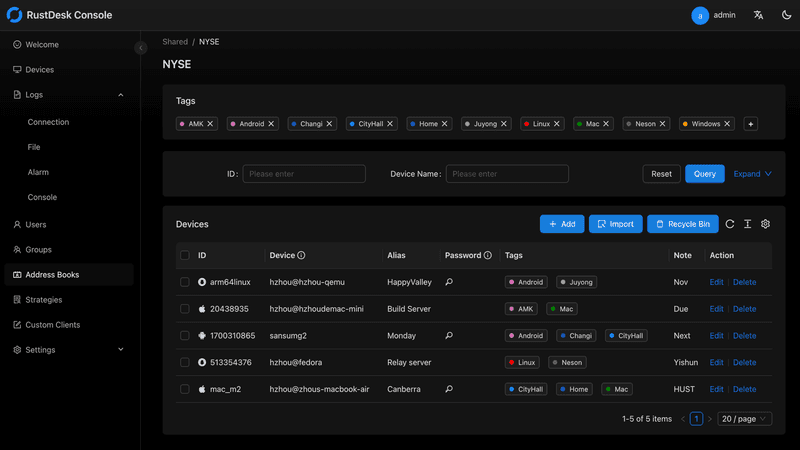
DeskIn – Best all-in-one RustDesk alternative for performance and ease of use
AnyDesk – Best lightweight tool for fast connections
TeamViewer – Best for enterprise-grade remote support
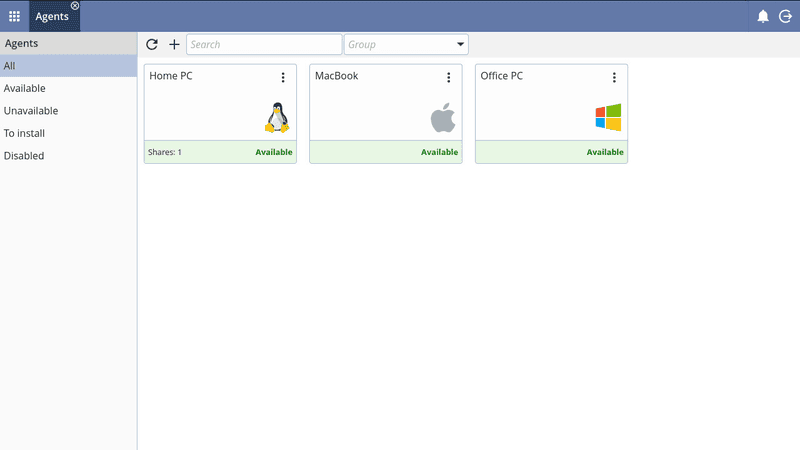
MeshCentral – Best open-source and self-hosted solution
DWService – Best free browser-based tool
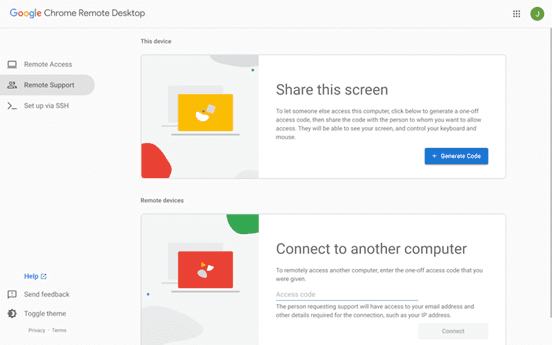
Chrome Remote Desktop – Best simple, no-frills option
1. DeskIn – Best RustDesk Alternative for Seamless Performance and Ease of Use
Pros
Ultra-low latency with smooth high-frame-rate streaming
No complex setup or server deployment required
Cross-platform including Rustdesk alternative for Android
Secure with encryption and device control features
Built-in file transfer and multi-device management
Cons
Smaller awareness than legacy competitors
Best for: Users who want a powerful yet simple remote desktop solution

DeskIn removes the friction that often comes with remote access tools. Instead of relying on IDs or manual configurations, it offers a streamlined connection experience that works right out of the box. This makes it especially valuable for users supporting non-technical family members or managing multiple remote devices.
Performance is where DeskIn truly distinguishes itself. Compared to RustDesk, which can sometimes struggle with latency, DeskIn delivers consistently smooth sessions with minimal lag. It also eliminates the need for self-hosting, making it a strong free RustDesk alternative option for users who want powerful features without the complexity.
For those exploring options beyond the RustDesk alternative GitHub projects, DeskIn provides a polished, ready-to-use experience that balances simplicity with professional-grade performance.
2. AnyDesk – Best Lightweight Alternative for Fast Connections
Pros
Lightweight and fast installation
Good performance on low bandwidth
Cross-platform support
Easy-to-use interface
Cons
Performance may drop during long sessions
File transfer can be inconsistent
Best for: Users needing quick and simple remote access

AnyDesk is often considered a natural step up from RustDesk for users who want something easier to deploy. It offers a lightweight application that connects quickly and performs well under normal conditions. This makes it suitable for quick troubleshooting or occasional remote access.
However, performance consistency can be an issue. Users frequently report lag or instability during extended sessions or when handling more demanding tasks. While AnyDesk is a solid option for basic needs, it may not fully satisfy users looking for a more robust, all-in-one solution.
👀 You may also be interested in: |
|---|
3. TeamViewer – Best for Enterprise Remote Support and Cross-Platform Access
Pros
Enterprise-grade security with encryption and 2FA
Stable performance across global networks
Rich features like file transfer and session recording
Broad device compatibility
Cons
Expensive for commercial use
Free version has limitations
Heavier resource usage on some systems
Best for: Businesses and IT teams managing multiple endpoints
TeamViewer has long been a dominant player in the remote desktop space, offering a comprehensive suite of features designed for enterprise environments. It excels in reliability and global connectivity, making it a popular choice for IT support teams.
That said, its pricing model is a major drawback for many users. Frequent users may quickly encounter licensing restrictions, and costs can escalate for businesses. Additionally, its heavier footprint can impact performance on lower-end devices. DeskIn offers a more modern alternative by delivering similar performance and essential features without the same cost barriers. For users who want enterprise-level capabilities with better efficiency, it presents a compelling option.
👀 You may also be interested in: |
|---|
4. MeshCentral – Best Open-Source Self-Hosted Alternative
Pros
Fully RustDesk alternative open source solution
Web-based management dashboard
Supports multi-device environments
Strong customization and control
Cons
Complex setup and maintenance
Requires technical expertise
Best for: Advanced users needing a Rustdesk alternative self-hosted
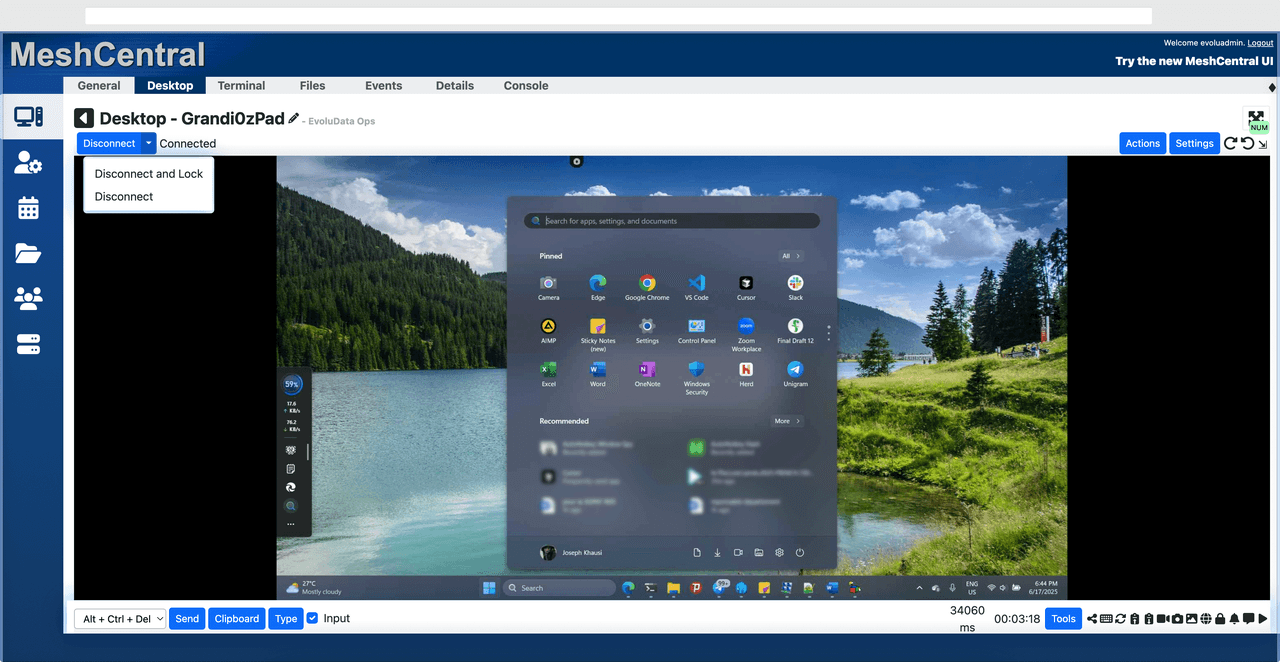
MeshCentral is a powerful open-source platform designed for users who want full control over their remote access infrastructure. It supports multiple devices and provides a centralized dashboard for management, making it attractive for IT professionals.
However, this flexibility comes with complexity. Setting up and maintaining a MeshCentral server requires technical knowledge, which can be a barrier for many users. Compared to this, DeskIn offers a much simpler deployment process while still delivering strong performance and security. For users who prioritize ease of use over full control, modern solutions like DeskIn provide a more accessible alternative.
5. DWService – Best Free and Browser-Based Alternative
Pros
Completely free
Browser-based access
Open-source foundation
Simple setup
Cons
Limited performance
Basic feature set
Best for: Users looking for a simple, free RustDesk alternative
DWService offers a browser-based approach to remote access with no heavy installation, making it convenient for quick connections in restricted environments. It supports both desktop access and file management across major platforms.
However, performance often feels sluggish, especially on demanding tasks, and features remain basic; lacking session recording, smooth multi-monitor support, or advanced security controls. While suitable for occasional personal use, it falls short for professional or high-performance scenarios.
6. Chrome Remote Desktop – Best Simple Remote Access Tool
Pros
Free and easy to use
Browser-based setup
Cross-platform compatibility
Cons
Very limited features
No advanced management or collaboration tools
Best for: Casual users needing basic remote access

Chrome Remote Desktop is one of the simplest remote access tools available. It’s easy to set up and works across devices, making it a convenient choice for occasional use.
However, it lacks many essential features such as file transfer, session management, and advanced security controls. For users with more demanding needs, it quickly becomes insufficient. Compared to Chrome Remote Desktop, DeskIn provides a much more complete experience without sacrificing ease of use, making it a better long-term solution.
👀 You may also be interested in: |
|---|
FAQs About Best RustDesk Alternatives
1. Why should I look for a RustDesk alternative?
RustDesk is powerful but can be difficult to set up and manage, especially with self-hosting. Many users prefer tools that offer similar performance without technical complexity. DeskIn simplifies remote access while maintaining strong performance and security.
2. What is the best free RustDesk alternative?
Several tools qualify as a free RustDesk alternative, including DWService and Chrome Remote Desktop. However, DeskIn stands out by offering better performance and usability even in its free version.
3. Is there an open-source alternative to RustDesk?
Yes, tools like MeshCentral and DWService are considered RustDesk alternative open source options. They provide flexibility and control but often require technical expertise to set up and maintain.
4. Which RustDesk alternative is best for beginners?
Beginners should choose tools with a simple setup and intuitive interfaces. DeskIn is an excellent option because it removes the need for manual configuration while still delivering advanced features.
Conclusion
RustDesk is a powerful starting point, but it’s not always the easiest or most efficient tool for everyday use. From setup complexity to performance limitations, many users eventually look for a better RustDesk alternative.
Among all the options, DeskIn stands out as the most balanced solution. It combines speed, simplicity, and cross-platform support into one seamless experience. If you’re ready to move beyond technical friction and enjoy truly smooth remote access, DeskIn is a choice that simply works.

Top 7 RDP Alternative Tools for Faster, Safer Remote Access
Remote desktop access used to feel like a solid bridge. Now, for many users, traditional RDP feels more like a creaky rope ladder. With performance issues, security concerns, and limited cross-platform support, it's no surprise that more people are actively searching for a better RDP alternative that actually keeps up with modern workflows.
If you're managing multiple servers, working across devices, or just tired of unstable connections, this guide will walk you through the best tools worth switching to.
What is RDP Desktop?
RDP (Remote Desktop Protocol) is a proprietary protocol developed by Microsoft that allows users to connect to another computer over a network. It's widely used for accessing Windows servers, virtual machines, and remote workstations.
While powerful in controlled environments, RDP is often tied to Windows systems and requires configuration like port forwarding or VPNs. Compared to newer tools, it can feel rigid and outdated.
You may also be interested in: |
|---|
Why You Need an RDP Alternative
RDP still works, but it comes with trade-offs that many users find frustrating:
Security risks if not properly configured
Complex setup for remote or external access
Limited cross-platform compatibility
Performance issues over unstable networks
Many IT teams are now actively replacing it, especially when looking for a Windows RDP client alternative or something that works seamlessly across macOS, Linux, and mobile devices. That's where modern Remote Desktop alternatives shine.
Quick Comparison of the Best RDP Alternatives
Choosing the right tool is like picking the right vehicle. Some are built for speed, others for heavy-duty enterprise work. Here's a quick snapshot:
DeskIn – Best all-in-one RDP alternative for performance and cross-platform use
TeamViewer – Best for enterprise remote support
AnyDesk – Best lightweight option for fast connections
RustDesk – Best Windows RDP alternative open-source solution
Remmina – Best RDP alternative for Linux users
Chrome Remote Desktop – Best simple browser-based tool
Splashtop – Best for high-performance business environments
1. DeskIn – Best RDP Alternative for Cross-Platform Performance
Pros
Ultra-low latency with smooth high-frame-rate streaming
Works across Windows, macOS, Linux, iOS, and Android
Strong encryption and secure access controls
Built-in file transfer and multi-session support
Cons
Newer compared to legacy brands
Best for: Users who want a powerful, flexible RDP alternative

DeskIn feels less like remote access and more like teleportation for your desktop. Whether you're managing servers, supporting clients, or working remotely, it delivers consistently smooth performance without the usual lag spikes seen in traditional RDP setups.
Unlike many tools, DeskIn eliminates the need for complex configurations. You don't need to wrestle with firewalls or VPNs just to connect. It also works seamlessly across platforms, making it a strong alternative to Microsoft Remote Desktop for Mac and mobile users alike.
For teams juggling multiple systems, DeskIn provides a unified experience that replaces fragmented workflows. It's also a strong free RDP alternative option with premium-level capabilities, making it ideal for both individuals and businesses.
2. TeamViewer – Best for Enterprise Remote Support
Pros
Enterprise-grade security and compliance
Extensive feature set including collaboration tools
Cross-platform compatibility
Reliable global performance
Cons
Expensive licensing
Can be overkill for individuals
Best for: Enterprises needing secure and scalable remote access
TeamViewer is a comprehensive remote desktop platform widely adopted by IT teams, support professionals, and enterprises. Its feature set extends far beyond simple screen sharing—it includes robust device management, remote printing, file transfer, session recording, and even augmented reality support for field service. TeamViewer's security architecture relies on AES‑256 encryption, two‑factor authentication, and whitelisting, making it suitable for organizations with strict compliance requirements. It runs on virtually every operating system and mobile platform.
The main trade‑off is its pricing: licenses are subscription‑based and can become expensive for small teams or individual users, especially as TeamViewer aggressively flags personal use as commercial, leading to session restrictions.
3. AnyDesk – Best Lightweight RDP Alternative for Speed
Pros
Fast and responsive
Lightweight installation
Works well on low bandwidth
Easy to use
Cons
File transfer can be inconsistent
Lag during longer sessions
Best for: Users needing quick, simple remote access
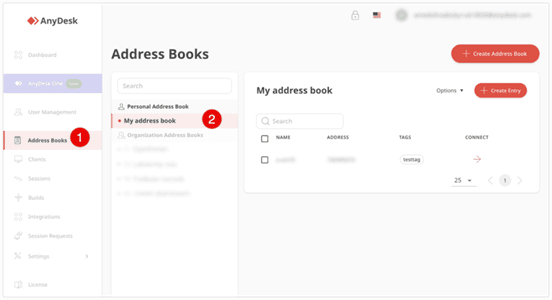
AnyDesk is a lightweight remote desktop application prized for its speed and efficiency, often recommended as a fast alternative to Microsoft's native Remote Desktop on Windows 10 and Android. It uses a proprietary video codec, DeskRT, to achieve low latency even on limited bandwidth, making it ideal for quick support sessions and accessing devices over mobile networks. The interface is clean and minimalist, with features like address book management, file transfer, and session recording available.
However, users frequently report instability during extended sessions; performance can degrade over time, and file transfers may slow considerably compared to competitors. While its free version is generous for personal use, professional users often find the performance ceiling limits its suitability for continuous, demanding workloads. DeskIn, by contrast, maintains consistent performance even during extended use, making it better suited for professional workloads.
You may also be interested in: |
|---|
4. RustDesk – Best Open-Source RDP Alternative for Privacy
Pros
Free and open-source
Self-hosting for full control
Strong privacy protection
Active community
Cons
Technical setup required
Limited user-friendly features
Best for: Developers and privacy-focused users
RustDesk has emerged as a leading open‑source remote desktop alternative, appealing to developers and organizations that require full control over their data. It allows users to self‑host the relay and rendezvous servers, meaning no third‑party infrastructure handles connection metadata. Built with Rust, it offers a modern codebase with cross‑platform clients (Windows, macOS, Linux, Android, iOS) and supports essential features such as file transfer, TCP tunneling, and customizable address books.
The major barrier is its complexity: deploying a self‑hosted environment requires technical expertise to configure firewalls, SSL certificates, and ongoing server maintenance. For those using the public relay, performance can be inconsistent depending on server load and geographic proximity.
You may also be interested in: Top RustDesk Alternatives for Better Performance, Security & Ease of Use |
|---|
5. Remmina – Best Linux RDP Alternative
Pros
Open-source and free
Supports multiple protocols including RDP and VNC
Lightweight and flexible
Native to Linux environments
Cons
Limited features compared to modern tools
UI can feel outdated
Best for: Linux users looking for a traditional RDP alternative Linux
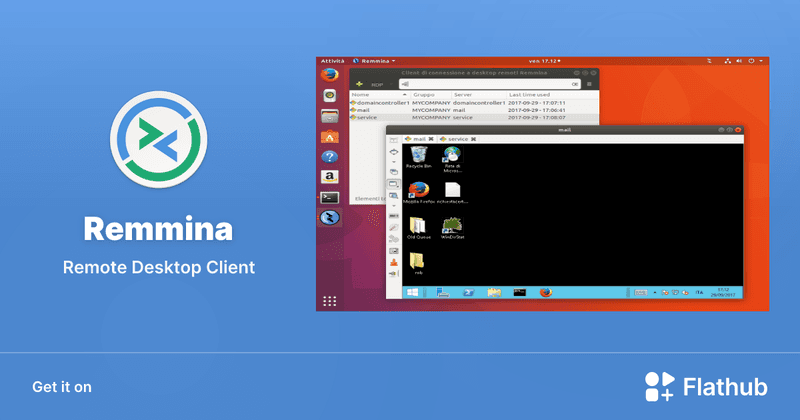
Remmina is a beloved open‑source remote desktop client for Linux, supporting multiple protocols (RDP, VNC, SSH, SPICE, and others) in a single unified interface. It is frequently chosen by system administrators and Linux enthusiasts who need a flexible, lightweight tool to manage diverse environments. Remmina offers tabbed sessions, quick‑connect profiles, and a plugin system that extends its capabilities.
However, its strength - protocol flexibility, also highlights its limitations. As a frontend client rather than a full remote access solution, it lacks features like unattended access, centralized account management, or robust session recording out of the box. Performance can vary by protocol, and the user experience lags behind more polished commercial tools, particularly for users seeking a plug‑and‑play setup.
6. Chrome Remote Desktop – Best Free and Simple Option
Pros
Free and easy to use
Browser-based setup
Cross-platform access
Cons
Very limited features
No advanced management tools
Best for: Casual users needing basic remote access

Chrome Remote Desktop is a free, browser‑based remote access tool from Google that requires nothing more than a Chrome browser and a Google account. It excels in simplicity: installation takes seconds, and connections are mediated through Google's infrastructure, eliminating complex firewall configurations. For occasional use—such as helping a family member or quickly accessing a home computer—it works reliably across Windows, macOS, Linux, and even ChromeOS.
The trade‑off is its minimal feature set. There is no native file transfer, multi‑session management, remote printing, or granular permission controls. Collaboration tools are absent, and the reliance on a Google account for authentication can be a limitation in professional environments. It remains a convenient entry‑level tool but struggles to meet the needs of power users or IT teams.
You may also be interested in: |
|---|
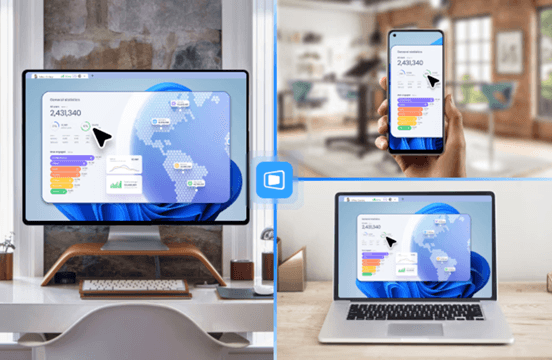
7. Splashtop – Best for High-Performance Business Use
Pros
High-quality streaming performance
Strong security features
Good for business environments
Reliable connections
Cons
Subscription-based pricing
Limited free version
Best for: Businesses needing performance-focused remote access
Splashtop is a high‑performance remote desktop solution frequently adopted by creative professionals, educational institutions, and enterprises that prioritize fluid interaction. It delivers low‑latency streaming with support for high‑frame‑rate displays, making it suitable for video editing, CAD work, and other graphics‑intensive tasks. Splashtop offers a range of editions—from Business Access to SOS for on‑demand support—all of which include robust security (AES‑256, device authentication) and features like file transfer, remote printing, and multi‑monitor navigation. Its performance over local networks and the internet is consistently praised.
The primary drawback is cost: while competitive, the subscription model can accumulate quickly for users needing access to multiple devices or advanced features, especially when compared to similarly capable tools with more flexible pricing structures. DeskIn offers similar performance benefits with a more flexible pricing structure, making it a compelling alternative.
You may also be interested in: |
|---|
FAQs About Best RDP Alternatives
Why should I look for an RDP alternative?
RDP can be difficult to configure, less secure if exposed, and limited outside Windows environments. Modern tools like DeskIn provide better performance, security, and ease of use.
What is the best RDP alternative?
The best RDP alternative depends on your needs, but DeskIn stands out for its balance of speed, security, and cross-platform compatibility.
Is there a free RDP alternative?
Yes, several tools qualify as an RDP alternative free, including RustDesk and Chrome Remote Desktop. DeskIn also offers a free tier with advanced capabilities.
Is Microsoft shutting down RDP?
Microsoft is evolving its remote desktop ecosystem, but traditional RDP isn't disappearing overnight. However, many users are already transitioning to more modern solutions like DeskIn for better reliability and flexibility.
Conclusion
RDP has served its purpose, but the digital world has outgrown its limitations. Whether you need better performance, stronger security, or true cross-platform access, switching to a modern RDP alternative is no longer optional, it's inevitable.
Among all the options, DeskIn stands out as a future-ready solution. It combines speed, simplicity, and power into one seamless experience, helping you leave behind the friction of traditional remote desktop tools and step into something far more efficient.

Top 10 Splashtop Alternative Tools for Faster, More Reliable Remote Access (2026)
If your remote desktop tool has started to feel like a buffering video at the worst possible moment, you're not alone. Many users are actively searching for a better Splashtop alternative due to rising costs, laggy connections, and limited flexibility. Whether you're managing remote IT support or simply accessing your work computer from home, the right tool can turn frustration into seamless control. Let’s dive into the best options available today.
Key Features to Look for in a Splashtop Alternative
Before switching, it’s worth knowing what actually matters. A great remote desktop tool should offer:
Smooth performance with low latency and high frame rates
Strong security like AES-256 encryption and 2FA
Cross-platform compatibility (desktop + mobile)
Easy setup and intuitive interface
Transparent pricing without hidden increases
Stable unattended remote access
These factors define the best remote desktop experience in 2026.
Quick Comparison of the Best Splashtop Alternatives
Tool | Pros | Cons | Best For |
|---|---|---|---|
High performance, affordable, smooth | Newer brand | High-quality remote work | |
AnyDesk | Lightweight, fast | Security limits | Quick sessions |
TeamViewer | Secure, scalable | Expensive | Enterprises |
Chrome Remote Desktop | Free, simple
| Limited features | Personal use |
Zoho Assist | Clean UI, integrations | Stability issues | IT support |
RemotePC | Affordable | Performance inconsistency | SMBs |
RealVNC | Secure | Occasional disconnects | Secure access |
LogMeIn | Feature-rich | High cost | Enterprises |
ScreenConnect | Powerful | Complex setup | MSPs |
RustDesk | Open-source | Technical setup | Developers |
1. Best Splashtop Alternative for High-Performance Remote Work - DeskIn
Pros
Up to 4K 60FPS/2K 240FPS ultra-smooth remote control
Low latency even across long distances
Competitive pricing with strong value
Cross-platform including mobile
Cons
Smaller brand awareness
Best for: Performance-driven users and remote professionals
DeskIn is designed for users who are tired of lag and blurry screens. It delivers a near-local experience, making it ideal for developers, designers, and remote teams who rely on precision and speed. Compared to many traditional tools, it feels significantly more responsive.
Beyond performance, DeskIn balances cost and capability extremely well. If you're looking for a free alternative to Splashtop or a scalable upgrade, it offers a compelling mix of speed, security, and usability. Many users consider it a strong case where DeskIn is better than Splashtop, especially when stability matters.
2. AnyDesk - Lightweight and Fast for Quick Access
Pros
Very lightweight installation
Fast connections on low bandwidth
Easy to use interface
Cons
Limited advanced security features
Occasional connection instability
Best for: Quick remote support and simple workflows
AnyDesk is frequently recommended as a Splashtop alternative thanks to its exceptional speed and minimal system footprint. The installer is just a few megabytes, and the application runs smoothly even on older hardware. It performs particularly well in low‑bandwidth environments, where its proprietary video codec maintains responsive connections during quick troubleshooting sessions.
That said, users who require consistently high frame rates, crisp visuals for design work, or advanced session management may find AnyDesk’s simplicity limiting. While it handles basic tasks admirably, power users often need more stability and richer feature sets.
You may also be interested in:
3. TeamViewer - Enterprise-Grade Remote Access
Pros
Strong security (AES-256, 2FA)
Wide device compatibility
Mature ecosystem and features
Reliable remote support tools
Cons
Expensive pricing plans
Can feel heavy for small teams
Best for: Enterprises and large organizations
TeamViewer has long been a dominant force in remote desktop software, trusted by IT departments and enterprises worldwide. Its comprehensive feature set includes remote support, meeting tools, file transfer, and even augmented‑reality assistance, all secured with AES‑256 encryption and two‑factor authentication.
However, this power comes at a price—literally. TeamViewer’s licensing model can be prohibitively expensive for smaller businesses or individual users. The interface, while feature‑rich, can also feel cluttered for those who simply need unattended access to a few computers.
You may also be interested in:
4. Chrome Remote Desktop - Simple and Free
Pros
Completely free to use
Easy browser-based setup
Works across devices
Cons
Very limited features
Not suitable for business use
Best for: Individuals needing a free remote desktop
Chrome Remote Desktop is the ultimate choice for users seeking a straightforward, completely free remote access solution. Setup takes less than a minute: install the browser extension, authenticate with your Google account, and you can instantly access any computer from another device.
The trade‑off for this simplicity is a very limited feature set. There is no file transfer, multi‑monitor switching, remote printing, or session recording. Users who find themselves needing more than bare‑bones access will see a significant boost in efficiency and experience by upgrading to a dedicated tool like DeskIn, which retains ease of use while adding the features power users rely on.
You may also be interested in:
5. Zoho Assist - Clean and Business-Friendly
Pros
Intuitive interface
Good integrations with Zoho ecosystem
Cloud-based access
Cons
Occasional performance issues
Limited advanced features
Best for: IT helpdesk teams
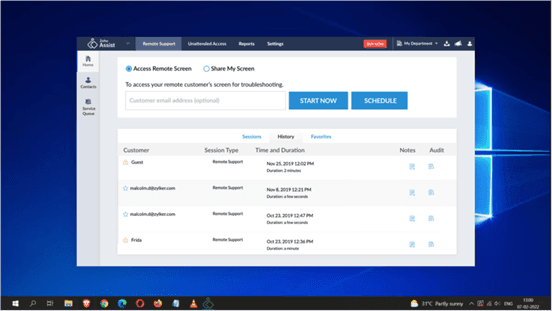
Zoho Assist delivers a clean, well‑organized remote support experience that integrates naturally with the broader Zoho ecosystem. Its dashboard is intuitive, making it easy for helpdesk teams to manage clients, schedule sessions, and generate reports. For organizations already using Zoho CRM or other Zoho applications, the seamless integration streamlines workflows and reduces the need to switch between different tools.
Despite its polished interface, performance consistency can be an issue, especially during file transfers or when connecting to machines with slower internet connections. The feature set, while sufficient for standard helpdesk operations, lacks some of the advanced controls that IT professionals expect for more complex troubleshooting.
6. RemotePC - Budget-Friendly Alternative
Pros
Affordable pricing
Easy setup
Supports multiple devices
Cons
Performance can vary
Limited advanced capabilities
Best for: Small businesses and budget users
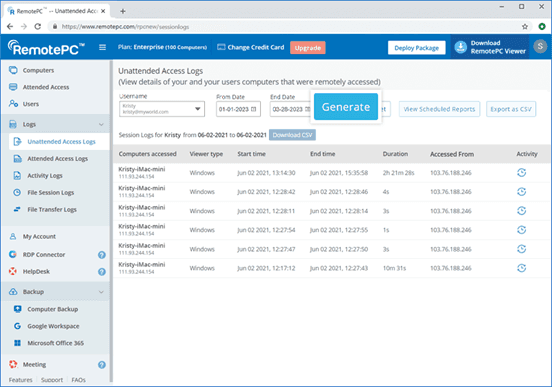
RemotePC positions itself as a budget‑friendly alternative for users who need basic remote access without a steep learning curve. Setup is straightforward, and the pricing structure is refreshingly simple—affordable plans that allow connection to multiple computers without hidden fees. It covers essential features like remote printing, file transfer, and even a simple chat function, making it a practical choice for small businesses and individual users.
However, performance can vary depending on network conditions and the specific devices being connected. Some users report occasional lag or reduced frame rates, which can become frustrating during extended sessions.
7. RealVNC – Secure and Reliable
Pros
Strong encryption and security
Customisable setup
Reliable remote connections
Cons
Occasional login interruptions
Slight learning curve
Best for: Security-focused users
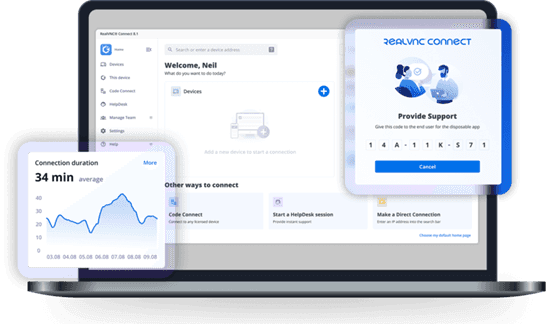
RealVNC has built a strong reputation for secure remote access. It uses robust encryption and offers granular permission controls, allowing administrators to tailor access levels for different users. The platform is highly customizable, supporting on‑premises deployments as well as cloud‑based options, which appeals to organizations with strict security requirements.
While security is clearly its strength, the user experience can sometimes feel less polished than newer competitors. Occasional login interruptions and a steeper configuration curve mean that getting the most out of RealVNC often requires technical expertise. For businesses that need both enterprise‑grade security and consistently high performance without complex setup, a more balanced solution, such as DeskIn, can deliver the best of both worlds, combining strong encryption with a streamlined, speed‑optimized experience.
8. LogMeIn - Feature-Rich but Expensive
Pros
Comprehensive feature set
Strong integrations
Good for collaboration
Reliable access
Cons
High pricing
Overkill for simple use cases
Best for: Enterprises needing all-in-one solutions
LogMeIn provides a comprehensive toolkit that extends far beyond simple remote desktop access. It includes robust file storage, collaboration features, and extensive integration options, making it well‑suited for enterprises that want an all‑in‑one remote work platform. The service is known for its reliability and strong customer support, which can be critical for large organizations managing hundreds or thousands of endpoints.
The main drawback is the cost. LogMeIn’s pricing plans are among the highest in the industry, and the feature set can be overwhelming for users who only need occasional remote access. Many of its advanced capabilities go unused by smaller teams, making it difficult to justify the expense.
9. ScreenConnect - Built for IT Professionals
Pros
Highly customizable
Remote support features
Multi-session support
Cons
Complex setup
Difficult to manage at scale
Best for: MSPs and IT teams
ScreenConnect (now part of ConnectWise) is a powerful, highly customizable remote support platform built with IT professionals and managed service providers in mind. It excels at multi‑session management, allowing technicians to handle several concurrent connections from a single interface. The level of granular control, over permissions, session recording, and even the appearance of the client UI, makes it a favorite among those who need to tailor the software to specific operational workflows.
However, this flexibility comes with a steep learning curve. Initial setup and ongoing management can be complex, especially for smaller teams without dedicated IT administration. For teams seeking a powerful yet approachable solution, DeskIn offers a streamlined alternative that delivers professional‑grade reliability and speed without the administrative overhead.
10. RustDesk – Open-Source Flexibility
Pros
Free and open-source
Self-hosting options
Strong privacy control
Cons
Requires technical setup
Limited support
Best for: Developers and privacy-focused users
RustDesk appeals to developers and privacy‑conscious users who want full control over their remote access infrastructure. As an open‑source solution, it allows self‑hosting on private servers, ensuring that no session data ever passes through third‑party servers. This transparency and autonomy are highly valued by organizations with strict data sovereignty requirements or those simply wishing to avoid vendor lock‑in.
The flip side is that RustDesk requires technical expertise to deploy and maintain. Users must manage their own servers, handle updates, and troubleshoot connection issues without dedicated commercial support. While the core software is free, the total cost of ownership in time and resources can be significant.
You may also be interested in:
FAQs About Best Splashtop Alternatives
1. What is the best Splashtop alternative?
DeskIn is one of the strongest options due to its balance of performance, pricing, and usability. TeamViewer and AnyDesk are also popular choices.
2. Is there a Splashtop alternative free?
Yes, Chrome Remote Desktop and RustDesk are free options. DeskIn also offers a competitive free plan with better performance.
3. What is the best remote desktop software in 2026?
The best remote desktop tools combine speed, security, and ease of use. DeskIn stands out for performance, while TeamViewer excels in enterprise environments.
4. Are there mobile-friendly options?
Yes, most tools support mobile, making them suitable as a Splashtop alternative for Android or a Splashtop alternative for iPad.
5. Why are users switching from Splashtop?
Many users cite high Splashtop pricing, lag issues, and limited scalability as reasons to explore alternatives.
Conclusion
Finding the right Splashtop alternative is less about replacing a tool and more about upgrading your workflow. While options like AnyDesk and TeamViewer each have their strengths, DeskIn stands out by combining high performance, smooth visuals, and cost efficiency in one package. If you want a remote desktop experience that feels fast, stable, and future-ready, DeskIn is easily one of the smartest choices you can make today.

Is DeskIn Safe to Use? Everything You Need to Know
When considering a remote desktop tool, one question always comes first: Is DeskIn safe? After all, you're not just accessing a device; you're potentially exposing files, data, and even real-time activity across networks.
The short answer is yes, DeskIn is designed with strong security measures in place. But understanding why it's safe, and how that safety actually works in real-world use, is what truly matters. This guide breaks it down in a clear, practical way so you can decide with confidence.

What Does "Safe" Really Mean for Remote Desktop Software?
Before answering is DeskIn safe to use, it helps to define what "safe" actually means in the context of remote desktop software.
Security isn't just one feature. It's a layered system that protects different aspects of your connection. First, there's data security, which ensures that everything transmitted between devices is encrypted and unreadable to outsiders. Then comes access control, which determines who can connect to your device and under what conditions.
Privacy protection is another key layer. This includes features that prevent others from seeing your screen or accessing sensitive inputs without permission. Finally, account security ensures that even if someone tries to break in, additional verification steps stop unauthorized access. A remote desktop tool is only truly safe when all of these layers work together.
👀 What Is DeskIn Used For? (And Why Security Matters)
To fully understand whether DeskIn is safe, it helps to look at what DeskIn is used for. DeskIn is commonly used for remote work, IT support, cross-device file access, and even high-performance tasks like design or development. These scenarios often involve sensitive data, which makes security not just important, but essential.
Users benefit from DeskIn's stable connection and low-latency performance, but those advantages only matter if the connection is secure. That's why security features are deeply integrated into the platform rather than treated as optional extras.
How DeskIn Protects Your Data and Privacy
DeskIn approaches security as a complete system with multiple protective layers, addressing common concerns about whether the platform is safe and legit for daily use. Here's how it keeps your data secure.
1. End-to-End Encryption
All connections use AES-256 encryption, the same standard trusted by banks and financial institutions. This ensures your data remains protected during transmission, even on public or unsecured networks.
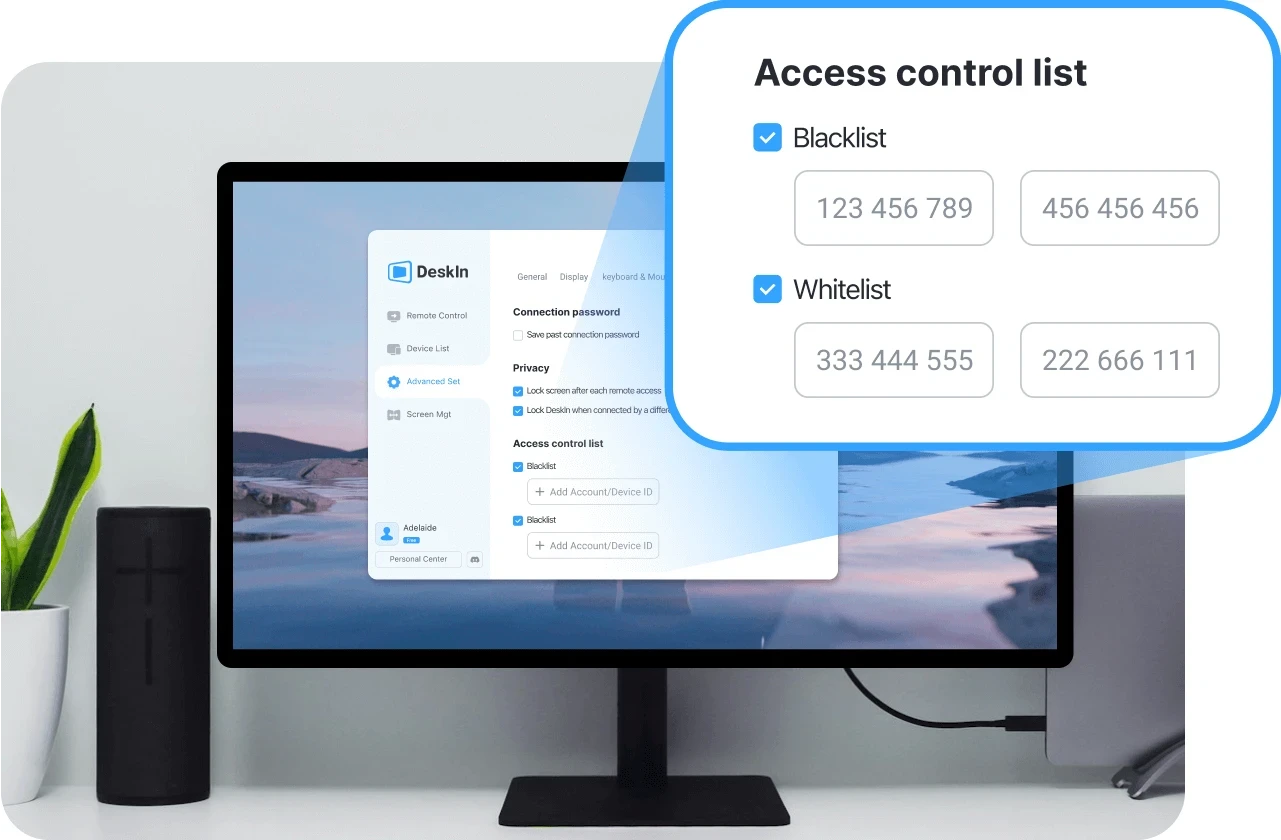
2. Multi-Layered Access Control
Beyond passwords, DeskIn requires various verifications: user access, blacklisting IP and device verification. Even if login credentials are compromised, unauthorized users cannot access your device without passing these additional checks.
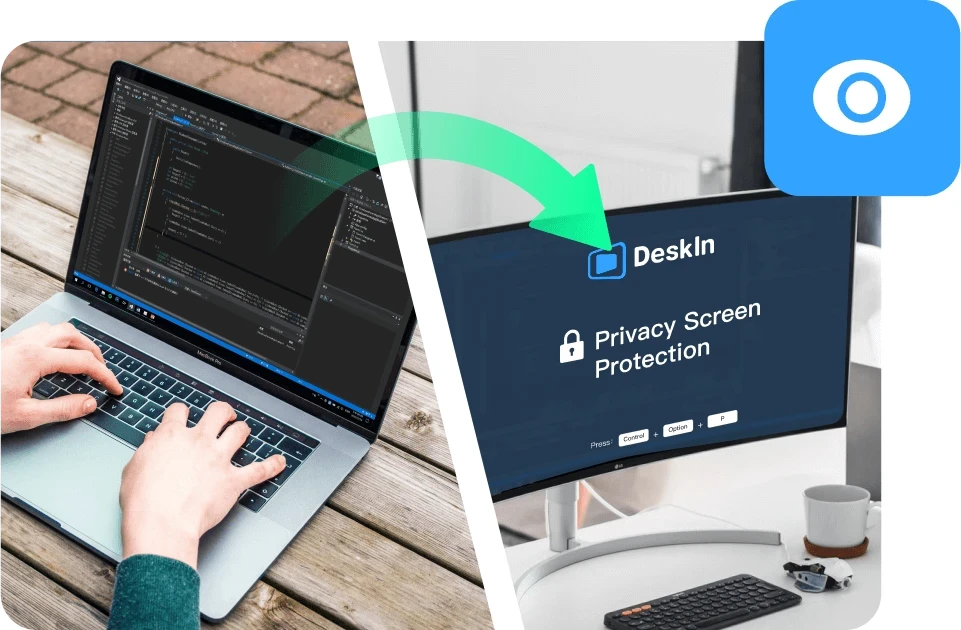
3. Privacy-Focused Features
Privacy screen mode lets you black out the host display during sessions, preventing anyone nearby from viewing your activity. Granular permission settings also give you control over file, audio, and input access.
4. Proven Reliability for Daily Use
These security layers work together to make DeskIn a safe choice for everyday workflows, whether you're accessing personal files or managing professional systems remotely.
👀 You may also be interested in
Is DeskIn Safe from Hackers? (Real Risk Analysis)
A more specific concern many users have is: Is DeskIn safe from hackers?
The reality is that no remote desktop software is completely risk-free, but the level of risk depends heavily on how the software is designed and how it's used.
DeskIn minimizes risk through encryption, authentication, and access controls. These features make unauthorized access extremely difficult. However, like any online tool, user behavior still plays a role. Weak passwords, sharing access credentials, or using unsecured devices can introduce vulnerabilities.
In practice, High-definition Remote Desktop App DeskIn provides the tools needed for a secure environment. As long as users follow basic security practices, the likelihood of unauthorized access remains very low.
Is DeskIn Safe on Mobile Devices (iPhone & Android)?
Mobile access introduces another layer of concern, especially for users asking is DeskIn safe for iPhone or is DeskIn safe for Android.
DeskIn is designed to maintain the same level of security across devices. Data transmitted between your phone and remote computer is still encrypted, and login protection remains in place through authentication features.
Unlike some remote tools, DeskIn does not require risky system modifications such as rooting or jailbreaking. This significantly reduces potential vulnerabilities on mobile devices. Whether you're accessing a work computer from an iPad or managing files through your phone, the security model remains consistent, making it a safe option for cross-device use.
Is DeskIn Free to Use? And Does Free Mean Less Secure?
Another common question is whether DeskIn is free to use, and more importantly, does free access affects security. DeskIn does offer a free version, but security features are not reduced or removed in lower-tier plans. Encryption, authentication, and access control remain in place regardless of pricing.
Security is part of the core infrastructure, not a premium add-on. This means users can still benefit from a secure connection even when using the free version.
Tips to Use DeskIn Safely (Best Practices)
Even with strong built-in protection, safe usage also depends on your own habits. Following a few key practices can help you maintain control over your account and devices:
Use strong passwords: Create unique, complex passwords for your DeskIn account to prevent unauthorized access through credential guessing.
Enable two-factor authentication: Adding this extra verification step ensures that even compromised passwords won't grant access to your device.
Never share access credentials: Keep your login details private and avoid sharing them with others, even temporarily.
Always log out after sessions: End remote connections when they're no longer needed to prevent unattended access to your system.
Keep devices updated: Regular updates ensure you have the latest security patches and protection against emerging vulnerabilities.
Final Verdict: Is DeskIn Safe and Reliable?
So, is DeskIn safe?
In most practical scenarios, the answer is yes. Its combination of encryption, authentication, and access control creates a secure environment for remote access, whether you're working from home or managing devices across locations.
At the same time, security is always a shared responsibility. DeskIn provides the foundation, but safe usage habits ensure the best protection. When both work together, DeskIn becomes a reliable and secure choice for remote desktop access.

MacからWindowsを操作!Chromeリモートデスクトップの設定方法と注意点 | DeskIn
はじめに:OSの壁を越えるリモートアクセスの必要性
Macユーザーが直面する大きな課題の「壁」、それはWindows専用ソフトの使用です。
CADや会計ソフト、あるいはWindowsでしか動作しないPCゲームなど、特定のソフトウェアを動かすためだけに、わざわざWindows機を買い足す必要はありません。Googleが提供する無料ツール「Chrome リモート デスクトップ」を使えば、今手元にあるMacから、遠隔地にあるWindowsを驚くほど簡単に操作できるようになります。
本記事では、MacからWindowsへ接続するための最短設定ガイドと、実際に使ってわかったクロスプラットフォーム(Mac-Win間)ならではの「見落としがちな注意点」を詳しく解説します。
設定手順:Mac から Windows へ接続するための設定手順
Chrome リモート デスクトップの設定は非常にシンプルですが、操作される側(Windows)と操作する側(Mac)の両方で準備が必要です。最短で接続を完了させるための手順を解説します。
Windows(ホスト側)での準備
まずは、操作される側の Windows パソコンでリモートアクセスを許可する設定を行います。
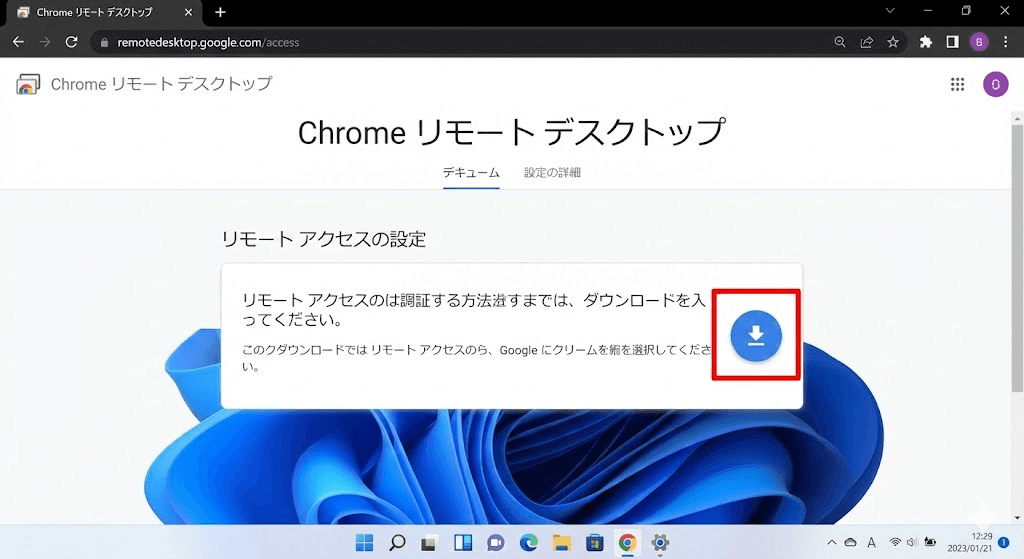
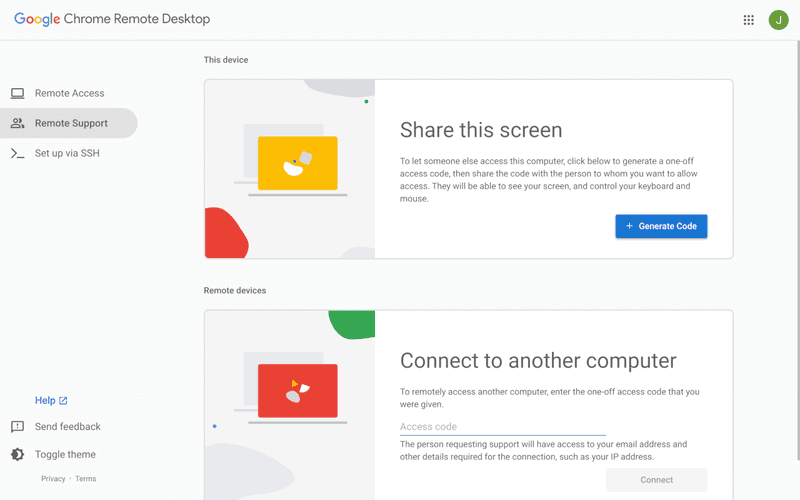
拡張機能とインストーラーの導入 Chrome ブラウザでChrome リモート デスクトップのアクセス設定ページを開き、「リモートアクセスの設定」から青色のダウンロードアイコンをクリックします。指示に従って Chrome 拡張機能を追加し、インストーラー(.msiファイル)を実行してください。
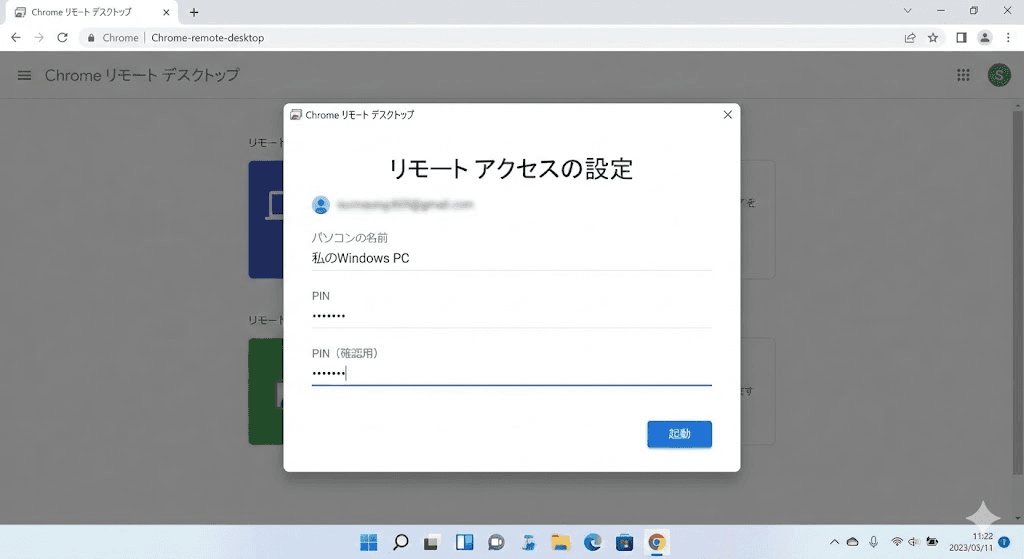
パソコンの名前と PIN コードの設定 インストール完了後、Windows パソコンに任意の名前を付けます。次に、6桁以上の PIN コード(暗証番号)を設定します。この PIN は Mac から接続する際に毎回必要になるため、忘れないようにメモしておきましょう。
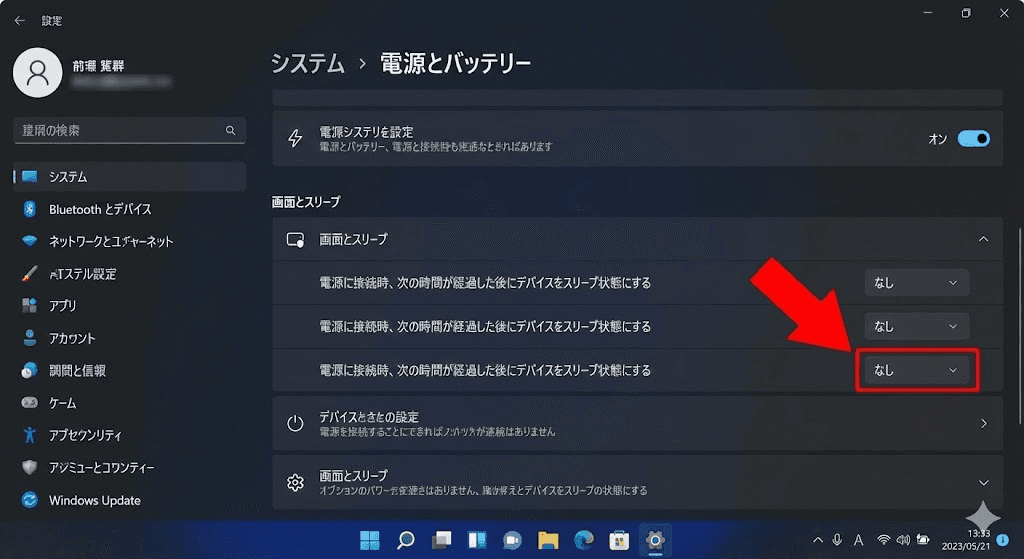
【重要】注意点:スリープモードの解除 ここが最も見落としやすいポイントです。Windows がスリープ状態になると、Mac から接続できなくなります。
「設定」>「システム」>「電源とバッテリー」を選択します。
「画面とスリープ」の設定で、電源接続時に「次の時間が経過後、デバイスをスリープ状態にする」を「なし」に変更してください。
Mac(クライアント側)からの操作
Windows 側の設定が終われば、あとは Mac からアクセスするだけです。
アクセスサイトへログイン
Mac の Chrome ブラウザで同じアクセス設定ページを開きます。Windows 側で使用したのと同じ Google アカウントでログインしていることを確認してください。
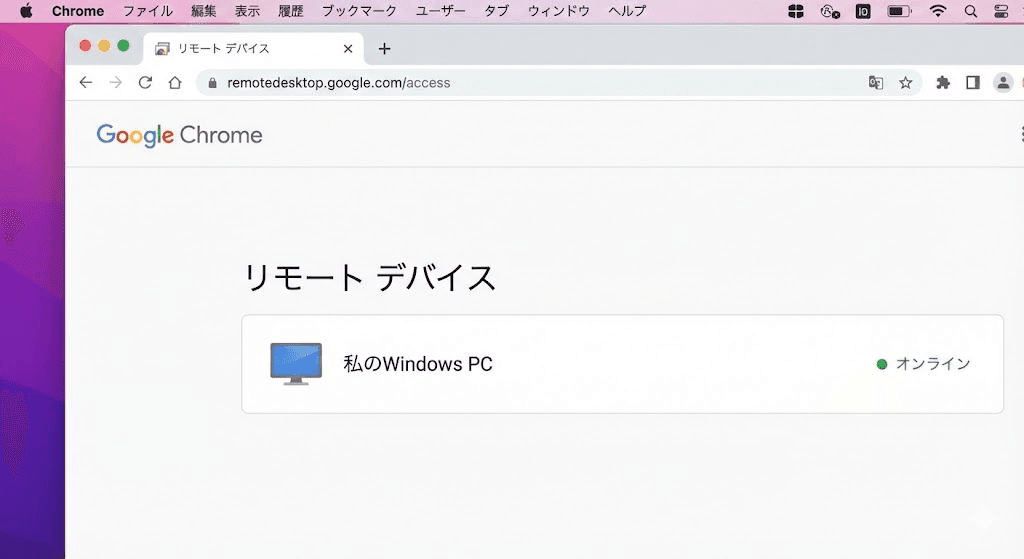
ターゲットの選択と認証
「リモートデバイス」の一覧に、先ほど設定した Windows パソコンの名前が表示されます。それをクリックすると PIN コードの入力画面が表示されます。
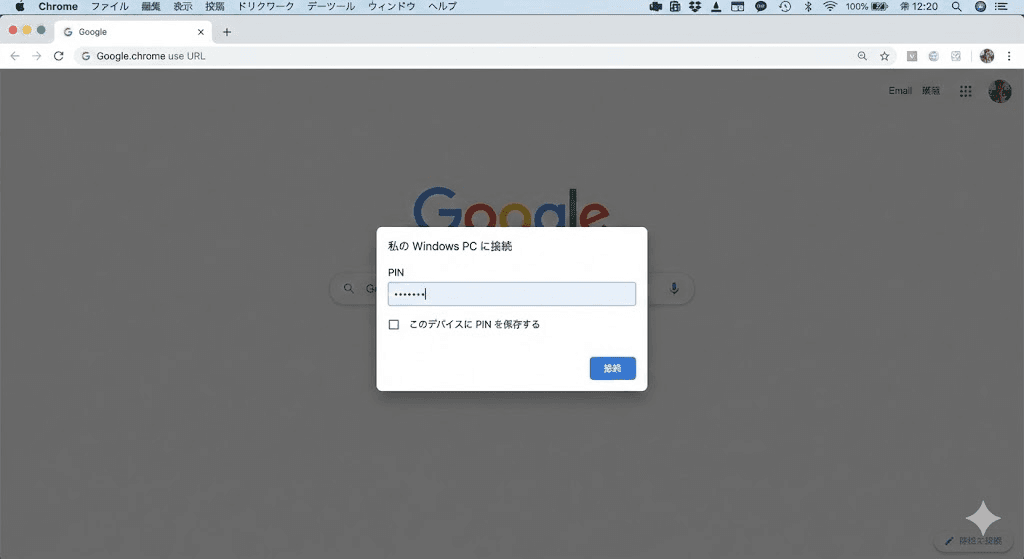
接続完了
正しい PIN を入力すれば、Mac のブラウザ内に Windows のデスクトップ画面が表示されます。これで、Mac のキーボードとマウスを使って Windows を操作できるようになります。
ヒント: よりスムーズにアクセスしたい場合は、Chrome の「アプリとしてインストール」機能を使って、Dock に Chrome リモート デスクトップを登録しておくのがおすすめです。
Mac-Windows間の操作における注意点と限界
Chrome リモート デスクトップは導入こそ簡単ですが、実際に Mac から Windows を操作し始めると、「OS の違い」に起因するいくつかの課題が出てきます。これらは作業効率に直結するため、あらかじめ理解しておく必要があります。
H3: キーボードマッピングの競合
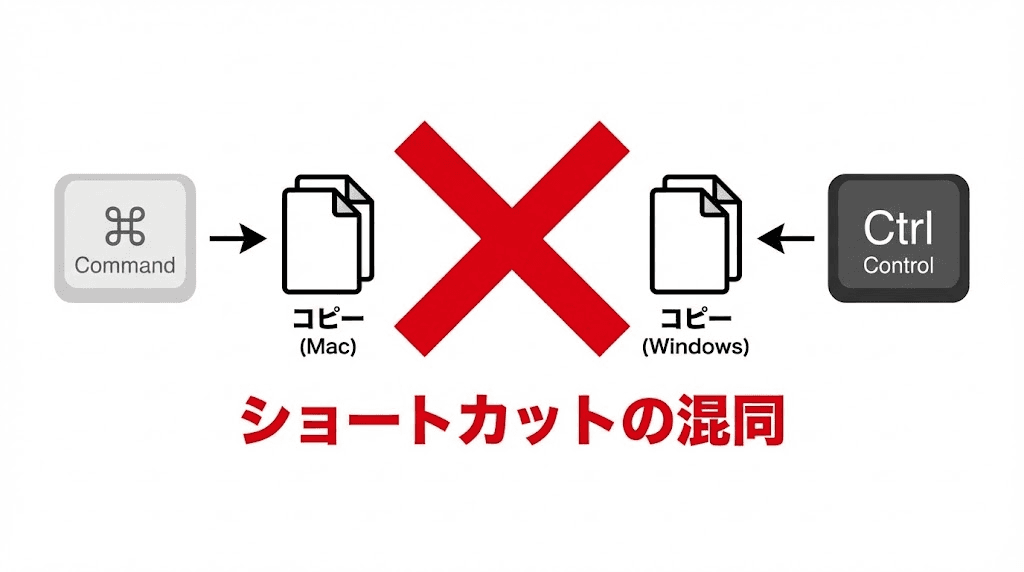
Mac ユーザーにとって最もストレスを感じるのが、「修飾キー」の違いです。
Command キー vs Control キー: Mac でのコピーは
Command + Cですが、リモート先の Windows ではControl + Cが基本です。Mac の Command キーが Windows の Windows キーとして認識されることもあり、指が覚えているショートカットが全く通用しない場面が多々あります。ショートカットキーの誤作動: 最も注意すべきは
Command + Qです。Windows 上のアプリを終了させようとしてこのキーを押すと、Mac 側のブラウザ(Chrome)自体が終了してしまい、リモート接続が切断されるという事態が頻発します。
電源管理の課題(Wake on LAN 非対応)
リモートデスクトップの運用において、非常に致命的な制限があります。
Wake on LAN (WoL) 非対応: Chrome リモート デスクトップは、電源が切れている(またはスリープ状態の)パソコンを遠隔から起動する「リモート喚起」機能を持っていません。
24時間稼働の必要性: つまり、外出先や別室から接続するためには、自宅の Windows PC を常に電源オンの状態で放置しておかなければなりません。これは電気代の無駄だけでなく、PC パーツの寿命を縮める原因にもなります。
もうキー入力や電源管理で悩まない。Macユーザーに最適な操作感を。 [DeskIn(デスクイン)を無料でインストール]
マウス操作とトラックパッドの違和感
Mac の魅力である「滑らかな操作感」が、リモート環境では損なわれがちです。
ジェスチャーの喪失: Mac 特有の「指3本でのスワイプ(デスクトップ切り替え)」や「ピンチイン・アウト」などのジェスチャーは、リモート先の Windows には正しく伝わりません。
スクロールの不自然さ: Mac の慣性スクロールが Windows 上ではカクついたり、右クリックの反応が一瞬遅れたりと、繊細な操作を求めるほど「手元の感覚」とのズレがストレスに変わります。
パフォーマンスと遅延(レイテンシ)
ブラウザベースで動作するツールである以上、通信速度や描画性能には限界があります。
フレームレートの制限: Chrome リモート デスクトップは通常 30FPS 程度に制限されています。通常の文書作成なら問題ありませんが、画面の動きが激しい作業では残像感やカクつきが目立ちます。
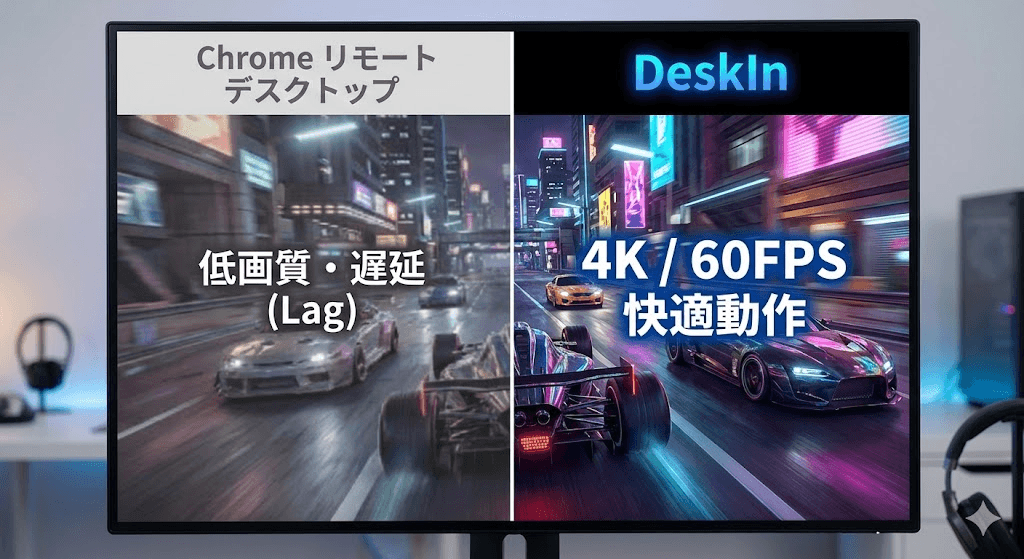
高負荷作業には不向き: 動画編集でタイムラインを細かく動かしたり、FPS ゲームをプレイしたりといった、コンマ数秒のレスポンスが求められる用途には、遅延(レイテンシ)が大きすぎるため実用的とは言えません。
Chrome リモート デスクトップはどんな人に向いている?
ここまで解説してきた通り、Chrome リモート デスクトップは「手軽さ」と「無料」という点では非常に優秀ですが、性能や操作性には明確な限界があります。
あなたの利用シーンが以下のどちらに当てはまるか、導入前のチェックリストとして活用してください。
推奨:このようなシーンには最適です
短時間のファイル確認: 外出先から自宅の PC にあるドキュメントを少しだけ閲覧・転送したい。
たまに行う設定変更: サーバーの再起動や、ソフトウェアの簡単なアップデート作業。
ライトな事務作業: ブラウザ上での簡単なデータ入力や、メールの送受信など、スピードを重視しない作業。
コストをかけたくない: 性能よりも、とにかく「無料で繋がること」を最優先したい。
× 非推奨:このようなシーンには不向きです
長時間の業務・テレワーク: 毎日数時間以上、リモート環境でメイン業務を行う場合。キーボードの違和感やカクつきが大きなストレスになります。
クリエイティブな作業: 動画編集、デザイン、CAD など。正確なマウス操作と色の再現性、そして滑らかな描画が求められる作業には力不足です。
遅延を嫌う操作(ゲームなど): コンマ数秒の遅延が命取りになる PC ゲームや、リアルタイムのレスポンスが必要な操作。
生産性を追求するプロフェッショナル: 「接続できる」ことではなく、「手元のパソコンと同じ感覚で動く」ことを求める方。
まとめると: Chrome リモート デスクトップは、いわば「非常用の予備ツール」です。もしあなたが「非推奨」の項目に一つでも当てはまり、リモート環境での生産性を妥協したくないのであれば、より高度な機能を持つ専門ツールの検討をおすすめします。
さらに快適さを求めるなら:プロ仕様の選択肢
「とりあえず繋がる」という段階を卒業し、「リモート先であることを忘れるほどの快適さ」を求めるなら、無料ツールの限界を超えたプロ仕様の選択肢を検討するタイミングです。
特に、「PCをつけっぱなしにするのが不安」「キー入力が直感的でない」「画面の動きがカクつく」といったストレスを日常的に感じ始めたら、それはリモートデスクトップ環境をアップグレードすべきサインです。
そこでおすすめなのが、Macユーザーのニーズを徹底的に研究して開発された「DeskIn(デスクイン)」です。
Macに最適化されたキー入力:Command/Controlの自動マッピング
DeskIn(デスクイン)の最大の特徴の一つは、OS 間の違いをインテリジェントに吸収する「スマートキーマッピング」です。
Chrome リモート デスクトップで多くのユーザーを悩ませていた「Command と Control の押し間違い」や「Cmd+Q でブラウザが閉じてしまう問題」を解決。Mac のキーボードレイアウトを維持したまま、Windows を直感的に操作できるため、ブラインドタッチのスピードを落とすことなく作業に没頭できます。
Wake on LAN(リモート起動)対応:必要な時だけPCを起動
「外出先から繋ぎたいけれど、自宅の PC を一日中つけておくのは抵抗がある……」。そんな悩みも DeskIn なら解決できます。
Wake on LAN(リモート起動)機能に対応しているため、Windows PC がスリープ状態やシャットダウン状態であっても、必要な時に Mac から遠隔から電源を入れることが可能です。電気代の節約はもちろん、ハードウェアへの負荷も最小限に抑えられる、スマートな運用を実現します。
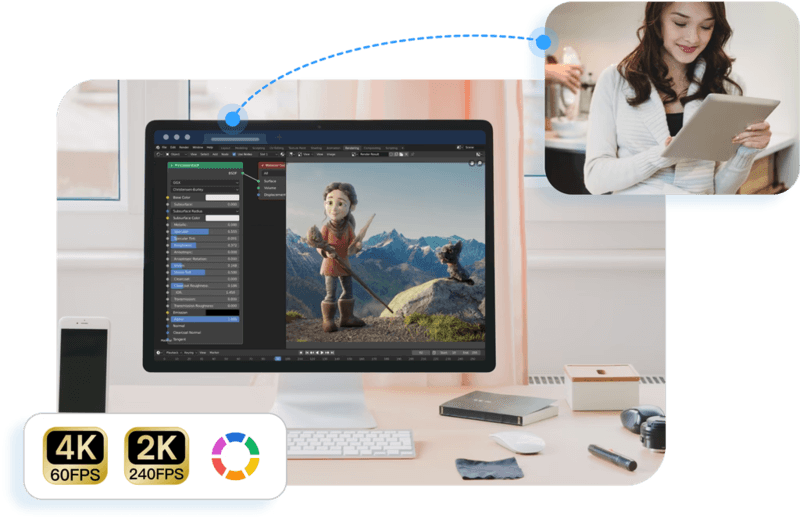
4K/60FPS の圧倒的パフォーマンス:ネイティブに近い低遅延
ブラウザベースのツールでは到達できない、4Kの高解像度と 60FPS の高フレームレートでのストリーミングに対応しています。
まるで手元の Mac 上で Windows アプリが直接動いているかのような、吸い付くような操作感を実現。動画編集の繊細なシーク操作や、一瞬の判断が求められる PC ゲームでも、遅延を気にすることなく快適にプレイ・作業が可能です。
iPad/モバイル連携の強化:外出先からの高い操作性
DeskIn は Mac だけでなく、iPad やスマートフォンからの操作性も極限まで高められています。
iPad を使った「サブディスプレイ化」や、マウス・キーボードを接続しての「完全リモートワーク」など、モバイルデバイスを真の生産性ツールへと変貌させます。専用アプリならではのジェスチャー最適化により、移動中のちょっとした修正もストレスフリーに行えます。
性能比較:Chrome リモート デスクトップ vs DeskIn
機能・特性 | Chrome リモート デスクトップ | DeskIn(デスクイン) |
主な用途 | 簡易的な操作・緊急用 | ビジネス・クリエイティブ・ゲーム |
画質・フレームレート | 最大 30FPS(カクつきあり) | 4K / 60〜144FPS(極めて滑らか) |
キーボードマッピング | 基本のみ(Cmd/Ctrl 競合あり) | Mac/Win 自動最適化(競合なし) |
リモート起動 (WoL) | 非対応(PCの常時起動が必要) | 対応(必要な時だけ遠隔起動) |
操作感 | 遅延あり・直感的でない | 低遅延・Macネイティブな操作感 |
導入コスト | 無料 | 無料版あり / 高機能有料版あり |
まとめ
Chrome リモート デスクトップは、その圧倒的な手軽さとコストパフォーマンスにおいて、リモートデスクトップの「入り口」として非常に優秀なツールです。ちょっとしたファイル確認や、たまに発生する軽作業であれば、これほど便利なものはありません。
しかし、毎日数時間に及ぶ業務や、1分1秒を争うクリエイティブな作業、あるいは Mac と Windows の操作性の違いにストレスを感じているのであれば、無料ツールの限界を超える時が来ているのかもしれません。
これらを手に入れることで、あなたのリモートワーク体験は劇的に進化するはずです。まずは一度、DeskIn が提供する無料版の快適さを体験してみてはいかがでしょうか

DeskIn vs Chrome Remote Desktop: Which One Fits Your Workflow Best?
When it comes to remote access tools, the comparison between DeskIn and Chrome Remote Desktop often comes down to one simple question: do you just need quick access, or do you need performance and control?
Both tools are reliable, secure, and widely used. But they are built for very different types of users. Chrome Remote Desktop focuses on simplicity and accessibility, while DeskIn is designed for users who need high performance, stability, and advanced features across multiple devices.
If you're deciding between the two, this guide breaks down not just what they offer, but which one actually fits your workflow.
Quick Comparison: DeskIn vs Chrome Remote Desktop
Feature | DeskIn | Chrome Remote Desktop |
|---|---|---|
Performance | Up to 4K 60FPS/2K 240FPS, low latency | Standard performance |
Ease of Use | Requires app installation | Browser-based, very simple |
Device Support | Windows, macOS, iOS, Android | Works via Chrome browser |
File Transfer | Fast and stable | Limited |
Multi-device Management | Yes | No |
Mobile Experience | Optimized for iPad & iPhone | Basic |
Security | Privacy screens and granular black/whitelists | Basic |
Price | Free + paid plans | Completely free |
In short, Chrome Remote Desktop is great for quick, lightweight access, while DeskIn is built for users who expect more from their remote desktop experience.
Chrome Remote Desktop Overview
Chrome Remote Desktop is one of the simplest remote access tools available. It runs directly through the Chrome browser and requires only a Google account to get started. This makes it especially popular among casual users and those already working within the Google ecosystem.
It works particularly well on devices like Chromebooks, where everything is already browser-based. It's also accessible across platforms, including mobile devices like iPhone and iPad, though the experience on mobile can feel limited compared to desktop use.
If you're wondering how to use Chrome Remote Desktop, the process is straightforward. You install the Chrome extension, sign in with your Google account, set up a PIN on the host device, and then connect from another device using the same account. The entire setup usually takes just a few minutes.
That said, simplicity comes with trade-offs. Chrome Remote Desktop lacks advanced features like high frame rate streaming, multi-monitor control, or professional-grade file transfer. For occasional access, it works well. But for more demanding tasks, users often start to feel its limitations.
👀You may also be interested in:
DeskIn Overview: A More Powerful Chrome Remote Desktop Alternative

If Chrome Remote Desktop is a lightweight sketch, DeskIn is a full workstation painted in high resolution. DeskIn focuses on performance, stability, and flexibility. It supports up to 4K 60FPS streaming, making it suitable for tasks where visual clarity and responsiveness matter, such as design work, video editing, or even gaming.
As a Chrome remote desktop alternative, unlike browser-based tools, DeskIn is a dedicated remote desktop application. While this requires installation, it unlocks a much more stable and feature-rich experience. Users can manage multiple devices, transfer large files efficiently, and enjoy smoother control across different platforms.
DeskIn is also optimized for mobile workflows. Whether you're using an iPad or smartphone, the interaction feels more responsive and closer to a desktop experience, rather than a simplified viewer. For users who find Chrome Remote Desktop "good enough" at first but limiting over time, DeskIn often becomes the natural upgrade path.
DeskIn vs Chrome Remote Desktop: Real Use Cases
The real difference between these two tools becomes clear when you look at how they perform in everyday scenarios.
1. For Casual Remote Access
If you only need to check files on your home computer or help a friend troubleshoot something quickly, Chrome Remote Desktop is more than enough. It's free, easy to set up, and doesn't require installing extra software beyond Chrome. In this case, DeskIn may feel like overkill.
2. For Remote Work and Productivity
For professionals working remotely on a daily basis, stability and efficiency matter much more. This is where DeskIn starts to stand out.
Tasks like editing documents, managing multiple screens, or transferring files between devices become smoother and faster. Chrome Remote Desktop can handle basic workflows, but it often struggles with responsiveness and lacks the tools needed for a seamless work environment.
3. For High-Performance Tasks (Design, Editing, Gaming)
This is where the gap becomes impossible to ignore. DeskIn's support for high resolution and high frame rates makes it suitable for visually demanding work. Whether you're editing videos, working with design software, or running simulations, performance consistency is critical. Chrome Remote Desktop, on the other hand, is not designed for these scenarios. It works, but not comfortably.
4. For Chromebook and Google Ecosystem Users
If you rely heavily on Google services or use a Chromebook, Chrome Remote Desktop integrates naturally into your workflow. It's lightweight, requires no additional setup, and feels like an extension of the browser itself. In this scenario, it remains a very practical choice.
5. For iPad and iPhone Remote Access
Mobile usage highlights another important difference. While remote desktop Chrome iPhone, and Chrome Remote Desktop iPad are functional, they often feel like simplified versions of the desktop experience. Controls can be less intuitive, and performance may vary depending on the connection.
DeskIn, by contrast, is designed with cross-device interaction in mind, offering a smoother and more responsive mobile experience.
👀 You may also be interested in:
FAQs About Chrome Remote Desktop and DeskIn
1. Is there anything better than Chrome Remote Desktop?
Yes. Tools like DeskIn offer better performance, more features, and improved stability, especially for professional use cases.
2. Is Chrome Remote Desktop discontinued?
No, Chrome Remote Desktop is still actively maintained by Google. It continues to receive security updates and remains available for users needing simple, free remote access.
3. Is DeskIn Remote Desktop legit?
Yes, DeskIn is a legitimate remote desktop solution. It uses encryption to secure connections and provides access controls, making it safe for both personal and professional use.
4. Final Verdict: Which One Should You Choose?
When comparing DeskIn vs Chrome Remote Desktop, the choice depends on how demanding your remote access needs are. Chrome Remote Desktop is simple, free, and ideal for occasional use, especially if you just need quick access to a device without extra setup.
As your workflow becomes more intensive, the limitations start to surface. DeskIn offers a smoother, more stable experience with better performance and control, making it a strong long-term Chrome remote desktop alternative for users who rely on remote access every day.

8 Best Remote Desktops for Video Editing in 2026
Remote video editing is no longer a compromise; it's a workflow upgrade. Whether you're working in Adobe Premiere Pro, After Effects, or DaVinci Resolve, the right remote desktop can turn your laptop into a high-performance editing station.
But not all tools are built for remote video editing collaboration. Lag, poor color accuracy, and unstable connections can ruin productivity. In this guide, we'll break down the best remote desktop for video editing tools so that you can edit smoothly from anywhere.
Why You Need a Remote Desktop for Video Editing
Modern creators are no longer tied to a single workstation. With remote work software, you can access your powerful desktop from anywhere without investing in an expensive laptop. For many editors, especially freelancers and small teams, this solves a real problem: you already have a high-performance PC, but mobility is limited. Instead of duplicating hardware, video editing remote desktop tools let you stream your workflow in real time.
Another key benefit is remote collaboration. Teams can work on the same project across different locations, review edits instantly, and avoid large file transfers via remote collaboration tools. However, this only works if your remote desktop software supports high frame rates, low latency, and stable connections. Otherwise, editing becomes frustrating.
Quick Comparison of Best Remote Desktops for Video Editing
Here's a quick overview of the best tools and who they're for:
DeskIn – Best overall for performance + affordability + multi-device workflows
Parsec – Best for ultra-low latency editing
Splashtop – Best for high-resolution streaming
HP Anyware – Best for enterprise-level workflows
Jump Desktop – Best for Mac users
AnyDesk – Best lightweight remote access
Chrome Remote Desktop – Best free basic option
RustDesk – Best open-source alternative
1. The Best Overall Remote Desktop for Video Editing: DeskIn
Pros
Up to 4K 60FPS / 2K 240FPS performance
Ultra-low latency for smooth editing timelines
Multi-device support (PC, Mac, iPad, Android)
Affordable pricing with free plan available
Cons
Smaller brand awareness compared to legacy tools
DeskIn stands out as the best remote desktop for video editing by balancing performance, stability, and accessibility. Unlike many traditional remote support tools, it is designed for high-frame-rate tasks, making timeline scrubbing, preview playback, and effects editing feel responsive and fluid.
For creators working across devices, DeskIn enables seamless remote video editing collaboration. You can access your main editing PC from a laptop, tablet, or even a secondary workstation without noticeable lag. Compared to tools like Chrome Remote Desktop, which struggle with video-heavy workloads, DeskIn maintains consistent quality and responsiveness—making it a practical choice for both solo editors and distributed teams.
2. Best for Low-Latency Editing: Parsec
Pros
Extremely low latency
High frame rate streaming
Popular among creative professionals
Cons
Limited collaboration features
Setup can be complex for beginners
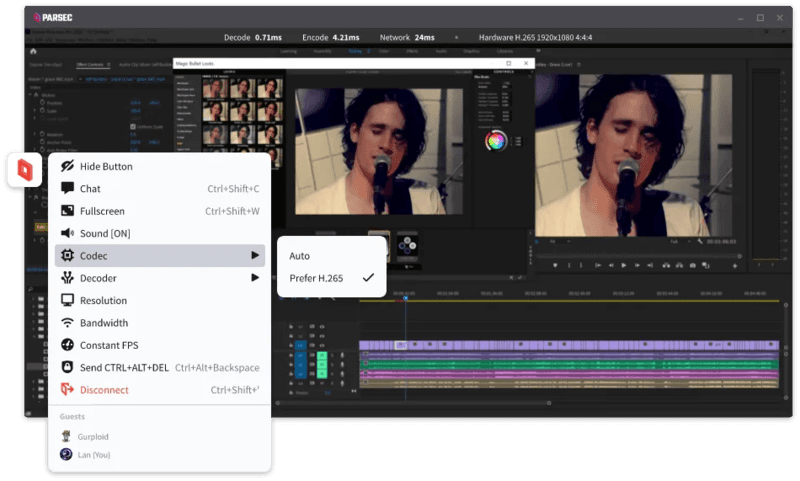
Parsec is widely recognized as a top choice for remote video editing, especially when latency is your biggest concern. Its streaming technology is optimized for real-time responsiveness, which makes it ideal for tasks like timeline scrubbing and motion graphics work in After Effects.
However, while Parsec excels in performance, it lacks some features needed for full remote video editing collaboration. Multi-user workflows and advanced access control are not as robust as some newer tools. For users who need both performance and flexibility, alternatives like DeskIn may provide a more balanced solution.
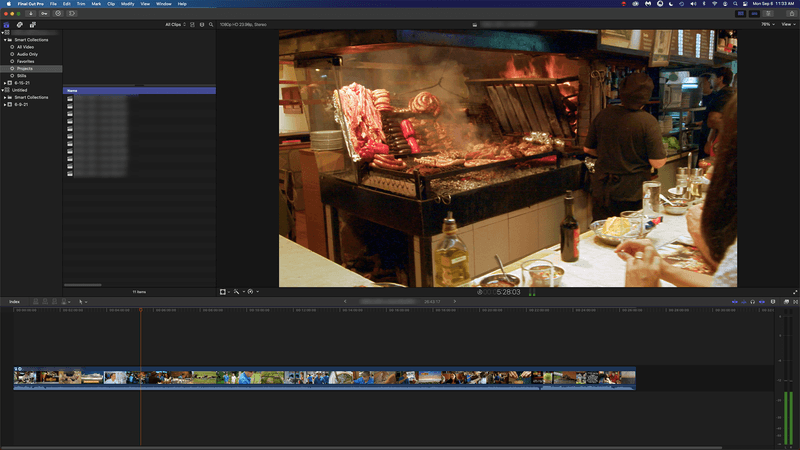
3. Splashtop – Best for High-Resolution Streaming
Pros
Supports 4K streaming
Strong color accuracy
Reliable for creative tasks
Cons
Higher cost for advanced features
Can experience latency over long distances
Splashtop is a solid option for editors who prioritize visual fidelity. Its support for high-resolution streaming and 4:4:4 color makes it suitable for color grading and detailed editing work.
That said, performance consistency can vary depending on network conditions. Some users report lag when working outside local networks. Compared to more optimized remote work software like DeskIn, Splashtop may require a stronger connection to maintain the same level of smoothness.
4. Best for Enterprise Workflows: HP Anyware
Pros
Industry-grade performance
Secure and scalable
Used in professional studios
Cons
Expensive
Complex setup
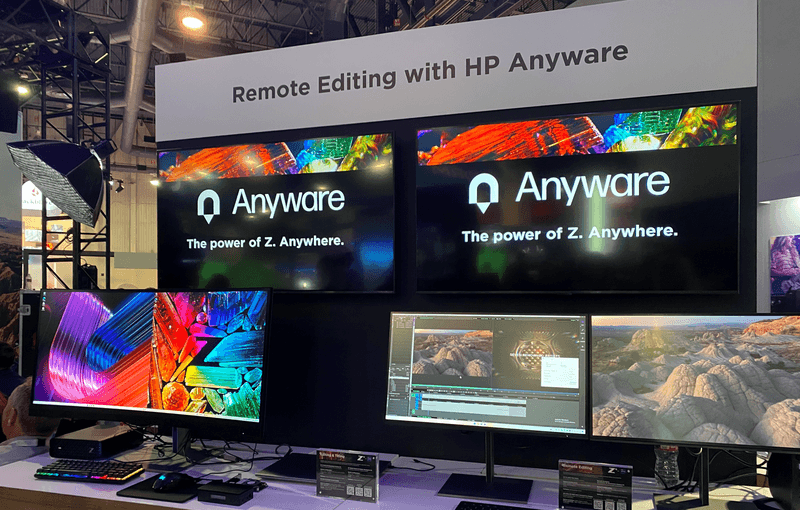
HP Anyware (formerly Teradici) is designed for high-end production environments. It uses advanced protocols to deliver excellent performance and security, making it a common choice in the media and entertainment industries.
However, for small teams or individual creators, it may be overkill. The cost and setup complexity make it less accessible compared to modern remote desktops for video editing tools that offer similar performance with easier deployment. The high cost and technical complexity create barriers that modern remote desktop solutions have eliminated, like DeskIn, offering comparable performance with far simpler deployment.
5. Best for Mac Users: Jump Desktop
Pros
Great macOS integration
Smooth performance
Easy to use
Cons
Limited advanced features
Not ideal for heavy collaboration
Jump Desktop has earned a loyal following among Mac users seeking a straightforward, efficient remote desktop for video editing. Its Fluid Remote Desktop protocol provides smooth, responsive performance for most editing tasks without unnecessary complexity.
Where it falls short is in collaboration. Jump Desktop is built for individual use, lacking the team-oriented features that creative groups need. For solo professionals, it works well, but teams will quickly miss real-time collaboration tools found on other platforms.
6. Best Lightweight Option: AnyDesk
Pros
Fast and lightweight
Easy to set up
Works on multiple devices
Cons
Limited performance for video editing
Lower visual quality

AnyDesk has built its reputation on lightweight design and remarkable ease of use for general remote access. It handles everyday tasks competently, connecting quickly and running smoothly on modest hardware.
The limitations become apparent with demanding creative work. Remote video editing requires consistent frame rates and crystal-clear visuals—areas where AnyDesk struggles. For professional editors who need precision, the performance gap becomes impossible to ignore.
7. Chrome Remote Desktop – Best Free Option
Pros
Completely free
Easy browser-based setup
Works on any device
Cons
Poor performance for editing
Limited features
Chrome Remote Desktop is one of the most accessible remote support tools, offering a simple way to access your computer from anywhere. It's free, requires almost no setup, and lets you access your computer from anywhere with just a browser. For basic technical support or quick file grabs, it gets the job done.
However, it is not built for remote video editing. Users often experience lag, compression artifacts, and low frame rates. If you're working on professional projects, upgrading to a more capable solution is highly recommended.
8. RustDesk – Best Open-Source Alternative
Pros
Open-source
Self-hosting available
Free to use
Cons
Requires technical setup
Performance can vary
RustDesk appeals to users who prioritize open-source philosophy and want complete control over their remote access infrastructure. The flexibility to self-host and customize is genuinely valuable for privacy-conscious users. RustDesk is an interesting option for users who prefer open-source remote desktop not working alternatives or want full control over their infrastructure.
Performance, however, depends entirely on your configuration skills. Without technical expertise, achieving the smooth, low-latency experience required for professional editing is challenging. It's powerful for those who know how to tune it, but not plug-and-play.
FAQs About the Best Remote Desktop for Video Editing
Q1. Can video editing be done remotely?
Yes, with the right remote desktop for video editing, you can edit videos smoothly from anywhere. Tools like DeskIn and Parsec provide low latency and high frame rates for professional workflows.
Q2. What is the best free remote desktop for video editing?
Free options like Chrome Remote Desktop exist, but they lack performance. DeskIn offers a free plan with better performance, making it a stronger choice for real editing work.
Q3. Is Parsec good for video editing?
Yes, Parsec is excellent for low-latency editing. However, it may lack collaboration features needed for team workflows.
Q4. Why is my remote desktop not working smoothly?
Common issues include poor network connection, low bandwidth, or software limitations. Choosing optimized remote work software like DeskIn can significantly improve performance.
Conclusion
Choosing the best remote desktop for video editing depends on your workflow, budget, and performance needs. While tools like Parsec and Splashtop excel in specific areas, many solutions struggle to balance performance, stability, and usability.
If you're looking for a well-rounded solution, DeskIn offers a strong combination of high performance, smooth streaming, and cross-device flexibility. Whether you're working solo or collaborating remotely, it provides a reliable foundation for modern remote video editing workflows.

荷物ゼロで、どこでもフルスペックの仕事を。Deskimo × DeskIn が変えるリモートワークの形
リモートワークの「自由」は、なぜこんなに重いのか
「どこでも働ける」はずが、気づけばバッグの中にはノートPC、充電器、マウス、場合によってはポータブルモニターまで詰め込んでいる——。東京や大阪でリモートワークをしている方なら、一度はこの「移動のたびにオフィスを背負う」感覚を経験したことがあるはずです。
さらに自宅で仕事をしていると、別の問題も出てきます。パートナーがリモート会議を始めた。上の階で工事が始まった。近所のカフェのWi-Fiが不安定で集中できない。「在宅勤務」は理想に見えて、実際には集中できる環境を確保するのが難しいことも多いのです。
この記事では、この2つの問題を同時に解決する組み合わせをご紹介します。Deskimo(オンデマンドのコワーキングスペース予約サービス)とDeskIn(リモートデスクトップソフトウェア)です。
自宅が「最高の仕事場」とは限らない理由
コワーキングスペースが選ばれるのには理由があります。
まず、生活と仕事を物理的に切り分けられること。「この場所に来たら仕事モード」という境界線があるだけで、集中しやすくなります。コワーキングスペースの利用者が在宅勤務よりも高い生産性を感じやすいという調査結果もあります。
次に、設備面での充実。安定した高速Wi-Fi、エルゴノミクス対応の椅子、個室の会議室、静音ゾーン——自宅では再現しにくい環境が揃っています。
そして、仕事をしている人たちに囲まれるという環境。周りも集中して作業している場所にいると、自然と自分も仕事モードに入れます。
でも、月額会員になる必要はありません
コワーキングスペースの弱点は、月額会員制や長期契約が多いことです。毎日使うわけでもないのに固定費がかかるのは、リモートワーカーにとって合理的ではありません。
Deskimoはこの問題を解決します。東京・大阪を中心に、ホットデスクや会議室を分単位で予約・利用できます。会員登録不要、使った時間分だけ支払う仕組みです。
「軽い荷物」で働く、新しいワークフロー
コワーキングスペースを使い始めると、最初に気づくのがバッグの重さです。ノートPC、充電器、マウス——毎日電車や自転車で通勤しながら持ち歩くのは、じわじわと負担になります。
解決策はシンプルです。ハイスペックなマシンは自宅に置いておく。手元にはタブレットか軽量ノートPCだけ持つ。
DeskInがそのギャップを埋めます。タブレット上でDeskInを開き、自宅のデスクトップPCに接続すれば、CADソフト、動画編集タイムライン、数十タブを開いた調査作業——すべてが自宅のマシンで動きながら、手元の画面にそのまま映し出されます。重いPCを持ち歩かなくても、フルスペックの作業環境がどこでも手に入ります。
「軽い荷物の1日」はこんな感じ
午前中はDeskimoのホットデスクでメール処理と集中作業。午後は個室の会議室を予約し、DeskInで自宅のPCに接続して、重い処理が必要なデザイン作業やレンダリングをこなす。バッグの中身はタブレット1台分。アウトプットは変わらない。
パブリックWi-Fiのセキュリティ問題を、構造ごと解決する
コワーキングスペースや카フェのWi-Fiで機密ファイルを開くのは、リスクを伴います。ファイルが端末に保存されていれば、デバイスの紛失や盗難によってデータが漏洩する可能性があります。
DeskInのアーキテクチャは、この問題を構造的に回避します。実際の作業は自宅・オフィスのマシン上で完結し、ファイルは一切ネットワーク外に出ません。 手元のデバイスは「画面を表示し、キーボード・マウスの入力を送り返すだけ」の窓口にすぎません。
さらに、DeskInにはエンドツーエンド暗号化とプライバシーモード(ホスト側の画面をブランクにし、後ろから覗かれても作業内容が見えない機能)が備わっています。法務・医療・金融など、規制のある業界でデータを扱うチームにとっても、安全に使えるリモート環境です。
モニターは「借りる」、デスクトップは「持ち込む」
コワーキングスペースのあまり語られないメリットのひとつが、外部モニターやスマートTVが備わった会議室を使えることです。Deskimoの多くの会議室にも、こうした設備が用意されています。
DeskInのマルチスクリーン管理機能を使えば、こうした設備を最大限に活かせます。追加のケーブルやアダプターなしで、リモートデスクトップを複数のディスプレイに拡張表示できます。財務モデルを1画面に、参考資料を別画面に、コミュニケーションツールをもう1画面に。モニターを1台も買わずに実現できます。
コワーキングスペースでリモートデスクトップを使うためのヒント
まず場所を決め、ソフトウェアはその後で
在宅での集中に課題を感じているなら、まずDeskimoでいくつかの場所を試してみてください。カフェのような雰囲気が合う人もいれば、静かな個室ブースが向いている人もいます。自分に合った場所がわかったら、デスクトップとタブレット両方にDeskInをインストールし、実際の業務に使う前に接続を試しておきましょう。
場所と作業内容を組み合わせる
オープンなコワーキングエリアは、メール処理や軽いコミュニケーション作業に向いています。静音ゾーンは集中執筆やデータ分析に。個室の会議室はクライアントとのオンライン商談や、マルチスクリーンでの負荷の高い作業に最適です。Deskimoは分単位の料金制なので、ホットデスクで足りる日に会議室を予約するような無駄が生じません。
コスト感を現実的に見積もる
東京・大阪の主要エリアで専用個室を持つとなると、月額数万円〜数十万円規模のコストになります。DeskimoとDeskInを組み合わせて週に数日利用するスタイルであれば、そのコストの一部で同等以上の作業環境が手に入ります。Deskimoの料金はロケーションや利用形態によって異なるため、現地スタッフに確認することをおすすめします。
注意しておきたいトレードオフ
コワーキングスペースは専用オフィスの完全な代替ではありません。混雑状況や騒音レベルはその日によって変わります。分単位課金は長時間利用だとコストがかさむこともあります。大事なセッションは事前に予約を入れ、代替ロケーションも把握しておくと安心です。終日利用が予定されている日は、Deskimoのデイパスやバンドルプランも検討してみてください。
特別オファー:DeskimoとDeskInを組み合わせて始める
Deskimoを初めて使う方へ
Deskimoアプリで新規登録の際、紹介コード DESKIN を入力するとUS$10オフになります(新規ユーザー限定)。
Deskimo Businessアカウントを開設する場合は、紹介コード DESKBIZ で初回クレジットパッケージが60%オフになります。
DeskInを始める方へ
DeskInは無料プランから使い始められます。Deskimoをすでにお使いの方は、DeskIn購入時にプロモコード DESKIMO を入力すると、初月50%オフ(年間プランは20%オフ)が適用されます。このプロモーションは2026年7月31日まで有効です。
まとめ:「どこでも働ける」を、本当に実現するために
最高のリモートワーク環境とは、機材をたくさん揃えることではありません。どこに行っても手ぶら同然で、いつもと変わらないアウトプットが出せること。
Deskimoで東京・大阪の好きな場所に仕事の場を確保し、DeskInで自宅のマシンのフルパワーをどこからでも引き出す。この組み合わせが、リモートワークの「重さ」を取り除きます。
About Deskimo
Deskimoは、コワーキングスペース・プライベートオフィス・会議室を分単位で予約できる、オンデマンドのワークスペースプラットフォームです。長期契約も月額会員も不要。必要なときに、必要な時間だけ予約して、使った分だけ支払います。
About DeskIn
DeskInは、低遅延・高セキュリティのリモートデスクトップソフトウェアです。エンドツーエンド暗号化、マルチスクリーン管理、高速データ転送に対応し、デスクトップのパワーをそのままどこでも持ち出したいプロフェッショナル向けに設計されています。

リモートデスクトップでのCtrl+Alt+Delete操作の方法【トラブルシューティング】
リモートデスクトップセッションに接続しながら Ctrl + Alt + Delete をキーボードで押そうとしたことがあるなら、その操作が予想通りには機能しないことをご存知でしょう。このコマンドはリモートではなく、ローカルマシンが受け取るためです。イライラしますよね?
リモートで Ctrl + Alt + Del が機能しないとき
リモートワーカー、フリーランサー、デジタルノーマッドにとって、リモートデスクトップで Ctrl + Alt + Delete を制御する方法を知ることは非常に重要です。画面をロックしたり、タスクマネージャーにアクセスしたり、パスワードを変更したりする際、この簡単なショートカットはあなたが思っている以上に大事です。
良いニュースがあります。これを扱うためのより良い方法があり、ステップバイステップで説明します。
1. なぜ Ctrl + Alt + Del がデフォルトで機能しないのか
問題は何ですか?
リモートデスクトッププロトコル (RDP) またはリモートアクセスツールを使用しているとき、キーボードのコマンドは特に指定されない限り、ローカルシステムに送信されます。
Ctrl + Alt + Delete は保護されたシステムコマンドです。
ローカルシステムが常に最初に制御します。
リモートコンピューターには届きません。
これは設計上のものですが、リモートPCを管理する人には頭痛の種です。
これを必要とする人は?
複数のマシンを管理するリモートワーカー
メンテナンスを行うIT管理者
タイムゾーンを超えて作業するフリーランサー
どこからでもオフィスPCにアクセスするデジタルノマド
本当に必要なもの
Ctrl + Alt + Delete をローカルの混乱を引き起こすことなく、リモートマシンに送信する方法が必要です。
おすすめの記事:
DeskInを使用してリモートアクセスをスマートに処理する方法
DeskInは任意のPCにどこからでもアクセスできる無料のリモートデスクトップツールです。主要な利点の一つは、Ctrl + Alt + Delete を直接送信できることです。ストレスフリーです。
DeskInでの操作方法
両方のデバイスで DeskIn アプリを起動します
DeskInを使ってPC/Mac/ラップトップに接続します(接続されている場合、モバイルディスプレイはこのようになります)
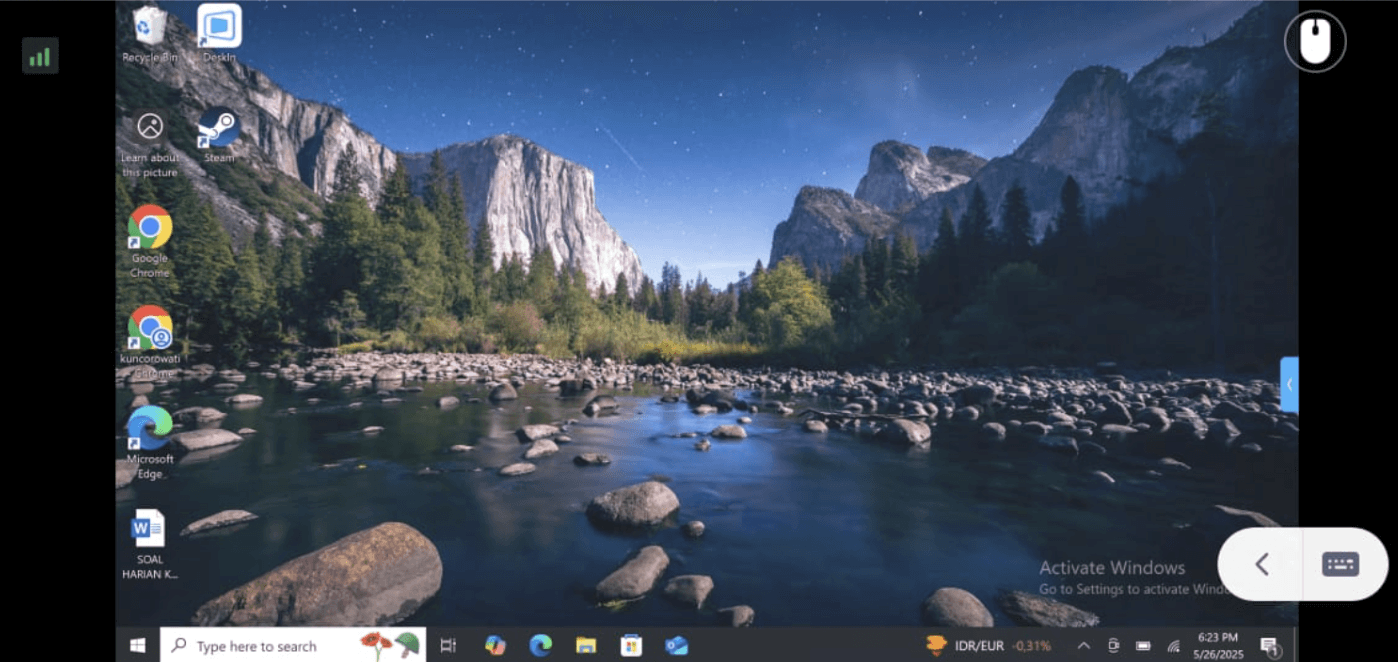
右下隅のメニューで矢印をクリックすると、別の追加ボタンが表示されます
次に、アクションメニューを左端から選択します

その後、ctrl+alt+deleteボタンが表示されますので、いつでも簡単に使用可能です。

クリックすれば、問題は解決です!
複雑なショートカットやキーボードハックを覚える必要はありません。DeskInはワンクリックでこれを実現します。
今すぐDeskInを試してみてください
リモートデスクトップでのCtrl + Alt + Deleteの操作にまだ困っているなら、DeskInにお任せください。ここをクリックしてDeskInをダウンロード。
もっと見る
ブログ
検索
すべてのトピック
比較
ゲーム
生産性
トラブルシューティング
WindowsとMacコンピュータをiPadでセカンドモニターに!
マルチタスクをこなすにとっ社員にとって、セカンドモニターを使用することは生産性を大幅に向上させることができます。ホームオフィスの方やデュアルスクリーンを持っていない学生の方へ。使用していないiPadを簡単にコンピュータのセカンドモニターに変える方法をご紹介します。
iPadを第二画面として使用するメリット:
1. 画面スペースを増やして同時により多く表示できます。マルチタスクユーザーは、ウィンドウの切り替えを避けることで時間を節約できます。
2. 各画面が独立して動作するため、作業スペースがより整理されます。
ビデオ編集では、一つの画面を編集に、もう一つの画面を素材置き場に。論文を書く場合、片方の画面で執筆、もう片方で情報を検索などです。
3. iPadの画面サイズは十分大きく、表示品質も非常に良好です。デザイン作業のニーズがあるユーザーやMacBookユーザーにとって、追加のスクリーンを購入するよりもコスト効率が高く、色差の問題もありません。
4. 多くの人が家にiPadを持っています。この手持ちのデバイスをデュアルスクリーンとして使用することで、別のスクリーンを購入するコストや置くスペースを節約できます。
MacでiPadをセカンドスクリーンとして使用する方法は?
Appleのネイティブ機能であるApple Sidecarを使用すると、iPadをMacBookやiMacの外部ディスプレイとして使用できます。簡単な設定を行うだけで、iPadとコンピュータ間のシームレスな接続が可能です。
注意:Apple Sidecarを使用するには、2台のデバイスが同じApple IDにログインしているか、同じネットワークに接続していることが必要です。両方のデバイスにBluetooth、Wi-Fiがオンになっており、距離は10メートル以内である必要があります。
ステップ1 ディスプレイ設定:
Macシステム設定を開き、サイドバーの「ディスプレイ」クリック >> 右側の「+」ポップアップメニューをクリックし、iPadを選択します。
iPadを選択し、使用設定を「拡張ディスプレイ」に変更します。Macの上部ツールバーのAirplay設定を確認し、iPadを「別のディスプレイとして使用」に設定します。
ステップ2:画面を拡張する
設定が完了すると、iPadがMacのセカンドディスプレイとなります。MacからiPadにウィンドウをスムーズにドラッグすることができます。また、iPadのサイドバーを使用したり、システムディスプレイ設定でサイドバーの位置を変更したりできます。
MacBookスクリーン(左)とiPadスクリーン(右)
WindowsでiPadをセカンドスクリーンとして使用する方法は?
Apple Sidecarは、2016年以降に発売されたMacとiPadOS13以上のみをサポートします。古いAppleデバイスやWindowsデバイスを使用している場合でも、DeskInリモートソフトウェアを利用して画面拡張を行うことができます。iPadをMacやWindowsのセカンドディスプレイとして使用でき、その滑らかさはSidecarに劣りません。
ステップ1:DeskInアカウントをダウンロードして登録する
コンピューターとiPadにDeskInをダウンロードし、無料アカウントを登録して別々にログインします。
注意: 新しいデバイスに初めてログインする際には、アカウントのセキュリティを保護するためにメール認証を完了する必要があります。
ステップ2:画面を拡張する
Windows/MacコンピュータでDeskInアプリを開き、「スクリーン管理」タブに行き、「画面を拡張する」をクリックします。
iPadを選択し、「拡張を開始」をクリックします。接続が完了すると、iPadはWindows/Macコンピューターのセカンドディスプレイとなり、2つのスクリーンを1つのもののようにウィンドウを移動できます。
コンピュータスクリーン(左)とiPadスクリーン(右)
ステップ3:システムディスプレイ設定
拡張後、iPadがコンピュータ画面の内容をミラーリングしているだけの場合はWindowsシステム設定 >>ディスプレイ設定に行き、「これらのディスプレイを拡張」を選択してください。2つの画面をドラッグして画面の位置を変更することもできます。
まとめ
この記事では、DeskInリモートデスクトップソフトウェアを使用してiPadをMacおよびWindowsコンピューターの「セカンドスクリーン」にする方法を紹介します。これは、同時に複数のタスクを処理し、生産性を向上させたい方に特に有用です。MacBook、iPad、Androidタブレット、およびWindows PCで動作する画面拡張ツールを探している場合、DeskInリモートデスクトップは最適なソリューションです。DeskInをダウンロードして、ぜひお試しください!
Top 6 RustDesk Alternative Tools for Faster, Easier Remote Access
Remote access should feel like flipping a light switch, not decoding a control panel. Yet many users exploring RustDesk eventually run into friction: connection IDs, server setup, or occasional lag. While RustDesk is powerful, it’s not always the easiest or smoothest option, especially for non-technical users.
That’s why more people are actively searching for a reliable RustDesk alternative that combines performance, simplicity, and flexibility. Whether you want a plug-and-play solution or something more advanced, this guide will help you find the best fit.
Why You Need a RustDesk Alternative (and How to Choose One)
RustDesk stands out as a privacy-friendly, self-hosted remote desktop tool. However, real-world usage reveals a few common challenges:
Complicated setup for the RustDesk self-hosted environments
Manual connection steps requiring IDs and passwords
Occasional latency or unstable connections
Limited user-friendly features out of the box
For many users, especially those helping family or managing multiple devices, simplicity matters just as much as control.
How to Choose the Right RustDesk Alternative
When evaluating a RustDesk alternative, focus on these key factors:
Ease of use: Quick setup without technical overhead
Performance: Smooth, low-latency remote sessions
Compatibility: Support for Windows, macOS, Linux, and mobile
Security: Strong encryption and access controls
Flexibility: Options ranging from cloud-based to open source
The ideal tool strikes a balance between power and convenience, something many modern solutions now deliver better than traditional setups.
Quick Comparison of the Best RustDesk Alternatives
Here’s a quick breakdown of the top tools and where they shine:
DeskIn – Best all-in-one RustDesk alternative for performance and ease of use
AnyDesk – Best lightweight tool for fast connections
TeamViewer – Best for enterprise-grade remote support
MeshCentral – Best open-source and self-hosted solution
DWService – Best free browser-based tool
Chrome Remote Desktop – Best simple, no-frills option
1. DeskIn – Best RustDesk Alternative for Seamless Performance and Ease of Use
Pros
Ultra-low latency with smooth high-frame-rate streaming
No complex setup or server deployment required
Cross-platform including Rustdesk alternative for Android
Secure with encryption and device control features
Built-in file transfer and multi-device management
Cons
Smaller awareness than legacy competitors
Best for: Users who want a powerful yet simple remote desktop solution
DeskIn removes the friction that often comes with remote access tools. Instead of relying on IDs or manual configurations, it offers a streamlined connection experience that works right out of the box. This makes it especially valuable for users supporting non-technical family members or managing multiple remote devices.
Performance is where DeskIn truly distinguishes itself. Compared to RustDesk, which can sometimes struggle with latency, DeskIn delivers consistently smooth sessions with minimal lag. It also eliminates the need for self-hosting, making it a strong free RustDesk alternative option for users who want powerful features without the complexity.
For those exploring options beyond the RustDesk alternative GitHub projects, DeskIn provides a polished, ready-to-use experience that balances simplicity with professional-grade performance.
2. AnyDesk – Best Lightweight Alternative for Fast Connections
Pros
Lightweight and fast installation
Good performance on low bandwidth
Cross-platform support
Easy-to-use interface
Cons
Performance may drop during long sessions
File transfer can be inconsistent
Best for: Users needing quick and simple remote access
AnyDesk is often considered a natural step up from RustDesk for users who want something easier to deploy. It offers a lightweight application that connects quickly and performs well under normal conditions. This makes it suitable for quick troubleshooting or occasional remote access.
However, performance consistency can be an issue. Users frequently report lag or instability during extended sessions or when handling more demanding tasks. While AnyDesk is a solid option for basic needs, it may not fully satisfy users looking for a more robust, all-in-one solution.
👀 You may also be interested in: |
|---|
3. TeamViewer – Best for Enterprise Remote Support and Cross-Platform Access
Pros
Enterprise-grade security with encryption and 2FA
Stable performance across global networks
Rich features like file transfer and session recording
Broad device compatibility
Cons
Expensive for commercial use
Free version has limitations
Heavier resource usage on some systems
Best for: Businesses and IT teams managing multiple endpoints
TeamViewer has long been a dominant player in the remote desktop space, offering a comprehensive suite of features designed for enterprise environments. It excels in reliability and global connectivity, making it a popular choice for IT support teams.
That said, its pricing model is a major drawback for many users. Frequent users may quickly encounter licensing restrictions, and costs can escalate for businesses. Additionally, its heavier footprint can impact performance on lower-end devices. DeskIn offers a more modern alternative by delivering similar performance and essential features without the same cost barriers. For users who want enterprise-level capabilities with better efficiency, it presents a compelling option.
👀 You may also be interested in: |
|---|
4. MeshCentral – Best Open-Source Self-Hosted Alternative
Pros
Fully RustDesk alternative open source solution
Web-based management dashboard
Supports multi-device environments
Strong customization and control
Cons
Complex setup and maintenance
Requires technical expertise
Best for: Advanced users needing a Rustdesk alternative self-hosted
MeshCentral is a powerful open-source platform designed for users who want full control over their remote access infrastructure. It supports multiple devices and provides a centralized dashboard for management, making it attractive for IT professionals.
However, this flexibility comes with complexity. Setting up and maintaining a MeshCentral server requires technical knowledge, which can be a barrier for many users. Compared to this, DeskIn offers a much simpler deployment process while still delivering strong performance and security. For users who prioritize ease of use over full control, modern solutions like DeskIn provide a more accessible alternative.
5. DWService – Best Free and Browser-Based Alternative
Pros
Completely free
Browser-based access
Open-source foundation
Simple setup
Cons
Limited performance
Basic feature set
Best for: Users looking for a simple, free RustDesk alternative
DWService offers a browser-based approach to remote access with no heavy installation, making it convenient for quick connections in restricted environments. It supports both desktop access and file management across major platforms.
However, performance often feels sluggish, especially on demanding tasks, and features remain basic; lacking session recording, smooth multi-monitor support, or advanced security controls. While suitable for occasional personal use, it falls short for professional or high-performance scenarios.
6. Chrome Remote Desktop – Best Simple Remote Access Tool
Pros
Free and easy to use
Browser-based setup
Cross-platform compatibility
Cons
Very limited features
No advanced management or collaboration tools
Best for: Casual users needing basic remote access
Chrome Remote Desktop is one of the simplest remote access tools available. It’s easy to set up and works across devices, making it a convenient choice for occasional use.
However, it lacks many essential features such as file transfer, session management, and advanced security controls. For users with more demanding needs, it quickly becomes insufficient. Compared to Chrome Remote Desktop, DeskIn provides a much more complete experience without sacrificing ease of use, making it a better long-term solution.
👀 You may also be interested in: |
|---|
FAQs About Best RustDesk Alternatives
1. Why should I look for a RustDesk alternative?
RustDesk is powerful but can be difficult to set up and manage, especially with self-hosting. Many users prefer tools that offer similar performance without technical complexity. DeskIn simplifies remote access while maintaining strong performance and security.
2. What is the best free RustDesk alternative?
Several tools qualify as a free RustDesk alternative, including DWService and Chrome Remote Desktop. However, DeskIn stands out by offering better performance and usability even in its free version.
3. Is there an open-source alternative to RustDesk?
Yes, tools like MeshCentral and DWService are considered RustDesk alternative open source options. They provide flexibility and control but often require technical expertise to set up and maintain.
4. Which RustDesk alternative is best for beginners?
Beginners should choose tools with a simple setup and intuitive interfaces. DeskIn is an excellent option because it removes the need for manual configuration while still delivering advanced features.
Conclusion
RustDesk is a powerful starting point, but it’s not always the easiest or most efficient tool for everyday use. From setup complexity to performance limitations, many users eventually look for a better RustDesk alternative.
Among all the options, DeskIn stands out as the most balanced solution. It combines speed, simplicity, and cross-platform support into one seamless experience. If you’re ready to move beyond technical friction and enjoy truly smooth remote access, DeskIn is a choice that simply works.
Top 7 RDP Alternative Tools for Faster, Safer Remote Access
Remote desktop access used to feel like a solid bridge. Now, for many users, traditional RDP feels more like a creaky rope ladder. With performance issues, security concerns, and limited cross-platform support, it's no surprise that more people are actively searching for a better RDP alternative that actually keeps up with modern workflows.
If you're managing multiple servers, working across devices, or just tired of unstable connections, this guide will walk you through the best tools worth switching to.
What is RDP Desktop?
RDP (Remote Desktop Protocol) is a proprietary protocol developed by Microsoft that allows users to connect to another computer over a network. It's widely used for accessing Windows servers, virtual machines, and remote workstations.
While powerful in controlled environments, RDP is often tied to Windows systems and requires configuration like port forwarding or VPNs. Compared to newer tools, it can feel rigid and outdated.
You may also be interested in: |
|---|
Why You Need an RDP Alternative
RDP still works, but it comes with trade-offs that many users find frustrating:
Security risks if not properly configured
Complex setup for remote or external access
Limited cross-platform compatibility
Performance issues over unstable networks
Many IT teams are now actively replacing it, especially when looking for a Windows RDP client alternative or something that works seamlessly across macOS, Linux, and mobile devices. That's where modern Remote Desktop alternatives shine.
Quick Comparison of the Best RDP Alternatives
Choosing the right tool is like picking the right vehicle. Some are built for speed, others for heavy-duty enterprise work. Here's a quick snapshot:
DeskIn – Best all-in-one RDP alternative for performance and cross-platform use
TeamViewer – Best for enterprise remote support
AnyDesk – Best lightweight option for fast connections
RustDesk – Best Windows RDP alternative open-source solution
Remmina – Best RDP alternative for Linux users
Chrome Remote Desktop – Best simple browser-based tool
Splashtop – Best for high-performance business environments
1. DeskIn – Best RDP Alternative for Cross-Platform Performance
Pros
Ultra-low latency with smooth high-frame-rate streaming
Works across Windows, macOS, Linux, iOS, and Android
Strong encryption and secure access controls
Built-in file transfer and multi-session support
Cons
Newer compared to legacy brands
Best for: Users who want a powerful, flexible RDP alternative
DeskIn feels less like remote access and more like teleportation for your desktop. Whether you're managing servers, supporting clients, or working remotely, it delivers consistently smooth performance without the usual lag spikes seen in traditional RDP setups.
Unlike many tools, DeskIn eliminates the need for complex configurations. You don't need to wrestle with firewalls or VPNs just to connect. It also works seamlessly across platforms, making it a strong alternative to Microsoft Remote Desktop for Mac and mobile users alike.
For teams juggling multiple systems, DeskIn provides a unified experience that replaces fragmented workflows. It's also a strong free RDP alternative option with premium-level capabilities, making it ideal for both individuals and businesses.
2. TeamViewer – Best for Enterprise Remote Support
Pros
Enterprise-grade security and compliance
Extensive feature set including collaboration tools
Cross-platform compatibility
Reliable global performance
Cons
Expensive licensing
Can be overkill for individuals
Best for: Enterprises needing secure and scalable remote access
TeamViewer is a comprehensive remote desktop platform widely adopted by IT teams, support professionals, and enterprises. Its feature set extends far beyond simple screen sharing—it includes robust device management, remote printing, file transfer, session recording, and even augmented reality support for field service. TeamViewer's security architecture relies on AES‑256 encryption, two‑factor authentication, and whitelisting, making it suitable for organizations with strict compliance requirements. It runs on virtually every operating system and mobile platform.
The main trade‑off is its pricing: licenses are subscription‑based and can become expensive for small teams or individual users, especially as TeamViewer aggressively flags personal use as commercial, leading to session restrictions.
3. AnyDesk – Best Lightweight RDP Alternative for Speed
Pros
Fast and responsive
Lightweight installation
Works well on low bandwidth
Easy to use
Cons
File transfer can be inconsistent
Lag during longer sessions
Best for: Users needing quick, simple remote access
AnyDesk is a lightweight remote desktop application prized for its speed and efficiency, often recommended as a fast alternative to Microsoft's native Remote Desktop on Windows 10 and Android. It uses a proprietary video codec, DeskRT, to achieve low latency even on limited bandwidth, making it ideal for quick support sessions and accessing devices over mobile networks. The interface is clean and minimalist, with features like address book management, file transfer, and session recording available.
However, users frequently report instability during extended sessions; performance can degrade over time, and file transfers may slow considerably compared to competitors. While its free version is generous for personal use, professional users often find the performance ceiling limits its suitability for continuous, demanding workloads. DeskIn, by contrast, maintains consistent performance even during extended use, making it better suited for professional workloads.
You may also be interested in: |
|---|
4. RustDesk – Best Open-Source RDP Alternative for Privacy
Pros
Free and open-source
Self-hosting for full control
Strong privacy protection
Active community
Cons
Technical setup required
Limited user-friendly features
Best for: Developers and privacy-focused users
RustDesk has emerged as a leading open‑source remote desktop alternative, appealing to developers and organizations that require full control over their data. It allows users to self‑host the relay and rendezvous servers, meaning no third‑party infrastructure handles connection metadata. Built with Rust, it offers a modern codebase with cross‑platform clients (Windows, macOS, Linux, Android, iOS) and supports essential features such as file transfer, TCP tunneling, and customizable address books.
The major barrier is its complexity: deploying a self‑hosted environment requires technical expertise to configure firewalls, SSL certificates, and ongoing server maintenance. For those using the public relay, performance can be inconsistent depending on server load and geographic proximity.
You may also be interested in: Top RustDesk Alternatives for Better Performance, Security & Ease of Use |
|---|
5. Remmina – Best Linux RDP Alternative
Pros
Open-source and free
Supports multiple protocols including RDP and VNC
Lightweight and flexible
Native to Linux environments
Cons
Limited features compared to modern tools
UI can feel outdated
Best for: Linux users looking for a traditional RDP alternative Linux
Remmina is a beloved open‑source remote desktop client for Linux, supporting multiple protocols (RDP, VNC, SSH, SPICE, and others) in a single unified interface. It is frequently chosen by system administrators and Linux enthusiasts who need a flexible, lightweight tool to manage diverse environments. Remmina offers tabbed sessions, quick‑connect profiles, and a plugin system that extends its capabilities.
However, its strength - protocol flexibility, also highlights its limitations. As a frontend client rather than a full remote access solution, it lacks features like unattended access, centralized account management, or robust session recording out of the box. Performance can vary by protocol, and the user experience lags behind more polished commercial tools, particularly for users seeking a plug‑and‑play setup.
6. Chrome Remote Desktop – Best Free and Simple Option
Pros
Free and easy to use
Browser-based setup
Cross-platform access
Cons
Very limited features
No advanced management tools
Best for: Casual users needing basic remote access
Chrome Remote Desktop is a free, browser‑based remote access tool from Google that requires nothing more than a Chrome browser and a Google account. It excels in simplicity: installation takes seconds, and connections are mediated through Google's infrastructure, eliminating complex firewall configurations. For occasional use—such as helping a family member or quickly accessing a home computer—it works reliably across Windows, macOS, Linux, and even ChromeOS.
The trade‑off is its minimal feature set. There is no native file transfer, multi‑session management, remote printing, or granular permission controls. Collaboration tools are absent, and the reliance on a Google account for authentication can be a limitation in professional environments. It remains a convenient entry‑level tool but struggles to meet the needs of power users or IT teams.
You may also be interested in: |
|---|
7. Splashtop – Best for High-Performance Business Use
Pros
High-quality streaming performance
Strong security features
Good for business environments
Reliable connections
Cons
Subscription-based pricing
Limited free version
Best for: Businesses needing performance-focused remote access
Splashtop is a high‑performance remote desktop solution frequently adopted by creative professionals, educational institutions, and enterprises that prioritize fluid interaction. It delivers low‑latency streaming with support for high‑frame‑rate displays, making it suitable for video editing, CAD work, and other graphics‑intensive tasks. Splashtop offers a range of editions—from Business Access to SOS for on‑demand support—all of which include robust security (AES‑256, device authentication) and features like file transfer, remote printing, and multi‑monitor navigation. Its performance over local networks and the internet is consistently praised.
The primary drawback is cost: while competitive, the subscription model can accumulate quickly for users needing access to multiple devices or advanced features, especially when compared to similarly capable tools with more flexible pricing structures. DeskIn offers similar performance benefits with a more flexible pricing structure, making it a compelling alternative.
You may also be interested in: |
|---|
FAQs About Best RDP Alternatives
Why should I look for an RDP alternative?
RDP can be difficult to configure, less secure if exposed, and limited outside Windows environments. Modern tools like DeskIn provide better performance, security, and ease of use.
What is the best RDP alternative?
The best RDP alternative depends on your needs, but DeskIn stands out for its balance of speed, security, and cross-platform compatibility.
Is there a free RDP alternative?
Yes, several tools qualify as an RDP alternative free, including RustDesk and Chrome Remote Desktop. DeskIn also offers a free tier with advanced capabilities.
Is Microsoft shutting down RDP?
Microsoft is evolving its remote desktop ecosystem, but traditional RDP isn't disappearing overnight. However, many users are already transitioning to more modern solutions like DeskIn for better reliability and flexibility.
Conclusion
RDP has served its purpose, but the digital world has outgrown its limitations. Whether you need better performance, stronger security, or true cross-platform access, switching to a modern RDP alternative is no longer optional, it's inevitable.
Among all the options, DeskIn stands out as a future-ready solution. It combines speed, simplicity, and power into one seamless experience, helping you leave behind the friction of traditional remote desktop tools and step into something far more efficient.
Top 10 Splashtop Alternative Tools for Faster, More Reliable Remote Access (2026)
If your remote desktop tool has started to feel like a buffering video at the worst possible moment, you're not alone. Many users are actively searching for a better Splashtop alternative due to rising costs, laggy connections, and limited flexibility. Whether you're managing remote IT support or simply accessing your work computer from home, the right tool can turn frustration into seamless control. Let’s dive into the best options available today.
Key Features to Look for in a Splashtop Alternative
Before switching, it’s worth knowing what actually matters. A great remote desktop tool should offer:
Smooth performance with low latency and high frame rates
Strong security like AES-256 encryption and 2FA
Cross-platform compatibility (desktop + mobile)
Easy setup and intuitive interface
Transparent pricing without hidden increases
Stable unattended remote access
These factors define the best remote desktop experience in 2026.
Quick Comparison of the Best Splashtop Alternatives
Tool | Pros | Cons | Best For |
|---|---|---|---|
High performance, affordable, smooth | Newer brand | High-quality remote work | |
AnyDesk | Lightweight, fast | Security limits | Quick sessions |
TeamViewer | Secure, scalable | Expensive | Enterprises |
Chrome Remote Desktop | Free, simple
| Limited features | Personal use |
Zoho Assist | Clean UI, integrations | Stability issues | IT support |
RemotePC | Affordable | Performance inconsistency | SMBs |
RealVNC | Secure | Occasional disconnects | Secure access |
LogMeIn | Feature-rich | High cost | Enterprises |
ScreenConnect | Powerful | Complex setup | MSPs |
RustDesk | Open-source | Technical setup | Developers |
1. Best Splashtop Alternative for High-Performance Remote Work - DeskIn
Pros
Up to 4K 60FPS/2K 240FPS ultra-smooth remote control
Low latency even across long distances
Competitive pricing with strong value
Cross-platform including mobile
Cons
Smaller brand awareness
Best for: Performance-driven users and remote professionals
DeskIn is designed for users who are tired of lag and blurry screens. It delivers a near-local experience, making it ideal for developers, designers, and remote teams who rely on precision and speed. Compared to many traditional tools, it feels significantly more responsive.
Beyond performance, DeskIn balances cost and capability extremely well. If you're looking for a free alternative to Splashtop or a scalable upgrade, it offers a compelling mix of speed, security, and usability. Many users consider it a strong case where DeskIn is better than Splashtop, especially when stability matters.
2. AnyDesk - Lightweight and Fast for Quick Access
Pros
Very lightweight installation
Fast connections on low bandwidth
Easy to use interface
Cons
Limited advanced security features
Occasional connection instability
Best for: Quick remote support and simple workflows
AnyDesk is frequently recommended as a Splashtop alternative thanks to its exceptional speed and minimal system footprint. The installer is just a few megabytes, and the application runs smoothly even on older hardware. It performs particularly well in low‑bandwidth environments, where its proprietary video codec maintains responsive connections during quick troubleshooting sessions.
That said, users who require consistently high frame rates, crisp visuals for design work, or advanced session management may find AnyDesk’s simplicity limiting. While it handles basic tasks admirably, power users often need more stability and richer feature sets.
You may also be interested in:
3. TeamViewer - Enterprise-Grade Remote Access
Pros
Strong security (AES-256, 2FA)
Wide device compatibility
Mature ecosystem and features
Reliable remote support tools
Cons
Expensive pricing plans
Can feel heavy for small teams
Best for: Enterprises and large organizations
TeamViewer has long been a dominant force in remote desktop software, trusted by IT departments and enterprises worldwide. Its comprehensive feature set includes remote support, meeting tools, file transfer, and even augmented‑reality assistance, all secured with AES‑256 encryption and two‑factor authentication.
However, this power comes at a price—literally. TeamViewer’s licensing model can be prohibitively expensive for smaller businesses or individual users. The interface, while feature‑rich, can also feel cluttered for those who simply need unattended access to a few computers.
You may also be interested in:
4. Chrome Remote Desktop - Simple and Free
Pros
Completely free to use
Easy browser-based setup
Works across devices
Cons
Very limited features
Not suitable for business use
Best for: Individuals needing a free remote desktop
Chrome Remote Desktop is the ultimate choice for users seeking a straightforward, completely free remote access solution. Setup takes less than a minute: install the browser extension, authenticate with your Google account, and you can instantly access any computer from another device.
The trade‑off for this simplicity is a very limited feature set. There is no file transfer, multi‑monitor switching, remote printing, or session recording. Users who find themselves needing more than bare‑bones access will see a significant boost in efficiency and experience by upgrading to a dedicated tool like DeskIn, which retains ease of use while adding the features power users rely on.
You may also be interested in:
5. Zoho Assist - Clean and Business-Friendly
Pros
Intuitive interface
Good integrations with Zoho ecosystem
Cloud-based access
Cons
Occasional performance issues
Limited advanced features
Best for: IT helpdesk teams
Zoho Assist delivers a clean, well‑organized remote support experience that integrates naturally with the broader Zoho ecosystem. Its dashboard is intuitive, making it easy for helpdesk teams to manage clients, schedule sessions, and generate reports. For organizations already using Zoho CRM or other Zoho applications, the seamless integration streamlines workflows and reduces the need to switch between different tools.
Despite its polished interface, performance consistency can be an issue, especially during file transfers or when connecting to machines with slower internet connections. The feature set, while sufficient for standard helpdesk operations, lacks some of the advanced controls that IT professionals expect for more complex troubleshooting.
6. RemotePC - Budget-Friendly Alternative
Pros
Affordable pricing
Easy setup
Supports multiple devices
Cons
Performance can vary
Limited advanced capabilities
Best for: Small businesses and budget users
RemotePC positions itself as a budget‑friendly alternative for users who need basic remote access without a steep learning curve. Setup is straightforward, and the pricing structure is refreshingly simple—affordable plans that allow connection to multiple computers without hidden fees. It covers essential features like remote printing, file transfer, and even a simple chat function, making it a practical choice for small businesses and individual users.
However, performance can vary depending on network conditions and the specific devices being connected. Some users report occasional lag or reduced frame rates, which can become frustrating during extended sessions.
7. RealVNC – Secure and Reliable
Pros
Strong encryption and security
Customisable setup
Reliable remote connections
Cons
Occasional login interruptions
Slight learning curve
Best for: Security-focused users
RealVNC has built a strong reputation for secure remote access. It uses robust encryption and offers granular permission controls, allowing administrators to tailor access levels for different users. The platform is highly customizable, supporting on‑premises deployments as well as cloud‑based options, which appeals to organizations with strict security requirements.
While security is clearly its strength, the user experience can sometimes feel less polished than newer competitors. Occasional login interruptions and a steeper configuration curve mean that getting the most out of RealVNC often requires technical expertise. For businesses that need both enterprise‑grade security and consistently high performance without complex setup, a more balanced solution, such as DeskIn, can deliver the best of both worlds, combining strong encryption with a streamlined, speed‑optimized experience.
8. LogMeIn - Feature-Rich but Expensive
Pros
Comprehensive feature set
Strong integrations
Good for collaboration
Reliable access
Cons
High pricing
Overkill for simple use cases
Best for: Enterprises needing all-in-one solutions
LogMeIn provides a comprehensive toolkit that extends far beyond simple remote desktop access. It includes robust file storage, collaboration features, and extensive integration options, making it well‑suited for enterprises that want an all‑in‑one remote work platform. The service is known for its reliability and strong customer support, which can be critical for large organizations managing hundreds or thousands of endpoints.
The main drawback is the cost. LogMeIn’s pricing plans are among the highest in the industry, and the feature set can be overwhelming for users who only need occasional remote access. Many of its advanced capabilities go unused by smaller teams, making it difficult to justify the expense.
9. ScreenConnect - Built for IT Professionals
Pros
Highly customizable
Remote support features
Multi-session support
Cons
Complex setup
Difficult to manage at scale
Best for: MSPs and IT teams
ScreenConnect (now part of ConnectWise) is a powerful, highly customizable remote support platform built with IT professionals and managed service providers in mind. It excels at multi‑session management, allowing technicians to handle several concurrent connections from a single interface. The level of granular control, over permissions, session recording, and even the appearance of the client UI, makes it a favorite among those who need to tailor the software to specific operational workflows.
However, this flexibility comes with a steep learning curve. Initial setup and ongoing management can be complex, especially for smaller teams without dedicated IT administration. For teams seeking a powerful yet approachable solution, DeskIn offers a streamlined alternative that delivers professional‑grade reliability and speed without the administrative overhead.
10. RustDesk – Open-Source Flexibility
Pros
Free and open-source
Self-hosting options
Strong privacy control
Cons
Requires technical setup
Limited support
Best for: Developers and privacy-focused users
RustDesk appeals to developers and privacy‑conscious users who want full control over their remote access infrastructure. As an open‑source solution, it allows self‑hosting on private servers, ensuring that no session data ever passes through third‑party servers. This transparency and autonomy are highly valued by organizations with strict data sovereignty requirements or those simply wishing to avoid vendor lock‑in.
The flip side is that RustDesk requires technical expertise to deploy and maintain. Users must manage their own servers, handle updates, and troubleshoot connection issues without dedicated commercial support. While the core software is free, the total cost of ownership in time and resources can be significant.
You may also be interested in:
FAQs About Best Splashtop Alternatives
1. What is the best Splashtop alternative?
DeskIn is one of the strongest options due to its balance of performance, pricing, and usability. TeamViewer and AnyDesk are also popular choices.
2. Is there a Splashtop alternative free?
Yes, Chrome Remote Desktop and RustDesk are free options. DeskIn also offers a competitive free plan with better performance.
3. What is the best remote desktop software in 2026?
The best remote desktop tools combine speed, security, and ease of use. DeskIn stands out for performance, while TeamViewer excels in enterprise environments.
4. Are there mobile-friendly options?
Yes, most tools support mobile, making them suitable as a Splashtop alternative for Android or a Splashtop alternative for iPad.
5. Why are users switching from Splashtop?
Many users cite high Splashtop pricing, lag issues, and limited scalability as reasons to explore alternatives.
Conclusion
Finding the right Splashtop alternative is less about replacing a tool and more about upgrading your workflow. While options like AnyDesk and TeamViewer each have their strengths, DeskIn stands out by combining high performance, smooth visuals, and cost efficiency in one package. If you want a remote desktop experience that feels fast, stable, and future-ready, DeskIn is easily one of the smartest choices you can make today.
Is DeskIn Safe to Use? Everything You Need to Know
When considering a remote desktop tool, one question always comes first: Is DeskIn safe? After all, you're not just accessing a device; you're potentially exposing files, data, and even real-time activity across networks.
The short answer is yes, DeskIn is designed with strong security measures in place. But understanding why it's safe, and how that safety actually works in real-world use, is what truly matters. This guide breaks it down in a clear, practical way so you can decide with confidence.
What Does "Safe" Really Mean for Remote Desktop Software?
Before answering is DeskIn safe to use, it helps to define what "safe" actually means in the context of remote desktop software.
Security isn't just one feature. It's a layered system that protects different aspects of your connection. First, there's data security, which ensures that everything transmitted between devices is encrypted and unreadable to outsiders. Then comes access control, which determines who can connect to your device and under what conditions.
Privacy protection is another key layer. This includes features that prevent others from seeing your screen or accessing sensitive inputs without permission. Finally, account security ensures that even if someone tries to break in, additional verification steps stop unauthorized access. A remote desktop tool is only truly safe when all of these layers work together.
👀 What Is DeskIn Used For? (And Why Security Matters)
To fully understand whether DeskIn is safe, it helps to look at what DeskIn is used for. DeskIn is commonly used for remote work, IT support, cross-device file access, and even high-performance tasks like design or development. These scenarios often involve sensitive data, which makes security not just important, but essential.
Users benefit from DeskIn's stable connection and low-latency performance, but those advantages only matter if the connection is secure. That's why security features are deeply integrated into the platform rather than treated as optional extras.
How DeskIn Protects Your Data and Privacy
DeskIn approaches security as a complete system with multiple protective layers, addressing common concerns about whether the platform is safe and legit for daily use. Here's how it keeps your data secure.
1. End-to-End Encryption
All connections use AES-256 encryption, the same standard trusted by banks and financial institutions. This ensures your data remains protected during transmission, even on public or unsecured networks.
2. Multi-Layered Access Control
Beyond passwords, DeskIn requires various verifications: user access, blacklisting IP and device verification. Even if login credentials are compromised, unauthorized users cannot access your device without passing these additional checks.
3. Privacy-Focused Features
Privacy screen mode lets you black out the host display during sessions, preventing anyone nearby from viewing your activity. Granular permission settings also give you control over file, audio, and input access.
4. Proven Reliability for Daily Use
These security layers work together to make DeskIn a safe choice for everyday workflows, whether you're accessing personal files or managing professional systems remotely.
👀 You may also be interested in
Is DeskIn Safe from Hackers? (Real Risk Analysis)
A more specific concern many users have is: Is DeskIn safe from hackers?
The reality is that no remote desktop software is completely risk-free, but the level of risk depends heavily on how the software is designed and how it's used.
DeskIn minimizes risk through encryption, authentication, and access controls. These features make unauthorized access extremely difficult. However, like any online tool, user behavior still plays a role. Weak passwords, sharing access credentials, or using unsecured devices can introduce vulnerabilities.
In practice, High-definition Remote Desktop App DeskIn provides the tools needed for a secure environment. As long as users follow basic security practices, the likelihood of unauthorized access remains very low.
Is DeskIn Safe on Mobile Devices (iPhone & Android)?
Mobile access introduces another layer of concern, especially for users asking is DeskIn safe for iPhone or is DeskIn safe for Android.
DeskIn is designed to maintain the same level of security across devices. Data transmitted between your phone and remote computer is still encrypted, and login protection remains in place through authentication features.
Unlike some remote tools, DeskIn does not require risky system modifications such as rooting or jailbreaking. This significantly reduces potential vulnerabilities on mobile devices. Whether you're accessing a work computer from an iPad or managing files through your phone, the security model remains consistent, making it a safe option for cross-device use.
Is DeskIn Free to Use? And Does Free Mean Less Secure?
Another common question is whether DeskIn is free to use, and more importantly, does free access affects security. DeskIn does offer a free version, but security features are not reduced or removed in lower-tier plans. Encryption, authentication, and access control remain in place regardless of pricing.
Security is part of the core infrastructure, not a premium add-on. This means users can still benefit from a secure connection even when using the free version.
Tips to Use DeskIn Safely (Best Practices)
Even with strong built-in protection, safe usage also depends on your own habits. Following a few key practices can help you maintain control over your account and devices:
Use strong passwords: Create unique, complex passwords for your DeskIn account to prevent unauthorized access through credential guessing.
Enable two-factor authentication: Adding this extra verification step ensures that even compromised passwords won't grant access to your device.
Never share access credentials: Keep your login details private and avoid sharing them with others, even temporarily.
Always log out after sessions: End remote connections when they're no longer needed to prevent unattended access to your system.
Keep devices updated: Regular updates ensure you have the latest security patches and protection against emerging vulnerabilities.
Final Verdict: Is DeskIn Safe and Reliable?
So, is DeskIn safe?
In most practical scenarios, the answer is yes. Its combination of encryption, authentication, and access control creates a secure environment for remote access, whether you're working from home or managing devices across locations.
At the same time, security is always a shared responsibility. DeskIn provides the foundation, but safe usage habits ensure the best protection. When both work together, DeskIn becomes a reliable and secure choice for remote desktop access.
MacからWindowsを操作!Chromeリモートデスクトップの設定方法と注意点 | DeskIn
はじめに:OSの壁を越えるリモートアクセスの必要性
Macユーザーが直面する大きな課題の「壁」、それはWindows専用ソフトの使用です。
CADや会計ソフト、あるいはWindowsでしか動作しないPCゲームなど、特定のソフトウェアを動かすためだけに、わざわざWindows機を買い足す必要はありません。Googleが提供する無料ツール「Chrome リモート デスクトップ」を使えば、今手元にあるMacから、遠隔地にあるWindowsを驚くほど簡単に操作できるようになります。
本記事では、MacからWindowsへ接続するための最短設定ガイドと、実際に使ってわかったクロスプラットフォーム(Mac-Win間)ならではの「見落としがちな注意点」を詳しく解説します。
設定手順:Mac から Windows へ接続するための設定手順
Chrome リモート デスクトップの設定は非常にシンプルですが、操作される側(Windows)と操作する側(Mac)の両方で準備が必要です。最短で接続を完了させるための手順を解説します。
Windows(ホスト側)での準備
まずは、操作される側の Windows パソコンでリモートアクセスを許可する設定を行います。
拡張機能とインストーラーの導入 Chrome ブラウザでChrome リモート デスクトップのアクセス設定ページを開き、「リモートアクセスの設定」から青色のダウンロードアイコンをクリックします。指示に従って Chrome 拡張機能を追加し、インストーラー(.msiファイル)を実行してください。
パソコンの名前と PIN コードの設定 インストール完了後、Windows パソコンに任意の名前を付けます。次に、6桁以上の PIN コード(暗証番号)を設定します。この PIN は Mac から接続する際に毎回必要になるため、忘れないようにメモしておきましょう。
【重要】注意点:スリープモードの解除 ここが最も見落としやすいポイントです。Windows がスリープ状態になると、Mac から接続できなくなります。
「設定」>「システム」>「電源とバッテリー」を選択します。
「画面とスリープ」の設定で、電源接続時に「次の時間が経過後、デバイスをスリープ状態にする」を「なし」に変更してください。
Mac(クライアント側)からの操作
Windows 側の設定が終われば、あとは Mac からアクセスするだけです。
アクセスサイトへログイン
Mac の Chrome ブラウザで同じアクセス設定ページを開きます。Windows 側で使用したのと同じ Google アカウントでログインしていることを確認してください。
ターゲットの選択と認証
「リモートデバイス」の一覧に、先ほど設定した Windows パソコンの名前が表示されます。それをクリックすると PIN コードの入力画面が表示されます。
接続完了
正しい PIN を入力すれば、Mac のブラウザ内に Windows のデスクトップ画面が表示されます。これで、Mac のキーボードとマウスを使って Windows を操作できるようになります。
ヒント: よりスムーズにアクセスしたい場合は、Chrome の「アプリとしてインストール」機能を使って、Dock に Chrome リモート デスクトップを登録しておくのがおすすめです。
Mac-Windows間の操作における注意点と限界
Chrome リモート デスクトップは導入こそ簡単ですが、実際に Mac から Windows を操作し始めると、「OS の違い」に起因するいくつかの課題が出てきます。これらは作業効率に直結するため、あらかじめ理解しておく必要があります。
H3: キーボードマッピングの競合
Mac ユーザーにとって最もストレスを感じるのが、「修飾キー」の違いです。
Command キー vs Control キー: Mac でのコピーは
Command + Cですが、リモート先の Windows ではControl + Cが基本です。Mac の Command キーが Windows の Windows キーとして認識されることもあり、指が覚えているショートカットが全く通用しない場面が多々あります。ショートカットキーの誤作動: 最も注意すべきは
Command + Qです。Windows 上のアプリを終了させようとしてこのキーを押すと、Mac 側のブラウザ(Chrome)自体が終了してしまい、リモート接続が切断されるという事態が頻発します。
電源管理の課題(Wake on LAN 非対応)
リモートデスクトップの運用において、非常に致命的な制限があります。
Wake on LAN (WoL) 非対応: Chrome リモート デスクトップは、電源が切れている(またはスリープ状態の)パソコンを遠隔から起動する「リモート喚起」機能を持っていません。
24時間稼働の必要性: つまり、外出先や別室から接続するためには、自宅の Windows PC を常に電源オンの状態で放置しておかなければなりません。これは電気代の無駄だけでなく、PC パーツの寿命を縮める原因にもなります。
もうキー入力や電源管理で悩まない。Macユーザーに最適な操作感を。 [DeskIn(デスクイン)を無料でインストール]
マウス操作とトラックパッドの違和感
Mac の魅力である「滑らかな操作感」が、リモート環境では損なわれがちです。
ジェスチャーの喪失: Mac 特有の「指3本でのスワイプ(デスクトップ切り替え)」や「ピンチイン・アウト」などのジェスチャーは、リモート先の Windows には正しく伝わりません。
スクロールの不自然さ: Mac の慣性スクロールが Windows 上ではカクついたり、右クリックの反応が一瞬遅れたりと、繊細な操作を求めるほど「手元の感覚」とのズレがストレスに変わります。
パフォーマンスと遅延(レイテンシ)
ブラウザベースで動作するツールである以上、通信速度や描画性能には限界があります。
フレームレートの制限: Chrome リモート デスクトップは通常 30FPS 程度に制限されています。通常の文書作成なら問題ありませんが、画面の動きが激しい作業では残像感やカクつきが目立ちます。
高負荷作業には不向き: 動画編集でタイムラインを細かく動かしたり、FPS ゲームをプレイしたりといった、コンマ数秒のレスポンスが求められる用途には、遅延(レイテンシ)が大きすぎるため実用的とは言えません。
Chrome リモート デスクトップはどんな人に向いている?
ここまで解説してきた通り、Chrome リモート デスクトップは「手軽さ」と「無料」という点では非常に優秀ですが、性能や操作性には明確な限界があります。
あなたの利用シーンが以下のどちらに当てはまるか、導入前のチェックリストとして活用してください。
推奨:このようなシーンには最適です
短時間のファイル確認: 外出先から自宅の PC にあるドキュメントを少しだけ閲覧・転送したい。
たまに行う設定変更: サーバーの再起動や、ソフトウェアの簡単なアップデート作業。
ライトな事務作業: ブラウザ上での簡単なデータ入力や、メールの送受信など、スピードを重視しない作業。
コストをかけたくない: 性能よりも、とにかく「無料で繋がること」を最優先したい。
× 非推奨:このようなシーンには不向きです
長時間の業務・テレワーク: 毎日数時間以上、リモート環境でメイン業務を行う場合。キーボードの違和感やカクつきが大きなストレスになります。
クリエイティブな作業: 動画編集、デザイン、CAD など。正確なマウス操作と色の再現性、そして滑らかな描画が求められる作業には力不足です。
遅延を嫌う操作(ゲームなど): コンマ数秒の遅延が命取りになる PC ゲームや、リアルタイムのレスポンスが必要な操作。
生産性を追求するプロフェッショナル: 「接続できる」ことではなく、「手元のパソコンと同じ感覚で動く」ことを求める方。
まとめると: Chrome リモート デスクトップは、いわば「非常用の予備ツール」です。もしあなたが「非推奨」の項目に一つでも当てはまり、リモート環境での生産性を妥協したくないのであれば、より高度な機能を持つ専門ツールの検討をおすすめします。
さらに快適さを求めるなら:プロ仕様の選択肢
「とりあえず繋がる」という段階を卒業し、「リモート先であることを忘れるほどの快適さ」を求めるなら、無料ツールの限界を超えたプロ仕様の選択肢を検討するタイミングです。
特に、「PCをつけっぱなしにするのが不安」「キー入力が直感的でない」「画面の動きがカクつく」といったストレスを日常的に感じ始めたら、それはリモートデスクトップ環境をアップグレードすべきサインです。
そこでおすすめなのが、Macユーザーのニーズを徹底的に研究して開発された「DeskIn(デスクイン)」です。
Macに最適化されたキー入力:Command/Controlの自動マッピング
DeskIn(デスクイン)の最大の特徴の一つは、OS 間の違いをインテリジェントに吸収する「スマートキーマッピング」です。
Chrome リモート デスクトップで多くのユーザーを悩ませていた「Command と Control の押し間違い」や「Cmd+Q でブラウザが閉じてしまう問題」を解決。Mac のキーボードレイアウトを維持したまま、Windows を直感的に操作できるため、ブラインドタッチのスピードを落とすことなく作業に没頭できます。
Wake on LAN(リモート起動)対応:必要な時だけPCを起動
「外出先から繋ぎたいけれど、自宅の PC を一日中つけておくのは抵抗がある……」。そんな悩みも DeskIn なら解決できます。
Wake on LAN(リモート起動)機能に対応しているため、Windows PC がスリープ状態やシャットダウン状態であっても、必要な時に Mac から遠隔から電源を入れることが可能です。電気代の節約はもちろん、ハードウェアへの負荷も最小限に抑えられる、スマートな運用を実現します。
4K/60FPS の圧倒的パフォーマンス:ネイティブに近い低遅延
ブラウザベースのツールでは到達できない、4Kの高解像度と 60FPS の高フレームレートでのストリーミングに対応しています。
まるで手元の Mac 上で Windows アプリが直接動いているかのような、吸い付くような操作感を実現。動画編集の繊細なシーク操作や、一瞬の判断が求められる PC ゲームでも、遅延を気にすることなく快適にプレイ・作業が可能です。
iPad/モバイル連携の強化:外出先からの高い操作性
DeskIn は Mac だけでなく、iPad やスマートフォンからの操作性も極限まで高められています。
iPad を使った「サブディスプレイ化」や、マウス・キーボードを接続しての「完全リモートワーク」など、モバイルデバイスを真の生産性ツールへと変貌させます。専用アプリならではのジェスチャー最適化により、移動中のちょっとした修正もストレスフリーに行えます。
性能比較:Chrome リモート デスクトップ vs DeskIn
機能・特性 | Chrome リモート デスクトップ | DeskIn(デスクイン) |
主な用途 | 簡易的な操作・緊急用 | ビジネス・クリエイティブ・ゲーム |
画質・フレームレート | 最大 30FPS(カクつきあり) | 4K / 60〜144FPS(極めて滑らか) |
キーボードマッピング | 基本のみ(Cmd/Ctrl 競合あり) | Mac/Win 自動最適化(競合なし) |
リモート起動 (WoL) | 非対応(PCの常時起動が必要) | 対応(必要な時だけ遠隔起動) |
操作感 | 遅延あり・直感的でない | 低遅延・Macネイティブな操作感 |
導入コスト | 無料 | 無料版あり / 高機能有料版あり |
まとめ
Chrome リモート デスクトップは、その圧倒的な手軽さとコストパフォーマンスにおいて、リモートデスクトップの「入り口」として非常に優秀なツールです。ちょっとしたファイル確認や、たまに発生する軽作業であれば、これほど便利なものはありません。
しかし、毎日数時間に及ぶ業務や、1分1秒を争うクリエイティブな作業、あるいは Mac と Windows の操作性の違いにストレスを感じているのであれば、無料ツールの限界を超える時が来ているのかもしれません。
これらを手に入れることで、あなたのリモートワーク体験は劇的に進化するはずです。まずは一度、DeskIn が提供する無料版の快適さを体験してみてはいかがでしょうか
DeskIn vs Chrome Remote Desktop: Which One Fits Your Workflow Best?
When it comes to remote access tools, the comparison between DeskIn and Chrome Remote Desktop often comes down to one simple question: do you just need quick access, or do you need performance and control?
Both tools are reliable, secure, and widely used. But they are built for very different types of users. Chrome Remote Desktop focuses on simplicity and accessibility, while DeskIn is designed for users who need high performance, stability, and advanced features across multiple devices.
If you're deciding between the two, this guide breaks down not just what they offer, but which one actually fits your workflow.
Quick Comparison: DeskIn vs Chrome Remote Desktop
Feature | DeskIn | Chrome Remote Desktop |
|---|---|---|
Performance | Up to 4K 60FPS/2K 240FPS, low latency | Standard performance |
Ease of Use | Requires app installation | Browser-based, very simple |
Device Support | Windows, macOS, iOS, Android | Works via Chrome browser |
File Transfer | Fast and stable | Limited |
Multi-device Management | Yes | No |
Mobile Experience | Optimized for iPad & iPhone | Basic |
Security | Privacy screens and granular black/whitelists | Basic |
Price | Free + paid plans | Completely free |
In short, Chrome Remote Desktop is great for quick, lightweight access, while DeskIn is built for users who expect more from their remote desktop experience.
Chrome Remote Desktop Overview
Chrome Remote Desktop is one of the simplest remote access tools available. It runs directly through the Chrome browser and requires only a Google account to get started. This makes it especially popular among casual users and those already working within the Google ecosystem.
It works particularly well on devices like Chromebooks, where everything is already browser-based. It's also accessible across platforms, including mobile devices like iPhone and iPad, though the experience on mobile can feel limited compared to desktop use.
If you're wondering how to use Chrome Remote Desktop, the process is straightforward. You install the Chrome extension, sign in with your Google account, set up a PIN on the host device, and then connect from another device using the same account. The entire setup usually takes just a few minutes.
That said, simplicity comes with trade-offs. Chrome Remote Desktop lacks advanced features like high frame rate streaming, multi-monitor control, or professional-grade file transfer. For occasional access, it works well. But for more demanding tasks, users often start to feel its limitations.
👀You may also be interested in:
DeskIn Overview: A More Powerful Chrome Remote Desktop Alternative
If Chrome Remote Desktop is a lightweight sketch, DeskIn is a full workstation painted in high resolution. DeskIn focuses on performance, stability, and flexibility. It supports up to 4K 60FPS streaming, making it suitable for tasks where visual clarity and responsiveness matter, such as design work, video editing, or even gaming.
As a Chrome remote desktop alternative, unlike browser-based tools, DeskIn is a dedicated remote desktop application. While this requires installation, it unlocks a much more stable and feature-rich experience. Users can manage multiple devices, transfer large files efficiently, and enjoy smoother control across different platforms.
DeskIn is also optimized for mobile workflows. Whether you're using an iPad or smartphone, the interaction feels more responsive and closer to a desktop experience, rather than a simplified viewer. For users who find Chrome Remote Desktop "good enough" at first but limiting over time, DeskIn often becomes the natural upgrade path.
DeskIn vs Chrome Remote Desktop: Real Use Cases
The real difference between these two tools becomes clear when you look at how they perform in everyday scenarios.
1. For Casual Remote Access
If you only need to check files on your home computer or help a friend troubleshoot something quickly, Chrome Remote Desktop is more than enough. It's free, easy to set up, and doesn't require installing extra software beyond Chrome. In this case, DeskIn may feel like overkill.
2. For Remote Work and Productivity
For professionals working remotely on a daily basis, stability and efficiency matter much more. This is where DeskIn starts to stand out.
Tasks like editing documents, managing multiple screens, or transferring files between devices become smoother and faster. Chrome Remote Desktop can handle basic workflows, but it often struggles with responsiveness and lacks the tools needed for a seamless work environment.
3. For High-Performance Tasks (Design, Editing, Gaming)
This is where the gap becomes impossible to ignore. DeskIn's support for high resolution and high frame rates makes it suitable for visually demanding work. Whether you're editing videos, working with design software, or running simulations, performance consistency is critical. Chrome Remote Desktop, on the other hand, is not designed for these scenarios. It works, but not comfortably.
4. For Chromebook and Google Ecosystem Users
If you rely heavily on Google services or use a Chromebook, Chrome Remote Desktop integrates naturally into your workflow. It's lightweight, requires no additional setup, and feels like an extension of the browser itself. In this scenario, it remains a very practical choice.
5. For iPad and iPhone Remote Access
Mobile usage highlights another important difference. While remote desktop Chrome iPhone, and Chrome Remote Desktop iPad are functional, they often feel like simplified versions of the desktop experience. Controls can be less intuitive, and performance may vary depending on the connection.
DeskIn, by contrast, is designed with cross-device interaction in mind, offering a smoother and more responsive mobile experience.
👀 You may also be interested in:
FAQs About Chrome Remote Desktop and DeskIn
1. Is there anything better than Chrome Remote Desktop?
Yes. Tools like DeskIn offer better performance, more features, and improved stability, especially for professional use cases.
2. Is Chrome Remote Desktop discontinued?
No, Chrome Remote Desktop is still actively maintained by Google. It continues to receive security updates and remains available for users needing simple, free remote access.
3. Is DeskIn Remote Desktop legit?
Yes, DeskIn is a legitimate remote desktop solution. It uses encryption to secure connections and provides access controls, making it safe for both personal and professional use.
4. Final Verdict: Which One Should You Choose?
When comparing DeskIn vs Chrome Remote Desktop, the choice depends on how demanding your remote access needs are. Chrome Remote Desktop is simple, free, and ideal for occasional use, especially if you just need quick access to a device without extra setup.
As your workflow becomes more intensive, the limitations start to surface. DeskIn offers a smoother, more stable experience with better performance and control, making it a strong long-term Chrome remote desktop alternative for users who rely on remote access every day.
8 Best Remote Desktops for Video Editing in 2026
Remote video editing is no longer a compromise; it's a workflow upgrade. Whether you're working in Adobe Premiere Pro, After Effects, or DaVinci Resolve, the right remote desktop can turn your laptop into a high-performance editing station.
But not all tools are built for remote video editing collaboration. Lag, poor color accuracy, and unstable connections can ruin productivity. In this guide, we'll break down the best remote desktop for video editing tools so that you can edit smoothly from anywhere.
Why You Need a Remote Desktop for Video Editing
Modern creators are no longer tied to a single workstation. With remote work software, you can access your powerful desktop from anywhere without investing in an expensive laptop. For many editors, especially freelancers and small teams, this solves a real problem: you already have a high-performance PC, but mobility is limited. Instead of duplicating hardware, video editing remote desktop tools let you stream your workflow in real time.
Another key benefit is remote collaboration. Teams can work on the same project across different locations, review edits instantly, and avoid large file transfers via remote collaboration tools. However, this only works if your remote desktop software supports high frame rates, low latency, and stable connections. Otherwise, editing becomes frustrating.
Quick Comparison of Best Remote Desktops for Video Editing
Here's a quick overview of the best tools and who they're for:
DeskIn – Best overall for performance + affordability + multi-device workflows
Parsec – Best for ultra-low latency editing
Splashtop – Best for high-resolution streaming
HP Anyware – Best for enterprise-level workflows
Jump Desktop – Best for Mac users
AnyDesk – Best lightweight remote access
Chrome Remote Desktop – Best free basic option
RustDesk – Best open-source alternative
1. The Best Overall Remote Desktop for Video Editing: DeskIn
Pros
Up to 4K 60FPS / 2K 240FPS performance
Ultra-low latency for smooth editing timelines
Multi-device support (PC, Mac, iPad, Android)
Affordable pricing with free plan available
Cons
Smaller brand awareness compared to legacy tools
DeskIn stands out as the best remote desktop for video editing by balancing performance, stability, and accessibility. Unlike many traditional remote support tools, it is designed for high-frame-rate tasks, making timeline scrubbing, preview playback, and effects editing feel responsive and fluid.
For creators working across devices, DeskIn enables seamless remote video editing collaboration. You can access your main editing PC from a laptop, tablet, or even a secondary workstation without noticeable lag. Compared to tools like Chrome Remote Desktop, which struggle with video-heavy workloads, DeskIn maintains consistent quality and responsiveness—making it a practical choice for both solo editors and distributed teams.
2. Best for Low-Latency Editing: Parsec
Pros
Extremely low latency
High frame rate streaming
Popular among creative professionals
Cons
Limited collaboration features
Setup can be complex for beginners
Parsec is widely recognized as a top choice for remote video editing, especially when latency is your biggest concern. Its streaming technology is optimized for real-time responsiveness, which makes it ideal for tasks like timeline scrubbing and motion graphics work in After Effects.
However, while Parsec excels in performance, it lacks some features needed for full remote video editing collaboration. Multi-user workflows and advanced access control are not as robust as some newer tools. For users who need both performance and flexibility, alternatives like DeskIn may provide a more balanced solution.
3. Splashtop – Best for High-Resolution Streaming
Pros
Supports 4K streaming
Strong color accuracy
Reliable for creative tasks
Cons
Higher cost for advanced features
Can experience latency over long distances
Splashtop is a solid option for editors who prioritize visual fidelity. Its support for high-resolution streaming and 4:4:4 color makes it suitable for color grading and detailed editing work.
That said, performance consistency can vary depending on network conditions. Some users report lag when working outside local networks. Compared to more optimized remote work software like DeskIn, Splashtop may require a stronger connection to maintain the same level of smoothness.
4. Best for Enterprise Workflows: HP Anyware
Pros
Industry-grade performance
Secure and scalable
Used in professional studios
Cons
Expensive
Complex setup
HP Anyware (formerly Teradici) is designed for high-end production environments. It uses advanced protocols to deliver excellent performance and security, making it a common choice in the media and entertainment industries.
However, for small teams or individual creators, it may be overkill. The cost and setup complexity make it less accessible compared to modern remote desktops for video editing tools that offer similar performance with easier deployment. The high cost and technical complexity create barriers that modern remote desktop solutions have eliminated, like DeskIn, offering comparable performance with far simpler deployment.
5. Best for Mac Users: Jump Desktop
Pros
Great macOS integration
Smooth performance
Easy to use
Cons
Limited advanced features
Not ideal for heavy collaboration
Jump Desktop has earned a loyal following among Mac users seeking a straightforward, efficient remote desktop for video editing. Its Fluid Remote Desktop protocol provides smooth, responsive performance for most editing tasks without unnecessary complexity.
Where it falls short is in collaboration. Jump Desktop is built for individual use, lacking the team-oriented features that creative groups need. For solo professionals, it works well, but teams will quickly miss real-time collaboration tools found on other platforms.
6. Best Lightweight Option: AnyDesk
Pros
Fast and lightweight
Easy to set up
Works on multiple devices
Cons
Limited performance for video editing
Lower visual quality
AnyDesk has built its reputation on lightweight design and remarkable ease of use for general remote access. It handles everyday tasks competently, connecting quickly and running smoothly on modest hardware.
The limitations become apparent with demanding creative work. Remote video editing requires consistent frame rates and crystal-clear visuals—areas where AnyDesk struggles. For professional editors who need precision, the performance gap becomes impossible to ignore.
7. Chrome Remote Desktop – Best Free Option
Pros
Completely free
Easy browser-based setup
Works on any device
Cons
Poor performance for editing
Limited features
Chrome Remote Desktop is one of the most accessible remote support tools, offering a simple way to access your computer from anywhere. It's free, requires almost no setup, and lets you access your computer from anywhere with just a browser. For basic technical support or quick file grabs, it gets the job done.
However, it is not built for remote video editing. Users often experience lag, compression artifacts, and low frame rates. If you're working on professional projects, upgrading to a more capable solution is highly recommended.
8. RustDesk – Best Open-Source Alternative
Pros
Open-source
Self-hosting available
Free to use
Cons
Requires technical setup
Performance can vary
RustDesk appeals to users who prioritize open-source philosophy and want complete control over their remote access infrastructure. The flexibility to self-host and customize is genuinely valuable for privacy-conscious users. RustDesk is an interesting option for users who prefer open-source remote desktop not working alternatives or want full control over their infrastructure.
Performance, however, depends entirely on your configuration skills. Without technical expertise, achieving the smooth, low-latency experience required for professional editing is challenging. It's powerful for those who know how to tune it, but not plug-and-play.
FAQs About the Best Remote Desktop for Video Editing
Q1. Can video editing be done remotely?
Yes, with the right remote desktop for video editing, you can edit videos smoothly from anywhere. Tools like DeskIn and Parsec provide low latency and high frame rates for professional workflows.
Q2. What is the best free remote desktop for video editing?
Free options like Chrome Remote Desktop exist, but they lack performance. DeskIn offers a free plan with better performance, making it a stronger choice for real editing work.
Q3. Is Parsec good for video editing?
Yes, Parsec is excellent for low-latency editing. However, it may lack collaboration features needed for team workflows.
Q4. Why is my remote desktop not working smoothly?
Common issues include poor network connection, low bandwidth, or software limitations. Choosing optimized remote work software like DeskIn can significantly improve performance.
Conclusion
Choosing the best remote desktop for video editing depends on your workflow, budget, and performance needs. While tools like Parsec and Splashtop excel in specific areas, many solutions struggle to balance performance, stability, and usability.
If you're looking for a well-rounded solution, DeskIn offers a strong combination of high performance, smooth streaming, and cross-device flexibility. Whether you're working solo or collaborating remotely, it provides a reliable foundation for modern remote video editing workflows.
荷物ゼロで、どこでもフルスペックの仕事を。Deskimo × DeskIn が変えるリモートワークの形
リモートワークの「自由」は、なぜこんなに重いのか
「どこでも働ける」はずが、気づけばバッグの中にはノートPC、充電器、マウス、場合によってはポータブルモニターまで詰め込んでいる——。東京や大阪でリモートワークをしている方なら、一度はこの「移動のたびにオフィスを背負う」感覚を経験したことがあるはずです。
さらに自宅で仕事をしていると、別の問題も出てきます。パートナーがリモート会議を始めた。上の階で工事が始まった。近所のカフェのWi-Fiが不安定で集中できない。「在宅勤務」は理想に見えて、実際には集中できる環境を確保するのが難しいことも多いのです。
この記事では、この2つの問題を同時に解決する組み合わせをご紹介します。Deskimo(オンデマンドのコワーキングスペース予約サービス)とDeskIn(リモートデスクトップソフトウェア)です。
自宅が「最高の仕事場」とは限らない理由
コワーキングスペースが選ばれるのには理由があります。
まず、生活と仕事を物理的に切り分けられること。「この場所に来たら仕事モード」という境界線があるだけで、集中しやすくなります。コワーキングスペースの利用者が在宅勤務よりも高い生産性を感じやすいという調査結果もあります。
次に、設備面での充実。安定した高速Wi-Fi、エルゴノミクス対応の椅子、個室の会議室、静音ゾーン——自宅では再現しにくい環境が揃っています。
そして、仕事をしている人たちに囲まれるという環境。周りも集中して作業している場所にいると、自然と自分も仕事モードに入れます。
でも、月額会員になる必要はありません
コワーキングスペースの弱点は、月額会員制や長期契約が多いことです。毎日使うわけでもないのに固定費がかかるのは、リモートワーカーにとって合理的ではありません。
Deskimoはこの問題を解決します。東京・大阪を中心に、ホットデスクや会議室を分単位で予約・利用できます。会員登録不要、使った時間分だけ支払う仕組みです。
「軽い荷物」で働く、新しいワークフロー
コワーキングスペースを使い始めると、最初に気づくのがバッグの重さです。ノートPC、充電器、マウス——毎日電車や自転車で通勤しながら持ち歩くのは、じわじわと負担になります。
解決策はシンプルです。ハイスペックなマシンは自宅に置いておく。手元にはタブレットか軽量ノートPCだけ持つ。
DeskInがそのギャップを埋めます。タブレット上でDeskInを開き、自宅のデスクトップPCに接続すれば、CADソフト、動画編集タイムライン、数十タブを開いた調査作業——すべてが自宅のマシンで動きながら、手元の画面にそのまま映し出されます。重いPCを持ち歩かなくても、フルスペックの作業環境がどこでも手に入ります。
「軽い荷物の1日」はこんな感じ
午前中はDeskimoのホットデスクでメール処理と集中作業。午後は個室の会議室を予約し、DeskInで自宅のPCに接続して、重い処理が必要なデザイン作業やレンダリングをこなす。バッグの中身はタブレット1台分。アウトプットは変わらない。
パブリックWi-Fiのセキュリティ問題を、構造ごと解決する
コワーキングスペースや카フェのWi-Fiで機密ファイルを開くのは、リスクを伴います。ファイルが端末に保存されていれば、デバイスの紛失や盗難によってデータが漏洩する可能性があります。
DeskInのアーキテクチャは、この問題を構造的に回避します。実際の作業は自宅・オフィスのマシン上で完結し、ファイルは一切ネットワーク外に出ません。 手元のデバイスは「画面を表示し、キーボード・マウスの入力を送り返すだけ」の窓口にすぎません。
さらに、DeskInにはエンドツーエンド暗号化とプライバシーモード(ホスト側の画面をブランクにし、後ろから覗かれても作業内容が見えない機能)が備わっています。法務・医療・金融など、規制のある業界でデータを扱うチームにとっても、安全に使えるリモート環境です。
モニターは「借りる」、デスクトップは「持ち込む」
コワーキングスペースのあまり語られないメリットのひとつが、外部モニターやスマートTVが備わった会議室を使えることです。Deskimoの多くの会議室にも、こうした設備が用意されています。
DeskInのマルチスクリーン管理機能を使えば、こうした設備を最大限に活かせます。追加のケーブルやアダプターなしで、リモートデスクトップを複数のディスプレイに拡張表示できます。財務モデルを1画面に、参考資料を別画面に、コミュニケーションツールをもう1画面に。モニターを1台も買わずに実現できます。
コワーキングスペースでリモートデスクトップを使うためのヒント
まず場所を決め、ソフトウェアはその後で
在宅での集中に課題を感じているなら、まずDeskimoでいくつかの場所を試してみてください。カフェのような雰囲気が合う人もいれば、静かな個室ブースが向いている人もいます。自分に合った場所がわかったら、デスクトップとタブレット両方にDeskInをインストールし、実際の業務に使う前に接続を試しておきましょう。
場所と作業内容を組み合わせる
オープンなコワーキングエリアは、メール処理や軽いコミュニケーション作業に向いています。静音ゾーンは集中執筆やデータ分析に。個室の会議室はクライアントとのオンライン商談や、マルチスクリーンでの負荷の高い作業に最適です。Deskimoは分単位の料金制なので、ホットデスクで足りる日に会議室を予約するような無駄が生じません。
コスト感を現実的に見積もる
東京・大阪の主要エリアで専用個室を持つとなると、月額数万円〜数十万円規模のコストになります。DeskimoとDeskInを組み合わせて週に数日利用するスタイルであれば、そのコストの一部で同等以上の作業環境が手に入ります。Deskimoの料金はロケーションや利用形態によって異なるため、現地スタッフに確認することをおすすめします。
注意しておきたいトレードオフ
コワーキングスペースは専用オフィスの完全な代替ではありません。混雑状況や騒音レベルはその日によって変わります。分単位課金は長時間利用だとコストがかさむこともあります。大事なセッションは事前に予約を入れ、代替ロケーションも把握しておくと安心です。終日利用が予定されている日は、Deskimoのデイパスやバンドルプランも検討してみてください。
特別オファー:DeskimoとDeskInを組み合わせて始める
Deskimoを初めて使う方へ
Deskimoアプリで新規登録の際、紹介コード DESKIN を入力するとUS$10オフになります(新規ユーザー限定)。
Deskimo Businessアカウントを開設する場合は、紹介コード DESKBIZ で初回クレジットパッケージが60%オフになります。
DeskInを始める方へ
DeskInは無料プランから使い始められます。Deskimoをすでにお使いの方は、DeskIn購入時にプロモコード DESKIMO を入力すると、初月50%オフ(年間プランは20%オフ)が適用されます。このプロモーションは2026年7月31日まで有効です。
まとめ:「どこでも働ける」を、本当に実現するために
最高のリモートワーク環境とは、機材をたくさん揃えることではありません。どこに行っても手ぶら同然で、いつもと変わらないアウトプットが出せること。
Deskimoで東京・大阪の好きな場所に仕事の場を確保し、DeskInで自宅のマシンのフルパワーをどこからでも引き出す。この組み合わせが、リモートワークの「重さ」を取り除きます。
About Deskimo
Deskimoは、コワーキングスペース・プライベートオフィス・会議室を分単位で予約できる、オンデマンドのワークスペースプラットフォームです。長期契約も月額会員も不要。必要なときに、必要な時間だけ予約して、使った分だけ支払います。
About DeskIn
DeskInは、低遅延・高セキュリティのリモートデスクトップソフトウェアです。エンドツーエンド暗号化、マルチスクリーン管理、高速データ転送に対応し、デスクトップのパワーをそのままどこでも持ち出したいプロフェッショナル向けに設計されています。
リモートデスクトップでのCtrl+Alt+Delete操作の方法【トラブルシューティング】
リモートデスクトップセッションに接続しながら Ctrl + Alt + Delete をキーボードで押そうとしたことがあるなら、その操作が予想通りには機能しないことをご存知でしょう。このコマンドはリモートではなく、ローカルマシンが受け取るためです。イライラしますよね?
リモートで Ctrl + Alt + Del が機能しないとき
リモートワーカー、フリーランサー、デジタルノーマッドにとって、リモートデスクトップで Ctrl + Alt + Delete を制御する方法を知ることは非常に重要です。画面をロックしたり、タスクマネージャーにアクセスしたり、パスワードを変更したりする際、この簡単なショートカットはあなたが思っている以上に大事です。
良いニュースがあります。これを扱うためのより良い方法があり、ステップバイステップで説明します。
1. なぜ Ctrl + Alt + Del がデフォルトで機能しないのか
問題は何ですか?
リモートデスクトッププロトコル (RDP) またはリモートアクセスツールを使用しているとき、キーボードのコマンドは特に指定されない限り、ローカルシステムに送信されます。
Ctrl + Alt + Delete は保護されたシステムコマンドです。
ローカルシステムが常に最初に制御します。
リモートコンピューターには届きません。
これは設計上のものですが、リモートPCを管理する人には頭痛の種です。
これを必要とする人は?
複数のマシンを管理するリモートワーカー
メンテナンスを行うIT管理者
タイムゾーンを超えて作業するフリーランサー
どこからでもオフィスPCにアクセスするデジタルノマド
本当に必要なもの
Ctrl + Alt + Delete をローカルの混乱を引き起こすことなく、リモートマシンに送信する方法が必要です。
おすすめの記事:
DeskInを使用してリモートアクセスをスマートに処理する方法
DeskInは任意のPCにどこからでもアクセスできる無料のリモートデスクトップツールです。主要な利点の一つは、Ctrl + Alt + Delete を直接送信できることです。ストレスフリーです。
DeskInでの操作方法
両方のデバイスで DeskIn アプリを起動します
DeskInを使ってPC/Mac/ラップトップに接続します(接続されている場合、モバイルディスプレイはこのようになります)
右下隅のメニューで矢印をクリックすると、別の追加ボタンが表示されます
次に、アクションメニューを左端から選択します
その後、ctrl+alt+deleteボタンが表示されますので、いつでも簡単に使用可能です。
クリックすれば、問題は解決です!
複雑なショートカットやキーボードハックを覚える必要はありません。DeskInはワンクリックでこれを実現します。
今すぐDeskInを試してみてください
リモートデスクトップでのCtrl + Alt + Deleteの操作にまだ困っているなら、DeskInにお任せください。ここをクリックしてDeskInをダウンロード。
もっと見る


連絡先
メール: support@deskin.io
オフィスの住所:
991D Alexandra Road #02-17
シンガポール 119972
著作権 © 2026 Zuler Technology PTE. LTD. 無断複写・転載を禁じます。
連絡先
support@deskin.io
991D Alexandra Road #02-17
シンガポール 119972
著作権 © 2026 Zuler Technology PTE. LTD. 無断複写・転載を禁じます。
お問い合わせ
Eメール: support@deskin.io
本社: 991D Alexandra Road #02-17, シンガポール 119972
著作権 © 2026 Zuler Technology PTE. LTD. 無断複写・転載を禁じます。