生産性
生産性
/
10分間
/
10分間
W. ティング
更新済み
更新済み
更新済み
オフィスでプレゼンテーションや共同作業に追われる私たちは、Androidで効率的に画面ミラーリングする方法を見つけるのに苦労してきました。無数のツールをテストした後、デバイス間でコンテンツを共有する方法を示す5つの信頼できる画面ミラーリングアプリを絞り込みました。チームミーティング中にAndroidの電話を別の電話にミラーリングする必要がある場合や、クライアントとの会議でTVにコンテンツを投影する場合、または同僚のデバイスをリモートでトラブルシューティングする場合でも、これらの画面ミラーリングプログラムはケーブルや互換性の問題の煩わしさを解消します。
ワイヤレスのクロスデバイスソリューションからAndroidの内蔵機能まで、各アプリはシンプルさとパフォーマンスを優先しながら特定のワークフローに対応しています。プレゼンテーションを効率化し、生産性を高める準備は整っていますか?私の日常のフラストレーションをシームレスなワークフローに変えたこれらの画期的なツールを紹介します。
トップAndroid画面共有アプリをお探しですか?PC、iPhone、またはAndroid-to-AndroidにはDeskInを試してください。
Google TVにキャストするなら、Chromecastを使用しましょう。GoogleブランドでないTVの場合、Samsung/OnePlusの電話はネイティブツールでうまく動作します。他のユーザーはApowerMirrorを選ぶことができます。WiFiがない場合は、HDMIケーブルかMiracastドングルがサポートします。
ツール | 長所 | 短所 | 使いやすさ | ベスト用途 |
DeskIn |
|
| ⭐⭐⭐⭐⭐ | PC/iPhone/Android/macOSミラー |
Chromecast |
|
| ⭐⭐⭐⭐ | Google TVユーザー |
ApowerMirror |
|
| ⭐⭐⭐⭐ | 非GoogleスマートTV |
HDMIケーブル/Miracastドングル |
|
| ⭐⭐ | WiFi環境のない場所 |
Samsung/OnePlusネイティブスクリーンツール |
|
| ⭐⭐⭐⭐ | Samsung/OnePlusユーザー |
Scrcpy/Vysor |
|
| ⭐⭐ | 上級ユーザー/開発者 |
クロスプラットフォームのタスクを頻繁に扱うチームには、その多様な画面ミラーリングツール機能を持つDeskInを強くお勧めします。
空港のWi-Fiでも、家庭での緊急編集でも、DeskInはAndroidデバイス、iPhone、またはノートパソコンを即座に任意のスクリーンに表示ミラーリングします。リアルタイムでのコラボレーションのためにビルトインの通話機能も備えています。
クライアントデモ中にAndroidをPCにミラーしなければならないとき、ワンクリックで電話のインターフェースをデスクトップに共有し、ほとんどラグがありません。その価格は競合の3分の1で、Windows、macOS、iOS、Androidをサポートします。無料版では基本的なミラーリングをカバーし、有料プランではマルチデバイス管理、音声チャット、Androidのリモートコントロール、プラットフォーム間のファイル転送を追加します。異なるエコシステムを扱うチームには、DeskInが予算を壊さずにギャップを埋めます。
ワイヤレスクロスデバイススクリーンミラーリングにDeskInを選ぶ理由:
4KウルトラHD & 40ms低レイテンシー: デザインレビューのためのクリスタルクリアなビジュアルとスムーズなリアルタイムコントロール。
クロスプラットフォームミラーリング: Android、iOS、Windows、Macデバイス間でのワイヤレススクリーン拡張(例: Samsungのエコシステム内でのAndroid電話のリモート接続)。
安全な256ビット暗号化 + アクセス制御: 機密プレゼンテーション中にデバイスをホワイトリストに登録し、画面をロックします。
ライブアノテーション & 共有クリップボード: 共有画面へのマークアップと瞬時のデバイス間のテキスト/ファイル同期。
ビルトインボイスコール: 画面を共有しながら、チームメイトやクライアントとリアルタイムの音声でコラボレーション。
関連のおすすめ記事:
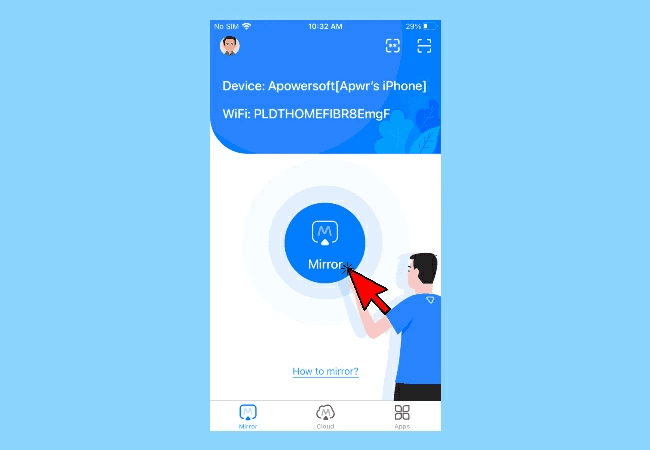
チームコール中にAndroid画面を共有したり、同僚のデバイスをトラブルシュートしたりする必要がありますか? DeskInは数秒でAndroid電話ディスプレイをPCにクローン作成する方法を簡素化します。始めるための迅速な手順を解説しましょう。
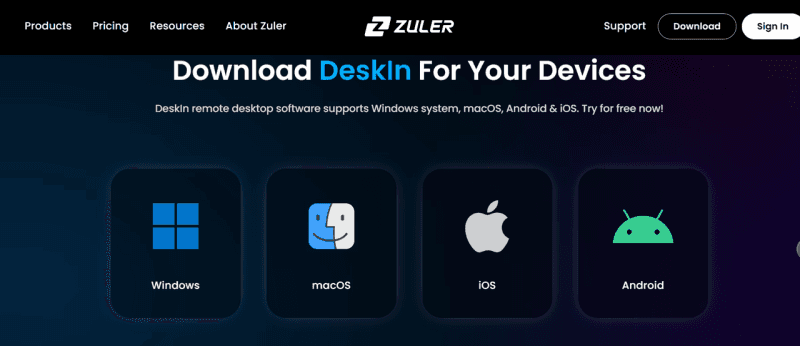
ステップ1. DeskInをダウンロードしてインストールする
公式DeskInサイトにアクセスし、Android電話とPCの両方に適切なバージョンをダウンロードしてインストールを完了します。
ステップ2. DeskInアカウントを作成してサインインする
両方のデバイスでDeskInアプリを開き、同じアカウントでサインインします。新規登録の場合はメールアドレスを使用して登録します。セキュリティのためには確認が必要です。
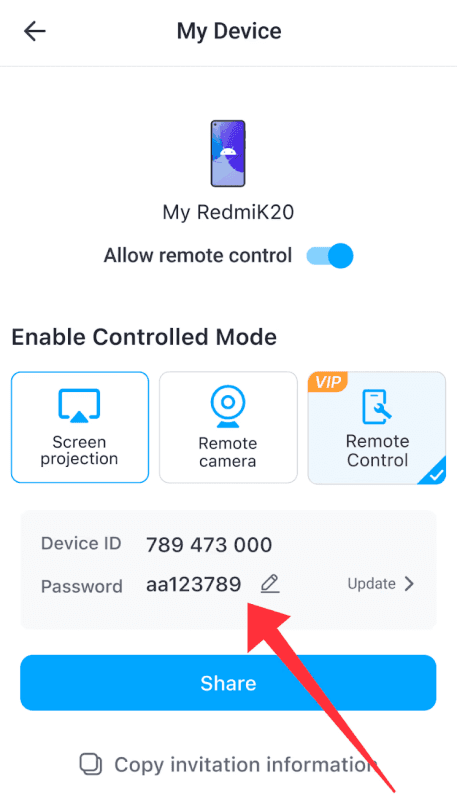
ステップ3. デバイスをリンクし、接続モードを選択する
サインイン後、AndroidデバイスのデバイスIDとパスワードが表示されます。それらをPCに挿入し、正常に接続が完了したら、リアルタイムで画面をミラーリングできます。
ステップ4. 接続を開始する
接続の促しに従ってセッションを開始します。DeskInは自動的に安全な接続を確立します。ニーズに応じて、メッセージ、ボイスコール、ホワイトボードなど、アプリ設定内の追加機能を有効にできます。これらのツールは画面ミラーリングとうまく統合され、ドキュメントのプレゼンテーション、デザインのデモ、クライアント会議でのリアルタイムのコラボレーションを可能にします。共有画面とインタラクティブホワイトボードを切り替えてダイナミックなフィードバックを強化します。ワークフローを簡素化するために、最高の無料スクリーンミラーリングアプリ、DeskInを今すぐダウンロードしましょう!
もしあなたのTVがGoogle TVなら、内蔵のChromecastはTVへのAndroidキャストに最適なソリューションです。追加のハードウェアは必要なく、優れた安定性を提供し、最大4K解像度に対応し、YouTubeやNetflixのようなアプリとシームレスに動作します。ただし、DRMで保護されたコンテンツ(例:特定のNetflix、Disney+タイトル)の全画面ミラーリングはうまくいかない場合があります。また、古いAndroid電話やTVモデルではスムーズまたは高解像度でのキャスティングをサポートしない可能性があります。
非Google TVの場合は、別途Chromecastデバイスが必要です - HD用で$30、4K用で$50です。これらの小さな欠点に問題がなく、すでにGoogleTVを所有しているなら、この方法は理想的です。TVでビデオをキャストするのも簡単です - 詳細な手順を学んでください!
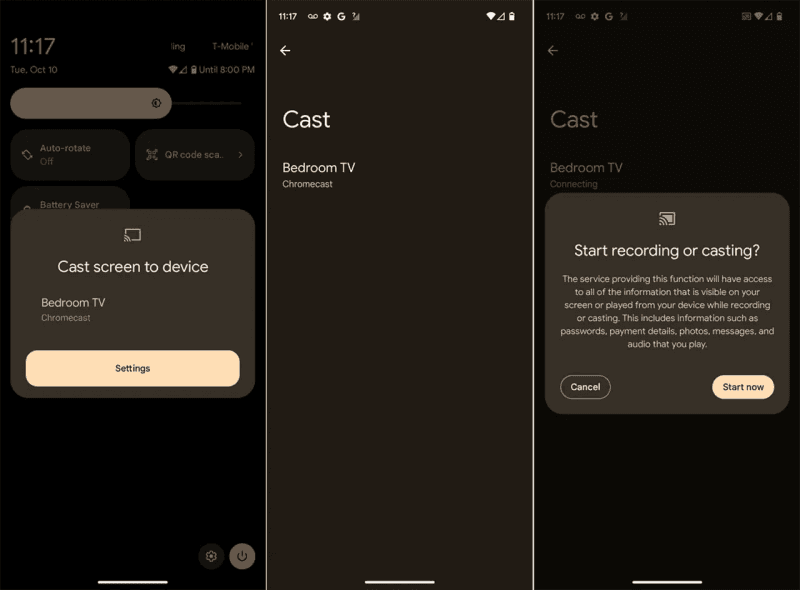
ステップ1. スクリーンキャストを有効にする
Android電話の上部からスワイプダウンして、クイック設定パネルを開きます。「キャスト」または「スクリーンキャスト」アイコンをタップします。電話とGoogleTVが同じWi-Fiネットワーク上にあることを確認してください。
ステップ2. TVデバイスを選択する
利用可能なデバイスのリストからあなたのGoogle TVまたはChromecastの名前をタップします。プロンプトが表示されたら、「開始」をタップしてスクリーンキャスティングを開始します。
ステップ3. 画面をミラーリングして調整する
電話の画面がTVに表示されます。表示したいアプリ、ビデオ、またはコンテンツを開き、縦または横モードに画面を回転させます。キャストを停止するには、キャストアイコンを再度タップし、「切断」を選択します。
スマートTVにAndroid電話を直接ミラーリングする必要があるとき、ApowerMirrorは信頼性の高い柔軟なオプションです。同僚の電話をリモートデモのためにミラーリングしたいときや、会議中にAndroidの電話で画面ミラーリングする方法を見つけたいとき、ApowerMirrorはそのプロセスを円滑にします。低遅延でAndroid電話からTVへのワイヤレスキャスティングに対応し、リアルタイムインタラクションを自然なものにします。
基本的なツールとは違い、ApowerMirrorはワイヤレスおよびUSB接続を許可し、不安定なWi-Fiユーザーに最適です。Chromecastを使用せずにAndroid画面をTVにキャストする方法を探している場合、無料ユーザーにはHD画質を提供し、有料プランでは画面録画、デュアルコントロール、その他多くの機能を解除します。TVにAndroidを簡単にミラーリングする方法を探しているなら、このツールを試す価値があります。
チームがプレゼンテーションや家庭でのゲームストリーミングのためにAndroid画面をTVと共有する必要があるとき、ApowerMirrorは煩わしさのないAndroidスクリーンシェアを提供します。
ステップ1. Android電話とTVを同じLANに接続します。
ステップ2. Android電話にApowerMirrorアプリをダウンロードします。
ステップ3. 電話でアプリを実行し、青いミラーアイコンをタップします。TVを探し、その名前をタップします。または、TVのQRコードをスキャンして接続することもできます。
WiFiがないですか?大丈夫です。アプリをダウンロードしたくない場合でも、HDMIケーブルやMiracastドングルを持っている場合、これはWiFiなしでAndroid電話のダウンロード済みビデオをTVにキャストするのに最適な方法です。オフライン使用に最適で、低遅延、より良いプライバシー、多くの場合での即時設定を提供します。
Android電話からのHDMIケーブルまたはUSBケーブルでのスクリーンミラーリングの方法は、追加のハードウェアが必要で、機能が限られている場合がありますが、信頼性が高く簡単です。ローカルビデオを大画面で視聴するだけが目的なら、この方法が最適です。設定方法を学ぶために読み続けてください!
要件:
ビデオ出力をサポートするUSB-Cポートを持つAndroid電話(DisplayPort Alt Mode)
USB-CからHDMIアダプタまたはMHLアダプタ
TVの使用可能なHDMIポート
ステップ1. 電話互換性を確認する
お使いのAndroid電話がUSB-Cを介したビデオ出力(DisplayPort Alt Mode)をサポートしていることを確認します。すべての電話がこの機能を持っているわけではありません。
ステップ2. HDMIアダプタを接続する
USB-CからHDMIアダプタを電話に接続し、標準のHDMIケーブルを使用してTVに接続します。
ステップ3. TV入力を切り替えてミラーリングを開始する
TVを正しいHDMI入力に切り替えます。電話の画面が即座にTVに表示されるはずです—アプリやWi-Fiは必要ありません。
SamsungまたはOnePlusの電話をお持ちで、サードパーティアプリをインストールせずにTVにミラーリングしたい場合、内蔵のスクリーンシェアツールは素晴らしい選択肢です。このネイティブのAndroidでのスクリーンシェア機能は、ミラキャスト対応TVに画面を直接ミラーリングすることができ、Androidでのスクリーンシェアリングをシンプルで迅速なものにします—家庭でビデオを見たりコンテンツを他の人に見せるのに最適です。
システムに統合された機能であるため、追加のアプリをダウンロードする必要はなく、多くのサードパーティツールと違い、広告なしでスムーズな体験を提供します。特に、Samsungの電話をSamsungのTVにミラーリングするために効果的で、低遅延のパフォーマンスを発揮します。ただし、双方のデバイスは同じWi-Fiネットワーク上にある必要があり、古いまたは非MiracastのTVでは互換性が制限される場合があります。それでも、同じブランドのエコシステムにいるユーザーにとっては最も簡単に画面を共有する方法の一つです。
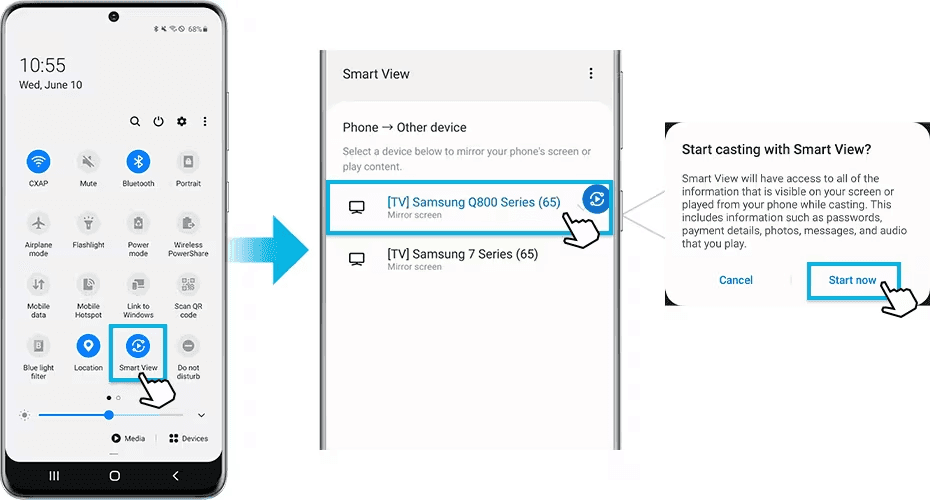
Samsung Smart Viewを使用してAndroidをTVにミラーリングする方法
要件
Smart View機能を持つSamsung電話(通常Android 9+がサポート)
MiracastをサポートするスマートTVまたはディスプレイ(例: Samsung/LG TV、Windows PC)
電話とTVが同じWi-Fiネットワーク上にあること
ステップ1. TVとSamsungの電話を同じWi-Fiに接続
両方のデバイスを同じワイヤレスネットワークに接続します。これは検出とキャストに必要です。
ステップ2:クイックパネルを開く
画面の上から下にスワイプし、もう一度スワイプして「クイック設定パネル」を開きます。
ステップ3:「Smart View」をタップ
「Smart View」アイコンを探します。見当たらない場合は、鉛筆アイコン(編集)をタップしてパネルに追加します。
ステップ4:接続先のテレビを選択
周辺の対応デバイスが自動的に検索されます。表示されたテレビ名をタップします。
ステップ5:テレビで接続を承認
テレビに接続リクエストが表示されたら「承認」または「許可」を選択します。これでミラーリングが開始されます。
必要条件
Cast/Wireless Display機能付きのOnePlusスマートフォン(Android 10以上推奨)
Miracast対応のスマートテレビ
両方の機器が同じWi-Fiネットワークに接続されていること
ステップ1:設定を開く
「設定」→「接続と共有」または「Bluetoothとデバイス接続」(機種によって異なる)を選択。
ステップ2:「キャスト」または「ワイヤレスディスプレイ」をタップ
該当のオプションを有効にします。機種によっては右上のメニュー(三点)から「ワイヤレスディスプレイを有効にする」を選ぶ必要があります。
ステップ3:テレビを選択
周辺のMiracast対応機器が表示されるので、テレビを選択します。
ステップ4:テレビで承認
テレビ画面に接続要求が出たら「承認」を選択してミラーリングを開始します。
Wi-Fiが使えない場合や超低遅延を求める場合、USB接続による画面ミラーリングは非常に優れた選択肢です。
Scrcpy や Vysor のようなツールを使えば、Android端末をPCや別のAndroid端末にUSB経由で接続し、
鮮明な映像、リアルタイムの応答速度、さらにはPCからの**逆操作(リモートコントロール)**まで可能になります。
ゲーマー、プレゼンター、開発者などに理想的な方法です。
この方法は安定性が抜群ですが、利用にはいくつかの準備が必要です。
たとえば、「開発者向けオプション」や「USBデバッグ」の有効化、
また初期設定としてソフトウェアのインストールやOTG構成などが求められます。
もしあなたが技術に詳しい方やパフォーマンス重視のユーザーであれば、
この方法が最もおすすめです。
それでは、実際の設定手順を見ていきましょう。
必要条件
Windows、macOS、またはLinuxのパソコン
Android 5.0以降のスマートフォン
USBデータケーブル
(Windowsの場合)ADBドライバーをインストール済み
スマホ側でUSBデバッグを有効にしていること
ステップ1:Scrcpyをダウンロード
公式GitHubページ「Scrcpy Releases」にアクセスします。
自分のOSに合ったZIPファイルをダウンロードし、解凍します。
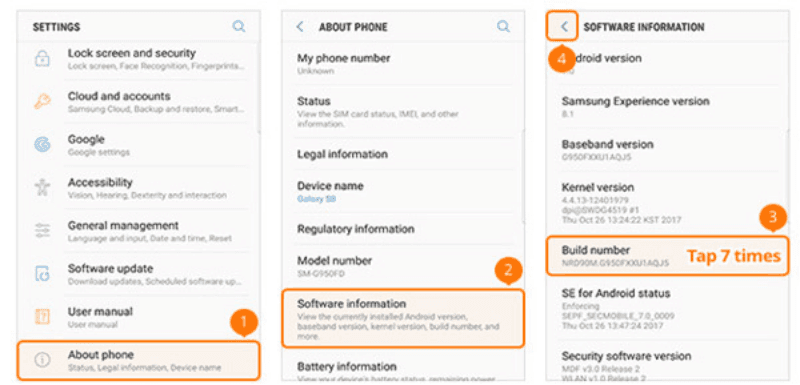
ステップ2:USBデバッグを有効にする
「設定」>「端末情報」に進みます。
「ビルド番号」を7回連続でタップし、「開発者向けオプション」を有効にします。
「設定」に戻り、「開発者向けオプション」を開き、「USBデバッグ」をオンにします。
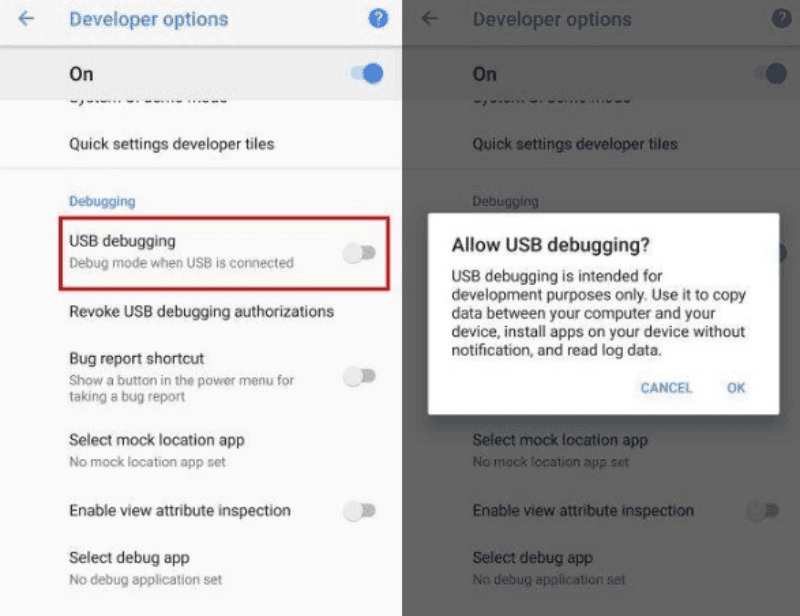
ステップ3:USBケーブルでスマホをPCに接続する
スマートフォンをUSBケーブルでパソコンに接続します。
スマホ画面に「USBデバッグを許可しますか?」というメッセージが表示されたら、**「許可」**をタップします。
ステップ4:Scrcpyを起動する
ダウンロードして解凍したフォルダ内の 「scrcpy.exe」(Windowsの場合)をダブルクリックします。
数秒後、あなたのスマートフォンの画面がパソコン上に表示されます。
キーボードとマウスによる**完全な操作(入力・クリックなど)**が可能です。
(初心者にも使いやすく、リモート操作も可能)
必要条件
Chromeブラウザ、またはVysorデスクトップアプリ
USBケーブル
「USBデバッグ」を有効にしたAndroidスマートフォン
ステップ1:Vysorをインストールする
公式サイト https://www.vysor.io にアクセスします。
デスクトップアプリ、またはChrome拡張機能をインストールします。
ステップ2:USBデバッグを有効にしてスマホを接続
Scrcpyの手順と同様に、開発者オプションで「USBデバッグ」をオンにします。
スマホをパソコンに接続し、画面に表示される「USBデバッグを許可」をタップします。
ステップ3:Vysorを開き、「Find Devices(デバイスを検索)」をクリック
Vysorを起動し、検出されたデバイス一覧の中から自分のスマートフォンを選択します。
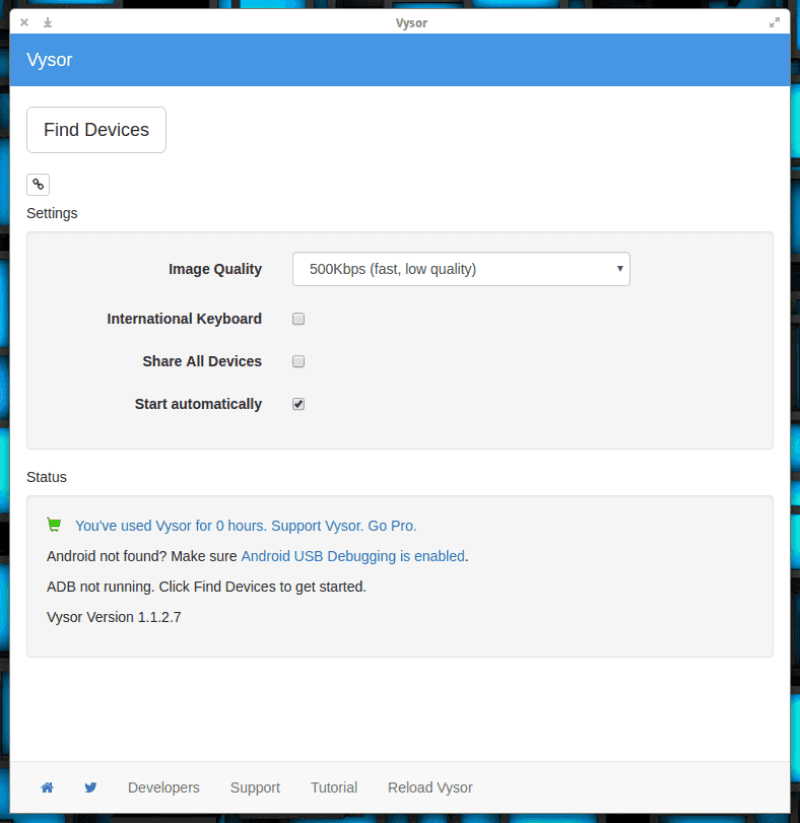
ステップ4:「View」または「Control」をクリック
表示された画面で「View(表示)」または「Control(操作)」をクリックします。
無料版では画面の共有のみが可能です。
フルリモート操作・HD画質ミラーリング・無線モードを利用したい場合は、**Vysor Pro(有料版)**へのアップグレードが必要です。
もしAndroidの画面ミラーリングがうまくいかない場合は、以下の手順を試してみてください。
Wi-Fiの問題:両方のデバイスが同じ安定したWi-Fiネットワークに接続されていることを確認します。必要であればルーターを再起動してください。
USBデバッグ設定:有線接続でミラーリングする場合は、「開発者向けオプション」でUSBデバッグを有効にします。
アプリの不具合:使用しているミラーリングアプリのキャッシュを削除するか、再インストールしてみましょう。
互換性の確認:お使いのテレビやデバイスがMiracastまたは使用中のミラーリングツールに対応しているかをチェックしてください。
それでも問題が解決しない場合は、**別の方法(Wi-Fi接続、USB接続など)**を試してみるのがおすすめです。
無料リモートデスクトップソフト徹底比較[わかりやすく・包括的]
[完全ガイド]リモートワークを効率化するおすすめソフトウェア集
Q1:インターネットなしでも画面ミラーリングはできますか?
はい、DeskIn や Miracast のようなオフライン対応のミラーリングソフトを使えば、インターネットなしでも可能です。
これらのツールは、Wi-Fi Direct や Bluetooth 接続を利用してデバイス間で直接通信するため、ネット環境が不安定な場所でも利用できます。
たとえば、DeskInのピアツーピア(P2P)モード や Miracastの「ワイヤレスディスプレイ」機能 は、外部サーバーに依存せずローカル接続を確立します。
同じプロトコルをサポートしており、通信距離内にあることを確認すれば、会議や機密プレゼン、ネット接続が弱い環境でのリモート作業にも最適です。
Q2:画面ミラーリングは双方向に操作できますか?
一般的なミラーリングは**片方向(スマホ → テレビ)**が基本です。
しかし、DeskIn のような高度なツールを使えば、**双方向操作(リアルタイムコラボレーション)**も可能です。
たとえば、スマートフォンからPCを操作してドキュメントを編集したり、PC上のアプリを遠隔で動かすことができます。
なお、「ミラーリング」は両方の画面に同じ内容を表示するのに対し、
「キャスト」は送信元の画面を非表示にして受信側にだけ映します。
用途に応じて、**共有重視(キャスト)か共同作業重視(双方向ミラーリング)**を選びましょう。
Q3:画面ミラーリングの安全性はどうですか?
暗号化された信頼できるツールを使用すれば安全です。
危険なのは、不安定なWi-Fiや信頼性の低いアプリを使う場合です。
たとえば DeskIn は、
256ビット暗号化通信を採用
許可済みデバイスのみ接続を許可(ホワイトリスト機能)
プライバシースクリーンモードで、共有中のローカル操作を隠す
といった機能により、高いセキュリティを確保しています。
機密資料を扱う場合は、公衆Wi-Fiを避け、信頼できるネットワーク環境で利用しましょう。
Androidでどの方法を選ぶかは、目的と環境によって異なります。
🔒 セキュリティ重視・マルチデバイス対応(Android / iOS / Windows / Mac) → DeskIn
→ リモートワークやハイブリッド勤務に最適。
📺 Google TVなどへの簡単な無線キャスト → Chromecast
→ アプリ不要で手軽に接続可能。
📱 Samsung / OnePlus などのスマートフォンとスマートTV間 → 標準のスクリーンシェア機能
→ シームレスな同期体験。
🎮 インタラクティブなプレゼンやゲーム配信 → ApowerMirror
→ 高精細映像とリアルタイム注釈機能。
⚡ Wi-Fiなし・超安定接続を求める場合 → USB接続(Scrcpy / Vysor)
→ 高画質・低遅延でプロ仕様のパフォーマンス。
私たちオフィスワーカーの間では、
DeskIn が最もバランスに優れた選択肢として高く評価されています。
理由は、
低遅延
軍用レベルの暗号化セキュリティ
Android / iOS / Windows / Mac間の完全互換性
という3点を同時に実現しているからです。
iPadへの画面拡張や機密資料の共有など、
スピードも安全性も妥協したくないハイブリッド環境において、
DeskInはプロフェッショナルに最適な「シンプル×高性能」ミラーリングツールです。
オフィスでプレゼンテーションや共同作業に追われる私たちは、Androidで効率的に画面ミラーリングする方法を見つけるのに苦労してきました。無数のツールをテストした後、デバイス間でコンテンツを共有する方法を示す5つの信頼できる画面ミラーリングアプリを絞り込みました。チームミーティング中にAndroidの電話を別の電話にミラーリングする必要がある場合や、クライアントとの会議でTVにコンテンツを投影する場合、または同僚のデバイスをリモートでトラブルシューティングする場合でも、これらの画面ミラーリングプログラムはケーブルや互換性の問題の煩わしさを解消します。
ワイヤレスのクロスデバイスソリューションからAndroidの内蔵機能まで、各アプリはシンプルさとパフォーマンスを優先しながら特定のワークフローに対応しています。プレゼンテーションを効率化し、生産性を高める準備は整っていますか?私の日常のフラストレーションをシームレスなワークフローに変えたこれらの画期的なツールを紹介します。
トップAndroid画面共有アプリをお探しですか?PC、iPhone、またはAndroid-to-AndroidにはDeskInを試してください。
Google TVにキャストするなら、Chromecastを使用しましょう。GoogleブランドでないTVの場合、Samsung/OnePlusの電話はネイティブツールでうまく動作します。他のユーザーはApowerMirrorを選ぶことができます。WiFiがない場合は、HDMIケーブルかMiracastドングルがサポートします。
ツール | 長所 | 短所 | 使いやすさ | ベスト用途 |
DeskIn |
|
| ⭐⭐⭐⭐⭐ | PC/iPhone/Android/macOSミラー |
Chromecast |
|
| ⭐⭐⭐⭐ | Google TVユーザー |
ApowerMirror |
|
| ⭐⭐⭐⭐ | 非GoogleスマートTV |
HDMIケーブル/Miracastドングル |
|
| ⭐⭐ | WiFi環境のない場所 |
Samsung/OnePlusネイティブスクリーンツール |
|
| ⭐⭐⭐⭐ | Samsung/OnePlusユーザー |
Scrcpy/Vysor |
|
| ⭐⭐ | 上級ユーザー/開発者 |
クロスプラットフォームのタスクを頻繁に扱うチームには、その多様な画面ミラーリングツール機能を持つDeskInを強くお勧めします。
空港のWi-Fiでも、家庭での緊急編集でも、DeskInはAndroidデバイス、iPhone、またはノートパソコンを即座に任意のスクリーンに表示ミラーリングします。リアルタイムでのコラボレーションのためにビルトインの通話機能も備えています。
クライアントデモ中にAndroidをPCにミラーしなければならないとき、ワンクリックで電話のインターフェースをデスクトップに共有し、ほとんどラグがありません。その価格は競合の3分の1で、Windows、macOS、iOS、Androidをサポートします。無料版では基本的なミラーリングをカバーし、有料プランではマルチデバイス管理、音声チャット、Androidのリモートコントロール、プラットフォーム間のファイル転送を追加します。異なるエコシステムを扱うチームには、DeskInが予算を壊さずにギャップを埋めます。
ワイヤレスクロスデバイススクリーンミラーリングにDeskInを選ぶ理由:
4KウルトラHD & 40ms低レイテンシー: デザインレビューのためのクリスタルクリアなビジュアルとスムーズなリアルタイムコントロール。
クロスプラットフォームミラーリング: Android、iOS、Windows、Macデバイス間でのワイヤレススクリーン拡張(例: Samsungのエコシステム内でのAndroid電話のリモート接続)。
安全な256ビット暗号化 + アクセス制御: 機密プレゼンテーション中にデバイスをホワイトリストに登録し、画面をロックします。
ライブアノテーション & 共有クリップボード: 共有画面へのマークアップと瞬時のデバイス間のテキスト/ファイル同期。
ビルトインボイスコール: 画面を共有しながら、チームメイトやクライアントとリアルタイムの音声でコラボレーション。
関連のおすすめ記事:
チームコール中にAndroid画面を共有したり、同僚のデバイスをトラブルシュートしたりする必要がありますか? DeskInは数秒でAndroid電話ディスプレイをPCにクローン作成する方法を簡素化します。始めるための迅速な手順を解説しましょう。
ステップ1. DeskInをダウンロードしてインストールする
公式DeskInサイトにアクセスし、Android電話とPCの両方に適切なバージョンをダウンロードしてインストールを完了します。
ステップ2. DeskInアカウントを作成してサインインする
両方のデバイスでDeskInアプリを開き、同じアカウントでサインインします。新規登録の場合はメールアドレスを使用して登録します。セキュリティのためには確認が必要です。
ステップ3. デバイスをリンクし、接続モードを選択する
サインイン後、AndroidデバイスのデバイスIDとパスワードが表示されます。それらをPCに挿入し、正常に接続が完了したら、リアルタイムで画面をミラーリングできます。
ステップ4. 接続を開始する
接続の促しに従ってセッションを開始します。DeskInは自動的に安全な接続を確立します。ニーズに応じて、メッセージ、ボイスコール、ホワイトボードなど、アプリ設定内の追加機能を有効にできます。これらのツールは画面ミラーリングとうまく統合され、ドキュメントのプレゼンテーション、デザインのデモ、クライアント会議でのリアルタイムのコラボレーションを可能にします。共有画面とインタラクティブホワイトボードを切り替えてダイナミックなフィードバックを強化します。ワークフローを簡素化するために、最高の無料スクリーンミラーリングアプリ、DeskInを今すぐダウンロードしましょう!
もしあなたのTVがGoogle TVなら、内蔵のChromecastはTVへのAndroidキャストに最適なソリューションです。追加のハードウェアは必要なく、優れた安定性を提供し、最大4K解像度に対応し、YouTubeやNetflixのようなアプリとシームレスに動作します。ただし、DRMで保護されたコンテンツ(例:特定のNetflix、Disney+タイトル)の全画面ミラーリングはうまくいかない場合があります。また、古いAndroid電話やTVモデルではスムーズまたは高解像度でのキャスティングをサポートしない可能性があります。
非Google TVの場合は、別途Chromecastデバイスが必要です - HD用で$30、4K用で$50です。これらの小さな欠点に問題がなく、すでにGoogleTVを所有しているなら、この方法は理想的です。TVでビデオをキャストするのも簡単です - 詳細な手順を学んでください!
ステップ1. スクリーンキャストを有効にする
Android電話の上部からスワイプダウンして、クイック設定パネルを開きます。「キャスト」または「スクリーンキャスト」アイコンをタップします。電話とGoogleTVが同じWi-Fiネットワーク上にあることを確認してください。
ステップ2. TVデバイスを選択する
利用可能なデバイスのリストからあなたのGoogle TVまたはChromecastの名前をタップします。プロンプトが表示されたら、「開始」をタップしてスクリーンキャスティングを開始します。
ステップ3. 画面をミラーリングして調整する
電話の画面がTVに表示されます。表示したいアプリ、ビデオ、またはコンテンツを開き、縦または横モードに画面を回転させます。キャストを停止するには、キャストアイコンを再度タップし、「切断」を選択します。
スマートTVにAndroid電話を直接ミラーリングする必要があるとき、ApowerMirrorは信頼性の高い柔軟なオプションです。同僚の電話をリモートデモのためにミラーリングしたいときや、会議中にAndroidの電話で画面ミラーリングする方法を見つけたいとき、ApowerMirrorはそのプロセスを円滑にします。低遅延でAndroid電話からTVへのワイヤレスキャスティングに対応し、リアルタイムインタラクションを自然なものにします。
基本的なツールとは違い、ApowerMirrorはワイヤレスおよびUSB接続を許可し、不安定なWi-Fiユーザーに最適です。Chromecastを使用せずにAndroid画面をTVにキャストする方法を探している場合、無料ユーザーにはHD画質を提供し、有料プランでは画面録画、デュアルコントロール、その他多くの機能を解除します。TVにAndroidを簡単にミラーリングする方法を探しているなら、このツールを試す価値があります。
チームがプレゼンテーションや家庭でのゲームストリーミングのためにAndroid画面をTVと共有する必要があるとき、ApowerMirrorは煩わしさのないAndroidスクリーンシェアを提供します。
ステップ1. Android電話とTVを同じLANに接続します。
ステップ2. Android電話にApowerMirrorアプリをダウンロードします。
ステップ3. 電話でアプリを実行し、青いミラーアイコンをタップします。TVを探し、その名前をタップします。または、TVのQRコードをスキャンして接続することもできます。
WiFiがないですか?大丈夫です。アプリをダウンロードしたくない場合でも、HDMIケーブルやMiracastドングルを持っている場合、これはWiFiなしでAndroid電話のダウンロード済みビデオをTVにキャストするのに最適な方法です。オフライン使用に最適で、低遅延、より良いプライバシー、多くの場合での即時設定を提供します。
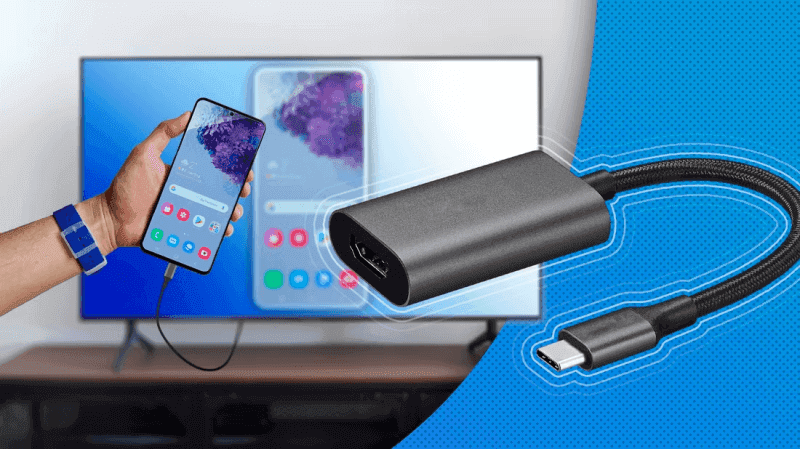
Android電話からのHDMIケーブルまたはUSBケーブルでのスクリーンミラーリングの方法は、追加のハードウェアが必要で、機能が限られている場合がありますが、信頼性が高く簡単です。ローカルビデオを大画面で視聴するだけが目的なら、この方法が最適です。設定方法を学ぶために読み続けてください!
要件:
ビデオ出力をサポートするUSB-Cポートを持つAndroid電話(DisplayPort Alt Mode)
USB-CからHDMIアダプタまたはMHLアダプタ
TVの使用可能なHDMIポート
ステップ1. 電話互換性を確認する
お使いのAndroid電話がUSB-Cを介したビデオ出力(DisplayPort Alt Mode)をサポートしていることを確認します。すべての電話がこの機能を持っているわけではありません。
ステップ2. HDMIアダプタを接続する
USB-CからHDMIアダプタを電話に接続し、標準のHDMIケーブルを使用してTVに接続します。
ステップ3. TV入力を切り替えてミラーリングを開始する
TVを正しいHDMI入力に切り替えます。電話の画面が即座にTVに表示されるはずです—アプリやWi-Fiは必要ありません。
SamsungまたはOnePlusの電話をお持ちで、サードパーティアプリをインストールせずにTVにミラーリングしたい場合、内蔵のスクリーンシェアツールは素晴らしい選択肢です。このネイティブのAndroidでのスクリーンシェア機能は、ミラキャスト対応TVに画面を直接ミラーリングすることができ、Androidでのスクリーンシェアリングをシンプルで迅速なものにします—家庭でビデオを見たりコンテンツを他の人に見せるのに最適です。
システムに統合された機能であるため、追加のアプリをダウンロードする必要はなく、多くのサードパーティツールと違い、広告なしでスムーズな体験を提供します。特に、Samsungの電話をSamsungのTVにミラーリングするために効果的で、低遅延のパフォーマンスを発揮します。ただし、双方のデバイスは同じWi-Fiネットワーク上にある必要があり、古いまたは非MiracastのTVでは互換性が制限される場合があります。それでも、同じブランドのエコシステムにいるユーザーにとっては最も簡単に画面を共有する方法の一つです。
Samsung Smart Viewを使用してAndroidをTVにミラーリングする方法
要件
Smart View機能を持つSamsung電話(通常Android 9+がサポート)
MiracastをサポートするスマートTVまたはディスプレイ(例: Samsung/LG TV、Windows PC)
電話とTVが同じWi-Fiネットワーク上にあること
ステップ1. TVとSamsungの電話を同じWi-Fiに接続
両方のデバイスを同じワイヤレスネットワークに接続します。これは検出とキャストに必要です。
ステップ2:クイックパネルを開く
画面の上から下にスワイプし、もう一度スワイプして「クイック設定パネル」を開きます。
ステップ3:「Smart View」をタップ
「Smart View」アイコンを探します。見当たらない場合は、鉛筆アイコン(編集)をタップしてパネルに追加します。
ステップ4:接続先のテレビを選択
周辺の対応デバイスが自動的に検索されます。表示されたテレビ名をタップします。
ステップ5:テレビで接続を承認
テレビに接続リクエストが表示されたら「承認」または「許可」を選択します。これでミラーリングが開始されます。
必要条件
Cast/Wireless Display機能付きのOnePlusスマートフォン(Android 10以上推奨)
Miracast対応のスマートテレビ
両方の機器が同じWi-Fiネットワークに接続されていること
ステップ1:設定を開く
「設定」→「接続と共有」または「Bluetoothとデバイス接続」(機種によって異なる)を選択。
ステップ2:「キャスト」または「ワイヤレスディスプレイ」をタップ
該当のオプションを有効にします。機種によっては右上のメニュー(三点)から「ワイヤレスディスプレイを有効にする」を選ぶ必要があります。
ステップ3:テレビを選択
周辺のMiracast対応機器が表示されるので、テレビを選択します。
ステップ4:テレビで承認
テレビ画面に接続要求が出たら「承認」を選択してミラーリングを開始します。
Wi-Fiが使えない場合や超低遅延を求める場合、USB接続による画面ミラーリングは非常に優れた選択肢です。
Scrcpy や Vysor のようなツールを使えば、Android端末をPCや別のAndroid端末にUSB経由で接続し、
鮮明な映像、リアルタイムの応答速度、さらにはPCからの**逆操作(リモートコントロール)**まで可能になります。
ゲーマー、プレゼンター、開発者などに理想的な方法です。
この方法は安定性が抜群ですが、利用にはいくつかの準備が必要です。
たとえば、「開発者向けオプション」や「USBデバッグ」の有効化、
また初期設定としてソフトウェアのインストールやOTG構成などが求められます。
もしあなたが技術に詳しい方やパフォーマンス重視のユーザーであれば、
この方法が最もおすすめです。
それでは、実際の設定手順を見ていきましょう。
必要条件
Windows、macOS、またはLinuxのパソコン
Android 5.0以降のスマートフォン
USBデータケーブル
(Windowsの場合)ADBドライバーをインストール済み
スマホ側でUSBデバッグを有効にしていること
ステップ1:Scrcpyをダウンロード
公式GitHubページ「Scrcpy Releases」にアクセスします。
自分のOSに合ったZIPファイルをダウンロードし、解凍します。
ステップ2:USBデバッグを有効にする
「設定」>「端末情報」に進みます。
「ビルド番号」を7回連続でタップし、「開発者向けオプション」を有効にします。
「設定」に戻り、「開発者向けオプション」を開き、「USBデバッグ」をオンにします。
ステップ3:USBケーブルでスマホをPCに接続する
スマートフォンをUSBケーブルでパソコンに接続します。
スマホ画面に「USBデバッグを許可しますか?」というメッセージが表示されたら、**「許可」**をタップします。
ステップ4:Scrcpyを起動する
ダウンロードして解凍したフォルダ内の 「scrcpy.exe」(Windowsの場合)をダブルクリックします。
数秒後、あなたのスマートフォンの画面がパソコン上に表示されます。
キーボードとマウスによる**完全な操作(入力・クリックなど)**が可能です。
(初心者にも使いやすく、リモート操作も可能)
必要条件
Chromeブラウザ、またはVysorデスクトップアプリ
USBケーブル
「USBデバッグ」を有効にしたAndroidスマートフォン
ステップ1:Vysorをインストールする
公式サイト https://www.vysor.io にアクセスします。
デスクトップアプリ、またはChrome拡張機能をインストールします。
ステップ2:USBデバッグを有効にしてスマホを接続
Scrcpyの手順と同様に、開発者オプションで「USBデバッグ」をオンにします。
スマホをパソコンに接続し、画面に表示される「USBデバッグを許可」をタップします。
ステップ3:Vysorを開き、「Find Devices(デバイスを検索)」をクリック
Vysorを起動し、検出されたデバイス一覧の中から自分のスマートフォンを選択します。
ステップ4:「View」または「Control」をクリック
表示された画面で「View(表示)」または「Control(操作)」をクリックします。
無料版では画面の共有のみが可能です。
フルリモート操作・HD画質ミラーリング・無線モードを利用したい場合は、**Vysor Pro(有料版)**へのアップグレードが必要です。
もしAndroidの画面ミラーリングがうまくいかない場合は、以下の手順を試してみてください。
Wi-Fiの問題:両方のデバイスが同じ安定したWi-Fiネットワークに接続されていることを確認します。必要であればルーターを再起動してください。
USBデバッグ設定:有線接続でミラーリングする場合は、「開発者向けオプション」でUSBデバッグを有効にします。
アプリの不具合:使用しているミラーリングアプリのキャッシュを削除するか、再インストールしてみましょう。
互換性の確認:お使いのテレビやデバイスがMiracastまたは使用中のミラーリングツールに対応しているかをチェックしてください。
それでも問題が解決しない場合は、**別の方法(Wi-Fi接続、USB接続など)**を試してみるのがおすすめです。
無料リモートデスクトップソフト徹底比較[わかりやすく・包括的]
[完全ガイド]リモートワークを効率化するおすすめソフトウェア集
Q1:インターネットなしでも画面ミラーリングはできますか?
はい、DeskIn や Miracast のようなオフライン対応のミラーリングソフトを使えば、インターネットなしでも可能です。
これらのツールは、Wi-Fi Direct や Bluetooth 接続を利用してデバイス間で直接通信するため、ネット環境が不安定な場所でも利用できます。
たとえば、DeskInのピアツーピア(P2P)モード や Miracastの「ワイヤレスディスプレイ」機能 は、外部サーバーに依存せずローカル接続を確立します。
同じプロトコルをサポートしており、通信距離内にあることを確認すれば、会議や機密プレゼン、ネット接続が弱い環境でのリモート作業にも最適です。
Q2:画面ミラーリングは双方向に操作できますか?
一般的なミラーリングは**片方向(スマホ → テレビ)**が基本です。
しかし、DeskIn のような高度なツールを使えば、**双方向操作(リアルタイムコラボレーション)**も可能です。
たとえば、スマートフォンからPCを操作してドキュメントを編集したり、PC上のアプリを遠隔で動かすことができます。
なお、「ミラーリング」は両方の画面に同じ内容を表示するのに対し、
「キャスト」は送信元の画面を非表示にして受信側にだけ映します。
用途に応じて、**共有重視(キャスト)か共同作業重視(双方向ミラーリング)**を選びましょう。
Q3:画面ミラーリングの安全性はどうですか?
暗号化された信頼できるツールを使用すれば安全です。
危険なのは、不安定なWi-Fiや信頼性の低いアプリを使う場合です。
たとえば DeskIn は、
256ビット暗号化通信を採用
許可済みデバイスのみ接続を許可(ホワイトリスト機能)
プライバシースクリーンモードで、共有中のローカル操作を隠す
といった機能により、高いセキュリティを確保しています。
機密資料を扱う場合は、公衆Wi-Fiを避け、信頼できるネットワーク環境で利用しましょう。
Androidでどの方法を選ぶかは、目的と環境によって異なります。
🔒 セキュリティ重視・マルチデバイス対応(Android / iOS / Windows / Mac) → DeskIn
→ リモートワークやハイブリッド勤務に最適。
📺 Google TVなどへの簡単な無線キャスト → Chromecast
→ アプリ不要で手軽に接続可能。
📱 Samsung / OnePlus などのスマートフォンとスマートTV間 → 標準のスクリーンシェア機能
→ シームレスな同期体験。
🎮 インタラクティブなプレゼンやゲーム配信 → ApowerMirror
→ 高精細映像とリアルタイム注釈機能。
⚡ Wi-Fiなし・超安定接続を求める場合 → USB接続(Scrcpy / Vysor)
→ 高画質・低遅延でプロ仕様のパフォーマンス。
私たちオフィスワーカーの間では、
DeskIn が最もバランスに優れた選択肢として高く評価されています。
理由は、
低遅延
軍用レベルの暗号化セキュリティ
Android / iOS / Windows / Mac間の完全互換性
という3点を同時に実現しているからです。
iPadへの画面拡張や機密資料の共有など、
スピードも安全性も妥協したくないハイブリッド環境において、
DeskInはプロフェッショナルに最適な「シンプル×高性能」ミラーリングツールです。


Top 6 RustDesk Alternative Tools for Faster, Easier Remote Access
Remote access should feel like flipping a light switch, not decoding a control panel. Yet many users exploring RustDesk eventually run into friction: connection IDs, server setup, or occasional lag. While RustDesk is powerful, it’s not always the easiest or smoothest option, especially for non-technical users.
That’s why more people are actively searching for a reliable RustDesk alternative that combines performance, simplicity, and flexibility. Whether you want a plug-and-play solution or something more advanced, this guide will help you find the best fit.
RustDesk stands out as a privacy-friendly, self-hosted remote desktop tool. However, real-world usage reveals a few common challenges:
Complicated setup for the RustDesk self-hosted environments
Manual connection steps requiring IDs and passwords
Occasional latency or unstable connections
Limited user-friendly features out of the box
For many users, especially those helping family or managing multiple devices, simplicity matters just as much as control.
When evaluating a RustDesk alternative, focus on these key factors:
Ease of use: Quick setup without technical overhead
Performance: Smooth, low-latency remote sessions
Compatibility: Support for Windows, macOS, Linux, and mobile
Security: Strong encryption and access controls
Flexibility: Options ranging from cloud-based to open source
The ideal tool strikes a balance between power and convenience, something many modern solutions now deliver better than traditional setups.
Here’s a quick breakdown of the top tools and where they shine:
DeskIn – Best all-in-one RustDesk alternative for performance and ease of use
AnyDesk – Best lightweight tool for fast connections
TeamViewer – Best for enterprise-grade remote support
MeshCentral – Best open-source and self-hosted solution
DWService – Best free browser-based tool
Chrome Remote Desktop – Best simple, no-frills option
Ultra-low latency with smooth high-frame-rate streaming
No complex setup or server deployment required
Cross-platform including Rustdesk alternative for Android
Secure with encryption and device control features
Built-in file transfer and multi-device management
Smaller awareness than legacy competitors
Best for: Users who want a powerful yet simple remote desktop solution

DeskIn removes the friction that often comes with remote access tools. Instead of relying on IDs or manual configurations, it offers a streamlined connection experience that works right out of the box. This makes it especially valuable for users supporting non-technical family members or managing multiple remote devices.
Performance is where DeskIn truly distinguishes itself. Compared to RustDesk, which can sometimes struggle with latency, DeskIn delivers consistently smooth sessions with minimal lag. It also eliminates the need for self-hosting, making it a strong free RustDesk alternative option for users who want powerful features without the complexity.
For those exploring options beyond the RustDesk alternative GitHub projects, DeskIn provides a polished, ready-to-use experience that balances simplicity with professional-grade performance.
Lightweight and fast installation
Good performance on low bandwidth
Cross-platform support
Easy-to-use interface
Performance may drop during long sessions
File transfer can be inconsistent
Best for: Users needing quick and simple remote access

AnyDesk is often considered a natural step up from RustDesk for users who want something easier to deploy. It offers a lightweight application that connects quickly and performs well under normal conditions. This makes it suitable for quick troubleshooting or occasional remote access.
However, performance consistency can be an issue. Users frequently report lag or instability during extended sessions or when handling more demanding tasks. While AnyDesk is a solid option for basic needs, it may not fully satisfy users looking for a more robust, all-in-one solution.
👀 You may also be interested in: |
|---|
Enterprise-grade security with encryption and 2FA
Stable performance across global networks
Rich features like file transfer and session recording
Broad device compatibility
Expensive for commercial use
Free version has limitations
Heavier resource usage on some systems
Best for: Businesses and IT teams managing multiple endpoints
TeamViewer has long been a dominant player in the remote desktop space, offering a comprehensive suite of features designed for enterprise environments. It excels in reliability and global connectivity, making it a popular choice for IT support teams.
That said, its pricing model is a major drawback for many users. Frequent users may quickly encounter licensing restrictions, and costs can escalate for businesses. Additionally, its heavier footprint can impact performance on lower-end devices. DeskIn offers a more modern alternative by delivering similar performance and essential features without the same cost barriers. For users who want enterprise-level capabilities with better efficiency, it presents a compelling option.
👀 You may also be interested in: |
|---|
Fully RustDesk alternative open source solution
Web-based management dashboard
Supports multi-device environments
Strong customization and control
Complex setup and maintenance
Requires technical expertise
Best for: Advanced users needing a Rustdesk alternative self-hosted
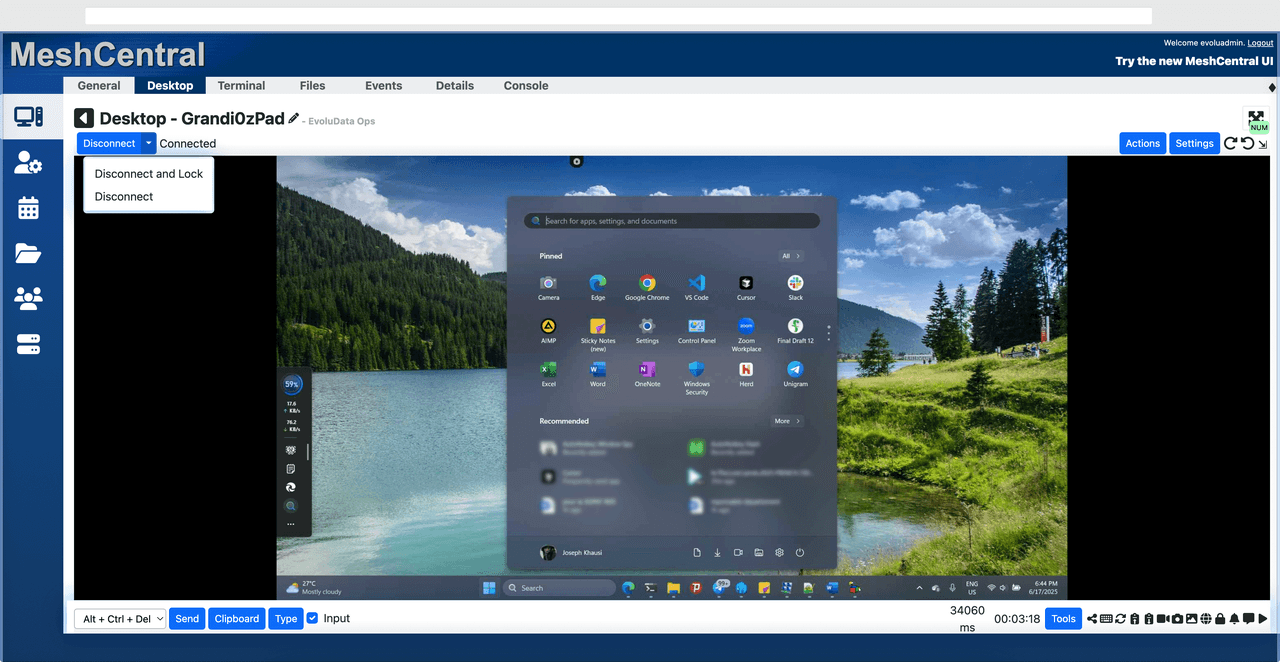
MeshCentral is a powerful open-source platform designed for users who want full control over their remote access infrastructure. It supports multiple devices and provides a centralized dashboard for management, making it attractive for IT professionals.
However, this flexibility comes with complexity. Setting up and maintaining a MeshCentral server requires technical knowledge, which can be a barrier for many users. Compared to this, DeskIn offers a much simpler deployment process while still delivering strong performance and security. For users who prioritize ease of use over full control, modern solutions like DeskIn provide a more accessible alternative.
Completely free
Browser-based access
Open-source foundation
Simple setup
Limited performance
Basic feature set
Best for: Users looking for a simple, free RustDesk alternative
DWService offers a browser-based approach to remote access with no heavy installation, making it convenient for quick connections in restricted environments. It supports both desktop access and file management across major platforms.
However, performance often feels sluggish, especially on demanding tasks, and features remain basic; lacking session recording, smooth multi-monitor support, or advanced security controls. While suitable for occasional personal use, it falls short for professional or high-performance scenarios.
Free and easy to use
Browser-based setup
Cross-platform compatibility
Very limited features
No advanced management or collaboration tools
Best for: Casual users needing basic remote access

Chrome Remote Desktop is one of the simplest remote access tools available. It’s easy to set up and works across devices, making it a convenient choice for occasional use.
However, it lacks many essential features such as file transfer, session management, and advanced security controls. For users with more demanding needs, it quickly becomes insufficient. Compared to Chrome Remote Desktop, DeskIn provides a much more complete experience without sacrificing ease of use, making it a better long-term solution.
👀 You may also be interested in: |
|---|
RustDesk is powerful but can be difficult to set up and manage, especially with self-hosting. Many users prefer tools that offer similar performance without technical complexity. DeskIn simplifies remote access while maintaining strong performance and security.
Several tools qualify as a free RustDesk alternative, including DWService and Chrome Remote Desktop. However, DeskIn stands out by offering better performance and usability even in its free version.
Yes, tools like MeshCentral and DWService are considered RustDesk alternative open source options. They provide flexibility and control but often require technical expertise to set up and maintain.
Beginners should choose tools with a simple setup and intuitive interfaces. DeskIn is an excellent option because it removes the need for manual configuration while still delivering advanced features.
RustDesk is a powerful starting point, but it’s not always the easiest or most efficient tool for everyday use. From setup complexity to performance limitations, many users eventually look for a better RustDesk alternative.
Among all the options, DeskIn stands out as the most balanced solution. It combines speed, simplicity, and cross-platform support into one seamless experience. If you’re ready to move beyond technical friction and enjoy truly smooth remote access, DeskIn is a choice that simply works.

Top 7 RDP Alternative Tools for Faster, Safer Remote Access
Remote desktop access used to feel like a solid bridge. Now, for many users, traditional RDP feels more like a creaky rope ladder. With performance issues, security concerns, and limited cross-platform support, it's no surprise that more people are actively searching for a better RDP alternative that actually keeps up with modern workflows.
If you're managing multiple servers, working across devices, or just tired of unstable connections, this guide will walk you through the best tools worth switching to.
RDP (Remote Desktop Protocol) is a proprietary protocol developed by Microsoft that allows users to connect to another computer over a network. It's widely used for accessing Windows servers, virtual machines, and remote workstations.
While powerful in controlled environments, RDP is often tied to Windows systems and requires configuration like port forwarding or VPNs. Compared to newer tools, it can feel rigid and outdated.
You may also be interested in: |
|---|
RDP still works, but it comes with trade-offs that many users find frustrating:
Security risks if not properly configured
Complex setup for remote or external access
Limited cross-platform compatibility
Performance issues over unstable networks
Many IT teams are now actively replacing it, especially when looking for a Windows RDP client alternative or something that works seamlessly across macOS, Linux, and mobile devices. That's where modern Remote Desktop alternatives shine.
Choosing the right tool is like picking the right vehicle. Some are built for speed, others for heavy-duty enterprise work. Here's a quick snapshot:
DeskIn – Best all-in-one RDP alternative for performance and cross-platform use
TeamViewer – Best for enterprise remote support
AnyDesk – Best lightweight option for fast connections
RustDesk – Best Windows RDP alternative open-source solution
Remmina – Best RDP alternative for Linux users
Chrome Remote Desktop – Best simple browser-based tool
Splashtop – Best for high-performance business environments
Ultra-low latency with smooth high-frame-rate streaming
Works across Windows, macOS, Linux, iOS, and Android
Strong encryption and secure access controls
Built-in file transfer and multi-session support
Newer compared to legacy brands
Best for: Users who want a powerful, flexible RDP alternative

DeskIn feels less like remote access and more like teleportation for your desktop. Whether you're managing servers, supporting clients, or working remotely, it delivers consistently smooth performance without the usual lag spikes seen in traditional RDP setups.
Unlike many tools, DeskIn eliminates the need for complex configurations. You don't need to wrestle with firewalls or VPNs just to connect. It also works seamlessly across platforms, making it a strong alternative to Microsoft Remote Desktop for Mac and mobile users alike.
For teams juggling multiple systems, DeskIn provides a unified experience that replaces fragmented workflows. It's also a strong free RDP alternative option with premium-level capabilities, making it ideal for both individuals and businesses.
Enterprise-grade security and compliance
Extensive feature set including collaboration tools
Cross-platform compatibility
Reliable global performance
Expensive licensing
Can be overkill for individuals
Best for: Enterprises needing secure and scalable remote access
TeamViewer is a comprehensive remote desktop platform widely adopted by IT teams, support professionals, and enterprises. Its feature set extends far beyond simple screen sharing—it includes robust device management, remote printing, file transfer, session recording, and even augmented reality support for field service. TeamViewer's security architecture relies on AES‑256 encryption, two‑factor authentication, and whitelisting, making it suitable for organizations with strict compliance requirements. It runs on virtually every operating system and mobile platform.
The main trade‑off is its pricing: licenses are subscription‑based and can become expensive for small teams or individual users, especially as TeamViewer aggressively flags personal use as commercial, leading to session restrictions.
Fast and responsive
Lightweight installation
Works well on low bandwidth
Easy to use
File transfer can be inconsistent
Lag during longer sessions
Best for: Users needing quick, simple remote access
AnyDesk is a lightweight remote desktop application prized for its speed and efficiency, often recommended as a fast alternative to Microsoft's native Remote Desktop on Windows 10 and Android. It uses a proprietary video codec, DeskRT, to achieve low latency even on limited bandwidth, making it ideal for quick support sessions and accessing devices over mobile networks. The interface is clean and minimalist, with features like address book management, file transfer, and session recording available.
However, users frequently report instability during extended sessions; performance can degrade over time, and file transfers may slow considerably compared to competitors. While its free version is generous for personal use, professional users often find the performance ceiling limits its suitability for continuous, demanding workloads. DeskIn, by contrast, maintains consistent performance even during extended use, making it better suited for professional workloads.
You may also be interested in: |
|---|
Free and open-source
Self-hosting for full control
Strong privacy protection
Active community
Technical setup required
Limited user-friendly features
Best for: Developers and privacy-focused users
RustDesk has emerged as a leading open‑source remote desktop alternative, appealing to developers and organizations that require full control over their data. It allows users to self‑host the relay and rendezvous servers, meaning no third‑party infrastructure handles connection metadata. Built with Rust, it offers a modern codebase with cross‑platform clients (Windows, macOS, Linux, Android, iOS) and supports essential features such as file transfer, TCP tunneling, and customizable address books.
The major barrier is its complexity: deploying a self‑hosted environment requires technical expertise to configure firewalls, SSL certificates, and ongoing server maintenance. For those using the public relay, performance can be inconsistent depending on server load and geographic proximity.
You may also be interested in: Top RustDesk Alternatives for Better Performance, Security & Ease of Use |
|---|
Open-source and free
Supports multiple protocols including RDP and VNC
Lightweight and flexible
Native to Linux environments
Limited features compared to modern tools
UI can feel outdated
Best for: Linux users looking for a traditional RDP alternative Linux
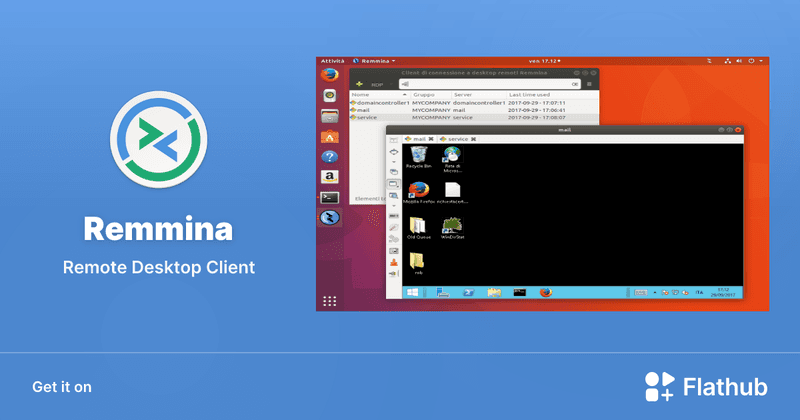
Remmina is a beloved open‑source remote desktop client for Linux, supporting multiple protocols (RDP, VNC, SSH, SPICE, and others) in a single unified interface. It is frequently chosen by system administrators and Linux enthusiasts who need a flexible, lightweight tool to manage diverse environments. Remmina offers tabbed sessions, quick‑connect profiles, and a plugin system that extends its capabilities.
However, its strength - protocol flexibility, also highlights its limitations. As a frontend client rather than a full remote access solution, it lacks features like unattended access, centralized account management, or robust session recording out of the box. Performance can vary by protocol, and the user experience lags behind more polished commercial tools, particularly for users seeking a plug‑and‑play setup.
Free and easy to use
Browser-based setup
Cross-platform access
Very limited features
No advanced management tools
Best for: Casual users needing basic remote access
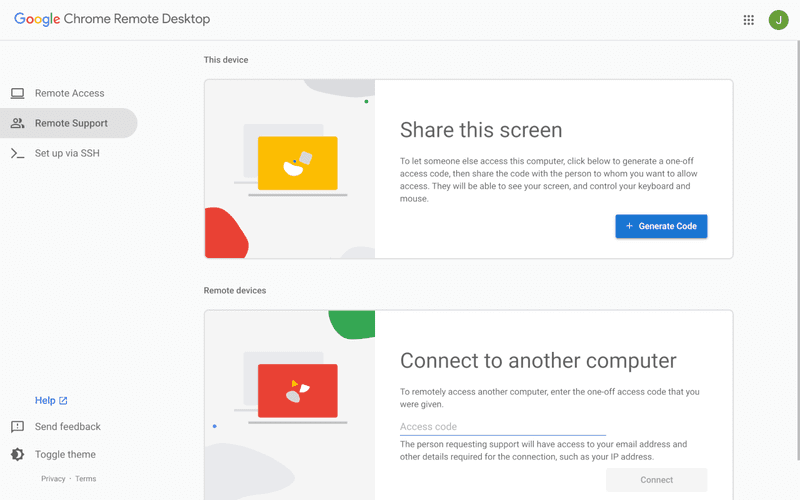
Chrome Remote Desktop is a free, browser‑based remote access tool from Google that requires nothing more than a Chrome browser and a Google account. It excels in simplicity: installation takes seconds, and connections are mediated through Google's infrastructure, eliminating complex firewall configurations. For occasional use—such as helping a family member or quickly accessing a home computer—it works reliably across Windows, macOS, Linux, and even ChromeOS.
The trade‑off is its minimal feature set. There is no native file transfer, multi‑session management, remote printing, or granular permission controls. Collaboration tools are absent, and the reliance on a Google account for authentication can be a limitation in professional environments. It remains a convenient entry‑level tool but struggles to meet the needs of power users or IT teams.
You may also be interested in: |
|---|
High-quality streaming performance
Strong security features
Good for business environments
Reliable connections
Subscription-based pricing
Limited free version
Best for: Businesses needing performance-focused remote access
Splashtop is a high‑performance remote desktop solution frequently adopted by creative professionals, educational institutions, and enterprises that prioritize fluid interaction. It delivers low‑latency streaming with support for high‑frame‑rate displays, making it suitable for video editing, CAD work, and other graphics‑intensive tasks. Splashtop offers a range of editions—from Business Access to SOS for on‑demand support—all of which include robust security (AES‑256, device authentication) and features like file transfer, remote printing, and multi‑monitor navigation. Its performance over local networks and the internet is consistently praised.
The primary drawback is cost: while competitive, the subscription model can accumulate quickly for users needing access to multiple devices or advanced features, especially when compared to similarly capable tools with more flexible pricing structures. DeskIn offers similar performance benefits with a more flexible pricing structure, making it a compelling alternative.
You may also be interested in: |
|---|
RDP can be difficult to configure, less secure if exposed, and limited outside Windows environments. Modern tools like DeskIn provide better performance, security, and ease of use.
The best RDP alternative depends on your needs, but DeskIn stands out for its balance of speed, security, and cross-platform compatibility.
Yes, several tools qualify as an RDP alternative free, including RustDesk and Chrome Remote Desktop. DeskIn also offers a free tier with advanced capabilities.
Microsoft is evolving its remote desktop ecosystem, but traditional RDP isn't disappearing overnight. However, many users are already transitioning to more modern solutions like DeskIn for better reliability and flexibility.
RDP has served its purpose, but the digital world has outgrown its limitations. Whether you need better performance, stronger security, or true cross-platform access, switching to a modern RDP alternative is no longer optional, it's inevitable.
Among all the options, DeskIn stands out as a future-ready solution. It combines speed, simplicity, and power into one seamless experience, helping you leave behind the friction of traditional remote desktop tools and step into something far more efficient.

Top 10 Splashtop Alternative Tools for Faster, More Reliable Remote Access (2026)
If your remote desktop tool has started to feel like a buffering video at the worst possible moment, you're not alone. Many users are actively searching for a better Splashtop alternative due to rising costs, laggy connections, and limited flexibility. Whether you're managing remote IT support or simply accessing your work computer from home, the right tool can turn frustration into seamless control. Let’s dive into the best options available today.
Before switching, it’s worth knowing what actually matters. A great remote desktop tool should offer:
Smooth performance with low latency and high frame rates
Strong security like AES-256 encryption and 2FA
Cross-platform compatibility (desktop + mobile)
Easy setup and intuitive interface
Transparent pricing without hidden increases
Stable unattended remote access
These factors define the best remote desktop experience in 2026.
Tool | Pros | Cons | Best For |
|---|---|---|---|
High performance, affordable, smooth | Newer brand | High-quality remote work | |
AnyDesk | Lightweight, fast | Security limits | Quick sessions |
TeamViewer | Secure, scalable | Expensive | Enterprises |
Chrome Remote Desktop | Free, simple
| Limited features | Personal use |
Zoho Assist | Clean UI, integrations | Stability issues | IT support |
RemotePC | Affordable | Performance inconsistency | SMBs |
RealVNC | Secure | Occasional disconnects | Secure access |
LogMeIn | Feature-rich | High cost | Enterprises |
ScreenConnect | Powerful | Complex setup | MSPs |
RustDesk | Open-source | Technical setup | Developers |
Up to 4K 60FPS/2K 240FPS ultra-smooth remote control
Low latency even across long distances
Competitive pricing with strong value
Cross-platform including mobile
Smaller brand awareness
Best for: Performance-driven users and remote professionals
DeskIn is designed for users who are tired of lag and blurry screens. It delivers a near-local experience, making it ideal for developers, designers, and remote teams who rely on precision and speed. Compared to many traditional tools, it feels significantly more responsive.
Beyond performance, DeskIn balances cost and capability extremely well. If you're looking for a free alternative to Splashtop or a scalable upgrade, it offers a compelling mix of speed, security, and usability. Many users consider it a strong case where DeskIn is better than Splashtop, especially when stability matters.
Very lightweight installation
Fast connections on low bandwidth
Easy to use interface
Limited advanced security features
Occasional connection instability
Best for: Quick remote support and simple workflows
AnyDesk is frequently recommended as a Splashtop alternative thanks to its exceptional speed and minimal system footprint. The installer is just a few megabytes, and the application runs smoothly even on older hardware. It performs particularly well in low‑bandwidth environments, where its proprietary video codec maintains responsive connections during quick troubleshooting sessions.
That said, users who require consistently high frame rates, crisp visuals for design work, or advanced session management may find AnyDesk’s simplicity limiting. While it handles basic tasks admirably, power users often need more stability and richer feature sets.
You may also be interested in:
Strong security (AES-256, 2FA)
Wide device compatibility
Mature ecosystem and features
Reliable remote support tools
Expensive pricing plans
Can feel heavy for small teams
Best for: Enterprises and large organizations
TeamViewer has long been a dominant force in remote desktop software, trusted by IT departments and enterprises worldwide. Its comprehensive feature set includes remote support, meeting tools, file transfer, and even augmented‑reality assistance, all secured with AES‑256 encryption and two‑factor authentication.
However, this power comes at a price—literally. TeamViewer’s licensing model can be prohibitively expensive for smaller businesses or individual users. The interface, while feature‑rich, can also feel cluttered for those who simply need unattended access to a few computers.
You may also be interested in:
Completely free to use
Easy browser-based setup
Works across devices
Very limited features
Not suitable for business use
Best for: Individuals needing a free remote desktop
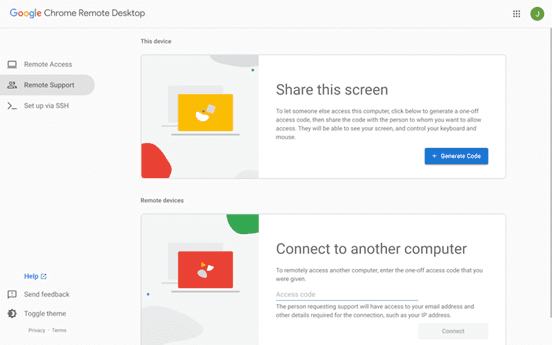
Chrome Remote Desktop is the ultimate choice for users seeking a straightforward, completely free remote access solution. Setup takes less than a minute: install the browser extension, authenticate with your Google account, and you can instantly access any computer from another device.
The trade‑off for this simplicity is a very limited feature set. There is no file transfer, multi‑monitor switching, remote printing, or session recording. Users who find themselves needing more than bare‑bones access will see a significant boost in efficiency and experience by upgrading to a dedicated tool like DeskIn, which retains ease of use while adding the features power users rely on.
You may also be interested in:
Intuitive interface
Good integrations with Zoho ecosystem
Cloud-based access
Occasional performance issues
Limited advanced features
Best for: IT helpdesk teams
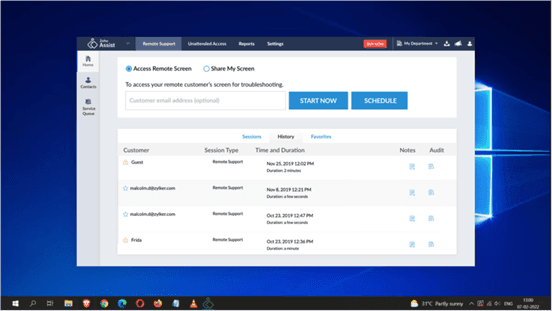
Zoho Assist delivers a clean, well‑organized remote support experience that integrates naturally with the broader Zoho ecosystem. Its dashboard is intuitive, making it easy for helpdesk teams to manage clients, schedule sessions, and generate reports. For organizations already using Zoho CRM or other Zoho applications, the seamless integration streamlines workflows and reduces the need to switch between different tools.
Despite its polished interface, performance consistency can be an issue, especially during file transfers or when connecting to machines with slower internet connections. The feature set, while sufficient for standard helpdesk operations, lacks some of the advanced controls that IT professionals expect for more complex troubleshooting.
Affordable pricing
Easy setup
Supports multiple devices
Performance can vary
Limited advanced capabilities
Best for: Small businesses and budget users
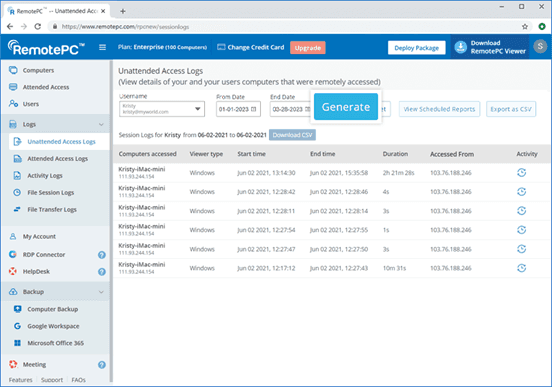
RemotePC positions itself as a budget‑friendly alternative for users who need basic remote access without a steep learning curve. Setup is straightforward, and the pricing structure is refreshingly simple—affordable plans that allow connection to multiple computers without hidden fees. It covers essential features like remote printing, file transfer, and even a simple chat function, making it a practical choice for small businesses and individual users.
However, performance can vary depending on network conditions and the specific devices being connected. Some users report occasional lag or reduced frame rates, which can become frustrating during extended sessions.
Strong encryption and security
Customisable setup
Reliable remote connections
Occasional login interruptions
Slight learning curve
Best for: Security-focused users
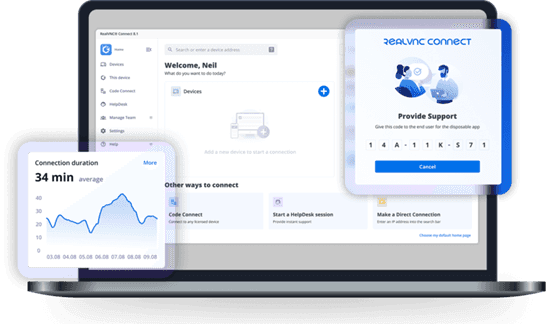
RealVNC has built a strong reputation for secure remote access. It uses robust encryption and offers granular permission controls, allowing administrators to tailor access levels for different users. The platform is highly customizable, supporting on‑premises deployments as well as cloud‑based options, which appeals to organizations with strict security requirements.
While security is clearly its strength, the user experience can sometimes feel less polished than newer competitors. Occasional login interruptions and a steeper configuration curve mean that getting the most out of RealVNC often requires technical expertise. For businesses that need both enterprise‑grade security and consistently high performance without complex setup, a more balanced solution, such as DeskIn, can deliver the best of both worlds, combining strong encryption with a streamlined, speed‑optimized experience.
Comprehensive feature set
Strong integrations
Good for collaboration
Reliable access
High pricing
Overkill for simple use cases
Best for: Enterprises needing all-in-one solutions
LogMeIn provides a comprehensive toolkit that extends far beyond simple remote desktop access. It includes robust file storage, collaboration features, and extensive integration options, making it well‑suited for enterprises that want an all‑in‑one remote work platform. The service is known for its reliability and strong customer support, which can be critical for large organizations managing hundreds or thousands of endpoints.
The main drawback is the cost. LogMeIn’s pricing plans are among the highest in the industry, and the feature set can be overwhelming for users who only need occasional remote access. Many of its advanced capabilities go unused by smaller teams, making it difficult to justify the expense.
Highly customizable
Remote support features
Multi-session support
Complex setup
Difficult to manage at scale
Best for: MSPs and IT teams
ScreenConnect (now part of ConnectWise) is a powerful, highly customizable remote support platform built with IT professionals and managed service providers in mind. It excels at multi‑session management, allowing technicians to handle several concurrent connections from a single interface. The level of granular control, over permissions, session recording, and even the appearance of the client UI, makes it a favorite among those who need to tailor the software to specific operational workflows.
However, this flexibility comes with a steep learning curve. Initial setup and ongoing management can be complex, especially for smaller teams without dedicated IT administration. For teams seeking a powerful yet approachable solution, DeskIn offers a streamlined alternative that delivers professional‑grade reliability and speed without the administrative overhead.
Free and open-source
Self-hosting options
Strong privacy control
Requires technical setup
Limited support
Best for: Developers and privacy-focused users
RustDesk appeals to developers and privacy‑conscious users who want full control over their remote access infrastructure. As an open‑source solution, it allows self‑hosting on private servers, ensuring that no session data ever passes through third‑party servers. This transparency and autonomy are highly valued by organizations with strict data sovereignty requirements or those simply wishing to avoid vendor lock‑in.
The flip side is that RustDesk requires technical expertise to deploy and maintain. Users must manage their own servers, handle updates, and troubleshoot connection issues without dedicated commercial support. While the core software is free, the total cost of ownership in time and resources can be significant.
You may also be interested in:
DeskIn is one of the strongest options due to its balance of performance, pricing, and usability. TeamViewer and AnyDesk are also popular choices.
Yes, Chrome Remote Desktop and RustDesk are free options. DeskIn also offers a competitive free plan with better performance.
The best remote desktop tools combine speed, security, and ease of use. DeskIn stands out for performance, while TeamViewer excels in enterprise environments.
Yes, most tools support mobile, making them suitable as a Splashtop alternative for Android or a Splashtop alternative for iPad.
Many users cite high Splashtop pricing, lag issues, and limited scalability as reasons to explore alternatives.
Finding the right Splashtop alternative is less about replacing a tool and more about upgrading your workflow. While options like AnyDesk and TeamViewer each have their strengths, DeskIn stands out by combining high performance, smooth visuals, and cost efficiency in one package. If you want a remote desktop experience that feels fast, stable, and future-ready, DeskIn is easily one of the smartest choices you can make today.
Top 6 RustDesk Alternative Tools for Faster, Easier Remote Access
Remote access should feel like flipping a light switch, not decoding a control panel. Yet many users exploring RustDesk eventually run into friction: connection IDs, server setup, or occasional lag. While RustDesk is powerful, it’s not always the easiest or smoothest option, especially for non-technical users.
That’s why more people are actively searching for a reliable RustDesk alternative that combines performance, simplicity, and flexibility. Whether you want a plug-and-play solution or something more advanced, this guide will help you find the best fit.
RustDesk stands out as a privacy-friendly, self-hosted remote desktop tool. However, real-world usage reveals a few common challenges:
Complicated setup for the RustDesk self-hosted environments
Manual connection steps requiring IDs and passwords
Occasional latency or unstable connections
Limited user-friendly features out of the box
For many users, especially those helping family or managing multiple devices, simplicity matters just as much as control.
When evaluating a RustDesk alternative, focus on these key factors:
Ease of use: Quick setup without technical overhead
Performance: Smooth, low-latency remote sessions
Compatibility: Support for Windows, macOS, Linux, and mobile
Security: Strong encryption and access controls
Flexibility: Options ranging from cloud-based to open source
The ideal tool strikes a balance between power and convenience, something many modern solutions now deliver better than traditional setups.
Here’s a quick breakdown of the top tools and where they shine:
DeskIn – Best all-in-one RustDesk alternative for performance and ease of use
AnyDesk – Best lightweight tool for fast connections
TeamViewer – Best for enterprise-grade remote support
MeshCentral – Best open-source and self-hosted solution
DWService – Best free browser-based tool
Chrome Remote Desktop – Best simple, no-frills option
Ultra-low latency with smooth high-frame-rate streaming
No complex setup or server deployment required
Cross-platform including Rustdesk alternative for Android
Secure with encryption and device control features
Built-in file transfer and multi-device management
Smaller awareness than legacy competitors
Best for: Users who want a powerful yet simple remote desktop solution
DeskIn removes the friction that often comes with remote access tools. Instead of relying on IDs or manual configurations, it offers a streamlined connection experience that works right out of the box. This makes it especially valuable for users supporting non-technical family members or managing multiple remote devices.
Performance is where DeskIn truly distinguishes itself. Compared to RustDesk, which can sometimes struggle with latency, DeskIn delivers consistently smooth sessions with minimal lag. It also eliminates the need for self-hosting, making it a strong free RustDesk alternative option for users who want powerful features without the complexity.
For those exploring options beyond the RustDesk alternative GitHub projects, DeskIn provides a polished, ready-to-use experience that balances simplicity with professional-grade performance.
Lightweight and fast installation
Good performance on low bandwidth
Cross-platform support
Easy-to-use interface
Performance may drop during long sessions
File transfer can be inconsistent
Best for: Users needing quick and simple remote access
AnyDesk is often considered a natural step up from RustDesk for users who want something easier to deploy. It offers a lightweight application that connects quickly and performs well under normal conditions. This makes it suitable for quick troubleshooting or occasional remote access.
However, performance consistency can be an issue. Users frequently report lag or instability during extended sessions or when handling more demanding tasks. While AnyDesk is a solid option for basic needs, it may not fully satisfy users looking for a more robust, all-in-one solution.
👀 You may also be interested in: |
|---|
Enterprise-grade security with encryption and 2FA
Stable performance across global networks
Rich features like file transfer and session recording
Broad device compatibility
Expensive for commercial use
Free version has limitations
Heavier resource usage on some systems
Best for: Businesses and IT teams managing multiple endpoints
TeamViewer has long been a dominant player in the remote desktop space, offering a comprehensive suite of features designed for enterprise environments. It excels in reliability and global connectivity, making it a popular choice for IT support teams.
That said, its pricing model is a major drawback for many users. Frequent users may quickly encounter licensing restrictions, and costs can escalate for businesses. Additionally, its heavier footprint can impact performance on lower-end devices. DeskIn offers a more modern alternative by delivering similar performance and essential features without the same cost barriers. For users who want enterprise-level capabilities with better efficiency, it presents a compelling option.
👀 You may also be interested in: |
|---|
Fully RustDesk alternative open source solution
Web-based management dashboard
Supports multi-device environments
Strong customization and control
Complex setup and maintenance
Requires technical expertise
Best for: Advanced users needing a Rustdesk alternative self-hosted
MeshCentral is a powerful open-source platform designed for users who want full control over their remote access infrastructure. It supports multiple devices and provides a centralized dashboard for management, making it attractive for IT professionals.
However, this flexibility comes with complexity. Setting up and maintaining a MeshCentral server requires technical knowledge, which can be a barrier for many users. Compared to this, DeskIn offers a much simpler deployment process while still delivering strong performance and security. For users who prioritize ease of use over full control, modern solutions like DeskIn provide a more accessible alternative.
Completely free
Browser-based access
Open-source foundation
Simple setup
Limited performance
Basic feature set
Best for: Users looking for a simple, free RustDesk alternative
DWService offers a browser-based approach to remote access with no heavy installation, making it convenient for quick connections in restricted environments. It supports both desktop access and file management across major platforms.
However, performance often feels sluggish, especially on demanding tasks, and features remain basic; lacking session recording, smooth multi-monitor support, or advanced security controls. While suitable for occasional personal use, it falls short for professional or high-performance scenarios.
Free and easy to use
Browser-based setup
Cross-platform compatibility
Very limited features
No advanced management or collaboration tools
Best for: Casual users needing basic remote access
Chrome Remote Desktop is one of the simplest remote access tools available. It’s easy to set up and works across devices, making it a convenient choice for occasional use.
However, it lacks many essential features such as file transfer, session management, and advanced security controls. For users with more demanding needs, it quickly becomes insufficient. Compared to Chrome Remote Desktop, DeskIn provides a much more complete experience without sacrificing ease of use, making it a better long-term solution.
👀 You may also be interested in: |
|---|
RustDesk is powerful but can be difficult to set up and manage, especially with self-hosting. Many users prefer tools that offer similar performance without technical complexity. DeskIn simplifies remote access while maintaining strong performance and security.
Several tools qualify as a free RustDesk alternative, including DWService and Chrome Remote Desktop. However, DeskIn stands out by offering better performance and usability even in its free version.
Yes, tools like MeshCentral and DWService are considered RustDesk alternative open source options. They provide flexibility and control but often require technical expertise to set up and maintain.
Beginners should choose tools with a simple setup and intuitive interfaces. DeskIn is an excellent option because it removes the need for manual configuration while still delivering advanced features.
RustDesk is a powerful starting point, but it’s not always the easiest or most efficient tool for everyday use. From setup complexity to performance limitations, many users eventually look for a better RustDesk alternative.
Among all the options, DeskIn stands out as the most balanced solution. It combines speed, simplicity, and cross-platform support into one seamless experience. If you’re ready to move beyond technical friction and enjoy truly smooth remote access, DeskIn is a choice that simply works.
Top 7 RDP Alternative Tools for Faster, Safer Remote Access
Remote desktop access used to feel like a solid bridge. Now, for many users, traditional RDP feels more like a creaky rope ladder. With performance issues, security concerns, and limited cross-platform support, it's no surprise that more people are actively searching for a better RDP alternative that actually keeps up with modern workflows.
If you're managing multiple servers, working across devices, or just tired of unstable connections, this guide will walk you through the best tools worth switching to.
RDP (Remote Desktop Protocol) is a proprietary protocol developed by Microsoft that allows users to connect to another computer over a network. It's widely used for accessing Windows servers, virtual machines, and remote workstations.
While powerful in controlled environments, RDP is often tied to Windows systems and requires configuration like port forwarding or VPNs. Compared to newer tools, it can feel rigid and outdated.
You may also be interested in: |
|---|
RDP still works, but it comes with trade-offs that many users find frustrating:
Security risks if not properly configured
Complex setup for remote or external access
Limited cross-platform compatibility
Performance issues over unstable networks
Many IT teams are now actively replacing it, especially when looking for a Windows RDP client alternative or something that works seamlessly across macOS, Linux, and mobile devices. That's where modern Remote Desktop alternatives shine.
Choosing the right tool is like picking the right vehicle. Some are built for speed, others for heavy-duty enterprise work. Here's a quick snapshot:
DeskIn – Best all-in-one RDP alternative for performance and cross-platform use
TeamViewer – Best for enterprise remote support
AnyDesk – Best lightweight option for fast connections
RustDesk – Best Windows RDP alternative open-source solution
Remmina – Best RDP alternative for Linux users
Chrome Remote Desktop – Best simple browser-based tool
Splashtop – Best for high-performance business environments
Ultra-low latency with smooth high-frame-rate streaming
Works across Windows, macOS, Linux, iOS, and Android
Strong encryption and secure access controls
Built-in file transfer and multi-session support
Newer compared to legacy brands
Best for: Users who want a powerful, flexible RDP alternative
DeskIn feels less like remote access and more like teleportation for your desktop. Whether you're managing servers, supporting clients, or working remotely, it delivers consistently smooth performance without the usual lag spikes seen in traditional RDP setups.
Unlike many tools, DeskIn eliminates the need for complex configurations. You don't need to wrestle with firewalls or VPNs just to connect. It also works seamlessly across platforms, making it a strong alternative to Microsoft Remote Desktop for Mac and mobile users alike.
For teams juggling multiple systems, DeskIn provides a unified experience that replaces fragmented workflows. It's also a strong free RDP alternative option with premium-level capabilities, making it ideal for both individuals and businesses.
Enterprise-grade security and compliance
Extensive feature set including collaboration tools
Cross-platform compatibility
Reliable global performance
Expensive licensing
Can be overkill for individuals
Best for: Enterprises needing secure and scalable remote access
TeamViewer is a comprehensive remote desktop platform widely adopted by IT teams, support professionals, and enterprises. Its feature set extends far beyond simple screen sharing—it includes robust device management, remote printing, file transfer, session recording, and even augmented reality support for field service. TeamViewer's security architecture relies on AES‑256 encryption, two‑factor authentication, and whitelisting, making it suitable for organizations with strict compliance requirements. It runs on virtually every operating system and mobile platform.
The main trade‑off is its pricing: licenses are subscription‑based and can become expensive for small teams or individual users, especially as TeamViewer aggressively flags personal use as commercial, leading to session restrictions.
Fast and responsive
Lightweight installation
Works well on low bandwidth
Easy to use
File transfer can be inconsistent
Lag during longer sessions
Best for: Users needing quick, simple remote access
AnyDesk is a lightweight remote desktop application prized for its speed and efficiency, often recommended as a fast alternative to Microsoft's native Remote Desktop on Windows 10 and Android. It uses a proprietary video codec, DeskRT, to achieve low latency even on limited bandwidth, making it ideal for quick support sessions and accessing devices over mobile networks. The interface is clean and minimalist, with features like address book management, file transfer, and session recording available.
However, users frequently report instability during extended sessions; performance can degrade over time, and file transfers may slow considerably compared to competitors. While its free version is generous for personal use, professional users often find the performance ceiling limits its suitability for continuous, demanding workloads. DeskIn, by contrast, maintains consistent performance even during extended use, making it better suited for professional workloads.
You may also be interested in: |
|---|
Free and open-source
Self-hosting for full control
Strong privacy protection
Active community
Technical setup required
Limited user-friendly features
Best for: Developers and privacy-focused users
RustDesk has emerged as a leading open‑source remote desktop alternative, appealing to developers and organizations that require full control over their data. It allows users to self‑host the relay and rendezvous servers, meaning no third‑party infrastructure handles connection metadata. Built with Rust, it offers a modern codebase with cross‑platform clients (Windows, macOS, Linux, Android, iOS) and supports essential features such as file transfer, TCP tunneling, and customizable address books.
The major barrier is its complexity: deploying a self‑hosted environment requires technical expertise to configure firewalls, SSL certificates, and ongoing server maintenance. For those using the public relay, performance can be inconsistent depending on server load and geographic proximity.
You may also be interested in: Top RustDesk Alternatives for Better Performance, Security & Ease of Use |
|---|
Open-source and free
Supports multiple protocols including RDP and VNC
Lightweight and flexible
Native to Linux environments
Limited features compared to modern tools
UI can feel outdated
Best for: Linux users looking for a traditional RDP alternative Linux
Remmina is a beloved open‑source remote desktop client for Linux, supporting multiple protocols (RDP, VNC, SSH, SPICE, and others) in a single unified interface. It is frequently chosen by system administrators and Linux enthusiasts who need a flexible, lightweight tool to manage diverse environments. Remmina offers tabbed sessions, quick‑connect profiles, and a plugin system that extends its capabilities.
However, its strength - protocol flexibility, also highlights its limitations. As a frontend client rather than a full remote access solution, it lacks features like unattended access, centralized account management, or robust session recording out of the box. Performance can vary by protocol, and the user experience lags behind more polished commercial tools, particularly for users seeking a plug‑and‑play setup.
Free and easy to use
Browser-based setup
Cross-platform access
Very limited features
No advanced management tools
Best for: Casual users needing basic remote access
Chrome Remote Desktop is a free, browser‑based remote access tool from Google that requires nothing more than a Chrome browser and a Google account. It excels in simplicity: installation takes seconds, and connections are mediated through Google's infrastructure, eliminating complex firewall configurations. For occasional use—such as helping a family member or quickly accessing a home computer—it works reliably across Windows, macOS, Linux, and even ChromeOS.
The trade‑off is its minimal feature set. There is no native file transfer, multi‑session management, remote printing, or granular permission controls. Collaboration tools are absent, and the reliance on a Google account for authentication can be a limitation in professional environments. It remains a convenient entry‑level tool but struggles to meet the needs of power users or IT teams.
You may also be interested in: |
|---|
High-quality streaming performance
Strong security features
Good for business environments
Reliable connections
Subscription-based pricing
Limited free version
Best for: Businesses needing performance-focused remote access
Splashtop is a high‑performance remote desktop solution frequently adopted by creative professionals, educational institutions, and enterprises that prioritize fluid interaction. It delivers low‑latency streaming with support for high‑frame‑rate displays, making it suitable for video editing, CAD work, and other graphics‑intensive tasks. Splashtop offers a range of editions—from Business Access to SOS for on‑demand support—all of which include robust security (AES‑256, device authentication) and features like file transfer, remote printing, and multi‑monitor navigation. Its performance over local networks and the internet is consistently praised.
The primary drawback is cost: while competitive, the subscription model can accumulate quickly for users needing access to multiple devices or advanced features, especially when compared to similarly capable tools with more flexible pricing structures. DeskIn offers similar performance benefits with a more flexible pricing structure, making it a compelling alternative.
You may also be interested in: |
|---|
RDP can be difficult to configure, less secure if exposed, and limited outside Windows environments. Modern tools like DeskIn provide better performance, security, and ease of use.
The best RDP alternative depends on your needs, but DeskIn stands out for its balance of speed, security, and cross-platform compatibility.
Yes, several tools qualify as an RDP alternative free, including RustDesk and Chrome Remote Desktop. DeskIn also offers a free tier with advanced capabilities.
Microsoft is evolving its remote desktop ecosystem, but traditional RDP isn't disappearing overnight. However, many users are already transitioning to more modern solutions like DeskIn for better reliability and flexibility.
RDP has served its purpose, but the digital world has outgrown its limitations. Whether you need better performance, stronger security, or true cross-platform access, switching to a modern RDP alternative is no longer optional, it's inevitable.
Among all the options, DeskIn stands out as a future-ready solution. It combines speed, simplicity, and power into one seamless experience, helping you leave behind the friction of traditional remote desktop tools and step into something far more efficient.
連絡先
メール: support@deskin.io
オフィスの住所:
991D Alexandra Road #02-17
シンガポール 119972
著作権 © 2026 Zuler Technology PTE. LTD. 無断複写・転載を禁じます。
お問い合わせ
Eメール: support@deskin.io
本社: 991D Alexandra Road #02-17, シンガポール 119972
著作権 © 2026 Zuler Technology PTE. LTD. 無断複写・転載を禁じます。
連絡先
support@deskin.io
991D Alexandra Road #02-17
シンガポール 119972
著作権 © 2026 Zuler Technology PTE. LTD. 無断複写・転載を禁じます。

