ประสิทธิภาพ
ประสิทธิภาพ
·
10 นาที
·
10 นาที
ดับเบิลยู ทิง
Published on
Updated on
Updated on
ในขณะที่แอป ของบุคคลที่สาม หลายตัวสัญญาว่าจะช่วยคุณควบคุม Mac จาก iPhone ได้อย่างไร้สาย แต่ฟังก์ชันการทำงานของพวกเขามักมีข้อจำกัดที่น่าหงุดหงิด บางตัว อนุญาตให้ดูทางไกลโดยไม่สามารถควบคุมจริงได้ ในขณะที่บางตัวประสบปัญหาการดีเลย์หน้าจออย่างมากในช่วงเซสชัน ข้อจำกัดเหล่านี้ทำให้ประสบการณ์ตามเวลาจริงที่คุณคาดหวังจากการเข้าถึงระยะไกลแบบราบรื่นลดลงอย่างมาก
คู่มือนี้จะช่วยให้คุณเดินผ่านวิธีการยอดนิยมในการควบคุม Mac จาก iPhone โดยแนะนำเครื่องมือต่างๆ ฟีเจอร์ของพวกเขา และคำแนะนำการตั้งค่าแบบขั้นตอนต่อขั้นตอนเพื่อช่วยคุณค้นหาโซลูชันที่มีประสิทธิภาพมากที่สุด!
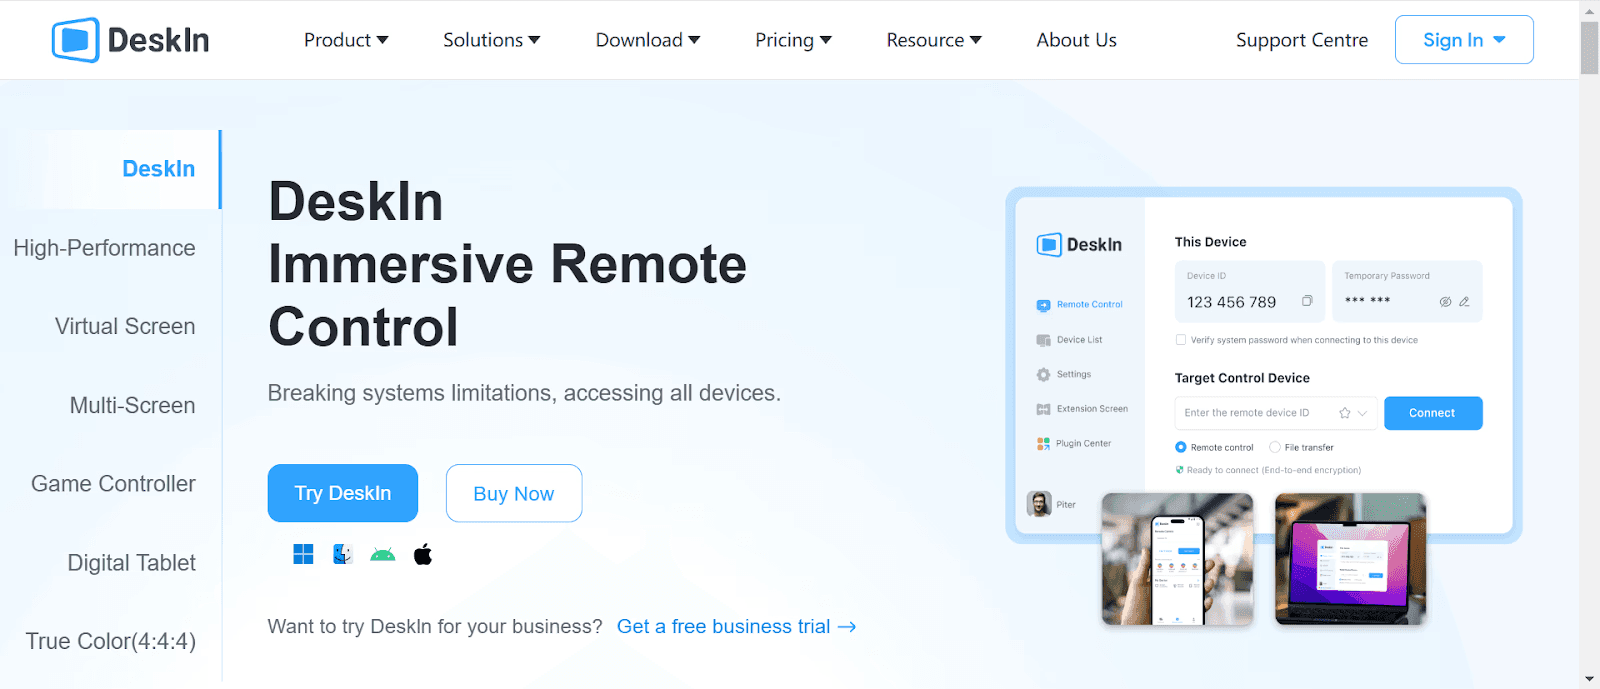
เมื่อพูดถึงการควบคุม Mac จาก iPhone ทางไกล DeskIn เดือดเด่นในฐานะโซลูชันที่มีประสิทธิภาพและใช้งานง่ายที่สุด ไม่ว่าคุณจะต้องการเข้าถึงไฟล์สำคัญ ช่วยเพื่อนร่วมงาน หรือควบคุม Mac ของคุณจากที่ใดก็ตาม DeskIn มอบประสบการณ์การควบคุมระยะไกลที่ไร้รอยต่อและปลอดภัย ด้านล่างนี้ เราจะสำรวจว่าเหตุใด DeskIn จึงเป็นตัวเลือกที่ดีที่สุด วิธีการตั้งค่า และวิธีใช้สำหรับการเข้าถึงระยะไกลอย่างราบรื่น
DeskIn เป็นเครื่องมือเข้าถึงระยะไกลที่มีคุณสมบัติครบครัน ออกแบบมาเพื่อให้การควบคุมระยะไกลมีประสิทธิภาพสูงและมีการหน่วงต่ำผ่านอุปกรณ์ต่างๆ นี่คือสิ่งที่ทำให้มันเป็น แอปควบคุมระยะไกลที่ดีที่สุดสำหรับ iPhone ของคุณ ที่จะควบคุม MacBook หรือ iMac ของคุณ
DeskIn: แอปที่ดีที่สุดในการควบคุม Mac จาก iPhone
ควบคุม Mac ได้อย่างง่ายดายและไม่มีดีเลย์: ด้วยเซิร์ฟเวอร์โหนดทั่วโลกกว่า 200+ DeskIn รับรองอัตราความสำเร็จในการเชื่อมต่อสูง เซสชันที่ไม่สะดุด และการดีเลย์ต่ำสุด
เชื่อมต่อ Mac, iMac, และ Mac Pro จาก iPhone ส่วนใหญ่: ทำงานข้ามระบบปฏิบัติการต่างๆ ได้แก่ macOS, iOS, Windows และ Android อนุญาตให้เชื่อมต่อระหว่างอุปกรณ์ต่างๆ ได้อย่างง่ายดาย
ประสบการณ์ที่ราบรื่นและเสถียร: แม้ในสภาพเครือข่ายต่ำ DeskIn ยังรักษาการดำเนินการที่ราบรื่นปราศจากดีเลย์ ทำให้มันเหมาะสำหรับการทำงาน การเล่นเกม และการถ่ายโอนไฟล์
การเข้าถึงระยะไกลที่ปลอดภัย: รวมถึงการยืนยันทางอีเมล หน้าจอความเป็นส่วนตัว และการควบคุมบัญชีดำ/บัญชีขาวเพื่อปกป้องข้อมูลของคุณและรับรองการเข้าถึงที่ได้รับอนุญาตเท่านั้น
การตั้งค่า DeskIn นั้นรวดเร็วและง่ายดาย ทำตามขั้นตอนเหล่านี้เพื่อเปิดใช้งานการควบคุมระยะไกลของ Mac จาก iPhone ของคุณ
ขั้นตอนที่ 1. เยี่ยมชมเว็บไซต์ทางการของ DeskIn และดาวน์โหลดแอปสำหรับทั้ง Mac และ iPhone

ขั้นตอนที่ 2. ลงทะเบียนด้วยที่อยู่อีเมลของคุณ ยืนยันตัวตนของคุณ และเข้าสู่ระบบที่ DeskIn บนอุปกรณ์ทั้งสอง
ขั้นตอนที่ 3. ปฏิบัติตามคำแนะนำบนหน้าจอใน Mac ของคุณเพื่อรับสิทธิ์ระบบที่จำเป็น เช่น การบันทึกหน้าจอและการควบคุมการเข้าถึง
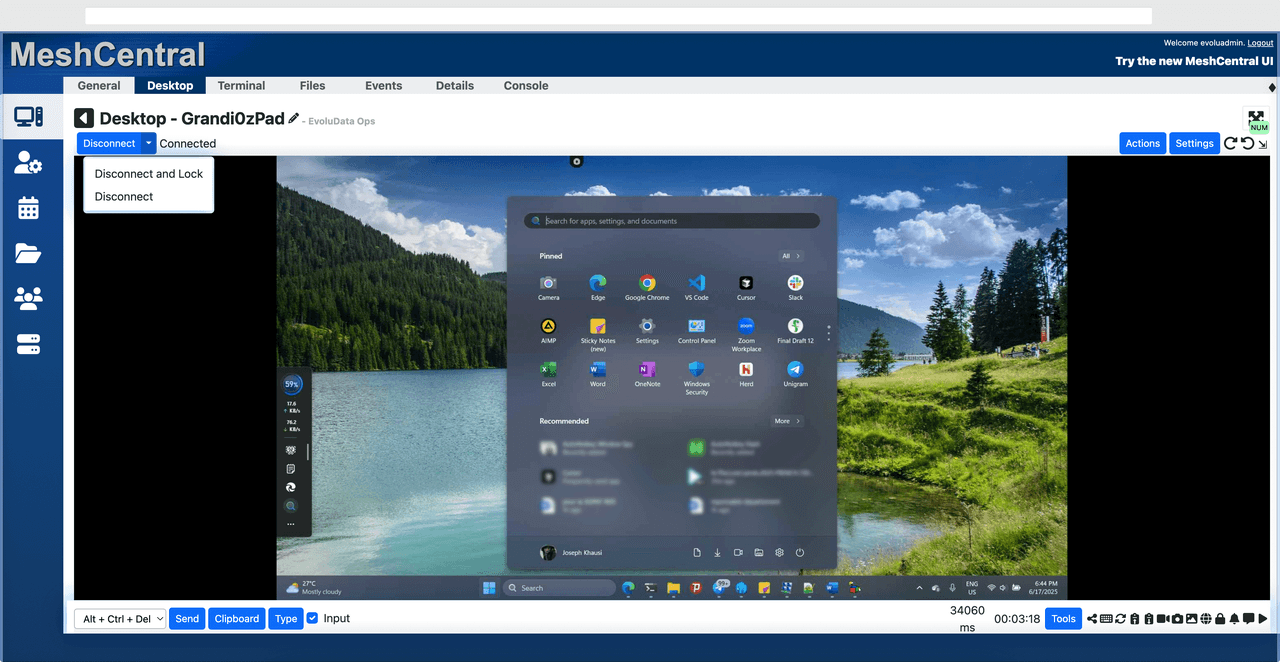
ขั้นตอนที่ 4. เปิดแอป DeskIn บน iPhone ของคุณ เข้าสู่ระบบ และเลือก Mac ของคุณจากรายการอุปกรณ์ที่มี เมื่อเชื่อมต่อแล้ว คุณสามารถควบคุม Mac ของคุณได้อย่างราบรื่น ใช้ท่าทางสัมผัส ถ่ายโอนไฟล์ระหว่างอุปกรณ์ รันแอปพลิเคชันระยะไกล และจัดการ Mac ของคุณเหมือนกับการนั่งอยู่หน้ามัน รีบใช้ DeskIn โดยคลิก ปุ่มดาวน์โหลดที่นี่

การอ่านที่เกี่ยวข้อง:
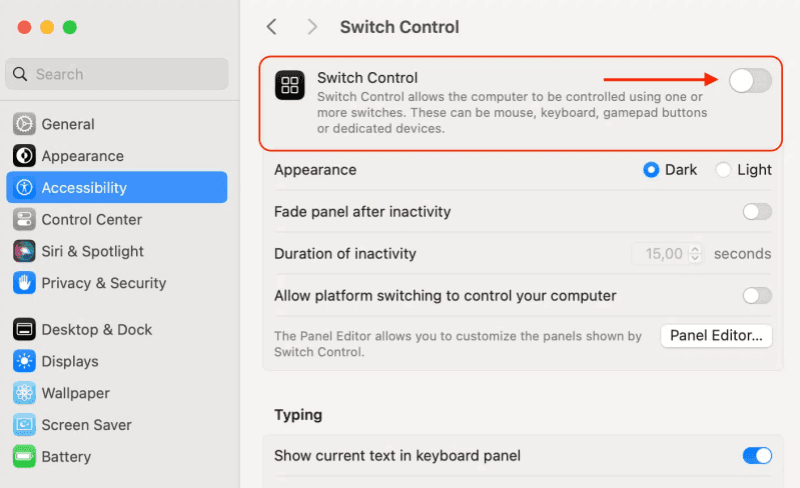
Switch Control เป็นฟีเจอร์การเข้าถึงภายในของ macOS และ iOS ที่อนุญาตให้ผู้ใช้ควบคุม Mac จาก iPhone ได้ระยะไกล เดิมออกแบบมาเพื่อผู้ที่มีความบกพร่องทางกายภาพ ฟีเจอร์นี้สามารถใช้ได้สำหรับการเข้าถึงทั่วไปอย่างระยะไกลของ Mac ต่างจากการจัดการระยะไกล Switch Control ให้คุณควบคุม Mac ของคุณได้อย่างเต็มที่โดยใช้ระบบสัมผัสของ iPhone ของคุณโดยไม่ต้องใช้แอปของบุคคลที่สาม
ขั้นตอนที่ 1. คลิกเมนู Apple > การตั้งค่าระบบ > การเข้าถึง > Switch Control จากนั้นเปิดใช้ Switch Control
ขั้นตอนที่ 2. เปิดการตั้งค่าใน iPhone ของคุณ ไปที่การเข้าถึง > Switch Control และเปิดใช้
ขั้นตอนที่ 3. ภายใต้ Switches แตะ เพิ่ม Switch ใหม่ > ภายนอก เลือก ใช้อุปกรณ์อื่น และเลือก Mac ของคุณจากรายการอุปกรณ์ที่มี
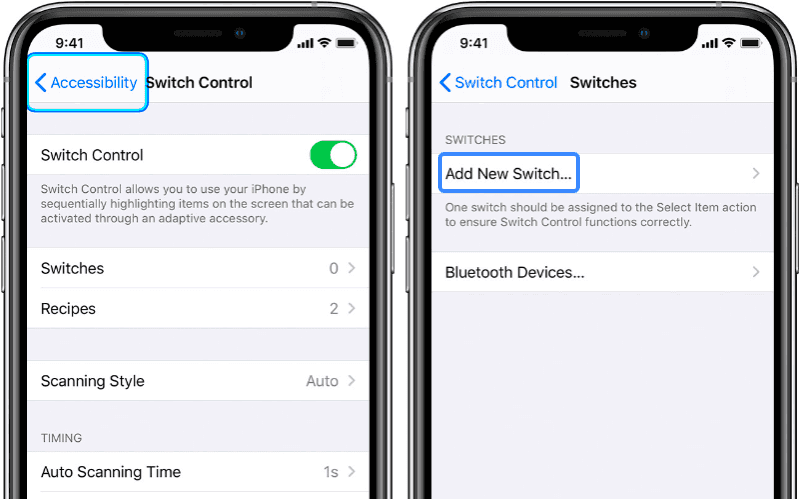
ขั้นตอนที่ 4. ใส่รหัสยืนยันที่แสดงบน Mac ของคุณเพื่อทำให้การตั้งค่าเสร็จสมบูรณ์
ขั้นตอนที่ 5. ตอนนี้คุณสามารถใช้งานระบบสัมผัสของ iPhone หรืออุปกรณ์สวิทช์ภายนอกเพื่อบรรยาย คลิกและโต้ตอบกับ Mac ของคุณ
ฟีเจอร์ "Control Nearby Devices" คืออะไร
ฟีเจอร์ภายในอื่นของ Mac และ iPhone คือ "ควมคุมอุปกรณ์ใกล้เคียง" มันสามารถควบคุม Mac ของคุณได้อย่างง่ายดายจาก iPhone ของคุณ แต่คุณต้องทำให้สองอุปกรณ์ใกล้เคียงอยู่ในระยะประมาณ 30 เมตร มันไม่แนะนำเนื่องจากระยะทางที่จำกัดและการทำงานระยะไกล
สำหรับ ระยะไกลและฟังก์ชันการทำงานระยะไกลที่ทรงพลัง ลองวิธีที่หนึ่ง DeskIn
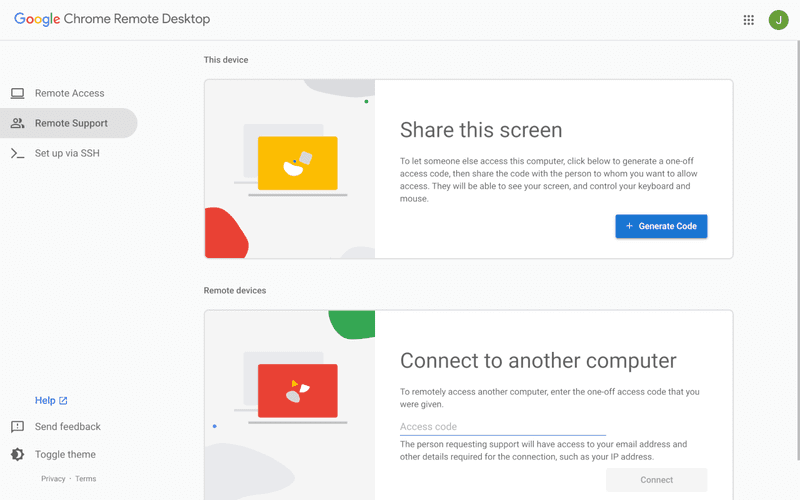
Chrome Remote Desktop เป็นเครื่องมือฟรีและเชื่อถือได้ที่ให้คุณควบคุม Mac ทางไกลจาก iPhone ได้ มันทำงานผ่านบริการเสริมใน Chrome พร้อมการเข้าถึงระยะไกลที่ปลอดภัยผ่านบัญชี Google วิธีนี้เหมาะสมหากคุณต้องการการตั้งค่าง่าย ๆ โดยไม่ติดตั้งซอฟต์แวร์เพิ่มเติมนอกจาก Chrome อย่างไรก็ตาม คุณจำเป็นต้องใช้ Chrome เป็นเบราว์เซอร์ของคุณสำหรับการตั้งค่าและการเข้าถึง
ขั้นตอนที่ 1. เปิด Google Chrome บน Mac ของคุณ ไปที่เว็บไซต์ Chrome Remote Desktop และติดตั้งบริการเสริม Chrome Remote Desktop
ขั้นตอนที่ 2. เปิดบริการเสริม Chrome Remote Desktop คลิก ตั้งค่าการเข้าถึงระยะไกล และทำตามคำแนะนำเพื่อเปิดใช้
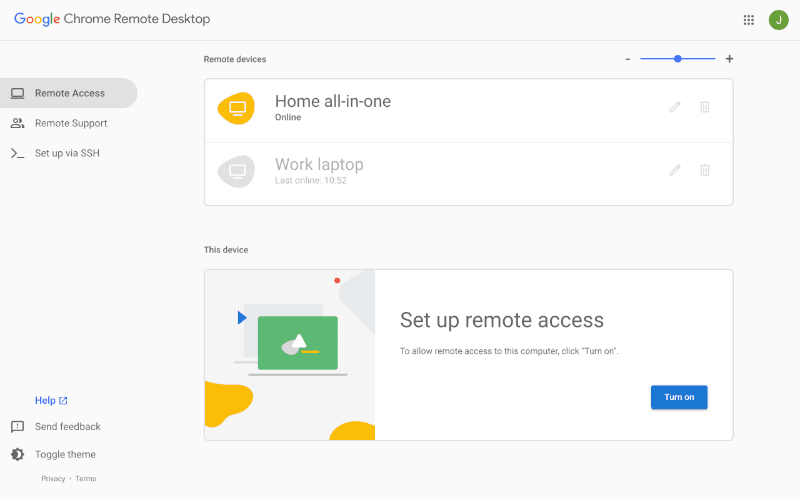
ขั้นตอนที่ 3. ตั้งค่ารหัส PIN 6 หลักที่จะต้องใช้เพื่อเชื่อมต่อกับ Mac ทางไกล
ขั้นตอนที่ 4. ดาวน์โหลดและติดตั้งแอป Chrome Remote Desktop จาก App Store
ขั้นตอนที่ 5. เปิดแอป Chrome Remote Desktop บน iPhone ของคุณ เข้าสู่ระบบด้วยบัญชี Google เดียวกันที่เชื่อมโยงกับ Mac ของคุณ
ขั้นตอนที่ 6. เลือก Mac ของคุณจากรายการอุปกรณ์ที่มี ใส่รหัส PIN และเริ่มเซสชันทางไกล
เมื่อเชื่อมต่อแล้ว คุณสามารถนำทาง Mac ของคุณโดยใช้ท่าทางสัมผัสหรือแป้นพิมพ์ภายนอก ทำให้มันเป็นตัวเลือกสะดวกสำหรับการเข้าถึงพื้นฐานทางไกล
คุณยังสามารถสนใจ: วิธีใช้งาน Microsoft Remote Desktop Mac
Apple Remote Desktop เป็นเครื่องมือครบวงจรของ macOS ที่ออกแบบมาเพื่อการจัดการระยะไกลอย่างไร้สายผ่านอุปกรณ์ Apple มันทำให้คุณสามารถควบคุม iTunes Mac ทางไกลจาก iPhone และทำงานหลากหลายอย่างเช่น การถ่ายโอนไฟล์ การติดตั้งซอฟต์แวร์ และการตรวจสอบระบบแบบเรียลไทม์ เป็น โซลูชันข้อมูลทางการของ Apple มันมอบการรวมเพื่อการควบคุมหลาย Mac ได้โดยตรงจาก iPhone ของคุณ
อย่างไรก็ตาม การทำงานขั้นสูงนี้ มีค่าใช้จ่าย: ราคาซื้อสูงใน Mac App Store นอกจากนี้ อินเทอร์เฟซที่มุ่งเน้นไปทางองค์กรนำเสนอการเรียนรู้ที่มีราคาแพงเมื่อเทียบกับแอปผู้บริโภคที่ง่ายกว่า ทำให้เกิดความยุ่งยากต่อผู้ใช้ทั่วไป
ขั้นตอนที่ 1: เปิดการจัดการระยะไกลใน MacBook ของคุณ
ไปที่การตั้งค่าระบบ > ทั่วไป > การแบ่งปัน เปิด "การจัดการระยะไกล" และให้สิทธิ์การเข้าถึง
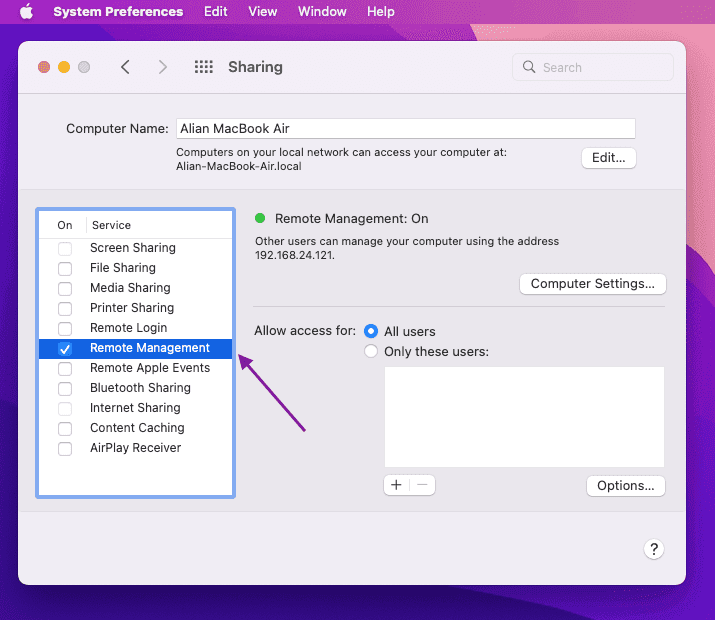
ขั้นตอนที่ 2: ดาวน์โหลดแอป Apple Remote Desktop (ฟรี) จาก App Store และลงชื่อเข้าใช้ด้วย Apple ID ของคุณ
ขั้นตอนที่ 3: แตะ "+" > "เพิ่มคอมพิวเตอร์" ป้อน IP Address หรือชื่อโฮสต์ของ Mac ของคุณ และยืนยันข้อมูลรับรอง
ขั้นตอนที่ 4: เลือก Mac ของคุณจากรายการอุปกรณ์และแตะ "ควบคุม" เพื่อเริ่มการเข้าถึงอย่างไร้สาย
Jump Desktop: มอบ ประสิทธิภาพสูงและการดีเลย์ต่ำสุด ผ่านโพรโทคอล Fluid Remote Desktop ที่เป็นเจ้าของ มีความปลอดภัยสูงพร้อม การเข้ารหัสจากต้นทางถึงปลายทาง อินเทอร์เฟซที่ใช้งานง่ายรองรับการควบคุมหลายหน้าจอและการรวมอุปกรณ์ภายนอกอย่างไร้รอยต่อ
RealVNC Viewer: โซลูชั่น ฟรี ที่ได้รับการยกย่องในเรื่องคุณภาพภาพที่ปรับเปลี่ยนได้และดำเนินการได้ราบรื่นในสภาพเงื่อนไขที่เหมาะสม อย่างไรก็ตาม การเชื่อมต่ออาจทำงานได้ดีเยี่ยม ในบางเซสชันแต่ ล้มเหลวบางครั้งในเวลาอื่น อย่างเช่นการตกหล่นในการเชื่อมต่อในเวลาเช้า
เครื่องมือของบุคคลที่สามอื่นๆ:
TeamViewer
ให้การสนับสนุนข้ามแพลตฟอร์มแต่ถูกวิจารณ์ในเรื่อง ราคาสูง (แผนการเชิงพาณิชย์) การทำงานที่ขึ้นกับการหน่วงต่ำในปริมาณแบนด์วิดธ์ต่ำ และรายงานการเกิดข้อบกพร่องด้านความปลอดภัยซ้ำๆ
Splashtop
ตัวเลือก ที่มีค่าใช้จ่ายต่ำกว่าสำหรับ TeamViewer ประหยัดมากกว่า 50% ต่อปี มันเน้นการตั้งค่าที่ง่ายและการเข้าถึงระยะไกลที่ใช้งานง่ายสำหรับ Mac พร้อมการสนับสนุนพิเศษเช่นการถ่ายโอนไฟล์และการสนับสนุนหลายหน้าจอ
AnyDesk
ใช้ DeskRT codec เพื่อการเชื่อมต่อที่มีความเร็วสูงแต่ ขาดส่วนลดสำหรับกลุ่มใหญ่ ทำให้การติดตั้งในองค์กรมีค่าใช้จ่ายสูง ความโปร่งใสของราคาอยู่ในระดับต่ำ และ คุณลักษณะขั้นสูง (เช่น การทำรายการที่อนุญาต) ต้องการแผนระดับสูง โดยไม่มีการประหยัดสำหรับการใช้งานเป็นจำนวนมาก
ในการเลือกวิธีที่ดีที่สุดในการควบคุม Mac จาก iPhone ทางไกล สิ่งสำคัญคือการเปรียบเทียบโซลูชันต่างๆ โดยพิจารณาจากปัจจัยสำคัญเช่นประสิทธิภาพ ความปลอดภัย ความง่ายในการใช้งานและชุดคุณสมบัติ ด้านล่างเป็นการเปรียบเทียบของ DeskIn ตัวเลือกการจัดการระยะไกลภายใน macOS และ Chrome Remote Desktop เพื่อช่วยให้คุณตัดสินใจได้
คุณลักษณะ | การจัดการระยะไกลภายใน macOS | Chrome Remote Desktop | |
|---|---|---|---|
ความง่ายในการใช้งาน | ✅ การตั้งค่าใช้งานง่าย & อินเทอร์เฟซที่ใช้งานง่าย | ❌ ต้องการการตั้งค่าด้วยตนเอง | ✅ การเข้าถึงผ่านเบราว์เซอร์ที่ง่าย |
ประสิทธิภาพ | ✅ การเชื่อมต่อความเร็วสูงและการหน่วงต่ำ | ❌ ประสิทธิภาพขึ้นอยู่กับเครือข่าย | ❌ อาจมีการดีเลย์จากการเชื่อมต่อที่อ่อน |
ความปลอดภัย | ✅ การเข้ารหัสจากต้นทางถึงปลายทาง, 2FA และหน้าจอความเป็นส่วนตัว | ✅ ปลอดภัยแต่ต้องตั้งค่าอย่างถูกต้อง | ✅ เข้ารหัส, แต่มีการควบคุมด้านความปลอดภัยน้อยลง |
ความเข้ากันข้ามแพลตฟอร์ม | ✅ ทำงานบน macOS, Windows, iOS และ Android | ❌ ทำงานเฉพาะภายในระบบ Apple | ✅ ทำงานได้ข้ามระบบหลายแพลตฟอร์ม |
รองรับการถ่ายโอนไฟล์ | ✅ ใช่, การแชร์ไฟล์ในตัว | ❌ ตัวเลือกการแชร์ไฟล์ที่จำกัด | ❌ ไม่มีการถ่ายโอนไฟล์ในตัว |
ความต้องการอินเทอร์เน็ต | ✅ ทำงานได้อย่างมีประสิทธิภาพแม้ในแบนด์วิดท์ต่ำ | ✅ ทำงานได้ดีบน LAN แต่การเข้าถึงภายนอกอาจต้องตั้งค่าเพิ่ม | ❌ ต้องการการเชื่อมต่ออินเทอร์เน็ตที่เสถียร |
อย่างที่คุณเห็น DeskIn เดือดเด่นในด้านประสิทธิภาพที่มีการหน่วงต่ำคุณลักษณะด้านความปลอดภัยที่แข็งแกร่งเช่นการเข้ารหัสจากต้นทางถึงปลายทางและ 2FA และความเข้ากันได้ข้ามแพลตฟอร์มระหว่าง macOS, Windows, iOS และ Android ต่างจาก Chrome Remote Desktop, มันยังรองรับการถ่ายโอนไฟล์ที่ง่ายทำให้มันเป็นทางเลือกที่น่าเชื่อถือและเต็มไปด้วยฟีเจอร์ที่สุดสำหรับการควบคุม Mac ของคุณจาก iPhone อย่างไร้สาย
คุณอาจสนใจ: การเปรียบเทียบซอฟต์แวร์การควบคุมระยะไกลฟรี 3 ตัว
เพื่อรักษา Mac ของคุณให้ปลอดภัยขณะใช้การเข้าถึงระยะไกล ให้ปฏิบัติตามวิธีการป้องกันที่ดีที่สุดเหล่านี้:
ใช้รหัสผ่านที่แข็งแรง & เปิดใช้ 2FA: ตั้งรหัสผ่านที่ซับซ้อนและไม่ซ้ำสำหรับบัญชี DeskIn และ Google ของคุณ และเปิดใช้งานการยืนยันสองขั้นตอน (2FA) เพื่อเพิ่มการป้องกันเพิ่มเติม
เปิดใช้ฟีเจอร์ความเป็นส่วนตัวของ DeskIn: เปิดใช้งานหน้าจอความเป็นส่วนตัวเพื่อป้องกันการดูโดยไม่ได้รับอนุญาตในระหว่างเซสชันระยะไกล ใช้การตั้งค่าบัญชีขาวและบัญชีดำของ DeskIn เพื่อควบคุมว่าใครสามารถเข้าถึง Mac ของคุณได้
อัพเดตรหัสผ่านอย่างสม่ำเสมอ: เปลี่ยนรหัสผ่านสำหรับการเข้าถึงระยะไกลของคุณเป็นประจำเพื่อลดความเสี่ยงของการเข้าถึงโดยไม่ได้รับอนุญาต
อัปเดตซอฟต์แวร์เป็นประจำ: ตรวจสอบให้แน่ใจว่า macOS แอป DeskIn และเครื่องมือการเข้าถึงระยะไกลอัปเดตอยู่เสมอเพื่อแก้ไขช่องโหว่ของความปลอดภัย
ใช้เครือข่ายที่ปลอดภัย: หลีกเลี่ยงการเชื่อมต่อผ่าน Wi-Fi สาธารณะเมื่อเป็นไปได้ ใช้ VPN ที่เชื่อถือได้เพื่อเข้ารหัสการเชื่อมต่อของคุณและป้องกันข้อมูลของคุณเมื่อเข้าถึง Mac ของคุณทางไกล
โดยการปฏิบัติตามมาตรการความปลอดภัยเหล่านี้ คุณสามารถปกป้องข้อมูลและความเป็นส่วนตัวของคุณขณะเพลิดเพลินกับการเข้าถึง Mac ของคุณทางไกลอย่างไร้รอยต่อ
ใช่, ทั้ง DeskIn รุ่นฟรีและการจัดการระยะไกลของ macOS ให้การเข้าถึงระยะไกลได้ฟรี อย่างไรก็ตาม ฟีเจอร์ Switch Control ของ Apple ไม่ค่อยใช้งานง่ายขณะใช้งาน ดังนั้นเราจึงแนะนำให้ใช้ DeskIn เป็นเครื่องมือฟรีสำหรับการควบคุม Mac ทางไกล หรืออัปเกรดเป็นเวอร์ชันพรีเมียมเพื่อรับประสิทธิภาพที่ดีขึ้น ความปลอดภัยเพิ่มขึ้น และคุณสมบัติเพิ่มเติม
ใช่, เป็นเช่นนั้น ตราบใดที่ทั้ง Mac และ iPhone ของคุณเชื่อมต่อกับอินเทอร์เน็ต คุณสามารถเข้าถึงและควบคุม Mac ของคุณทางไกลได้โดยใช้ DeskIn ไม่ว่าคุณจะอยู่ที่ไหนก็ตาม
การควบคุม Mac ของคุณทางไกลจาก iPhone เพิ่มประสิทธิภาพการทำงาน การสนับสนุนทางไกล และความสะดวกสบายโดยรวม ในขณะที่เครื่องมือภายใน macOS และ Chrome Remote Desktop ให้ฟังก์ชันทั่วไป และ Apple Remote Desktop มีค่าใช้จ่ายสูง, DeskIn เดือดเด่นด้วยความมั่นคง ความปลอดภัย และประสบการณ์ที่เต็มไปด้วยคุณสมบัติที่ยอดเยี่ยมที่สุด สำหรับโซลูชันการเข้าถึงระยะไกลที่ดีที่สุด ลองใช้ DeskIn วันนี้และเพลิดเพลินกับการควบคุม Mac ของคุณอย่างไร้รอยต่อและปลอดภัยจากทุกที่!
ในขณะที่แอป ของบุคคลที่สาม หลายตัวสัญญาว่าจะช่วยคุณควบคุม Mac จาก iPhone ได้อย่างไร้สาย แต่ฟังก์ชันการทำงานของพวกเขามักมีข้อจำกัดที่น่าหงุดหงิด บางตัว อนุญาตให้ดูทางไกลโดยไม่สามารถควบคุมจริงได้ ในขณะที่บางตัวประสบปัญหาการดีเลย์หน้าจออย่างมากในช่วงเซสชัน ข้อจำกัดเหล่านี้ทำให้ประสบการณ์ตามเวลาจริงที่คุณคาดหวังจากการเข้าถึงระยะไกลแบบราบรื่นลดลงอย่างมาก
คู่มือนี้จะช่วยให้คุณเดินผ่านวิธีการยอดนิยมในการควบคุม Mac จาก iPhone โดยแนะนำเครื่องมือต่างๆ ฟีเจอร์ของพวกเขา และคำแนะนำการตั้งค่าแบบขั้นตอนต่อขั้นตอนเพื่อช่วยคุณค้นหาโซลูชันที่มีประสิทธิภาพมากที่สุด!
เมื่อพูดถึงการควบคุม Mac จาก iPhone ทางไกล DeskIn เดือดเด่นในฐานะโซลูชันที่มีประสิทธิภาพและใช้งานง่ายที่สุด ไม่ว่าคุณจะต้องการเข้าถึงไฟล์สำคัญ ช่วยเพื่อนร่วมงาน หรือควบคุม Mac ของคุณจากที่ใดก็ตาม DeskIn มอบประสบการณ์การควบคุมระยะไกลที่ไร้รอยต่อและปลอดภัย ด้านล่างนี้ เราจะสำรวจว่าเหตุใด DeskIn จึงเป็นตัวเลือกที่ดีที่สุด วิธีการตั้งค่า และวิธีใช้สำหรับการเข้าถึงระยะไกลอย่างราบรื่น
DeskIn เป็นเครื่องมือเข้าถึงระยะไกลที่มีคุณสมบัติครบครัน ออกแบบมาเพื่อให้การควบคุมระยะไกลมีประสิทธิภาพสูงและมีการหน่วงต่ำผ่านอุปกรณ์ต่างๆ นี่คือสิ่งที่ทำให้มันเป็น แอปควบคุมระยะไกลที่ดีที่สุดสำหรับ iPhone ของคุณ ที่จะควบคุม MacBook หรือ iMac ของคุณ
DeskIn: แอปที่ดีที่สุดในการควบคุม Mac จาก iPhone
ควบคุม Mac ได้อย่างง่ายดายและไม่มีดีเลย์: ด้วยเซิร์ฟเวอร์โหนดทั่วโลกกว่า 200+ DeskIn รับรองอัตราความสำเร็จในการเชื่อมต่อสูง เซสชันที่ไม่สะดุด และการดีเลย์ต่ำสุด
เชื่อมต่อ Mac, iMac, และ Mac Pro จาก iPhone ส่วนใหญ่: ทำงานข้ามระบบปฏิบัติการต่างๆ ได้แก่ macOS, iOS, Windows และ Android อนุญาตให้เชื่อมต่อระหว่างอุปกรณ์ต่างๆ ได้อย่างง่ายดาย
ประสบการณ์ที่ราบรื่นและเสถียร: แม้ในสภาพเครือข่ายต่ำ DeskIn ยังรักษาการดำเนินการที่ราบรื่นปราศจากดีเลย์ ทำให้มันเหมาะสำหรับการทำงาน การเล่นเกม และการถ่ายโอนไฟล์
การเข้าถึงระยะไกลที่ปลอดภัย: รวมถึงการยืนยันทางอีเมล หน้าจอความเป็นส่วนตัว และการควบคุมบัญชีดำ/บัญชีขาวเพื่อปกป้องข้อมูลของคุณและรับรองการเข้าถึงที่ได้รับอนุญาตเท่านั้น
การตั้งค่า DeskIn นั้นรวดเร็วและง่ายดาย ทำตามขั้นตอนเหล่านี้เพื่อเปิดใช้งานการควบคุมระยะไกลของ Mac จาก iPhone ของคุณ
ขั้นตอนที่ 1. เยี่ยมชมเว็บไซต์ทางการของ DeskIn และดาวน์โหลดแอปสำหรับทั้ง Mac และ iPhone
ขั้นตอนที่ 2. ลงทะเบียนด้วยที่อยู่อีเมลของคุณ ยืนยันตัวตนของคุณ และเข้าสู่ระบบที่ DeskIn บนอุปกรณ์ทั้งสอง
ขั้นตอนที่ 3. ปฏิบัติตามคำแนะนำบนหน้าจอใน Mac ของคุณเพื่อรับสิทธิ์ระบบที่จำเป็น เช่น การบันทึกหน้าจอและการควบคุมการเข้าถึง
ขั้นตอนที่ 4. เปิดแอป DeskIn บน iPhone ของคุณ เข้าสู่ระบบ และเลือก Mac ของคุณจากรายการอุปกรณ์ที่มี เมื่อเชื่อมต่อแล้ว คุณสามารถควบคุม Mac ของคุณได้อย่างราบรื่น ใช้ท่าทางสัมผัส ถ่ายโอนไฟล์ระหว่างอุปกรณ์ รันแอปพลิเคชันระยะไกล และจัดการ Mac ของคุณเหมือนกับการนั่งอยู่หน้ามัน รีบใช้ DeskIn โดยคลิก ปุ่มดาวน์โหลดที่นี่
การอ่านที่เกี่ยวข้อง:
Switch Control เป็นฟีเจอร์การเข้าถึงภายในของ macOS และ iOS ที่อนุญาตให้ผู้ใช้ควบคุม Mac จาก iPhone ได้ระยะไกล เดิมออกแบบมาเพื่อผู้ที่มีความบกพร่องทางกายภาพ ฟีเจอร์นี้สามารถใช้ได้สำหรับการเข้าถึงทั่วไปอย่างระยะไกลของ Mac ต่างจากการจัดการระยะไกล Switch Control ให้คุณควบคุม Mac ของคุณได้อย่างเต็มที่โดยใช้ระบบสัมผัสของ iPhone ของคุณโดยไม่ต้องใช้แอปของบุคคลที่สาม
ขั้นตอนที่ 1. คลิกเมนู Apple > การตั้งค่าระบบ > การเข้าถึง > Switch Control จากนั้นเปิดใช้ Switch Control
ขั้นตอนที่ 2. เปิดการตั้งค่าใน iPhone ของคุณ ไปที่การเข้าถึง > Switch Control และเปิดใช้
ขั้นตอนที่ 3. ภายใต้ Switches แตะ เพิ่ม Switch ใหม่ > ภายนอก เลือก ใช้อุปกรณ์อื่น และเลือก Mac ของคุณจากรายการอุปกรณ์ที่มี
ขั้นตอนที่ 4. ใส่รหัสยืนยันที่แสดงบน Mac ของคุณเพื่อทำให้การตั้งค่าเสร็จสมบูรณ์
ขั้นตอนที่ 5. ตอนนี้คุณสามารถใช้งานระบบสัมผัสของ iPhone หรืออุปกรณ์สวิทช์ภายนอกเพื่อบรรยาย คลิกและโต้ตอบกับ Mac ของคุณ
ฟีเจอร์ "Control Nearby Devices" คืออะไร
ฟีเจอร์ภายในอื่นของ Mac และ iPhone คือ "ควมคุมอุปกรณ์ใกล้เคียง" มันสามารถควบคุม Mac ของคุณได้อย่างง่ายดายจาก iPhone ของคุณ แต่คุณต้องทำให้สองอุปกรณ์ใกล้เคียงอยู่ในระยะประมาณ 30 เมตร มันไม่แนะนำเนื่องจากระยะทางที่จำกัดและการทำงานระยะไกล
สำหรับ ระยะไกลและฟังก์ชันการทำงานระยะไกลที่ทรงพลัง ลองวิธีที่หนึ่ง DeskIn
Chrome Remote Desktop เป็นเครื่องมือฟรีและเชื่อถือได้ที่ให้คุณควบคุม Mac ทางไกลจาก iPhone ได้ มันทำงานผ่านบริการเสริมใน Chrome พร้อมการเข้าถึงระยะไกลที่ปลอดภัยผ่านบัญชี Google วิธีนี้เหมาะสมหากคุณต้องการการตั้งค่าง่าย ๆ โดยไม่ติดตั้งซอฟต์แวร์เพิ่มเติมนอกจาก Chrome อย่างไรก็ตาม คุณจำเป็นต้องใช้ Chrome เป็นเบราว์เซอร์ของคุณสำหรับการตั้งค่าและการเข้าถึง
ขั้นตอนที่ 1. เปิด Google Chrome บน Mac ของคุณ ไปที่เว็บไซต์ Chrome Remote Desktop และติดตั้งบริการเสริม Chrome Remote Desktop
ขั้นตอนที่ 2. เปิดบริการเสริม Chrome Remote Desktop คลิก ตั้งค่าการเข้าถึงระยะไกล และทำตามคำแนะนำเพื่อเปิดใช้
ขั้นตอนที่ 3. ตั้งค่ารหัส PIN 6 หลักที่จะต้องใช้เพื่อเชื่อมต่อกับ Mac ทางไกล
ขั้นตอนที่ 4. ดาวน์โหลดและติดตั้งแอป Chrome Remote Desktop จาก App Store
ขั้นตอนที่ 5. เปิดแอป Chrome Remote Desktop บน iPhone ของคุณ เข้าสู่ระบบด้วยบัญชี Google เดียวกันที่เชื่อมโยงกับ Mac ของคุณ
ขั้นตอนที่ 6. เลือก Mac ของคุณจากรายการอุปกรณ์ที่มี ใส่รหัส PIN และเริ่มเซสชันทางไกล
เมื่อเชื่อมต่อแล้ว คุณสามารถนำทาง Mac ของคุณโดยใช้ท่าทางสัมผัสหรือแป้นพิมพ์ภายนอก ทำให้มันเป็นตัวเลือกสะดวกสำหรับการเข้าถึงพื้นฐานทางไกล
คุณยังสามารถสนใจ: วิธีใช้งาน Microsoft Remote Desktop Mac
Apple Remote Desktop เป็นเครื่องมือครบวงจรของ macOS ที่ออกแบบมาเพื่อการจัดการระยะไกลอย่างไร้สายผ่านอุปกรณ์ Apple มันทำให้คุณสามารถควบคุม iTunes Mac ทางไกลจาก iPhone และทำงานหลากหลายอย่างเช่น การถ่ายโอนไฟล์ การติดตั้งซอฟต์แวร์ และการตรวจสอบระบบแบบเรียลไทม์ เป็น โซลูชันข้อมูลทางการของ Apple มันมอบการรวมเพื่อการควบคุมหลาย Mac ได้โดยตรงจาก iPhone ของคุณ
อย่างไรก็ตาม การทำงานขั้นสูงนี้ มีค่าใช้จ่าย: ราคาซื้อสูงใน Mac App Store นอกจากนี้ อินเทอร์เฟซที่มุ่งเน้นไปทางองค์กรนำเสนอการเรียนรู้ที่มีราคาแพงเมื่อเทียบกับแอปผู้บริโภคที่ง่ายกว่า ทำให้เกิดความยุ่งยากต่อผู้ใช้ทั่วไป
ขั้นตอนที่ 1: เปิดการจัดการระยะไกลใน MacBook ของคุณ
ไปที่การตั้งค่าระบบ > ทั่วไป > การแบ่งปัน เปิด "การจัดการระยะไกล" และให้สิทธิ์การเข้าถึง
ขั้นตอนที่ 2: ดาวน์โหลดแอป Apple Remote Desktop (ฟรี) จาก App Store และลงชื่อเข้าใช้ด้วย Apple ID ของคุณ
ขั้นตอนที่ 3: แตะ "+" > "เพิ่มคอมพิวเตอร์" ป้อน IP Address หรือชื่อโฮสต์ของ Mac ของคุณ และยืนยันข้อมูลรับรอง
ขั้นตอนที่ 4: เลือก Mac ของคุณจากรายการอุปกรณ์และแตะ "ควบคุม" เพื่อเริ่มการเข้าถึงอย่างไร้สาย
Jump Desktop: มอบ ประสิทธิภาพสูงและการดีเลย์ต่ำสุด ผ่านโพรโทคอล Fluid Remote Desktop ที่เป็นเจ้าของ มีความปลอดภัยสูงพร้อม การเข้ารหัสจากต้นทางถึงปลายทาง อินเทอร์เฟซที่ใช้งานง่ายรองรับการควบคุมหลายหน้าจอและการรวมอุปกรณ์ภายนอกอย่างไร้รอยต่อ
RealVNC Viewer: โซลูชั่น ฟรี ที่ได้รับการยกย่องในเรื่องคุณภาพภาพที่ปรับเปลี่ยนได้และดำเนินการได้ราบรื่นในสภาพเงื่อนไขที่เหมาะสม อย่างไรก็ตาม การเชื่อมต่ออาจทำงานได้ดีเยี่ยม ในบางเซสชันแต่ ล้มเหลวบางครั้งในเวลาอื่น อย่างเช่นการตกหล่นในการเชื่อมต่อในเวลาเช้า
เครื่องมือของบุคคลที่สามอื่นๆ:
TeamViewer
ให้การสนับสนุนข้ามแพลตฟอร์มแต่ถูกวิจารณ์ในเรื่อง ราคาสูง (แผนการเชิงพาณิชย์) การทำงานที่ขึ้นกับการหน่วงต่ำในปริมาณแบนด์วิดธ์ต่ำ และรายงานการเกิดข้อบกพร่องด้านความปลอดภัยซ้ำๆ
Splashtop
ตัวเลือก ที่มีค่าใช้จ่ายต่ำกว่าสำหรับ TeamViewer ประหยัดมากกว่า 50% ต่อปี มันเน้นการตั้งค่าที่ง่ายและการเข้าถึงระยะไกลที่ใช้งานง่ายสำหรับ Mac พร้อมการสนับสนุนพิเศษเช่นการถ่ายโอนไฟล์และการสนับสนุนหลายหน้าจอ
AnyDesk
ใช้ DeskRT codec เพื่อการเชื่อมต่อที่มีความเร็วสูงแต่ ขาดส่วนลดสำหรับกลุ่มใหญ่ ทำให้การติดตั้งในองค์กรมีค่าใช้จ่ายสูง ความโปร่งใสของราคาอยู่ในระดับต่ำ และ คุณลักษณะขั้นสูง (เช่น การทำรายการที่อนุญาต) ต้องการแผนระดับสูง โดยไม่มีการประหยัดสำหรับการใช้งานเป็นจำนวนมาก
ในการเลือกวิธีที่ดีที่สุดในการควบคุม Mac จาก iPhone ทางไกล สิ่งสำคัญคือการเปรียบเทียบโซลูชันต่างๆ โดยพิจารณาจากปัจจัยสำคัญเช่นประสิทธิภาพ ความปลอดภัย ความง่ายในการใช้งานและชุดคุณสมบัติ ด้านล่างเป็นการเปรียบเทียบของ DeskIn ตัวเลือกการจัดการระยะไกลภายใน macOS และ Chrome Remote Desktop เพื่อช่วยให้คุณตัดสินใจได้
คุณลักษณะ | การจัดการระยะไกลภายใน macOS | Chrome Remote Desktop | |
|---|---|---|---|
ความง่ายในการใช้งาน | ✅ การตั้งค่าใช้งานง่าย & อินเทอร์เฟซที่ใช้งานง่าย | ❌ ต้องการการตั้งค่าด้วยตนเอง | ✅ การเข้าถึงผ่านเบราว์เซอร์ที่ง่าย |
ประสิทธิภาพ | ✅ การเชื่อมต่อความเร็วสูงและการหน่วงต่ำ | ❌ ประสิทธิภาพขึ้นอยู่กับเครือข่าย | ❌ อาจมีการดีเลย์จากการเชื่อมต่อที่อ่อน |
ความปลอดภัย | ✅ การเข้ารหัสจากต้นทางถึงปลายทาง, 2FA และหน้าจอความเป็นส่วนตัว | ✅ ปลอดภัยแต่ต้องตั้งค่าอย่างถูกต้อง | ✅ เข้ารหัส, แต่มีการควบคุมด้านความปลอดภัยน้อยลง |
ความเข้ากันข้ามแพลตฟอร์ม | ✅ ทำงานบน macOS, Windows, iOS และ Android | ❌ ทำงานเฉพาะภายในระบบ Apple | ✅ ทำงานได้ข้ามระบบหลายแพลตฟอร์ม |
รองรับการถ่ายโอนไฟล์ | ✅ ใช่, การแชร์ไฟล์ในตัว | ❌ ตัวเลือกการแชร์ไฟล์ที่จำกัด | ❌ ไม่มีการถ่ายโอนไฟล์ในตัว |
ความต้องการอินเทอร์เน็ต | ✅ ทำงานได้อย่างมีประสิทธิภาพแม้ในแบนด์วิดท์ต่ำ | ✅ ทำงานได้ดีบน LAN แต่การเข้าถึงภายนอกอาจต้องตั้งค่าเพิ่ม | ❌ ต้องการการเชื่อมต่ออินเทอร์เน็ตที่เสถียร |
อย่างที่คุณเห็น DeskIn เดือดเด่นในด้านประสิทธิภาพที่มีการหน่วงต่ำคุณลักษณะด้านความปลอดภัยที่แข็งแกร่งเช่นการเข้ารหัสจากต้นทางถึงปลายทางและ 2FA และความเข้ากันได้ข้ามแพลตฟอร์มระหว่าง macOS, Windows, iOS และ Android ต่างจาก Chrome Remote Desktop, มันยังรองรับการถ่ายโอนไฟล์ที่ง่ายทำให้มันเป็นทางเลือกที่น่าเชื่อถือและเต็มไปด้วยฟีเจอร์ที่สุดสำหรับการควบคุม Mac ของคุณจาก iPhone อย่างไร้สาย
คุณอาจสนใจ: การเปรียบเทียบซอฟต์แวร์การควบคุมระยะไกลฟรี 3 ตัว
เพื่อรักษา Mac ของคุณให้ปลอดภัยขณะใช้การเข้าถึงระยะไกล ให้ปฏิบัติตามวิธีการป้องกันที่ดีที่สุดเหล่านี้:
ใช้รหัสผ่านที่แข็งแรง & เปิดใช้ 2FA: ตั้งรหัสผ่านที่ซับซ้อนและไม่ซ้ำสำหรับบัญชี DeskIn และ Google ของคุณ และเปิดใช้งานการยืนยันสองขั้นตอน (2FA) เพื่อเพิ่มการป้องกันเพิ่มเติม
เปิดใช้ฟีเจอร์ความเป็นส่วนตัวของ DeskIn: เปิดใช้งานหน้าจอความเป็นส่วนตัวเพื่อป้องกันการดูโดยไม่ได้รับอนุญาตในระหว่างเซสชันระยะไกล ใช้การตั้งค่าบัญชีขาวและบัญชีดำของ DeskIn เพื่อควบคุมว่าใครสามารถเข้าถึง Mac ของคุณได้
อัพเดตรหัสผ่านอย่างสม่ำเสมอ: เปลี่ยนรหัสผ่านสำหรับการเข้าถึงระยะไกลของคุณเป็นประจำเพื่อลดความเสี่ยงของการเข้าถึงโดยไม่ได้รับอนุญาต
อัปเดตซอฟต์แวร์เป็นประจำ: ตรวจสอบให้แน่ใจว่า macOS แอป DeskIn และเครื่องมือการเข้าถึงระยะไกลอัปเดตอยู่เสมอเพื่อแก้ไขช่องโหว่ของความปลอดภัย
ใช้เครือข่ายที่ปลอดภัย: หลีกเลี่ยงการเชื่อมต่อผ่าน Wi-Fi สาธารณะเมื่อเป็นไปได้ ใช้ VPN ที่เชื่อถือได้เพื่อเข้ารหัสการเชื่อมต่อของคุณและป้องกันข้อมูลของคุณเมื่อเข้าถึง Mac ของคุณทางไกล
โดยการปฏิบัติตามมาตรการความปลอดภัยเหล่านี้ คุณสามารถปกป้องข้อมูลและความเป็นส่วนตัวของคุณขณะเพลิดเพลินกับการเข้าถึง Mac ของคุณทางไกลอย่างไร้รอยต่อ
ใช่, ทั้ง DeskIn รุ่นฟรีและการจัดการระยะไกลของ macOS ให้การเข้าถึงระยะไกลได้ฟรี อย่างไรก็ตาม ฟีเจอร์ Switch Control ของ Apple ไม่ค่อยใช้งานง่ายขณะใช้งาน ดังนั้นเราจึงแนะนำให้ใช้ DeskIn เป็นเครื่องมือฟรีสำหรับการควบคุม Mac ทางไกล หรืออัปเกรดเป็นเวอร์ชันพรีเมียมเพื่อรับประสิทธิภาพที่ดีขึ้น ความปลอดภัยเพิ่มขึ้น และคุณสมบัติเพิ่มเติม
ใช่, เป็นเช่นนั้น ตราบใดที่ทั้ง Mac และ iPhone ของคุณเชื่อมต่อกับอินเทอร์เน็ต คุณสามารถเข้าถึงและควบคุม Mac ของคุณทางไกลได้โดยใช้ DeskIn ไม่ว่าคุณจะอยู่ที่ไหนก็ตาม
การควบคุม Mac ของคุณทางไกลจาก iPhone เพิ่มประสิทธิภาพการทำงาน การสนับสนุนทางไกล และความสะดวกสบายโดยรวม ในขณะที่เครื่องมือภายใน macOS และ Chrome Remote Desktop ให้ฟังก์ชันทั่วไป และ Apple Remote Desktop มีค่าใช้จ่ายสูง, DeskIn เดือดเด่นด้วยความมั่นคง ความปลอดภัย และประสบการณ์ที่เต็มไปด้วยคุณสมบัติที่ยอดเยี่ยมที่สุด สำหรับโซลูชันการเข้าถึงระยะไกลที่ดีที่สุด ลองใช้ DeskIn วันนี้และเพลิดเพลินกับการควบคุม Mac ของคุณอย่างไร้รอยต่อและปลอดภัยจากทุกที่!


เปลี่ยน iPad ให้เป็นจอภาพที่สองสำหรับคอมพิวเตอร์ Windows และ Mac
A second monitor can make everyday work feel much easier, especially when you are switching between research, documents, meetings, design files, or dashboards. If you already own an iPad, you may be able to use it as an extra display instead of buying another monitor.
This guide explains how to use an iPad as a second monitor for Mac with Apple Sidecar, and how Windows or cross-platform users can use DeskIn screen extension on supported paid plans.
Increase screen space so you can view more content at the same time. This helps reduce constant window switching during multitasking.
Keep each screen focused on a different task. For example, you can edit a video on one screen and keep source materials on the other, or write a paper while browsing references side by side.
Use the iPad display you already have. For students, remote workers, and light creative work, an iPad can be a convenient and cost-effective second-screen option.
Save desk space and avoid carrying another external monitor when you work from home, travel, or move between rooms.
Apple Sidecar lets compatible iPads work as an external display for compatible MacBook and iMac devices. It is a good native option if both devices support Sidecar and are signed in with the same Apple ID.
Note: To use Apple Sidecar, your Mac and iPad should use the same Apple ID, have Bluetooth and Wi-Fi turned on, and stay within close wireless range. Sidecar availability depends on Apple device and operating system compatibility.
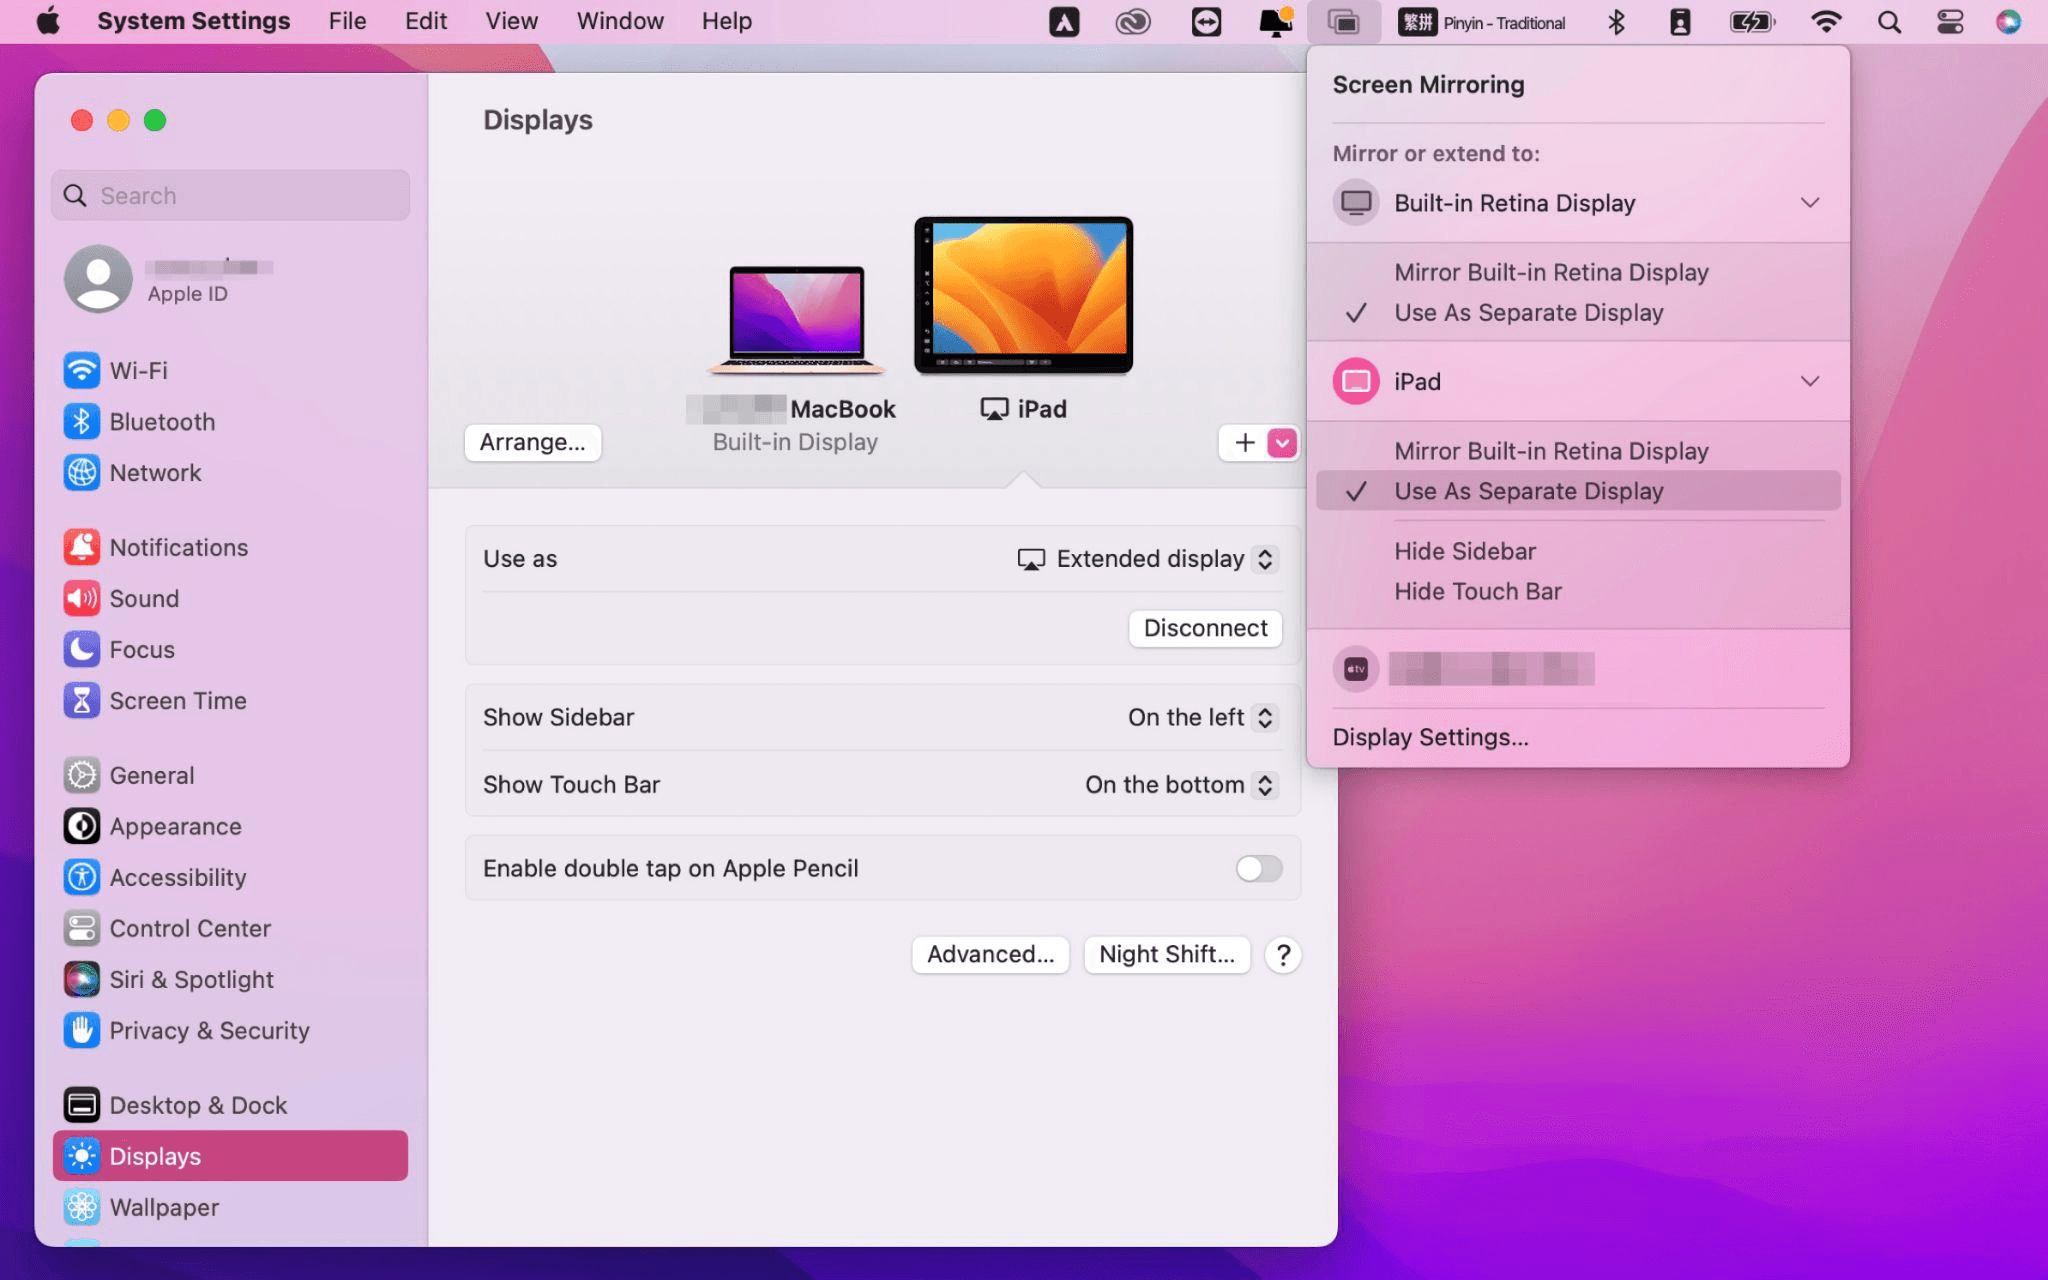
Open the Mac System Settings >> Click "Display" in the sidebar >> Click the "+" pop up menu on the right and choose your iPad.
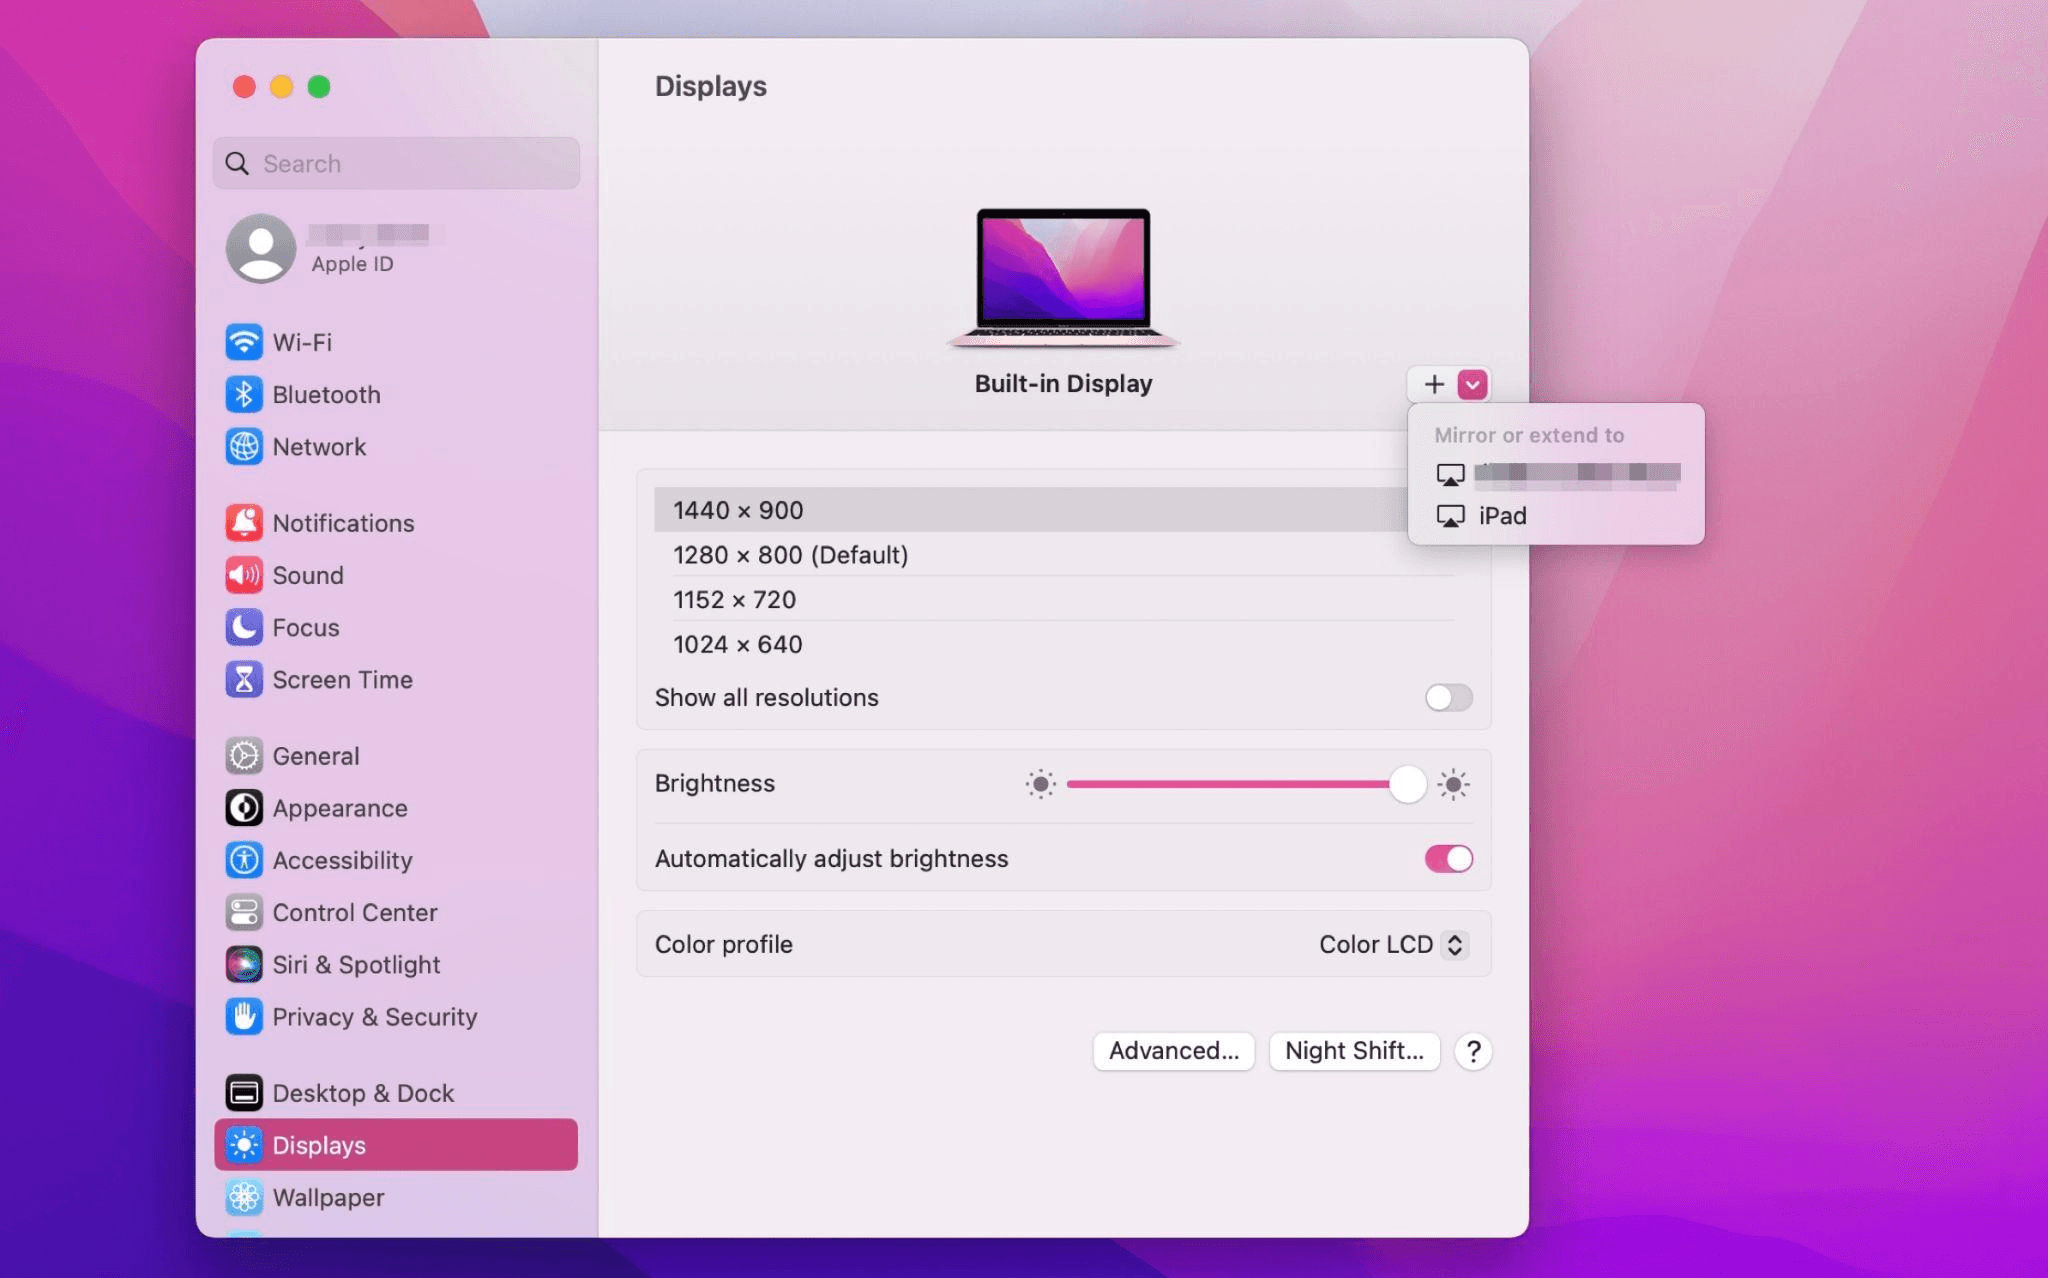
Select the iPad, change the Use as settings to "Extended Display". Check the Airplay settings on the top toolbar of the mac and set iPad as "Use As Separate Display".
After completing the settings, your iPad will become the second display for your Mac. You can drag windows from your Mac to your iPad smoothly. You can also use the sidebar on the iPad or change the position of the sidebar on the system display settings.
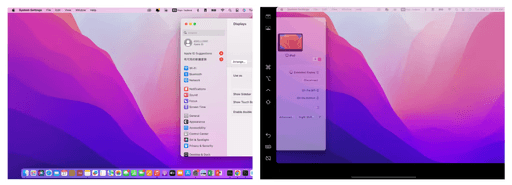
MacBook Screen (Left) and iPad Screen (Right)
Apple Sidecar only supports mac released after 2016 and iPadOS13 or newer. If you are using an old Apple device or a Windows device, you can still use DeskIn remote software to do the screen extension. It supports using iPad as a second display for Mac and Windows, and the smoothness is no worse than sidecar.
Install DeskIn on both your computer and iPad. Sign in to your DeskIn account on each device. When you log in on a new device for the first time, you may need to complete email verification to help protect your account.
To use Screen Extension, you'll need to subscribe to any Premium plan. Click here to view DeskIn plans.
Open DeskIn on your Windows or Mac computer, go to the screen management area, and choose the screen extension option. Select your iPad as the target display and start extending.
Once connected, your iPad can work as an additional display, letting you move windows between your computer and iPad for a wider workspace.
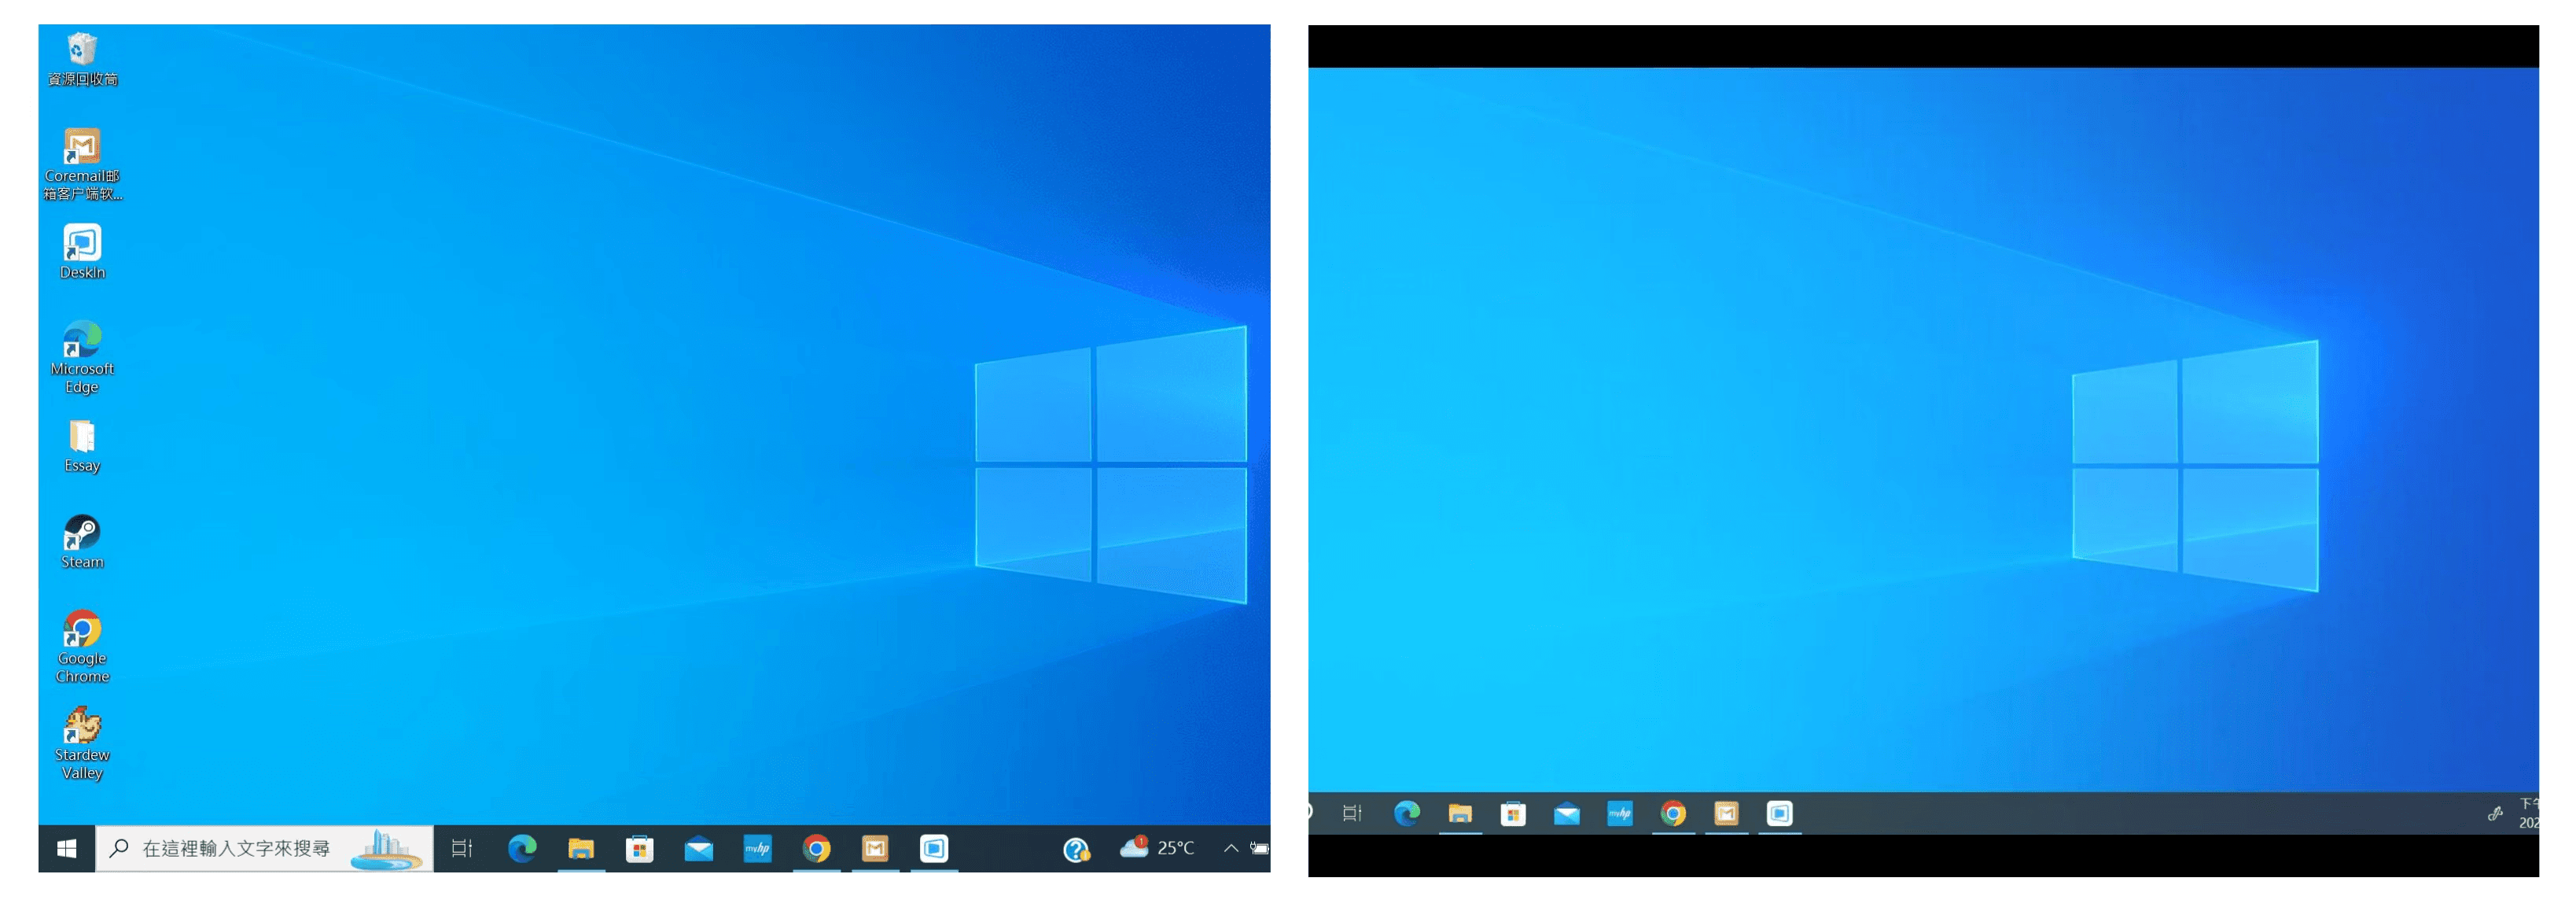
Computer Screen (Left) and iPad Screen (Right)
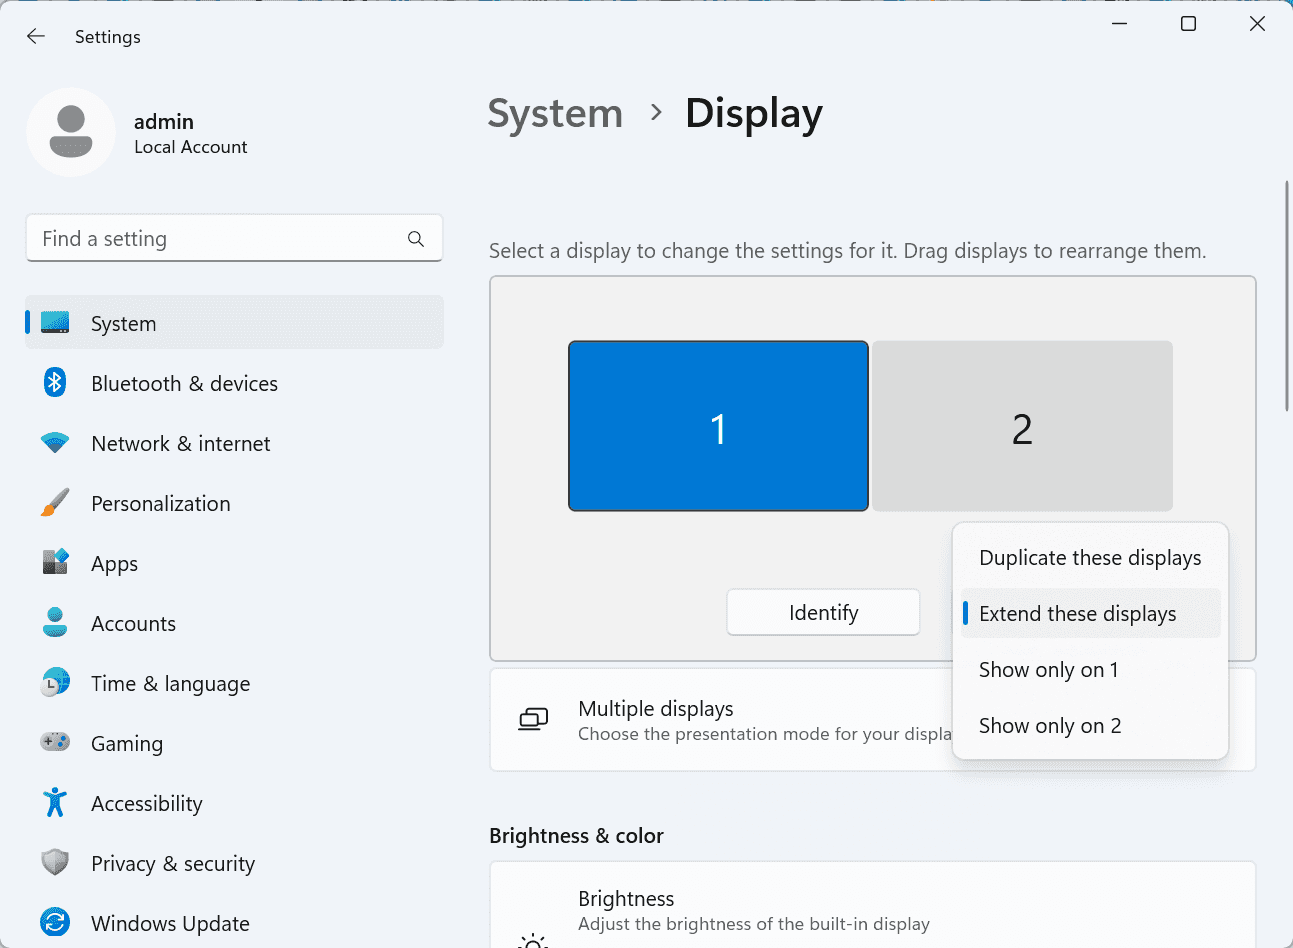
After extension, if you find that your iPad is only mirroring the content on your computer screen, please go to Windows System Settings >> Display Settings and change the screen option to "Extend these displays". You can also modify the screen position by dragging the 2 screens.
Need | Best Option | Why |
Use iPad as a second monitor for a compatible Mac | Apple Sidecar | Built into Apple devices and easy to set up when both devices are compatible. |
Use iPad as a second monitor for Windows | DeskIn | Sidecar does not support Windows, while DeskIn supports cross-platform screen extension on eligible plans. |
Work across Windows, macOS, iPad, Android tablets, and mobile devices | DeskIn | Better suited for users who need cross-platform remote access and flexible device combinations. |
Yes. Windows does not support Apple Sidecar, but you can use DeskIn screen extension on a paid plan that includes this feature to turn your iPad into an additional display for a Windows computer.
DeskIn Screen Extension is included in all paid plans. After subscribing, you can use it across all supported systems with no restrictions.
Yes. DeskIn supports using an iPad as an additional screen with Windows and Mac computers when your plan includes screen mirroring or screen extension.
Using an iPad as a second monitor is a practical way to expand your workspace without buying another display. Mac users with compatible devices can use Apple Sidecar, while Windows and cross-platform users can use DeskIn screen extension on eligible paid plans.
If you want to work across Windows, macOS, iPad, and other devices, DeskIn gives you a flexible way to build a portable multi-screen workspace. Download DeskIn and choose the plan that fits your screen extension and remote access needs.

Top 6 RustDesk Alternative Tools for Faster, Easier Remote Access
Remote access should feel like flipping a light switch, not decoding a control panel. Yet many users exploring RustDesk eventually run into friction: connection IDs, server setup, or occasional lag. While RustDesk is powerful, it’s not always the easiest or smoothest option, especially for non-technical users.
That’s why more people are actively searching for a reliable RustDesk alternative that combines performance, simplicity, and flexibility. Whether you want a plug-and-play solution or something more advanced, this guide will help you find the best fit.
RustDesk stands out as a privacy-friendly, self-hosted remote desktop tool. However, real-world usage reveals a few common challenges:
Complicated setup for the RustDesk self-hosted environments
Manual connection steps requiring IDs and passwords
Occasional latency or unstable connections
Limited user-friendly features out of the box
For many users, especially those helping family or managing multiple devices, simplicity matters just as much as control.
When evaluating a RustDesk alternative, focus on these key factors:
Ease of use: Quick setup without technical overhead
Performance: Smooth, low-latency remote sessions
Compatibility: Support for Windows, macOS, Linux, and mobile
Security: Strong encryption and access controls
Flexibility: Options ranging from cloud-based to open source
The ideal tool strikes a balance between power and convenience, something many modern solutions now deliver better than traditional setups.
Here’s a quick breakdown of the top tools and where they shine:
DeskIn – Best all-in-one RustDesk alternative for performance and ease of use
AnyDesk – Best lightweight tool for fast connections
TeamViewer – Best for enterprise-grade remote support
MeshCentral – Best open-source and self-hosted solution
DWService – Best free browser-based tool
Chrome Remote Desktop – Best simple, no-frills option
Ultra-low latency with smooth high-frame-rate streaming
No complex setup or server deployment required
Cross-platform including Rustdesk alternative for Android
Secure with encryption and device control features
Built-in file transfer and multi-device management
Smaller awareness than legacy competitors
Best for: Users who want a powerful yet simple remote desktop solution
DeskIn removes the friction that often comes with remote access tools. Instead of relying on IDs or manual configurations, it offers a streamlined connection experience that works right out of the box. This makes it especially valuable for users supporting non-technical family members or managing multiple remote devices.
Performance is where DeskIn truly distinguishes itself. Compared to RustDesk, which can sometimes struggle with latency, DeskIn delivers consistently smooth sessions with minimal lag. It also eliminates the need for self-hosting, making it a strong free RustDesk alternative option for users who want powerful features without the complexity.
For those exploring options beyond the RustDesk alternative GitHub projects, DeskIn provides a polished, ready-to-use experience that balances simplicity with professional-grade performance.
Lightweight and fast installation
Good performance on low bandwidth
Cross-platform support
Easy-to-use interface
Performance may drop during long sessions
File transfer can be inconsistent
Best for: Users needing quick and simple remote access
AnyDesk is often considered a natural step up from RustDesk for users who want something easier to deploy. It offers a lightweight application that connects quickly and performs well under normal conditions. This makes it suitable for quick troubleshooting or occasional remote access.
However, performance consistency can be an issue. Users frequently report lag or instability during extended sessions or when handling more demanding tasks. While AnyDesk is a solid option for basic needs, it may not fully satisfy users looking for a more robust, all-in-one solution.
👀 You may also be interested in: |
|---|
Enterprise-grade security with encryption and 2FA
Stable performance across global networks
Rich features like file transfer and session recording
Broad device compatibility
Expensive for commercial use
Free version has limitations
Heavier resource usage on some systems
Best for: Businesses and IT teams managing multiple endpoints
TeamViewer has long been a dominant player in the remote desktop space, offering a comprehensive suite of features designed for enterprise environments. It excels in reliability and global connectivity, making it a popular choice for IT support teams.
That said, its pricing model is a major drawback for many users. Frequent users may quickly encounter licensing restrictions, and costs can escalate for businesses. Additionally, its heavier footprint can impact performance on lower-end devices. DeskIn offers a more modern alternative by delivering similar performance and essential features without the same cost barriers. For users who want enterprise-level capabilities with better efficiency, it presents a compelling option.
👀 You may also be interested in: |
|---|
Fully RustDesk alternative open source solution
Web-based management dashboard
Supports multi-device environments
Strong customization and control
Complex setup and maintenance
Requires technical expertise
Best for: Advanced users needing a Rustdesk alternative self-hosted
MeshCentral is a powerful open-source platform designed for users who want full control over their remote access infrastructure. It supports multiple devices and provides a centralized dashboard for management, making it attractive for IT professionals.
However, this flexibility comes with complexity. Setting up and maintaining a MeshCentral server requires technical knowledge, which can be a barrier for many users. Compared to this, DeskIn offers a much simpler deployment process while still delivering strong performance and security. For users who prioritize ease of use over full control, modern solutions like DeskIn provide a more accessible alternative.
Completely free
Browser-based access
Open-source foundation
Simple setup
Limited performance
Basic feature set
Best for: Users looking for a simple, free RustDesk alternative
DWService offers a browser-based approach to remote access with no heavy installation, making it convenient for quick connections in restricted environments. It supports both desktop access and file management across major platforms.
However, performance often feels sluggish, especially on demanding tasks, and features remain basic; lacking session recording, smooth multi-monitor support, or advanced security controls. While suitable for occasional personal use, it falls short for professional or high-performance scenarios.
Free and easy to use
Browser-based setup
Cross-platform compatibility
Very limited features
No advanced management or collaboration tools
Best for: Casual users needing basic remote access

Chrome Remote Desktop is one of the simplest remote access tools available. It’s easy to set up and works across devices, making it a convenient choice for occasional use.
However, it lacks many essential features such as file transfer, session management, and advanced security controls. For users with more demanding needs, it quickly becomes insufficient. Compared to Chrome Remote Desktop, DeskIn provides a much more complete experience without sacrificing ease of use, making it a better long-term solution.
👀 You may also be interested in: |
|---|
RustDesk is powerful but can be difficult to set up and manage, especially with self-hosting. Many users prefer tools that offer similar performance without technical complexity. DeskIn simplifies remote access while maintaining strong performance and security.
Several tools qualify as a free RustDesk alternative, including DWService and Chrome Remote Desktop. However, DeskIn stands out by offering better performance and usability even in its free version.
Yes, tools like MeshCentral and DWService are considered RustDesk alternative open source options. They provide flexibility and control but often require technical expertise to set up and maintain.
Beginners should choose tools with a simple setup and intuitive interfaces. DeskIn is an excellent option because it removes the need for manual configuration while still delivering advanced features.
RustDesk is a powerful starting point, but it’s not always the easiest or most efficient tool for everyday use. From setup complexity to performance limitations, many users eventually look for a better RustDesk alternative.
Among all the options, DeskIn stands out as the most balanced solution. It combines speed, simplicity, and cross-platform support into one seamless experience. If you’re ready to move beyond technical friction and enjoy truly smooth remote access, DeskIn is a choice that simply works.

Top 7 RDP Alternative Tools for Faster, Safer Remote Access
Remote desktop access used to feel like a solid bridge. Now, for many users, traditional RDP feels more like a creaky rope ladder. With performance issues, security concerns, and limited cross-platform support, it's no surprise that more people are actively searching for a better RDP alternative that actually keeps up with modern workflows.
If you're managing multiple servers, working across devices, or just tired of unstable connections, this guide will walk you through the best tools worth switching to.
RDP (Remote Desktop Protocol) is a proprietary protocol developed by Microsoft that allows users to connect to another computer over a network. It's widely used for accessing Windows servers, virtual machines, and remote workstations.
While powerful in controlled environments, RDP is often tied to Windows systems and requires configuration like port forwarding or VPNs. Compared to newer tools, it can feel rigid and outdated.
You may also be interested in: |
|---|
RDP still works, but it comes with trade-offs that many users find frustrating:
Security risks if not properly configured
Complex setup for remote or external access
Limited cross-platform compatibility
Performance issues over unstable networks
Many IT teams are now actively replacing it, especially when looking for a Windows RDP client alternative or something that works seamlessly across macOS, Linux, and mobile devices. That's where modern Remote Desktop alternatives shine.
Choosing the right tool is like picking the right vehicle. Some are built for speed, others for heavy-duty enterprise work. Here's a quick snapshot:
DeskIn – Best all-in-one RDP alternative for performance and cross-platform use
TeamViewer – Best for enterprise remote support
AnyDesk – Best lightweight option for fast connections
RustDesk – Best Windows RDP alternative open-source solution
Remmina – Best RDP alternative for Linux users
Chrome Remote Desktop – Best simple browser-based tool
Splashtop – Best for high-performance business environments
Ultra-low latency with smooth high-frame-rate streaming
Works across Windows, macOS, Linux, iOS, and Android
Strong encryption and secure access controls
Built-in file transfer and multi-session support
Newer compared to legacy brands
Best for: Users who want a powerful, flexible RDP alternative

DeskIn feels less like remote access and more like teleportation for your desktop. Whether you're managing servers, supporting clients, or working remotely, it delivers consistently smooth performance without the usual lag spikes seen in traditional RDP setups.
Unlike many tools, DeskIn eliminates the need for complex configurations. You don't need to wrestle with firewalls or VPNs just to connect. It also works seamlessly across platforms, making it a strong alternative to Microsoft Remote Desktop for Mac and mobile users alike.
For teams juggling multiple systems, DeskIn provides a unified experience that replaces fragmented workflows. It's also a strong free RDP alternative option with premium-level capabilities, making it ideal for both individuals and businesses.
Enterprise-grade security and compliance
Extensive feature set including collaboration tools
Cross-platform compatibility
Reliable global performance
Expensive licensing
Can be overkill for individuals
Best for: Enterprises needing secure and scalable remote access
TeamViewer is a comprehensive remote desktop platform widely adopted by IT teams, support professionals, and enterprises. Its feature set extends far beyond simple screen sharing—it includes robust device management, remote printing, file transfer, session recording, and even augmented reality support for field service. TeamViewer's security architecture relies on AES‑256 encryption, two‑factor authentication, and whitelisting, making it suitable for organizations with strict compliance requirements. It runs on virtually every operating system and mobile platform.
The main trade‑off is its pricing: licenses are subscription‑based and can become expensive for small teams or individual users, especially as TeamViewer aggressively flags personal use as commercial, leading to session restrictions.
Fast and responsive
Lightweight installation
Works well on low bandwidth
Easy to use
File transfer can be inconsistent
Lag during longer sessions
Best for: Users needing quick, simple remote access
AnyDesk is a lightweight remote desktop application prized for its speed and efficiency, often recommended as a fast alternative to Microsoft's native Remote Desktop on Windows 10 and Android. It uses a proprietary video codec, DeskRT, to achieve low latency even on limited bandwidth, making it ideal for quick support sessions and accessing devices over mobile networks. The interface is clean and minimalist, with features like address book management, file transfer, and session recording available.
However, users frequently report instability during extended sessions; performance can degrade over time, and file transfers may slow considerably compared to competitors. While its free version is generous for personal use, professional users often find the performance ceiling limits its suitability for continuous, demanding workloads. DeskIn, by contrast, maintains consistent performance even during extended use, making it better suited for professional workloads.
You may also be interested in: |
|---|
Free and open-source
Self-hosting for full control
Strong privacy protection
Active community
Technical setup required
Limited user-friendly features
Best for: Developers and privacy-focused users
RustDesk has emerged as a leading open‑source remote desktop alternative, appealing to developers and organizations that require full control over their data. It allows users to self‑host the relay and rendezvous servers, meaning no third‑party infrastructure handles connection metadata. Built with Rust, it offers a modern codebase with cross‑platform clients (Windows, macOS, Linux, Android, iOS) and supports essential features such as file transfer, TCP tunneling, and customizable address books.
The major barrier is its complexity: deploying a self‑hosted environment requires technical expertise to configure firewalls, SSL certificates, and ongoing server maintenance. For those using the public relay, performance can be inconsistent depending on server load and geographic proximity.
You may also be interested in: Top RustDesk Alternatives for Better Performance, Security & Ease of Use |
|---|
Open-source and free
Supports multiple protocols including RDP and VNC
Lightweight and flexible
Native to Linux environments
Limited features compared to modern tools
UI can feel outdated
Best for: Linux users looking for a traditional RDP alternative Linux
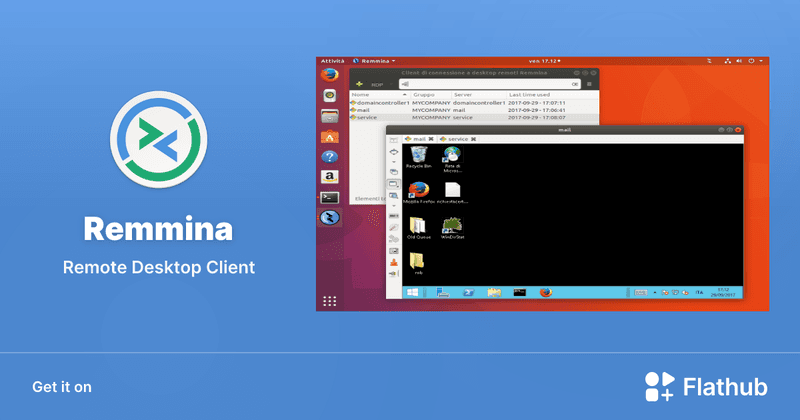
Remmina is a beloved open‑source remote desktop client for Linux, supporting multiple protocols (RDP, VNC, SSH, SPICE, and others) in a single unified interface. It is frequently chosen by system administrators and Linux enthusiasts who need a flexible, lightweight tool to manage diverse environments. Remmina offers tabbed sessions, quick‑connect profiles, and a plugin system that extends its capabilities.
However, its strength - protocol flexibility, also highlights its limitations. As a frontend client rather than a full remote access solution, it lacks features like unattended access, centralized account management, or robust session recording out of the box. Performance can vary by protocol, and the user experience lags behind more polished commercial tools, particularly for users seeking a plug‑and‑play setup.
Free and easy to use
Browser-based setup
Cross-platform access
Very limited features
No advanced management tools
Best for: Casual users needing basic remote access
Chrome Remote Desktop is a free, browser‑based remote access tool from Google that requires nothing more than a Chrome browser and a Google account. It excels in simplicity: installation takes seconds, and connections are mediated through Google's infrastructure, eliminating complex firewall configurations. For occasional use—such as helping a family member or quickly accessing a home computer—it works reliably across Windows, macOS, Linux, and even ChromeOS.
The trade‑off is its minimal feature set. There is no native file transfer, multi‑session management, remote printing, or granular permission controls. Collaboration tools are absent, and the reliance on a Google account for authentication can be a limitation in professional environments. It remains a convenient entry‑level tool but struggles to meet the needs of power users or IT teams.
You may also be interested in: |
|---|
High-quality streaming performance
Strong security features
Good for business environments
Reliable connections
Subscription-based pricing
Limited free version
Best for: Businesses needing performance-focused remote access
Splashtop is a high‑performance remote desktop solution frequently adopted by creative professionals, educational institutions, and enterprises that prioritize fluid interaction. It delivers low‑latency streaming with support for high‑frame‑rate displays, making it suitable for video editing, CAD work, and other graphics‑intensive tasks. Splashtop offers a range of editions—from Business Access to SOS for on‑demand support—all of which include robust security (AES‑256, device authentication) and features like file transfer, remote printing, and multi‑monitor navigation. Its performance over local networks and the internet is consistently praised.
The primary drawback is cost: while competitive, the subscription model can accumulate quickly for users needing access to multiple devices or advanced features, especially when compared to similarly capable tools with more flexible pricing structures. DeskIn offers similar performance benefits with a more flexible pricing structure, making it a compelling alternative.
You may also be interested in: |
|---|
RDP can be difficult to configure, less secure if exposed, and limited outside Windows environments. Modern tools like DeskIn provide better performance, security, and ease of use.
The best RDP alternative depends on your needs, but DeskIn stands out for its balance of speed, security, and cross-platform compatibility.
Yes, several tools qualify as an RDP alternative free, including RustDesk and Chrome Remote Desktop. DeskIn also offers a free tier with advanced capabilities.
Microsoft is evolving its remote desktop ecosystem, but traditional RDP isn't disappearing overnight. However, many users are already transitioning to more modern solutions like DeskIn for better reliability and flexibility.
RDP has served its purpose, but the digital world has outgrown its limitations. Whether you need better performance, stronger security, or true cross-platform access, switching to a modern RDP alternative is no longer optional, it's inevitable.
Among all the options, DeskIn stands out as a future-ready solution. It combines speed, simplicity, and power into one seamless experience, helping you leave behind the friction of traditional remote desktop tools and step into something far more efficient.
เปลี่ยน iPad ให้เป็นจอภาพที่สองสำหรับคอมพิวเตอร์ Windows และ Mac
A second monitor can make everyday work feel much easier, especially when you are switching between research, documents, meetings, design files, or dashboards. If you already own an iPad, you may be able to use it as an extra display instead of buying another monitor.
This guide explains how to use an iPad as a second monitor for Mac with Apple Sidecar, and how Windows or cross-platform users can use DeskIn screen extension on supported paid plans.
Increase screen space so you can view more content at the same time. This helps reduce constant window switching during multitasking.
Keep each screen focused on a different task. For example, you can edit a video on one screen and keep source materials on the other, or write a paper while browsing references side by side.
Use the iPad display you already have. For students, remote workers, and light creative work, an iPad can be a convenient and cost-effective second-screen option.
Save desk space and avoid carrying another external monitor when you work from home, travel, or move between rooms.
Apple Sidecar lets compatible iPads work as an external display for compatible MacBook and iMac devices. It is a good native option if both devices support Sidecar and are signed in with the same Apple ID.
Note: To use Apple Sidecar, your Mac and iPad should use the same Apple ID, have Bluetooth and Wi-Fi turned on, and stay within close wireless range. Sidecar availability depends on Apple device and operating system compatibility.
Open the Mac System Settings >> Click "Display" in the sidebar >> Click the "+" pop up menu on the right and choose your iPad.
Select the iPad, change the Use as settings to "Extended Display". Check the Airplay settings on the top toolbar of the mac and set iPad as "Use As Separate Display".
After completing the settings, your iPad will become the second display for your Mac. You can drag windows from your Mac to your iPad smoothly. You can also use the sidebar on the iPad or change the position of the sidebar on the system display settings.
MacBook Screen (Left) and iPad Screen (Right)
Apple Sidecar only supports mac released after 2016 and iPadOS13 or newer. If you are using an old Apple device or a Windows device, you can still use DeskIn remote software to do the screen extension. It supports using iPad as a second display for Mac and Windows, and the smoothness is no worse than sidecar.
Install DeskIn on both your computer and iPad. Sign in to your DeskIn account on each device. When you log in on a new device for the first time, you may need to complete email verification to help protect your account.
To use Screen Extension, you'll need to subscribe to any Premium plan. Click here to view DeskIn plans.
Open DeskIn on your Windows or Mac computer, go to the screen management area, and choose the screen extension option. Select your iPad as the target display and start extending.
Once connected, your iPad can work as an additional display, letting you move windows between your computer and iPad for a wider workspace.
Computer Screen (Left) and iPad Screen (Right)
After extension, if you find that your iPad is only mirroring the content on your computer screen, please go to Windows System Settings >> Display Settings and change the screen option to "Extend these displays". You can also modify the screen position by dragging the 2 screens.
Need | Best Option | Why |
Use iPad as a second monitor for a compatible Mac | Apple Sidecar | Built into Apple devices and easy to set up when both devices are compatible. |
Use iPad as a second monitor for Windows | DeskIn | Sidecar does not support Windows, while DeskIn supports cross-platform screen extension on eligible plans. |
Work across Windows, macOS, iPad, Android tablets, and mobile devices | DeskIn | Better suited for users who need cross-platform remote access and flexible device combinations. |
Yes. Windows does not support Apple Sidecar, but you can use DeskIn screen extension on a paid plan that includes this feature to turn your iPad into an additional display for a Windows computer.
DeskIn Screen Extension is included in all paid plans. After subscribing, you can use it across all supported systems with no restrictions.
Yes. DeskIn supports using an iPad as an additional screen with Windows and Mac computers when your plan includes screen mirroring or screen extension.
Using an iPad as a second monitor is a practical way to expand your workspace without buying another display. Mac users with compatible devices can use Apple Sidecar, while Windows and cross-platform users can use DeskIn screen extension on eligible paid plans.
If you want to work across Windows, macOS, iPad, and other devices, DeskIn gives you a flexible way to build a portable multi-screen workspace. Download DeskIn and choose the plan that fits your screen extension and remote access needs.
Top 6 RustDesk Alternative Tools for Faster, Easier Remote Access
Remote access should feel like flipping a light switch, not decoding a control panel. Yet many users exploring RustDesk eventually run into friction: connection IDs, server setup, or occasional lag. While RustDesk is powerful, it’s not always the easiest or smoothest option, especially for non-technical users.
That’s why more people are actively searching for a reliable RustDesk alternative that combines performance, simplicity, and flexibility. Whether you want a plug-and-play solution or something more advanced, this guide will help you find the best fit.
RustDesk stands out as a privacy-friendly, self-hosted remote desktop tool. However, real-world usage reveals a few common challenges:
Complicated setup for the RustDesk self-hosted environments
Manual connection steps requiring IDs and passwords
Occasional latency or unstable connections
Limited user-friendly features out of the box
For many users, especially those helping family or managing multiple devices, simplicity matters just as much as control.
When evaluating a RustDesk alternative, focus on these key factors:
Ease of use: Quick setup without technical overhead
Performance: Smooth, low-latency remote sessions
Compatibility: Support for Windows, macOS, Linux, and mobile
Security: Strong encryption and access controls
Flexibility: Options ranging from cloud-based to open source
The ideal tool strikes a balance between power and convenience, something many modern solutions now deliver better than traditional setups.
Here’s a quick breakdown of the top tools and where they shine:
DeskIn – Best all-in-one RustDesk alternative for performance and ease of use
AnyDesk – Best lightweight tool for fast connections
TeamViewer – Best for enterprise-grade remote support
MeshCentral – Best open-source and self-hosted solution
DWService – Best free browser-based tool
Chrome Remote Desktop – Best simple, no-frills option
Ultra-low latency with smooth high-frame-rate streaming
No complex setup or server deployment required
Cross-platform including Rustdesk alternative for Android
Secure with encryption and device control features
Built-in file transfer and multi-device management
Smaller awareness than legacy competitors
Best for: Users who want a powerful yet simple remote desktop solution
DeskIn removes the friction that often comes with remote access tools. Instead of relying on IDs or manual configurations, it offers a streamlined connection experience that works right out of the box. This makes it especially valuable for users supporting non-technical family members or managing multiple remote devices.
Performance is where DeskIn truly distinguishes itself. Compared to RustDesk, which can sometimes struggle with latency, DeskIn delivers consistently smooth sessions with minimal lag. It also eliminates the need for self-hosting, making it a strong free RustDesk alternative option for users who want powerful features without the complexity.
For those exploring options beyond the RustDesk alternative GitHub projects, DeskIn provides a polished, ready-to-use experience that balances simplicity with professional-grade performance.
Lightweight and fast installation
Good performance on low bandwidth
Cross-platform support
Easy-to-use interface
Performance may drop during long sessions
File transfer can be inconsistent
Best for: Users needing quick and simple remote access
AnyDesk is often considered a natural step up from RustDesk for users who want something easier to deploy. It offers a lightweight application that connects quickly and performs well under normal conditions. This makes it suitable for quick troubleshooting or occasional remote access.
However, performance consistency can be an issue. Users frequently report lag or instability during extended sessions or when handling more demanding tasks. While AnyDesk is a solid option for basic needs, it may not fully satisfy users looking for a more robust, all-in-one solution.
👀 You may also be interested in: |
|---|
Enterprise-grade security with encryption and 2FA
Stable performance across global networks
Rich features like file transfer and session recording
Broad device compatibility
Expensive for commercial use
Free version has limitations
Heavier resource usage on some systems
Best for: Businesses and IT teams managing multiple endpoints
TeamViewer has long been a dominant player in the remote desktop space, offering a comprehensive suite of features designed for enterprise environments. It excels in reliability and global connectivity, making it a popular choice for IT support teams.
That said, its pricing model is a major drawback for many users. Frequent users may quickly encounter licensing restrictions, and costs can escalate for businesses. Additionally, its heavier footprint can impact performance on lower-end devices. DeskIn offers a more modern alternative by delivering similar performance and essential features without the same cost barriers. For users who want enterprise-level capabilities with better efficiency, it presents a compelling option.
👀 You may also be interested in: |
|---|
Fully RustDesk alternative open source solution
Web-based management dashboard
Supports multi-device environments
Strong customization and control
Complex setup and maintenance
Requires technical expertise
Best for: Advanced users needing a Rustdesk alternative self-hosted
MeshCentral is a powerful open-source platform designed for users who want full control over their remote access infrastructure. It supports multiple devices and provides a centralized dashboard for management, making it attractive for IT professionals.
However, this flexibility comes with complexity. Setting up and maintaining a MeshCentral server requires technical knowledge, which can be a barrier for many users. Compared to this, DeskIn offers a much simpler deployment process while still delivering strong performance and security. For users who prioritize ease of use over full control, modern solutions like DeskIn provide a more accessible alternative.
Completely free
Browser-based access
Open-source foundation
Simple setup
Limited performance
Basic feature set
Best for: Users looking for a simple, free RustDesk alternative
DWService offers a browser-based approach to remote access with no heavy installation, making it convenient for quick connections in restricted environments. It supports both desktop access and file management across major platforms.
However, performance often feels sluggish, especially on demanding tasks, and features remain basic; lacking session recording, smooth multi-monitor support, or advanced security controls. While suitable for occasional personal use, it falls short for professional or high-performance scenarios.
Free and easy to use
Browser-based setup
Cross-platform compatibility
Very limited features
No advanced management or collaboration tools
Best for: Casual users needing basic remote access
Chrome Remote Desktop is one of the simplest remote access tools available. It’s easy to set up and works across devices, making it a convenient choice for occasional use.
However, it lacks many essential features such as file transfer, session management, and advanced security controls. For users with more demanding needs, it quickly becomes insufficient. Compared to Chrome Remote Desktop, DeskIn provides a much more complete experience without sacrificing ease of use, making it a better long-term solution.
👀 You may also be interested in: |
|---|
RustDesk is powerful but can be difficult to set up and manage, especially with self-hosting. Many users prefer tools that offer similar performance without technical complexity. DeskIn simplifies remote access while maintaining strong performance and security.
Several tools qualify as a free RustDesk alternative, including DWService and Chrome Remote Desktop. However, DeskIn stands out by offering better performance and usability even in its free version.
Yes, tools like MeshCentral and DWService are considered RustDesk alternative open source options. They provide flexibility and control but often require technical expertise to set up and maintain.
Beginners should choose tools with a simple setup and intuitive interfaces. DeskIn is an excellent option because it removes the need for manual configuration while still delivering advanced features.
RustDesk is a powerful starting point, but it’s not always the easiest or most efficient tool for everyday use. From setup complexity to performance limitations, many users eventually look for a better RustDesk alternative.
Among all the options, DeskIn stands out as the most balanced solution. It combines speed, simplicity, and cross-platform support into one seamless experience. If you’re ready to move beyond technical friction and enjoy truly smooth remote access, DeskIn is a choice that simply works.
Products
ดาวน์โหลด
Resources
ติดต่อเรา
Email: support@deskin.io
Office: 991D Alexandra Road #02-17, Singapore 119972
Copyright © 2026 Zuler Technology PTE. LTD. All rights reserved.
ติดต่อเรา
Email: support@deskin.io
Office: 991D Alexandra Road #02-17, Singapore 119972
Products
ดาวน์โหลด
Resources
Copyright © 2026 Zuler Technology PTE. LTD. All rights reserved.
Products
ดาวน์โหลด
Resources
ติดต่อเรา
support@deskin.io
991D Alexandra Road #02-17
Singapore 119972
Copyright © 2026 Zuler Technology PTE. LTD. All rights reserved.
【New User Special Offer】
Save
Extra 20%
on your first order|4K60FPS
Extra
20% Off
|For
New Users
【New User Special Offer】
Save
Extra 20%
on first order

