3 นาที
·
·
ประสิทธิภาพ
·
·
Updated on
Updated on
สำหรับผู้ที่ต้องใช้หลายอุปกรณ์ทุกวัน ฉันได้ค้นพบว่าความสามารถในการสะท้อนหน้าจอ Android ไปยัง Mac ไม่เพียงแค่สะดวกเท่านั้น แต่ยังเป็นตัวเปลี่ยนเกมสำหรับการเพิ่มประสิทธิภาพในการทำงาน ไม่ว่าคุณจะเป็นพนักงานระยะไกลที่ต้องการแชร์การนำเสนอผ่านมือถือ นักเดินทางดิจิทัลที่จัดการเนื้อหาข้ามอุปกรณ์ หรือเพียงแค่ต้องการเพลิดเพลินกับแอป Android บนหน้าจอขนาดใหญ่ขึ้น การสะท้อนหน้าจอ Android ไปยัง Mac จะเปิดทางเลือกที่น่าทึ่งมากมายขึ้นมา
ความท้าทาย? Apple และ Android โดยธรรมชาติแล้วไม่สามารถทำงานร่วมกันได้อย่างง่ายดาย แต่ไม่ต้องกังวล—ฉันได้ใช้เวลาหลายปีในการทดสอบวิธีการที่หลากหลาย และฉันอยู่ที่นี่เพื่อแนะนำคุณผ่านวิธีการที่มีประสิทธิภาพที่สุดเพื่อสะท้อนหน้าจอ Android ไปยัง Mac ในปี 2025
ในคู่มือนี้ คุณจะได้เรียนรู้:
วิธีที่ดีที่สุดในการสะท้อนหน้าจอ Android ไปยัง Mac โดยไม่มีปัญหาความเข้ากันได้
คำแนะนำทีละขั้นตอนในการตั้งค่าการสะท้อนหน้าจอ
วิธีที่ DeskIn ทำให้การสะท้อนหน้าจอ Android ไปยัง Mac ง่ายดายมาก
การใช้งานในสถานการณ์จริงที่จะเปลี่ยนแปลงการทำงานของคุณ
มาทลายกำแพงระหว่างอุปกรณ์ของคุณและสร้างประสบการณ์ดิจิทัลที่ราบรื่นกันเถอะ
ทำความเข้าใจการสะท้อนหน้าจอ Android ไปยัง Mac: สิ่งที่คุณต้องรู้
ก่อนจะเจาะลึกถึงวิธีการเฉพาะเพื่อการสะท้อนหน้าจอ Android ไปยัง Mac สิ่งสำคัญคือต้องเข้าใจว่าเมื่อคุณสะท้อนหน้าจอ Android ไปยัง Mac คุณจะแสดงหน้าจอของอุปกรณ์ Android บนคอมพิวเตอร์ Mac ของคุณแบบเรียลไทม์ ซึ่งจะสามารถให้คุณทำสิ่งต่อไปนี้ได้:
ดูและควบคุมแอป Android จาก Mac ของคุณ
ถ่ายโอนไฟล์ระหว่างอุปกรณ์ได้ง่ายขึ้น
นำเสนอแอปมือถือในระหว่างการนำเสนอ
ถ่ายภาพหน้าจอหรือบันทึกหน้าจอ Android ของคุณ
ส่งข้อความจาก Mac ของคุณโดยใช้โทรศัพท์ Android
สำหรับพนักงานระยะไกลและนักเดินทางดิจิทัล ความสามารถในการสะท้อนหน้าจอ Android ไปยัง Mac หมายถึงการสลับอุปกรณ์น้อยลงและความสามารถในความจดจ่อที่ดีขึ้น สำหรับผู้สร้างเนื้อหา มันเสนอวิธีใหม่ๆ ในการจับภาพและแชร์เนื้อหามือถือ
เคล็ดลับจากมืออาชีพ: เมื่อคุณสะท้อนหน้าจอ Android ไปยัง Mac โปรดตรวจสอบว่าอุปกรณ์ทั้งสองเชื่อมต่อกับเครือข่าย Wi-Fi เดียวกันเพื่อประสิทธิภาพที่ดีที่สุดและความล่าช้าที่ต่ำที่สุด
วิธีการ 3 แบบในการสะท้อนหน้าจอ Android ไปยัง Mac
1. การใช้การเชื่อมต่อ USB เพื่อสะท้อนหน้าจอ Android ไปยัง Mac โดยตรง
หนึ่งในวิธีการที่เชื่อถือได้ที่สุดในการสะท้อนหน้าจอ Android ไปยัง Mac คือผ่านการเชื่อมต่อ USB แบบกายภาพ วิธีนี้มีข้อดีคือมีการเชื่อมต่อที่เสถียรพร้อมกับความล่าช้าที่น้อย—เหมาะสำหรับการใช้สะท้อนหน้าจอ Android ไปยัง Mac สำหรับการนำเสนอหรือการสาธิต
นี่คือวิธีตั้งค่า:
เปิดใช้การดีบัก USB บนอุปกรณ์ Android ของคุณ:
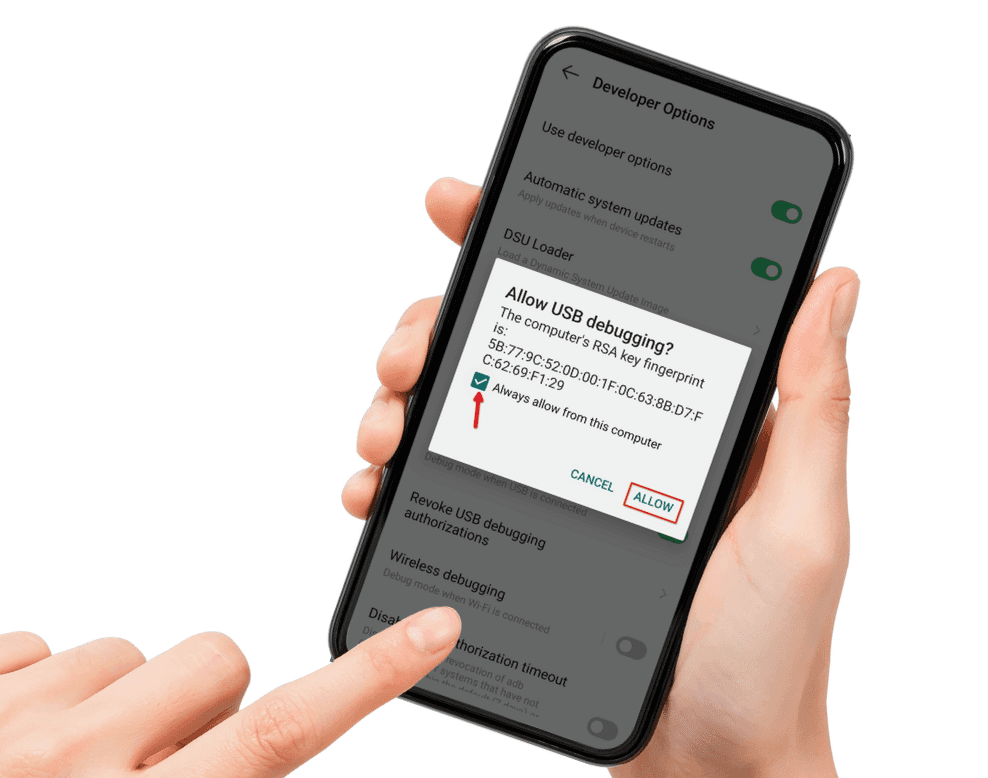
ไปที่ การตั้งค่า > เกี่ยวกับโทรศัพท์
แตะที่ Build Number 7 ครั้งเพื่อเปิดใช้งานตัวเลือกสำหรับนักพัฒนา
ไปที่ตัวเลือกสำหรับนักพัฒนาและเปิดใช้การดีบัก USB
ติดตั้ง Android File Transfer บน Mac ของคุณ
เชื่อมต่ออุปกรณ์ Android เข้ากับ Mac ของคุณด้วยสาย USB
เปิดใช้งาน Android File Transfer บน Mac ของคุณ
ใช้แอปสะท้อนหน้าจอที่รองรับการเชื่อมต่อ USB
ในขณะที่วิธีนี้ให้การเชื่อมต่อที่เสถียรในการสะท้อนหน้าจอ Android ไปยัง Mac แต่มันต้องให้โทรศัพท์ของคุณเชื่อมต่อกับคอมพิวเตอร์อยู่ซึ่งอาจไม่สะดวกสำหรับทุกคน
2. โซลูชันไร้สายในการสะท้อนหน้าจอ Android ไปยัง Mac
หากคุณต้องการอิสระในการเคลื่อนไหวมากขึ้นเมื่อสะท้อนหน้าจอ Android ไปยัง Mac โซลูชันไร้สายเสนอความยืดหยุ่นที่มากขึ้น วิธีเหล่านี้ใช้เครือข่าย Wi-Fi ของคุณเพื่อสร้างการเชื่อมต่อระหว่างอุปกรณ์

แอปที่นิยมที่ให้คุณสะท้อนหน้าจอ Android ไปยัง Mac แบบไร้สาย ได้แก่:
Vysor: เสนอทั้งเวอร์ชันฟรีและแบบพรีเมียมพร้อมตัวเลือกคุณภาพที่หลากหลาย
AirDroid: ให้การสะท้อนหน้าจอพร้อมด้วยความสามารถในการถ่ายโอนไฟล์
ApowerMirror: มีอินเทอร์เฟซที่ใช้งานง่ายพร้อมเครื่องมือบันทึกหน้าจอเพิ่มเติม
เพื่อการตั้งค่าสะท้อนหน้าจอแบบไร้สาย:
ติดตั้งแอปที่คุณเลือกบนทั้งอุปกรณ์ Android และ Mac ของคุณ
เชื่อมต่ออุปกรณ์ทั้งสองกับเครือข่าย Wi-Fi เดียวกัน
ปฏิบัติตามคำแนะนำการจับคู่ของแอป (ปกติจะเกี่ยวข้องกับการสแกน QR code หรือป้อนพิน)
เริ่มสะท้อนหน้าจอ Android ของคุณไปยัง Mac
ในขณะที่โซลูชันไร้สายเสนอความสะดวกสบาย พวกมันอาจก่อให้เกิดความล่าบ้าง ขึ้นอยู่กับความเร็วเครือข่ายของคุณ สำหรับการใช้งานทั่วไป อาจจะไม่สังเกตได้ แต่สำหรับการเล่นเกมหรือการสาธิตที่ต้องการความแม่นยำ การเชื่อมต่อมีสายอาจจะเป็นที่ต้องการมากกว่าเมื่อคุณสะท้อนหน้าจอ Android ไปยัง Mac
3. DeskIn: วิธีที่ง่ายที่สุดในการสะท้อนหน้าจอ Android ไปยัง Mac
หลังจากทดสอบโซลูชันมากมาย ฉันพบว่า DeskIn มอบประสบการณ์ผู้ใช้ที่ใช้งานง่ายที่สุดเมื่อต้องการสะท้อนหน้าจอ Android ไปยัง Mac เครื่องมือนี้ที่ถูกสร้างขึ้นเพื่อเหตุผลนี้ช่วยกำจัดปัญหาความเข้ากันได้ที่มักเกิดขึ้นระหว่างระบบ Android และ macOS
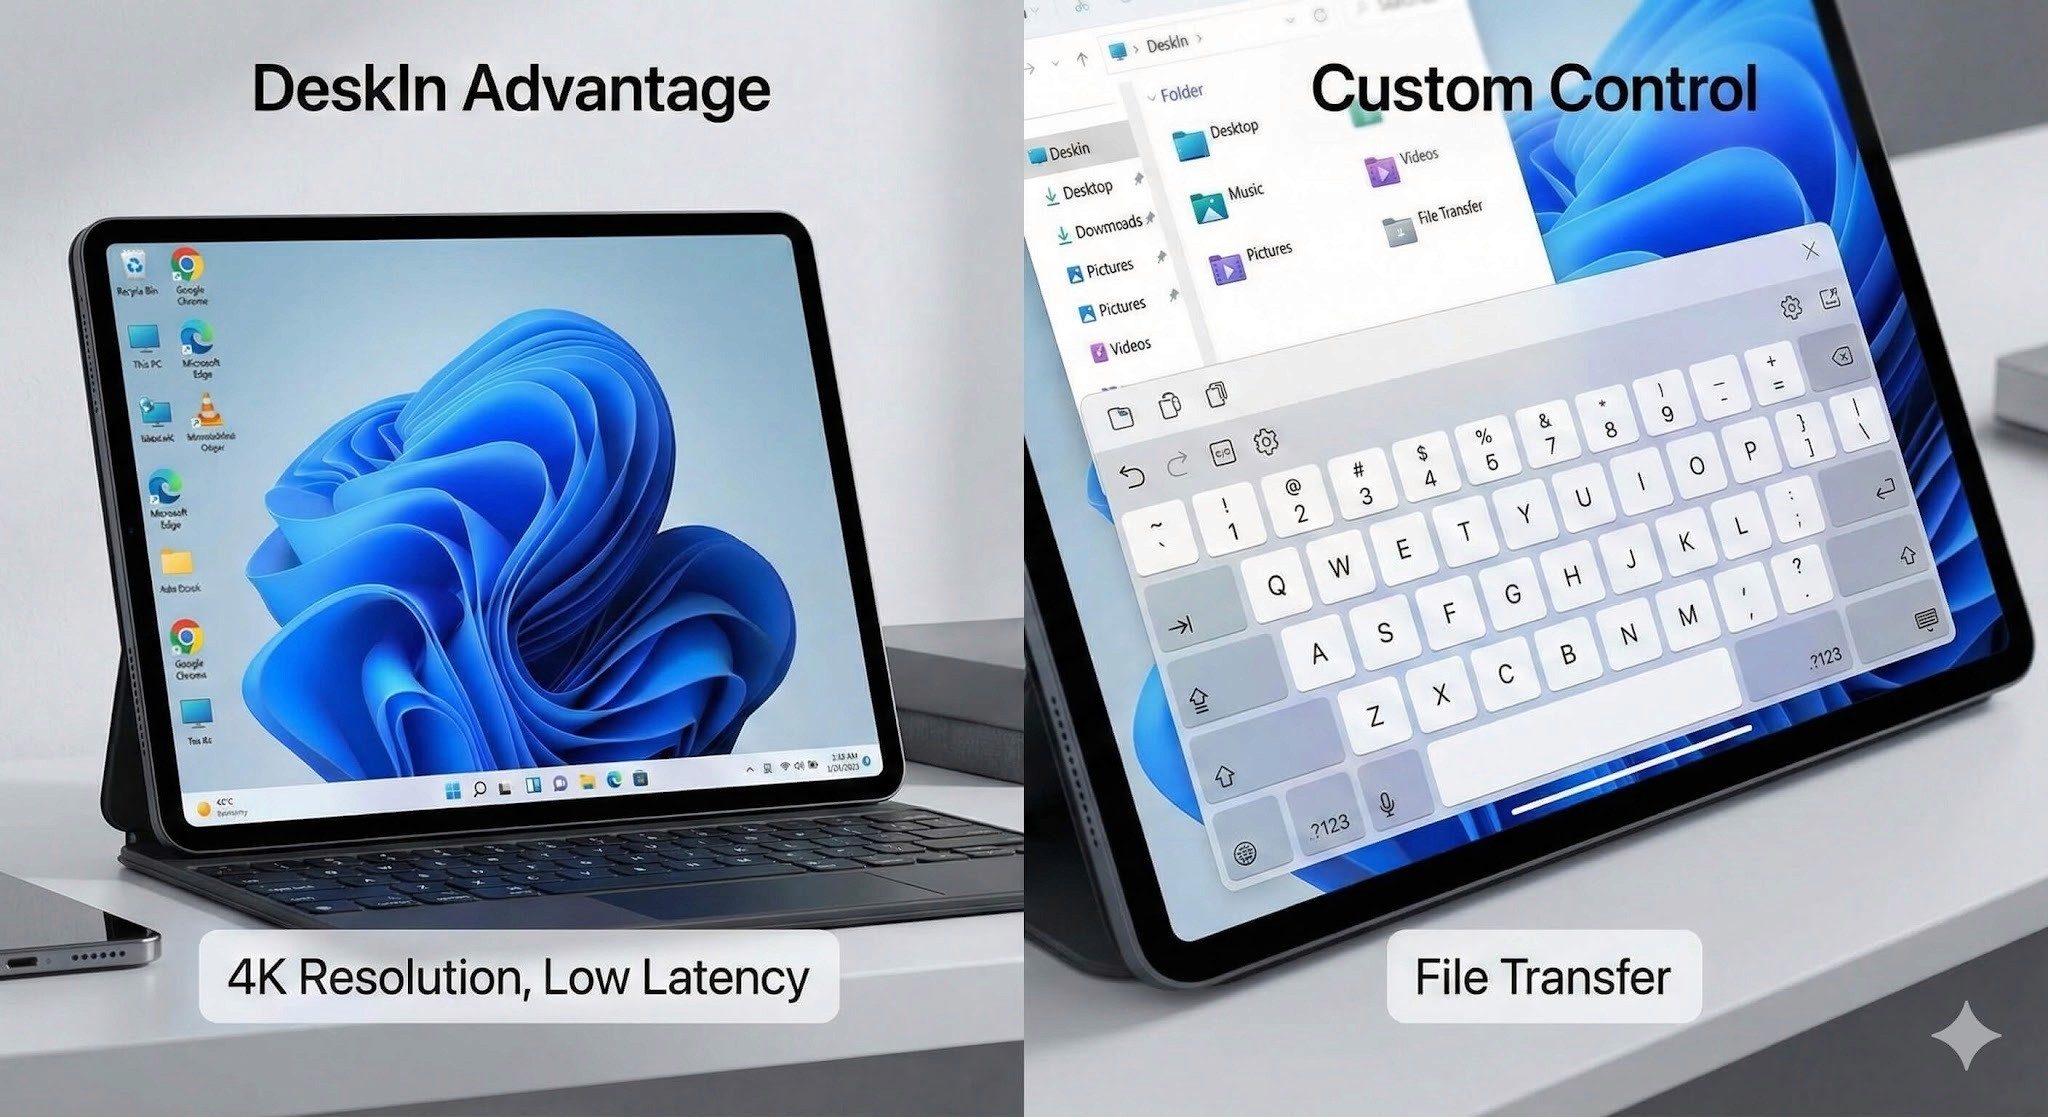
นี่คือเหตุผลที่ทำให้ DeskIn โดดเด่นสำหรับทุกคนที่ต้องการสะท้อนหน้าจอ Android ไปยัง Mac:
การเชื่อมต่อด้วยคลิกเดียว: ไม่ต้องมีการตั้งค่าที่ซับซ้อน
การสะท้อนหน้าจอความละเอียดสูง: การแสดงผลที่ชัดเจนทุกจุดของหน้าจอ Android ของคุณ
ความล่าที่ต่ำ: ลดการหน่วงเวลาระหว่างการทำงานบน Android และแสดงผลบน Mac
ตัวควบคุมที่ติดตั้งในตัว: ใช้งาน Android ของคุณโดยตรงจาก Mac
ความสามารถในการถ่ายโอนไฟล์: ย้ายไฟล์ระหว่างอุปกรณ์ขณะสะท้อนหน้าจอ
วิธีการสะท้อนหน้าจอ Android ไปยัง Mac ด้วย DeskIn:
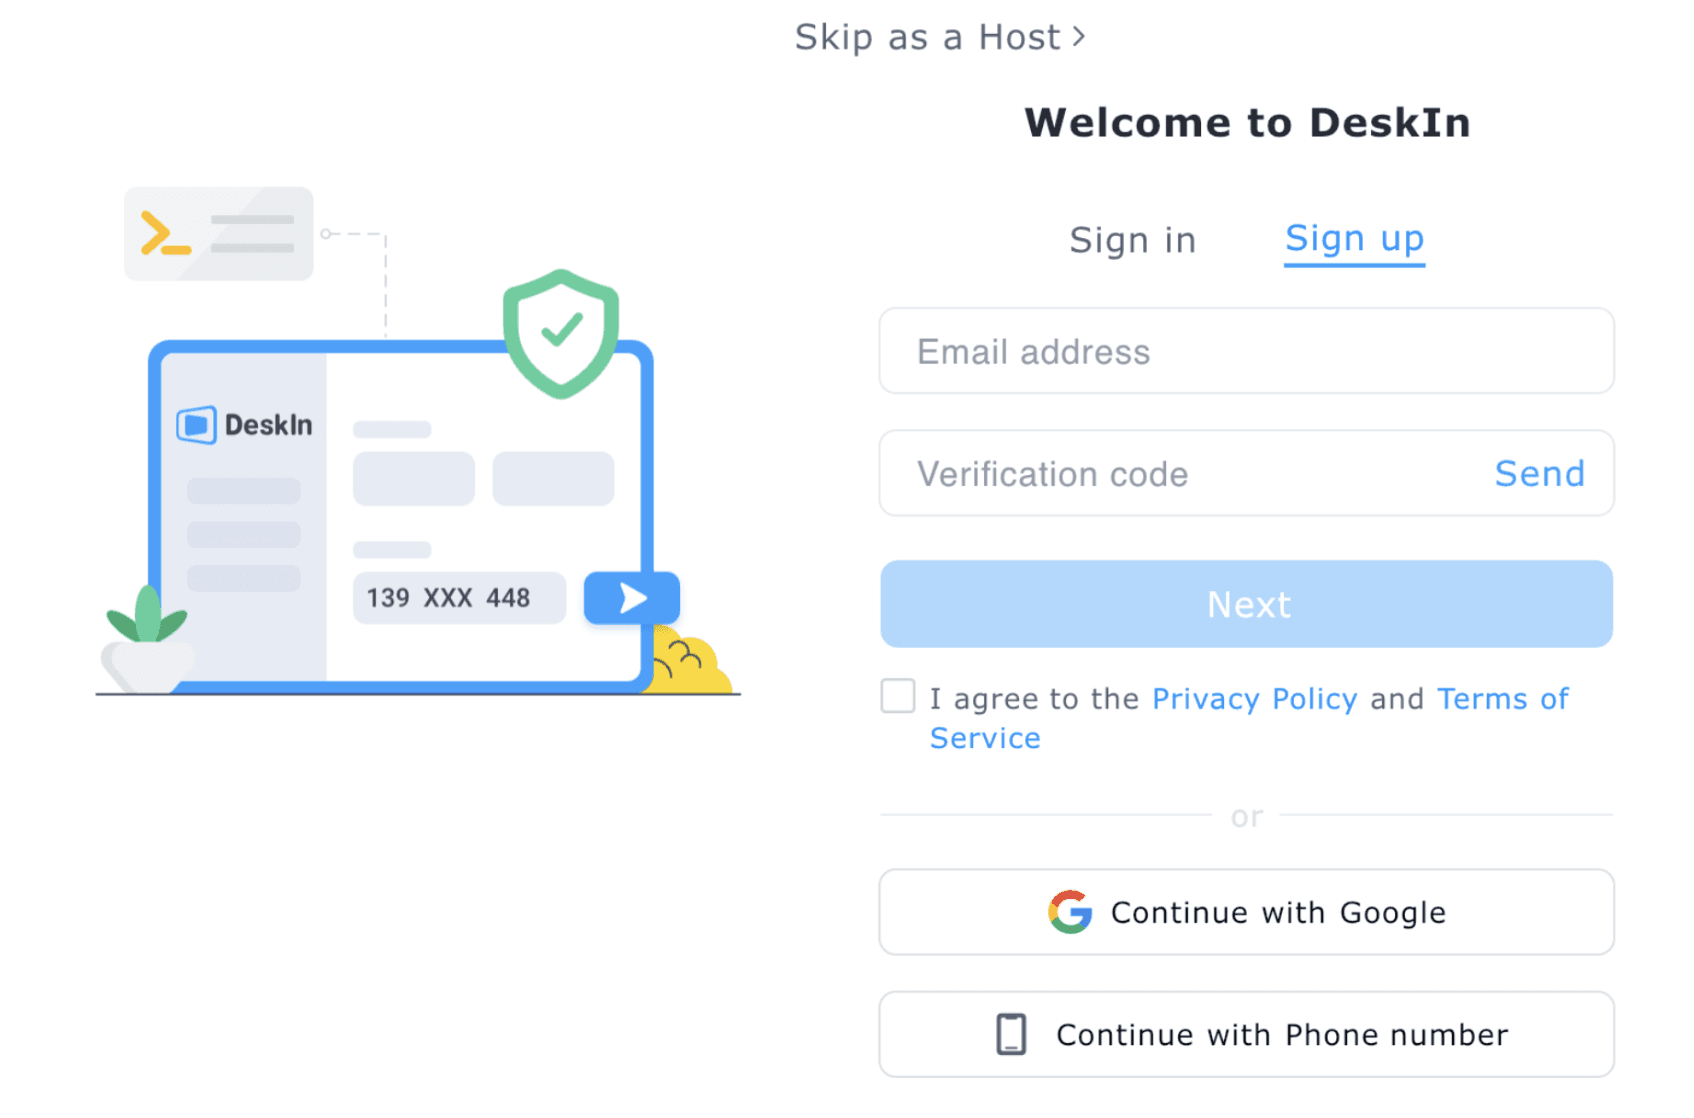
ดาวน์โหลดและเข้าสู่ระบบ
แอป Deskin บนอุปกรณ์ Android และ Mac ของคุณ สร้างบัญชีและเข้าสู่ระบบด้วยบัญชีเดียวกันบนทั้งสองอุปกรณ์
เชื่อมต่อจาก Android

เปิดแอป Deskin บน Android ของคุณ
แตะที่อุปกรณ์ที่คุณต้องการใช้สำหรับการสะท้อนหน้าจอเลือกตัวเลือกสำหรับการสะท้อนหน้าจอ

คุณจะเห็นสามตัวเลือก:
- สะท้อนหน้าจอ- แชร์กล้อง
- ควบคุมระยะไกล
เลือก สะท้อนหน้าจอ.
จด ID ของอุปกรณ์และรหัสผ่าน

หลังจากเลือกสะท้อนหน้าจอ คุณจะเห็น ID ของอุปกรณ์และรหัสผ่าน
(คุณสามารถ ปรับแต่งรหัสผ่าน ได้เพื่อให้จดจำได้ง่ายขึ้น.)
เชื่อมต่อจาก Mac
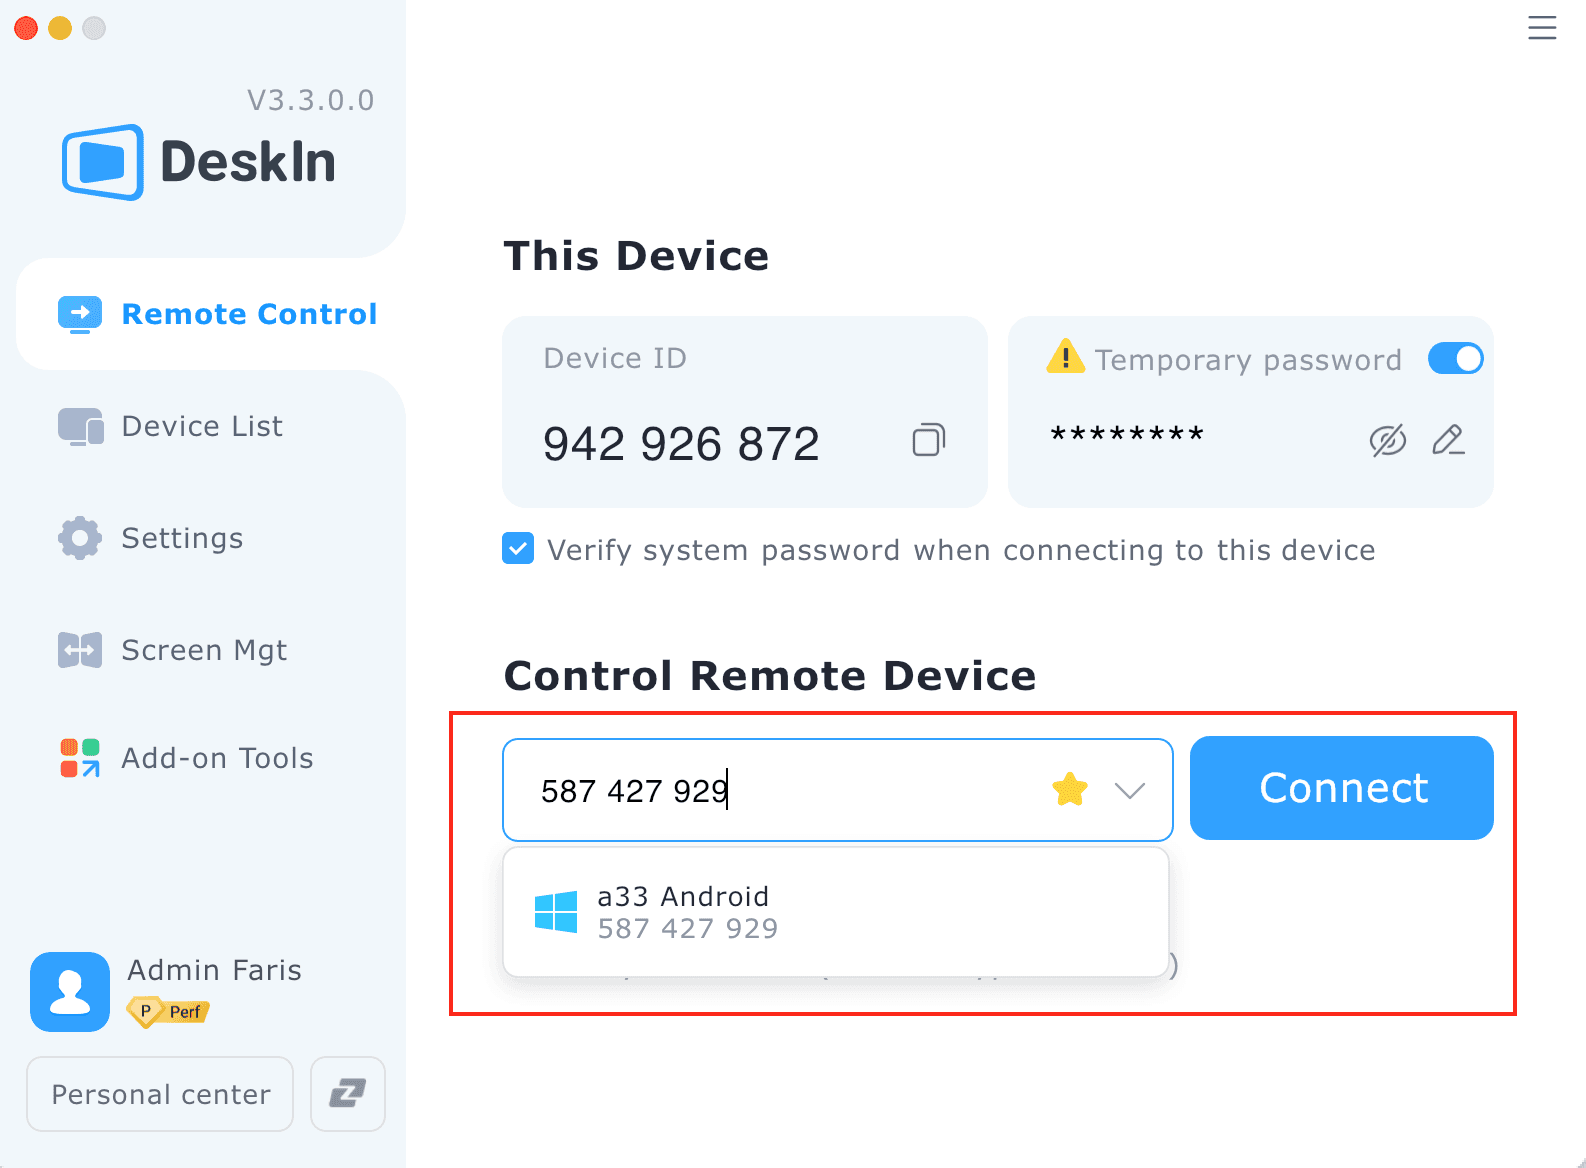
เปิดแอป Deskin บน Mac ของคุณ หากคุณเข้าสู่ระบบด้วยบัญชีเดียวกัน อุปกรณ์ Android ของคุณควรจะปรากฏในรายการโดยอัตโนมัติ
ป้อนรหัสผ่าน
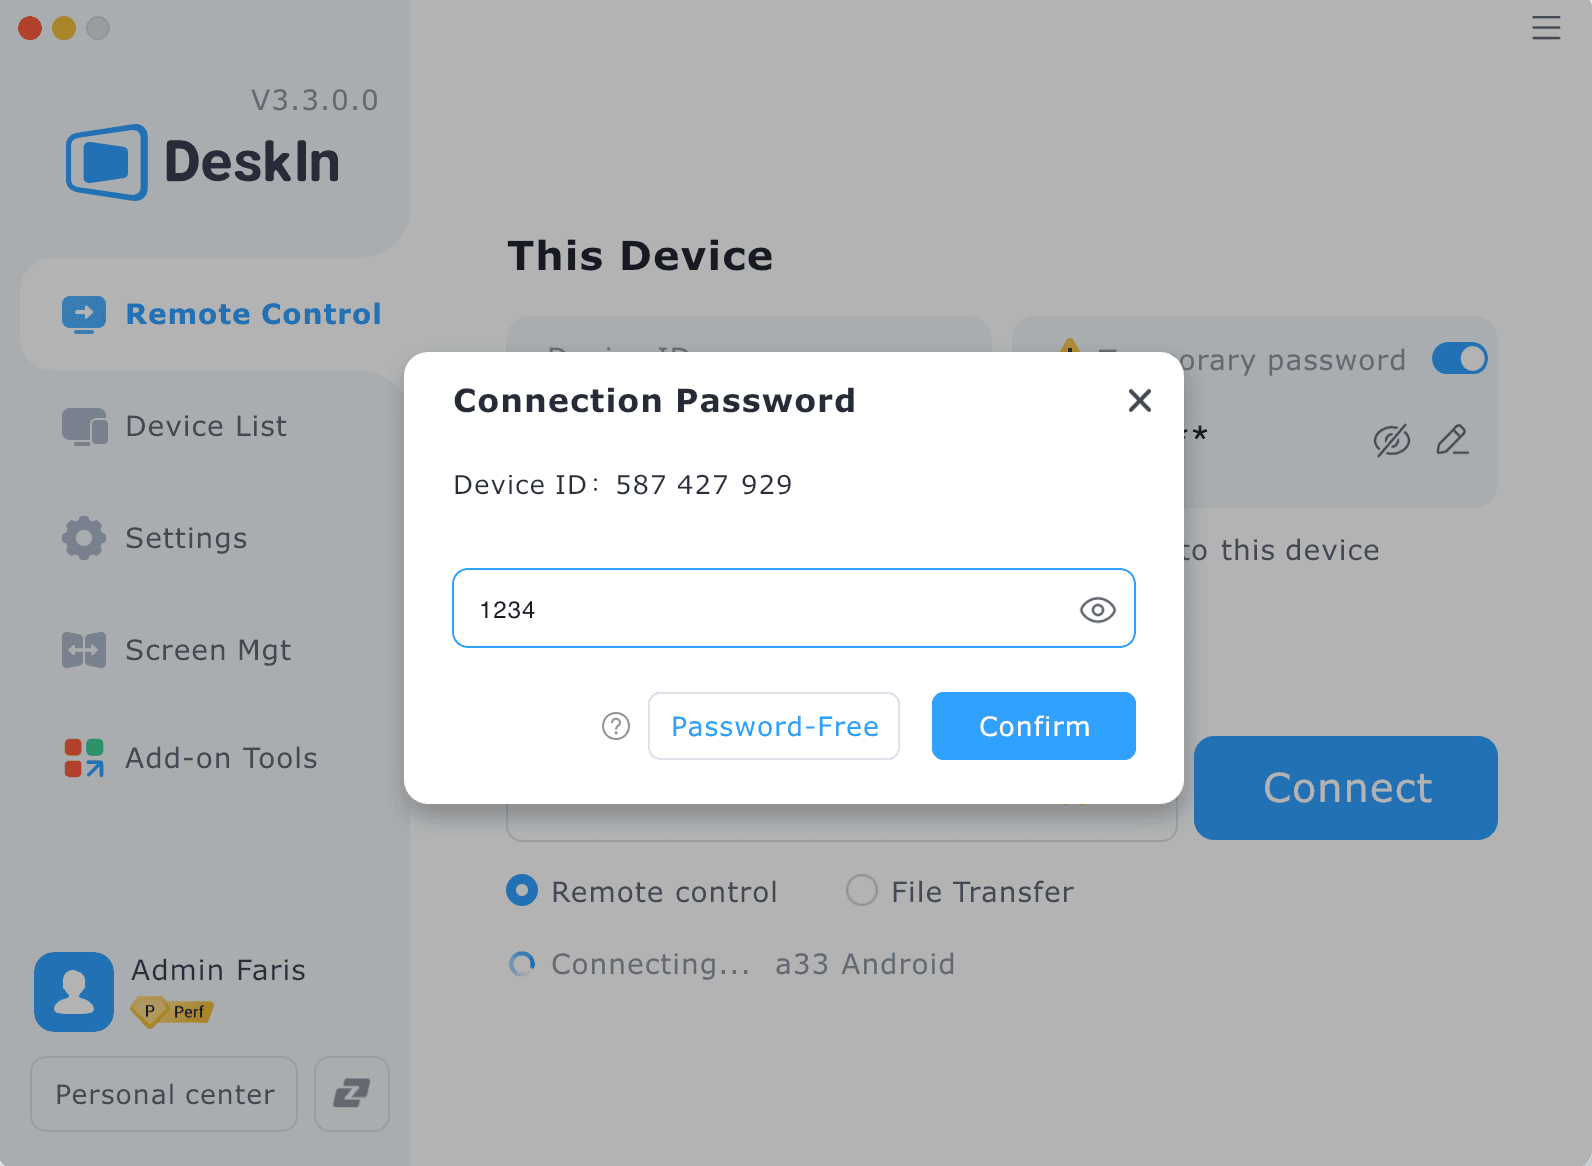
เลือกอุปกรณ์ Android ของคุณ ป้อน รหัสผ่านที่ปรับแต่ง ที่คุณสร้างขึ้นก่อนหน้านี้
แล้วคลิก ยืนยัน.เริ่มการสะท้อนหน้าจอ

หน้าจอ Android ของคุณควรจะสะท้อนไปยัง Mac ของคุณพร้อมใช้งาน
ประสบการณ์การใช้งานจริง: "ในฐานะนักออกแบบอิสระ ฉันต้องแสดงการออกแบบบนมือถือให้กับลูกค้าอยู่เสมอ DeskIn ให้ฉันสะท้อนหน้าจอ Android ไปยัง Mac ระหว่างการสนทนาทางวิดีโอ ทำให้ลูกค้าเห็นได้ตรงตามที่การออกแบบถูกสร้างไว้บนมือถือ โดยไม่ต้องเซ็ตอัพกล้องแบบยุ่งเหยิง" — เจมี่, นักออกแบบ UX
การใช้งานจริง: การใช้ประโยชน์สูงสุดเมื่อคุณสะท้อนหน้าจอ Android ไปยัง Mac
ตอนนี้คุณได้รู้วิธีการสะท้อนหน้าจอ Android ไปยัง Mac แล้ว ลองมาดูการใช้งานที่มีประสิทธิภาพที่สามารถเปลี่ยนแปลงดิจิทัลเวิร์กโฟลวของคุณได้:
เพิ่มประสิทธิภาพการทำงานทางไกล
เมื่อคุณสะท้อนหน้าจอ Android ไปยัง Mac คุณสามารถ:
ตอบข้อความงานที่เกี่ยวข้องกับมือถือโดยใช้คีย์บอร์ดคอมพิวเตอร์ของคุณ
เข้าร่วมในแอปที่ใช้เฉพาะมือถือในระหว่างการประชุมทีม
เข้าถึงแอปการตรวจสอบที่ใช้สำหรับการเข้าสู่ระบบงานโดยไม่ต้องหยิบโทรศัพท์
ตรวจสอบการแจ้งเตือนงานบนหน้าจอใหญ่ขึ้น
การสร้างเนื้อหาที่ง่ายขึ้น
สำหรับผู้สร้างเนื้อหาดิจิทัล ความสามารถในการสะท้อนหน้าจอ Android ไปยัง Mac ทำให้เปิดทางเลือกใหม่ๆ:
บันทึกการสอนแอปมือถือคุณภาพสูง
ถ่ายภาพหน้าจอที่สมบูรณ์แบบสำหรับการเอกสาร
แสดงคุณสมบัติเฉพาะมือถือในระหว่างการสัมมนาออนไลน์
ทดสอบวิธีการที่เนื้อหาของคุณถูกแสดงบนอุปกรณ์มือถือ
การเพิ่มประสิทธิภาพส่วนบุคคล
แม้แต่ในการใช้งานทั่วไปเมื่อคุณสะท้อนหน้าจอ Android ไปยัง Mac คุณสามารถ:
เล่นเกมมือถือบนหน้าจอที่ใหญ่ขึ้น
ดูรูปภาพและวิดีโอจากโทรศัพท์ของคุณบนหน้าจอ Mac
ส่งข้อความโดยไม่ต้องสลับอุปกรณ์
เข้าถึงแอปที่ใช้เฉพาะมือถือจากสภาพแวดล้อมเดสก์ท็อปของคุณ
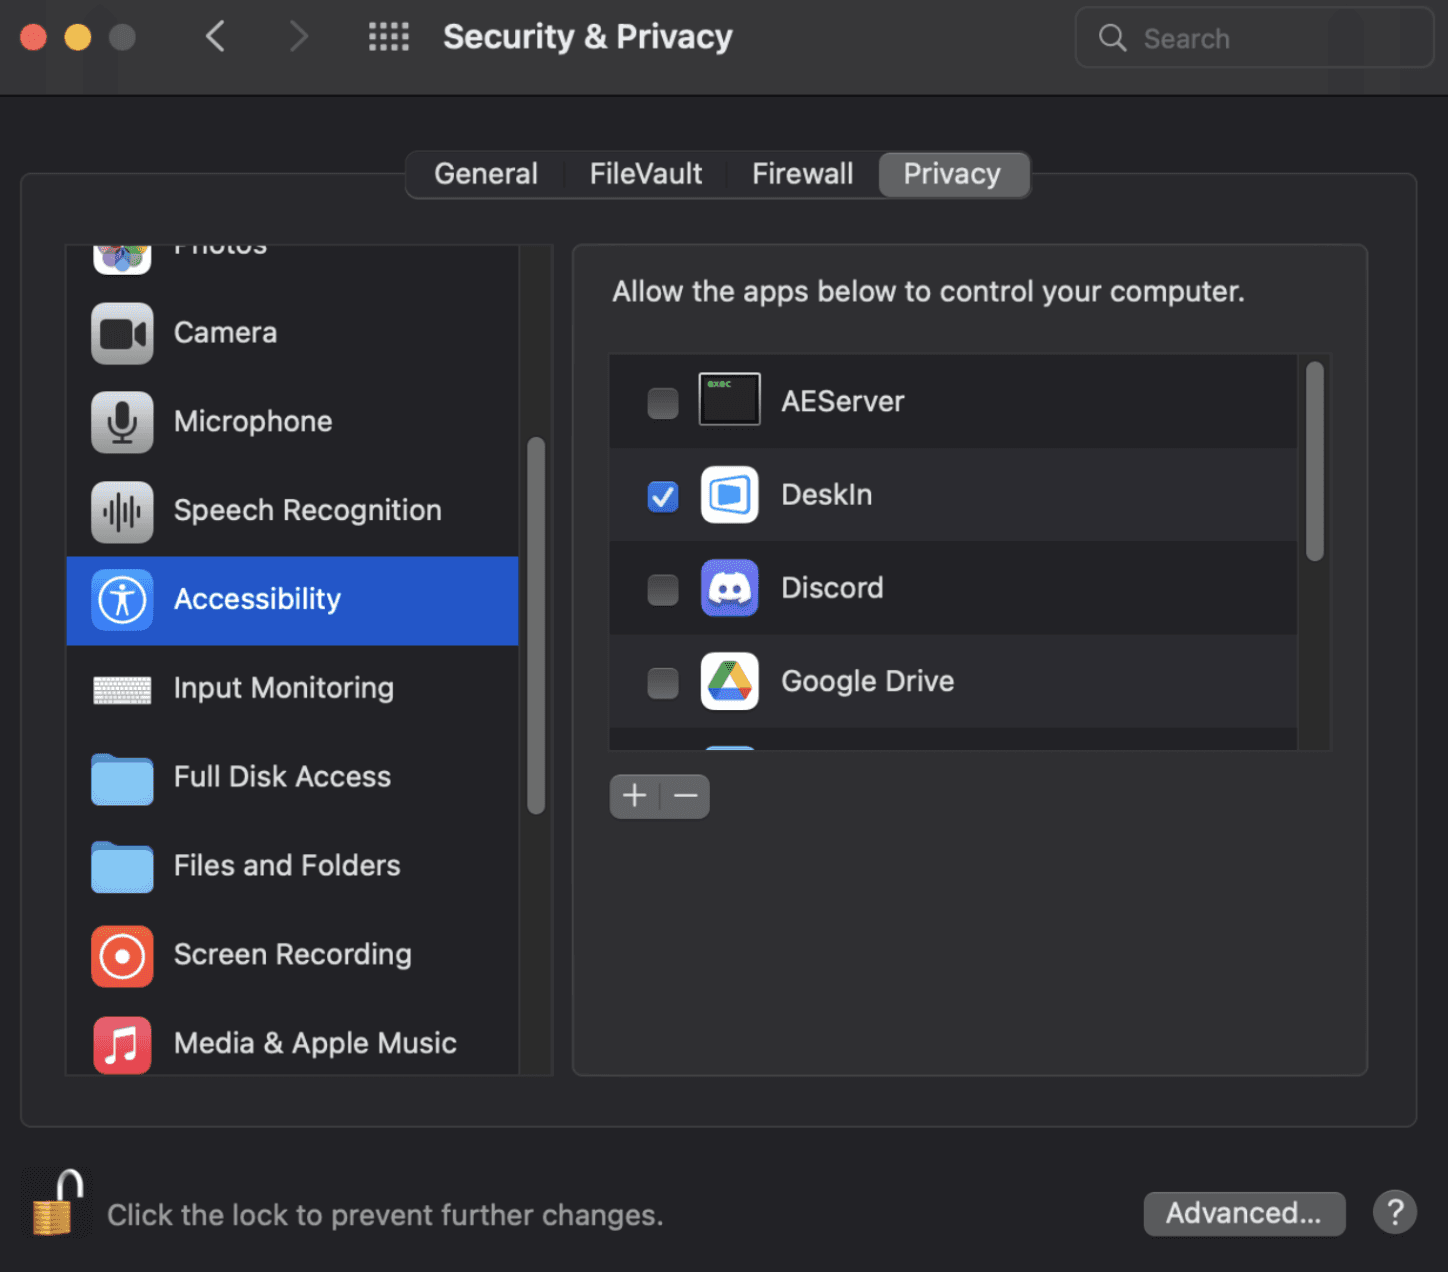
ความท้าทายทั่วไปเมื่อคุณสะท้อนหน้าจอ Android ไปยัง Mac (และวิธีแก้ไข)
ไม่ว่าจะเป็นข้อได้เปรียบใด คุณอาจจะพบปัญหาหลายอย่างเมื่อพยายามสะท้อนหน้าจอ Android ไปยัง Mac นี่คือวิธีแก้ปัญหาสำหรับปัญหาที่พบบ่อยที่สุด:
ปัญหาการเชื่อมต่อ:
ตรวจสอบให้อุปกรณ์ทั้งสองต่อกับเครือข่าย Wi-Fi เดียวกัน
รีสตาร์ทอุปกรณ์ทั้งสองถ้ามีปัญหาการเชื่อมต่อซ้ำๆ
ตรวจสอบว่าไม่มีการตั้งค่าไฟร์วอลล์ขัดขวางการเชื่อมต่อ
ปัญหาประสิทธิภาพ:
ปิดแอปที่ไม่จำเป็นทั้งบนอุปกรณ์ทั้งสอง
เพื่อประสิทธิภาพที่ดีขึ้นเมื่อคุณสะท้อนหน้าจอ Android ไปยัง Mac ลดความละเอียดในการตั้งค่าของแอปสะท้อนหน้าจอของคุณ
รักษาอุปกรณ์ Android ของคุณให้มีพลังงานเพียงพอหรือชาร์จไว้อยู่เสมอเนื่องจากการสะท้อนหน้าจออาจใช้พลังงานแบตเตอรี่อย่างรวดเร็ว
ปัญหาความเข้ากันได้:
ตรวจสอบเสมอว่าโซลูชันที่คุณเลือกสนับสนุนเวอร์ชัน Android และ macOS เฉพาะของคุณ
อัปเดตทั้งอุปกรณ์ Android และ Mac ของคุณเป็นเวอร์ชันระบบล่าสุด
ใช้ DeskIn เพื่อรองรับความเข้ากันได้ที่กว้างที่สุดเมื่อคุณต้องสะท้อนหน้าจอ Android ไปยัง Mac
สรุป: เปลี่ยนเวิร์กโฟลวของคุณเมื่อคุณสะท้อนหน้าจอ Android ไปยัง Mac
ความสามารถในการสะท้อนหน้าจอ Android ไปยัง Mac หมายถึงมากกว่าแค่การเชื่อมต่อนำทาง—มันเกี่ยวกับการสร้างสภาพแวดล้อมดิจิทัลที่รวมกัน ซึ่งจะเพิ่มความสามารถในการทำงานและการเล่นของคุณ โดยการทำตามวิธีในคู่มือนี้ คุณสามารถทำลายขอบเขตระหว่างอุปกรณ์ของคุณและพบกับชีวิตดิจิทัลที่รวมเป็นหนึ่ง
ไม่ว่าคุณจะเลือกใช้การเชื่อมต่อแบบมีสาย โซลูชันแบบไร้สาย หรือประสบการณ์ที่ประหยัดเวลาของ DeskIn การสะท้อนหน้าจอ Android ไปยัง Mac สามารถช่วยคุณประหยัดเวลา ลดความหงุดหงิด และเปิดโอกาสใหม่สำหรับประสิทธิภาพและความบันเทิง
พร้อมที่จะสัมผัสประสบการณ์ของระบบดิจิทัลที่เชื่อมต่อกันอย่างไม่มีอุปสรรค? ดาวน์โหลด DeskIn วันนี้และเริ่มสะท้อนหน้าจอ Android ของคุณไปยัง Mac ด้วยเพียงแค่ไม่กี่คลิก ชีวิตดิจิทัลที่มีประสิทธิภาพมากขึ้นรอคุณอยู่!
สำหรับผู้ที่ต้องใช้หลายอุปกรณ์ทุกวัน ฉันได้ค้นพบว่าความสามารถในการสะท้อนหน้าจอ Android ไปยัง Mac ไม่เพียงแค่สะดวกเท่านั้น แต่ยังเป็นตัวเปลี่ยนเกมสำหรับการเพิ่มประสิทธิภาพในการทำงาน ไม่ว่าคุณจะเป็นพนักงานระยะไกลที่ต้องการแชร์การนำเสนอผ่านมือถือ นักเดินทางดิจิทัลที่จัดการเนื้อหาข้ามอุปกรณ์ หรือเพียงแค่ต้องการเพลิดเพลินกับแอป Android บนหน้าจอขนาดใหญ่ขึ้น การสะท้อนหน้าจอ Android ไปยัง Mac จะเปิดทางเลือกที่น่าทึ่งมากมายขึ้นมา
ความท้าทาย? Apple และ Android โดยธรรมชาติแล้วไม่สามารถทำงานร่วมกันได้อย่างง่ายดาย แต่ไม่ต้องกังวล—ฉันได้ใช้เวลาหลายปีในการทดสอบวิธีการที่หลากหลาย และฉันอยู่ที่นี่เพื่อแนะนำคุณผ่านวิธีการที่มีประสิทธิภาพที่สุดเพื่อสะท้อนหน้าจอ Android ไปยัง Mac ในปี 2025
ในคู่มือนี้ คุณจะได้เรียนรู้:
วิธีที่ดีที่สุดในการสะท้อนหน้าจอ Android ไปยัง Mac โดยไม่มีปัญหาความเข้ากันได้
คำแนะนำทีละขั้นตอนในการตั้งค่าการสะท้อนหน้าจอ
วิธีที่ DeskIn ทำให้การสะท้อนหน้าจอ Android ไปยัง Mac ง่ายดายมาก
การใช้งานในสถานการณ์จริงที่จะเปลี่ยนแปลงการทำงานของคุณ
มาทลายกำแพงระหว่างอุปกรณ์ของคุณและสร้างประสบการณ์ดิจิทัลที่ราบรื่นกันเถอะ
ทำความเข้าใจการสะท้อนหน้าจอ Android ไปยัง Mac: สิ่งที่คุณต้องรู้
ก่อนจะเจาะลึกถึงวิธีการเฉพาะเพื่อการสะท้อนหน้าจอ Android ไปยัง Mac สิ่งสำคัญคือต้องเข้าใจว่าเมื่อคุณสะท้อนหน้าจอ Android ไปยัง Mac คุณจะแสดงหน้าจอของอุปกรณ์ Android บนคอมพิวเตอร์ Mac ของคุณแบบเรียลไทม์ ซึ่งจะสามารถให้คุณทำสิ่งต่อไปนี้ได้:
ดูและควบคุมแอป Android จาก Mac ของคุณ
ถ่ายโอนไฟล์ระหว่างอุปกรณ์ได้ง่ายขึ้น
นำเสนอแอปมือถือในระหว่างการนำเสนอ
ถ่ายภาพหน้าจอหรือบันทึกหน้าจอ Android ของคุณ
ส่งข้อความจาก Mac ของคุณโดยใช้โทรศัพท์ Android
สำหรับพนักงานระยะไกลและนักเดินทางดิจิทัล ความสามารถในการสะท้อนหน้าจอ Android ไปยัง Mac หมายถึงการสลับอุปกรณ์น้อยลงและความสามารถในความจดจ่อที่ดีขึ้น สำหรับผู้สร้างเนื้อหา มันเสนอวิธีใหม่ๆ ในการจับภาพและแชร์เนื้อหามือถือ
เคล็ดลับจากมืออาชีพ: เมื่อคุณสะท้อนหน้าจอ Android ไปยัง Mac โปรดตรวจสอบว่าอุปกรณ์ทั้งสองเชื่อมต่อกับเครือข่าย Wi-Fi เดียวกันเพื่อประสิทธิภาพที่ดีที่สุดและความล่าช้าที่ต่ำที่สุด
วิธีการ 3 แบบในการสะท้อนหน้าจอ Android ไปยัง Mac
1. การใช้การเชื่อมต่อ USB เพื่อสะท้อนหน้าจอ Android ไปยัง Mac โดยตรง
หนึ่งในวิธีการที่เชื่อถือได้ที่สุดในการสะท้อนหน้าจอ Android ไปยัง Mac คือผ่านการเชื่อมต่อ USB แบบกายภาพ วิธีนี้มีข้อดีคือมีการเชื่อมต่อที่เสถียรพร้อมกับความล่าช้าที่น้อย—เหมาะสำหรับการใช้สะท้อนหน้าจอ Android ไปยัง Mac สำหรับการนำเสนอหรือการสาธิต
นี่คือวิธีตั้งค่า:
เปิดใช้การดีบัก USB บนอุปกรณ์ Android ของคุณ:
ไปที่ การตั้งค่า > เกี่ยวกับโทรศัพท์
แตะที่ Build Number 7 ครั้งเพื่อเปิดใช้งานตัวเลือกสำหรับนักพัฒนา
ไปที่ตัวเลือกสำหรับนักพัฒนาและเปิดใช้การดีบัก USB
ติดตั้ง Android File Transfer บน Mac ของคุณ
เชื่อมต่ออุปกรณ์ Android เข้ากับ Mac ของคุณด้วยสาย USB
เปิดใช้งาน Android File Transfer บน Mac ของคุณ
ใช้แอปสะท้อนหน้าจอที่รองรับการเชื่อมต่อ USB
ในขณะที่วิธีนี้ให้การเชื่อมต่อที่เสถียรในการสะท้อนหน้าจอ Android ไปยัง Mac แต่มันต้องให้โทรศัพท์ของคุณเชื่อมต่อกับคอมพิวเตอร์อยู่ซึ่งอาจไม่สะดวกสำหรับทุกคน
2. โซลูชันไร้สายในการสะท้อนหน้าจอ Android ไปยัง Mac
หากคุณต้องการอิสระในการเคลื่อนไหวมากขึ้นเมื่อสะท้อนหน้าจอ Android ไปยัง Mac โซลูชันไร้สายเสนอความยืดหยุ่นที่มากขึ้น วิธีเหล่านี้ใช้เครือข่าย Wi-Fi ของคุณเพื่อสร้างการเชื่อมต่อระหว่างอุปกรณ์
แอปที่นิยมที่ให้คุณสะท้อนหน้าจอ Android ไปยัง Mac แบบไร้สาย ได้แก่:
Vysor: เสนอทั้งเวอร์ชันฟรีและแบบพรีเมียมพร้อมตัวเลือกคุณภาพที่หลากหลาย
AirDroid: ให้การสะท้อนหน้าจอพร้อมด้วยความสามารถในการถ่ายโอนไฟล์
ApowerMirror: มีอินเทอร์เฟซที่ใช้งานง่ายพร้อมเครื่องมือบันทึกหน้าจอเพิ่มเติม
เพื่อการตั้งค่าสะท้อนหน้าจอแบบไร้สาย:
ติดตั้งแอปที่คุณเลือกบนทั้งอุปกรณ์ Android และ Mac ของคุณ
เชื่อมต่ออุปกรณ์ทั้งสองกับเครือข่าย Wi-Fi เดียวกัน
ปฏิบัติตามคำแนะนำการจับคู่ของแอป (ปกติจะเกี่ยวข้องกับการสแกน QR code หรือป้อนพิน)
เริ่มสะท้อนหน้าจอ Android ของคุณไปยัง Mac
ในขณะที่โซลูชันไร้สายเสนอความสะดวกสบาย พวกมันอาจก่อให้เกิดความล่าบ้าง ขึ้นอยู่กับความเร็วเครือข่ายของคุณ สำหรับการใช้งานทั่วไป อาจจะไม่สังเกตได้ แต่สำหรับการเล่นเกมหรือการสาธิตที่ต้องการความแม่นยำ การเชื่อมต่อมีสายอาจจะเป็นที่ต้องการมากกว่าเมื่อคุณสะท้อนหน้าจอ Android ไปยัง Mac
3. DeskIn: วิธีที่ง่ายที่สุดในการสะท้อนหน้าจอ Android ไปยัง Mac
หลังจากทดสอบโซลูชันมากมาย ฉันพบว่า DeskIn มอบประสบการณ์ผู้ใช้ที่ใช้งานง่ายที่สุดเมื่อต้องการสะท้อนหน้าจอ Android ไปยัง Mac เครื่องมือนี้ที่ถูกสร้างขึ้นเพื่อเหตุผลนี้ช่วยกำจัดปัญหาความเข้ากันได้ที่มักเกิดขึ้นระหว่างระบบ Android และ macOS
นี่คือเหตุผลที่ทำให้ DeskIn โดดเด่นสำหรับทุกคนที่ต้องการสะท้อนหน้าจอ Android ไปยัง Mac:
การเชื่อมต่อด้วยคลิกเดียว: ไม่ต้องมีการตั้งค่าที่ซับซ้อน
การสะท้อนหน้าจอความละเอียดสูง: การแสดงผลที่ชัดเจนทุกจุดของหน้าจอ Android ของคุณ
ความล่าที่ต่ำ: ลดการหน่วงเวลาระหว่างการทำงานบน Android และแสดงผลบน Mac
ตัวควบคุมที่ติดตั้งในตัว: ใช้งาน Android ของคุณโดยตรงจาก Mac
ความสามารถในการถ่ายโอนไฟล์: ย้ายไฟล์ระหว่างอุปกรณ์ขณะสะท้อนหน้าจอ
วิธีการสะท้อนหน้าจอ Android ไปยัง Mac ด้วย DeskIn:
ดาวน์โหลดและเข้าสู่ระบบ
แอป Deskin บนอุปกรณ์ Android และ Mac ของคุณ สร้างบัญชีและเข้าสู่ระบบด้วยบัญชีเดียวกันบนทั้งสองอุปกรณ์เชื่อมต่อจาก Android
เปิดแอป Deskin บน Android ของคุณ
แตะที่อุปกรณ์ที่คุณต้องการใช้สำหรับการสะท้อนหน้าจอเลือกตัวเลือกสำหรับการสะท้อนหน้าจอ
คุณจะเห็นสามตัวเลือก:
- สะท้อนหน้าจอ- แชร์กล้อง
- ควบคุมระยะไกล
เลือก สะท้อนหน้าจอ.
จด ID ของอุปกรณ์และรหัสผ่าน
หลังจากเลือกสะท้อนหน้าจอ คุณจะเห็น ID ของอุปกรณ์และรหัสผ่าน
(คุณสามารถ ปรับแต่งรหัสผ่าน ได้เพื่อให้จดจำได้ง่ายขึ้น.)
เชื่อมต่อจาก Mac
เปิดแอป Deskin บน Mac ของคุณ หากคุณเข้าสู่ระบบด้วยบัญชีเดียวกัน อุปกรณ์ Android ของคุณควรจะปรากฏในรายการโดยอัตโนมัติ
ป้อนรหัสผ่าน
เลือกอุปกรณ์ Android ของคุณ ป้อน รหัสผ่านที่ปรับแต่ง ที่คุณสร้างขึ้นก่อนหน้านี้
แล้วคลิก ยืนยัน.เริ่มการสะท้อนหน้าจอ
หน้าจอ Android ของคุณควรจะสะท้อนไปยัง Mac ของคุณพร้อมใช้งาน
ประสบการณ์การใช้งานจริง: "ในฐานะนักออกแบบอิสระ ฉันต้องแสดงการออกแบบบนมือถือให้กับลูกค้าอยู่เสมอ DeskIn ให้ฉันสะท้อนหน้าจอ Android ไปยัง Mac ระหว่างการสนทนาทางวิดีโอ ทำให้ลูกค้าเห็นได้ตรงตามที่การออกแบบถูกสร้างไว้บนมือถือ โดยไม่ต้องเซ็ตอัพกล้องแบบยุ่งเหยิง" — เจมี่, นักออกแบบ UX
การใช้งานจริง: การใช้ประโยชน์สูงสุดเมื่อคุณสะท้อนหน้าจอ Android ไปยัง Mac
ตอนนี้คุณได้รู้วิธีการสะท้อนหน้าจอ Android ไปยัง Mac แล้ว ลองมาดูการใช้งานที่มีประสิทธิภาพที่สามารถเปลี่ยนแปลงดิจิทัลเวิร์กโฟลวของคุณได้:
เพิ่มประสิทธิภาพการทำงานทางไกล
เมื่อคุณสะท้อนหน้าจอ Android ไปยัง Mac คุณสามารถ:
ตอบข้อความงานที่เกี่ยวข้องกับมือถือโดยใช้คีย์บอร์ดคอมพิวเตอร์ของคุณ
เข้าร่วมในแอปที่ใช้เฉพาะมือถือในระหว่างการประชุมทีม
เข้าถึงแอปการตรวจสอบที่ใช้สำหรับการเข้าสู่ระบบงานโดยไม่ต้องหยิบโทรศัพท์
ตรวจสอบการแจ้งเตือนงานบนหน้าจอใหญ่ขึ้น
การสร้างเนื้อหาที่ง่ายขึ้น
สำหรับผู้สร้างเนื้อหาดิจิทัล ความสามารถในการสะท้อนหน้าจอ Android ไปยัง Mac ทำให้เปิดทางเลือกใหม่ๆ:
บันทึกการสอนแอปมือถือคุณภาพสูง
ถ่ายภาพหน้าจอที่สมบูรณ์แบบสำหรับการเอกสาร
แสดงคุณสมบัติเฉพาะมือถือในระหว่างการสัมมนาออนไลน์
ทดสอบวิธีการที่เนื้อหาของคุณถูกแสดงบนอุปกรณ์มือถือ
การเพิ่มประสิทธิภาพส่วนบุคคล
แม้แต่ในการใช้งานทั่วไปเมื่อคุณสะท้อนหน้าจอ Android ไปยัง Mac คุณสามารถ:
เล่นเกมมือถือบนหน้าจอที่ใหญ่ขึ้น
ดูรูปภาพและวิดีโอจากโทรศัพท์ของคุณบนหน้าจอ Mac
ส่งข้อความโดยไม่ต้องสลับอุปกรณ์
เข้าถึงแอปที่ใช้เฉพาะมือถือจากสภาพแวดล้อมเดสก์ท็อปของคุณ
ความท้าทายทั่วไปเมื่อคุณสะท้อนหน้าจอ Android ไปยัง Mac (และวิธีแก้ไข)
ไม่ว่าจะเป็นข้อได้เปรียบใด คุณอาจจะพบปัญหาหลายอย่างเมื่อพยายามสะท้อนหน้าจอ Android ไปยัง Mac นี่คือวิธีแก้ปัญหาสำหรับปัญหาที่พบบ่อยที่สุด:
ปัญหาการเชื่อมต่อ:
ตรวจสอบให้อุปกรณ์ทั้งสองต่อกับเครือข่าย Wi-Fi เดียวกัน
รีสตาร์ทอุปกรณ์ทั้งสองถ้ามีปัญหาการเชื่อมต่อซ้ำๆ
ตรวจสอบว่าไม่มีการตั้งค่าไฟร์วอลล์ขัดขวางการเชื่อมต่อ
ปัญหาประสิทธิภาพ:
ปิดแอปที่ไม่จำเป็นทั้งบนอุปกรณ์ทั้งสอง
เพื่อประสิทธิภาพที่ดีขึ้นเมื่อคุณสะท้อนหน้าจอ Android ไปยัง Mac ลดความละเอียดในการตั้งค่าของแอปสะท้อนหน้าจอของคุณ
รักษาอุปกรณ์ Android ของคุณให้มีพลังงานเพียงพอหรือชาร์จไว้อยู่เสมอเนื่องจากการสะท้อนหน้าจออาจใช้พลังงานแบตเตอรี่อย่างรวดเร็ว
ปัญหาความเข้ากันได้:
ตรวจสอบเสมอว่าโซลูชันที่คุณเลือกสนับสนุนเวอร์ชัน Android และ macOS เฉพาะของคุณ
อัปเดตทั้งอุปกรณ์ Android และ Mac ของคุณเป็นเวอร์ชันระบบล่าสุด
ใช้ DeskIn เพื่อรองรับความเข้ากันได้ที่กว้างที่สุดเมื่อคุณต้องสะท้อนหน้าจอ Android ไปยัง Mac
สรุป: เปลี่ยนเวิร์กโฟลวของคุณเมื่อคุณสะท้อนหน้าจอ Android ไปยัง Mac
ความสามารถในการสะท้อนหน้าจอ Android ไปยัง Mac หมายถึงมากกว่าแค่การเชื่อมต่อนำทาง—มันเกี่ยวกับการสร้างสภาพแวดล้อมดิจิทัลที่รวมกัน ซึ่งจะเพิ่มความสามารถในการทำงานและการเล่นของคุณ โดยการทำตามวิธีในคู่มือนี้ คุณสามารถทำลายขอบเขตระหว่างอุปกรณ์ของคุณและพบกับชีวิตดิจิทัลที่รวมเป็นหนึ่ง
ไม่ว่าคุณจะเลือกใช้การเชื่อมต่อแบบมีสาย โซลูชันแบบไร้สาย หรือประสบการณ์ที่ประหยัดเวลาของ DeskIn การสะท้อนหน้าจอ Android ไปยัง Mac สามารถช่วยคุณประหยัดเวลา ลดความหงุดหงิด และเปิดโอกาสใหม่สำหรับประสิทธิภาพและความบันเทิง
พร้อมที่จะสัมผัสประสบการณ์ของระบบดิจิทัลที่เชื่อมต่อกันอย่างไม่มีอุปสรรค? ดาวน์โหลด DeskIn วันนี้และเริ่มสะท้อนหน้าจอ Android ของคุณไปยัง Mac ด้วยเพียงแค่ไม่กี่คลิก ชีวิตดิจิทัลที่มีประสิทธิภาพมากขึ้นรอคุณอยู่!