Pagiging produktibo
Pagiging produktibo
/
/
author
Na-update
Na-update
Na-update
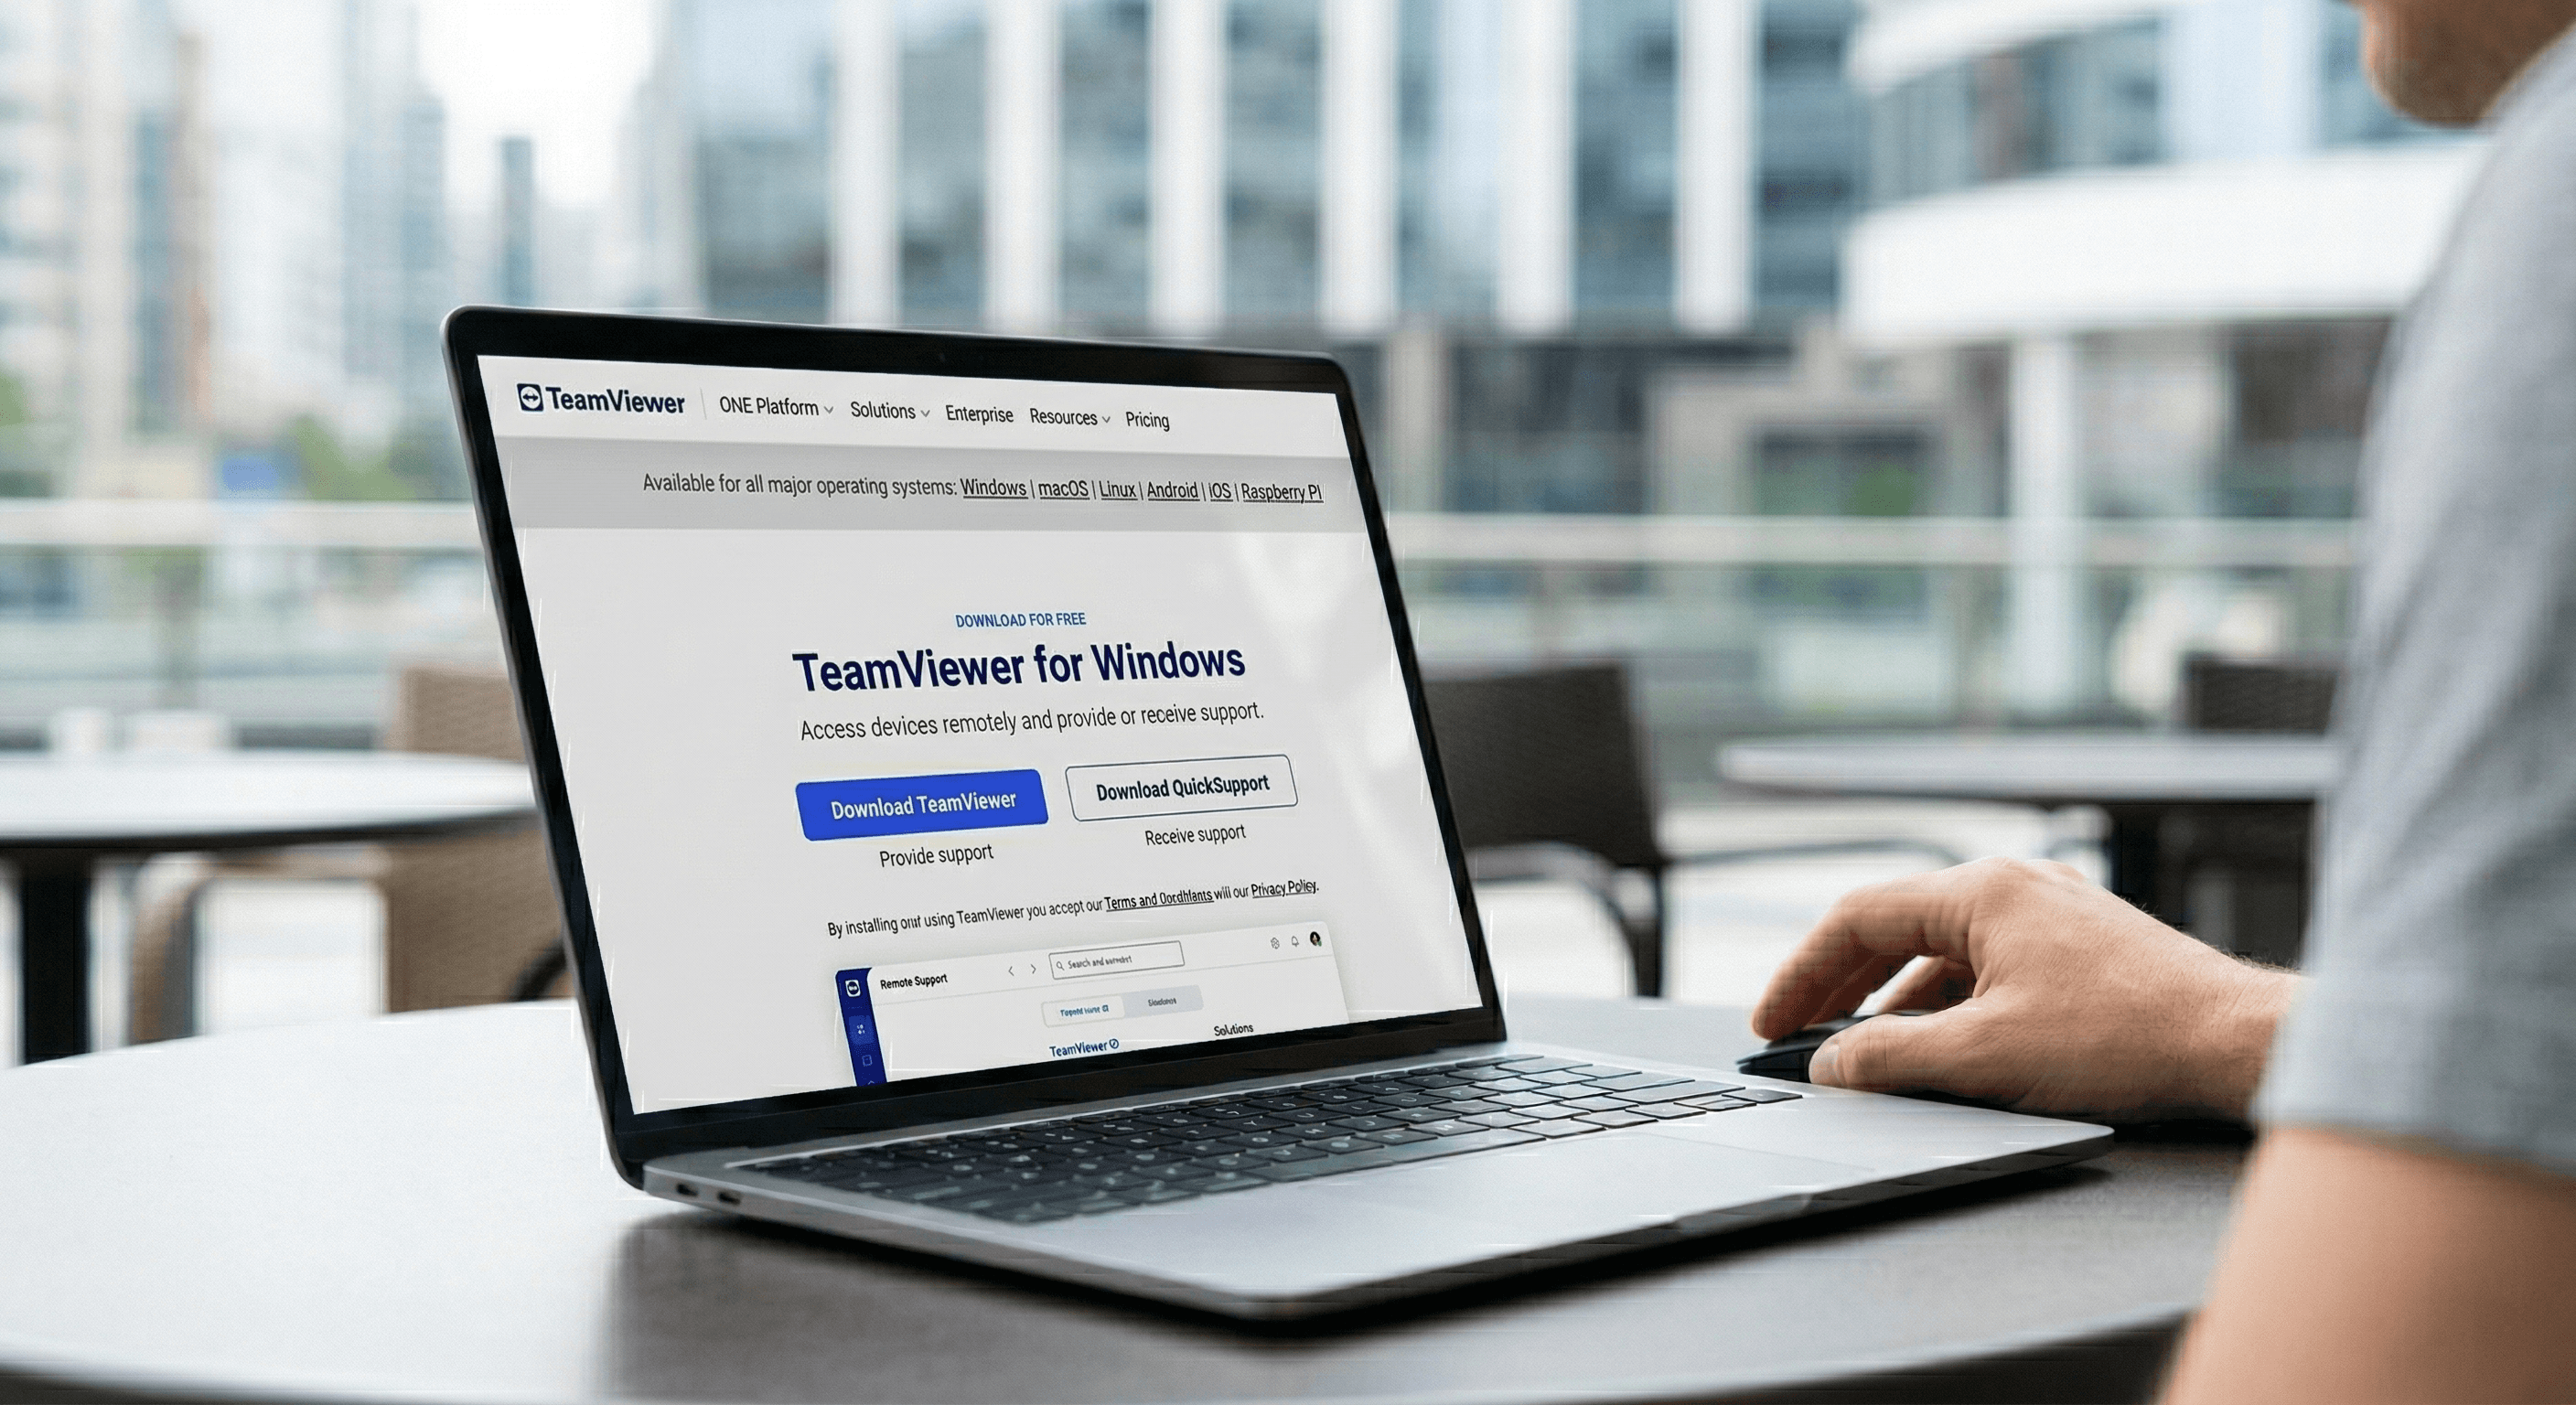
Isipin mong nagtatrabaho mula sa isang kaaya-ayang café sa Barcelona kapag nag-crash ang computer ng iyong kliyente sa kalahatan ng mundo. Noong nakaraan, ang senaryong ito ay nangangahulugan ng mga oras ng pagkabigo, walang katapusang mga email, o isang mahal na pagbisita sa lugar. Ngayon, sa tulong ng remote IT support software tulad ng DeskIn, maaari kang mag-troubleshoot at ayusin ang mga isyu sa loob ng ilang minuto, saan ka man naroroon.

Binago ng mga tool na ito kung paano nagiging produktibo ang mga remote workers, freelancers, at digital nomads, ginagawa ang mobility at efficiency na isang realidad. Sa globalized workforce ngayon, ang mga remote support tools ay mahalaga para sa pagpapanatili ng maayos na pagtakbo ng mga device nang walang pisikal na access. Kung isa kang tech-savvy freelancer o may-ari ng negosyo na sumusuporta sa isang distributed team, ang tamang remote IT support tools ay makakatipid sa oras, magbabawas ng mga gastos, at mababawasan ang stress.
Sumiklab ang remote work, na may 80% ng mga kumpanya na planong panatilihin ang hybrid o ganap na remote models sa 2025, ayon sa isang ulat mula sa Gartner. Ngunit sa mga team na nakakalat sa iba't ibang time zone, ang mga isyu sa IT tulad ng software glitches, connectivity problems, o security breaches ay maaaring sumira sa productivity. Ang remote support software ay nag-uugnay sa puwang na ito sa pamamagitan ng pagpapahintulot ng instant access sa mga device para sa troubleshooting, updates, o maintenance.
Halimbawa, isang beses, tinulungan ko ang isang kliyente na maibalik ang mga kritikal na file pagkatapos ng isang system crash gamit ang remote IT support tools. Nang hindi umaalis sa aking desk, na-access ko ang kanilang PC, na-diagnose ang isyu, at naibalik ang kanilang data—lahat sa loob ng 30 minuto. Ang mga tool na ito ay nagbibigay kapangyarihan sa iyo na malutas ang mga problema nang mabilis, saan ka man naroroon.
Pangunahing Benepisyo:
Bilis: Ayusin ang mga isyu real-time nang walang biyahe.
Pag-save ng Gastos: Iwasan ang mahal na bayarin sa technician na nasa lugar.
Flexibilidad: Suportahan ang mga device sa Windows, macOS, iOS, o Android.
Alam mo ba? Ang mga negosyo na gumagamit ng remote support tools ay nakakatipid ng average na $11,000 bawat taon sa mga gastos sa IT support, ayon sa isang pag-aaral mula sa TechRepublic noong 2024.
Hindi lahat ng remote support software ay pare-pareho. Upang pumili ng pinakamahusay na libreng remote access tool, tumuon sa mga katangian na umaayon sa iyong mga pangangailangan bilang isang remote worker o freelancer. Narito ang aking mga prayoridad matapos ang mga taon ng pagsusuri ng mga tool:
Cross-Platform Compatibility: Dapat gumana ang software ng walang putol sa Windows, macOS, iOS, at Android. Ang DeskIn, halimbawa, ay sumusuporta sa lahat ng apat, na ginagawa itong perpekto para sa iba't ibang mga setup.
Seguridad: Hanapin ang 256-bit AES encryption at two-factor authentication upang protektahan ang sensitibong data. Isang ulat mula sa Cybersecurity Ventures noong 2023 ang nagsasaad na 60% ng mga breach sa remote access ay nagmumula sa mahina na seguridad.
Kadalian ng Paggamit: Ang isang user-friendly na interface ay nakakatipid ng oras. Ang mga tool na may magugulong dashboard o kumplikadong setup ay maaaring magpabagal sa iyo.
Performance: Ang mababang latency at mataas na resolusyon na suporta (tulad ng 4K sa 60 FPS) ay nagtitiyak ng maayos na koneksyon, lalo na para sa mga gawain tulad ng graphic design o gaming.
File Transfer: Ang mabilis, ligtas na pagbabahagi ng file ay mahalaga para sa pagpapadala ng mga patches o pagkuha ng mga logs.
Actionable Tip: Subukan ang libreng bersyon ng tool tulad ng DeskIn upang matiyak na nakakatugon ito sa iyong mga pangangailangan bago mag-commit sa isang bayad na plano. Tingnan ang lag, kadalian ng setup, at compatibility ng device.
Bilang isang digital nomad, umaasa ako sa remote IT support software upang manatiling produktibo habang on the go. Narito ang tatlong paraan na binabago ng mga tool na ito ang mga workflow, na may mga halimbawa mula sa aking sariling karanasan:
Troubleshooting ng mga Device ng Kliyente: Isang beses, tumawag sa akin ang isang kliyente sa pagkabahala dahil ang kanilang CRM software ay patuloy na nag-crash. Gamit ang mga remote support tools, na-access ko ang kanilang PC, in-update ang software, at naayos ang isyu sa loob ng 20 minuto—lahat habang nasa isang tren.
Pag-collaborate sa mga Teams: Sa isang proyekto, kailangan ng aking team na ibahagi ang isang design prototype. Gamit ang screen-sharing feature ng DeskIn, ipinakita ko ang aking screen sa mga kasamahan sa iba't ibang bansa, na ginagawang instant at seamless ang feedback.
Pamamahala ng mga Personal na Device: Nang nag-freeze ang aking laptop sa isang deadline, ginamit ko ang isang remote IT support tool mula sa aking telepono upang i-restart ito at maibalik ang aking trabaho, naligtas ang mga oras ng pagkabigo.
Pro Tip: Gumamit ng remote support software na may mga voice call feature upang gabayan ang mga kliyente sa mga pag-aayos habang kontrolado mo ang kanilang screen. Ito ay bumubuo ng tiwala at nagpapabilis ng resolusyon.
Nakahanda ka na bang subukan ang isa sa pinakamagandang libreng remote access tools? Narito kung paano i-setup at gamitin ang DeskIn para sa remote IT support. Ginamit ko na ang prosesong ito ng maraming beses, at ito ay tuwid kahit para sa mga baguhan.
I-download at I-install:
Bumisita sa website ng DeskIn o i-download ang app mula sa App Store o Google Play.
I-install ito sa parehong iyong device at sa target device (halimbawa, sa PC ng kliyente).
Gumawa ng Account:
Mag-sign up para sa isang libreng account. I-verify ang iyong email para sa seguridad.
Mag-log in sa parehong mga device.
Ikonekta sa isang Remote Device:
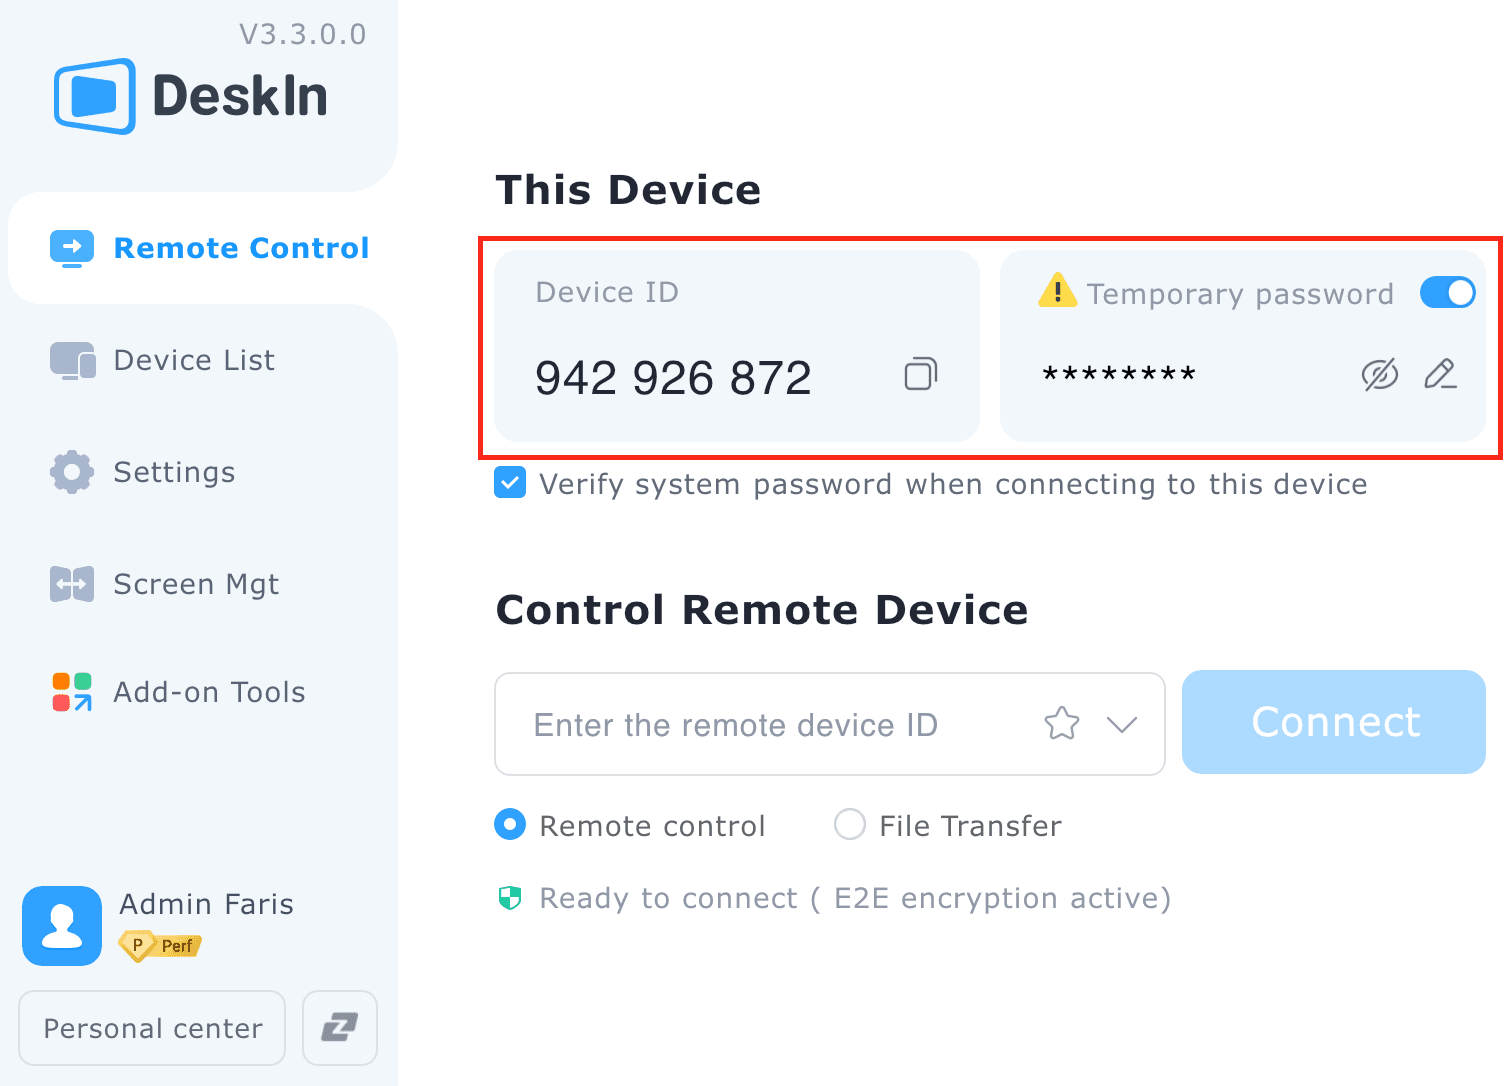
Sa target device, tandaan ang device ID na ipapakita sa DeskIn.
I-enter ang code na ito sa iyong device upang simulan ang secure na koneksyon.
Para sa unattended access, mag-set ng manual security code sa mga setting ng DeskIn.
Mag-troubleshoot o Mag-share:
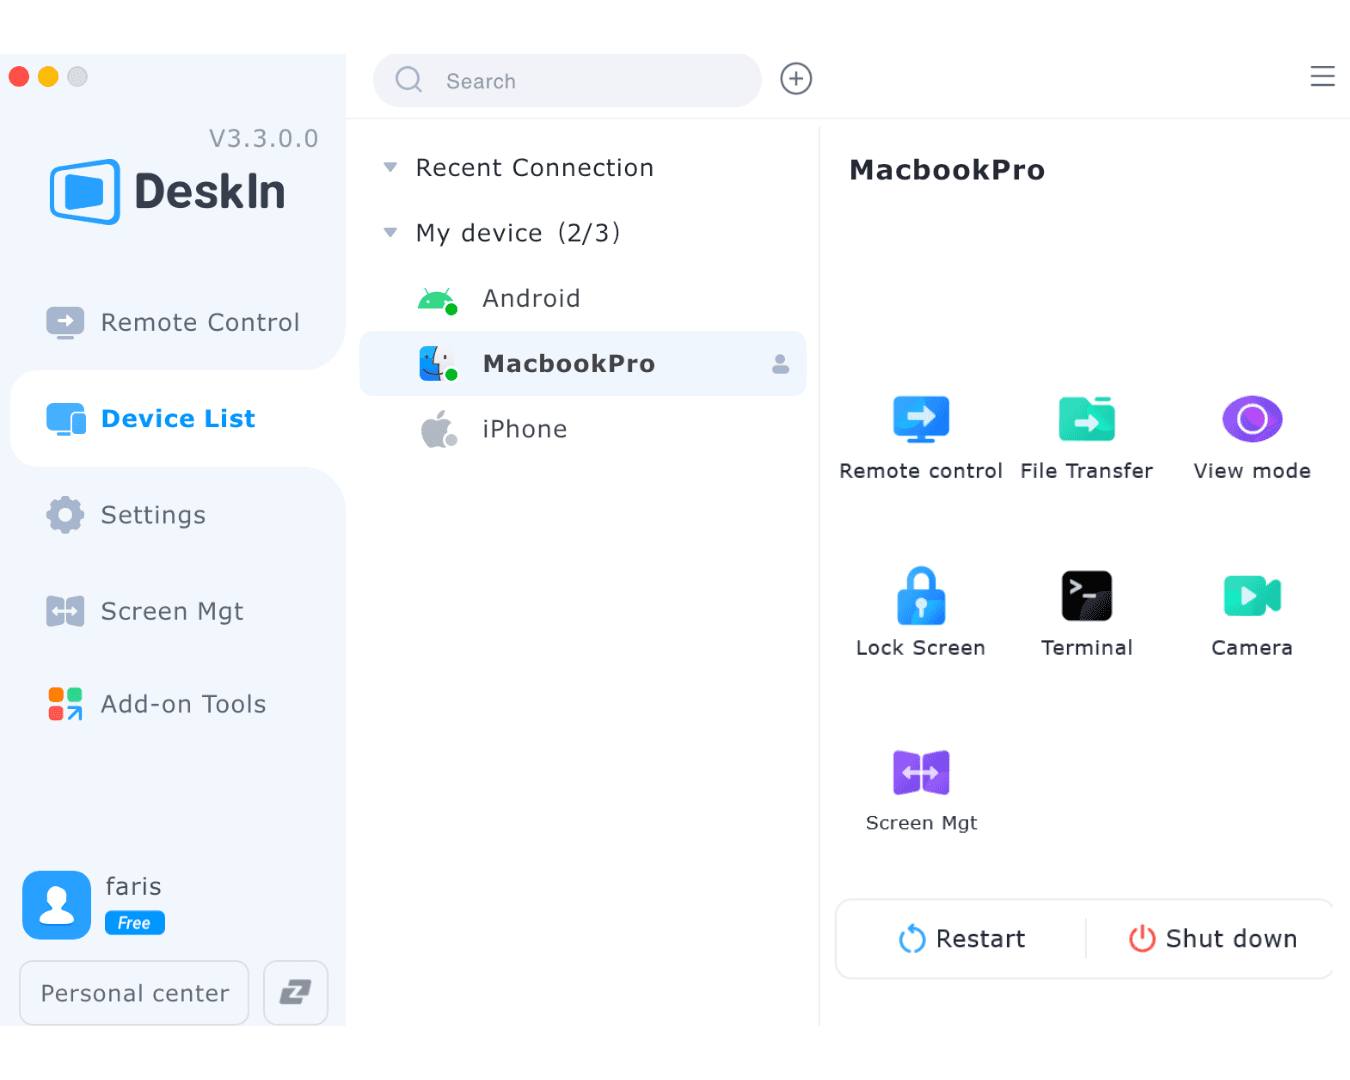
Gamitin ang toolbar ng DeskIn upang kontrolin ang remote screen, maglipat ng mga file, o i-adjust ang resolusyon.
Para sa collaboration, paganahin ang screen sharing o voice calls.
Tapusin ang Sesyon:
Isara nang secure ang koneksyon. Tinitiyak ng 256-bit encryption ng DeskIn na walang data ang naiiwang vulnerable.
Halimbawa: Kamakailan, ginamit ko ang DeskIn upang tulungan ang isang freelancer na ayusin ang isyu sa printer. Sa pamamagitan ng remote na pag-access sa kanilang Mac, in-update ko ang mga driver at sinubukan ang printer sa loob ng 15 minuto. Masaya ang kliyente, at nakatipid ako ng biyahe.
Sinusuportahan ng libreng bersyon ng DeskIn ang 3 device na walang limitasyon sa oras, na ginagawang nangungunang pagpipilian ito para sa mga freelancer at maliliit na negosyo.
Para sa mga negosyo na nangangailangan ng advanced remote support capabilities, ang DeskIn Enterprise Edition ay nag-aalok ng isang suite ng mga katangian na idinisenyo para sa kahusayan, seguridad, at scalability:
I-CLICK DITO ANG DESKIN ENTERPRISE
Mabilis na Remote Assistance: Sa SOS mode ng DeskIn, magbigay ng remote support nang hindi nangangailangan ng pag-install sa device ng kliyente. Isang simpleng 3-segundong download at 1-click na koneksyon ang nagpapadali sa proseso ng suporta.
Customizable Branding: Itaas ang iyong brand image sa pamamagitan ng pag-customize ng hitsura at pakiramdam ng software, kabilang ang mga logo at kulay ng tema.
Detalyadong Logging: Panatilihin ang komprehensibong mga tala ng lahat ng remote sessions, kabilang ang mga aksyon ng gumagamit, timestamps, at mga file transfer, na tinitiyak ang accountability at compliance.
Efficient Management: Utilisin ang pinag-isang pamamahala ng mga pahintulot sa operasyon ng empleyado at mga estado ng device, na nagpapadali ng streamlined IT operations.
High-Performance Connections: Samantalahin ang higit sa 200 SD-WAN nodes sa buong mundo para sa pinakamainam na mga daan ng transmisyon, na tinitiyak ang matatag at maayos na karanasan sa remote work.
Paalala: Ang DeskIn Enterprise Edition ay angkop para sa mga sitwasyon tulad ng teknikal na suporta sa customer, pamamahala ng IT ng kumpanya, at unattended remote access.
Ang remote IT support software ay isang lifeline para sa mga remote workers, digital nomads, at freelancers. Nakakatipid ito ng oras, nagpapababa ng gastos, at nagpapanatili ng maayos na pagtakbo ng iyong mga device, saan man dalhin ka ng buhay. Sa pamamagitan ng pagpili ng tool na may malakas na seguridad, cross-platform support, at mataas na performance—tulad ng DeskIn—maari mong harapin ang mga hamon sa IT nang may kumpiyansa.
Isipin mong nagtatrabaho mula sa isang kaaya-ayang café sa Barcelona kapag nag-crash ang computer ng iyong kliyente sa kalahatan ng mundo. Noong nakaraan, ang senaryong ito ay nangangahulugan ng mga oras ng pagkabigo, walang katapusang mga email, o isang mahal na pagbisita sa lugar. Ngayon, sa tulong ng remote IT support software tulad ng DeskIn, maaari kang mag-troubleshoot at ayusin ang mga isyu sa loob ng ilang minuto, saan ka man naroroon.
Binago ng mga tool na ito kung paano nagiging produktibo ang mga remote workers, freelancers, at digital nomads, ginagawa ang mobility at efficiency na isang realidad. Sa globalized workforce ngayon, ang mga remote support tools ay mahalaga para sa pagpapanatili ng maayos na pagtakbo ng mga device nang walang pisikal na access. Kung isa kang tech-savvy freelancer o may-ari ng negosyo na sumusuporta sa isang distributed team, ang tamang remote IT support tools ay makakatipid sa oras, magbabawas ng mga gastos, at mababawasan ang stress.
Sumiklab ang remote work, na may 80% ng mga kumpanya na planong panatilihin ang hybrid o ganap na remote models sa 2025, ayon sa isang ulat mula sa Gartner. Ngunit sa mga team na nakakalat sa iba't ibang time zone, ang mga isyu sa IT tulad ng software glitches, connectivity problems, o security breaches ay maaaring sumira sa productivity. Ang remote support software ay nag-uugnay sa puwang na ito sa pamamagitan ng pagpapahintulot ng instant access sa mga device para sa troubleshooting, updates, o maintenance.
Halimbawa, isang beses, tinulungan ko ang isang kliyente na maibalik ang mga kritikal na file pagkatapos ng isang system crash gamit ang remote IT support tools. Nang hindi umaalis sa aking desk, na-access ko ang kanilang PC, na-diagnose ang isyu, at naibalik ang kanilang data—lahat sa loob ng 30 minuto. Ang mga tool na ito ay nagbibigay kapangyarihan sa iyo na malutas ang mga problema nang mabilis, saan ka man naroroon.
Pangunahing Benepisyo:
Bilis: Ayusin ang mga isyu real-time nang walang biyahe.
Pag-save ng Gastos: Iwasan ang mahal na bayarin sa technician na nasa lugar.
Flexibilidad: Suportahan ang mga device sa Windows, macOS, iOS, o Android.
Alam mo ba? Ang mga negosyo na gumagamit ng remote support tools ay nakakatipid ng average na $11,000 bawat taon sa mga gastos sa IT support, ayon sa isang pag-aaral mula sa TechRepublic noong 2024.
Hindi lahat ng remote support software ay pare-pareho. Upang pumili ng pinakamahusay na libreng remote access tool, tumuon sa mga katangian na umaayon sa iyong mga pangangailangan bilang isang remote worker o freelancer. Narito ang aking mga prayoridad matapos ang mga taon ng pagsusuri ng mga tool:
Cross-Platform Compatibility: Dapat gumana ang software ng walang putol sa Windows, macOS, iOS, at Android. Ang DeskIn, halimbawa, ay sumusuporta sa lahat ng apat, na ginagawa itong perpekto para sa iba't ibang mga setup.
Seguridad: Hanapin ang 256-bit AES encryption at two-factor authentication upang protektahan ang sensitibong data. Isang ulat mula sa Cybersecurity Ventures noong 2023 ang nagsasaad na 60% ng mga breach sa remote access ay nagmumula sa mahina na seguridad.
Kadalian ng Paggamit: Ang isang user-friendly na interface ay nakakatipid ng oras. Ang mga tool na may magugulong dashboard o kumplikadong setup ay maaaring magpabagal sa iyo.
Performance: Ang mababang latency at mataas na resolusyon na suporta (tulad ng 4K sa 60 FPS) ay nagtitiyak ng maayos na koneksyon, lalo na para sa mga gawain tulad ng graphic design o gaming.
File Transfer: Ang mabilis, ligtas na pagbabahagi ng file ay mahalaga para sa pagpapadala ng mga patches o pagkuha ng mga logs.
Actionable Tip: Subukan ang libreng bersyon ng tool tulad ng DeskIn upang matiyak na nakakatugon ito sa iyong mga pangangailangan bago mag-commit sa isang bayad na plano. Tingnan ang lag, kadalian ng setup, at compatibility ng device.
Bilang isang digital nomad, umaasa ako sa remote IT support software upang manatiling produktibo habang on the go. Narito ang tatlong paraan na binabago ng mga tool na ito ang mga workflow, na may mga halimbawa mula sa aking sariling karanasan:
Troubleshooting ng mga Device ng Kliyente: Isang beses, tumawag sa akin ang isang kliyente sa pagkabahala dahil ang kanilang CRM software ay patuloy na nag-crash. Gamit ang mga remote support tools, na-access ko ang kanilang PC, in-update ang software, at naayos ang isyu sa loob ng 20 minuto—lahat habang nasa isang tren.
Pag-collaborate sa mga Teams: Sa isang proyekto, kailangan ng aking team na ibahagi ang isang design prototype. Gamit ang screen-sharing feature ng DeskIn, ipinakita ko ang aking screen sa mga kasamahan sa iba't ibang bansa, na ginagawang instant at seamless ang feedback.
Pamamahala ng mga Personal na Device: Nang nag-freeze ang aking laptop sa isang deadline, ginamit ko ang isang remote IT support tool mula sa aking telepono upang i-restart ito at maibalik ang aking trabaho, naligtas ang mga oras ng pagkabigo.
Pro Tip: Gumamit ng remote support software na may mga voice call feature upang gabayan ang mga kliyente sa mga pag-aayos habang kontrolado mo ang kanilang screen. Ito ay bumubuo ng tiwala at nagpapabilis ng resolusyon.
Nakahanda ka na bang subukan ang isa sa pinakamagandang libreng remote access tools? Narito kung paano i-setup at gamitin ang DeskIn para sa remote IT support. Ginamit ko na ang prosesong ito ng maraming beses, at ito ay tuwid kahit para sa mga baguhan.
I-download at I-install:
Bumisita sa website ng DeskIn o i-download ang app mula sa App Store o Google Play.
I-install ito sa parehong iyong device at sa target device (halimbawa, sa PC ng kliyente).
Gumawa ng Account:
Mag-sign up para sa isang libreng account. I-verify ang iyong email para sa seguridad.
Mag-log in sa parehong mga device.
Ikonekta sa isang Remote Device:
Sa target device, tandaan ang device ID na ipapakita sa DeskIn.
I-enter ang code na ito sa iyong device upang simulan ang secure na koneksyon.
Para sa unattended access, mag-set ng manual security code sa mga setting ng DeskIn.
Mag-troubleshoot o Mag-share:
Gamitin ang toolbar ng DeskIn upang kontrolin ang remote screen, maglipat ng mga file, o i-adjust ang resolusyon.
Para sa collaboration, paganahin ang screen sharing o voice calls.
Tapusin ang Sesyon:
Isara nang secure ang koneksyon. Tinitiyak ng 256-bit encryption ng DeskIn na walang data ang naiiwang vulnerable.
Halimbawa: Kamakailan, ginamit ko ang DeskIn upang tulungan ang isang freelancer na ayusin ang isyu sa printer. Sa pamamagitan ng remote na pag-access sa kanilang Mac, in-update ko ang mga driver at sinubukan ang printer sa loob ng 15 minuto. Masaya ang kliyente, at nakatipid ako ng biyahe.
Sinusuportahan ng libreng bersyon ng DeskIn ang 3 device na walang limitasyon sa oras, na ginagawang nangungunang pagpipilian ito para sa mga freelancer at maliliit na negosyo.
Para sa mga negosyo na nangangailangan ng advanced remote support capabilities, ang DeskIn Enterprise Edition ay nag-aalok ng isang suite ng mga katangian na idinisenyo para sa kahusayan, seguridad, at scalability:
I-CLICK DITO ANG DESKIN ENTERPRISE
Mabilis na Remote Assistance: Sa SOS mode ng DeskIn, magbigay ng remote support nang hindi nangangailangan ng pag-install sa device ng kliyente. Isang simpleng 3-segundong download at 1-click na koneksyon ang nagpapadali sa proseso ng suporta.
Customizable Branding: Itaas ang iyong brand image sa pamamagitan ng pag-customize ng hitsura at pakiramdam ng software, kabilang ang mga logo at kulay ng tema.
Detalyadong Logging: Panatilihin ang komprehensibong mga tala ng lahat ng remote sessions, kabilang ang mga aksyon ng gumagamit, timestamps, at mga file transfer, na tinitiyak ang accountability at compliance.
Efficient Management: Utilisin ang pinag-isang pamamahala ng mga pahintulot sa operasyon ng empleyado at mga estado ng device, na nagpapadali ng streamlined IT operations.
High-Performance Connections: Samantalahin ang higit sa 200 SD-WAN nodes sa buong mundo para sa pinakamainam na mga daan ng transmisyon, na tinitiyak ang matatag at maayos na karanasan sa remote work.
Paalala: Ang DeskIn Enterprise Edition ay angkop para sa mga sitwasyon tulad ng teknikal na suporta sa customer, pamamahala ng IT ng kumpanya, at unattended remote access.
Ang remote IT support software ay isang lifeline para sa mga remote workers, digital nomads, at freelancers. Nakakatipid ito ng oras, nagpapababa ng gastos, at nagpapanatili ng maayos na pagtakbo ng iyong mga device, saan man dalhin ka ng buhay. Sa pamamagitan ng pagpili ng tool na may malakas na seguridad, cross-platform support, at mataas na performance—tulad ng DeskIn—maari mong harapin ang mga hamon sa IT nang may kumpiyansa.


Control Windows from Your iPad Using Chrome Remote Desktop: Tips & Limits | DeskIn Japan
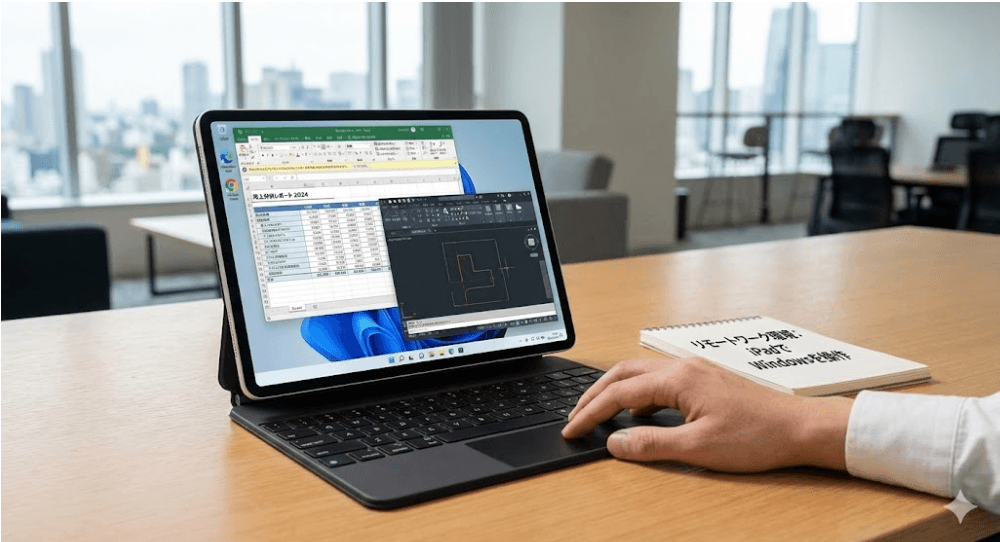
You're settled into a café in Shimokitazawa or a co-working space in Shinjuku, iPad in hand, no laptop in sight. It sounds ideal — until you need full Excel functionality, a Windows-only business application, or software sitting on the office PC back at your desk.
For many people living and working in Japan, this situation comes up more often than expected. The answer is remote desktop access — specifically, using your iPad to connect to and control a Windows PC from wherever you are.
Among the remote desktop tools available, Google's Chrome Remote Desktop (CRD) consistently gets chosen as the starting point. It's completely free, requires no technical background to set up, and works across devices. For anyone wanting to test the concept before committing to a paid tool, it's the natural first step.
Using an iPad to control a Windows PC isn't quite as seamless as it sounds. Touch input and mouse input are fundamentally different, and without a few adjustments, the experience can feel clunky fast. This guide covers the setup process from scratch, the gestures and settings that actually make it workable, and the honest limitations you'll run into if you push it too far.
Among all the remote desktop options out there, Chrome Remote Desktop wins on approachability. The reason comes down to its sheer ease of use.
Completely free, with no feature restrictions: Whether for personal or professional use, everything is available at no cost — the biggest advantage by far.
No complex setup required: No VPN configuration, no router port-forwarding, no specialist knowledge needed. If you have a Google account, setup takes a few minutes.
Works across devices: Windows, Mac, and iPadOS all connect seamlessly — no environment restrictions.
For anyone who wants to try remote access on their existing iPad without spending anything or reconfiguring their network, CRD is the right place to start.
An iPad and a Windows PC speak different languages — one is built for touch, the other for a mouse. Bridging that gap takes some deliberate setup.
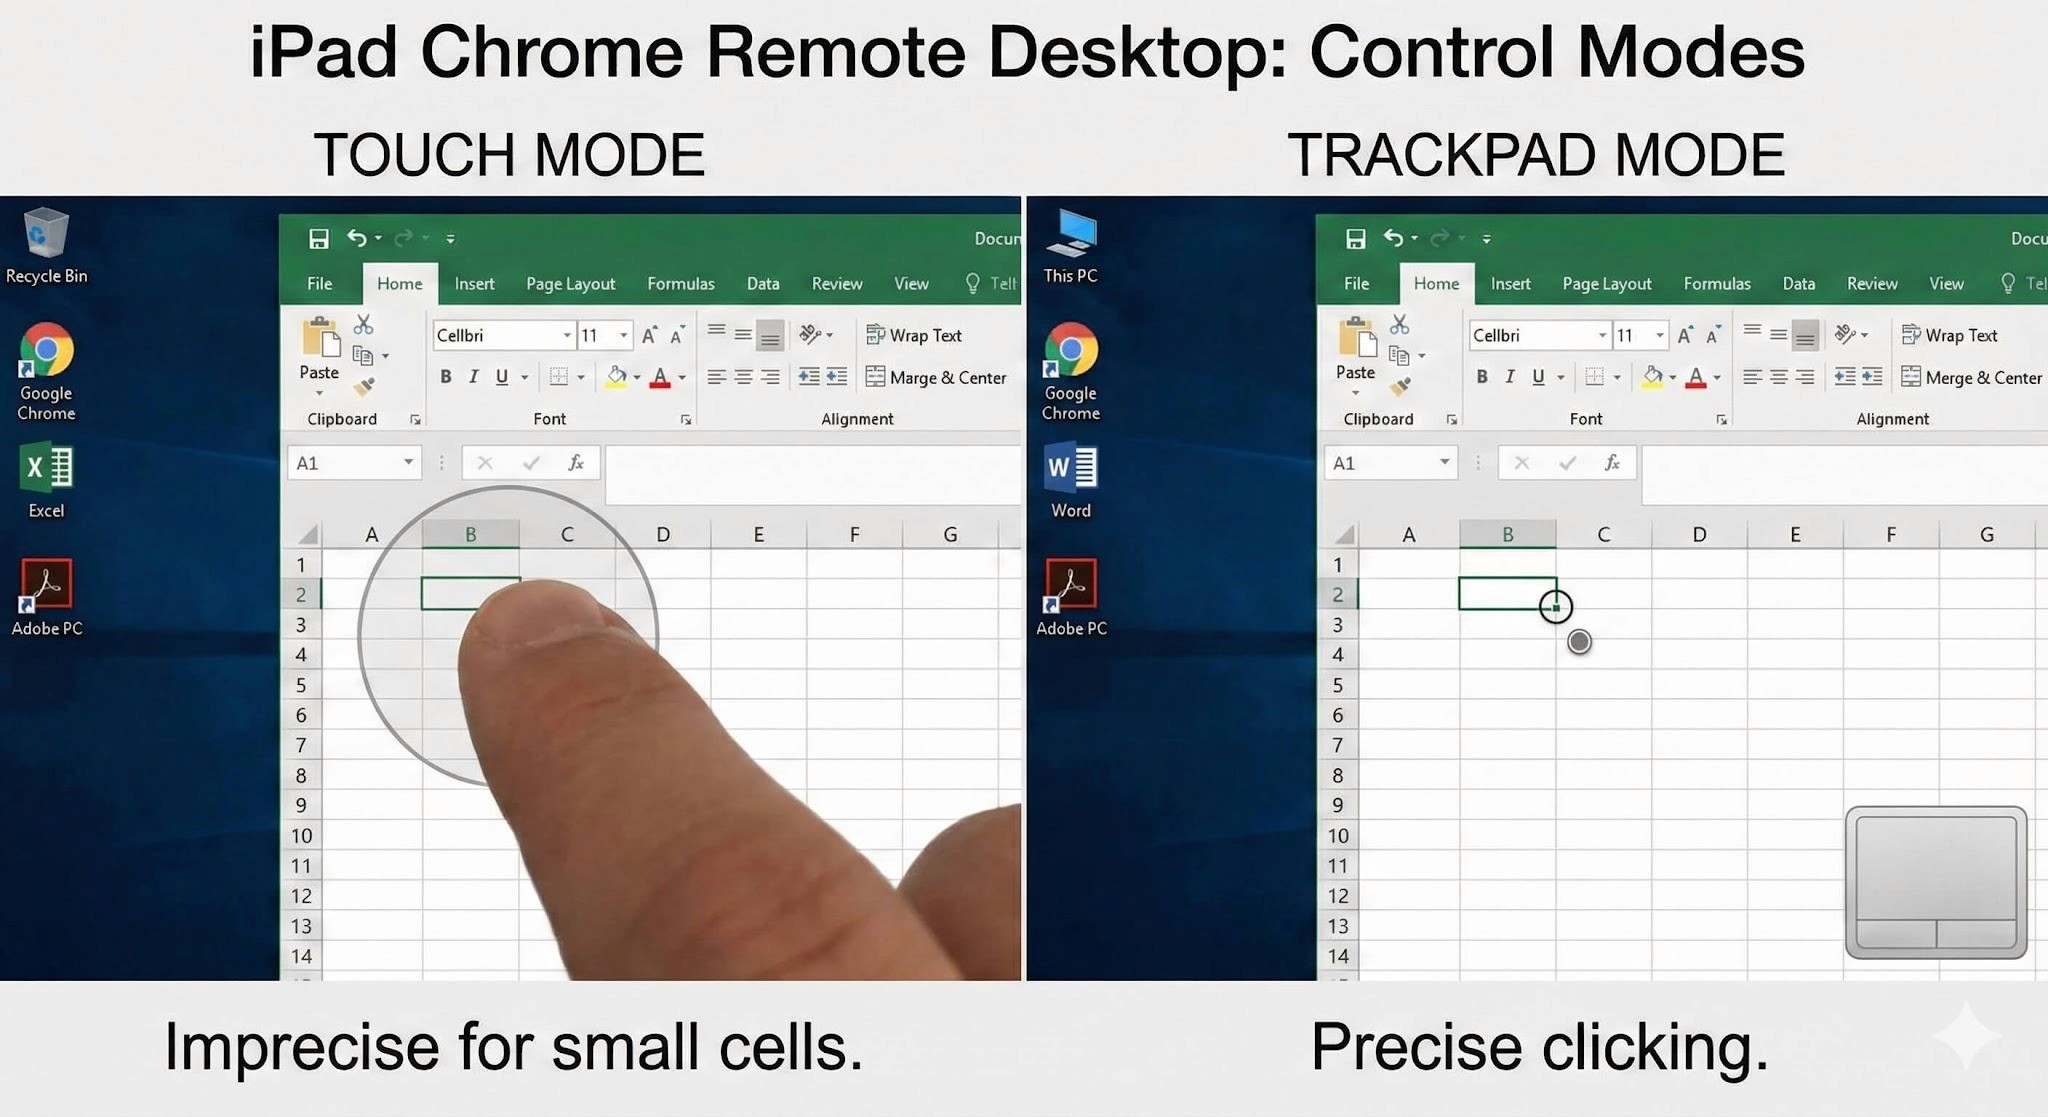
The iPad app offers two control modes. Not knowing about this is the most common reason people give up early.
Trackpad Mode (recommended): Moving your finger anywhere on screen moves the mouse cursor — similar to using a laptop trackpad. Right-click and drag-and-drop work accurately, making this the right choice for Excel, business software, or anything requiring precise input.
Touch Mode: Tapping the screen directly clicks at that point. This works better for browsing or watching videos — consumption tasks rather than production work.
Tip: Switch between modes instantly from the side-panel menu that appears when you swipe in from the right edge of the screen. Get into the habit of switching based on what you're doing.
You can replicate most standard mouse actions with just your fingers:
Right-click: Tap with two fingers simultaneously
Drag and drop: Long-press on a target with one finger, then slide
Scroll: Slide two fingers up or down
If you're using an iPad keyboard like the Magic Keyboard, the key layout takes some getting used to.
Command = Ctrl: The iPad's Command key functions as the Windows Ctrl key in remote sessions. Command + C copies, Command + V pastes — standard shortcuts carry over in that sense.
Japanese input switching: This is where most people hit a wall. The usual shortcuts for toggling between Japanese and English input (nihongo nyūryoku, 日本語入力) — Ctrl + Space or Caps Lock — often don't transmit cleanly to Windows. When this happens, the most reliable workaround is tapping the IME icon in the Windows taskbar directly, or reconfiguring the input method shortcut on the Windows side.
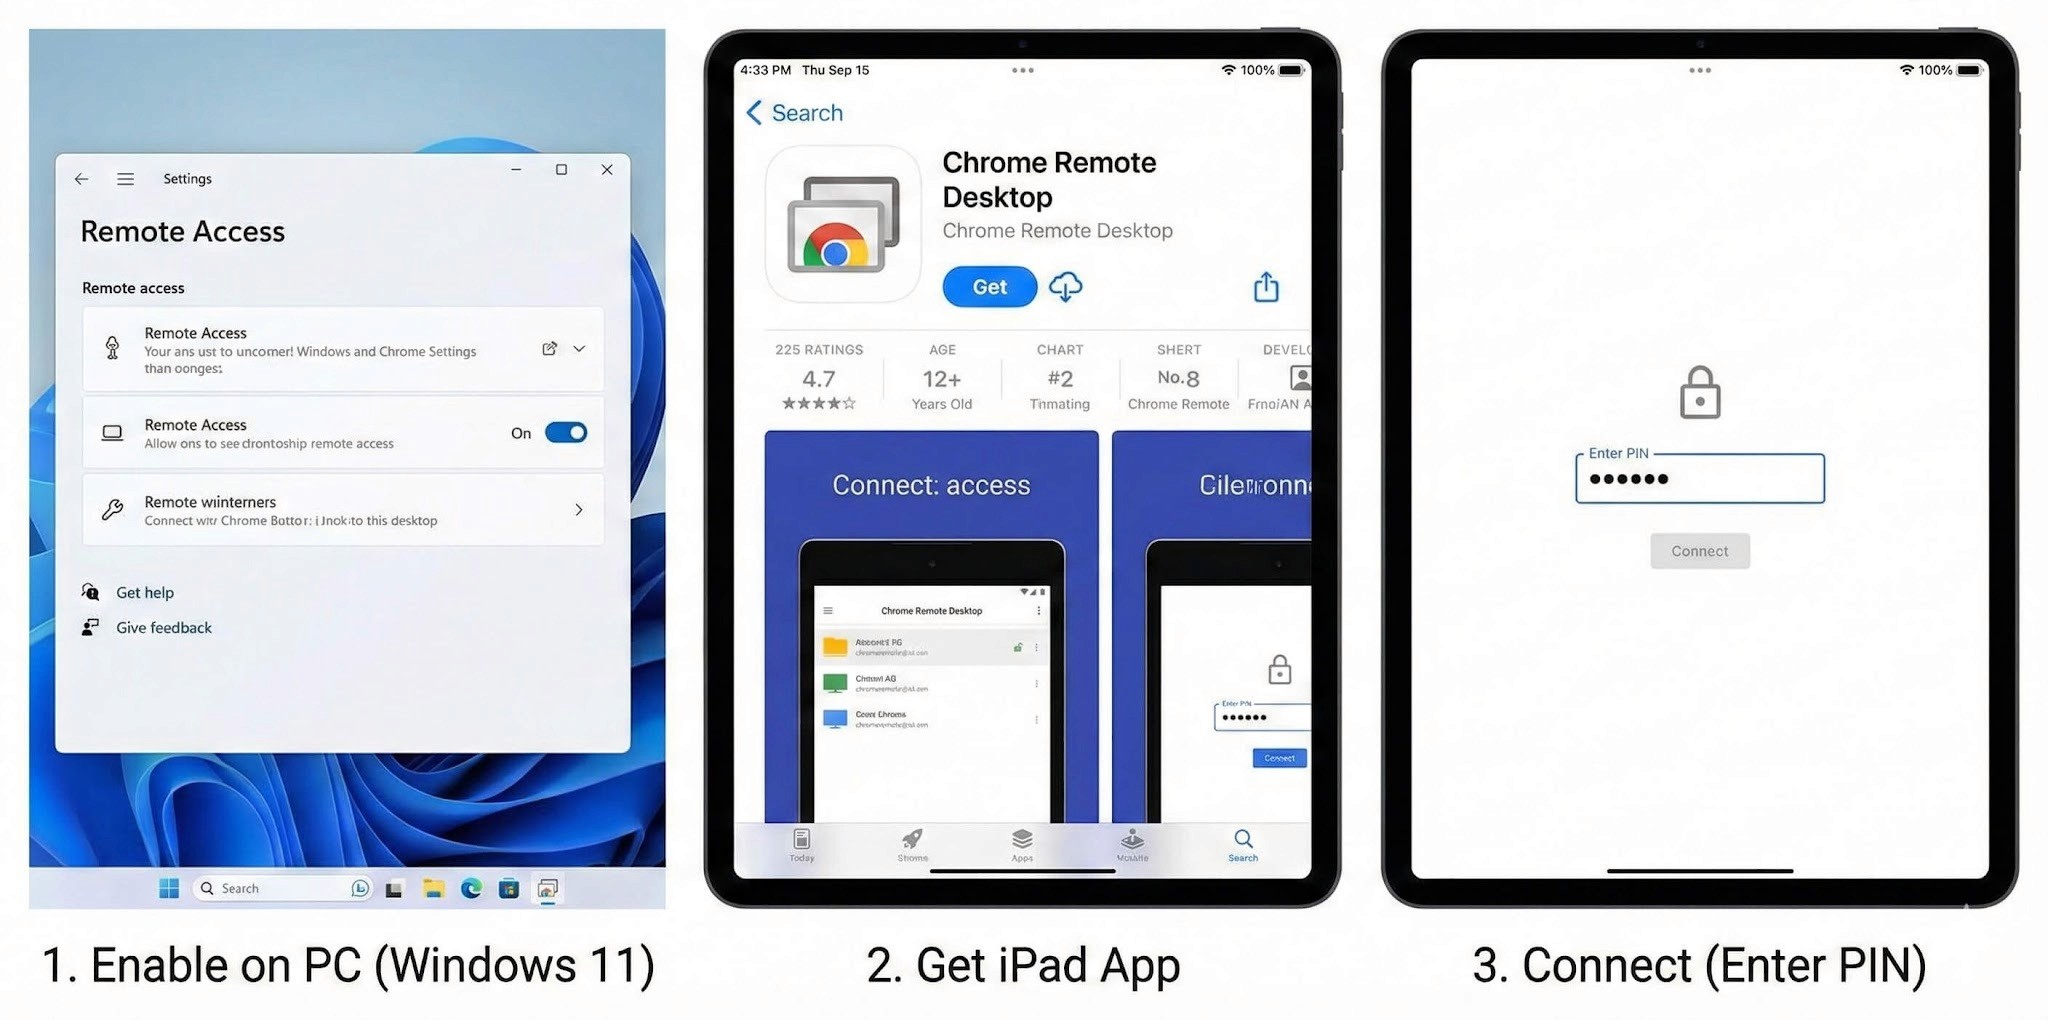
Start on the Windows machine you want to access remotely.
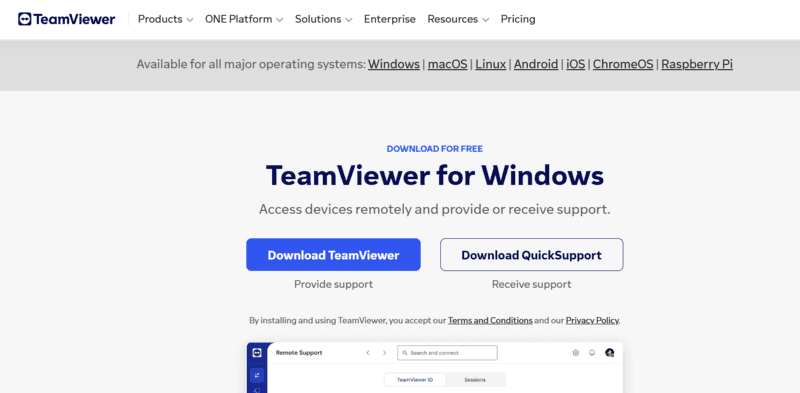
Access the official site in Chrome: Open Chrome and go to remotedesktop.google.com/access
Install the extension: Under "Set up remote access," click the blue download icon and install the Chrome extension.
Enable Remote Access: Click "Turn on" and give your PC a name.
Set your PIN: Create a PIN of at least six digits — you'll need this every time you connect from your iPad. The Windows PC is now ready.
Download the app: Search for "Chrome Remote Desktop" in the App Store and install it.
Log in: Sign in with the same Google account you used on your Windows PC.
Select your PC: Your PC will appear in the device list once it's online.
Enter your PIN: Select your PC from the list and enter the PIN you set. Connection is now established.
Optimise the display: Open the menu (the three-line icon at the bottom right of the screen), go to Settings, and enable "Shrink to fit." This resizes the Windows display to match your iPad's screen, so you're not scrolling around a desktop that doesn't fit.
CRD is genuinely useful — but if you're trying to use your iPad as a primary work machine through it, these friction points will catch up with you.
iPads use a 4:3 aspect ratio; most Windows PCs use 16:9.
Black bars: When displayed on an iPad, large black bars appear at the top and bottom of the screen, reducing your actual working area.
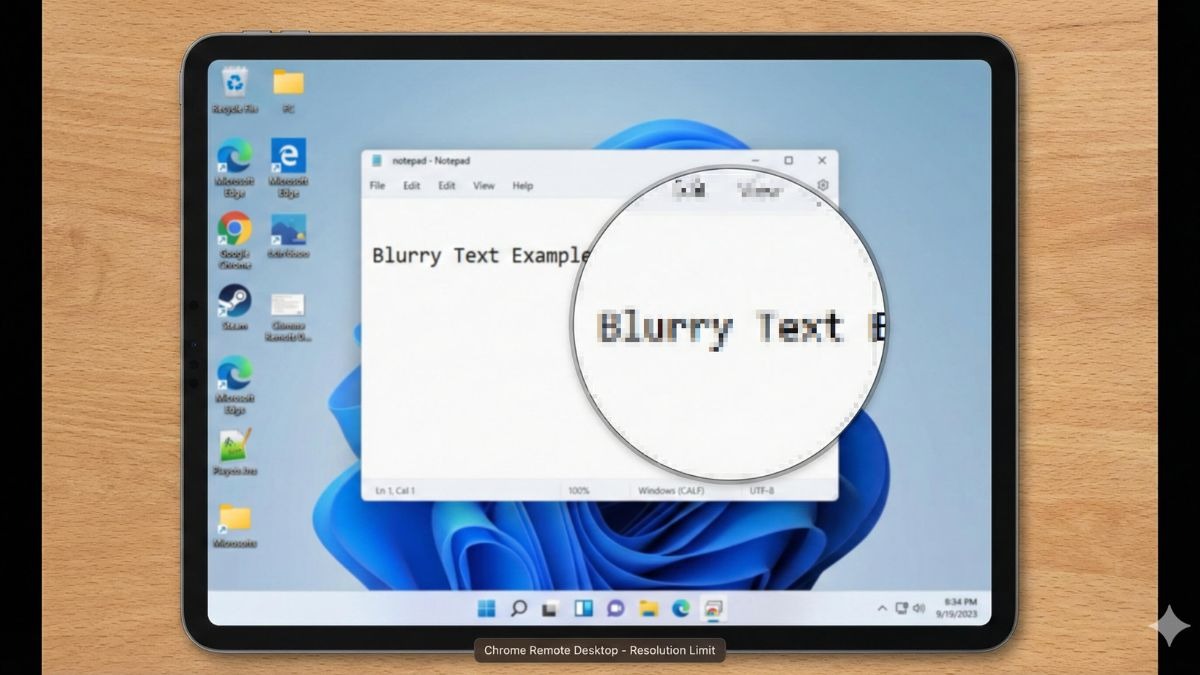
Blurry text: CRD isn't optimised for Retina displays, so fine text — spreadsheet cells, small interface labels — appears soft and blurry. After an hour of this, eye fatigue sets in fast.
This is the biggest pain point for most users working in Japanese.
Shortcut conflicts: Trying to switch between Japanese and English input on the iPad side doesn't transmit cleanly to Windows, leading to constant input errors and frustrating interruptions.
Typing lag: Depending on network conditions, typed characters can appear a beat behind what you're typing — making longer Japanese text genuinely painful to compose.
Even with a physical mouse connected to your iPad, the experience doesn't match what you'd get on a PC.
Unnatural scrolling: Scroll wheel behaviour can be jerky or even reversed.
Advanced inputs not supported: Mouse side buttons aren't recognised, and right-clicking requires a long-press or two-finger tap workaround rather than a direct click. The speed and fluidity of a real PC setup simply isn't achievable.
Chrome Remote Desktop is purely a screen control tool — it doesn't support file transfer between your iPad and Windows PC.
No direct sending: Transferring a photo from your iPad to Windows, or saving a Windows document to your iPad, requires routing through cloud storage like Google Drive or iCloud. It works, but it breaks your workflow every time.
If CRD's limitations are getting in the way of actual productivity, DeskIn was built to solve exactly those problems. Where CRD is designed for "basic screen control," DeskIn is designed for genuine professional use — remote sessions that feel as close to working locally as possible.
The blurry text and choppy movement that characterise CRD on an iPad? DeskIn eliminates both.
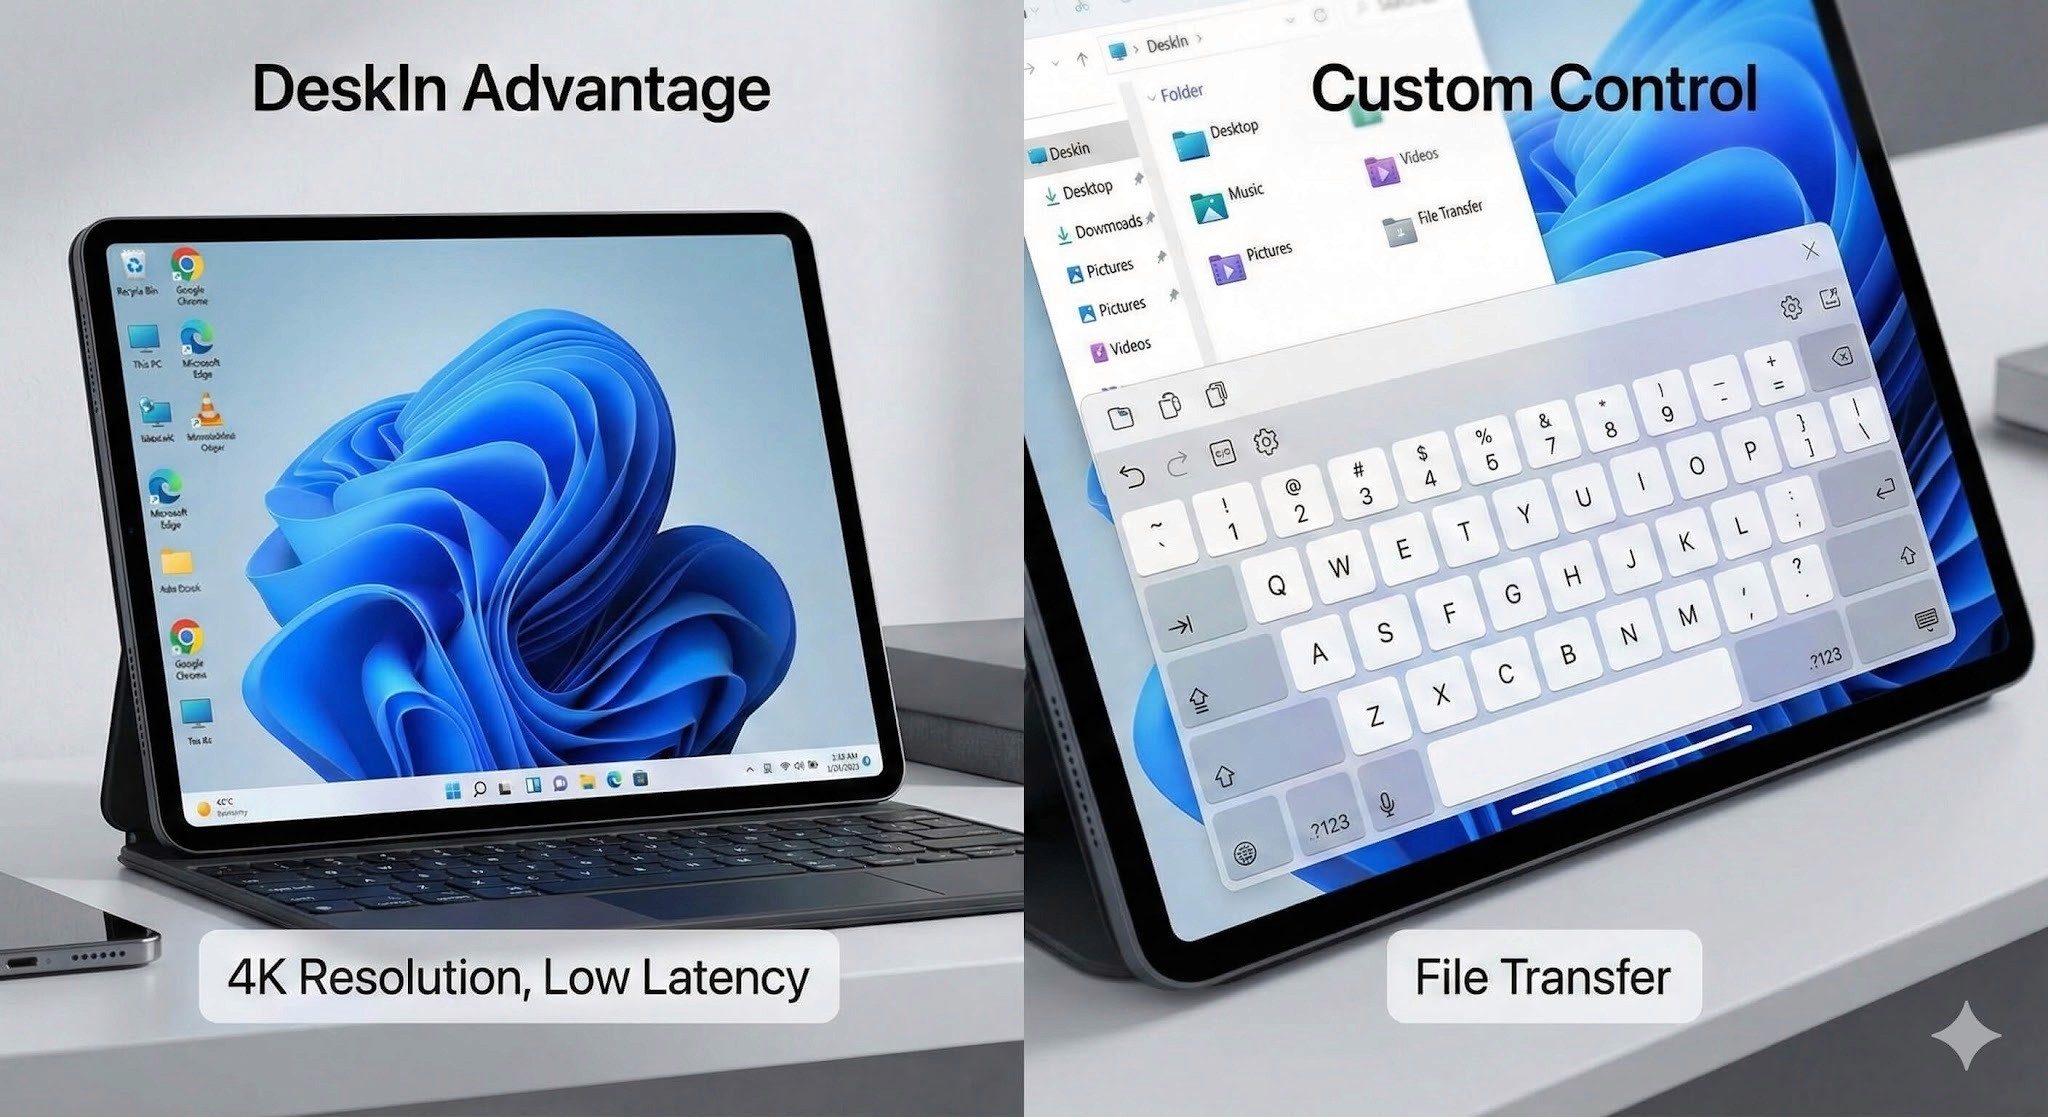
Outstanding display quality: 4K resolution and 60FPS high frame rate support. iPad's Retina display is used to its full potential — the experience feels like running Windows locally.
Automatic aspect ratio optimisation: DeskIn adapts automatically to the iPad's 4:3 ratio, filling the screen properly without black bars.
Input performance is where the gap between DeskIn and CRD is most noticeable.
Stress-free Japanese input: Switching between Japanese and English works smoothly. iPad keyboard shortcuts don't conflict with Windows, so you can type in full focus.
Gaming-level peripheral support: Scroll wheel and mouse side buttons fully supported. DeskIn also lets you place custom virtual keyboard layouts — for gaming or work — directly on screen, useful in environments where you don't have a hardware keyboard to hand.
Standard features not found in CRD, all directly relevant to getting work done:
Direct file transfer: Move files between your iPad and Windows PC without touching cloud storage. Photos, documents, design files — sent directly and immediately.
Multi-monitor support: Use your iPad as an extended display for your Windows PC — effectively a second screen — when working away from your desk.
Independent security: DeskIn uses its own advanced encryption and doesn't rely on a Google account, reducing the single point of failure that CRD carries.
Remote access from iPad to Windows opens up genuine flexibility in how and where you work. But which tool is right for you depends on what you're actually trying to do.
Want a completely free solution with no setup complexity
Only need occasional access — checking a file, making a quick change
Don't need precision input or extended work sessions
Want your iPad to function as a genuine secondary work machine
Need to do extended work in Excel, document editing, or design tools
Find the display quality, input lag, or Japanese input issues frustrating
Want to transfer files directly between iPad and Windows without cloud workarounds
Starting with Chrome Remote Desktop is a perfectly reasonable approach — it costs nothing and gets you connected in minutes. But if you keep running into the same friction points — blurry display, awkward Japanese input, no file transfer — that's a clear signal your workflow needs more than CRD can offer.
That's when DeskIn is worth installing. Your iPad becomes a considerably more capable Windows machine than you might have expected.
Recommended Reads:
A Must-Read for Fresh Professionals: How Remote Desktop Can Support Your Fresh Start

How to Use AnyDesk Wake on LAN to Power On Your Remote PC
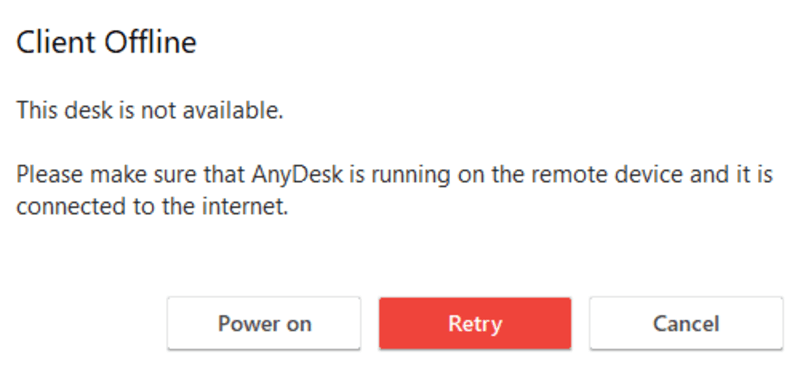
If you want to remotely power on a sleeping computer, AnyDesk Wake on LAN can be a useful feature. It allows you to wake a device without physically pressing the power button, making remote work and system maintenance much easier.
In this guide, we'll walk through how to configure AnyDesk Wake on LAN step by step, including BIOS settings, operating system configuration, and AnyDesk options. While the process works well when everything is configured correctly, it can also involve several technical steps. That's why we'll also introduce DeskIn, a simpler and more streamlined alternative for remote access and Wake on LAN. Keep reading to learn both approaches.
Wake on LAN is a networking feature that allows a device to be powered on remotely through a special network signal known as a "magic packet." When the sleeping computer's network card receives this packet, it sends a signal to the motherboard to start the system.
The main benefit of Wake on LAN is convenience and energy efficiency. Instead of keeping a computer running all day, you can leave it in sleep or shutdown mode and wake it only when needed. This saves electricity and extends hardware lifespan.
Another advantage is accessibility. Whether you're working from home, performing remote maintenance, or managing servers, Wake on LAN ensures devices remain reachable even when they are powered down. IT teams often rely on this capability to troubleshoot systems or perform updates without being physically present.
Configuring AnyDesk Wake on LAN involves preparing the hardware, enabling settings in your operating system, and activating the feature in AnyDesk itself. The steps below will guide you through the process.
The first requirement is enabling Wake on LAN at the motherboard level.
Restart your computer.
Enter the BIOS or UEFI menu during startup (usually by pressing F2, DEL, or F10).
Open the Power Management section.
Locate a setting such as Wake on LAN, Power on by PCI-E, or similar.
Enable the option.
Save changes and exit the BIOS.
This step ensures the motherboard will allow network signals to power the system on.
Next, you need to allow the network card to receive wake signals.
Open Device Manager.
Expand Network Adapters.
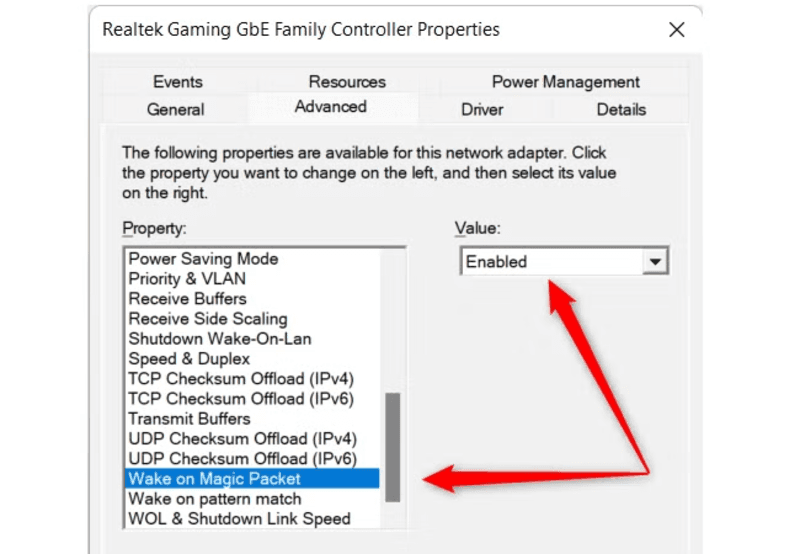
Right-click your Ethernet adapter and select Properties.
Go to the Advanced tab and enable Wake on Magic Packet.
Open the Power Management tab.
Check Allow this device to wake the computer.
Also, enable Only allow a magic packet to wake the computer.
For users running AnyDesk Wake on LAN on Windows 11 or older systems, these steps are essentially the same.
Some Windows systems block network wake signals due to the fast startup feature.
To disable it:
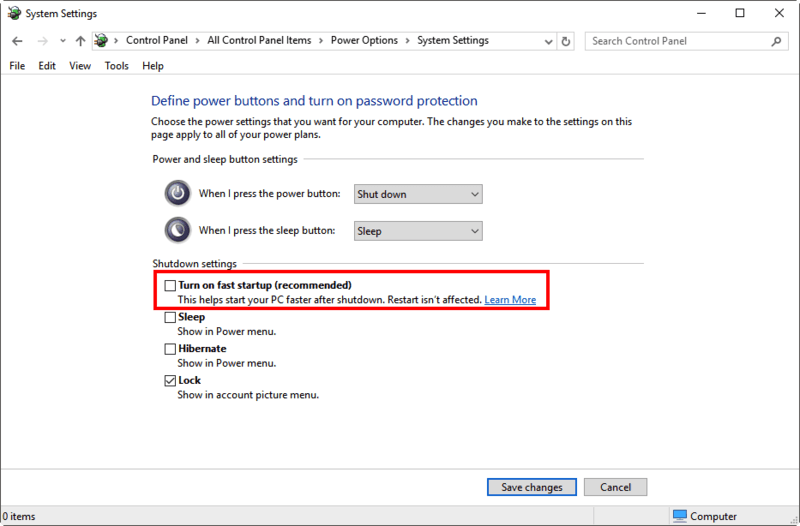
Open Control Panel.
Go to Power Options.
Click Choose what the power buttons do.
Select Change settings that are currently unavailable.
Uncheck Turn on fast startup.
This step often fixes situations where AnyDesk Wake on LAN is not working even though the configuration appears correct.
Now configure the feature inside the AnyDesk client.
Open AnyDesk on the target computer.
Go to Settings.
Navigate to the Wake-on-LAN option.
Enable Allow Wake-on-LAN.
Ensure another AnyDesk device on the same network remains online.
When you try to connect to the sleeping device, AnyDesk will show a "Power On" option.
After completing the setup:
Open AnyDesk on your remote device.
Enter the address of the sleeping computer.
Click Power On.
AnyDesk will locate another active device on the same network and ask it to send the wake packet.
This process is how Wake on LAN AnyDesk functions behind the scenes. If everything is configured correctly, the sleeping machine will start, and AnyDesk will automatically connect.
Sometimes you may see errors such as AnyDesk Wake on LAN no device found. This usually means there is no active device on the same network to send the magic packet. Another frequent issue is that AnyDesk Wake on LAN not working due to Wi-Fi limitations. Wake signals are most reliable over wired Ethernet connections.
If troubleshooting becomes too time-consuming, many users choose tools designed to simplify remote desktop Wake on LAN workflows.
While AnyDesk provides Wake on LAN functionality, the setup process can be technical. Users often need to adjust BIOS settings, network adapters, and device configurations before the feature works properly.
DeskIn focuses on making remote access simpler and more reliable. First, the setup process is easier. Devices linked to the same DeskIn account can be managed quickly without complex network configuration or troubleshooting steps. Second, DeskIn delivers excellent performance for remote connections. It supports high-resolution sessions, smooth frame rates, and stable connections even when accessing powerful workstations remotely. Third, DeskIn integrates device management, remote access, and connectivity tools into one platform. Instead of relying on multiple Wake on LAN software tools, users can manage everything from a single interface.
For professionals who frequently need remote access, DeskIn provides a faster and more predictable experience.
👀 You may also be interested in
Yes. AnyDesk supports Wake on LAN as long as the hardware, operating system, and application settings are configured properly. Another device on the same network must remain active to send the wake signal.
You must enable Wake on LAN in three places: the BIOS or UEFI firmware, the operating system's network adapter settings, and the AnyDesk client configuration. Once enabled, you can wake a sleeping device remotely.
Wake on LAN works by sending a "magic packet" containing the device's MAC address through the network. The network card receives the packet and signals the motherboard to power the system.
Yes, but only if the system supports Wake on LAN from the shutdown state and still receives standby power through the network adapter. For smoother remote control workflows, many users adopt tools like DeskIn.
Setting up AnyDesk Wake on LAN allows you to power on a remote computer without physically accessing it. By enabling BIOS settings, configuring the network adapter, and activating the feature inside AnyDesk, you can wake sleeping machines and connect instantly.
However, the setup process can sometimes be complicated, especially when dealing with hardware compatibility or network configuration issues. If you prefer a simpler and more reliable remote access experience, DeskIn provides an excellent alternative.
With streamlined device management, stable remote sessions, and easier setup, DeskIn helps you stay connected to your computers anytime while still benefiting from the power of Wake on LAN.
How to Set Up TeamViewer Wake on LAN (Step-by-Step Complete Guide)
Turning on your computer remotely can save time, energy, and frustration. Many users rely on TeamViewer Wake on LAN to start a sleeping computer without physically pressing the power button. Whether you want to access your office PC from home or wake a server in another room, Wake on LAN makes remote work much easier.
In this guide, we'll walk through how to configure TeamViewer Wake on LAN step by step. We'll also introduce DeskIn, a simpler remote access solution that can make remote wake and control smoother and more reliable. If you've ever struggled with complicated configuration or TeamViewer Wake on LAN not working, keep reading to discover an easier approach.
Wake on LAN (WoL) is a network technology that allows a computer to power on or wake from sleep when it receives a special network signal called a "magic packet." This packet is sent through the network to the computer's network interface card, which remains partially active even when the system is powered down.
When configured correctly, tools like TeamViewer send that packet from another device on the same network or through the internet. The target computer's motherboard and network adapter detect the signal and trigger the system to start up.
This process is often used for remote work, server management, or accessing a home PC while traveling. Many people combine remote desktop Wake on LAN features with remote control software so they can both power on and operate their computer from anywhere.
Setting up TeamViewer Wake on LAN involves configuring your hardware, operating system, and TeamViewer settings. Follow the steps below carefully to ensure everything works properly.
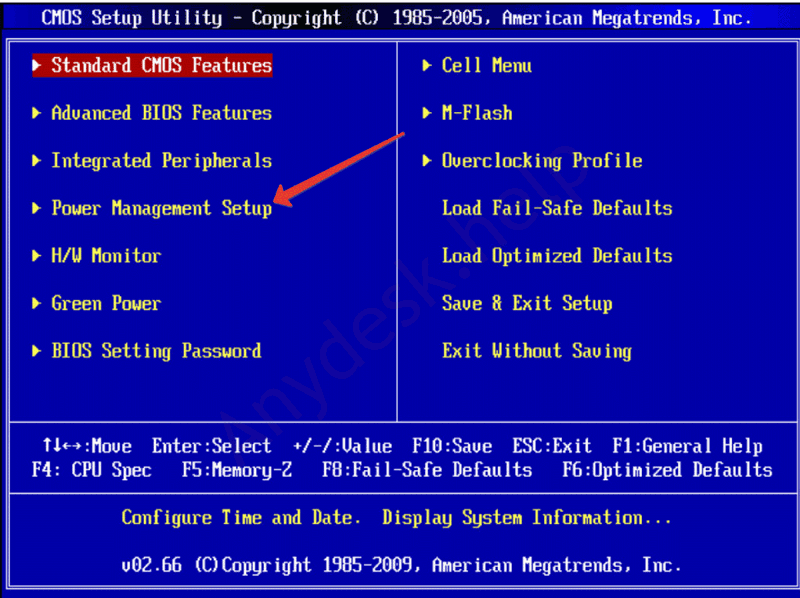
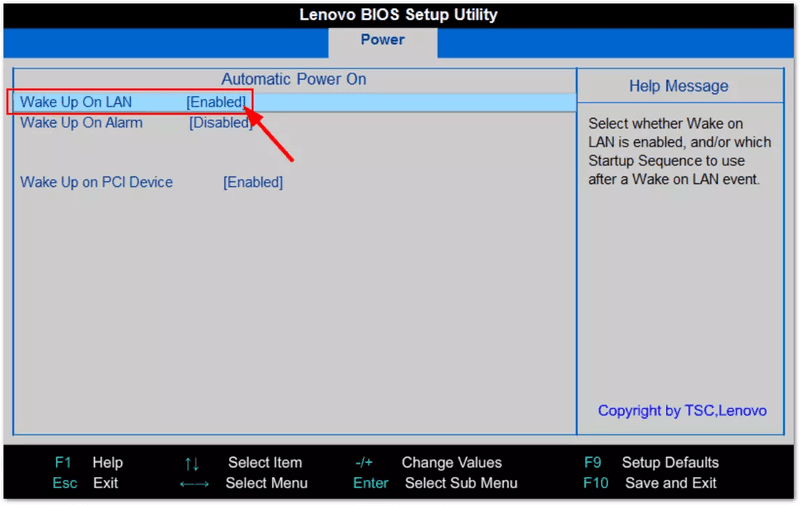
First, you need to activate Wake on LAN at the hardware level. Restart your computer and enter the BIOS or UEFI setup menu. This is usually done by pressing keys like F2, F12, Delete, or Esc during startup. Inside the BIOS interface, navigate to the Power Management section.
Look for an option such as Wake on LAN, Power On by PCI-E, or Resume by LAN and enable it. Save the settings and exit the BIOS. Without this configuration, no Wake on LAN software will be able to power on your computer remotely.
Next, you need to allow your network adapter to receive wake signals. Open Device Manager and locate your network adapter under the Network Adapters category. Right-click the adapter and open its Properties panel.
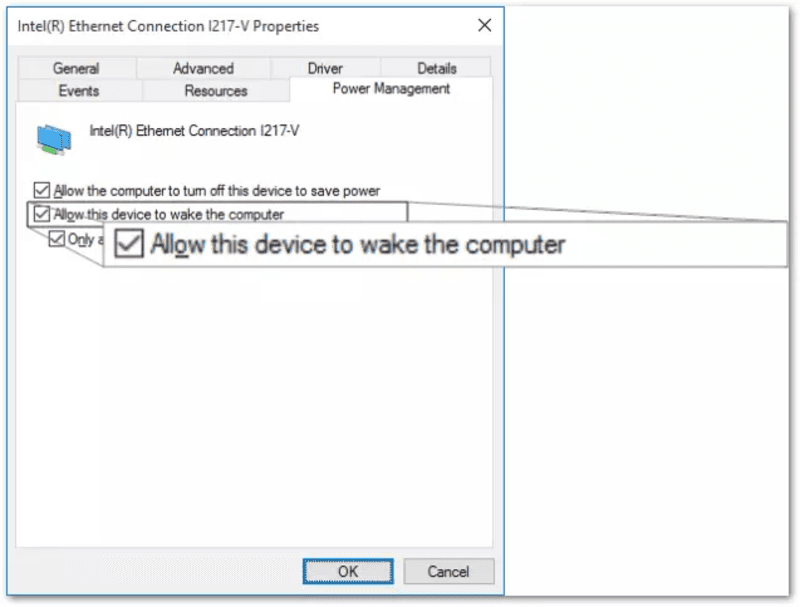
In the Power Management tab, enable the option allowing the device to wake the computer. In the Advanced settings, ensure Wake on Magic Packet is enabled. These steps are essential for both Wake on LAN Windows 10 and Windows 11 configurations. If your adapter does not support WoL, the feature will not work.
Windows Fast Startup can sometimes interfere with WoL signals. Open Control Panel, go to Power Options, and locate the settings for what the power button does. From there, disable the fast startup feature and save your changes. This small adjustment often fixes problems when Wake on LAN Windows 11 or older Windows versions fail to respond to wake requests.
If these configuration steps start to feel complex, this is where DeskIn stands out. DeskIn integrates remote wake and remote access into a more streamlined workflow with fewer configuration hurdles.
To use TeamViewer Wake on LAN, your computer must be linked to your TeamViewer account. Install the TeamViewer Host application on the computer you want to wake remotely. After installation, sign in and assign the device to your TeamViewer account. Once the computer appears in your device list, you will be able to configure wake options and manage the device remotely.
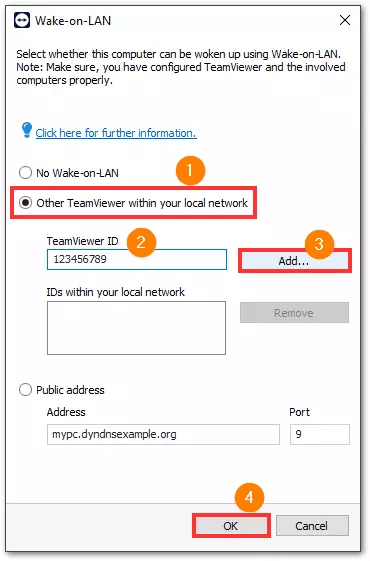
Now you can configure the WoL settings inside TeamViewer. Open the application settings. Under the Device menu, go to Network, click Wake-on-LAN, click "Other TeamViewer within your local network", enter the TeamViewer ID of the device waking up the remote computer, click "Add...", and confirm by clicking "OK".
After configuration, open your TeamViewer device list. Locate the offline computer and select the option to wake it. TeamViewer will send a magic packet through the network and start the remote computer. This method works on different systems, including TeamViewer Wake on LAN Mac, although Mac devices typically only wake from sleep mode rather than from a full shutdown.
If the device does not wake up, the issue may relate to network configuration, router settings, or incorrect BIOS settings. Many users searching for Wake on LAN not working run into these common problems.
While TeamViewer Wake on LAN works for many users, the setup process can be complicated. BIOS configuration, network adapter settings, and router port forwarding can make the process frustrating.
DeskIn offers a more streamlined approach for Wake on LAN and device management. Instead of juggling multiple configuration layers, DeskIn focuses on simplicity and reliability. Once your devices are connected to the same account, you can quickly access and manage them from anywhere without dealing with complicated networking rules. Another advantage is performance. DeskIn supports high-resolution remote sessions with smooth frame delivery, making it suitable not only for office work but also for creative tasks and high-performance workflows. This means you can wake your device, connect instantly, and continue working without interruptions.
DeskIn also integrates device management and remote control into one unified platform. Instead of using separate tools for wake, connection, and control, everything is handled in one place, which reduces troubleshooting time and improves reliability for daily remote work. If you frequently rely on remote desktop Wake on LAN functionality, DeskIn can provide a smoother and more predictable experience compared to traditional setups.
Want to see a detailed DeskIn walkthrough? Read our complete guide on setting up Wake on LAN.
👀 You may also be interested in:
To use Wake on LAN with TeamViewer, you must enable Wake on LAN in BIOS, configure the network adapter, install TeamViewer Host, and set up the WoL settings in the application.
Many users ask if TeamViewer Wake on LAN is free. The feature is available in TeamViewer, but commercial usage may require a paid license depending on how the software is used.
To enable remote wake functionality, the target computer must support Wake on LAN, be connected via Ethernet, and have WoL activated in both hardware and operating system settings.
If TeamViewer Wake on LAN is not working, check BIOS settings, network adapter configuration, router port forwarding, and Windows power settings. If the process becomes too complicated, solutions like DeskIn provide simpler remote access alternatives.
Setting up TeamViewer Wake on LAN allows you to power on your computer remotely and access it whenever needed. By enabling Wake on LAN in BIOS, configuring your network adapter, and linking the device to TeamViewer, you can wake your PC from another device across the network.
However, the configuration process can sometimes be complex, especially when dealing with router settings or troubleshooting wake failures. If you want a more streamlined remote access experience, DeskIn offers a powerful alternative with smoother connectivity and easier device management. With DeskIn, you can spend less time configuring systems and more time getting work done remotely.
Control Windows from Your iPad Using Chrome Remote Desktop: Tips & Limits | DeskIn Japan
You're settled into a café in Shimokitazawa or a co-working space in Shinjuku, iPad in hand, no laptop in sight. It sounds ideal — until you need full Excel functionality, a Windows-only business application, or software sitting on the office PC back at your desk.
For many people living and working in Japan, this situation comes up more often than expected. The answer is remote desktop access — specifically, using your iPad to connect to and control a Windows PC from wherever you are.
Among the remote desktop tools available, Google's Chrome Remote Desktop (CRD) consistently gets chosen as the starting point. It's completely free, requires no technical background to set up, and works across devices. For anyone wanting to test the concept before committing to a paid tool, it's the natural first step.
Using an iPad to control a Windows PC isn't quite as seamless as it sounds. Touch input and mouse input are fundamentally different, and without a few adjustments, the experience can feel clunky fast. This guide covers the setup process from scratch, the gestures and settings that actually make it workable, and the honest limitations you'll run into if you push it too far.
Among all the remote desktop options out there, Chrome Remote Desktop wins on approachability. The reason comes down to its sheer ease of use.
Completely free, with no feature restrictions: Whether for personal or professional use, everything is available at no cost — the biggest advantage by far.
No complex setup required: No VPN configuration, no router port-forwarding, no specialist knowledge needed. If you have a Google account, setup takes a few minutes.
Works across devices: Windows, Mac, and iPadOS all connect seamlessly — no environment restrictions.
For anyone who wants to try remote access on their existing iPad without spending anything or reconfiguring their network, CRD is the right place to start.
An iPad and a Windows PC speak different languages — one is built for touch, the other for a mouse. Bridging that gap takes some deliberate setup.
The iPad app offers two control modes. Not knowing about this is the most common reason people give up early.
Trackpad Mode (recommended): Moving your finger anywhere on screen moves the mouse cursor — similar to using a laptop trackpad. Right-click and drag-and-drop work accurately, making this the right choice for Excel, business software, or anything requiring precise input.
Touch Mode: Tapping the screen directly clicks at that point. This works better for browsing or watching videos — consumption tasks rather than production work.
Tip: Switch between modes instantly from the side-panel menu that appears when you swipe in from the right edge of the screen. Get into the habit of switching based on what you're doing.
You can replicate most standard mouse actions with just your fingers:
Right-click: Tap with two fingers simultaneously
Drag and drop: Long-press on a target with one finger, then slide
Scroll: Slide two fingers up or down
If you're using an iPad keyboard like the Magic Keyboard, the key layout takes some getting used to.
Command = Ctrl: The iPad's Command key functions as the Windows Ctrl key in remote sessions. Command + C copies, Command + V pastes — standard shortcuts carry over in that sense.
Japanese input switching: This is where most people hit a wall. The usual shortcuts for toggling between Japanese and English input (nihongo nyūryoku, 日本語入力) — Ctrl + Space or Caps Lock — often don't transmit cleanly to Windows. When this happens, the most reliable workaround is tapping the IME icon in the Windows taskbar directly, or reconfiguring the input method shortcut on the Windows side.
Start on the Windows machine you want to access remotely.
Access the official site in Chrome: Open Chrome and go to remotedesktop.google.com/access
Install the extension: Under "Set up remote access," click the blue download icon and install the Chrome extension.
Enable Remote Access: Click "Turn on" and give your PC a name.
Set your PIN: Create a PIN of at least six digits — you'll need this every time you connect from your iPad. The Windows PC is now ready.
Download the app: Search for "Chrome Remote Desktop" in the App Store and install it.
Log in: Sign in with the same Google account you used on your Windows PC.
Select your PC: Your PC will appear in the device list once it's online.
Enter your PIN: Select your PC from the list and enter the PIN you set. Connection is now established.
Optimise the display: Open the menu (the three-line icon at the bottom right of the screen), go to Settings, and enable "Shrink to fit." This resizes the Windows display to match your iPad's screen, so you're not scrolling around a desktop that doesn't fit.
CRD is genuinely useful — but if you're trying to use your iPad as a primary work machine through it, these friction points will catch up with you.
iPads use a 4:3 aspect ratio; most Windows PCs use 16:9.
Black bars: When displayed on an iPad, large black bars appear at the top and bottom of the screen, reducing your actual working area.
Blurry text: CRD isn't optimised for Retina displays, so fine text — spreadsheet cells, small interface labels — appears soft and blurry. After an hour of this, eye fatigue sets in fast.
This is the biggest pain point for most users working in Japanese.
Shortcut conflicts: Trying to switch between Japanese and English input on the iPad side doesn't transmit cleanly to Windows, leading to constant input errors and frustrating interruptions.
Typing lag: Depending on network conditions, typed characters can appear a beat behind what you're typing — making longer Japanese text genuinely painful to compose.
Even with a physical mouse connected to your iPad, the experience doesn't match what you'd get on a PC.
Unnatural scrolling: Scroll wheel behaviour can be jerky or even reversed.
Advanced inputs not supported: Mouse side buttons aren't recognised, and right-clicking requires a long-press or two-finger tap workaround rather than a direct click. The speed and fluidity of a real PC setup simply isn't achievable.
Chrome Remote Desktop is purely a screen control tool — it doesn't support file transfer between your iPad and Windows PC.
No direct sending: Transferring a photo from your iPad to Windows, or saving a Windows document to your iPad, requires routing through cloud storage like Google Drive or iCloud. It works, but it breaks your workflow every time.
If CRD's limitations are getting in the way of actual productivity, DeskIn was built to solve exactly those problems. Where CRD is designed for "basic screen control," DeskIn is designed for genuine professional use — remote sessions that feel as close to working locally as possible.
The blurry text and choppy movement that characterise CRD on an iPad? DeskIn eliminates both.
Outstanding display quality: 4K resolution and 60FPS high frame rate support. iPad's Retina display is used to its full potential — the experience feels like running Windows locally.
Automatic aspect ratio optimisation: DeskIn adapts automatically to the iPad's 4:3 ratio, filling the screen properly without black bars.
Input performance is where the gap between DeskIn and CRD is most noticeable.
Stress-free Japanese input: Switching between Japanese and English works smoothly. iPad keyboard shortcuts don't conflict with Windows, so you can type in full focus.
Gaming-level peripheral support: Scroll wheel and mouse side buttons fully supported. DeskIn also lets you place custom virtual keyboard layouts — for gaming or work — directly on screen, useful in environments where you don't have a hardware keyboard to hand.
Standard features not found in CRD, all directly relevant to getting work done:
Direct file transfer: Move files between your iPad and Windows PC without touching cloud storage. Photos, documents, design files — sent directly and immediately.
Multi-monitor support: Use your iPad as an extended display for your Windows PC — effectively a second screen — when working away from your desk.
Independent security: DeskIn uses its own advanced encryption and doesn't rely on a Google account, reducing the single point of failure that CRD carries.
Remote access from iPad to Windows opens up genuine flexibility in how and where you work. But which tool is right for you depends on what you're actually trying to do.
Want a completely free solution with no setup complexity
Only need occasional access — checking a file, making a quick change
Don't need precision input or extended work sessions
Want your iPad to function as a genuine secondary work machine
Need to do extended work in Excel, document editing, or design tools
Find the display quality, input lag, or Japanese input issues frustrating
Want to transfer files directly between iPad and Windows without cloud workarounds
Starting with Chrome Remote Desktop is a perfectly reasonable approach — it costs nothing and gets you connected in minutes. But if you keep running into the same friction points — blurry display, awkward Japanese input, no file transfer — that's a clear signal your workflow needs more than CRD can offer.
That's when DeskIn is worth installing. Your iPad becomes a considerably more capable Windows machine than you might have expected.
Recommended Reads:
A Must-Read for Fresh Professionals: How Remote Desktop Can Support Your Fresh Start
How to Use AnyDesk Wake on LAN to Power On Your Remote PC
If you want to remotely power on a sleeping computer, AnyDesk Wake on LAN can be a useful feature. It allows you to wake a device without physically pressing the power button, making remote work and system maintenance much easier.
In this guide, we'll walk through how to configure AnyDesk Wake on LAN step by step, including BIOS settings, operating system configuration, and AnyDesk options. While the process works well when everything is configured correctly, it can also involve several technical steps. That's why we'll also introduce DeskIn, a simpler and more streamlined alternative for remote access and Wake on LAN. Keep reading to learn both approaches.
Wake on LAN is a networking feature that allows a device to be powered on remotely through a special network signal known as a "magic packet." When the sleeping computer's network card receives this packet, it sends a signal to the motherboard to start the system.
The main benefit of Wake on LAN is convenience and energy efficiency. Instead of keeping a computer running all day, you can leave it in sleep or shutdown mode and wake it only when needed. This saves electricity and extends hardware lifespan.
Another advantage is accessibility. Whether you're working from home, performing remote maintenance, or managing servers, Wake on LAN ensures devices remain reachable even when they are powered down. IT teams often rely on this capability to troubleshoot systems or perform updates without being physically present.
Configuring AnyDesk Wake on LAN involves preparing the hardware, enabling settings in your operating system, and activating the feature in AnyDesk itself. The steps below will guide you through the process.
The first requirement is enabling Wake on LAN at the motherboard level.
Restart your computer.
Enter the BIOS or UEFI menu during startup (usually by pressing F2, DEL, or F10).
Open the Power Management section.
Locate a setting such as Wake on LAN, Power on by PCI-E, or similar.
Enable the option.
Save changes and exit the BIOS.
This step ensures the motherboard will allow network signals to power the system on.
Next, you need to allow the network card to receive wake signals.
Open Device Manager.
Expand Network Adapters.
Right-click your Ethernet adapter and select Properties.
Go to the Advanced tab and enable Wake on Magic Packet.
Open the Power Management tab.
Check Allow this device to wake the computer.
Also, enable Only allow a magic packet to wake the computer.
For users running AnyDesk Wake on LAN on Windows 11 or older systems, these steps are essentially the same.
Some Windows systems block network wake signals due to the fast startup feature.
To disable it:
Open Control Panel.
Go to Power Options.
Click Choose what the power buttons do.
Select Change settings that are currently unavailable.
Uncheck Turn on fast startup.
This step often fixes situations where AnyDesk Wake on LAN is not working even though the configuration appears correct.
Now configure the feature inside the AnyDesk client.
Open AnyDesk on the target computer.
Go to Settings.
Navigate to the Wake-on-LAN option.
Enable Allow Wake-on-LAN.
Ensure another AnyDesk device on the same network remains online.
When you try to connect to the sleeping device, AnyDesk will show a "Power On" option.
After completing the setup:
Open AnyDesk on your remote device.
Enter the address of the sleeping computer.
Click Power On.
AnyDesk will locate another active device on the same network and ask it to send the wake packet.
This process is how Wake on LAN AnyDesk functions behind the scenes. If everything is configured correctly, the sleeping machine will start, and AnyDesk will automatically connect.
Sometimes you may see errors such as AnyDesk Wake on LAN no device found. This usually means there is no active device on the same network to send the magic packet. Another frequent issue is that AnyDesk Wake on LAN not working due to Wi-Fi limitations. Wake signals are most reliable over wired Ethernet connections.
If troubleshooting becomes too time-consuming, many users choose tools designed to simplify remote desktop Wake on LAN workflows.
While AnyDesk provides Wake on LAN functionality, the setup process can be technical. Users often need to adjust BIOS settings, network adapters, and device configurations before the feature works properly.
DeskIn focuses on making remote access simpler and more reliable. First, the setup process is easier. Devices linked to the same DeskIn account can be managed quickly without complex network configuration or troubleshooting steps. Second, DeskIn delivers excellent performance for remote connections. It supports high-resolution sessions, smooth frame rates, and stable connections even when accessing powerful workstations remotely. Third, DeskIn integrates device management, remote access, and connectivity tools into one platform. Instead of relying on multiple Wake on LAN software tools, users can manage everything from a single interface.
For professionals who frequently need remote access, DeskIn provides a faster and more predictable experience.
👀 You may also be interested in
Yes. AnyDesk supports Wake on LAN as long as the hardware, operating system, and application settings are configured properly. Another device on the same network must remain active to send the wake signal.
You must enable Wake on LAN in three places: the BIOS or UEFI firmware, the operating system's network adapter settings, and the AnyDesk client configuration. Once enabled, you can wake a sleeping device remotely.
Wake on LAN works by sending a "magic packet" containing the device's MAC address through the network. The network card receives the packet and signals the motherboard to power the system.
Yes, but only if the system supports Wake on LAN from the shutdown state and still receives standby power through the network adapter. For smoother remote control workflows, many users adopt tools like DeskIn.
Setting up AnyDesk Wake on LAN allows you to power on a remote computer without physically accessing it. By enabling BIOS settings, configuring the network adapter, and activating the feature inside AnyDesk, you can wake sleeping machines and connect instantly.
However, the setup process can sometimes be complicated, especially when dealing with hardware compatibility or network configuration issues. If you prefer a simpler and more reliable remote access experience, DeskIn provides an excellent alternative.
With streamlined device management, stable remote sessions, and easier setup, DeskIn helps you stay connected to your computers anytime while still benefiting from the power of Wake on LAN.
Products
Download
Resources
Contact Us
Email: support@deskin.io
Office: 991D Alexandra Road #02-17, Singapore 119972
Copyright © 2026 Zuler Technology PTE. LTD. All rights reserved.
Contact Us
Email: support@deskin.io
Office: 991D Alexandra Road #02-17, Singapore 119972
Products
Download
Resources
Copyright © 2026 Zuler Technology PTE. LTD. All rights reserved.
Products
Download
Resources
Contact Us
support@deskin.io
991D Alexandra Road #02-17
Singapore 119972
Copyright © 2026 Zuler Technology PTE. LTD. All rights reserved.

