Blog
Search Docs…
ALL TOPICS
COMPARISONS
GAME
PRODUCTIVITY
TROUBLESHOOTING

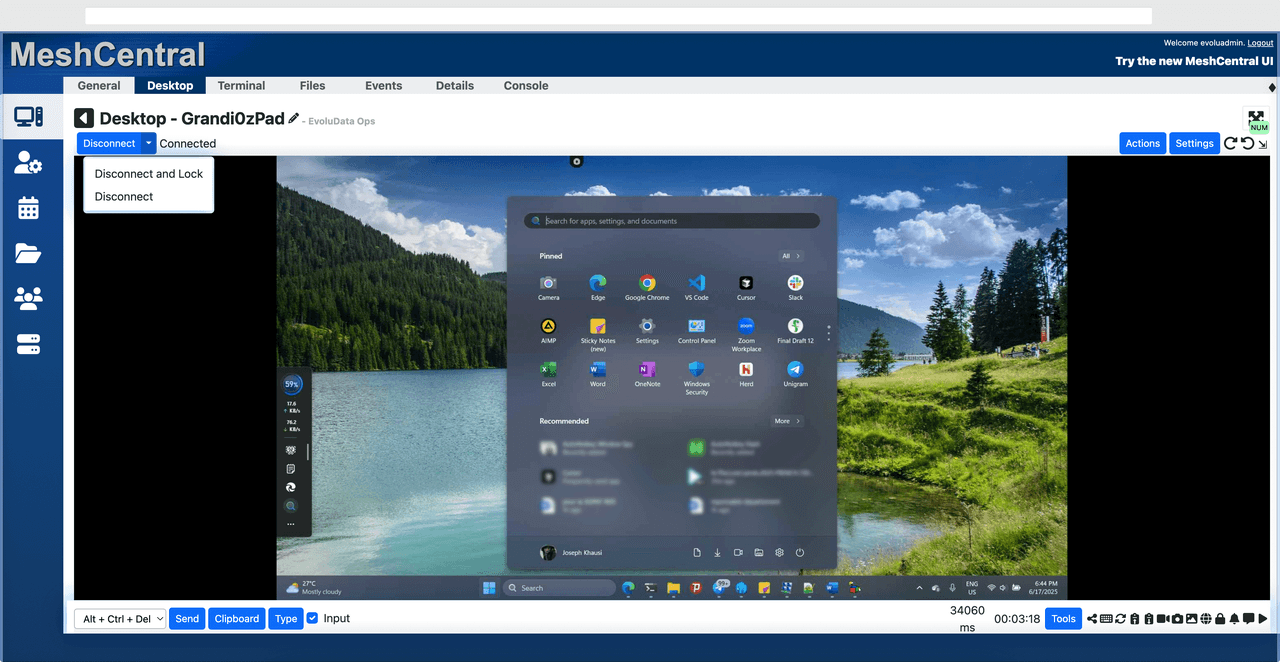
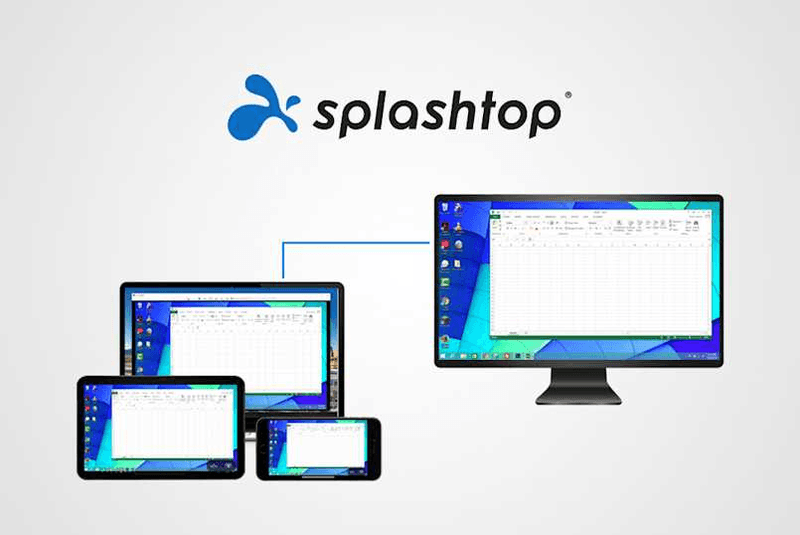
Gawing Pangalawang Monitor ang iPad Para sa Windows at Mac Computers
Para sa mga multitasking na manggagawa, ang pagkakaroon ng pangalawang monitor ay maaaring greatly increase ng productivity. Kung ikaw ay isang tao sa home office o isang estudyante na walang dual screen. Narito kung paano mo madaling gawing pangalawang monitor ang iyong idle iPad para sa iyong computer.
Mga Benepisyo ng Paggamit ng iPad bilang Pangalawang Screen:
1. Taasan ang espasyo ng screen upang ipakita ang higit pa sa parehong oras. Para sa mga multi-task users, maiiwasan nilang magpalipat-lipat ng mga bintana, na nakakatipid ng oras.
2. Ang bawat screen ay gumagana nang hiwalay, ginagawang mas organisado ang workspace.
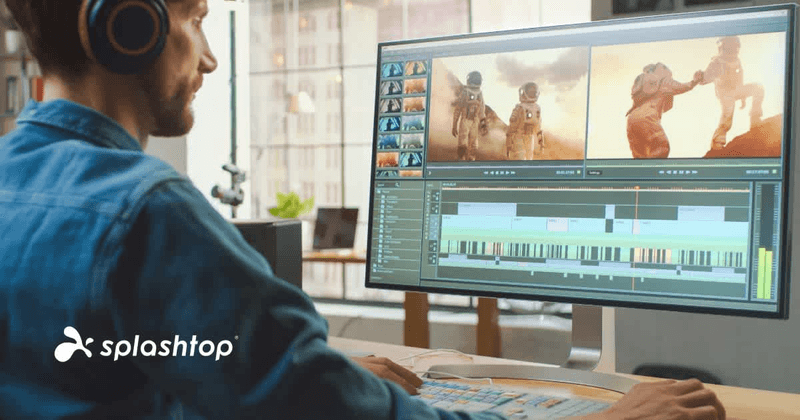
Kapag nag-e-edit ng mga video, isang screen ang ginagamit para sa pag-e-edit at ang isa para sa paglalagay ng mga materyales. Kapag sumusulat ng papel, isang screen para sa pagsusulat, ang isa para sa paghahanap ng impormasyon atbp.
3. Ang laki ng screen ng iPad ay sapat na malaki, at ang kalidad ng display ay medyo maganda. Para sa mga gumagamit na may mga pangangailangan sa disenyo o gumagamit ng MacBook, mas nagiging cost-effective ito kaysa sa pagbili ng karagdagang screen, at wala nang problema sa pagkakaiba ng kulay.
4. Maraming tao ang may mga iPad sa bahay. Sa pamamagitan ng paggamit ng device na mayroon ka bilang isang dual screen, nakakatipid ka sa gastos ng pagbili ng isa pang screen at ng espasyong ilalagay ito.
Paano Gagamitin ang iPad bilang Pangalawang Screen para sa Mac?
Ang sariling tampok ng Apple na Apple Sidecar ay nagbibigay-daan sa iyo na gamitin ang iPad bilang isang external display para sa MacBook at iMac. Gumawa lamang ng ilang simpleng setting at maaari mong makamit ang seamless connection sa pagitan ng iyong iPad at computer.
Paalala: Upang magamit ang Apple Sidecar, ang dalawang device ay dapat nakalog sa parehong Apple ID o nasa parehong network. Dapat i-on ang Bluetooth at Wi-Fi sa parehong device, at hindi dapat lumagpas ang distansya ng 10 meters (tungkol sa 10 meters).
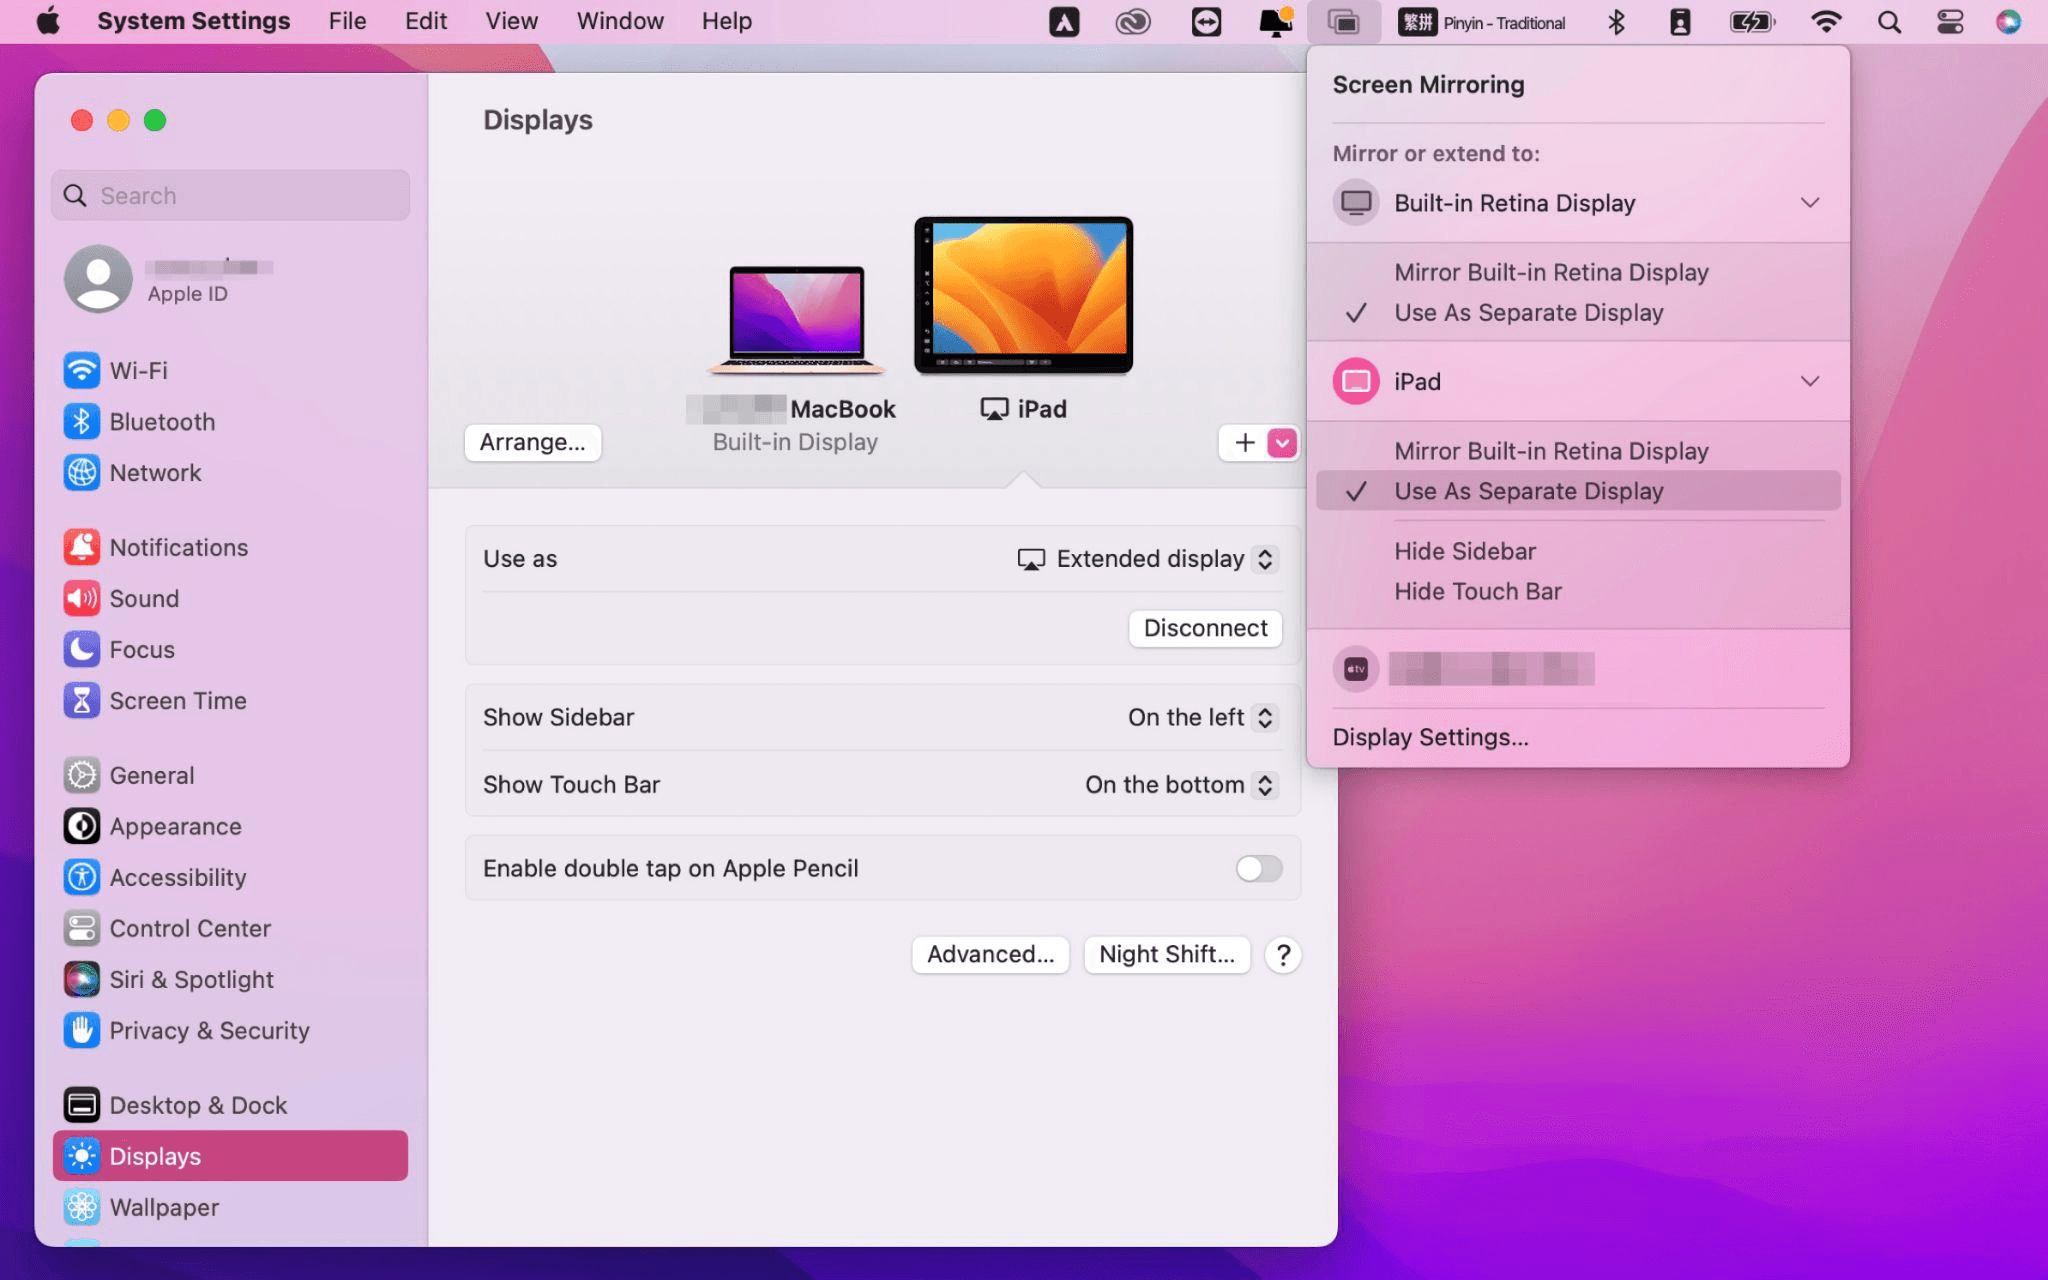
Hakbang 1 Pag-set ng Display:
Buksan ang Mac System Settings >> I-click ang "Display" sa sidebar >> I-click ang "+" pop up menu sa kanan at piliin ang iyong iPad.
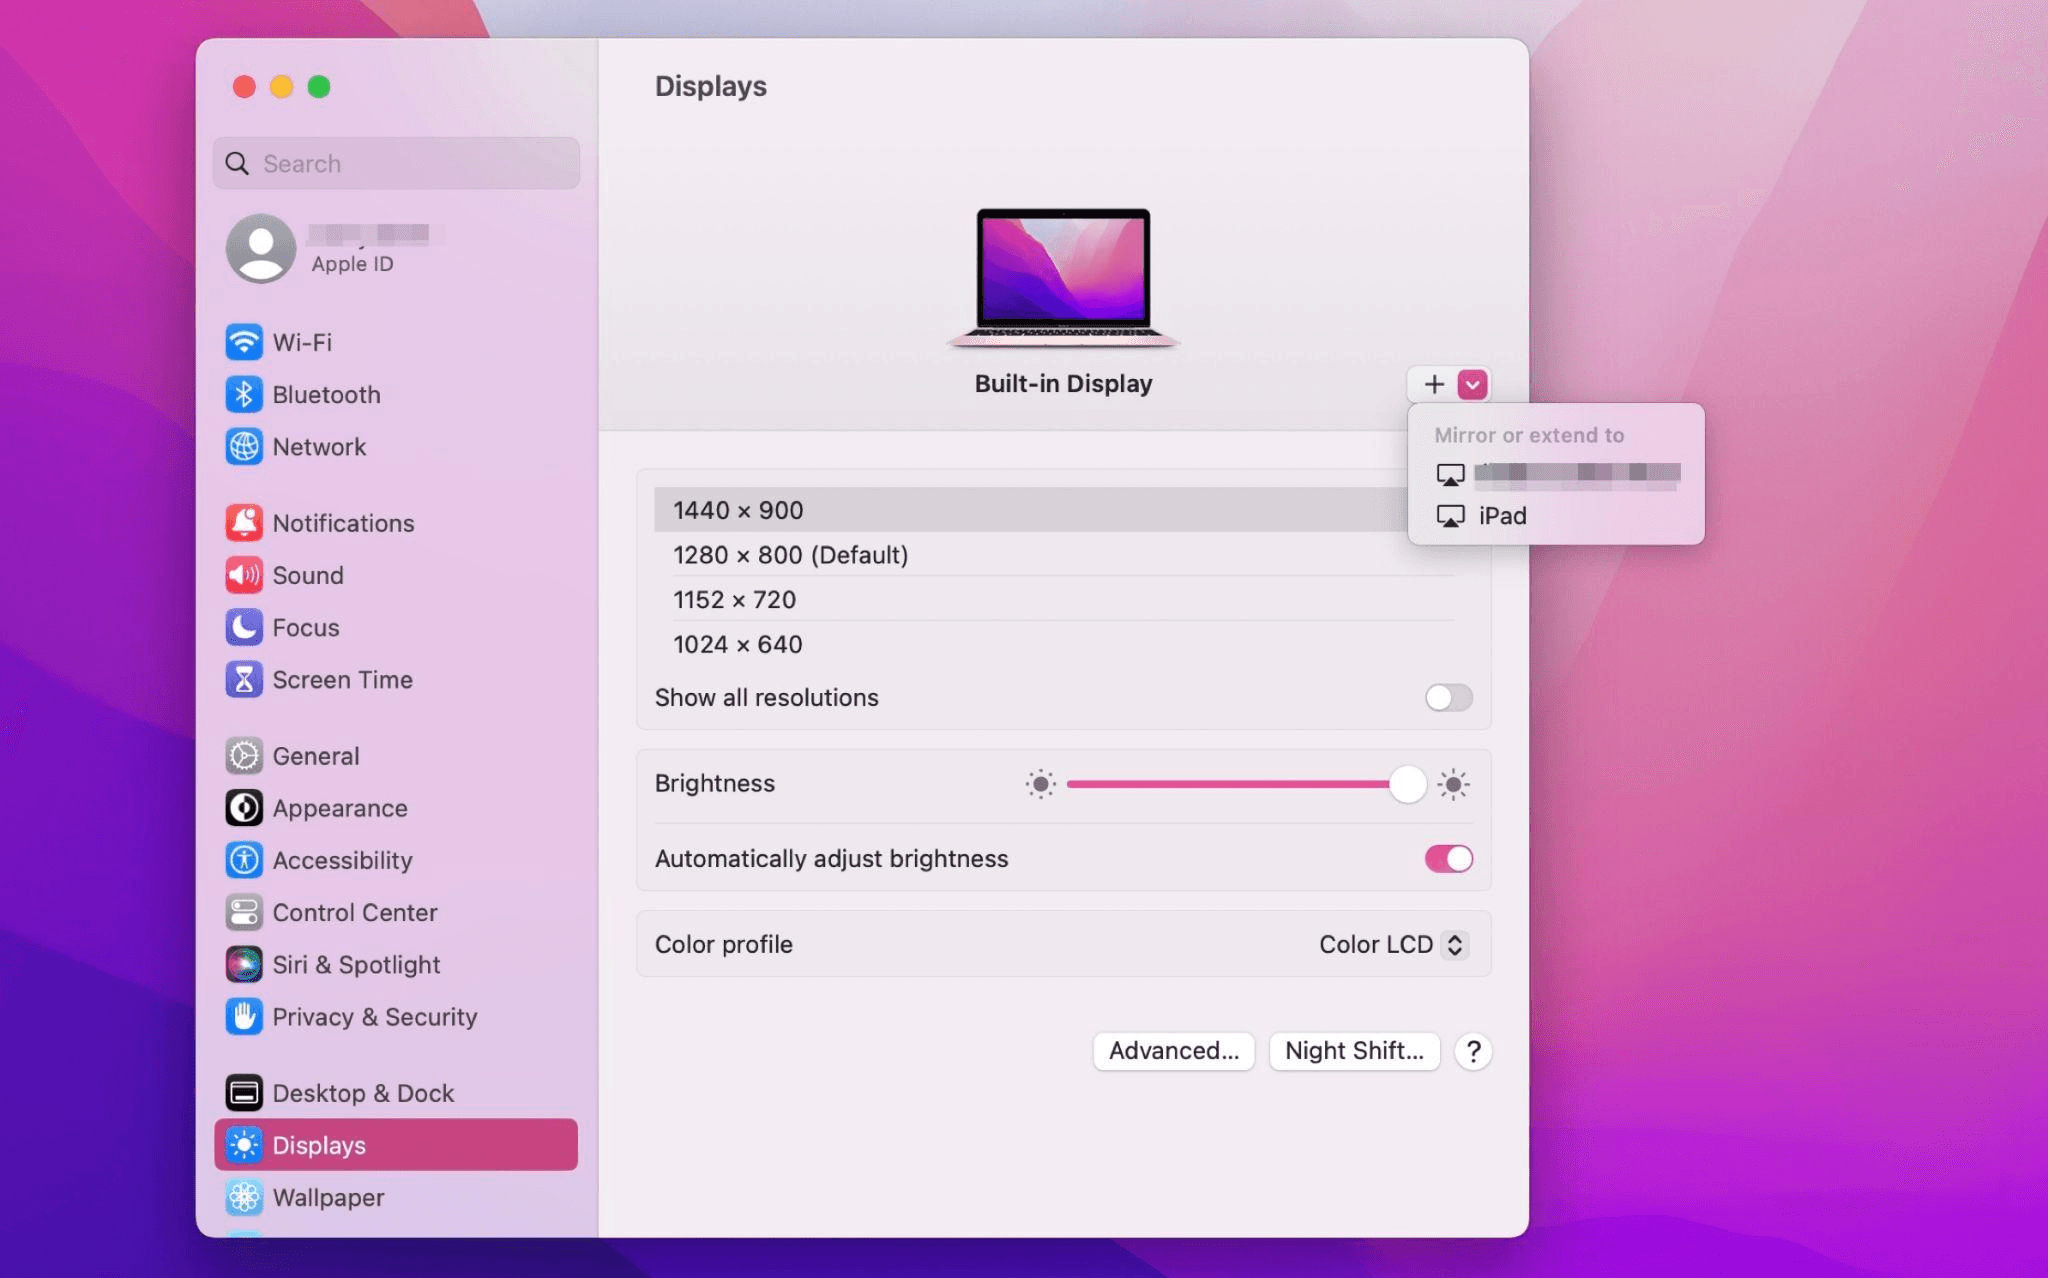
Piliin ang iPad, baguhin ang Use as settings sa "Extended Display". Suriin ang Airplay settings sa itaas na toolbar ng Mac at itakda ang iPad bilang "Use As Separate Display".
Hakbang 2: Palawakin ang Screen
Matapos makumpleto ang mga setting, ang iyong iPad ay magiging pangalawang display para sa iyong Mac. Maaari mong ilipat ang mga bintana mula sa iyong Mac papunta sa iyong iPad nang maayos. Maaari mo ring gamitin ang sidebar sa iPad o baguhin ang posisyon ng sidebar sa system display settings.
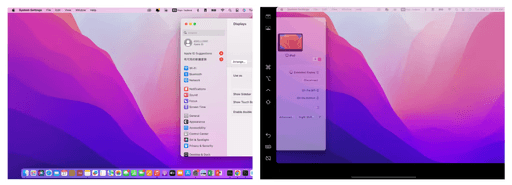
MacBook Screen (Kaliwa) at iPad Screen (Kanan)
Paano Gagamitin ang iPad bilang Pangalawang Screen para sa Windows?
Ang Apple Sidecar ay sumusuporta lamang sa mga Mac na inilabas pagkatapos ng 2016 at iPadOS13 o bago. Kung gumagamit ka ng lumang Apple device o Windows device, maaari mo pa ring gamitin ang DeskIn remote software upang gawin ang screen extension. Sinusuportahan nito ang paggamit ng iPad bilang pangalawang display para sa Mac at Windows, at ang smoothness ay hindi mas mababa sa sidecar.
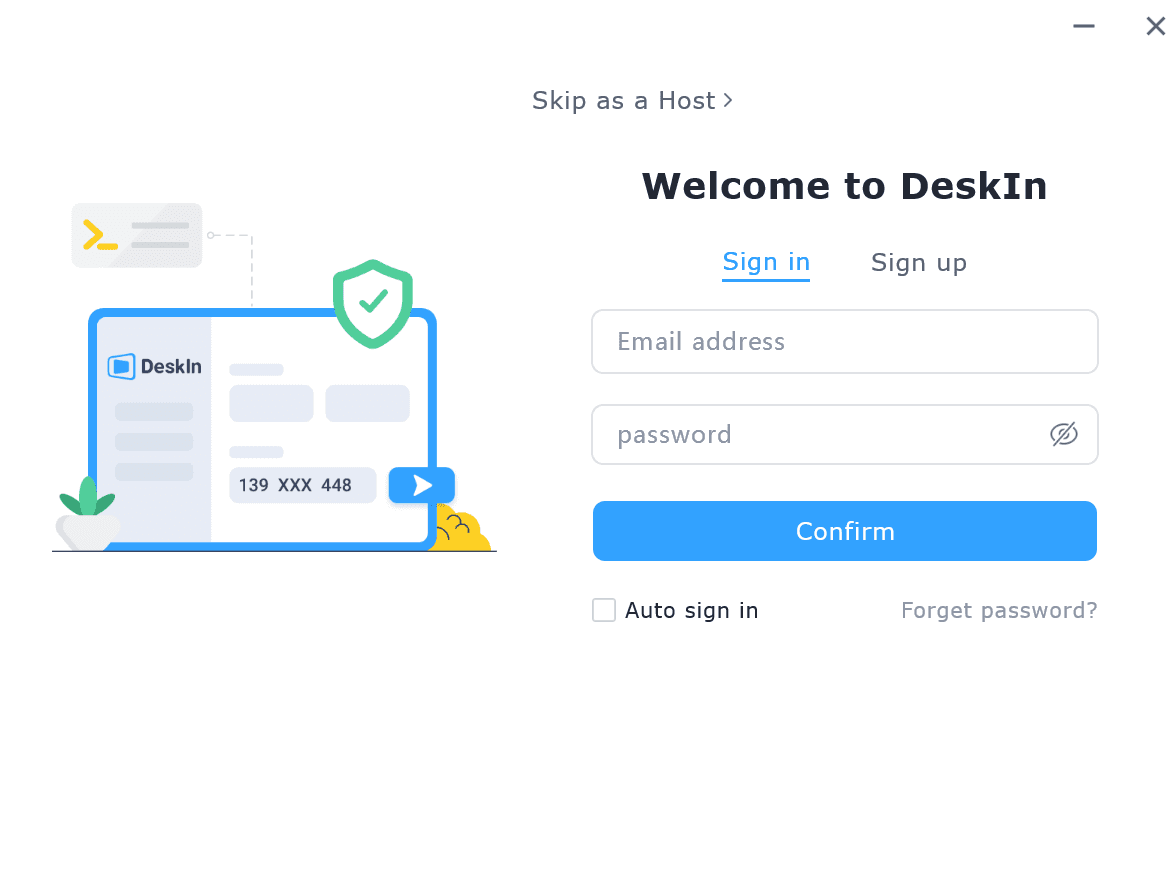
Hakbang 1: I-download at Magrehistro ng DeskIn Account
I-download ang DeskIn sa iyong computer at iPad, magrehistro para sa isang libreng account at mag-log in nang hiwalay.

Paalala: Sa iyong unang pag-log in sa isang bagong device, kailangan mong kumpletuhin ang email verification, na naglalayong protektahan ang seguridad ng iyong account.
Hakbang 2: Palawakin ang Screen
Buksan ang DeskIn app sa iyong Windows/Mac computer >> Pumunta sa "Screen Mgt" Tab >> I-click ang "Extend my screen"
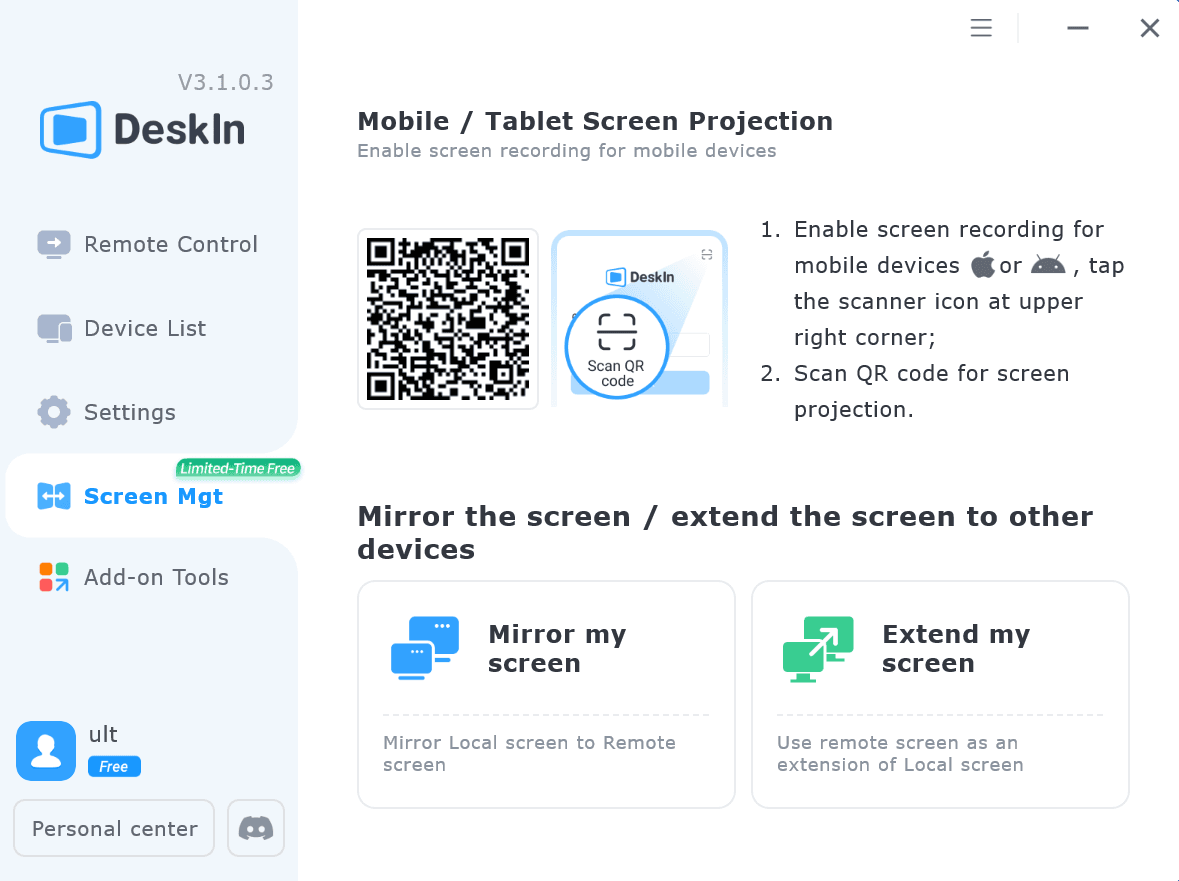
Piliin ang iyong iPad, at i-click ang "Start Extending". Kapag nakakonekta, ang iyong iPad ay magiging pangalawang display ng iyong Windows/Mac computer, maaari mong ilipat ang mga bintana sa pagitan ng dalawang screen na para bang nasa isa lamang ito.
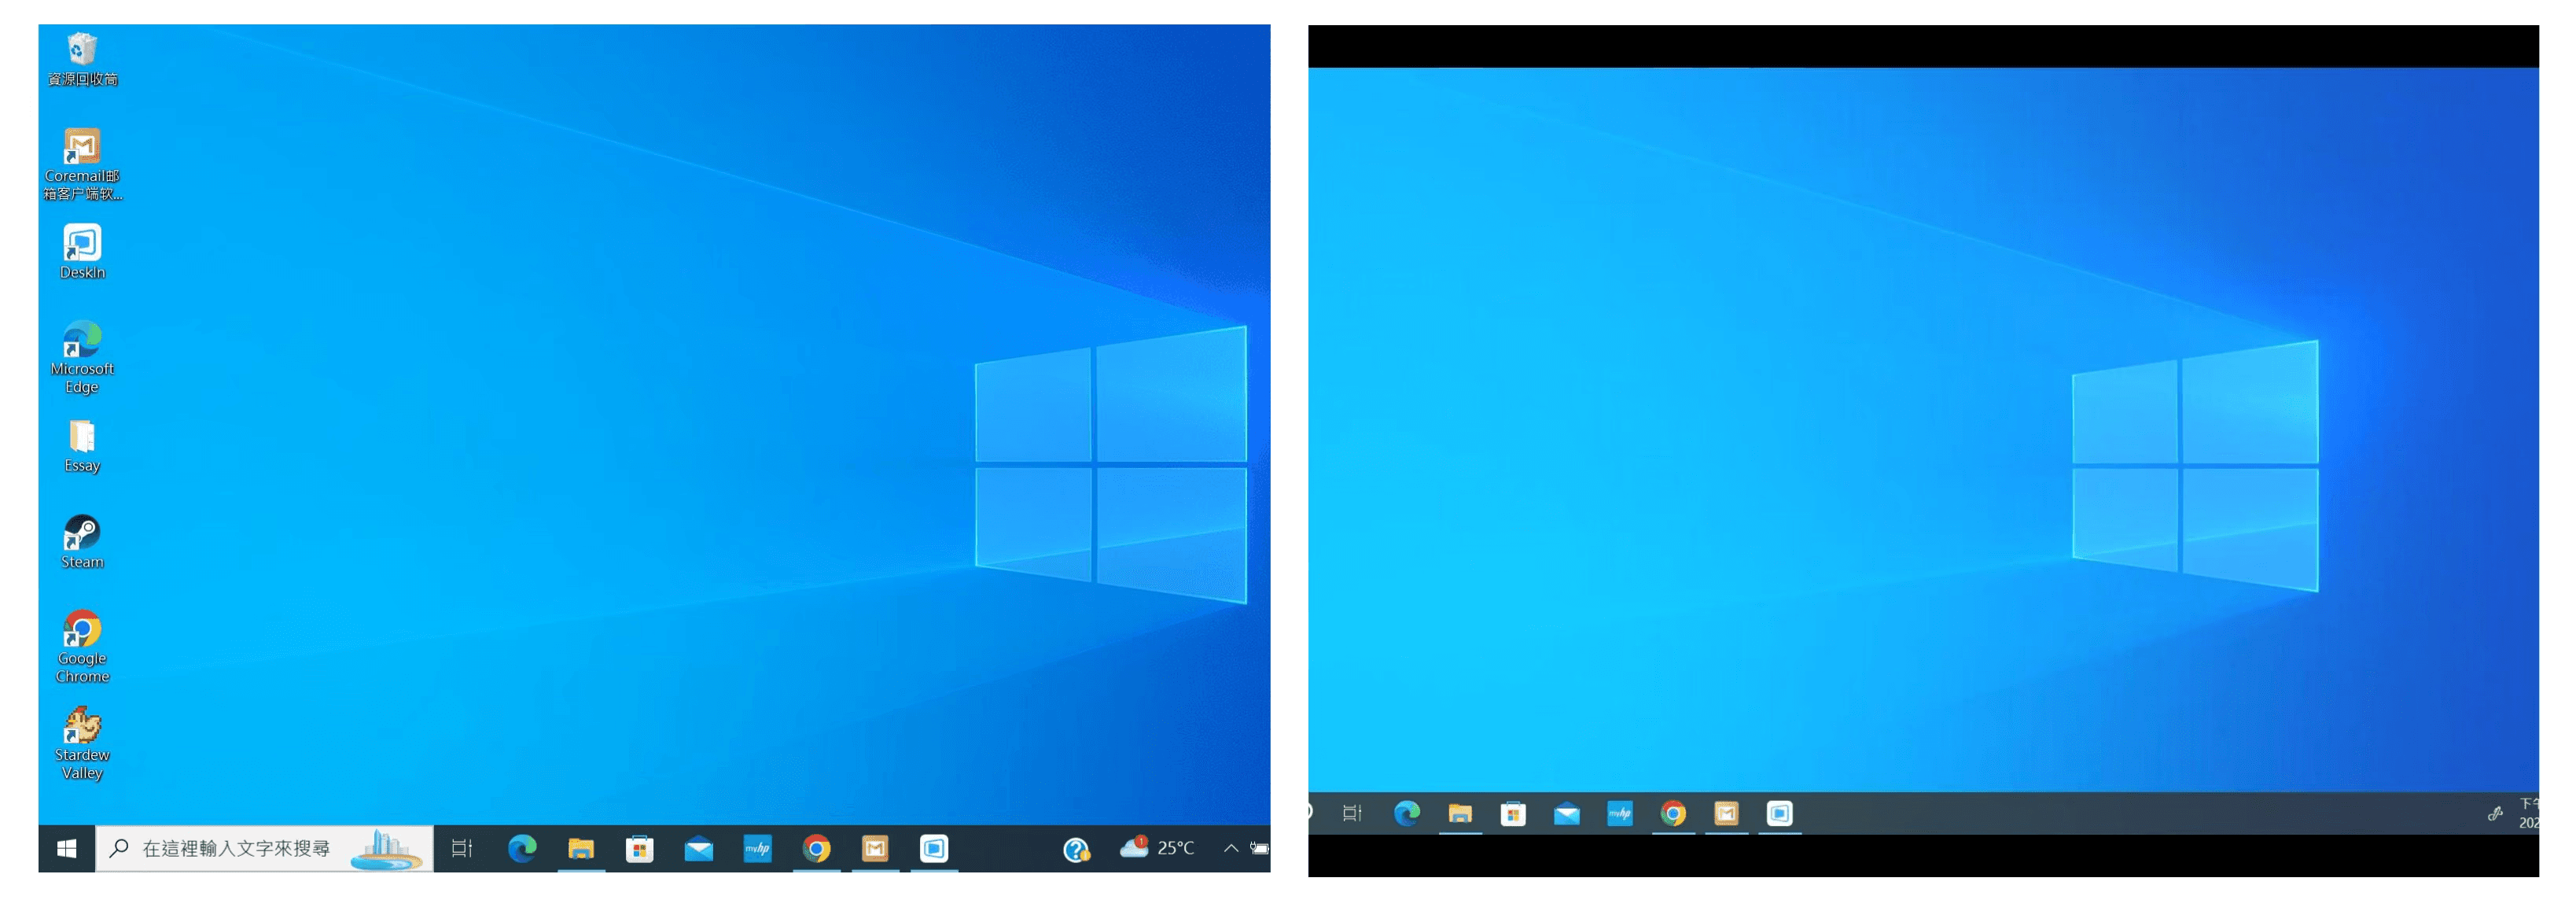
Computer Screen (Kaliwa) at iPad Screen (Kanan)
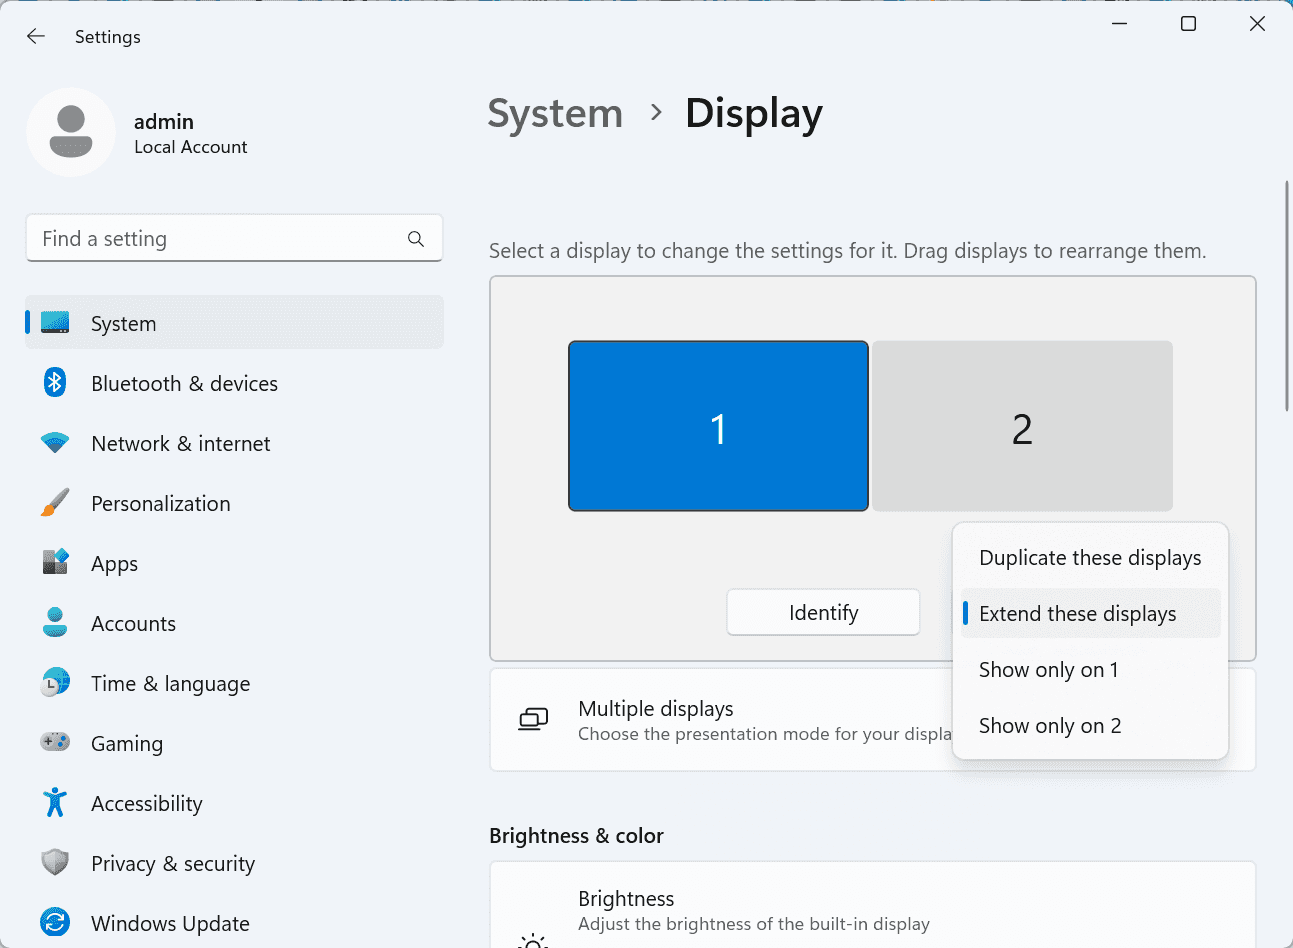
Hakbang 3: Mga Setting ng Display ng System
Matapos ang extension, kung napansin mong ang iyong iPad ay nagmi-mirror lamang ng nilalaman sa iyong computer screen, mangyaring pumunta sa Windows System Settings >> Display Settings at baguhin ang screen option sa "Extend these displays". Maaari mo ring baguhin ang posisyon ng screen sa pamamagitan ng pag-drag ng 2 screens.
Konklusyon
Ang artikulong ito ay nagpapakita kung paano gamitin ang DeskIn remote desktop software upang gawing "pangalawang screen" ang isang iPad para sa Mac at Windows computers. Ito ay lalong kapaki-pakinabang para sa mga tao na kailangang hawakan ang maraming gawain nang sabay-sabay at nais na mapabuti ang productivity. Kung naghahanap ka ng screen extension tool na gumagana sa iyong MacBook, iPad, Android Tablet at Windows PC, ang DeskIn remote desktop ay ang pinakamainam na solusyon para sa iyo. I-download ang DeskIn at subukan ito ngayon!

Top 6 RustDesk Alternative Tools for Faster, Easier Remote Access
Remote access should feel like flipping a light switch, not decoding a control panel. Yet many users exploring RustDesk eventually run into friction: connection IDs, server setup, or occasional lag. While RustDesk is powerful, it’s not always the easiest or smoothest option, especially for non-technical users.
That’s why more people are actively searching for a reliable RustDesk alternative that combines performance, simplicity, and flexibility. Whether you want a plug-and-play solution or something more advanced, this guide will help you find the best fit.
Why You Need a RustDesk Alternative (and How to Choose One)
RustDesk stands out as a privacy-friendly, self-hosted remote desktop tool. However, real-world usage reveals a few common challenges:
Complicated setup for the RustDesk self-hosted environments
Manual connection steps requiring IDs and passwords
Occasional latency or unstable connections
Limited user-friendly features out of the box
For many users, especially those helping family or managing multiple devices, simplicity matters just as much as control.
How to Choose the Right RustDesk Alternative
When evaluating a RustDesk alternative, focus on these key factors:
Ease of use: Quick setup without technical overhead
Performance: Smooth, low-latency remote sessions
Compatibility: Support for Windows, macOS, Linux, and mobile
Security: Strong encryption and access controls
Flexibility: Options ranging from cloud-based to open source
The ideal tool strikes a balance between power and convenience, something many modern solutions now deliver better than traditional setups.
Quick Comparison of the Best RustDesk Alternatives
Here’s a quick breakdown of the top tools and where they shine:
DeskIn – Best all-in-one RustDesk alternative for performance and ease of use
AnyDesk – Best lightweight tool for fast connections
TeamViewer – Best for enterprise-grade remote support
MeshCentral – Best open-source and self-hosted solution
DWService – Best free browser-based tool
Chrome Remote Desktop – Best simple, no-frills option
1. DeskIn – Best RustDesk Alternative for Seamless Performance and Ease of Use
Pros
Ultra-low latency with smooth high-frame-rate streaming
No complex setup or server deployment required
Cross-platform including Rustdesk alternative for Android
Secure with encryption and device control features
Built-in file transfer and multi-device management
Cons
Smaller awareness than legacy competitors
Best for: Users who want a powerful yet simple remote desktop solution

DeskIn removes the friction that often comes with remote access tools. Instead of relying on IDs or manual configurations, it offers a streamlined connection experience that works right out of the box. This makes it especially valuable for users supporting non-technical family members or managing multiple remote devices.
Performance is where DeskIn truly distinguishes itself. Compared to RustDesk, which can sometimes struggle with latency, DeskIn delivers consistently smooth sessions with minimal lag. It also eliminates the need for self-hosting, making it a strong free RustDesk alternative option for users who want powerful features without the complexity.
For those exploring options beyond the RustDesk alternative GitHub projects, DeskIn provides a polished, ready-to-use experience that balances simplicity with professional-grade performance.
2. AnyDesk – Best Lightweight Alternative for Fast Connections
Pros
Lightweight and fast installation
Good performance on low bandwidth
Cross-platform support
Easy-to-use interface
Cons
Performance may drop during long sessions
File transfer can be inconsistent
Best for: Users needing quick and simple remote access

AnyDesk is often considered a natural step up from RustDesk for users who want something easier to deploy. It offers a lightweight application that connects quickly and performs well under normal conditions. This makes it suitable for quick troubleshooting or occasional remote access.
However, performance consistency can be an issue. Users frequently report lag or instability during extended sessions or when handling more demanding tasks. While AnyDesk is a solid option for basic needs, it may not fully satisfy users looking for a more robust, all-in-one solution.
👀 You may also be interested in: |
|---|
3. TeamViewer – Best for Enterprise Remote Support and Cross-Platform Access
Pros
Enterprise-grade security with encryption and 2FA
Stable performance across global networks
Rich features like file transfer and session recording
Broad device compatibility
Cons
Expensive for commercial use
Free version has limitations
Heavier resource usage on some systems
Best for: Businesses and IT teams managing multiple endpoints
TeamViewer has long been a dominant player in the remote desktop space, offering a comprehensive suite of features designed for enterprise environments. It excels in reliability and global connectivity, making it a popular choice for IT support teams.
That said, its pricing model is a major drawback for many users. Frequent users may quickly encounter licensing restrictions, and costs can escalate for businesses. Additionally, its heavier footprint can impact performance on lower-end devices. DeskIn offers a more modern alternative by delivering similar performance and essential features without the same cost barriers. For users who want enterprise-level capabilities with better efficiency, it presents a compelling option.
👀 You may also be interested in: |
|---|
4. MeshCentral – Best Open-Source Self-Hosted Alternative
Pros
Fully RustDesk alternative open source solution
Web-based management dashboard
Supports multi-device environments
Strong customization and control
Cons
Complex setup and maintenance
Requires technical expertise
Best for: Advanced users needing a Rustdesk alternative self-hosted
MeshCentral is a powerful open-source platform designed for users who want full control over their remote access infrastructure. It supports multiple devices and provides a centralized dashboard for management, making it attractive for IT professionals.
However, this flexibility comes with complexity. Setting up and maintaining a MeshCentral server requires technical knowledge, which can be a barrier for many users. Compared to this, DeskIn offers a much simpler deployment process while still delivering strong performance and security. For users who prioritize ease of use over full control, modern solutions like DeskIn provide a more accessible alternative.
5. DWService – Best Free and Browser-Based Alternative
Pros
Completely free
Browser-based access
Open-source foundation
Simple setup
Cons
Limited performance
Basic feature set
Best for: Users looking for a simple, free RustDesk alternative
DWService offers a browser-based approach to remote access with no heavy installation, making it convenient for quick connections in restricted environments. It supports both desktop access and file management across major platforms.
However, performance often feels sluggish, especially on demanding tasks, and features remain basic; lacking session recording, smooth multi-monitor support, or advanced security controls. While suitable for occasional personal use, it falls short for professional or high-performance scenarios.
6. Chrome Remote Desktop – Best Simple Remote Access Tool
Pros
Free and easy to use
Browser-based setup
Cross-platform compatibility
Cons
Very limited features
No advanced management or collaboration tools
Best for: Casual users needing basic remote access

Chrome Remote Desktop is one of the simplest remote access tools available. It’s easy to set up and works across devices, making it a convenient choice for occasional use.
However, it lacks many essential features such as file transfer, session management, and advanced security controls. For users with more demanding needs, it quickly becomes insufficient. Compared to Chrome Remote Desktop, DeskIn provides a much more complete experience without sacrificing ease of use, making it a better long-term solution.
👀 You may also be interested in: |
|---|
FAQs About Best RustDesk Alternatives
1. Why should I look for a RustDesk alternative?
RustDesk is powerful but can be difficult to set up and manage, especially with self-hosting. Many users prefer tools that offer similar performance without technical complexity. DeskIn simplifies remote access while maintaining strong performance and security.
2. What is the best free RustDesk alternative?
Several tools qualify as a free RustDesk alternative, including DWService and Chrome Remote Desktop. However, DeskIn stands out by offering better performance and usability even in its free version.
3. Is there an open-source alternative to RustDesk?
Yes, tools like MeshCentral and DWService are considered RustDesk alternative open source options. They provide flexibility and control but often require technical expertise to set up and maintain.
4. Which RustDesk alternative is best for beginners?
Beginners should choose tools with a simple setup and intuitive interfaces. DeskIn is an excellent option because it removes the need for manual configuration while still delivering advanced features.
Conclusion
RustDesk is a powerful starting point, but it’s not always the easiest or most efficient tool for everyday use. From setup complexity to performance limitations, many users eventually look for a better RustDesk alternative.
Among all the options, DeskIn stands out as the most balanced solution. It combines speed, simplicity, and cross-platform support into one seamless experience. If you’re ready to move beyond technical friction and enjoy truly smooth remote access, DeskIn is a choice that simply works.

Top 7 RDP Alternative Tools for Faster, Safer Remote Access
Remote desktop access used to feel like a solid bridge. Now, for many users, traditional RDP feels more like a creaky rope ladder. With performance issues, security concerns, and limited cross-platform support, it's no surprise that more people are actively searching for a better RDP alternative that actually keeps up with modern workflows.
If you're managing multiple servers, working across devices, or just tired of unstable connections, this guide will walk you through the best tools worth switching to.
What is RDP Desktop?
RDP (Remote Desktop Protocol) is a proprietary protocol developed by Microsoft that allows users to connect to another computer over a network. It's widely used for accessing Windows servers, virtual machines, and remote workstations.
While powerful in controlled environments, RDP is often tied to Windows systems and requires configuration like port forwarding or VPNs. Compared to newer tools, it can feel rigid and outdated.
You may also be interested in: |
|---|
Why You Need an RDP Alternative
RDP still works, but it comes with trade-offs that many users find frustrating:
Security risks if not properly configured
Complex setup for remote or external access
Limited cross-platform compatibility
Performance issues over unstable networks
Many IT teams are now actively replacing it, especially when looking for a Windows RDP client alternative or something that works seamlessly across macOS, Linux, and mobile devices. That's where modern Remote Desktop alternatives shine.
Quick Comparison of the Best RDP Alternatives
Choosing the right tool is like picking the right vehicle. Some are built for speed, others for heavy-duty enterprise work. Here's a quick snapshot:
DeskIn – Best all-in-one RDP alternative for performance and cross-platform use
TeamViewer – Best for enterprise remote support
AnyDesk – Best lightweight option for fast connections
RustDesk – Best Windows RDP alternative open-source solution
Remmina – Best RDP alternative for Linux users
Chrome Remote Desktop – Best simple browser-based tool
Splashtop – Best for high-performance business environments
1. DeskIn – Best RDP Alternative for Cross-Platform Performance
Pros
Ultra-low latency with smooth high-frame-rate streaming
Works across Windows, macOS, Linux, iOS, and Android
Strong encryption and secure access controls
Built-in file transfer and multi-session support
Cons
Newer compared to legacy brands
Best for: Users who want a powerful, flexible RDP alternative

DeskIn feels less like remote access and more like teleportation for your desktop. Whether you're managing servers, supporting clients, or working remotely, it delivers consistently smooth performance without the usual lag spikes seen in traditional RDP setups.
Unlike many tools, DeskIn eliminates the need for complex configurations. You don't need to wrestle with firewalls or VPNs just to connect. It also works seamlessly across platforms, making it a strong alternative to Microsoft Remote Desktop for Mac and mobile users alike.
For teams juggling multiple systems, DeskIn provides a unified experience that replaces fragmented workflows. It's also a strong free RDP alternative option with premium-level capabilities, making it ideal for both individuals and businesses.
2. TeamViewer – Best for Enterprise Remote Support
Pros
Enterprise-grade security and compliance
Extensive feature set including collaboration tools
Cross-platform compatibility
Reliable global performance
Cons
Expensive licensing
Can be overkill for individuals
Best for: Enterprises needing secure and scalable remote access
TeamViewer is a comprehensive remote desktop platform widely adopted by IT teams, support professionals, and enterprises. Its feature set extends far beyond simple screen sharing—it includes robust device management, remote printing, file transfer, session recording, and even augmented reality support for field service. TeamViewer's security architecture relies on AES‑256 encryption, two‑factor authentication, and whitelisting, making it suitable for organizations with strict compliance requirements. It runs on virtually every operating system and mobile platform.
The main trade‑off is its pricing: licenses are subscription‑based and can become expensive for small teams or individual users, especially as TeamViewer aggressively flags personal use as commercial, leading to session restrictions.
3. AnyDesk – Best Lightweight RDP Alternative for Speed
Pros
Fast and responsive
Lightweight installation
Works well on low bandwidth
Easy to use
Cons
File transfer can be inconsistent
Lag during longer sessions
Best for: Users needing quick, simple remote access
AnyDesk is a lightweight remote desktop application prized for its speed and efficiency, often recommended as a fast alternative to Microsoft's native Remote Desktop on Windows 10 and Android. It uses a proprietary video codec, DeskRT, to achieve low latency even on limited bandwidth, making it ideal for quick support sessions and accessing devices over mobile networks. The interface is clean and minimalist, with features like address book management, file transfer, and session recording available.
However, users frequently report instability during extended sessions; performance can degrade over time, and file transfers may slow considerably compared to competitors. While its free version is generous for personal use, professional users often find the performance ceiling limits its suitability for continuous, demanding workloads. DeskIn, by contrast, maintains consistent performance even during extended use, making it better suited for professional workloads.
You may also be interested in: |
|---|
4. RustDesk – Best Open-Source RDP Alternative for Privacy
Pros
Free and open-source
Self-hosting for full control
Strong privacy protection
Active community
Cons
Technical setup required
Limited user-friendly features
Best for: Developers and privacy-focused users
RustDesk has emerged as a leading open‑source remote desktop alternative, appealing to developers and organizations that require full control over their data. It allows users to self‑host the relay and rendezvous servers, meaning no third‑party infrastructure handles connection metadata. Built with Rust, it offers a modern codebase with cross‑platform clients (Windows, macOS, Linux, Android, iOS) and supports essential features such as file transfer, TCP tunneling, and customizable address books.
The major barrier is its complexity: deploying a self‑hosted environment requires technical expertise to configure firewalls, SSL certificates, and ongoing server maintenance. For those using the public relay, performance can be inconsistent depending on server load and geographic proximity.
You may also be interested in: Top RustDesk Alternatives for Better Performance, Security & Ease of Use |
|---|
5. Remmina – Best Linux RDP Alternative
Pros
Open-source and free
Supports multiple protocols including RDP and VNC
Lightweight and flexible
Native to Linux environments
Cons
Limited features compared to modern tools
UI can feel outdated
Best for: Linux users looking for a traditional RDP alternative Linux
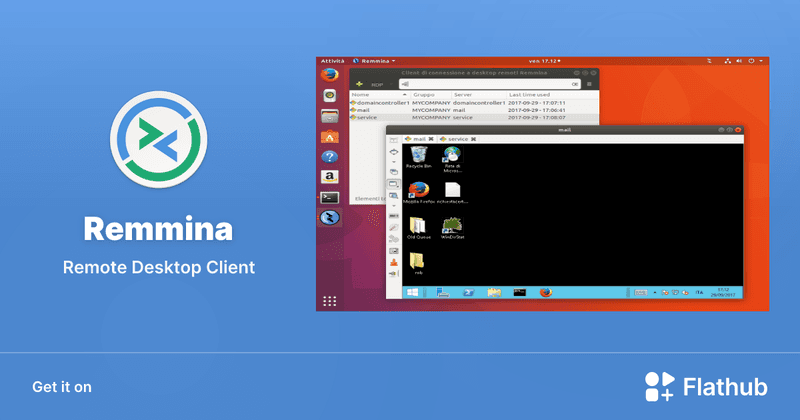
Remmina is a beloved open‑source remote desktop client for Linux, supporting multiple protocols (RDP, VNC, SSH, SPICE, and others) in a single unified interface. It is frequently chosen by system administrators and Linux enthusiasts who need a flexible, lightweight tool to manage diverse environments. Remmina offers tabbed sessions, quick‑connect profiles, and a plugin system that extends its capabilities.
However, its strength - protocol flexibility, also highlights its limitations. As a frontend client rather than a full remote access solution, it lacks features like unattended access, centralized account management, or robust session recording out of the box. Performance can vary by protocol, and the user experience lags behind more polished commercial tools, particularly for users seeking a plug‑and‑play setup.
6. Chrome Remote Desktop – Best Free and Simple Option
Pros
Free and easy to use
Browser-based setup
Cross-platform access
Cons
Very limited features
No advanced management tools
Best for: Casual users needing basic remote access

Chrome Remote Desktop is a free, browser‑based remote access tool from Google that requires nothing more than a Chrome browser and a Google account. It excels in simplicity: installation takes seconds, and connections are mediated through Google's infrastructure, eliminating complex firewall configurations. For occasional use—such as helping a family member or quickly accessing a home computer—it works reliably across Windows, macOS, Linux, and even ChromeOS.
The trade‑off is its minimal feature set. There is no native file transfer, multi‑session management, remote printing, or granular permission controls. Collaboration tools are absent, and the reliance on a Google account for authentication can be a limitation in professional environments. It remains a convenient entry‑level tool but struggles to meet the needs of power users or IT teams.
You may also be interested in: |
|---|
7. Splashtop – Best for High-Performance Business Use
Pros
High-quality streaming performance
Strong security features
Good for business environments
Reliable connections
Cons
Subscription-based pricing
Limited free version
Best for: Businesses needing performance-focused remote access
Splashtop is a high‑performance remote desktop solution frequently adopted by creative professionals, educational institutions, and enterprises that prioritize fluid interaction. It delivers low‑latency streaming with support for high‑frame‑rate displays, making it suitable for video editing, CAD work, and other graphics‑intensive tasks. Splashtop offers a range of editions—from Business Access to SOS for on‑demand support—all of which include robust security (AES‑256, device authentication) and features like file transfer, remote printing, and multi‑monitor navigation. Its performance over local networks and the internet is consistently praised.
The primary drawback is cost: while competitive, the subscription model can accumulate quickly for users needing access to multiple devices or advanced features, especially when compared to similarly capable tools with more flexible pricing structures. DeskIn offers similar performance benefits with a more flexible pricing structure, making it a compelling alternative.
You may also be interested in: |
|---|
FAQs About Best RDP Alternatives
Why should I look for an RDP alternative?
RDP can be difficult to configure, less secure if exposed, and limited outside Windows environments. Modern tools like DeskIn provide better performance, security, and ease of use.
What is the best RDP alternative?
The best RDP alternative depends on your needs, but DeskIn stands out for its balance of speed, security, and cross-platform compatibility.
Is there a free RDP alternative?
Yes, several tools qualify as an RDP alternative free, including RustDesk and Chrome Remote Desktop. DeskIn also offers a free tier with advanced capabilities.
Is Microsoft shutting down RDP?
Microsoft is evolving its remote desktop ecosystem, but traditional RDP isn't disappearing overnight. However, many users are already transitioning to more modern solutions like DeskIn for better reliability and flexibility.
Conclusion
RDP has served its purpose, but the digital world has outgrown its limitations. Whether you need better performance, stronger security, or true cross-platform access, switching to a modern RDP alternative is no longer optional, it's inevitable.
Among all the options, DeskIn stands out as a future-ready solution. It combines speed, simplicity, and power into one seamless experience, helping you leave behind the friction of traditional remote desktop tools and step into something far more efficient.

Top 10 Splashtop Alternative Tools for Faster, More Reliable Remote Access (2026)
If your remote desktop tool has started to feel like a buffering video at the worst possible moment, you're not alone. Many users are actively searching for a better Splashtop alternative due to rising costs, laggy connections, and limited flexibility. Whether you're managing remote IT support or simply accessing your work computer from home, the right tool can turn frustration into seamless control. Let’s dive into the best options available today.
Key Features to Look for in a Splashtop Alternative
Before switching, it’s worth knowing what actually matters. A great remote desktop tool should offer:
Smooth performance with low latency and high frame rates
Strong security like AES-256 encryption and 2FA
Cross-platform compatibility (desktop + mobile)
Easy setup and intuitive interface
Transparent pricing without hidden increases
Stable unattended remote access
These factors define the best remote desktop experience in 2026.
Quick Comparison of the Best Splashtop Alternatives
Tool | Pros | Cons | Best For |
|---|---|---|---|
High performance, affordable, smooth | Newer brand | High-quality remote work | |
AnyDesk | Lightweight, fast | Security limits | Quick sessions |
TeamViewer | Secure, scalable | Expensive | Enterprises |
Chrome Remote Desktop | Free, simple
| Limited features | Personal use |
Zoho Assist | Clean UI, integrations | Stability issues | IT support |
RemotePC | Affordable | Performance inconsistency | SMBs |
RealVNC | Secure | Occasional disconnects | Secure access |
LogMeIn | Feature-rich | High cost | Enterprises |
ScreenConnect | Powerful | Complex setup | MSPs |
RustDesk | Open-source | Technical setup | Developers |
1. Best Splashtop Alternative for High-Performance Remote Work - DeskIn
Pros
Up to 4K 60FPS/2K 240FPS ultra-smooth remote control
Low latency even across long distances
Competitive pricing with strong value
Cross-platform including mobile
Cons
Smaller brand awareness
Best for: Performance-driven users and remote professionals
DeskIn is designed for users who are tired of lag and blurry screens. It delivers a near-local experience, making it ideal for developers, designers, and remote teams who rely on precision and speed. Compared to many traditional tools, it feels significantly more responsive.
Beyond performance, DeskIn balances cost and capability extremely well. If you're looking for a free alternative to Splashtop or a scalable upgrade, it offers a compelling mix of speed, security, and usability. Many users consider it a strong case where DeskIn is better than Splashtop, especially when stability matters.
2. AnyDesk - Lightweight and Fast for Quick Access
Pros
Very lightweight installation
Fast connections on low bandwidth
Easy to use interface
Cons
Limited advanced security features
Occasional connection instability
Best for: Quick remote support and simple workflows
AnyDesk is frequently recommended as a Splashtop alternative thanks to its exceptional speed and minimal system footprint. The installer is just a few megabytes, and the application runs smoothly even on older hardware. It performs particularly well in low‑bandwidth environments, where its proprietary video codec maintains responsive connections during quick troubleshooting sessions.
That said, users who require consistently high frame rates, crisp visuals for design work, or advanced session management may find AnyDesk’s simplicity limiting. While it handles basic tasks admirably, power users often need more stability and richer feature sets.
You may also be interested in:
3. TeamViewer - Enterprise-Grade Remote Access
Pros
Strong security (AES-256, 2FA)
Wide device compatibility
Mature ecosystem and features
Reliable remote support tools
Cons
Expensive pricing plans
Can feel heavy for small teams
Best for: Enterprises and large organizations
TeamViewer has long been a dominant force in remote desktop software, trusted by IT departments and enterprises worldwide. Its comprehensive feature set includes remote support, meeting tools, file transfer, and even augmented‑reality assistance, all secured with AES‑256 encryption and two‑factor authentication.
However, this power comes at a price—literally. TeamViewer’s licensing model can be prohibitively expensive for smaller businesses or individual users. The interface, while feature‑rich, can also feel cluttered for those who simply need unattended access to a few computers.
You may also be interested in:
4. Chrome Remote Desktop - Simple and Free
Pros
Completely free to use
Easy browser-based setup
Works across devices
Cons
Very limited features
Not suitable for business use
Best for: Individuals needing a free remote desktop
Chrome Remote Desktop is the ultimate choice for users seeking a straightforward, completely free remote access solution. Setup takes less than a minute: install the browser extension, authenticate with your Google account, and you can instantly access any computer from another device.
The trade‑off for this simplicity is a very limited feature set. There is no file transfer, multi‑monitor switching, remote printing, or session recording. Users who find themselves needing more than bare‑bones access will see a significant boost in efficiency and experience by upgrading to a dedicated tool like DeskIn, which retains ease of use while adding the features power users rely on.
You may also be interested in:
5. Zoho Assist - Clean and Business-Friendly
Pros
Intuitive interface
Good integrations with Zoho ecosystem
Cloud-based access
Cons
Occasional performance issues
Limited advanced features
Best for: IT helpdesk teams
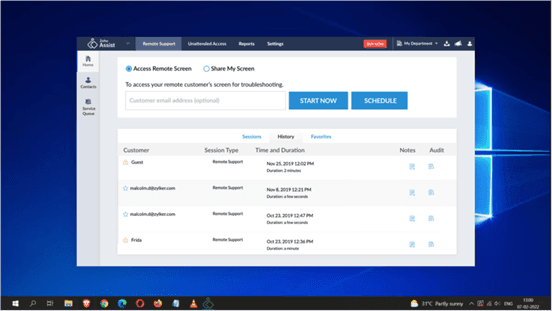
Zoho Assist delivers a clean, well‑organized remote support experience that integrates naturally with the broader Zoho ecosystem. Its dashboard is intuitive, making it easy for helpdesk teams to manage clients, schedule sessions, and generate reports. For organizations already using Zoho CRM or other Zoho applications, the seamless integration streamlines workflows and reduces the need to switch between different tools.
Despite its polished interface, performance consistency can be an issue, especially during file transfers or when connecting to machines with slower internet connections. The feature set, while sufficient for standard helpdesk operations, lacks some of the advanced controls that IT professionals expect for more complex troubleshooting.
6. RemotePC - Budget-Friendly Alternative
Pros
Affordable pricing
Easy setup
Supports multiple devices
Cons
Performance can vary
Limited advanced capabilities
Best for: Small businesses and budget users
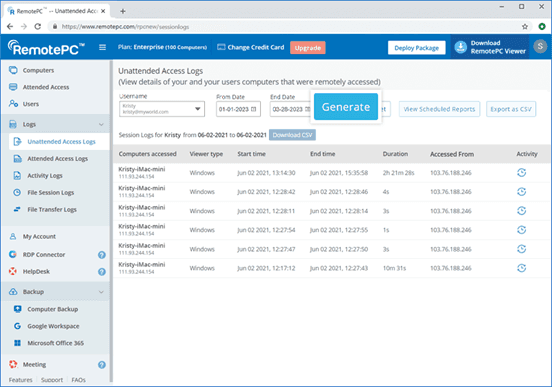
RemotePC positions itself as a budget‑friendly alternative for users who need basic remote access without a steep learning curve. Setup is straightforward, and the pricing structure is refreshingly simple—affordable plans that allow connection to multiple computers without hidden fees. It covers essential features like remote printing, file transfer, and even a simple chat function, making it a practical choice for small businesses and individual users.
However, performance can vary depending on network conditions and the specific devices being connected. Some users report occasional lag or reduced frame rates, which can become frustrating during extended sessions.
7. RealVNC – Secure and Reliable
Pros
Strong encryption and security
Customisable setup
Reliable remote connections
Cons
Occasional login interruptions
Slight learning curve
Best for: Security-focused users
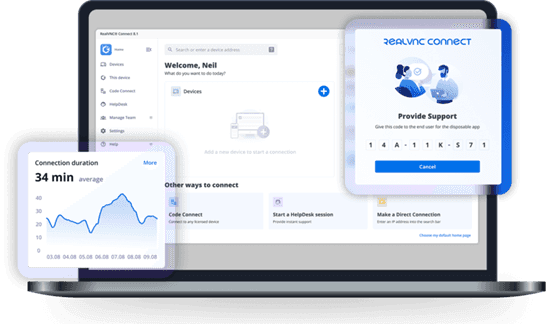
RealVNC has built a strong reputation for secure remote access. It uses robust encryption and offers granular permission controls, allowing administrators to tailor access levels for different users. The platform is highly customizable, supporting on‑premises deployments as well as cloud‑based options, which appeals to organizations with strict security requirements.
While security is clearly its strength, the user experience can sometimes feel less polished than newer competitors. Occasional login interruptions and a steeper configuration curve mean that getting the most out of RealVNC often requires technical expertise. For businesses that need both enterprise‑grade security and consistently high performance without complex setup, a more balanced solution, such as DeskIn, can deliver the best of both worlds, combining strong encryption with a streamlined, speed‑optimized experience.
8. LogMeIn - Feature-Rich but Expensive
Pros
Comprehensive feature set
Strong integrations
Good for collaboration
Reliable access
Cons
High pricing
Overkill for simple use cases
Best for: Enterprises needing all-in-one solutions
LogMeIn provides a comprehensive toolkit that extends far beyond simple remote desktop access. It includes robust file storage, collaboration features, and extensive integration options, making it well‑suited for enterprises that want an all‑in‑one remote work platform. The service is known for its reliability and strong customer support, which can be critical for large organizations managing hundreds or thousands of endpoints.
The main drawback is the cost. LogMeIn’s pricing plans are among the highest in the industry, and the feature set can be overwhelming for users who only need occasional remote access. Many of its advanced capabilities go unused by smaller teams, making it difficult to justify the expense.
9. ScreenConnect - Built for IT Professionals
Pros
Highly customizable
Remote support features
Multi-session support
Cons
Complex setup
Difficult to manage at scale
Best for: MSPs and IT teams
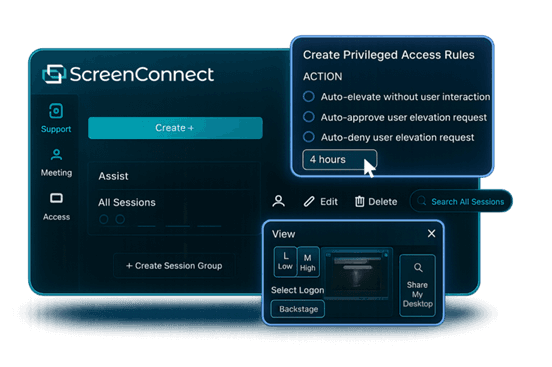
ScreenConnect (now part of ConnectWise) is a powerful, highly customizable remote support platform built with IT professionals and managed service providers in mind. It excels at multi‑session management, allowing technicians to handle several concurrent connections from a single interface. The level of granular control, over permissions, session recording, and even the appearance of the client UI, makes it a favorite among those who need to tailor the software to specific operational workflows.
However, this flexibility comes with a steep learning curve. Initial setup and ongoing management can be complex, especially for smaller teams without dedicated IT administration. For teams seeking a powerful yet approachable solution, DeskIn offers a streamlined alternative that delivers professional‑grade reliability and speed without the administrative overhead.
10. RustDesk – Open-Source Flexibility
Pros
Free and open-source
Self-hosting options
Strong privacy control
Cons
Requires technical setup
Limited support
Best for: Developers and privacy-focused users
RustDesk appeals to developers and privacy‑conscious users who want full control over their remote access infrastructure. As an open‑source solution, it allows self‑hosting on private servers, ensuring that no session data ever passes through third‑party servers. This transparency and autonomy are highly valued by organizations with strict data sovereignty requirements or those simply wishing to avoid vendor lock‑in.
The flip side is that RustDesk requires technical expertise to deploy and maintain. Users must manage their own servers, handle updates, and troubleshoot connection issues without dedicated commercial support. While the core software is free, the total cost of ownership in time and resources can be significant.
You may also be interested in:
FAQs About Best Splashtop Alternatives
1. What is the best Splashtop alternative?
DeskIn is one of the strongest options due to its balance of performance, pricing, and usability. TeamViewer and AnyDesk are also popular choices.
2. Is there a Splashtop alternative free?
Yes, Chrome Remote Desktop and RustDesk are free options. DeskIn also offers a competitive free plan with better performance.
3. What is the best remote desktop software in 2026?
The best remote desktop tools combine speed, security, and ease of use. DeskIn stands out for performance, while TeamViewer excels in enterprise environments.
4. Are there mobile-friendly options?
Yes, most tools support mobile, making them suitable as a Splashtop alternative for Android or a Splashtop alternative for iPad.
5. Why are users switching from Splashtop?
Many users cite high Splashtop pricing, lag issues, and limited scalability as reasons to explore alternatives.
Conclusion
Finding the right Splashtop alternative is less about replacing a tool and more about upgrading your workflow. While options like AnyDesk and TeamViewer each have their strengths, DeskIn stands out by combining high performance, smooth visuals, and cost efficiency in one package. If you want a remote desktop experience that feels fast, stable, and future-ready, DeskIn is easily one of the smartest choices you can make today.

Is DeskIn Safe to Use? Everything You Need to Know
When considering a remote desktop tool, one question always comes first: Is DeskIn safe? After all, you're not just accessing a device; you're potentially exposing files, data, and even real-time activity across networks.
The short answer is yes, DeskIn is designed with strong security measures in place. But understanding why it's safe, and how that safety actually works in real-world use, is what truly matters. This guide breaks it down in a clear, practical way so you can decide with confidence.

What Does "Safe" Really Mean for Remote Desktop Software?
Before answering is DeskIn safe to use, it helps to define what "safe" actually means in the context of remote desktop software.
Security isn't just one feature. It's a layered system that protects different aspects of your connection. First, there's data security, which ensures that everything transmitted between devices is encrypted and unreadable to outsiders. Then comes access control, which determines who can connect to your device and under what conditions.
Privacy protection is another key layer. This includes features that prevent others from seeing your screen or accessing sensitive inputs without permission. Finally, account security ensures that even if someone tries to break in, additional verification steps stop unauthorized access. A remote desktop tool is only truly safe when all of these layers work together.
👀 What Is DeskIn Used For? (And Why Security Matters)
To fully understand whether DeskIn is safe, it helps to look at what DeskIn is used for. DeskIn is commonly used for remote work, IT support, cross-device file access, and even high-performance tasks like design or development. These scenarios often involve sensitive data, which makes security not just important, but essential.
Users benefit from DeskIn's stable connection and low-latency performance, but those advantages only matter if the connection is secure. That's why security features are deeply integrated into the platform rather than treated as optional extras.
How DeskIn Protects Your Data and Privacy
DeskIn approaches security as a complete system with multiple protective layers, addressing common concerns about whether the platform is safe and legit for daily use. Here's how it keeps your data secure.
1. End-to-End Encryption
All connections use AES-256 encryption, the same standard trusted by banks and financial institutions. This ensures your data remains protected during transmission, even on public or unsecured networks.
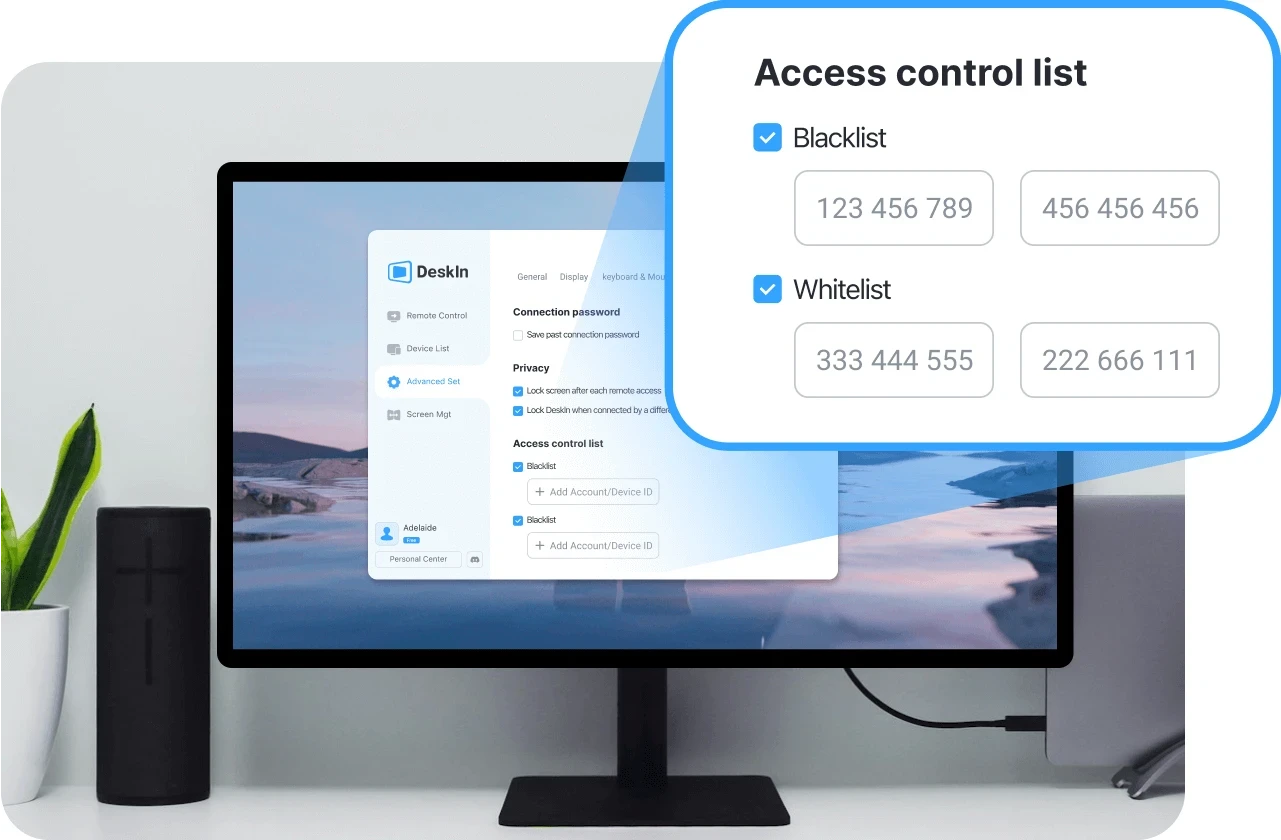
2. Multi-Layered Access Control
Beyond passwords, DeskIn requires various verifications: user access, blacklisting IP and device verification. Even if login credentials are compromised, unauthorized users cannot access your device without passing these additional checks.
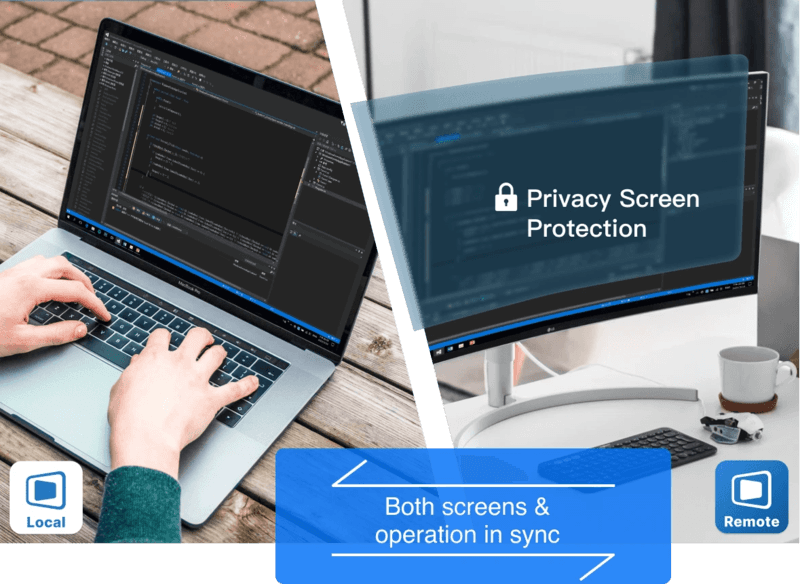
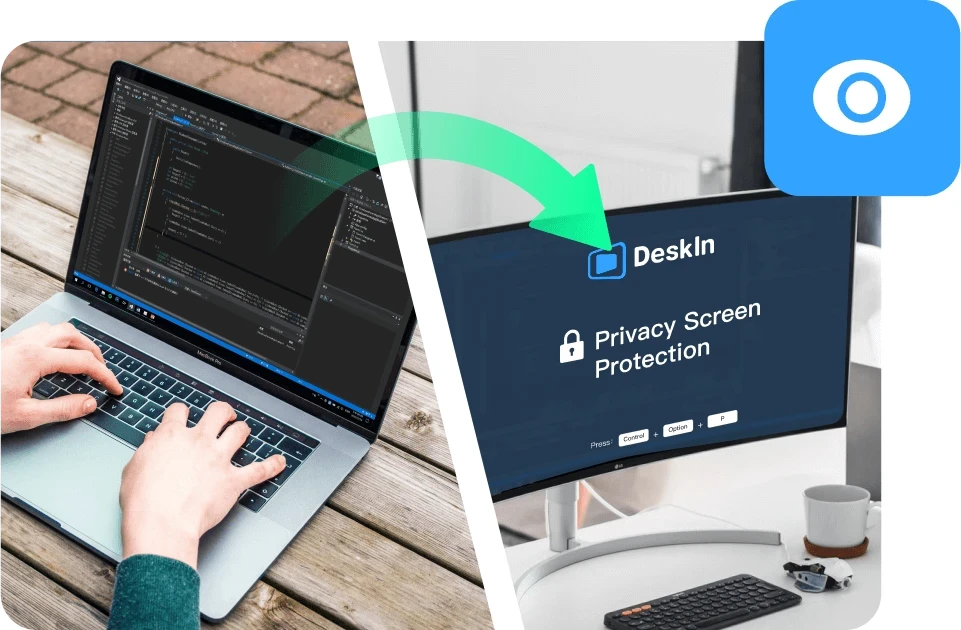
3. Privacy-Focused Features
Privacy screen mode lets you black out the host display during sessions, preventing anyone nearby from viewing your activity. Granular permission settings also give you control over file, audio, and input access.
4. Proven Reliability for Daily Use
These security layers work together to make DeskIn a safe choice for everyday workflows, whether you're accessing personal files or managing professional systems remotely.
👀 You may also be interested in
Is DeskIn Safe from Hackers? (Real Risk Analysis)
A more specific concern many users have is: Is DeskIn safe from hackers?
The reality is that no remote desktop software is completely risk-free, but the level of risk depends heavily on how the software is designed and how it's used.
DeskIn minimizes risk through encryption, authentication, and access controls. These features make unauthorized access extremely difficult. However, like any online tool, user behavior still plays a role. Weak passwords, sharing access credentials, or using unsecured devices can introduce vulnerabilities.
In practice, High-definition Remote Desktop App DeskIn provides the tools needed for a secure environment. As long as users follow basic security practices, the likelihood of unauthorized access remains very low.
Is DeskIn Safe on Mobile Devices (iPhone & Android)?
Mobile access introduces another layer of concern, especially for users asking is DeskIn safe for iPhone or is DeskIn safe for Android.
DeskIn is designed to maintain the same level of security across devices. Data transmitted between your phone and remote computer is still encrypted, and login protection remains in place through authentication features.
Unlike some remote tools, DeskIn does not require risky system modifications such as rooting or jailbreaking. This significantly reduces potential vulnerabilities on mobile devices. Whether you're accessing a work computer from an iPad or managing files through your phone, the security model remains consistent, making it a safe option for cross-device use.
Is DeskIn Free to Use? And Does Free Mean Less Secure?
Another common question is whether DeskIn is free to use, and more importantly, does free access affects security. DeskIn does offer a free version, but security features are not reduced or removed in lower-tier plans. Encryption, authentication, and access control remain in place regardless of pricing.
Security is part of the core infrastructure, not a premium add-on. This means users can still benefit from a secure connection even when using the free version.
Tips to Use DeskIn Safely (Best Practices)
Even with strong built-in protection, safe usage also depends on your own habits. Following a few key practices can help you maintain control over your account and devices:
Use strong passwords: Create unique, complex passwords for your DeskIn account to prevent unauthorized access through credential guessing.
Enable two-factor authentication: Adding this extra verification step ensures that even compromised passwords won't grant access to your device.
Never share access credentials: Keep your login details private and avoid sharing them with others, even temporarily.
Always log out after sessions: End remote connections when they're no longer needed to prevent unattended access to your system.
Keep devices updated: Regular updates ensure you have the latest security patches and protection against emerging vulnerabilities.
Final Verdict: Is DeskIn Safe and Reliable?
So, is DeskIn safe?
In most practical scenarios, the answer is yes. Its combination of encryption, authentication, and access control creates a secure environment for remote access, whether you're working from home or managing devices across locations.
At the same time, security is always a shared responsibility. DeskIn provides the foundation, but safe usage habits ensure the best protection. When both work together, DeskIn becomes a reliable and secure choice for remote desktop access.

Control Windows from Your Mac with Chrome Remote Desktop: Setup Guide & Pitfalls | DeskIn Japan
Introduction: Getting Past the Mac–Windows Divide
For Mac users working in Japan, there's a recurring frustration: a piece of software you need exists only on Windows. Whether it's CAD tools, Japanese accounting software (kaikei sofuto, 会計ソフト) required by your company, Windows-exclusive business systems, or PC games — the need to run Windows doesn't go away just because you prefer Mac.
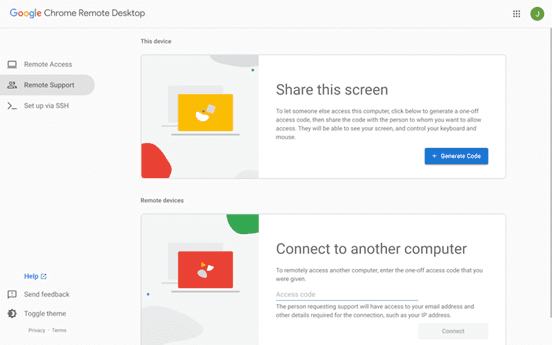
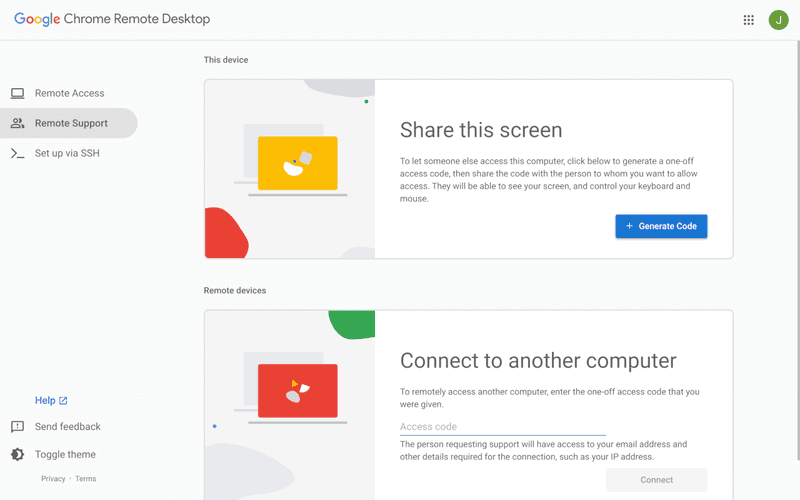
The good news is you don't need to buy a separate Windows machine. Google's free tool Chrome Remote Desktop lets you control a Windows PC remotely from your Mac, and the setup is simpler than most people expect.
This guide walks through the fastest path to getting connected, and then covers the cross-platform quirks that tend to catch Mac users off guard once they're actually in a session.
Setup: Connecting Your Mac to a Windows PC
Chrome Remote Desktop's configuration is straightforward, but it requires preparation on both machines — the Windows PC being controlled (the host) and the Mac doing the controlling (the client). Here's the fastest path to a working connection.
On the Windows PC (Host)
Start by allowing remote access on the Windows machine.
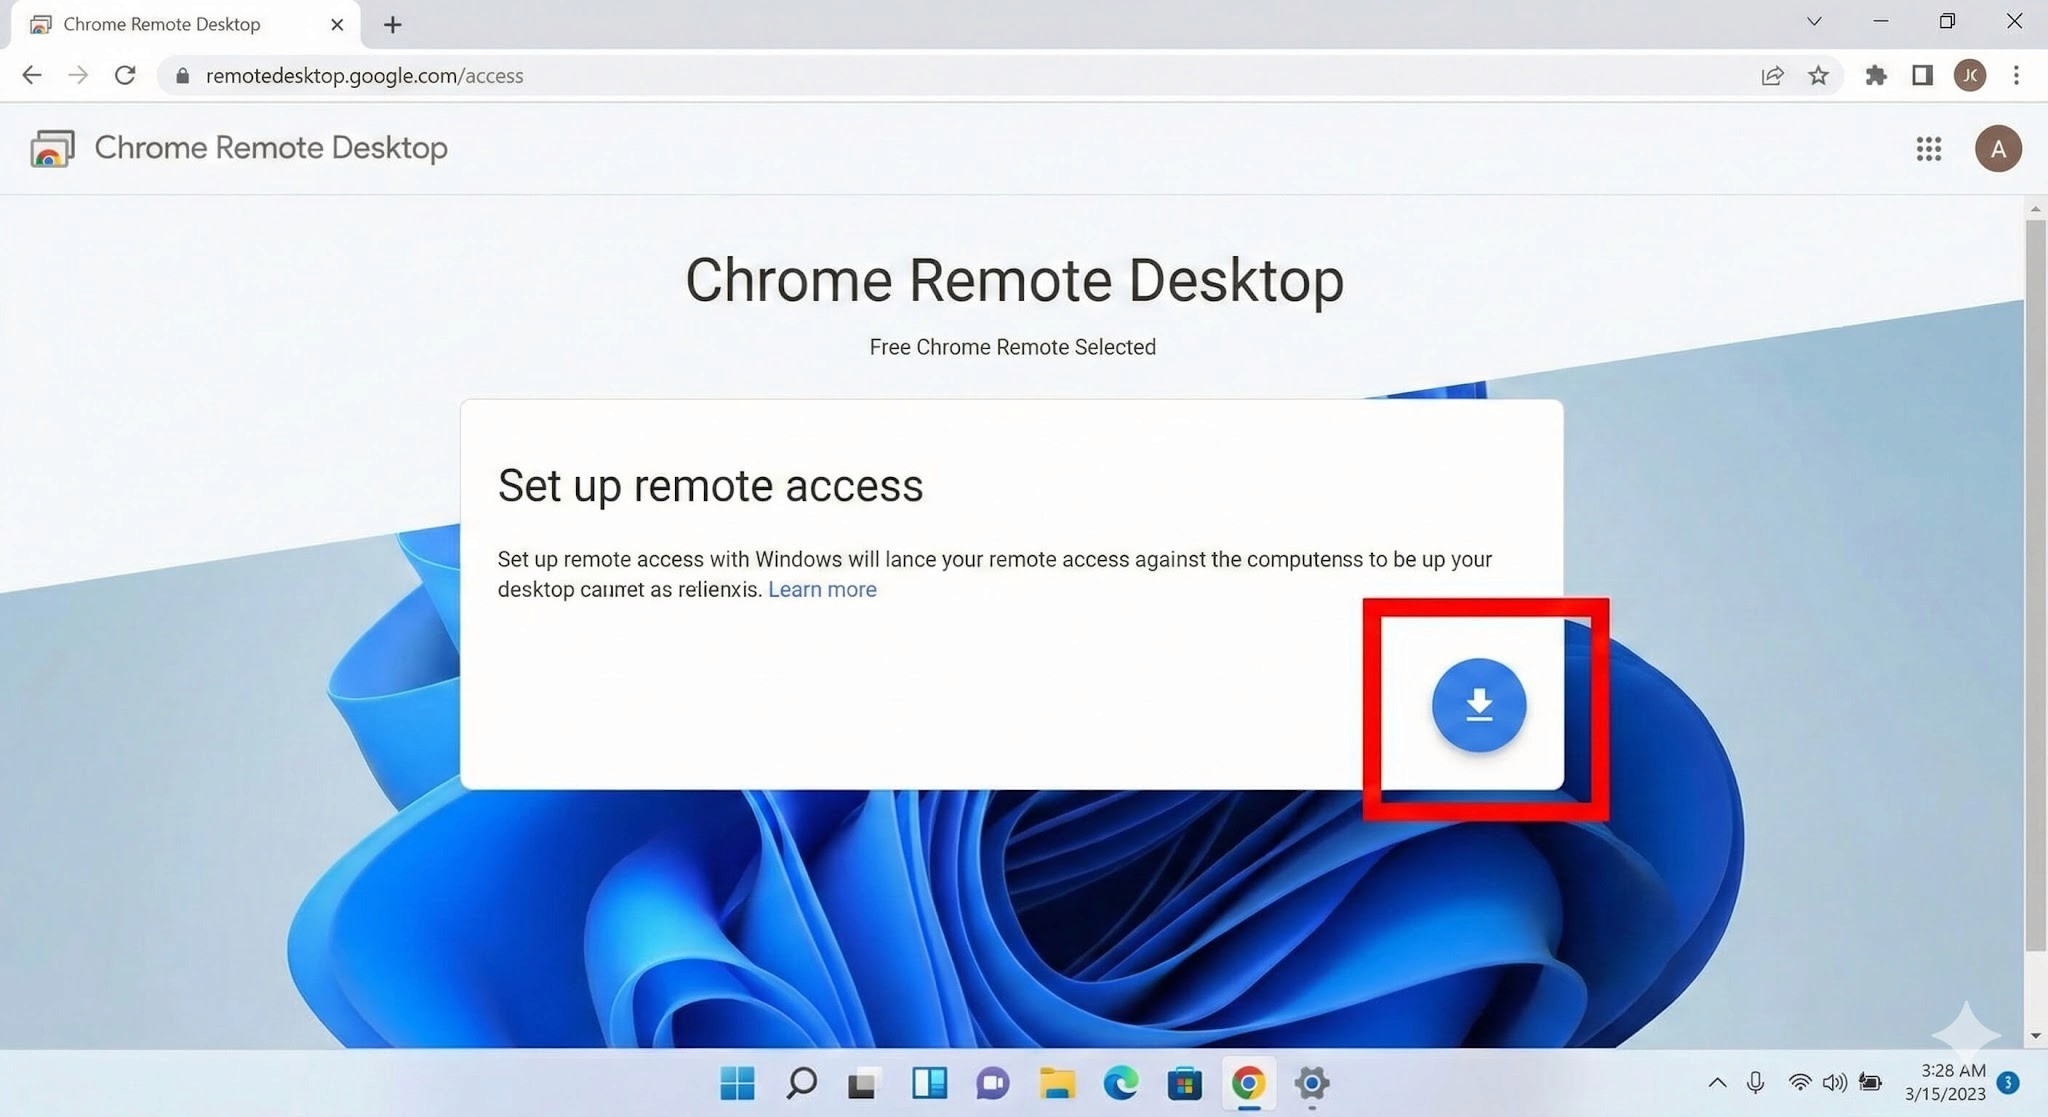
Install the extension and host software
Open Chrome and go to the Chrome Remote Desktop access page. Under "Set up remote access," click the blue download icon. Follow the prompts to add the Chrome extension and run the installer (.msi file).
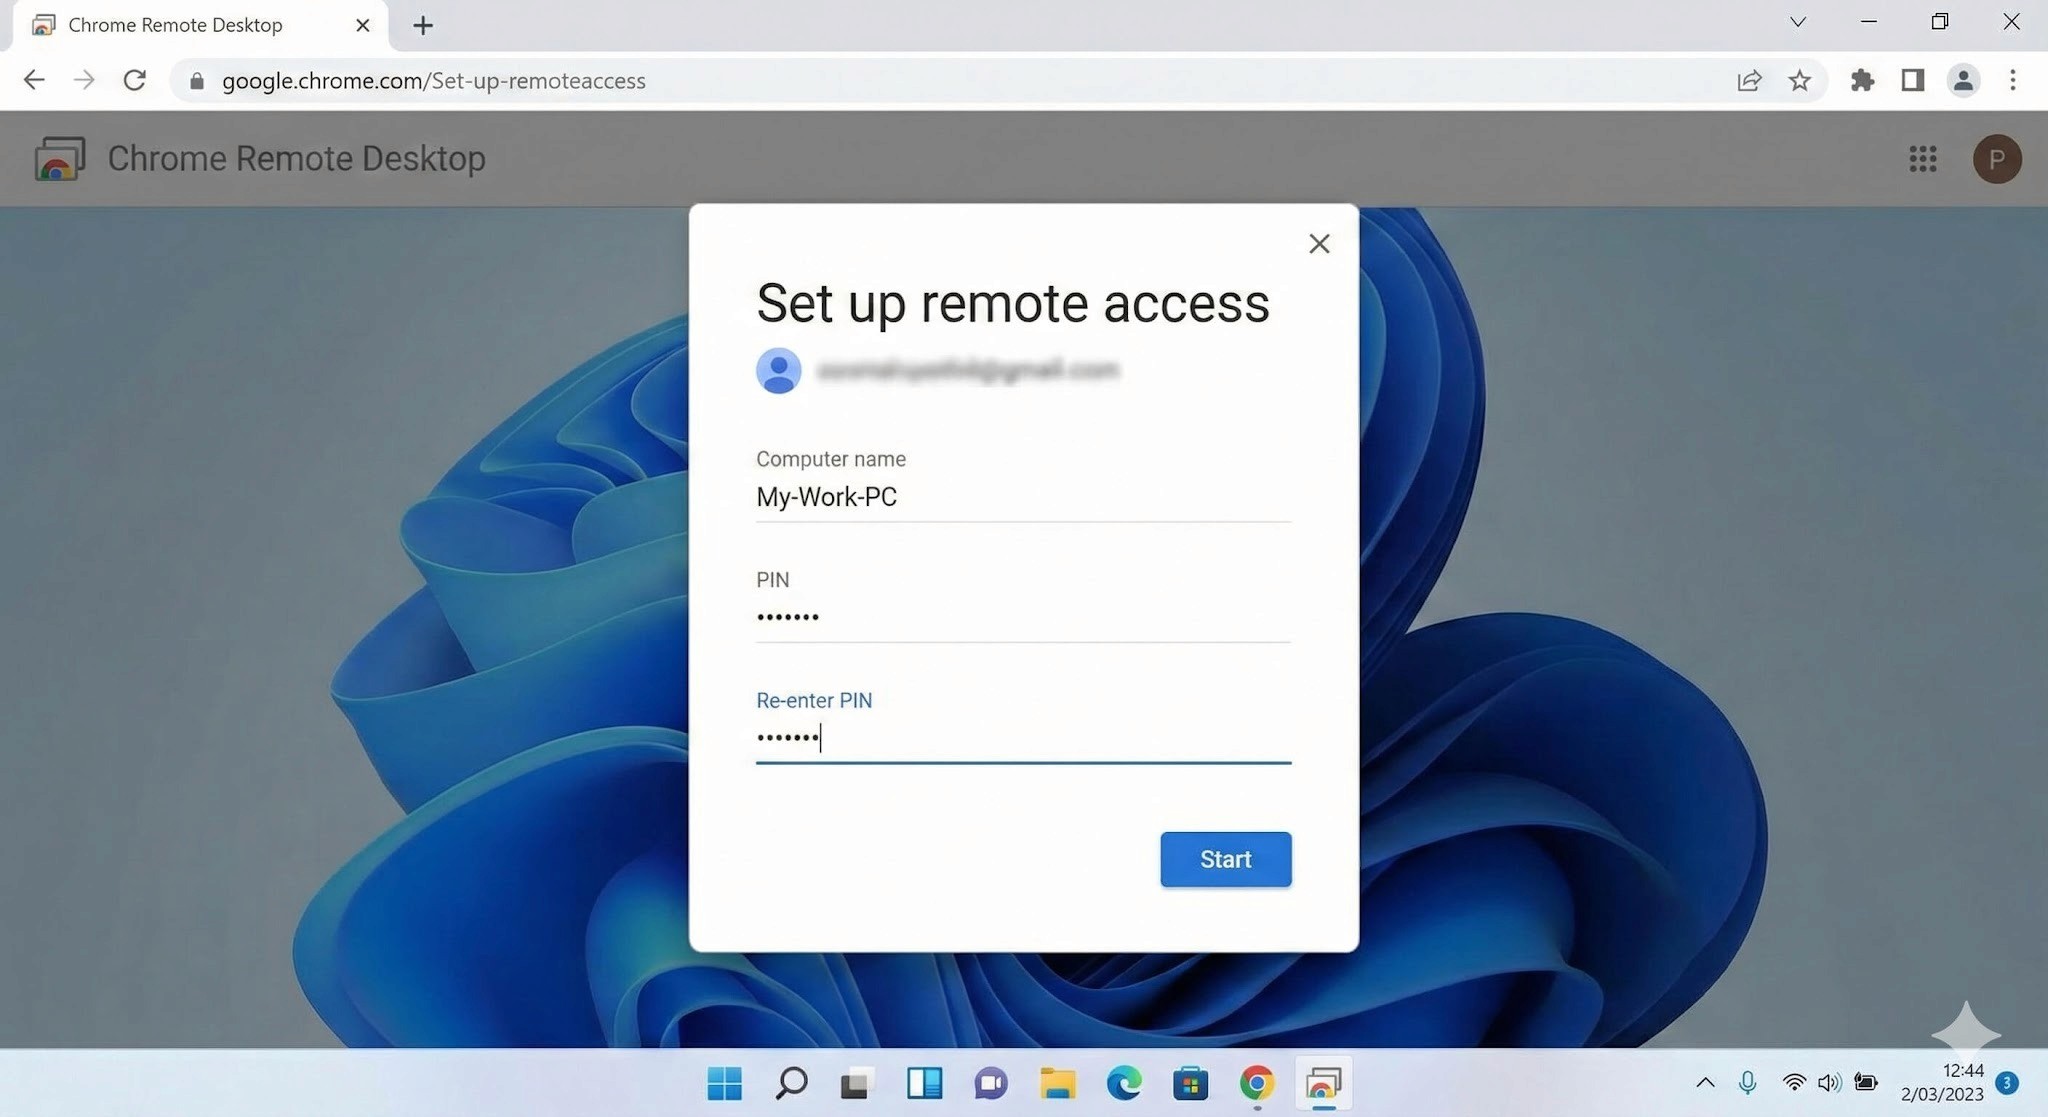
Name your PC and set a PIN
After installation, give the PC a name you'll recognise. Then set a PIN of at least six digits — you'll need to enter this every time you connect from your Mac, so write it somewhere safe.
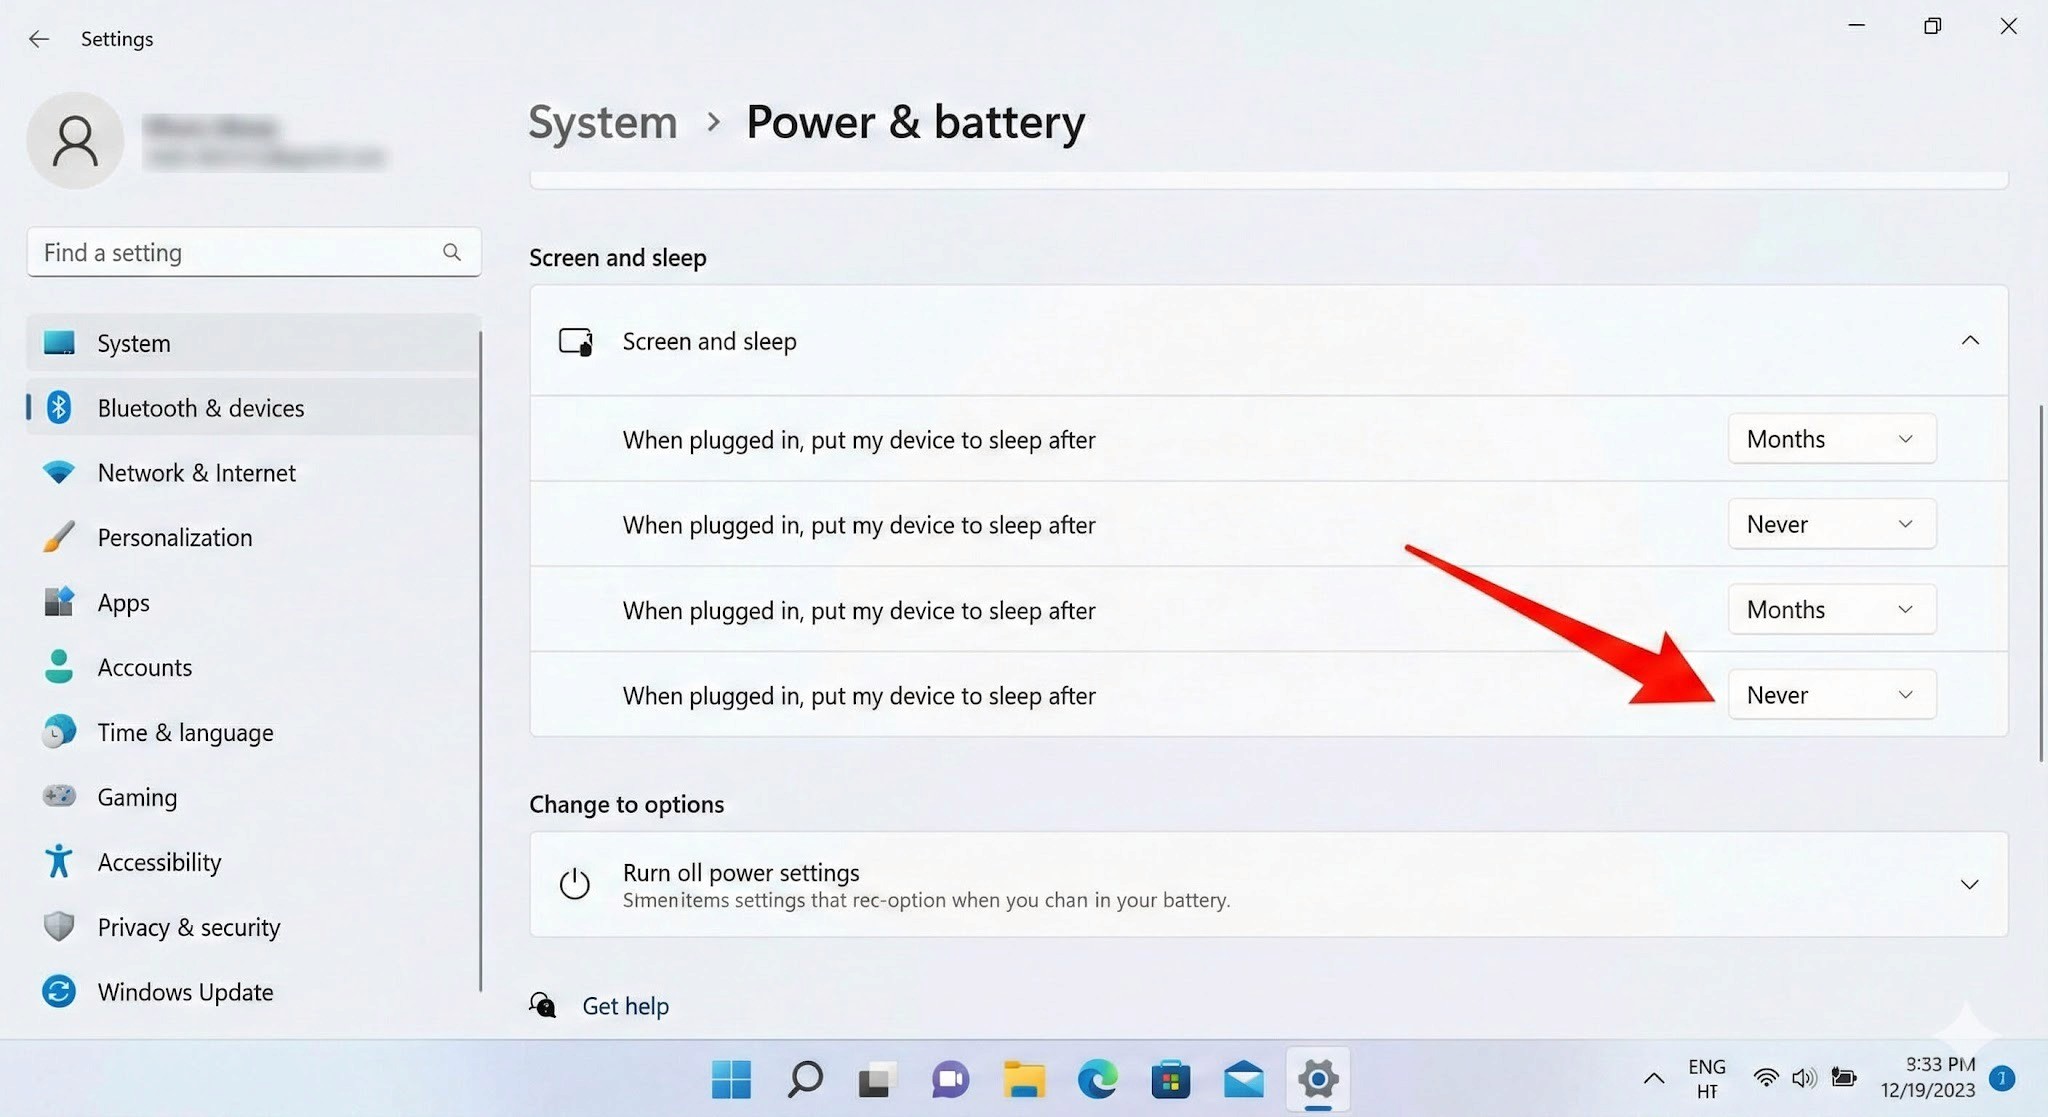
3. Important: Disable Sleep Mode
This is the step most people miss, and it will prevent connections entirely if skipped. A Windows PC in sleep mode cannot be reached remotely.
Go to Settings → System → Power & Battery
Under "Screen and Sleep," set "Put device to sleep after" to Never when plugged in
On the Mac (Client)
Once the Windows side is configured, connecting from your Mac is simple.
Log in to the access site
Open Chrome on your Mac and navigate to the same Chrome Remote Desktop access page. Make sure you're logged into the same Google account you used when setting up the Windows PC.
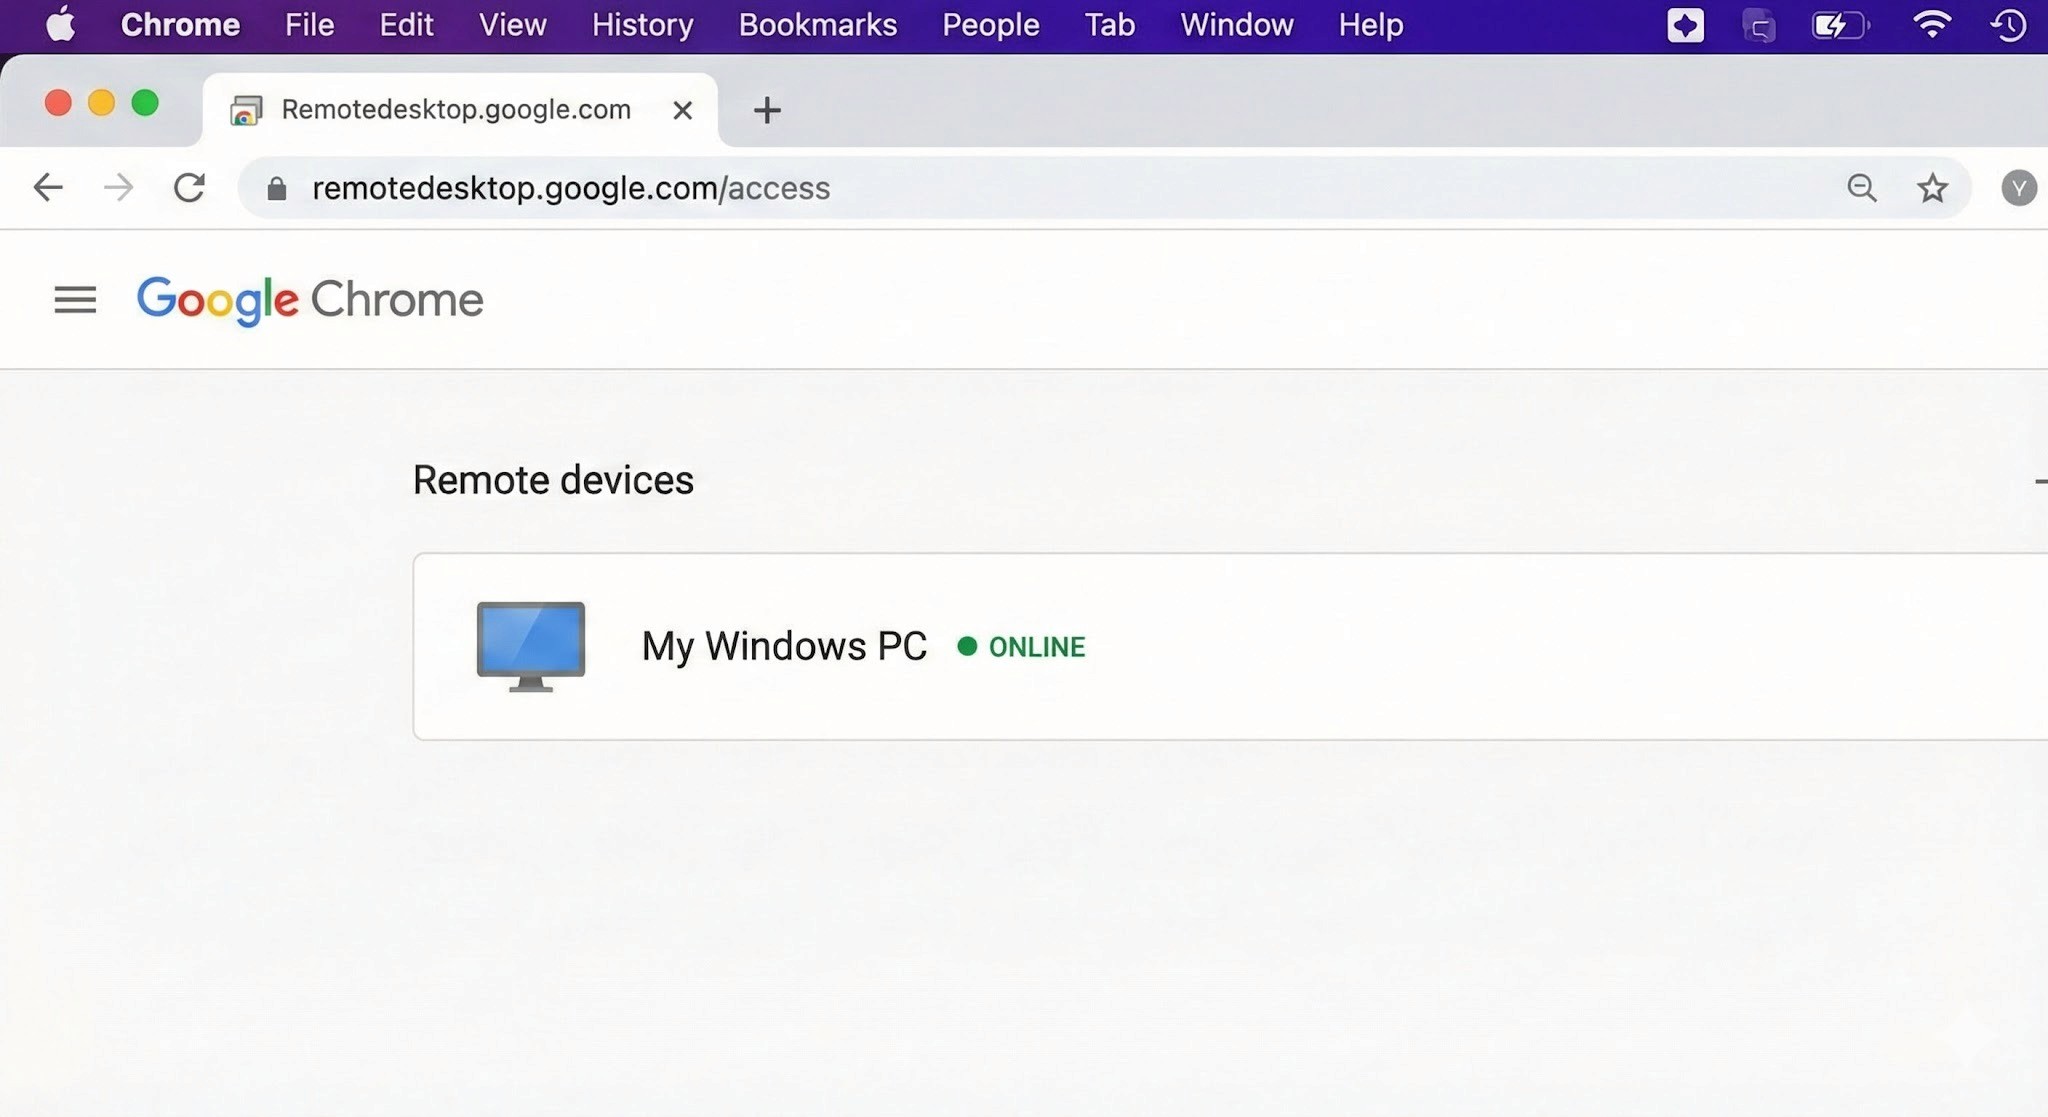
Select your PC and authenticate
Your Windows PC will appear under "Remote devices." Click it and enter your PIN — the Windows desktop will open inside your Chrome browser.
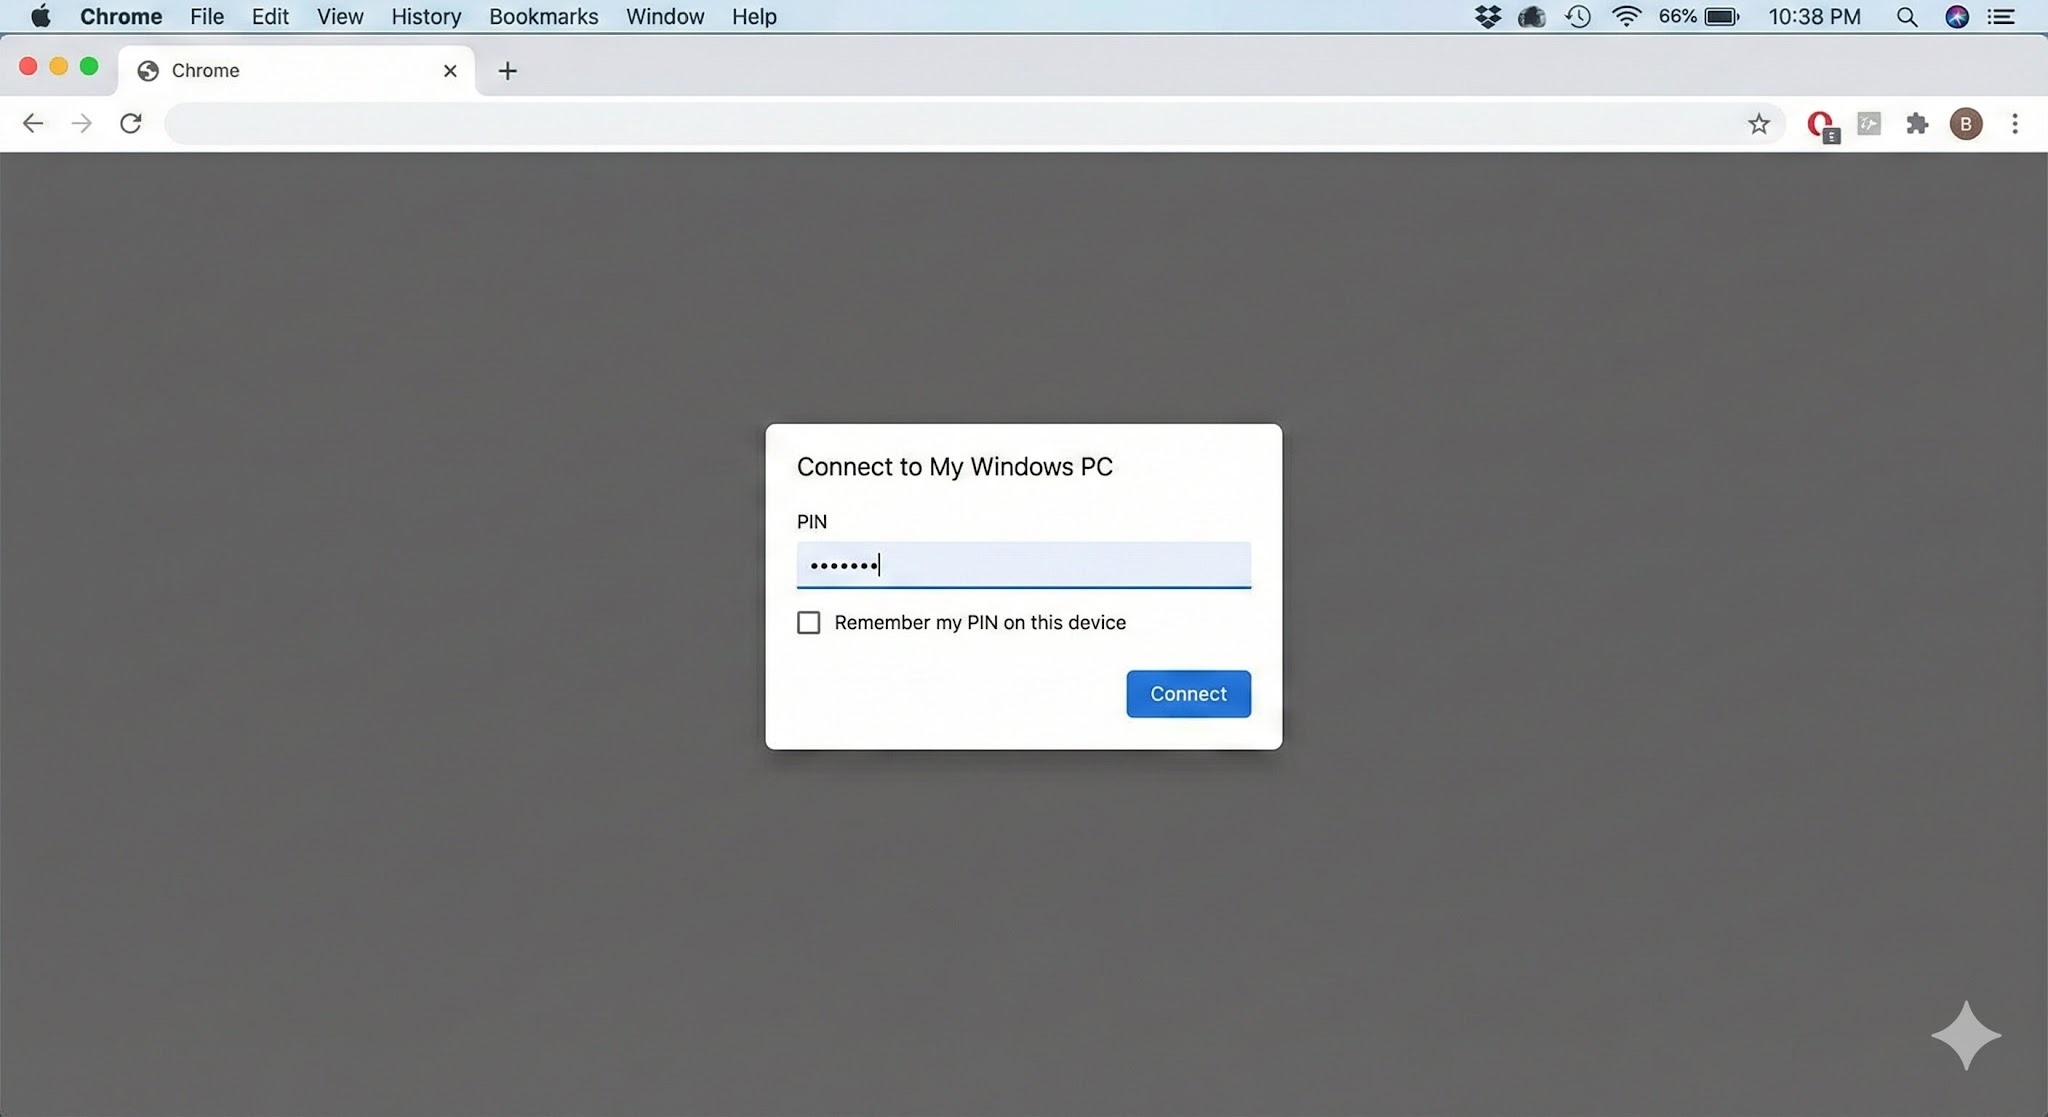
3. Connection complete
You can now control Windows using your Mac's keyboard and mouse.
Tip: For quicker access in the future, use Chrome's "Install as app" option to add Chrome Remote Desktop to your Mac's Dock — saves a few clicks every time.
H2: Cross-Platform Pitfalls: What Mac Users Run Into
Chrome Remote Desktop is easy to set up, but once you're inside a session, the Mac–Windows gap creates friction points that directly affect how much work you can actually get done. These are worth understanding before you depend on CRD for anything important.
H3: Keyboard Mapping Conflicts
The biggest source of frustration for Mac users is the modifier key difference.
Command key vs Control key: On Mac, you copy with
Command + C. On Windows, it'sControl + C.. In a remote session, Mac's Command key is sometimes interpreted as the Windows key rather than Control — meaning the shortcuts your hands have memorised simply don't work as expected.The Command + Q problem: This one catches people regularly. If you're working in a Windows application and instinctively press
Command + Qto close it, you don't close the Windows app — you close Chrome on your Mac, ending the remote session entirely. It happens more than once before you break the habit.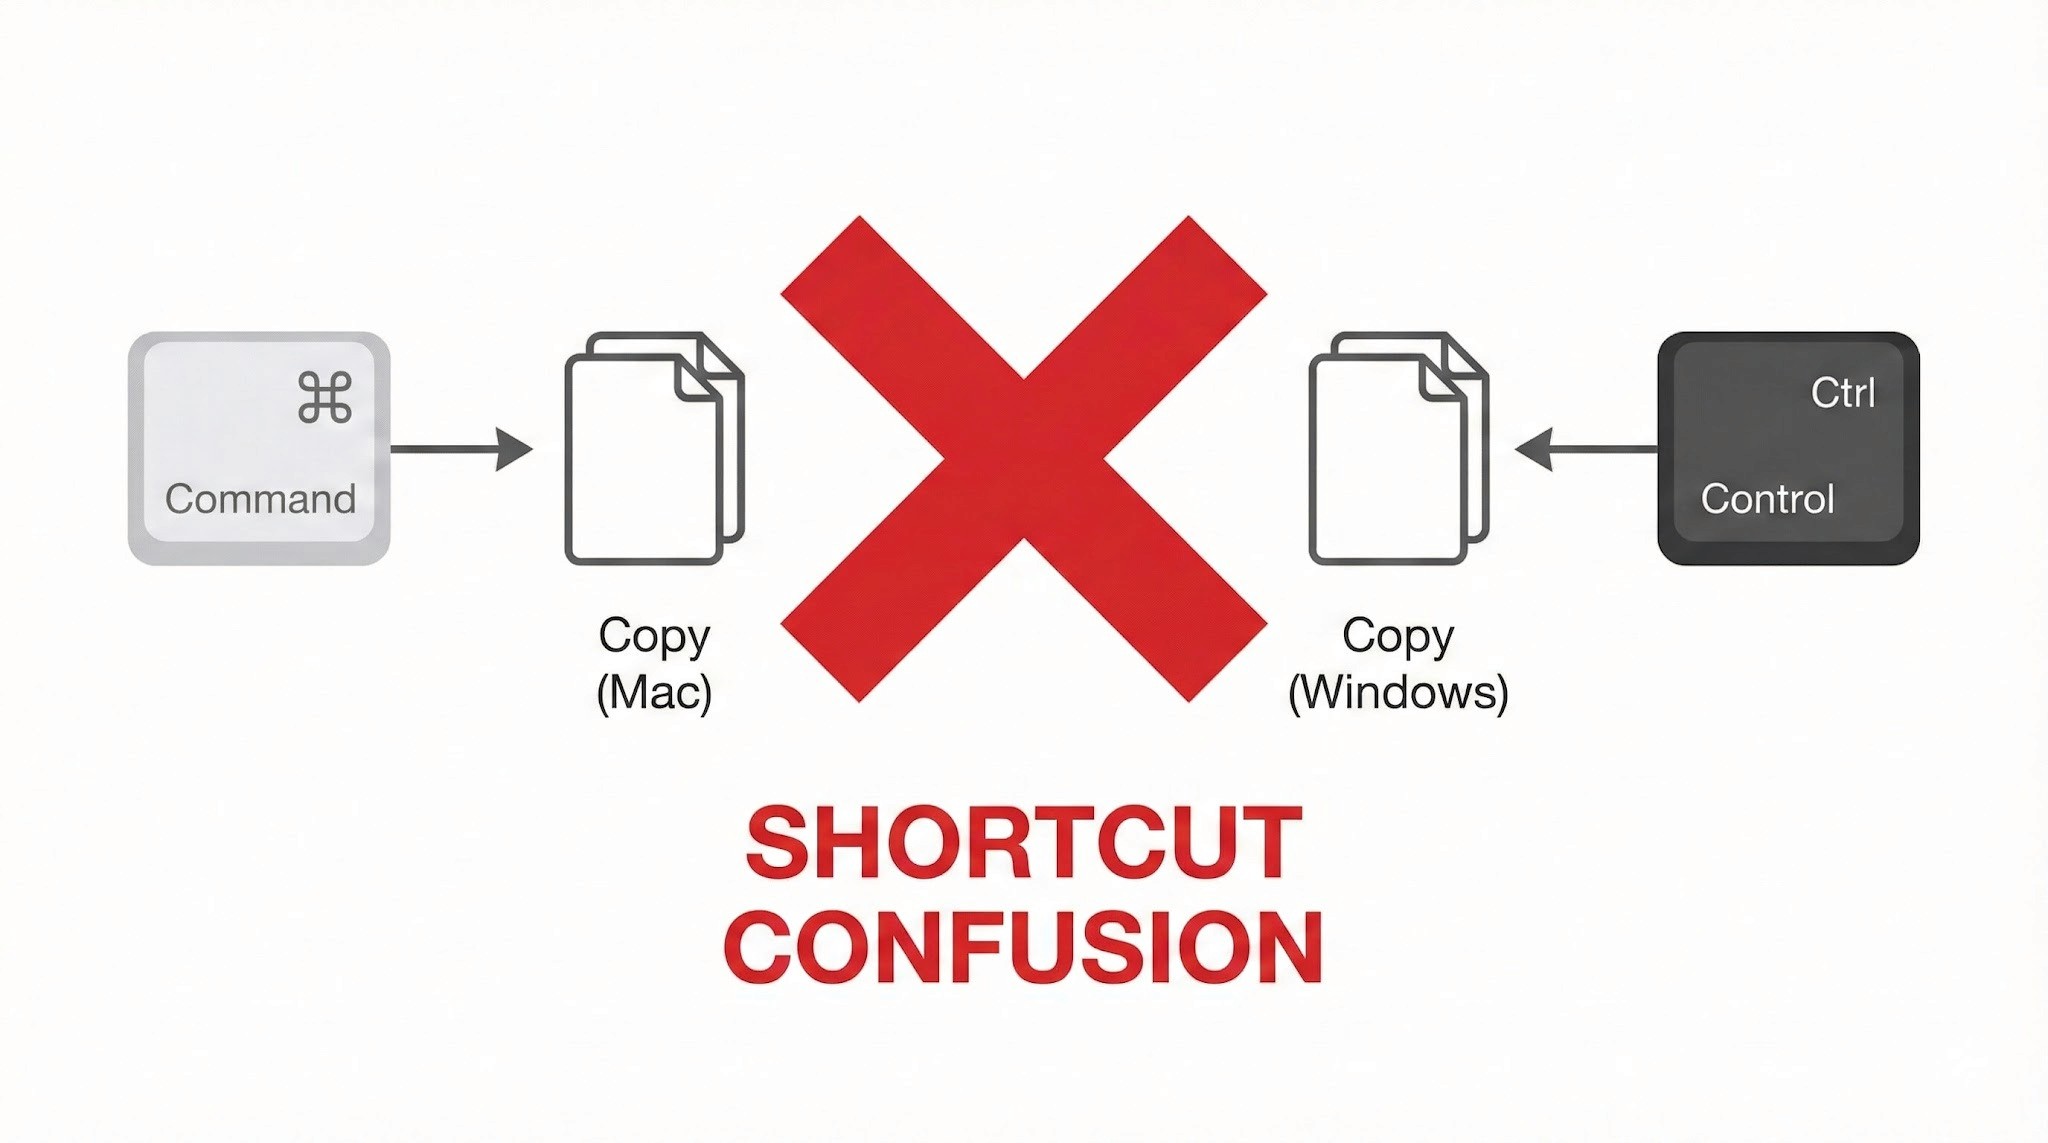
Power Management: No Wake on LAN Support
This is a significant operational limitation, and worth understanding before you depend on CRD for regular remote access.
Wake on LAN (WoL) not supported: Chrome Remote Desktop cannot remotely power on or wake up a PC that is off or sleeping. To maintain reliable remote access, the Windows PC must be left powered on continuously.
Always-on requirement: For people living in Japan, where electricity costs are relatively high and there's a cultural awareness around energy waste (mottainai, もったいない — the Japanese concept of waste-aversion that runs through everyday life), leaving a PC running overnight when it doesn't need to be is a friction point both practically and psychologically.
No more struggling with key input or power management. Stop here and try DeskIn — built for Mac users. [Install DeskIn for free]
Trackpad and Mouse Feel
The smooth, precise feel that makes Mac trackpads enjoyable doesn't carry through to a remote Windows session cleanly.
Lost gestures: Mac-specific gestures — three-finger swipes to switch desktops, pinch-to-zoom — don't transmit to Windows correctly and either do nothing or trigger the wrong action.
Unnatural scrolling: Mac's inertial scrolling feels choppy in the remote environment. Right-click response has a slight lag. These are small things individually, but they add up over a full work session.
Performance and Latency
As a browser-based tool, Chrome Remote Desktop is constrained by what it can push through a browser window.
Frame rate cap: Chrome Remote Desktop typically runs at around 30FPS. For standard document editing this is fine, but anything with fast on-screen movement shows obvious lag and ghosting.
Not suited for demanding tasks: Video editing, FPS games, or any application requiring sub-second responsiveness — the latency is too significant to be practical.
Who Should Use Chrome Remote Desktop?
Based on everything above, here's an honest assessment of where CRD works well and where it doesn't. Use this as a checklist before you decide.
✓ Recommended — CRD is a good fit for:
Quick file checks: Accessing a document on your home PC from the office or a café
Occasional admin tasks: Restarting a server, running a quick software update
Light office work: Simple browser-based data entry, sending emails — tasks where speed isn't critical
Zero-cost access: When "free and connected" is the overriding priority over performance
✗ Not recommended — CRD is a poor fit for:
Daily remote work: Working remotely for several hours at a stretch. Keyboard friction and choppy performance become a real source of stress.
Creative work: Video editing, graphic design, CAD. Accurate mouse movement, colour fidelity, and smooth rendering are all compromised.
Latency-sensitive tasks (gaming etc.): Any application where split-second responsiveness matters.
Professionals who need native performance: Not "can I connect" — but "does it feel like my own machine?"
In short: Chrome Remote Desktop is best treated as an emergency backup tool, not a primary workflow. If any of the "not recommended" scenarios describe your situation, a more capable tool is worth exploring.
When You're Ready to Go Further: DeskIn
There's a gap between "it connects" and "it feels like my own machine." If you've spent time with Chrome Remote Desktop and found yourself in that gap — frustrated by keyboard confusion, the always-on power requirement, or choppy performance — DeskIn is the purpose-built solution for exactly those problems.
Smart Key Mapping: Command/Control Auto-Mapping for Mac
One of DeskIn's standout features is its intelligent key mapping that bridges the OS divide automatically.
The Command/Control confusion that CRD leaves unresolved — and the "Command + Q closes Chrome" problem that ends remote sessions unexpectedly — are both solved. Your Mac keyboard layout works as expected in Windows, without workarounds. You can type at full speed without stopping to think about which key does what.
Wake on LAN — Start Your PC Only When You Need It
"I want to connect from outside, but I don't want to leave my PC running all day..." — DeskIn solves this.
With Wake on LAN (WoL) support, you can remotely power on a Windows PC from your Mac — even if it's shut down or sleeping. Start it when you need it, work, then let it sleep again. Less electricity, less wear on hardware, and a smarter way to work.
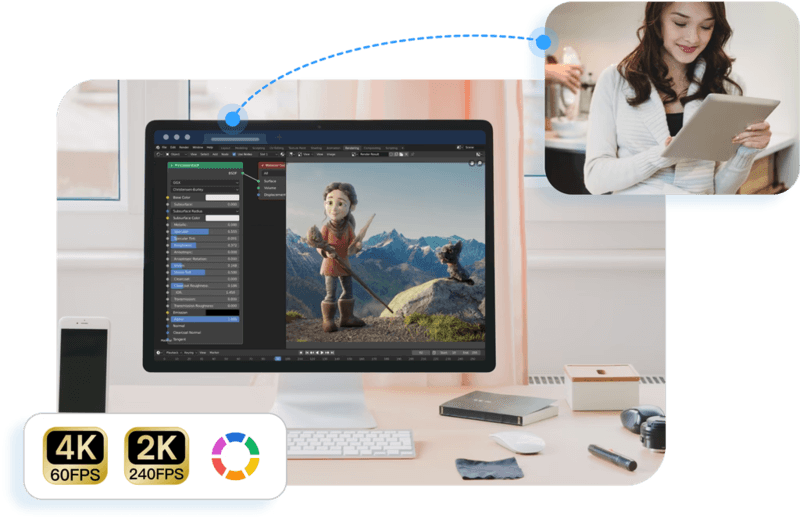
4K/60FPS Performance: The "Local Machine" Feel
DeskIn streams at 4K resolution and up to 60FPS — far beyond what CRD's browser-based approach can achieve.
Whether you're doing fine-detail design work, editing video, or playing a game, the response feels close to native. The lag that makes CRD frustrating for demanding tasks effectively disappears.
iPad and Mobile: Fully Connected on the Go
DeskIn's performance advantage extends beyond Mac to mobile — connecting from an iPad or smartphone delivers the same quality experience.
Use your iPad as an extended display for Windows, or connect a mouse and keyboard for a complete remote work setup. Gesture support is optimised for touch in a way that CRD's mobile app isn't. If you move between Mac and iPad regularly, DeskIn handles both well.
Performance Comparison: Chrome Remote Desktop vs DeskIn
Feature | Chrome Remote Desktop | DeskIn |
Primary use case | Occasional access / emergency use | Business, creative work, gaming |
Display quality | Up to 30FPS (choppy) | 4K / 60–144FPS (extremely smooth) |
Keyboard mapping | Basic — Command/Ctrl conflicts | Auto-optimised for Mac/Windows (no conflicts) |
Wake on LAN | Not supported — PC must stay on | Supported — start PC remotely |
Input feel | Noticeable lag, gesture loss | Low latency, Mac-native feel |
Cost | Free | Free tier available / Pro version |
Summary
Chrome Remote Desktop earns its place as an entry-level tool. Its ease of use and zero cost make it a great starting point for quick file access, occasional light tasks, and situations where budget is the overriding factor.
But if you're using a remote desktop regularly — for work, creative projects, or gaming — the accumulated frustrations of keyboard conflicts, always-on power requirements, and performance caps start to outweigh the convenience of free.
When that point arrives, DeskIn is the obvious next step: a tool designed from the ground up for people who need remote access to actually feel like working locally. Whether you're at your apartment, in a café in Kichioji, or somewhere further afield — your Windows machine should feel like it's right in front of you.
Experience professional-grade performance now — [Download DeskIn free and try it]

DeskIn vs Chrome Remote Desktop: Which One Fits Your Workflow Best?
When it comes to remote access tools, the comparison between DeskIn and Chrome Remote Desktop often comes down to one simple question: do you just need quick access, or do you need performance and control?
Both tools are reliable, secure, and widely used. But they are built for very different types of users. Chrome Remote Desktop focuses on simplicity and accessibility, while DeskIn is designed for users who need high performance, stability, and advanced features across multiple devices.
If you're deciding between the two, this guide breaks down not just what they offer, but which one actually fits your workflow.
Quick Comparison: DeskIn vs Chrome Remote Desktop
Feature | DeskIn | Chrome Remote Desktop |
|---|---|---|
Performance | Up to 4K 60FPS/2K 240FPS, low latency | Standard performance |
Ease of Use | Requires app installation | Browser-based, very simple |
Device Support | Windows, macOS, iOS, Android | Works via Chrome browser |
File Transfer | Fast and stable | Limited |
Multi-device Management | Yes | No |
Mobile Experience | Optimized for iPad & iPhone | Basic |
Security | Privacy screens and granular black/whitelists | Basic |
Price | Free + paid plans | Completely free |
In short, Chrome Remote Desktop is great for quick, lightweight access, while DeskIn is built for users who expect more from their remote desktop experience.
Chrome Remote Desktop Overview
Chrome Remote Desktop is one of the simplest remote access tools available. It runs directly through the Chrome browser and requires only a Google account to get started. This makes it especially popular among casual users and those already working within the Google ecosystem.
It works particularly well on devices like Chromebooks, where everything is already browser-based. It's also accessible across platforms, including mobile devices like iPhone and iPad, though the experience on mobile can feel limited compared to desktop use.
If you're wondering how to use Chrome Remote Desktop, the process is straightforward. You install the Chrome extension, sign in with your Google account, set up a PIN on the host device, and then connect from another device using the same account. The entire setup usually takes just a few minutes.
That said, simplicity comes with trade-offs. Chrome Remote Desktop lacks advanced features like high frame rate streaming, multi-monitor control, or professional-grade file transfer. For occasional access, it works well. But for more demanding tasks, users often start to feel its limitations.
👀You may also be interested in:
DeskIn Overview: A More Powerful Chrome Remote Desktop Alternative

If Chrome Remote Desktop is a lightweight sketch, DeskIn is a full workstation painted in high resolution. DeskIn focuses on performance, stability, and flexibility. It supports up to 4K 60FPS streaming, making it suitable for tasks where visual clarity and responsiveness matter, such as design work, video editing, or even gaming.
As a Chrome remote desktop alternative, unlike browser-based tools, DeskIn is a dedicated remote desktop application. While this requires installation, it unlocks a much more stable and feature-rich experience. Users can manage multiple devices, transfer large files efficiently, and enjoy smoother control across different platforms.
DeskIn is also optimized for mobile workflows. Whether you're using an iPad or smartphone, the interaction feels more responsive and closer to a desktop experience, rather than a simplified viewer. For users who find Chrome Remote Desktop "good enough" at first but limiting over time, DeskIn often becomes the natural upgrade path.
DeskIn vs Chrome Remote Desktop: Real Use Cases
The real difference between these two tools becomes clear when you look at how they perform in everyday scenarios.
1. For Casual Remote Access
If you only need to check files on your home computer or help a friend troubleshoot something quickly, Chrome Remote Desktop is more than enough. It's free, easy to set up, and doesn't require installing extra software beyond Chrome. In this case, DeskIn may feel like overkill.
2. For Remote Work and Productivity
For professionals working remotely on a daily basis, stability and efficiency matter much more. This is where DeskIn starts to stand out.
Tasks like editing documents, managing multiple screens, or transferring files between devices become smoother and faster. Chrome Remote Desktop can handle basic workflows, but it often struggles with responsiveness and lacks the tools needed for a seamless work environment.
3. For High-Performance Tasks (Design, Editing, Gaming)
This is where the gap becomes impossible to ignore. DeskIn's support for high resolution and high frame rates makes it suitable for visually demanding work. Whether you're editing videos, working with design software, or running simulations, performance consistency is critical. Chrome Remote Desktop, on the other hand, is not designed for these scenarios. It works, but not comfortably.
4. For Chromebook and Google Ecosystem Users
If you rely heavily on Google services or use a Chromebook, Chrome Remote Desktop integrates naturally into your workflow. It's lightweight, requires no additional setup, and feels like an extension of the browser itself. In this scenario, it remains a very practical choice.
5. For iPad and iPhone Remote Access
Mobile usage highlights another important difference. While remote desktop Chrome iPhone, and Chrome Remote Desktop iPad are functional, they often feel like simplified versions of the desktop experience. Controls can be less intuitive, and performance may vary depending on the connection.
DeskIn, by contrast, is designed with cross-device interaction in mind, offering a smoother and more responsive mobile experience.
👀 You may also be interested in:
FAQs About Chrome Remote Desktop and DeskIn
1. Is there anything better than Chrome Remote Desktop?
Yes. Tools like DeskIn offer better performance, more features, and improved stability, especially for professional use cases.
2. Is Chrome Remote Desktop discontinued?
No, Chrome Remote Desktop is still actively maintained by Google. It continues to receive security updates and remains available for users needing simple, free remote access.
3. Is DeskIn Remote Desktop legit?
Yes, DeskIn is a legitimate remote desktop solution. It uses encryption to secure connections and provides access controls, making it safe for both personal and professional use.
4. Final Verdict: Which One Should You Choose?
When comparing DeskIn vs Chrome Remote Desktop, the choice depends on how demanding your remote access needs are. Chrome Remote Desktop is simple, free, and ideal for occasional use, especially if you just need quick access to a device without extra setup.
As your workflow becomes more intensive, the limitations start to surface. DeskIn offers a smoother, more stable experience with better performance and control, making it a strong long-term Chrome remote desktop alternative for users who rely on remote access every day.

8 Best Remote Desktops for Video Editing in 2026
Remote video editing is no longer a compromise; it's a workflow upgrade. Whether you're working in Adobe Premiere Pro, After Effects, or DaVinci Resolve, the right remote desktop can turn your laptop into a high-performance editing station.
But not all tools are built for remote video editing collaboration. Lag, poor color accuracy, and unstable connections can ruin productivity. In this guide, we'll break down the best remote desktop for video editing tools so that you can edit smoothly from anywhere.
Why You Need a Remote Desktop for Video Editing
Modern creators are no longer tied to a single workstation. With remote work software, you can access your powerful desktop from anywhere without investing in an expensive laptop. For many editors, especially freelancers and small teams, this solves a real problem: you already have a high-performance PC, but mobility is limited. Instead of duplicating hardware, video editing remote desktop tools let you stream your workflow in real time.
Another key benefit is remote collaboration. Teams can work on the same project across different locations, review edits instantly, and avoid large file transfers via remote collaboration tools. However, this only works if your remote desktop software supports high frame rates, low latency, and stable connections. Otherwise, editing becomes frustrating.
Quick Comparison of Best Remote Desktops for Video Editing
Here's a quick overview of the best tools and who they're for:
DeskIn – Best overall for performance + affordability + multi-device workflows
Parsec – Best for ultra-low latency editing
Splashtop – Best for high-resolution streaming
HP Anyware – Best for enterprise-level workflows
Jump Desktop – Best for Mac users
AnyDesk – Best lightweight remote access
Chrome Remote Desktop – Best free basic option
RustDesk – Best open-source alternative
1. The Best Overall Remote Desktop for Video Editing: DeskIn
Pros
Up to 4K 60FPS / 2K 240FPS performance
Ultra-low latency for smooth editing timelines
Multi-device support (PC, Mac, iPad, Android)
Affordable pricing with free plan available
Cons
Smaller brand awareness compared to legacy tools
DeskIn stands out as the best remote desktop for video editing by balancing performance, stability, and accessibility. Unlike many traditional remote support tools, it is designed for high-frame-rate tasks, making timeline scrubbing, preview playback, and effects editing feel responsive and fluid.
For creators working across devices, DeskIn enables seamless remote video editing collaboration. You can access your main editing PC from a laptop, tablet, or even a secondary workstation without noticeable lag. Compared to tools like Chrome Remote Desktop, which struggle with video-heavy workloads, DeskIn maintains consistent quality and responsiveness—making it a practical choice for both solo editors and distributed teams.
2. Best for Low-Latency Editing: Parsec
Pros
Extremely low latency
High frame rate streaming
Popular among creative professionals
Cons
Limited collaboration features
Setup can be complex for beginners
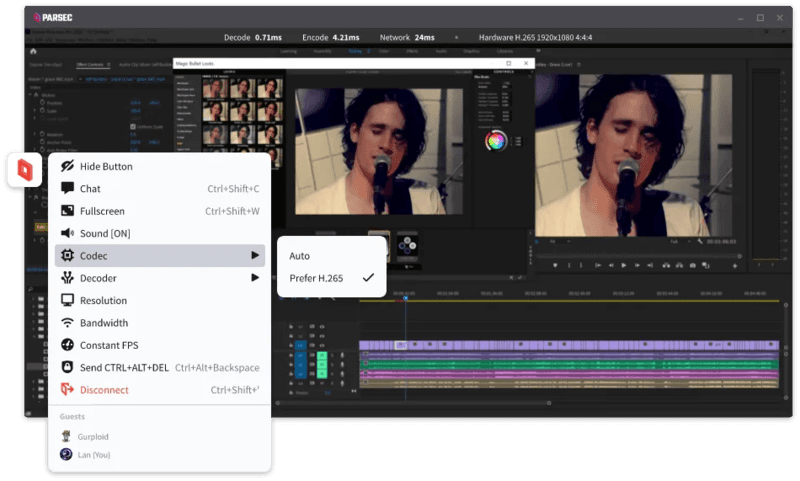
Parsec is widely recognized as a top choice for remote video editing, especially when latency is your biggest concern. Its streaming technology is optimized for real-time responsiveness, which makes it ideal for tasks like timeline scrubbing and motion graphics work in After Effects.
However, while Parsec excels in performance, it lacks some features needed for full remote video editing collaboration. Multi-user workflows and advanced access control are not as robust as some newer tools. For users who need both performance and flexibility, alternatives like DeskIn may provide a more balanced solution.
3. Splashtop – Best for High-Resolution Streaming
Pros
Supports 4K streaming
Strong color accuracy
Reliable for creative tasks
Cons
Higher cost for advanced features
Can experience latency over long distances
Splashtop is a solid option for editors who prioritize visual fidelity. Its support for high-resolution streaming and 4:4:4 color makes it suitable for color grading and detailed editing work.
That said, performance consistency can vary depending on network conditions. Some users report lag when working outside local networks. Compared to more optimized remote work software like DeskIn, Splashtop may require a stronger connection to maintain the same level of smoothness.
4. Best for Enterprise Workflows: HP Anyware
Pros
Industry-grade performance
Secure and scalable
Used in professional studios
Cons
Expensive
Complex setup
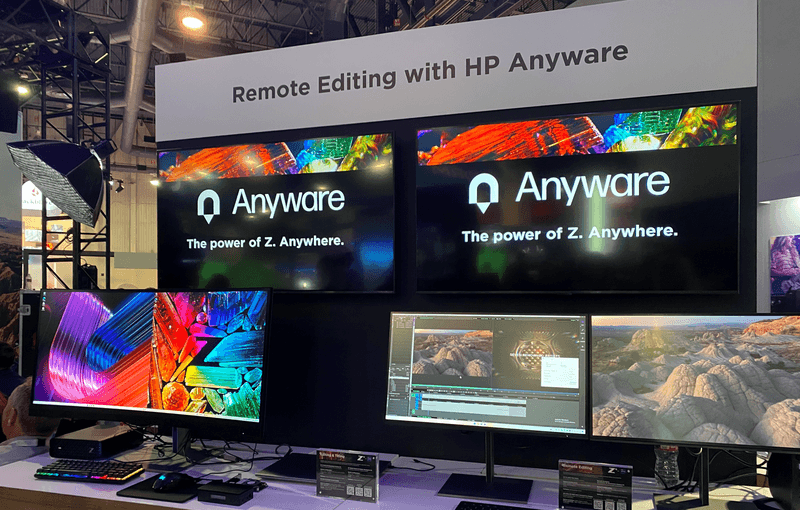
HP Anyware (formerly Teradici) is designed for high-end production environments. It uses advanced protocols to deliver excellent performance and security, making it a common choice in the media and entertainment industries.
However, for small teams or individual creators, it may be overkill. The cost and setup complexity make it less accessible compared to modern remote desktops for video editing tools that offer similar performance with easier deployment. The high cost and technical complexity create barriers that modern remote desktop solutions have eliminated, like DeskIn, offering comparable performance with far simpler deployment.
5. Best for Mac Users: Jump Desktop
Pros
Great macOS integration
Smooth performance
Easy to use
Cons
Limited advanced features
Not ideal for heavy collaboration
Jump Desktop has earned a loyal following among Mac users seeking a straightforward, efficient remote desktop for video editing. Its Fluid Remote Desktop protocol provides smooth, responsive performance for most editing tasks without unnecessary complexity.
Where it falls short is in collaboration. Jump Desktop is built for individual use, lacking the team-oriented features that creative groups need. For solo professionals, it works well, but teams will quickly miss real-time collaboration tools found on other platforms.
6. Best Lightweight Option: AnyDesk
Pros
Fast and lightweight
Easy to set up
Works on multiple devices
Cons
Limited performance for video editing
Lower visual quality

AnyDesk has built its reputation on lightweight design and remarkable ease of use for general remote access. It handles everyday tasks competently, connecting quickly and running smoothly on modest hardware.
The limitations become apparent with demanding creative work. Remote video editing requires consistent frame rates and crystal-clear visuals—areas where AnyDesk struggles. For professional editors who need precision, the performance gap becomes impossible to ignore.
7. Chrome Remote Desktop – Best Free Option
Pros
Completely free
Easy browser-based setup
Works on any device
Cons
Poor performance for editing
Limited features
Chrome Remote Desktop is one of the most accessible remote support tools, offering a simple way to access your computer from anywhere. It's free, requires almost no setup, and lets you access your computer from anywhere with just a browser. For basic technical support or quick file grabs, it gets the job done.
However, it is not built for remote video editing. Users often experience lag, compression artifacts, and low frame rates. If you're working on professional projects, upgrading to a more capable solution is highly recommended.
8. RustDesk – Best Open-Source Alternative
Pros
Open-source
Self-hosting available
Free to use
Cons
Requires technical setup
Performance can vary
RustDesk appeals to users who prioritize open-source philosophy and want complete control over their remote access infrastructure. The flexibility to self-host and customize is genuinely valuable for privacy-conscious users. RustDesk is an interesting option for users who prefer open-source remote desktop not working alternatives or want full control over their infrastructure.
Performance, however, depends entirely on your configuration skills. Without technical expertise, achieving the smooth, low-latency experience required for professional editing is challenging. It's powerful for those who know how to tune it, but not plug-and-play.
FAQs About the Best Remote Desktop for Video Editing
Q1. Can video editing be done remotely?
Yes, with the right remote desktop for video editing, you can edit videos smoothly from anywhere. Tools like DeskIn and Parsec provide low latency and high frame rates for professional workflows.
Q2. What is the best free remote desktop for video editing?
Free options like Chrome Remote Desktop exist, but they lack performance. DeskIn offers a free plan with better performance, making it a stronger choice for real editing work.
Q3. Is Parsec good for video editing?
Yes, Parsec is excellent for low-latency editing. However, it may lack collaboration features needed for team workflows.
Q4. Why is my remote desktop not working smoothly?
Common issues include poor network connection, low bandwidth, or software limitations. Choosing optimized remote work software like DeskIn can significantly improve performance.
Conclusion
Choosing the best remote desktop for video editing depends on your workflow, budget, and performance needs. While tools like Parsec and Splashtop excel in specific areas, many solutions struggle to balance performance, stability, and usability.
If you're looking for a well-rounded solution, DeskIn offers a strong combination of high performance, smooth streaming, and cross-device flexibility. Whether you're working solo or collaborating remotely, it provides a reliable foundation for modern remote video editing workflows.

Unlocking the Ultimate Remote Work Setup: Deskimo Meets DeskIn
Remote work promised freedom, but for many professionals it quietly delivered a new kind of friction. The apartment is too noisy. The café Wi-Fi is patchy. The laptop bag gets heavier every month as cables, chargers, and a second monitor piles on. Somewhere along the way, "working from anywhere" started to feel a lot like hauling your office everywhere.
The fix is to pair two tools that solve opposite halves of the same problem. Deskimo, a coworking space platform, gives you on-demand access to workspaces by the minute. DeskIn, a remote desktop software, gives you access to your home or office computer from any device. Put them together and you get a workflow that removes hardware limits, keeps your data on your home machine, and lets you walk into any city with nothing but a tablet.
Why your personal space isn't always a productive space
Working from home sounds ideal until your partner takes a call in the shared study. Or when the neighbour upstairs starts drilling at 9 a.m. Most work requires deep engagement and intense focus, free from distractions. Most homes were not designed to provide these on demand.
Coworking spaces fill this gap in three ways. Firstly, they set a physical boundary between personal life and work. Research suggests coworking setup is linked to higher productivity than working from home. Secondly, they offer amenities that are difficult to replicate at home: strong Wi-Fi, ergonomic chairs, private meeting rooms and quiet zones. Thirdly, individual workstations, open-plan workspaces foster a professional presence. You are most likely surrounded by people who are also there to work, and this social context encourages you to do the same.
Keep the Desk, Skip the Membership
The downside of most coworking spaces is the commitment. Monthly memberships and yearly office leases assume you need a desk every day, but most remote workers don't. Deskimo removes that friction: book a desk or meeting room by the hour, only when you need it, at hundreds of locations across cities.
The "Light Bag" Workflow
Once you start working outside of home regularly, the first thing you'll notice is the bag. A full laptop setup - machine, charger, mouse, maybe a portable monitor - adds up fast, especially if you're commuting by train or bike.
The fix is simple: leave your powerful machine at home. Carry only a lightweight tablet or thin laptop. DeskIn bridges the gap: open the app on your tablet, connect to your home workstation, and your full desktop environment streams to your screen. CAD software, video editing timelines, 40-tab research sessions. Everything runs on your hardware at home while you sit at a Deskimo desk across town.
What a Light Bag Day Actually Looks Like
A typical morning might start with email and focused work at a café-style hot desk over coffee. After lunch, you book a Deskimo private meeting room, connect to your home workstation through DeskIn, and tackle the heavy rendering or design work. Your bag weighs less than a paperback. Your output doesn't change.
Security Without the Usual Compromise
Working on public Wi-Fi has always been a quiet risk. When you open sensitive files on a portable device at a hot desk, those files are now physically travelling with you on a drive that could be stolen or compromised.
DeskIn's architecture sidesteps this. Your work runs on your home or office machine; the actual files never leave your network. Your device becomes a window: it displays pixels, sends back your clicks and keystrokes, and stores nothing from the session. Combined with DeskIn's end-to-end encryption and Privacy Mode (which blanks the host screen so no passerby sees what you're working on), the setup is arguably safer than carrying a laptop.
This matters most for teams working with regulated data - legal, healthcare, finance. Now you can offer staff the freedom to work from any Deskimo location without stretching your security perimeter to every space they visit.
Multi-Screen Workflows Without Buying Monitors
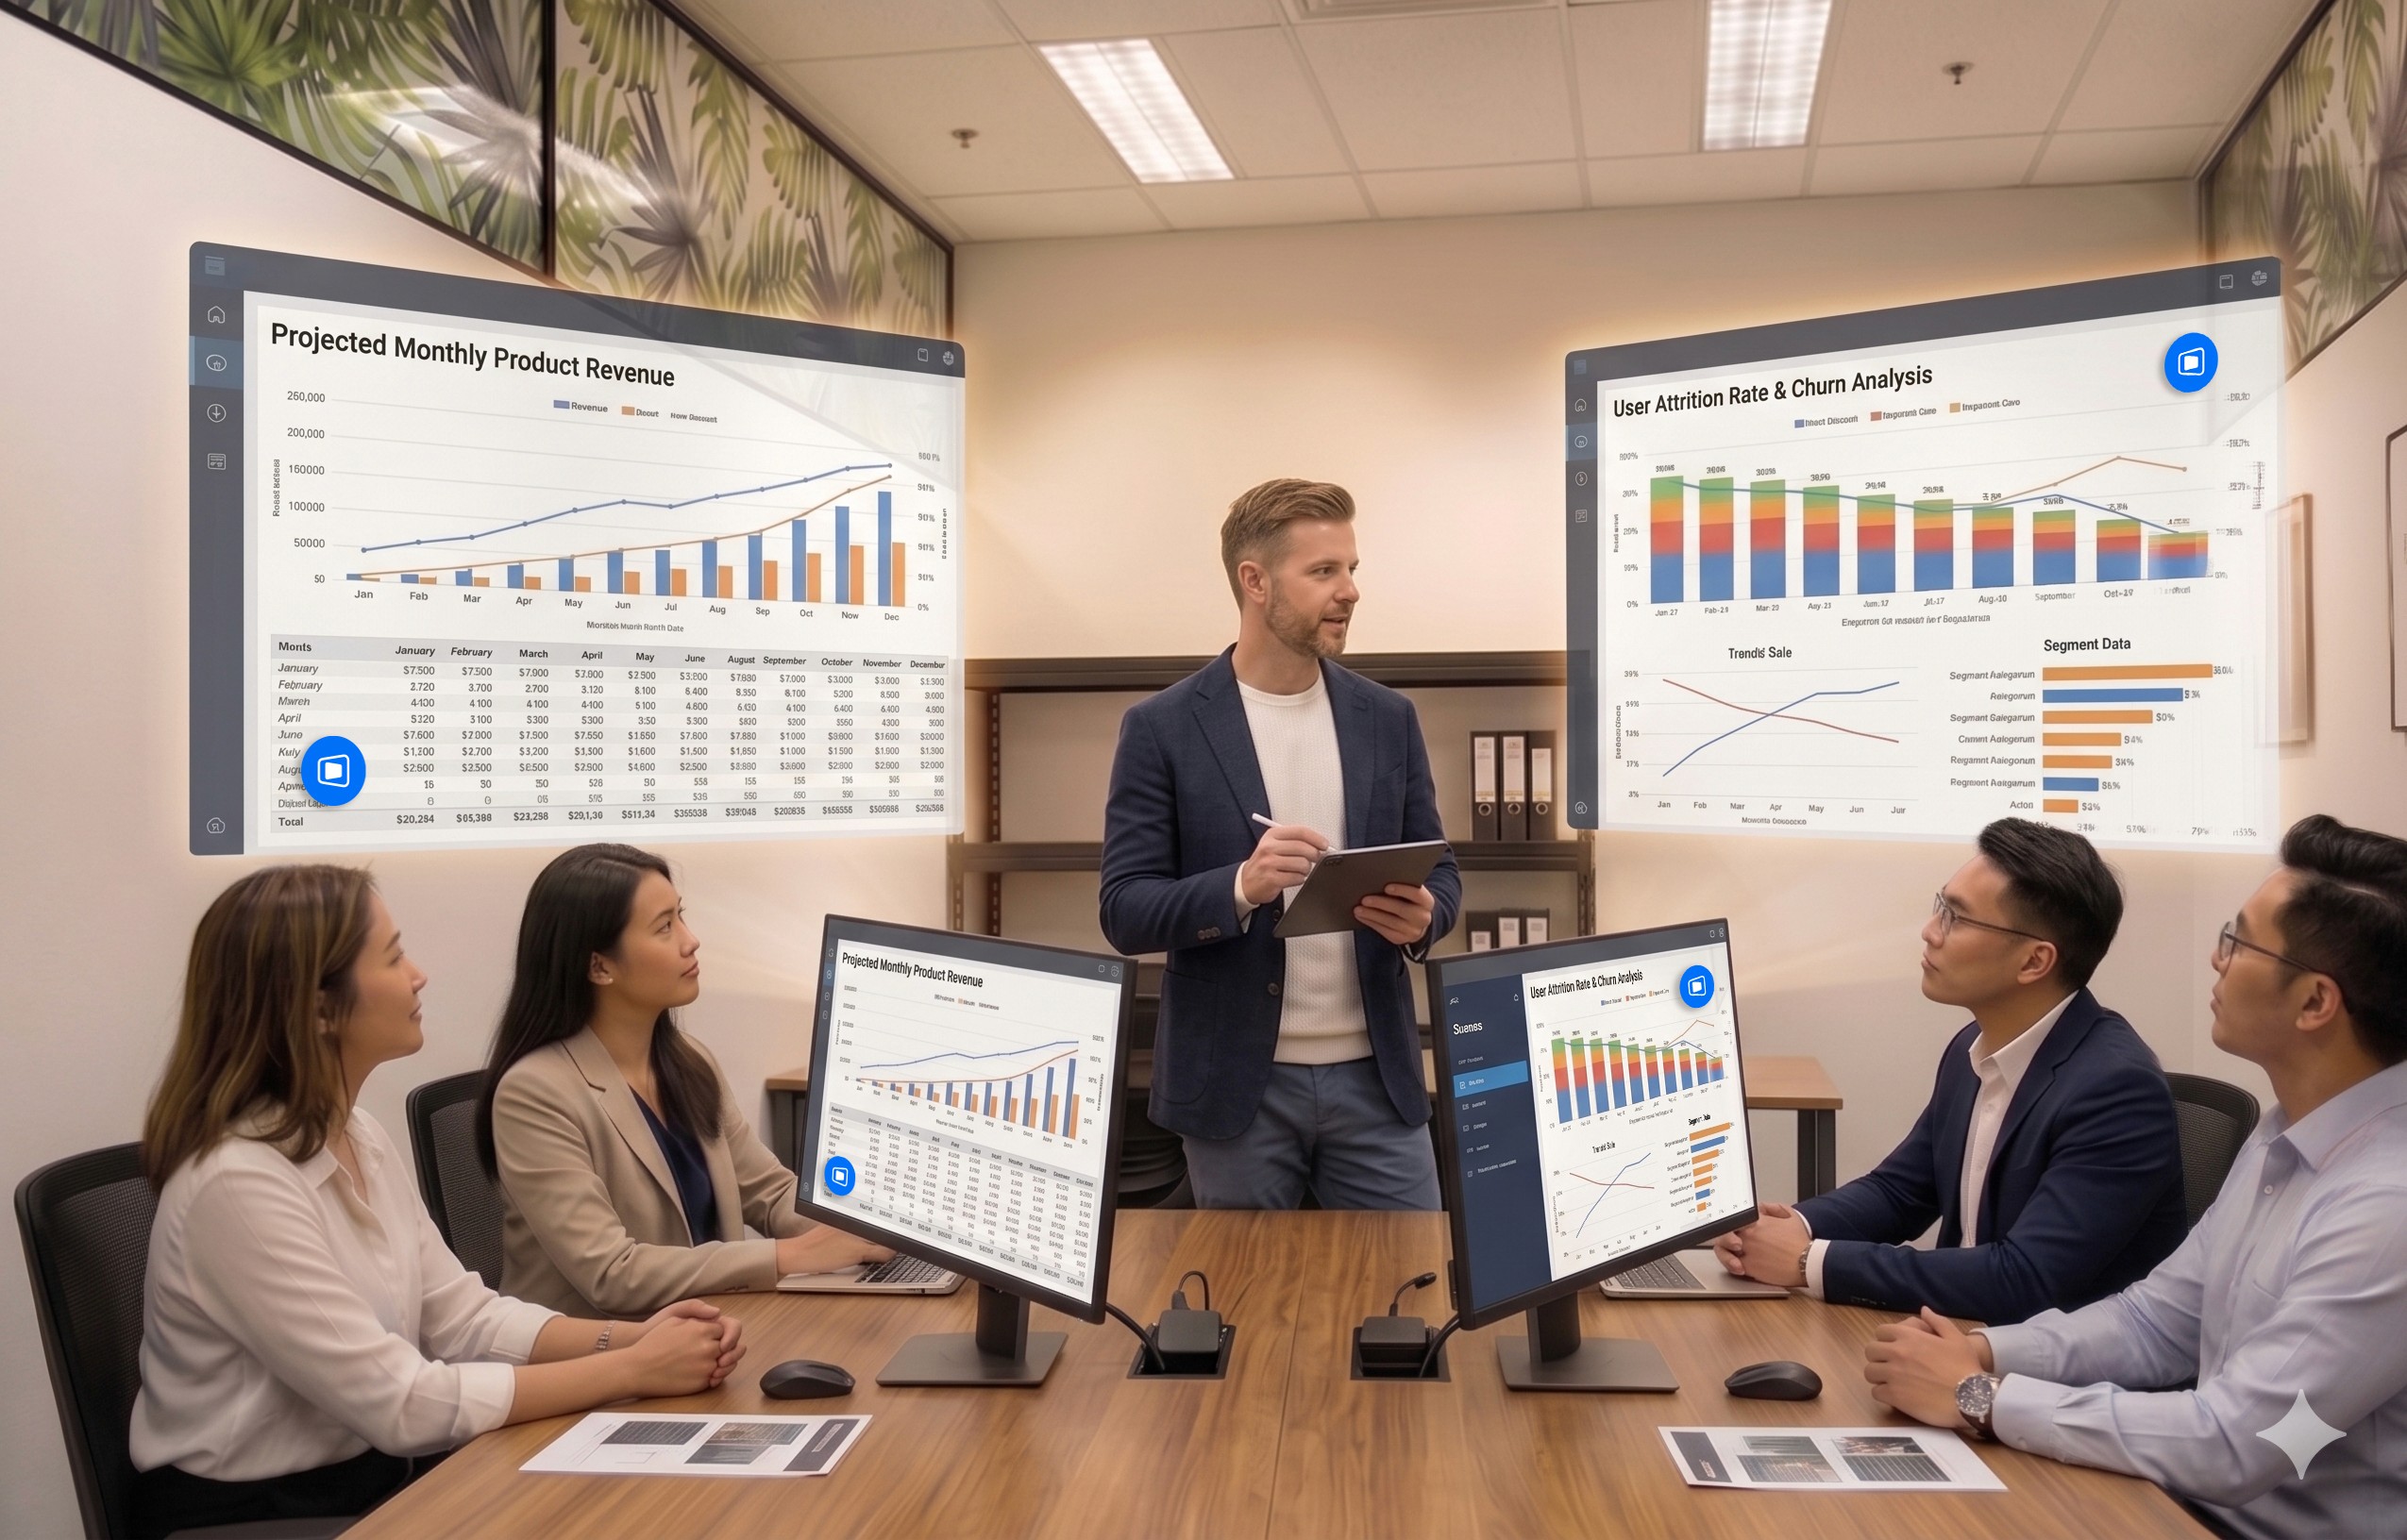
One of the underrated benefits of coworking spaces is that they often provide equipment that you wouldn't buy. Many Deskimo locations have meeting rooms equipped with external monitors, smart TVs or dual-display desks. Check the amenities at your chosen location and ask the staff if this is important for your session.
Bring the Desktop, Borrow the Screens
DeskIn's screen management feature allows you to make the most of these setups without the need for additional cables or adapters. You can wirelessly extend your remote desktop across multiple displays, which is a great upgrade for anyone working with spreadsheets, design files or code. For example, you could put financial models on one screen, reference documents on another, communication on a third; all without buying a single monitor.
How to use Remote Desktop in a coworking Space
The idea is appealing, but the practical question is where to begin. Here are a few guidelines:
1. Start with the space, then add the software.
If focusing at home has been a struggle, book a few Deskimo sessions across different locations and see what clicks. Some people thrive in café energy; others need a silent private booth. Once you know where you work best, install DeskIn on both your desktop and your portable device. Spend a session fine-tuning the connection before you depend on it for work.
2. Match the space to the task
Open coworking areas suit light communication and email. Quiet zones are better for focused writing or deep analysis. Private meeting rooms belong to client calls and heavy multi-screen work. With Deskimo's pay-per-minute pricing, you only pay for the room type you actually need; no overspending on a meeting room when a hot desk will do.
3. Be honest on your budget
A permanent private office in a major city can run from several hundred to several thousand dollars a month. A combined Deskimo and DeskIn setup, used a few days a week, typically costs at a fraction of that, before you even count the hardware you no longer need to buy. Ask the Deskimo staff about location pricing and team plans, as costs vary by city and space type.
4. Be aware of the trade-offs
Coworking spaces are not a perfect substitute for a dedicated office. Availability fluctuates, noise levels vary, and long sessions on pay-per-minute pricing is costly. The fix is simple: book ahead for important sessions, have an alternative location in mind, and use Deskimo day passes or bundles when you know you'll be there all day.
Bringing It Together
If you are using remote desktop software to work but struggle with noisy home environments, a coworking space could be the missing piece. Try booking a workspace on Deskimo app using the referral code DESKIN to get for $10 off (new users only). Setting up a new Deskimo Business account? Use referral code DESKBIZ for 60% off your first credit package. If you already have a Deskimo membership but find yourself hauling heavy gears to every session, DeskIn could change that. Download the app, connect to your desktop in minutes. Use promo code DESKIMO for 50% off DeskIn for the first month (or 20% off on annual plans). This promotion is valid until 31 July 2026. Terms and conditions apply.
The best remote setup isn't about buying more gear. It's about showing up anywhere with almost nothing, and still doing your best work.
About Deskimo
Deskimo is an on-demand workspace platform that gives professionals pay-per-minute access to coworking spaces, private offices, and meeting rooms. No long-term leases. No monthly subscriptions. Book a space when you need it and only pay for the time you use.
About DeskIn
DeskIn is remote desktop software that delivers low-latency access to your personal and enterprise computers from any device. With end-to-end encryption, multi-screen management, and fast data transmission, it's made for professionals who need all the power of a desktop computer without having to carry the hardware.

Paano Kontrolin ang Function na Alt Delete sa Remote Desktop [Pag-troubleshoot]
Kung nasubukan mo nang pinutin ang Ctrl + Alt + Delete sa iyong keyboard habang naka-connect sa isang remote desktop session, alam mo na hindi ito gumagana sa paraang inaasahan mo. Sinasala ang utos ng iyong lokal na makina, hindi ng remote. Nakakainis, di ba?
Kapag Hindi Gumagana ang Ctrl + Alt + Del nang Remote
Para sa mga remote workers, freelancers, at digital nomads, mahalagang malaman kung paano kontrolin ang alt delete sa remote desktop. Kung sinusubukan mong i-lock ang iyong screen, ma-access ang Task Manager, o magbago ng password, ang simpleng shortcut na ito ay mas mahalaga kaysa sa iyong inaasahan.
Good news: may mas mahusay na paraan upang hawakan ito, at sasamahan kita sa bawat hakbang.
1. Bakit Hindi Gumagana ang Ctrl + Alt + Del sa Default
Ano ang Problema?
Kapag gumagamit ka ng Remote Desktop Protocol (RDP) o mga remote access tools, pumupunta ang mga utos ng iyong keyboard sa lokal na sistema maliban kung sinabi nang iba.
Ang Ctrl + Alt + Delete ay isang protektadong utos ng sistema.
Palaging kontrolado ito ng iyong lokal na sistema muna.
Hindi ito natatanggap ng remote computer.
Ito ay ayon sa disenyo, ngunit para sa mga namamahala ng mga remote PC, ito ay isang sakit ng ulo.
Sino ang Kailangan nito?
Remote workers na namamahala ng maraming makina
Mga IT admin na gumagawa ng maintenance
Mga freelancers na nagtatrabaho sa iba't ibang time zone
Mga digital nomads na uma-access ng office PCs mula saanman
Ano ang Talagang Kailangan Mo
Kailangan mo ng paraan upang ipadala ang Ctrl + Alt + Delete sa remote machine nang hindi nagdudulot ng lokal na pagkaabala.
Maari mo ring gusto:
Bakit hindi ko ma-remotely control ang aking Android device?
Paano Secured ang Remote Desktop Access: Manatiling Ligtas na Remote
Paggamit ng DeskIn: Mas Matalinong Paraan upang Hawakan ang Remote Access
Ang DeskIn ay isang libre at remote desktop tool na nagbibigay-daan sa iyo na ma-access ang anumang PC, mula saanman. Isang malaking benepisyo? Pinapayagan ka nitong ipadala ang Ctrl + Alt + Delete nang direkta, walang stress.
Paano Ito Gawin sa DeskIn
Ilunsad ang DeskIn app sa parehong mga device
Kumonekta sa iyong PC/Mac/Laptop gamit ang DeskIn (kung nakakonekta, makikita ng iyong mobile display ang ganito)
Sa ibabang kanan na sulok ng menu, i-click ang arrow at lilitaw ang isa pang add button
Pagkatapos ay piliin ang action menu sa pinaka-kaliwa

Pagkatapos ay ang ctrl+alt+delete button ay lumilitaw na maaari mong madaling gamitin sa anumang oras.

I-click ito — problema ay nalutas!
Hindi mo kailangan alalahanin ang kumplikadong shortcuts o keyboard hacks. Ginagawang madali ng DeskIn ang isang click lamang.
Subukan ang DeskIn Ngayon
Naka-stuck pa rin sa pag-figure out kung paano kontrolin ang alt delete sa remote desktop? Hayaan ang DeskIn na hawakan ito para sa iyo. I-click dito upang i-download ang DeskIn.
Load More
Blog
Search Docs…
ALL TOPICS
COMPARISONS
GAME
PRODUCTIVITY
TROUBLESHOOTING
Gawing Pangalawang Monitor ang iPad Para sa Windows at Mac Computers
Para sa mga multitasking na manggagawa, ang pagkakaroon ng pangalawang monitor ay maaaring greatly increase ng productivity. Kung ikaw ay isang tao sa home office o isang estudyante na walang dual screen. Narito kung paano mo madaling gawing pangalawang monitor ang iyong idle iPad para sa iyong computer.
Mga Benepisyo ng Paggamit ng iPad bilang Pangalawang Screen:
1. Taasan ang espasyo ng screen upang ipakita ang higit pa sa parehong oras. Para sa mga multi-task users, maiiwasan nilang magpalipat-lipat ng mga bintana, na nakakatipid ng oras.
2. Ang bawat screen ay gumagana nang hiwalay, ginagawang mas organisado ang workspace.
Kapag nag-e-edit ng mga video, isang screen ang ginagamit para sa pag-e-edit at ang isa para sa paglalagay ng mga materyales. Kapag sumusulat ng papel, isang screen para sa pagsusulat, ang isa para sa paghahanap ng impormasyon atbp.
3. Ang laki ng screen ng iPad ay sapat na malaki, at ang kalidad ng display ay medyo maganda. Para sa mga gumagamit na may mga pangangailangan sa disenyo o gumagamit ng MacBook, mas nagiging cost-effective ito kaysa sa pagbili ng karagdagang screen, at wala nang problema sa pagkakaiba ng kulay.
4. Maraming tao ang may mga iPad sa bahay. Sa pamamagitan ng paggamit ng device na mayroon ka bilang isang dual screen, nakakatipid ka sa gastos ng pagbili ng isa pang screen at ng espasyong ilalagay ito.
Paano Gagamitin ang iPad bilang Pangalawang Screen para sa Mac?
Ang sariling tampok ng Apple na Apple Sidecar ay nagbibigay-daan sa iyo na gamitin ang iPad bilang isang external display para sa MacBook at iMac. Gumawa lamang ng ilang simpleng setting at maaari mong makamit ang seamless connection sa pagitan ng iyong iPad at computer.
Paalala: Upang magamit ang Apple Sidecar, ang dalawang device ay dapat nakalog sa parehong Apple ID o nasa parehong network. Dapat i-on ang Bluetooth at Wi-Fi sa parehong device, at hindi dapat lumagpas ang distansya ng 10 meters (tungkol sa 10 meters).
Hakbang 1 Pag-set ng Display:
Buksan ang Mac System Settings >> I-click ang "Display" sa sidebar >> I-click ang "+" pop up menu sa kanan at piliin ang iyong iPad.
Piliin ang iPad, baguhin ang Use as settings sa "Extended Display". Suriin ang Airplay settings sa itaas na toolbar ng Mac at itakda ang iPad bilang "Use As Separate Display".
Hakbang 2: Palawakin ang Screen
Matapos makumpleto ang mga setting, ang iyong iPad ay magiging pangalawang display para sa iyong Mac. Maaari mong ilipat ang mga bintana mula sa iyong Mac papunta sa iyong iPad nang maayos. Maaari mo ring gamitin ang sidebar sa iPad o baguhin ang posisyon ng sidebar sa system display settings.
MacBook Screen (Kaliwa) at iPad Screen (Kanan)
Paano Gagamitin ang iPad bilang Pangalawang Screen para sa Windows?
Ang Apple Sidecar ay sumusuporta lamang sa mga Mac na inilabas pagkatapos ng 2016 at iPadOS13 o bago. Kung gumagamit ka ng lumang Apple device o Windows device, maaari mo pa ring gamitin ang DeskIn remote software upang gawin ang screen extension. Sinusuportahan nito ang paggamit ng iPad bilang pangalawang display para sa Mac at Windows, at ang smoothness ay hindi mas mababa sa sidecar.
Hakbang 1: I-download at Magrehistro ng DeskIn Account
I-download ang DeskIn sa iyong computer at iPad, magrehistro para sa isang libreng account at mag-log in nang hiwalay.
Paalala: Sa iyong unang pag-log in sa isang bagong device, kailangan mong kumpletuhin ang email verification, na naglalayong protektahan ang seguridad ng iyong account.
Hakbang 2: Palawakin ang Screen
Buksan ang DeskIn app sa iyong Windows/Mac computer >> Pumunta sa "Screen Mgt" Tab >> I-click ang "Extend my screen"
Piliin ang iyong iPad, at i-click ang "Start Extending". Kapag nakakonekta, ang iyong iPad ay magiging pangalawang display ng iyong Windows/Mac computer, maaari mong ilipat ang mga bintana sa pagitan ng dalawang screen na para bang nasa isa lamang ito.
Computer Screen (Kaliwa) at iPad Screen (Kanan)
Hakbang 3: Mga Setting ng Display ng System
Matapos ang extension, kung napansin mong ang iyong iPad ay nagmi-mirror lamang ng nilalaman sa iyong computer screen, mangyaring pumunta sa Windows System Settings >> Display Settings at baguhin ang screen option sa "Extend these displays". Maaari mo ring baguhin ang posisyon ng screen sa pamamagitan ng pag-drag ng 2 screens.
Konklusyon
Ang artikulong ito ay nagpapakita kung paano gamitin ang DeskIn remote desktop software upang gawing "pangalawang screen" ang isang iPad para sa Mac at Windows computers. Ito ay lalong kapaki-pakinabang para sa mga tao na kailangang hawakan ang maraming gawain nang sabay-sabay at nais na mapabuti ang productivity. Kung naghahanap ka ng screen extension tool na gumagana sa iyong MacBook, iPad, Android Tablet at Windows PC, ang DeskIn remote desktop ay ang pinakamainam na solusyon para sa iyo. I-download ang DeskIn at subukan ito ngayon!
Top 6 RustDesk Alternative Tools for Faster, Easier Remote Access
Remote access should feel like flipping a light switch, not decoding a control panel. Yet many users exploring RustDesk eventually run into friction: connection IDs, server setup, or occasional lag. While RustDesk is powerful, it’s not always the easiest or smoothest option, especially for non-technical users.
That’s why more people are actively searching for a reliable RustDesk alternative that combines performance, simplicity, and flexibility. Whether you want a plug-and-play solution or something more advanced, this guide will help you find the best fit.
Why You Need a RustDesk Alternative (and How to Choose One)
RustDesk stands out as a privacy-friendly, self-hosted remote desktop tool. However, real-world usage reveals a few common challenges:
Complicated setup for the RustDesk self-hosted environments
Manual connection steps requiring IDs and passwords
Occasional latency or unstable connections
Limited user-friendly features out of the box
For many users, especially those helping family or managing multiple devices, simplicity matters just as much as control.
How to Choose the Right RustDesk Alternative
When evaluating a RustDesk alternative, focus on these key factors:
Ease of use: Quick setup without technical overhead
Performance: Smooth, low-latency remote sessions
Compatibility: Support for Windows, macOS, Linux, and mobile
Security: Strong encryption and access controls
Flexibility: Options ranging from cloud-based to open source
The ideal tool strikes a balance between power and convenience, something many modern solutions now deliver better than traditional setups.
Quick Comparison of the Best RustDesk Alternatives
Here’s a quick breakdown of the top tools and where they shine:
DeskIn – Best all-in-one RustDesk alternative for performance and ease of use
AnyDesk – Best lightweight tool for fast connections
TeamViewer – Best for enterprise-grade remote support
MeshCentral – Best open-source and self-hosted solution
DWService – Best free browser-based tool
Chrome Remote Desktop – Best simple, no-frills option
1. DeskIn – Best RustDesk Alternative for Seamless Performance and Ease of Use
Pros
Ultra-low latency with smooth high-frame-rate streaming
No complex setup or server deployment required
Cross-platform including Rustdesk alternative for Android
Secure with encryption and device control features
Built-in file transfer and multi-device management
Cons
Smaller awareness than legacy competitors
Best for: Users who want a powerful yet simple remote desktop solution
DeskIn removes the friction that often comes with remote access tools. Instead of relying on IDs or manual configurations, it offers a streamlined connection experience that works right out of the box. This makes it especially valuable for users supporting non-technical family members or managing multiple remote devices.
Performance is where DeskIn truly distinguishes itself. Compared to RustDesk, which can sometimes struggle with latency, DeskIn delivers consistently smooth sessions with minimal lag. It also eliminates the need for self-hosting, making it a strong free RustDesk alternative option for users who want powerful features without the complexity.
For those exploring options beyond the RustDesk alternative GitHub projects, DeskIn provides a polished, ready-to-use experience that balances simplicity with professional-grade performance.
2. AnyDesk – Best Lightweight Alternative for Fast Connections
Pros
Lightweight and fast installation
Good performance on low bandwidth
Cross-platform support
Easy-to-use interface
Cons
Performance may drop during long sessions
File transfer can be inconsistent
Best for: Users needing quick and simple remote access
AnyDesk is often considered a natural step up from RustDesk for users who want something easier to deploy. It offers a lightweight application that connects quickly and performs well under normal conditions. This makes it suitable for quick troubleshooting or occasional remote access.
However, performance consistency can be an issue. Users frequently report lag or instability during extended sessions or when handling more demanding tasks. While AnyDesk is a solid option for basic needs, it may not fully satisfy users looking for a more robust, all-in-one solution.
👀 You may also be interested in: |
|---|
3. TeamViewer – Best for Enterprise Remote Support and Cross-Platform Access
Pros
Enterprise-grade security with encryption and 2FA
Stable performance across global networks
Rich features like file transfer and session recording
Broad device compatibility
Cons
Expensive for commercial use
Free version has limitations
Heavier resource usage on some systems
Best for: Businesses and IT teams managing multiple endpoints
TeamViewer has long been a dominant player in the remote desktop space, offering a comprehensive suite of features designed for enterprise environments. It excels in reliability and global connectivity, making it a popular choice for IT support teams.
That said, its pricing model is a major drawback for many users. Frequent users may quickly encounter licensing restrictions, and costs can escalate for businesses. Additionally, its heavier footprint can impact performance on lower-end devices. DeskIn offers a more modern alternative by delivering similar performance and essential features without the same cost barriers. For users who want enterprise-level capabilities with better efficiency, it presents a compelling option.
👀 You may also be interested in: |
|---|
4. MeshCentral – Best Open-Source Self-Hosted Alternative
Pros
Fully RustDesk alternative open source solution
Web-based management dashboard
Supports multi-device environments
Strong customization and control
Cons
Complex setup and maintenance
Requires technical expertise
Best for: Advanced users needing a Rustdesk alternative self-hosted
MeshCentral is a powerful open-source platform designed for users who want full control over their remote access infrastructure. It supports multiple devices and provides a centralized dashboard for management, making it attractive for IT professionals.
However, this flexibility comes with complexity. Setting up and maintaining a MeshCentral server requires technical knowledge, which can be a barrier for many users. Compared to this, DeskIn offers a much simpler deployment process while still delivering strong performance and security. For users who prioritize ease of use over full control, modern solutions like DeskIn provide a more accessible alternative.
5. DWService – Best Free and Browser-Based Alternative
Pros
Completely free
Browser-based access
Open-source foundation
Simple setup
Cons
Limited performance
Basic feature set
Best for: Users looking for a simple, free RustDesk alternative
DWService offers a browser-based approach to remote access with no heavy installation, making it convenient for quick connections in restricted environments. It supports both desktop access and file management across major platforms.
However, performance often feels sluggish, especially on demanding tasks, and features remain basic; lacking session recording, smooth multi-monitor support, or advanced security controls. While suitable for occasional personal use, it falls short for professional or high-performance scenarios.
6. Chrome Remote Desktop – Best Simple Remote Access Tool
Pros
Free and easy to use
Browser-based setup
Cross-platform compatibility
Cons
Very limited features
No advanced management or collaboration tools
Best for: Casual users needing basic remote access
Chrome Remote Desktop is one of the simplest remote access tools available. It’s easy to set up and works across devices, making it a convenient choice for occasional use.
However, it lacks many essential features such as file transfer, session management, and advanced security controls. For users with more demanding needs, it quickly becomes insufficient. Compared to Chrome Remote Desktop, DeskIn provides a much more complete experience without sacrificing ease of use, making it a better long-term solution.
👀 You may also be interested in: |
|---|
FAQs About Best RustDesk Alternatives
1. Why should I look for a RustDesk alternative?
RustDesk is powerful but can be difficult to set up and manage, especially with self-hosting. Many users prefer tools that offer similar performance without technical complexity. DeskIn simplifies remote access while maintaining strong performance and security.
2. What is the best free RustDesk alternative?
Several tools qualify as a free RustDesk alternative, including DWService and Chrome Remote Desktop. However, DeskIn stands out by offering better performance and usability even in its free version.
3. Is there an open-source alternative to RustDesk?
Yes, tools like MeshCentral and DWService are considered RustDesk alternative open source options. They provide flexibility and control but often require technical expertise to set up and maintain.
4. Which RustDesk alternative is best for beginners?
Beginners should choose tools with a simple setup and intuitive interfaces. DeskIn is an excellent option because it removes the need for manual configuration while still delivering advanced features.
Conclusion
RustDesk is a powerful starting point, but it’s not always the easiest or most efficient tool for everyday use. From setup complexity to performance limitations, many users eventually look for a better RustDesk alternative.
Among all the options, DeskIn stands out as the most balanced solution. It combines speed, simplicity, and cross-platform support into one seamless experience. If you’re ready to move beyond technical friction and enjoy truly smooth remote access, DeskIn is a choice that simply works.
Top 7 RDP Alternative Tools for Faster, Safer Remote Access
Remote desktop access used to feel like a solid bridge. Now, for many users, traditional RDP feels more like a creaky rope ladder. With performance issues, security concerns, and limited cross-platform support, it's no surprise that more people are actively searching for a better RDP alternative that actually keeps up with modern workflows.
If you're managing multiple servers, working across devices, or just tired of unstable connections, this guide will walk you through the best tools worth switching to.
What is RDP Desktop?
RDP (Remote Desktop Protocol) is a proprietary protocol developed by Microsoft that allows users to connect to another computer over a network. It's widely used for accessing Windows servers, virtual machines, and remote workstations.
While powerful in controlled environments, RDP is often tied to Windows systems and requires configuration like port forwarding or VPNs. Compared to newer tools, it can feel rigid and outdated.
You may also be interested in: |
|---|
Why You Need an RDP Alternative
RDP still works, but it comes with trade-offs that many users find frustrating:
Security risks if not properly configured
Complex setup for remote or external access
Limited cross-platform compatibility
Performance issues over unstable networks
Many IT teams are now actively replacing it, especially when looking for a Windows RDP client alternative or something that works seamlessly across macOS, Linux, and mobile devices. That's where modern Remote Desktop alternatives shine.
Quick Comparison of the Best RDP Alternatives
Choosing the right tool is like picking the right vehicle. Some are built for speed, others for heavy-duty enterprise work. Here's a quick snapshot:
DeskIn – Best all-in-one RDP alternative for performance and cross-platform use
TeamViewer – Best for enterprise remote support
AnyDesk – Best lightweight option for fast connections
RustDesk – Best Windows RDP alternative open-source solution
Remmina – Best RDP alternative for Linux users
Chrome Remote Desktop – Best simple browser-based tool
Splashtop – Best for high-performance business environments
1. DeskIn – Best RDP Alternative for Cross-Platform Performance
Pros
Ultra-low latency with smooth high-frame-rate streaming
Works across Windows, macOS, Linux, iOS, and Android
Strong encryption and secure access controls
Built-in file transfer and multi-session support
Cons
Newer compared to legacy brands
Best for: Users who want a powerful, flexible RDP alternative
DeskIn feels less like remote access and more like teleportation for your desktop. Whether you're managing servers, supporting clients, or working remotely, it delivers consistently smooth performance without the usual lag spikes seen in traditional RDP setups.
Unlike many tools, DeskIn eliminates the need for complex configurations. You don't need to wrestle with firewalls or VPNs just to connect. It also works seamlessly across platforms, making it a strong alternative to Microsoft Remote Desktop for Mac and mobile users alike.
For teams juggling multiple systems, DeskIn provides a unified experience that replaces fragmented workflows. It's also a strong free RDP alternative option with premium-level capabilities, making it ideal for both individuals and businesses.
2. TeamViewer – Best for Enterprise Remote Support
Pros
Enterprise-grade security and compliance
Extensive feature set including collaboration tools
Cross-platform compatibility
Reliable global performance
Cons
Expensive licensing
Can be overkill for individuals
Best for: Enterprises needing secure and scalable remote access
TeamViewer is a comprehensive remote desktop platform widely adopted by IT teams, support professionals, and enterprises. Its feature set extends far beyond simple screen sharing—it includes robust device management, remote printing, file transfer, session recording, and even augmented reality support for field service. TeamViewer's security architecture relies on AES‑256 encryption, two‑factor authentication, and whitelisting, making it suitable for organizations with strict compliance requirements. It runs on virtually every operating system and mobile platform.
The main trade‑off is its pricing: licenses are subscription‑based and can become expensive for small teams or individual users, especially as TeamViewer aggressively flags personal use as commercial, leading to session restrictions.
3. AnyDesk – Best Lightweight RDP Alternative for Speed
Pros
Fast and responsive
Lightweight installation
Works well on low bandwidth
Easy to use
Cons
File transfer can be inconsistent
Lag during longer sessions
Best for: Users needing quick, simple remote access
AnyDesk is a lightweight remote desktop application prized for its speed and efficiency, often recommended as a fast alternative to Microsoft's native Remote Desktop on Windows 10 and Android. It uses a proprietary video codec, DeskRT, to achieve low latency even on limited bandwidth, making it ideal for quick support sessions and accessing devices over mobile networks. The interface is clean and minimalist, with features like address book management, file transfer, and session recording available.
However, users frequently report instability during extended sessions; performance can degrade over time, and file transfers may slow considerably compared to competitors. While its free version is generous for personal use, professional users often find the performance ceiling limits its suitability for continuous, demanding workloads. DeskIn, by contrast, maintains consistent performance even during extended use, making it better suited for professional workloads.
You may also be interested in: |
|---|
4. RustDesk – Best Open-Source RDP Alternative for Privacy
Pros
Free and open-source
Self-hosting for full control
Strong privacy protection
Active community
Cons
Technical setup required
Limited user-friendly features
Best for: Developers and privacy-focused users
RustDesk has emerged as a leading open‑source remote desktop alternative, appealing to developers and organizations that require full control over their data. It allows users to self‑host the relay and rendezvous servers, meaning no third‑party infrastructure handles connection metadata. Built with Rust, it offers a modern codebase with cross‑platform clients (Windows, macOS, Linux, Android, iOS) and supports essential features such as file transfer, TCP tunneling, and customizable address books.
The major barrier is its complexity: deploying a self‑hosted environment requires technical expertise to configure firewalls, SSL certificates, and ongoing server maintenance. For those using the public relay, performance can be inconsistent depending on server load and geographic proximity.
You may also be interested in: Top RustDesk Alternatives for Better Performance, Security & Ease of Use |
|---|
5. Remmina – Best Linux RDP Alternative
Pros
Open-source and free
Supports multiple protocols including RDP and VNC
Lightweight and flexible
Native to Linux environments
Cons
Limited features compared to modern tools
UI can feel outdated
Best for: Linux users looking for a traditional RDP alternative Linux
Remmina is a beloved open‑source remote desktop client for Linux, supporting multiple protocols (RDP, VNC, SSH, SPICE, and others) in a single unified interface. It is frequently chosen by system administrators and Linux enthusiasts who need a flexible, lightweight tool to manage diverse environments. Remmina offers tabbed sessions, quick‑connect profiles, and a plugin system that extends its capabilities.
However, its strength - protocol flexibility, also highlights its limitations. As a frontend client rather than a full remote access solution, it lacks features like unattended access, centralized account management, or robust session recording out of the box. Performance can vary by protocol, and the user experience lags behind more polished commercial tools, particularly for users seeking a plug‑and‑play setup.
6. Chrome Remote Desktop – Best Free and Simple Option
Pros
Free and easy to use
Browser-based setup
Cross-platform access
Cons
Very limited features
No advanced management tools
Best for: Casual users needing basic remote access
Chrome Remote Desktop is a free, browser‑based remote access tool from Google that requires nothing more than a Chrome browser and a Google account. It excels in simplicity: installation takes seconds, and connections are mediated through Google's infrastructure, eliminating complex firewall configurations. For occasional use—such as helping a family member or quickly accessing a home computer—it works reliably across Windows, macOS, Linux, and even ChromeOS.
The trade‑off is its minimal feature set. There is no native file transfer, multi‑session management, remote printing, or granular permission controls. Collaboration tools are absent, and the reliance on a Google account for authentication can be a limitation in professional environments. It remains a convenient entry‑level tool but struggles to meet the needs of power users or IT teams.
You may also be interested in: |
|---|
7. Splashtop – Best for High-Performance Business Use
Pros
High-quality streaming performance
Strong security features
Good for business environments
Reliable connections
Cons
Subscription-based pricing
Limited free version
Best for: Businesses needing performance-focused remote access
Splashtop is a high‑performance remote desktop solution frequently adopted by creative professionals, educational institutions, and enterprises that prioritize fluid interaction. It delivers low‑latency streaming with support for high‑frame‑rate displays, making it suitable for video editing, CAD work, and other graphics‑intensive tasks. Splashtop offers a range of editions—from Business Access to SOS for on‑demand support—all of which include robust security (AES‑256, device authentication) and features like file transfer, remote printing, and multi‑monitor navigation. Its performance over local networks and the internet is consistently praised.
The primary drawback is cost: while competitive, the subscription model can accumulate quickly for users needing access to multiple devices or advanced features, especially when compared to similarly capable tools with more flexible pricing structures. DeskIn offers similar performance benefits with a more flexible pricing structure, making it a compelling alternative.
You may also be interested in: |
|---|
FAQs About Best RDP Alternatives
Why should I look for an RDP alternative?
RDP can be difficult to configure, less secure if exposed, and limited outside Windows environments. Modern tools like DeskIn provide better performance, security, and ease of use.
What is the best RDP alternative?
The best RDP alternative depends on your needs, but DeskIn stands out for its balance of speed, security, and cross-platform compatibility.
Is there a free RDP alternative?
Yes, several tools qualify as an RDP alternative free, including RustDesk and Chrome Remote Desktop. DeskIn also offers a free tier with advanced capabilities.
Is Microsoft shutting down RDP?
Microsoft is evolving its remote desktop ecosystem, but traditional RDP isn't disappearing overnight. However, many users are already transitioning to more modern solutions like DeskIn for better reliability and flexibility.
Conclusion
RDP has served its purpose, but the digital world has outgrown its limitations. Whether you need better performance, stronger security, or true cross-platform access, switching to a modern RDP alternative is no longer optional, it's inevitable.
Among all the options, DeskIn stands out as a future-ready solution. It combines speed, simplicity, and power into one seamless experience, helping you leave behind the friction of traditional remote desktop tools and step into something far more efficient.
Top 10 Splashtop Alternative Tools for Faster, More Reliable Remote Access (2026)
If your remote desktop tool has started to feel like a buffering video at the worst possible moment, you're not alone. Many users are actively searching for a better Splashtop alternative due to rising costs, laggy connections, and limited flexibility. Whether you're managing remote IT support or simply accessing your work computer from home, the right tool can turn frustration into seamless control. Let’s dive into the best options available today.
Key Features to Look for in a Splashtop Alternative
Before switching, it’s worth knowing what actually matters. A great remote desktop tool should offer:
Smooth performance with low latency and high frame rates
Strong security like AES-256 encryption and 2FA
Cross-platform compatibility (desktop + mobile)
Easy setup and intuitive interface
Transparent pricing without hidden increases
Stable unattended remote access
These factors define the best remote desktop experience in 2026.
Quick Comparison of the Best Splashtop Alternatives
Tool | Pros | Cons | Best For |
|---|---|---|---|
High performance, affordable, smooth | Newer brand | High-quality remote work | |
AnyDesk | Lightweight, fast | Security limits | Quick sessions |
TeamViewer | Secure, scalable | Expensive | Enterprises |
Chrome Remote Desktop | Free, simple
| Limited features | Personal use |
Zoho Assist | Clean UI, integrations | Stability issues | IT support |
RemotePC | Affordable | Performance inconsistency | SMBs |
RealVNC | Secure | Occasional disconnects | Secure access |
LogMeIn | Feature-rich | High cost | Enterprises |
ScreenConnect | Powerful | Complex setup | MSPs |
RustDesk | Open-source | Technical setup | Developers |
1. Best Splashtop Alternative for High-Performance Remote Work - DeskIn
Pros
Up to 4K 60FPS/2K 240FPS ultra-smooth remote control
Low latency even across long distances
Competitive pricing with strong value
Cross-platform including mobile
Cons
Smaller brand awareness
Best for: Performance-driven users and remote professionals
DeskIn is designed for users who are tired of lag and blurry screens. It delivers a near-local experience, making it ideal for developers, designers, and remote teams who rely on precision and speed. Compared to many traditional tools, it feels significantly more responsive.
Beyond performance, DeskIn balances cost and capability extremely well. If you're looking for a free alternative to Splashtop or a scalable upgrade, it offers a compelling mix of speed, security, and usability. Many users consider it a strong case where DeskIn is better than Splashtop, especially when stability matters.
2. AnyDesk - Lightweight and Fast for Quick Access
Pros
Very lightweight installation
Fast connections on low bandwidth
Easy to use interface
Cons
Limited advanced security features
Occasional connection instability
Best for: Quick remote support and simple workflows
AnyDesk is frequently recommended as a Splashtop alternative thanks to its exceptional speed and minimal system footprint. The installer is just a few megabytes, and the application runs smoothly even on older hardware. It performs particularly well in low‑bandwidth environments, where its proprietary video codec maintains responsive connections during quick troubleshooting sessions.
That said, users who require consistently high frame rates, crisp visuals for design work, or advanced session management may find AnyDesk’s simplicity limiting. While it handles basic tasks admirably, power users often need more stability and richer feature sets.
You may also be interested in:
3. TeamViewer - Enterprise-Grade Remote Access
Pros
Strong security (AES-256, 2FA)
Wide device compatibility
Mature ecosystem and features
Reliable remote support tools
Cons
Expensive pricing plans
Can feel heavy for small teams
Best for: Enterprises and large organizations
TeamViewer has long been a dominant force in remote desktop software, trusted by IT departments and enterprises worldwide. Its comprehensive feature set includes remote support, meeting tools, file transfer, and even augmented‑reality assistance, all secured with AES‑256 encryption and two‑factor authentication.
However, this power comes at a price—literally. TeamViewer’s licensing model can be prohibitively expensive for smaller businesses or individual users. The interface, while feature‑rich, can also feel cluttered for those who simply need unattended access to a few computers.
You may also be interested in:
4. Chrome Remote Desktop - Simple and Free
Pros
Completely free to use
Easy browser-based setup
Works across devices
Cons
Very limited features
Not suitable for business use
Best for: Individuals needing a free remote desktop
Chrome Remote Desktop is the ultimate choice for users seeking a straightforward, completely free remote access solution. Setup takes less than a minute: install the browser extension, authenticate with your Google account, and you can instantly access any computer from another device.
The trade‑off for this simplicity is a very limited feature set. There is no file transfer, multi‑monitor switching, remote printing, or session recording. Users who find themselves needing more than bare‑bones access will see a significant boost in efficiency and experience by upgrading to a dedicated tool like DeskIn, which retains ease of use while adding the features power users rely on.
You may also be interested in:
5. Zoho Assist - Clean and Business-Friendly
Pros
Intuitive interface
Good integrations with Zoho ecosystem
Cloud-based access
Cons
Occasional performance issues
Limited advanced features
Best for: IT helpdesk teams
Zoho Assist delivers a clean, well‑organized remote support experience that integrates naturally with the broader Zoho ecosystem. Its dashboard is intuitive, making it easy for helpdesk teams to manage clients, schedule sessions, and generate reports. For organizations already using Zoho CRM or other Zoho applications, the seamless integration streamlines workflows and reduces the need to switch between different tools.
Despite its polished interface, performance consistency can be an issue, especially during file transfers or when connecting to machines with slower internet connections. The feature set, while sufficient for standard helpdesk operations, lacks some of the advanced controls that IT professionals expect for more complex troubleshooting.
6. RemotePC - Budget-Friendly Alternative
Pros
Affordable pricing
Easy setup
Supports multiple devices
Cons
Performance can vary
Limited advanced capabilities
Best for: Small businesses and budget users
RemotePC positions itself as a budget‑friendly alternative for users who need basic remote access without a steep learning curve. Setup is straightforward, and the pricing structure is refreshingly simple—affordable plans that allow connection to multiple computers without hidden fees. It covers essential features like remote printing, file transfer, and even a simple chat function, making it a practical choice for small businesses and individual users.
However, performance can vary depending on network conditions and the specific devices being connected. Some users report occasional lag or reduced frame rates, which can become frustrating during extended sessions.
7. RealVNC – Secure and Reliable
Pros
Strong encryption and security
Customisable setup
Reliable remote connections
Cons
Occasional login interruptions
Slight learning curve
Best for: Security-focused users
RealVNC has built a strong reputation for secure remote access. It uses robust encryption and offers granular permission controls, allowing administrators to tailor access levels for different users. The platform is highly customizable, supporting on‑premises deployments as well as cloud‑based options, which appeals to organizations with strict security requirements.
While security is clearly its strength, the user experience can sometimes feel less polished than newer competitors. Occasional login interruptions and a steeper configuration curve mean that getting the most out of RealVNC often requires technical expertise. For businesses that need both enterprise‑grade security and consistently high performance without complex setup, a more balanced solution, such as DeskIn, can deliver the best of both worlds, combining strong encryption with a streamlined, speed‑optimized experience.
8. LogMeIn - Feature-Rich but Expensive
Pros
Comprehensive feature set
Strong integrations
Good for collaboration
Reliable access
Cons
High pricing
Overkill for simple use cases
Best for: Enterprises needing all-in-one solutions
LogMeIn provides a comprehensive toolkit that extends far beyond simple remote desktop access. It includes robust file storage, collaboration features, and extensive integration options, making it well‑suited for enterprises that want an all‑in‑one remote work platform. The service is known for its reliability and strong customer support, which can be critical for large organizations managing hundreds or thousands of endpoints.
The main drawback is the cost. LogMeIn’s pricing plans are among the highest in the industry, and the feature set can be overwhelming for users who only need occasional remote access. Many of its advanced capabilities go unused by smaller teams, making it difficult to justify the expense.
9. ScreenConnect - Built for IT Professionals
Pros
Highly customizable
Remote support features
Multi-session support
Cons
Complex setup
Difficult to manage at scale
Best for: MSPs and IT teams
ScreenConnect (now part of ConnectWise) is a powerful, highly customizable remote support platform built with IT professionals and managed service providers in mind. It excels at multi‑session management, allowing technicians to handle several concurrent connections from a single interface. The level of granular control, over permissions, session recording, and even the appearance of the client UI, makes it a favorite among those who need to tailor the software to specific operational workflows.
However, this flexibility comes with a steep learning curve. Initial setup and ongoing management can be complex, especially for smaller teams without dedicated IT administration. For teams seeking a powerful yet approachable solution, DeskIn offers a streamlined alternative that delivers professional‑grade reliability and speed without the administrative overhead.
10. RustDesk – Open-Source Flexibility
Pros
Free and open-source
Self-hosting options
Strong privacy control
Cons
Requires technical setup
Limited support
Best for: Developers and privacy-focused users
RustDesk appeals to developers and privacy‑conscious users who want full control over their remote access infrastructure. As an open‑source solution, it allows self‑hosting on private servers, ensuring that no session data ever passes through third‑party servers. This transparency and autonomy are highly valued by organizations with strict data sovereignty requirements or those simply wishing to avoid vendor lock‑in.
The flip side is that RustDesk requires technical expertise to deploy and maintain. Users must manage their own servers, handle updates, and troubleshoot connection issues without dedicated commercial support. While the core software is free, the total cost of ownership in time and resources can be significant.
You may also be interested in:
FAQs About Best Splashtop Alternatives
1. What is the best Splashtop alternative?
DeskIn is one of the strongest options due to its balance of performance, pricing, and usability. TeamViewer and AnyDesk are also popular choices.
2. Is there a Splashtop alternative free?
Yes, Chrome Remote Desktop and RustDesk are free options. DeskIn also offers a competitive free plan with better performance.
3. What is the best remote desktop software in 2026?
The best remote desktop tools combine speed, security, and ease of use. DeskIn stands out for performance, while TeamViewer excels in enterprise environments.
4. Are there mobile-friendly options?
Yes, most tools support mobile, making them suitable as a Splashtop alternative for Android or a Splashtop alternative for iPad.
5. Why are users switching from Splashtop?
Many users cite high Splashtop pricing, lag issues, and limited scalability as reasons to explore alternatives.
Conclusion
Finding the right Splashtop alternative is less about replacing a tool and more about upgrading your workflow. While options like AnyDesk and TeamViewer each have their strengths, DeskIn stands out by combining high performance, smooth visuals, and cost efficiency in one package. If you want a remote desktop experience that feels fast, stable, and future-ready, DeskIn is easily one of the smartest choices you can make today.
Is DeskIn Safe to Use? Everything You Need to Know
When considering a remote desktop tool, one question always comes first: Is DeskIn safe? After all, you're not just accessing a device; you're potentially exposing files, data, and even real-time activity across networks.
The short answer is yes, DeskIn is designed with strong security measures in place. But understanding why it's safe, and how that safety actually works in real-world use, is what truly matters. This guide breaks it down in a clear, practical way so you can decide with confidence.
What Does "Safe" Really Mean for Remote Desktop Software?
Before answering is DeskIn safe to use, it helps to define what "safe" actually means in the context of remote desktop software.
Security isn't just one feature. It's a layered system that protects different aspects of your connection. First, there's data security, which ensures that everything transmitted between devices is encrypted and unreadable to outsiders. Then comes access control, which determines who can connect to your device and under what conditions.
Privacy protection is another key layer. This includes features that prevent others from seeing your screen or accessing sensitive inputs without permission. Finally, account security ensures that even if someone tries to break in, additional verification steps stop unauthorized access. A remote desktop tool is only truly safe when all of these layers work together.
👀 What Is DeskIn Used For? (And Why Security Matters)
To fully understand whether DeskIn is safe, it helps to look at what DeskIn is used for. DeskIn is commonly used for remote work, IT support, cross-device file access, and even high-performance tasks like design or development. These scenarios often involve sensitive data, which makes security not just important, but essential.
Users benefit from DeskIn's stable connection and low-latency performance, but those advantages only matter if the connection is secure. That's why security features are deeply integrated into the platform rather than treated as optional extras.
How DeskIn Protects Your Data and Privacy
DeskIn approaches security as a complete system with multiple protective layers, addressing common concerns about whether the platform is safe and legit for daily use. Here's how it keeps your data secure.
1. End-to-End Encryption
All connections use AES-256 encryption, the same standard trusted by banks and financial institutions. This ensures your data remains protected during transmission, even on public or unsecured networks.
2. Multi-Layered Access Control
Beyond passwords, DeskIn requires various verifications: user access, blacklisting IP and device verification. Even if login credentials are compromised, unauthorized users cannot access your device without passing these additional checks.
3. Privacy-Focused Features
Privacy screen mode lets you black out the host display during sessions, preventing anyone nearby from viewing your activity. Granular permission settings also give you control over file, audio, and input access.
4. Proven Reliability for Daily Use
These security layers work together to make DeskIn a safe choice for everyday workflows, whether you're accessing personal files or managing professional systems remotely.
👀 You may also be interested in
Is DeskIn Safe from Hackers? (Real Risk Analysis)
A more specific concern many users have is: Is DeskIn safe from hackers?
The reality is that no remote desktop software is completely risk-free, but the level of risk depends heavily on how the software is designed and how it's used.
DeskIn minimizes risk through encryption, authentication, and access controls. These features make unauthorized access extremely difficult. However, like any online tool, user behavior still plays a role. Weak passwords, sharing access credentials, or using unsecured devices can introduce vulnerabilities.
In practice, High-definition Remote Desktop App DeskIn provides the tools needed for a secure environment. As long as users follow basic security practices, the likelihood of unauthorized access remains very low.
Is DeskIn Safe on Mobile Devices (iPhone & Android)?
Mobile access introduces another layer of concern, especially for users asking is DeskIn safe for iPhone or is DeskIn safe for Android.
DeskIn is designed to maintain the same level of security across devices. Data transmitted between your phone and remote computer is still encrypted, and login protection remains in place through authentication features.
Unlike some remote tools, DeskIn does not require risky system modifications such as rooting or jailbreaking. This significantly reduces potential vulnerabilities on mobile devices. Whether you're accessing a work computer from an iPad or managing files through your phone, the security model remains consistent, making it a safe option for cross-device use.
Is DeskIn Free to Use? And Does Free Mean Less Secure?
Another common question is whether DeskIn is free to use, and more importantly, does free access affects security. DeskIn does offer a free version, but security features are not reduced or removed in lower-tier plans. Encryption, authentication, and access control remain in place regardless of pricing.
Security is part of the core infrastructure, not a premium add-on. This means users can still benefit from a secure connection even when using the free version.
Tips to Use DeskIn Safely (Best Practices)
Even with strong built-in protection, safe usage also depends on your own habits. Following a few key practices can help you maintain control over your account and devices:
Use strong passwords: Create unique, complex passwords for your DeskIn account to prevent unauthorized access through credential guessing.
Enable two-factor authentication: Adding this extra verification step ensures that even compromised passwords won't grant access to your device.
Never share access credentials: Keep your login details private and avoid sharing them with others, even temporarily.
Always log out after sessions: End remote connections when they're no longer needed to prevent unattended access to your system.
Keep devices updated: Regular updates ensure you have the latest security patches and protection against emerging vulnerabilities.
Final Verdict: Is DeskIn Safe and Reliable?
So, is DeskIn safe?
In most practical scenarios, the answer is yes. Its combination of encryption, authentication, and access control creates a secure environment for remote access, whether you're working from home or managing devices across locations.
At the same time, security is always a shared responsibility. DeskIn provides the foundation, but safe usage habits ensure the best protection. When both work together, DeskIn becomes a reliable and secure choice for remote desktop access.
Control Windows from Your Mac with Chrome Remote Desktop: Setup Guide & Pitfalls | DeskIn Japan
Introduction: Getting Past the Mac–Windows Divide
For Mac users working in Japan, there's a recurring frustration: a piece of software you need exists only on Windows. Whether it's CAD tools, Japanese accounting software (kaikei sofuto, 会計ソフト) required by your company, Windows-exclusive business systems, or PC games — the need to run Windows doesn't go away just because you prefer Mac.
The good news is you don't need to buy a separate Windows machine. Google's free tool Chrome Remote Desktop lets you control a Windows PC remotely from your Mac, and the setup is simpler than most people expect.
This guide walks through the fastest path to getting connected, and then covers the cross-platform quirks that tend to catch Mac users off guard once they're actually in a session.
Setup: Connecting Your Mac to a Windows PC
Chrome Remote Desktop's configuration is straightforward, but it requires preparation on both machines — the Windows PC being controlled (the host) and the Mac doing the controlling (the client). Here's the fastest path to a working connection.
On the Windows PC (Host)
Start by allowing remote access on the Windows machine.
Install the extension and host software
Open Chrome and go to the Chrome Remote Desktop access page. Under "Set up remote access," click the blue download icon. Follow the prompts to add the Chrome extension and run the installer (.msi file).
Name your PC and set a PIN
After installation, give the PC a name you'll recognise. Then set a PIN of at least six digits — you'll need to enter this every time you connect from your Mac, so write it somewhere safe.
3. Important: Disable Sleep Mode
This is the step most people miss, and it will prevent connections entirely if skipped. A Windows PC in sleep mode cannot be reached remotely.
Go to Settings → System → Power & Battery
Under "Screen and Sleep," set "Put device to sleep after" to Never when plugged in
On the Mac (Client)
Once the Windows side is configured, connecting from your Mac is simple.
Log in to the access site
Open Chrome on your Mac and navigate to the same Chrome Remote Desktop access page. Make sure you're logged into the same Google account you used when setting up the Windows PC.
Select your PC and authenticate
Your Windows PC will appear under "Remote devices." Click it and enter your PIN — the Windows desktop will open inside your Chrome browser.
3. Connection complete
You can now control Windows using your Mac's keyboard and mouse.
Tip: For quicker access in the future, use Chrome's "Install as app" option to add Chrome Remote Desktop to your Mac's Dock — saves a few clicks every time.
H2: Cross-Platform Pitfalls: What Mac Users Run Into
Chrome Remote Desktop is easy to set up, but once you're inside a session, the Mac–Windows gap creates friction points that directly affect how much work you can actually get done. These are worth understanding before you depend on CRD for anything important.
H3: Keyboard Mapping Conflicts
The biggest source of frustration for Mac users is the modifier key difference.
Command key vs Control key: On Mac, you copy with
Command + C. On Windows, it'sControl + C.. In a remote session, Mac's Command key is sometimes interpreted as the Windows key rather than Control — meaning the shortcuts your hands have memorised simply don't work as expected.The Command + Q problem: This one catches people regularly. If you're working in a Windows application and instinctively press
Command + Qto close it, you don't close the Windows app — you close Chrome on your Mac, ending the remote session entirely. It happens more than once before you break the habit.
Power Management: No Wake on LAN Support
This is a significant operational limitation, and worth understanding before you depend on CRD for regular remote access.
Wake on LAN (WoL) not supported: Chrome Remote Desktop cannot remotely power on or wake up a PC that is off or sleeping. To maintain reliable remote access, the Windows PC must be left powered on continuously.
Always-on requirement: For people living in Japan, where electricity costs are relatively high and there's a cultural awareness around energy waste (mottainai, もったいない — the Japanese concept of waste-aversion that runs through everyday life), leaving a PC running overnight when it doesn't need to be is a friction point both practically and psychologically.
No more struggling with key input or power management. Stop here and try DeskIn — built for Mac users. [Install DeskIn for free]
Trackpad and Mouse Feel
The smooth, precise feel that makes Mac trackpads enjoyable doesn't carry through to a remote Windows session cleanly.
Lost gestures: Mac-specific gestures — three-finger swipes to switch desktops, pinch-to-zoom — don't transmit to Windows correctly and either do nothing or trigger the wrong action.
Unnatural scrolling: Mac's inertial scrolling feels choppy in the remote environment. Right-click response has a slight lag. These are small things individually, but they add up over a full work session.
Performance and Latency
As a browser-based tool, Chrome Remote Desktop is constrained by what it can push through a browser window.
Frame rate cap: Chrome Remote Desktop typically runs at around 30FPS. For standard document editing this is fine, but anything with fast on-screen movement shows obvious lag and ghosting.
Not suited for demanding tasks: Video editing, FPS games, or any application requiring sub-second responsiveness — the latency is too significant to be practical.
Who Should Use Chrome Remote Desktop?
Based on everything above, here's an honest assessment of where CRD works well and where it doesn't. Use this as a checklist before you decide.
✓ Recommended — CRD is a good fit for:
Quick file checks: Accessing a document on your home PC from the office or a café
Occasional admin tasks: Restarting a server, running a quick software update
Light office work: Simple browser-based data entry, sending emails — tasks where speed isn't critical
Zero-cost access: When "free and connected" is the overriding priority over performance
✗ Not recommended — CRD is a poor fit for:
Daily remote work: Working remotely for several hours at a stretch. Keyboard friction and choppy performance become a real source of stress.
Creative work: Video editing, graphic design, CAD. Accurate mouse movement, colour fidelity, and smooth rendering are all compromised.
Latency-sensitive tasks (gaming etc.): Any application where split-second responsiveness matters.
Professionals who need native performance: Not "can I connect" — but "does it feel like my own machine?"
In short: Chrome Remote Desktop is best treated as an emergency backup tool, not a primary workflow. If any of the "not recommended" scenarios describe your situation, a more capable tool is worth exploring.
When You're Ready to Go Further: DeskIn
There's a gap between "it connects" and "it feels like my own machine." If you've spent time with Chrome Remote Desktop and found yourself in that gap — frustrated by keyboard confusion, the always-on power requirement, or choppy performance — DeskIn is the purpose-built solution for exactly those problems.
Smart Key Mapping: Command/Control Auto-Mapping for Mac
One of DeskIn's standout features is its intelligent key mapping that bridges the OS divide automatically.
The Command/Control confusion that CRD leaves unresolved — and the "Command + Q closes Chrome" problem that ends remote sessions unexpectedly — are both solved. Your Mac keyboard layout works as expected in Windows, without workarounds. You can type at full speed without stopping to think about which key does what.
Wake on LAN — Start Your PC Only When You Need It
"I want to connect from outside, but I don't want to leave my PC running all day..." — DeskIn solves this.
With Wake on LAN (WoL) support, you can remotely power on a Windows PC from your Mac — even if it's shut down or sleeping. Start it when you need it, work, then let it sleep again. Less electricity, less wear on hardware, and a smarter way to work.
4K/60FPS Performance: The "Local Machine" Feel
DeskIn streams at 4K resolution and up to 60FPS — far beyond what CRD's browser-based approach can achieve.
Whether you're doing fine-detail design work, editing video, or playing a game, the response feels close to native. The lag that makes CRD frustrating for demanding tasks effectively disappears.
iPad and Mobile: Fully Connected on the Go
DeskIn's performance advantage extends beyond Mac to mobile — connecting from an iPad or smartphone delivers the same quality experience.
Use your iPad as an extended display for Windows, or connect a mouse and keyboard for a complete remote work setup. Gesture support is optimised for touch in a way that CRD's mobile app isn't. If you move between Mac and iPad regularly, DeskIn handles both well.
Performance Comparison: Chrome Remote Desktop vs DeskIn
Feature | Chrome Remote Desktop | DeskIn |
Primary use case | Occasional access / emergency use | Business, creative work, gaming |
Display quality | Up to 30FPS (choppy) | 4K / 60–144FPS (extremely smooth) |
Keyboard mapping | Basic — Command/Ctrl conflicts | Auto-optimised for Mac/Windows (no conflicts) |
Wake on LAN | Not supported — PC must stay on | Supported — start PC remotely |
Input feel | Noticeable lag, gesture loss | Low latency, Mac-native feel |
Cost | Free | Free tier available / Pro version |
Summary
Chrome Remote Desktop earns its place as an entry-level tool. Its ease of use and zero cost make it a great starting point for quick file access, occasional light tasks, and situations where budget is the overriding factor.
But if you're using a remote desktop regularly — for work, creative projects, or gaming — the accumulated frustrations of keyboard conflicts, always-on power requirements, and performance caps start to outweigh the convenience of free.
When that point arrives, DeskIn is the obvious next step: a tool designed from the ground up for people who need remote access to actually feel like working locally. Whether you're at your apartment, in a café in Kichioji, or somewhere further afield — your Windows machine should feel like it's right in front of you.
Experience professional-grade performance now — [Download DeskIn free and try it]
DeskIn vs Chrome Remote Desktop: Which One Fits Your Workflow Best?
When it comes to remote access tools, the comparison between DeskIn and Chrome Remote Desktop often comes down to one simple question: do you just need quick access, or do you need performance and control?
Both tools are reliable, secure, and widely used. But they are built for very different types of users. Chrome Remote Desktop focuses on simplicity and accessibility, while DeskIn is designed for users who need high performance, stability, and advanced features across multiple devices.
If you're deciding between the two, this guide breaks down not just what they offer, but which one actually fits your workflow.
Quick Comparison: DeskIn vs Chrome Remote Desktop
Feature | DeskIn | Chrome Remote Desktop |
|---|---|---|
Performance | Up to 4K 60FPS/2K 240FPS, low latency | Standard performance |
Ease of Use | Requires app installation | Browser-based, very simple |
Device Support | Windows, macOS, iOS, Android | Works via Chrome browser |
File Transfer | Fast and stable | Limited |
Multi-device Management | Yes | No |
Mobile Experience | Optimized for iPad & iPhone | Basic |
Security | Privacy screens and granular black/whitelists | Basic |
Price | Free + paid plans | Completely free |
In short, Chrome Remote Desktop is great for quick, lightweight access, while DeskIn is built for users who expect more from their remote desktop experience.
Chrome Remote Desktop Overview
Chrome Remote Desktop is one of the simplest remote access tools available. It runs directly through the Chrome browser and requires only a Google account to get started. This makes it especially popular among casual users and those already working within the Google ecosystem.
It works particularly well on devices like Chromebooks, where everything is already browser-based. It's also accessible across platforms, including mobile devices like iPhone and iPad, though the experience on mobile can feel limited compared to desktop use.
If you're wondering how to use Chrome Remote Desktop, the process is straightforward. You install the Chrome extension, sign in with your Google account, set up a PIN on the host device, and then connect from another device using the same account. The entire setup usually takes just a few minutes.
That said, simplicity comes with trade-offs. Chrome Remote Desktop lacks advanced features like high frame rate streaming, multi-monitor control, or professional-grade file transfer. For occasional access, it works well. But for more demanding tasks, users often start to feel its limitations.
👀You may also be interested in:
DeskIn Overview: A More Powerful Chrome Remote Desktop Alternative
If Chrome Remote Desktop is a lightweight sketch, DeskIn is a full workstation painted in high resolution. DeskIn focuses on performance, stability, and flexibility. It supports up to 4K 60FPS streaming, making it suitable for tasks where visual clarity and responsiveness matter, such as design work, video editing, or even gaming.
As a Chrome remote desktop alternative, unlike browser-based tools, DeskIn is a dedicated remote desktop application. While this requires installation, it unlocks a much more stable and feature-rich experience. Users can manage multiple devices, transfer large files efficiently, and enjoy smoother control across different platforms.
DeskIn is also optimized for mobile workflows. Whether you're using an iPad or smartphone, the interaction feels more responsive and closer to a desktop experience, rather than a simplified viewer. For users who find Chrome Remote Desktop "good enough" at first but limiting over time, DeskIn often becomes the natural upgrade path.
DeskIn vs Chrome Remote Desktop: Real Use Cases
The real difference between these two tools becomes clear when you look at how they perform in everyday scenarios.
1. For Casual Remote Access
If you only need to check files on your home computer or help a friend troubleshoot something quickly, Chrome Remote Desktop is more than enough. It's free, easy to set up, and doesn't require installing extra software beyond Chrome. In this case, DeskIn may feel like overkill.
2. For Remote Work and Productivity
For professionals working remotely on a daily basis, stability and efficiency matter much more. This is where DeskIn starts to stand out.
Tasks like editing documents, managing multiple screens, or transferring files between devices become smoother and faster. Chrome Remote Desktop can handle basic workflows, but it often struggles with responsiveness and lacks the tools needed for a seamless work environment.
3. For High-Performance Tasks (Design, Editing, Gaming)
This is where the gap becomes impossible to ignore. DeskIn's support for high resolution and high frame rates makes it suitable for visually demanding work. Whether you're editing videos, working with design software, or running simulations, performance consistency is critical. Chrome Remote Desktop, on the other hand, is not designed for these scenarios. It works, but not comfortably.
4. For Chromebook and Google Ecosystem Users
If you rely heavily on Google services or use a Chromebook, Chrome Remote Desktop integrates naturally into your workflow. It's lightweight, requires no additional setup, and feels like an extension of the browser itself. In this scenario, it remains a very practical choice.
5. For iPad and iPhone Remote Access
Mobile usage highlights another important difference. While remote desktop Chrome iPhone, and Chrome Remote Desktop iPad are functional, they often feel like simplified versions of the desktop experience. Controls can be less intuitive, and performance may vary depending on the connection.
DeskIn, by contrast, is designed with cross-device interaction in mind, offering a smoother and more responsive mobile experience.
👀 You may also be interested in:
FAQs About Chrome Remote Desktop and DeskIn
1. Is there anything better than Chrome Remote Desktop?
Yes. Tools like DeskIn offer better performance, more features, and improved stability, especially for professional use cases.
2. Is Chrome Remote Desktop discontinued?
No, Chrome Remote Desktop is still actively maintained by Google. It continues to receive security updates and remains available for users needing simple, free remote access.
3. Is DeskIn Remote Desktop legit?
Yes, DeskIn is a legitimate remote desktop solution. It uses encryption to secure connections and provides access controls, making it safe for both personal and professional use.
4. Final Verdict: Which One Should You Choose?
When comparing DeskIn vs Chrome Remote Desktop, the choice depends on how demanding your remote access needs are. Chrome Remote Desktop is simple, free, and ideal for occasional use, especially if you just need quick access to a device without extra setup.
As your workflow becomes more intensive, the limitations start to surface. DeskIn offers a smoother, more stable experience with better performance and control, making it a strong long-term Chrome remote desktop alternative for users who rely on remote access every day.
8 Best Remote Desktops for Video Editing in 2026
Remote video editing is no longer a compromise; it's a workflow upgrade. Whether you're working in Adobe Premiere Pro, After Effects, or DaVinci Resolve, the right remote desktop can turn your laptop into a high-performance editing station.
But not all tools are built for remote video editing collaboration. Lag, poor color accuracy, and unstable connections can ruin productivity. In this guide, we'll break down the best remote desktop for video editing tools so that you can edit smoothly from anywhere.
Why You Need a Remote Desktop for Video Editing
Modern creators are no longer tied to a single workstation. With remote work software, you can access your powerful desktop from anywhere without investing in an expensive laptop. For many editors, especially freelancers and small teams, this solves a real problem: you already have a high-performance PC, but mobility is limited. Instead of duplicating hardware, video editing remote desktop tools let you stream your workflow in real time.
Another key benefit is remote collaboration. Teams can work on the same project across different locations, review edits instantly, and avoid large file transfers via remote collaboration tools. However, this only works if your remote desktop software supports high frame rates, low latency, and stable connections. Otherwise, editing becomes frustrating.
Quick Comparison of Best Remote Desktops for Video Editing
Here's a quick overview of the best tools and who they're for:
DeskIn – Best overall for performance + affordability + multi-device workflows
Parsec – Best for ultra-low latency editing
Splashtop – Best for high-resolution streaming
HP Anyware – Best for enterprise-level workflows
Jump Desktop – Best for Mac users
AnyDesk – Best lightweight remote access
Chrome Remote Desktop – Best free basic option
RustDesk – Best open-source alternative
1. The Best Overall Remote Desktop for Video Editing: DeskIn
Pros
Up to 4K 60FPS / 2K 240FPS performance
Ultra-low latency for smooth editing timelines
Multi-device support (PC, Mac, iPad, Android)
Affordable pricing with free plan available
Cons
Smaller brand awareness compared to legacy tools
DeskIn stands out as the best remote desktop for video editing by balancing performance, stability, and accessibility. Unlike many traditional remote support tools, it is designed for high-frame-rate tasks, making timeline scrubbing, preview playback, and effects editing feel responsive and fluid.
For creators working across devices, DeskIn enables seamless remote video editing collaboration. You can access your main editing PC from a laptop, tablet, or even a secondary workstation without noticeable lag. Compared to tools like Chrome Remote Desktop, which struggle with video-heavy workloads, DeskIn maintains consistent quality and responsiveness—making it a practical choice for both solo editors and distributed teams.
2. Best for Low-Latency Editing: Parsec
Pros
Extremely low latency
High frame rate streaming
Popular among creative professionals
Cons
Limited collaboration features
Setup can be complex for beginners
Parsec is widely recognized as a top choice for remote video editing, especially when latency is your biggest concern. Its streaming technology is optimized for real-time responsiveness, which makes it ideal for tasks like timeline scrubbing and motion graphics work in After Effects.
However, while Parsec excels in performance, it lacks some features needed for full remote video editing collaboration. Multi-user workflows and advanced access control are not as robust as some newer tools. For users who need both performance and flexibility, alternatives like DeskIn may provide a more balanced solution.
3. Splashtop – Best for High-Resolution Streaming
Pros
Supports 4K streaming
Strong color accuracy
Reliable for creative tasks
Cons
Higher cost for advanced features
Can experience latency over long distances
Splashtop is a solid option for editors who prioritize visual fidelity. Its support for high-resolution streaming and 4:4:4 color makes it suitable for color grading and detailed editing work.
That said, performance consistency can vary depending on network conditions. Some users report lag when working outside local networks. Compared to more optimized remote work software like DeskIn, Splashtop may require a stronger connection to maintain the same level of smoothness.
4. Best for Enterprise Workflows: HP Anyware
Pros
Industry-grade performance
Secure and scalable
Used in professional studios
Cons
Expensive
Complex setup
HP Anyware (formerly Teradici) is designed for high-end production environments. It uses advanced protocols to deliver excellent performance and security, making it a common choice in the media and entertainment industries.
However, for small teams or individual creators, it may be overkill. The cost and setup complexity make it less accessible compared to modern remote desktops for video editing tools that offer similar performance with easier deployment. The high cost and technical complexity create barriers that modern remote desktop solutions have eliminated, like DeskIn, offering comparable performance with far simpler deployment.
5. Best for Mac Users: Jump Desktop
Pros
Great macOS integration
Smooth performance
Easy to use
Cons
Limited advanced features
Not ideal for heavy collaboration
Jump Desktop has earned a loyal following among Mac users seeking a straightforward, efficient remote desktop for video editing. Its Fluid Remote Desktop protocol provides smooth, responsive performance for most editing tasks without unnecessary complexity.
Where it falls short is in collaboration. Jump Desktop is built for individual use, lacking the team-oriented features that creative groups need. For solo professionals, it works well, but teams will quickly miss real-time collaboration tools found on other platforms.
6. Best Lightweight Option: AnyDesk
Pros
Fast and lightweight
Easy to set up
Works on multiple devices
Cons
Limited performance for video editing
Lower visual quality
AnyDesk has built its reputation on lightweight design and remarkable ease of use for general remote access. It handles everyday tasks competently, connecting quickly and running smoothly on modest hardware.
The limitations become apparent with demanding creative work. Remote video editing requires consistent frame rates and crystal-clear visuals—areas where AnyDesk struggles. For professional editors who need precision, the performance gap becomes impossible to ignore.
7. Chrome Remote Desktop – Best Free Option
Pros
Completely free
Easy browser-based setup
Works on any device
Cons
Poor performance for editing
Limited features
Chrome Remote Desktop is one of the most accessible remote support tools, offering a simple way to access your computer from anywhere. It's free, requires almost no setup, and lets you access your computer from anywhere with just a browser. For basic technical support or quick file grabs, it gets the job done.
However, it is not built for remote video editing. Users often experience lag, compression artifacts, and low frame rates. If you're working on professional projects, upgrading to a more capable solution is highly recommended.
8. RustDesk – Best Open-Source Alternative
Pros
Open-source
Self-hosting available
Free to use
Cons
Requires technical setup
Performance can vary
RustDesk appeals to users who prioritize open-source philosophy and want complete control over their remote access infrastructure. The flexibility to self-host and customize is genuinely valuable for privacy-conscious users. RustDesk is an interesting option for users who prefer open-source remote desktop not working alternatives or want full control over their infrastructure.
Performance, however, depends entirely on your configuration skills. Without technical expertise, achieving the smooth, low-latency experience required for professional editing is challenging. It's powerful for those who know how to tune it, but not plug-and-play.
FAQs About the Best Remote Desktop for Video Editing
Q1. Can video editing be done remotely?
Yes, with the right remote desktop for video editing, you can edit videos smoothly from anywhere. Tools like DeskIn and Parsec provide low latency and high frame rates for professional workflows.
Q2. What is the best free remote desktop for video editing?
Free options like Chrome Remote Desktop exist, but they lack performance. DeskIn offers a free plan with better performance, making it a stronger choice for real editing work.
Q3. Is Parsec good for video editing?
Yes, Parsec is excellent for low-latency editing. However, it may lack collaboration features needed for team workflows.
Q4. Why is my remote desktop not working smoothly?
Common issues include poor network connection, low bandwidth, or software limitations. Choosing optimized remote work software like DeskIn can significantly improve performance.
Conclusion
Choosing the best remote desktop for video editing depends on your workflow, budget, and performance needs. While tools like Parsec and Splashtop excel in specific areas, many solutions struggle to balance performance, stability, and usability.
If you're looking for a well-rounded solution, DeskIn offers a strong combination of high performance, smooth streaming, and cross-device flexibility. Whether you're working solo or collaborating remotely, it provides a reliable foundation for modern remote video editing workflows.
Unlocking the Ultimate Remote Work Setup: Deskimo Meets DeskIn
Remote work promised freedom, but for many professionals it quietly delivered a new kind of friction. The apartment is too noisy. The café Wi-Fi is patchy. The laptop bag gets heavier every month as cables, chargers, and a second monitor piles on. Somewhere along the way, "working from anywhere" started to feel a lot like hauling your office everywhere.
The fix is to pair two tools that solve opposite halves of the same problem. Deskimo, a coworking space platform, gives you on-demand access to workspaces by the minute. DeskIn, a remote desktop software, gives you access to your home or office computer from any device. Put them together and you get a workflow that removes hardware limits, keeps your data on your home machine, and lets you walk into any city with nothing but a tablet.
Why your personal space isn't always a productive space
Working from home sounds ideal until your partner takes a call in the shared study. Or when the neighbour upstairs starts drilling at 9 a.m. Most work requires deep engagement and intense focus, free from distractions. Most homes were not designed to provide these on demand.
Coworking spaces fill this gap in three ways. Firstly, they set a physical boundary between personal life and work. Research suggests coworking setup is linked to higher productivity than working from home. Secondly, they offer amenities that are difficult to replicate at home: strong Wi-Fi, ergonomic chairs, private meeting rooms and quiet zones. Thirdly, individual workstations, open-plan workspaces foster a professional presence. You are most likely surrounded by people who are also there to work, and this social context encourages you to do the same.
Keep the Desk, Skip the Membership
The downside of most coworking spaces is the commitment. Monthly memberships and yearly office leases assume you need a desk every day, but most remote workers don't. Deskimo removes that friction: book a desk or meeting room by the hour, only when you need it, at hundreds of locations across cities.
The "Light Bag" Workflow
Once you start working outside of home regularly, the first thing you'll notice is the bag. A full laptop setup - machine, charger, mouse, maybe a portable monitor - adds up fast, especially if you're commuting by train or bike.
The fix is simple: leave your powerful machine at home. Carry only a lightweight tablet or thin laptop. DeskIn bridges the gap: open the app on your tablet, connect to your home workstation, and your full desktop environment streams to your screen. CAD software, video editing timelines, 40-tab research sessions. Everything runs on your hardware at home while you sit at a Deskimo desk across town.
What a Light Bag Day Actually Looks Like
A typical morning might start with email and focused work at a café-style hot desk over coffee. After lunch, you book a Deskimo private meeting room, connect to your home workstation through DeskIn, and tackle the heavy rendering or design work. Your bag weighs less than a paperback. Your output doesn't change.
Security Without the Usual Compromise
Working on public Wi-Fi has always been a quiet risk. When you open sensitive files on a portable device at a hot desk, those files are now physically travelling with you on a drive that could be stolen or compromised.
DeskIn's architecture sidesteps this. Your work runs on your home or office machine; the actual files never leave your network. Your device becomes a window: it displays pixels, sends back your clicks and keystrokes, and stores nothing from the session. Combined with DeskIn's end-to-end encryption and Privacy Mode (which blanks the host screen so no passerby sees what you're working on), the setup is arguably safer than carrying a laptop.
This matters most for teams working with regulated data - legal, healthcare, finance. Now you can offer staff the freedom to work from any Deskimo location without stretching your security perimeter to every space they visit.
Multi-Screen Workflows Without Buying Monitors
One of the underrated benefits of coworking spaces is that they often provide equipment that you wouldn't buy. Many Deskimo locations have meeting rooms equipped with external monitors, smart TVs or dual-display desks. Check the amenities at your chosen location and ask the staff if this is important for your session.
Bring the Desktop, Borrow the Screens
DeskIn's screen management feature allows you to make the most of these setups without the need for additional cables or adapters. You can wirelessly extend your remote desktop across multiple displays, which is a great upgrade for anyone working with spreadsheets, design files or code. For example, you could put financial models on one screen, reference documents on another, communication on a third; all without buying a single monitor.
How to use Remote Desktop in a coworking Space
The idea is appealing, but the practical question is where to begin. Here are a few guidelines:
1. Start with the space, then add the software.
If focusing at home has been a struggle, book a few Deskimo sessions across different locations and see what clicks. Some people thrive in café energy; others need a silent private booth. Once you know where you work best, install DeskIn on both your desktop and your portable device. Spend a session fine-tuning the connection before you depend on it for work.
2. Match the space to the task
Open coworking areas suit light communication and email. Quiet zones are better for focused writing or deep analysis. Private meeting rooms belong to client calls and heavy multi-screen work. With Deskimo's pay-per-minute pricing, you only pay for the room type you actually need; no overspending on a meeting room when a hot desk will do.
3. Be honest on your budget
A permanent private office in a major city can run from several hundred to several thousand dollars a month. A combined Deskimo and DeskIn setup, used a few days a week, typically costs at a fraction of that, before you even count the hardware you no longer need to buy. Ask the Deskimo staff about location pricing and team plans, as costs vary by city and space type.
4. Be aware of the trade-offs
Coworking spaces are not a perfect substitute for a dedicated office. Availability fluctuates, noise levels vary, and long sessions on pay-per-minute pricing is costly. The fix is simple: book ahead for important sessions, have an alternative location in mind, and use Deskimo day passes or bundles when you know you'll be there all day.
Bringing It Together
If you are using remote desktop software to work but struggle with noisy home environments, a coworking space could be the missing piece. Try booking a workspace on Deskimo app using the referral code DESKIN to get for $10 off (new users only). Setting up a new Deskimo Business account? Use referral code DESKBIZ for 60% off your first credit package. If you already have a Deskimo membership but find yourself hauling heavy gears to every session, DeskIn could change that. Download the app, connect to your desktop in minutes. Use promo code DESKIMO for 50% off DeskIn for the first month (or 20% off on annual plans). This promotion is valid until 31 July 2026. Terms and conditions apply.
The best remote setup isn't about buying more gear. It's about showing up anywhere with almost nothing, and still doing your best work.
About Deskimo
Deskimo is an on-demand workspace platform that gives professionals pay-per-minute access to coworking spaces, private offices, and meeting rooms. No long-term leases. No monthly subscriptions. Book a space when you need it and only pay for the time you use.
About DeskIn
DeskIn is remote desktop software that delivers low-latency access to your personal and enterprise computers from any device. With end-to-end encryption, multi-screen management, and fast data transmission, it's made for professionals who need all the power of a desktop computer without having to carry the hardware.
Paano Kontrolin ang Function na Alt Delete sa Remote Desktop [Pag-troubleshoot]
Kung nasubukan mo nang pinutin ang Ctrl + Alt + Delete sa iyong keyboard habang naka-connect sa isang remote desktop session, alam mo na hindi ito gumagana sa paraang inaasahan mo. Sinasala ang utos ng iyong lokal na makina, hindi ng remote. Nakakainis, di ba?
Kapag Hindi Gumagana ang Ctrl + Alt + Del nang Remote
Para sa mga remote workers, freelancers, at digital nomads, mahalagang malaman kung paano kontrolin ang alt delete sa remote desktop. Kung sinusubukan mong i-lock ang iyong screen, ma-access ang Task Manager, o magbago ng password, ang simpleng shortcut na ito ay mas mahalaga kaysa sa iyong inaasahan.
Good news: may mas mahusay na paraan upang hawakan ito, at sasamahan kita sa bawat hakbang.
1. Bakit Hindi Gumagana ang Ctrl + Alt + Del sa Default
Ano ang Problema?
Kapag gumagamit ka ng Remote Desktop Protocol (RDP) o mga remote access tools, pumupunta ang mga utos ng iyong keyboard sa lokal na sistema maliban kung sinabi nang iba.
Ang Ctrl + Alt + Delete ay isang protektadong utos ng sistema.
Palaging kontrolado ito ng iyong lokal na sistema muna.
Hindi ito natatanggap ng remote computer.
Ito ay ayon sa disenyo, ngunit para sa mga namamahala ng mga remote PC, ito ay isang sakit ng ulo.
Sino ang Kailangan nito?
Remote workers na namamahala ng maraming makina
Mga IT admin na gumagawa ng maintenance
Mga freelancers na nagtatrabaho sa iba't ibang time zone
Mga digital nomads na uma-access ng office PCs mula saanman
Ano ang Talagang Kailangan Mo
Kailangan mo ng paraan upang ipadala ang Ctrl + Alt + Delete sa remote machine nang hindi nagdudulot ng lokal na pagkaabala.
Maari mo ring gusto:
Bakit hindi ko ma-remotely control ang aking Android device?
Paano Secured ang Remote Desktop Access: Manatiling Ligtas na Remote
Paggamit ng DeskIn: Mas Matalinong Paraan upang Hawakan ang Remote Access
Ang DeskIn ay isang libre at remote desktop tool na nagbibigay-daan sa iyo na ma-access ang anumang PC, mula saanman. Isang malaking benepisyo? Pinapayagan ka nitong ipadala ang Ctrl + Alt + Delete nang direkta, walang stress.
Paano Ito Gawin sa DeskIn
Ilunsad ang DeskIn app sa parehong mga device
Kumonekta sa iyong PC/Mac/Laptop gamit ang DeskIn (kung nakakonekta, makikita ng iyong mobile display ang ganito)
Sa ibabang kanan na sulok ng menu, i-click ang arrow at lilitaw ang isa pang add button
Pagkatapos ay piliin ang action menu sa pinaka-kaliwa
Pagkatapos ay ang ctrl+alt+delete button ay lumilitaw na maaari mong madaling gamitin sa anumang oras.
I-click ito — problema ay nalutas!
Hindi mo kailangan alalahanin ang kumplikadong shortcuts o keyboard hacks. Ginagawang madali ng DeskIn ang isang click lamang.
Subukan ang DeskIn Ngayon
Naka-stuck pa rin sa pag-figure out kung paano kontrolin ang alt delete sa remote desktop? Hayaan ang DeskIn na hawakan ito para sa iyo. I-click dito upang i-download ang DeskIn.
Load More


Products
Download
Resources
Contact Us
Email: support@deskin.io
Office: 991D Alexandra Road #02-17, Singapore 119972
Copyright © 2026 Zuler Technology PTE. LTD. All rights reserved.
Products
Download
Resources
Contact Us
support@deskin.io
991D Alexandra Road #02-17
Singapore 119972
Copyright © 2026 Zuler Technology PTE. LTD. All rights reserved.
Contact Us
Email: support@deskin.io
Office: 991D Alexandra Road #02-17, Singapore 119972
Products
Download
Resources
Copyright © 2026 Zuler Technology PTE. LTD. All rights reserved.