產品教學
產品教學
·
10分鐘
·
10分鐘
DeskIn
已更新
已更新
已更新
越來越多使用者希望把 iPad 外接螢幕,不論是透過 HDMI 有線連接、AirPlay 無線鏡像,或用 DeskIn 遠端桌面進行 iPad 投影到電腦,都能讓工作與娛樂更高效。如果你也想把 iPad 延伸螢幕或用來展示影片、簡報,這篇教學將完整解析各種連接方式與最佳設定。
延伸閱讀:
許多使用者希望 iPad 當外接螢幕,打造更高效、靈活的工作與娛樂環境。常見用途包括:
多工處理:剪輯影片、繪圖、筆記或編輯文件時,透過 iPad 第二螢幕擴充桌面空間,提升 iPad 多工效率。
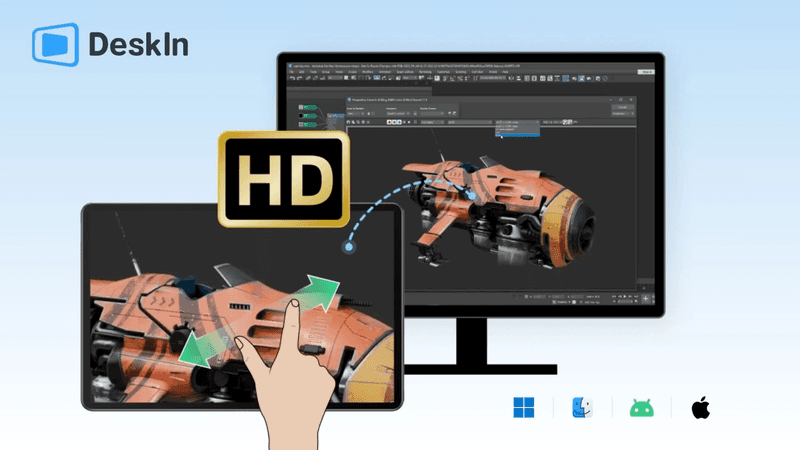
展示內容:將 iPad 投影到電腦或電視,用 iPad 螢幕鏡像輸出分享簡報、照片或影片,方便線上會議與課程。
雙螢幕應用:搭配 Mac 或 Windows,實現 iPad 雙螢幕,一邊工作一邊參考資料,節省切換視窗時間。
娛樂與影音:觀看電影、影片或遊戲畫面時,將 iPad 投影到大螢幕,享受更震撼的視覺體驗。
這些用途不僅滿足不同需求,也讓 iPad 的使用場景更廣泛、操作更便利。想知道如何實際連接 iPad 到外接螢幕或電視嗎?請繼續往下看,我們將詳解四種主要方法與設定技巧。
不確定該選哪種方式?先看下表比較各種連接方法的差異,再看看為何 DeskIn 是最靈活的免費選擇。
方法 | 連接穩定性 | 延遲表現 | 跨系統支援 | 是否免費 | 缺點說明 |
★★★★★ | ★★★★★ | 支援 Mac、Windows、iOS、Android | ✅ | 不支援Linux | |
有線連接(HDMI/USB-C) | ★★★★★ | ★★★★★ | 僅限有實體端口裝置 | ❌需購買轉接器 | 線材限制、無法跨平台、部分僅鏡像 |
Sidecar 並行顯示 | ★★★★☆ | ★★★☆☆ | 僅限 Mac+iPad | ✅ | 僅支援蘋果生態、舊機型不兼容 |
AirPlay 無線鏡像 | ★★★☆☆ | ★★☆☆☆ | 僅限支援 AirPlay 的裝置 | ✅ | 延遲明顯、畫質壓縮、需同 Wi-Fi |
想把 iPad 連接電腦 當作第二螢幕,又不想受限於有線連接和系統平台?DeskIn 提供跨平台的 iPad 遠端桌面解決方案,讓你輕鬆把 iPad 延伸 Windows 或 Mac 的螢幕。無論是 iPad 延伸螢幕 Windows,還是 iPad MacBook 雙螢幕,DeskIn 都能即時顯示高畫質畫面、延遲低,操作順暢,支援多工處理與螢幕排列調整。
對於許多 Reddit 使用者抱怨的問題,如 iPad 外接顯示器沒法調整解析度、鏡像模式無法自由分屏,DeskIn 可以完美解決,提供 iPad 外接顯示器擴展 和 iPad 外接顯示器分屏功能。使用 DeskIn,你不需任何線材,就能將iPad 延伸螢幕或將 iPad 變成電腦的第二螢幕,實現 iPad 遠端控製 Windows 的完整體驗,無論工作或娛樂都更高效。

作為專業的 iPad 外接螢幕解決方案,DeskIn 在多個層面都展現出優異表現:
跨系統兼容性強:不僅支援 iPad 成為 Mac 或 Windows 的第二螢幕,Android 平板同樣可用於 Windows、macOS 裝置的螢幕延伸或鏡像顯示。無論你的設備組合如何,都能輕鬆連線。
低延遲與穩定連線:DeskIn 擁有超過 200 個全球伺服器節點,會自動挑選最快線路,確保高連線成功率與穩定輸出。即使遠距離操作或網路不佳,也能維持流暢畫面,延遲低於 40ms。
高效能表現:DeskIn 支援最高 4K 60FPS 和 4:4:4 真彩色顯示,色彩和清晰度都優於其他軟體,是遠端設計的最佳遠端桌面軟體。
操作直覺、零設定:無需繁瑣設定即可快速連線。介面設計清晰,工具列與虛擬滑鼠操作流暢,輸入法適配完善,讓行動裝置的體驗與電腦一致。
完全免費:DeskIn 的多螢幕鏡像與外接功能對所有使用者開放,是同類軟體中少見的免費方案。
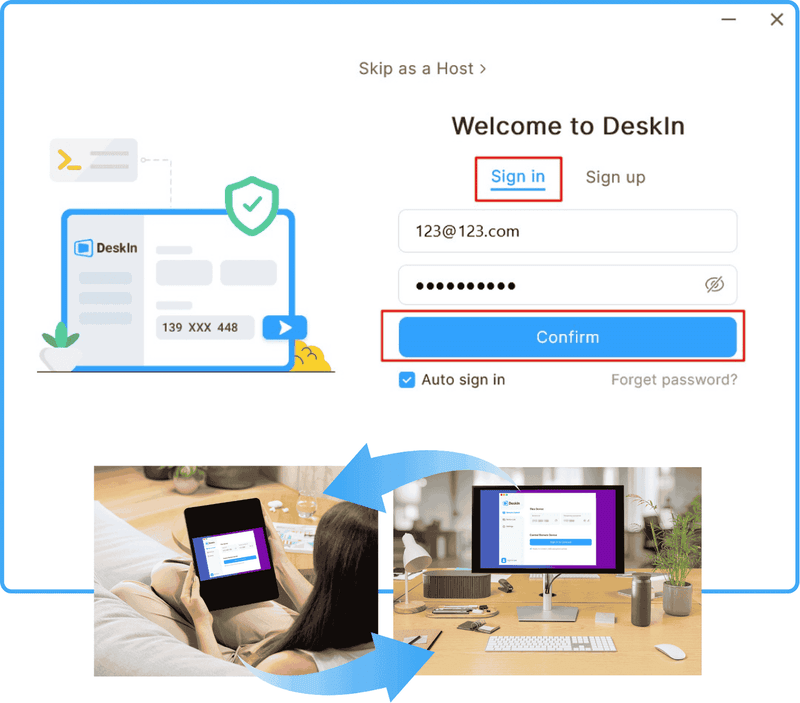
在 iPad 和電腦上下載 DeskIn 並創建同一個帳號 首先,確保你在 iPad 和 電腦 上都安裝了 DeskIn 並登錄到相同的帳號。這樣才能確保兩個設備之間的無縫連接。
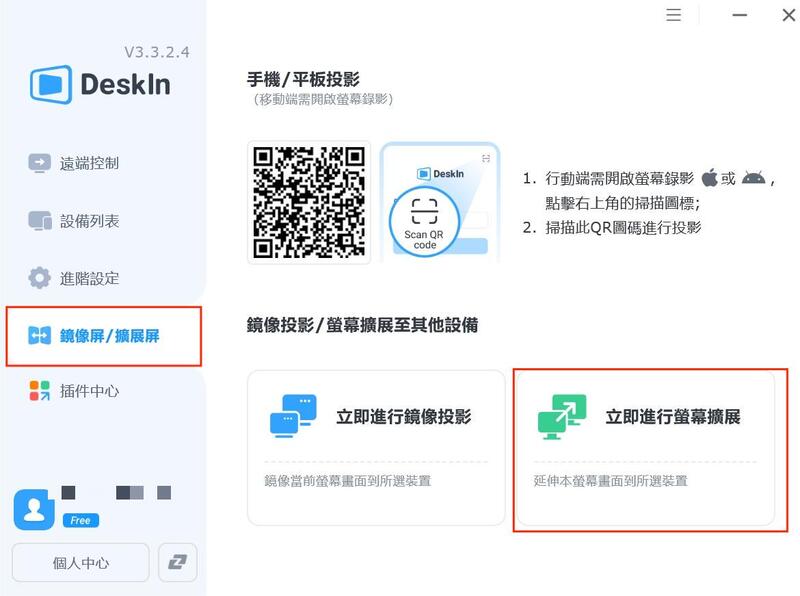
點擊左側導航欄的鏡像屏/擴展屏,選擇立即進行螢幕擴展 在 DeskIn 介面中,找到左側導航欄,選擇“鏡像屏/擴展屏”選項,點擊“立即進行螢幕擴展”
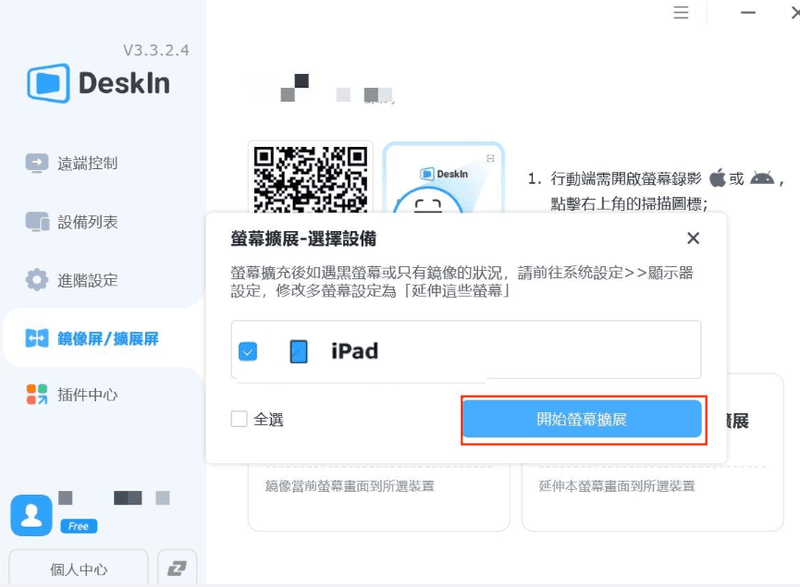
開始擴展螢幕 看到你的 iPad 出現在選項中後,選擇它並點擊“開始螢幕擴展”。點擊開始後,iPad會成為電腦的第二螢幕,你可以享受更高效的多工操作。
在了解了 DeskIn 的遠端延伸功能後,很多使用者仍希望透過傳統方式實現 iPad 外接螢幕,無論是投影到電腦、連接電視,或直接作為第二螢幕使用。下面將介紹三種最常見的連接方式,幫助你選擇最適合的方案。
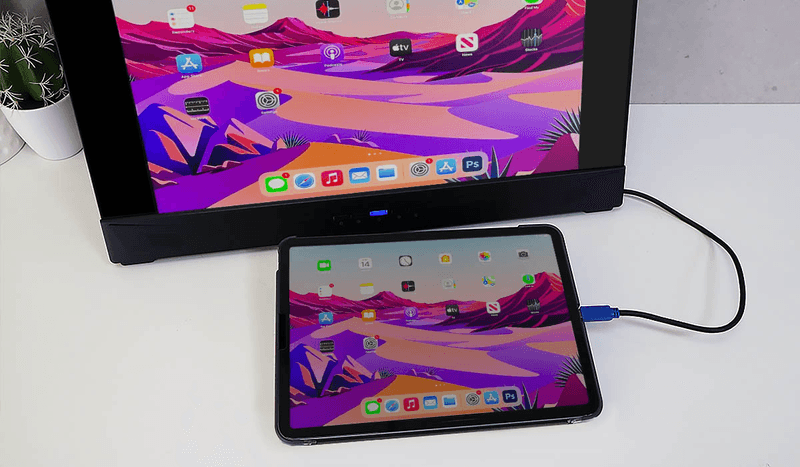
對於需要穩定輸出和低延遲的使用者,實現 iPad 外接螢幕,通過 HDMI 連接是一個直接且可靠的選擇使用 Apple 原廠或 MFI 認證的 HDMI / USB-C 轉接器,將 iPad 連接到電視、顯示器或投影機。連接後,可以在 iPad 外接顯示器設置 中調整顯示模式,包括全屏顯示或自訂解析度,並根據需求設置 iPad 外接顯示器分辨率和刷新率。
優點:
穩定輸出、低延遲
適合高畫質影片播放、遊戲及精確多工
支援顯示模式調整,包括 iPad 外接顯示器全屏 或延伸模式
缺點:
需要額外的轉接器和連接線
部分顯示器僅支援鏡像模式,不支援延伸桌面
若發生 iPad 接 HDMI 沒反應 或 iPad 外接顯示器沒反應,需要檢查連接線和顯示器設置
配備 USB-C 埠的 iPad 機型:
iPad Pro(M4)
iPad Pro 11 吋(第 1 代、第 2 代、第 3 代或第 4 代)
iPad Pro 12.9 吋(第 3 代、第 4 代、第 5 代或第 6 代)
iPad Air(M2 和 M3)
iPad Air(第 4 代或第 5 代)
iPad mini(A17 Pro)
iPad mini(第 6 代)
iPad(A16)
iPad(第 10 代)
如果你希望避免這些常見問題,或者尋求更靈活的跨平台解決方案,DeskIn 提供免線材、即時延伸並支援高解析度的遠端桌面方案。
了解更多詳情,可以參考:
如何使用 USB-C 連接器實現 iPad 外接螢幕
確認 iPad 配備 USB-C 連接器 首先,確保你的 iPad 是配備 USB-C 連接器 的機型。這將允許你將 iPad 直接連接到顯示器、電視或投影機。
使用 USB-C 顯示器轉接器 如果顯示器、電視或投影機的連接埠不與 iPad 的充電端口兼容,請使用 USB-C 顯示器 AV 轉接器 或 USB-C VGA 多埠轉接器。將轉接器插入 iPad 的充電埠。
連接 HDMI 或 VGA 線 使用 HDMI 或 VGA 連接線,將一端插入轉接器,另一端插入顯示器、電視或投影機的相應端口。
調整視訊來源 如有需要,請在顯示器、電視或投影機上切換到正確的視訊來源,確保 iPad 的畫面能顯示出來。
這樣,你就能夠使用 USB-C 連接器將 iPad 外接為顯示器,無論是工作還是娛樂,讓多工處理更加高效。
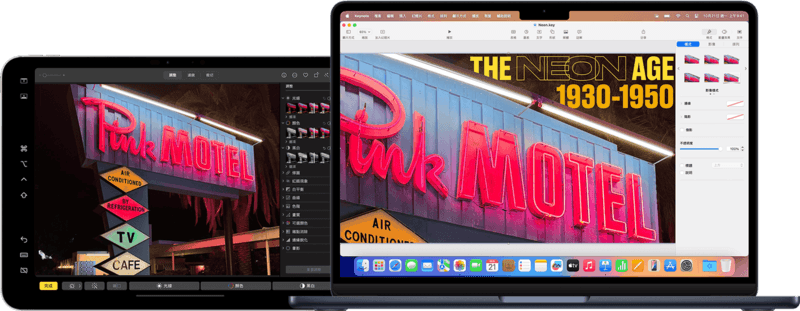
如果你是 Mac 使用者,Apple 提供的 Sidecar(並行顯示) 功能,是最方便的官方方案之一。 只要你的 Mac 與 iPad 登入相同的 Apple ID,並開啟藍牙與 Wi-Fi,就能讓 iPad 成為 Mac 的第二螢幕,支援鏡像顯示與延伸桌面兩種模式。
使用步驟:
確保 Mac 和 iPad 登入相同的 Apple ID,並開啟藍牙與 Wi-Fi。
在 Mac 上點擊「控制中心」>「螢幕鏡像輸出」> 選擇你的 iPad 名稱。
選擇「鏡像顯示」或「使用作為獨立顯示器」即可。
優點:
官方整合度高,連接速度快、畫質清晰。
可直接使用 Apple Pencil 在 iPad 上標註或繪圖。
支援無線與有線連接兩種方式,靈活度高。
缺點:
僅限於 macOS Catalina 以後 + iPadOS 13 以後 的新機型使用。
不支援 Windows 系統,跨平台使用受限。
延遲較明顯,特別是無線模式下。
部分應用無法正確延伸至 iPad 螢幕。
如果你同時擁有 Windows 電腦與 iPad,Sidecar 無法使用。此時可改用 DeskIn 這類跨系統延伸螢幕工具,不僅支援 iPad 延伸 Mac,也支援 iPad 延伸 Windows,甚至 Android 平板延伸 Mac/Windows,功能完全免費。
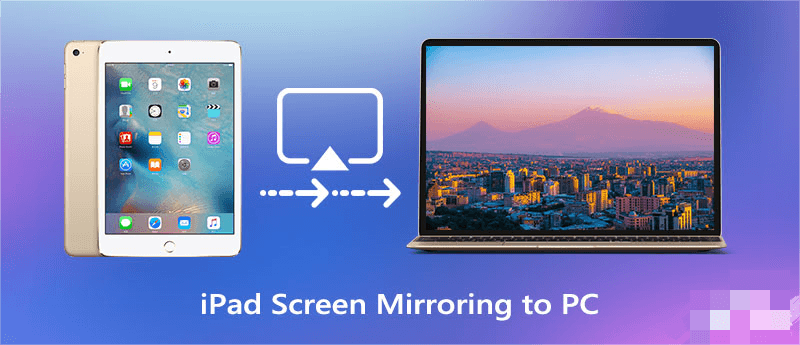
對於希望快速將 iPad 投影到電腦或 iPad 投影到電視的使用者,AirPlay 是一個方便的無線鏡像方案。使用者只需確保 iPad 和目標裝置(如 電視、電腦)連接至同一 Wi-Fi 網絡。在 iPad 上選擇要投影的內容,點擊 AirPlay 圖示後,選擇目標設備,即可實現畫面投影。
優點:
操作簡單:無需額外硬體設備,快速連接。
無線連接:不需要線材,移動方便。
缺點:
延遲較高:受到 Wi-Fi 網絡穩定性的影響,可能會有延遲。
兼容性低:適用於支持 AirPlay 的 電視、Mac 電腦等設備。
解析度限制:與有線連接相比,畫質和解析度可能會有損失。
範圍限制:需要與接收設備處於同一 Wi-Fi 網絡,範圍有限。
如果你希望避免以上限制,並且需要更高的畫質和流暢度,DeskIn 提供了更為靈活的延伸螢幕功能,適合需要跨平台使用的用戶。
了解更多詳情,請參考:
如何使用 AirPlay 實現 iPad 外接螢幕
連接到相同 Wi-Fi 網路 確保你的 iPad 與要進行擴展螢幕的設備連接到相同的 Wi-Fi 網路,這是使用 AirPlay 鏡像投影的前提。
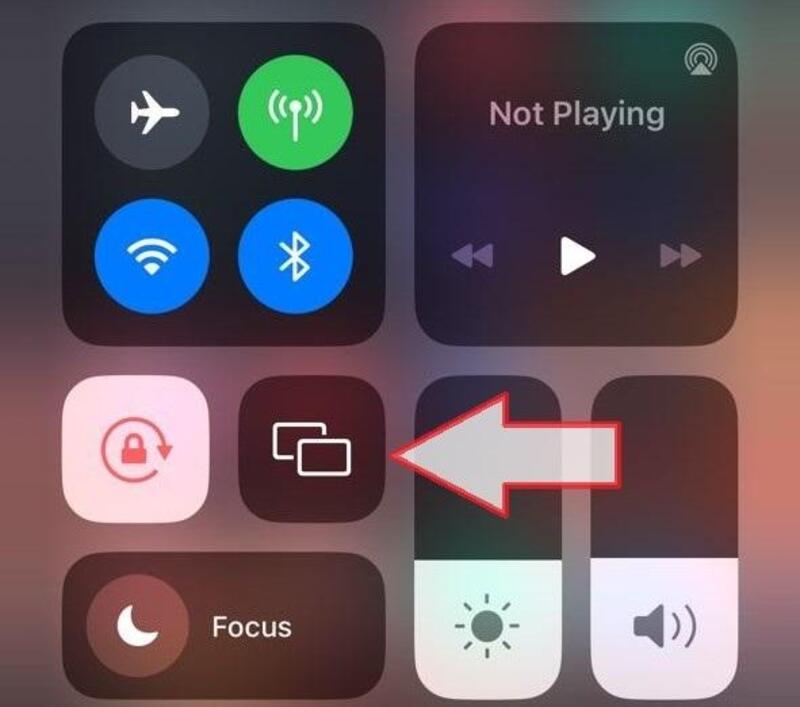
開啟控制中心 從 iPad 螢幕的右上角向下滑動,打開「控制中心」。
選擇螢幕鏡像輸出 在控制中心中,點擊「螢幕鏡像輸出」(Screen Mirroring) 按鈕。
選擇你的設備 系統會顯示可用的 AirPlay 裝置清單,從中選擇你的設備名稱。這樣就可以開始將 iPad 的畫面投影到設備上。
如果是首次投影,某些裝置會要求驗證。如果你的電視畫面顯示了一組 AirPlay 驗證碼,只需在 iPad 上輸入該碼即可完成連接。
這樣,你就可以通過 AirPlay 無線將 iPad 的畫面鏡像輸出到電視,方便分享內容或觀看影片。
鏡像輸出和延伸螢幕主要區別在於它們的用途和顯示方式:
鏡像輸出:將 iPad 螢幕畫面同步投影到外接顯示器或電視,適合用來展示演示、影片播放或簡單的內容共享。這樣做的好處是簡單快捷,但iPad 外接顯示器會僅顯示相同內容,無法提供額外的操作空間。
延伸螢幕:將外接螢幕視為 iPad 的延伸,適合用於多工操作、繪圖、文書處理等需要更多工作空間的場景。此時,iPad 和外接顯示器會顯示不同的內容,可以實現真正的多屏操作,提升工作效率。
此外,iPadOS 的 Stage Manager 功能讓分屏體驗更進一步,支持多視窗管理,實現更靈活的操作界面。若你希望將 iPad 外接顯示器擴展以便更有效率地工作,這些功能都能提供更強大的支持。
了解如何在不同設備間設置雙螢幕,請參考:
如果 iPad 外接顯示器沒反應,首先檢查連接線或轉接器是否正確插入。如果問題依舊,試著重新啟動設備,並確保使用的是 Apple 原廠或認證的轉接器。若你希望更穩定的連接體驗,DeskIn 作為跨平台遠端桌面工具,可幫助避免顯示器無法連接或遲滯等問題,提供更加流暢的操作體驗。
當只顯示鏡像畫面而無法實現 iPad 外接顯示器擴展,請檢查設置中的顯示模式。進入 iPad 設定 > 顯示與亮度,選擇“延伸螢幕”而非“鏡像顯示”。如果你的工作需求需要更高的延伸螢幕功能,DeskIn 可以作為最佳解決方案,讓你的 iPad 和電腦之間輕鬆實現高效的多屏操作。
如果顯示比例或解析度出現問題,可以進入 iPad 顯示設置,調整顯示的解析度。如果依然無法解決,建議檢查顯示器的 刷新率 和 解析度設置,確保其與 iPad 相容。若你需要無縫、高解析度的顯示,DeskIn 支援修改分辨率以匹配各類電腦螢幕,讓 iPad 外接顯示器的解析度 完美適配各種顯示需求,並且提供穩定無延遲的顯示效果。
若 iPad 連接顯示器息屏或出現閃爍,可以檢查連接的穩定性和轉接器是否有故障。此外,調整顯示器的亮度和刷新率,或使用 DeskIn 等專業工具,能提供更穩定的連接體驗,無需擔心螢幕閃爍或延遲,讓你更輕鬆地實現多工作業。
無論是通過 HDMI 連接、AirPlay 投影,還是 DeskIn 這種跨平台的遠端桌面解決方案,每種方法都能滿足不同使用者的需求。然而,DeskIn 在 iPad 延伸螢幕 的表現上,提供了無與倫比的優勢:
跨系統支援:無論是 Mac、Windows 還是 iPad,都能無縫協作。
低延遲,穩定輸出:無需擔心延遲問題,工作更加高效。
真正的延伸螢幕功能:不僅是鏡像顯示,真正實現多屏操作。
立即下載並體驗 DeskIn,讓 iPad 成為你的高效雙螢幕工具,提升工作與娛樂效率!
越來越多使用者希望把 iPad 外接螢幕,不論是透過 HDMI 有線連接、AirPlay 無線鏡像,或用 DeskIn 遠端桌面進行 iPad 投影到電腦,都能讓工作與娛樂更高效。如果你也想把 iPad 延伸螢幕或用來展示影片、簡報,這篇教學將完整解析各種連接方式與最佳設定。
延伸閱讀:
許多使用者希望 iPad 當外接螢幕,打造更高效、靈活的工作與娛樂環境。常見用途包括:
多工處理:剪輯影片、繪圖、筆記或編輯文件時,透過 iPad 第二螢幕擴充桌面空間,提升 iPad 多工效率。
展示內容:將 iPad 投影到電腦或電視,用 iPad 螢幕鏡像輸出分享簡報、照片或影片,方便線上會議與課程。
雙螢幕應用:搭配 Mac 或 Windows,實現 iPad 雙螢幕,一邊工作一邊參考資料,節省切換視窗時間。
娛樂與影音:觀看電影、影片或遊戲畫面時,將 iPad 投影到大螢幕,享受更震撼的視覺體驗。
這些用途不僅滿足不同需求,也讓 iPad 的使用場景更廣泛、操作更便利。想知道如何實際連接 iPad 到外接螢幕或電視嗎?請繼續往下看,我們將詳解四種主要方法與設定技巧。
不確定該選哪種方式?先看下表比較各種連接方法的差異,再看看為何 DeskIn 是最靈活的免費選擇。
方法 | 連接穩定性 | 延遲表現 | 跨系統支援 | 是否免費 | 缺點說明 |
★★★★★ | ★★★★★ | 支援 Mac、Windows、iOS、Android | ✅ | 不支援Linux | |
有線連接(HDMI/USB-C) | ★★★★★ | ★★★★★ | 僅限有實體端口裝置 | ❌需購買轉接器 | 線材限制、無法跨平台、部分僅鏡像 |
Sidecar 並行顯示 | ★★★★☆ | ★★★☆☆ | 僅限 Mac+iPad | ✅ | 僅支援蘋果生態、舊機型不兼容 |
AirPlay 無線鏡像 | ★★★☆☆ | ★★☆☆☆ | 僅限支援 AirPlay 的裝置 | ✅ | 延遲明顯、畫質壓縮、需同 Wi-Fi |
想把 iPad 連接電腦 當作第二螢幕,又不想受限於有線連接和系統平台?DeskIn 提供跨平台的 iPad 遠端桌面解決方案,讓你輕鬆把 iPad 延伸 Windows 或 Mac 的螢幕。無論是 iPad 延伸螢幕 Windows,還是 iPad MacBook 雙螢幕,DeskIn 都能即時顯示高畫質畫面、延遲低,操作順暢,支援多工處理與螢幕排列調整。
對於許多 Reddit 使用者抱怨的問題,如 iPad 外接顯示器沒法調整解析度、鏡像模式無法自由分屏,DeskIn 可以完美解決,提供 iPad 外接顯示器擴展 和 iPad 外接顯示器分屏功能。使用 DeskIn,你不需任何線材,就能將iPad 延伸螢幕或將 iPad 變成電腦的第二螢幕,實現 iPad 遠端控製 Windows 的完整體驗,無論工作或娛樂都更高效。
作為專業的 iPad 外接螢幕解決方案,DeskIn 在多個層面都展現出優異表現:
跨系統兼容性強:不僅支援 iPad 成為 Mac 或 Windows 的第二螢幕,Android 平板同樣可用於 Windows、macOS 裝置的螢幕延伸或鏡像顯示。無論你的設備組合如何,都能輕鬆連線。
低延遲與穩定連線:DeskIn 擁有超過 200 個全球伺服器節點,會自動挑選最快線路,確保高連線成功率與穩定輸出。即使遠距離操作或網路不佳,也能維持流暢畫面,延遲低於 40ms。
高效能表現:DeskIn 支援最高 4K 60FPS 和 4:4:4 真彩色顯示,色彩和清晰度都優於其他軟體,是遠端設計的最佳遠端桌面軟體。
操作直覺、零設定:無需繁瑣設定即可快速連線。介面設計清晰,工具列與虛擬滑鼠操作流暢,輸入法適配完善,讓行動裝置的體驗與電腦一致。
完全免費:DeskIn 的多螢幕鏡像與外接功能對所有使用者開放,是同類軟體中少見的免費方案。
在 iPad 和電腦上下載 DeskIn 並創建同一個帳號 首先,確保你在 iPad 和 電腦 上都安裝了 DeskIn 並登錄到相同的帳號。這樣才能確保兩個設備之間的無縫連接。
點擊左側導航欄的鏡像屏/擴展屏,選擇立即進行螢幕擴展 在 DeskIn 介面中,找到左側導航欄,選擇“鏡像屏/擴展屏”選項,點擊“立即進行螢幕擴展”
開始擴展螢幕 看到你的 iPad 出現在選項中後,選擇它並點擊“開始螢幕擴展”。點擊開始後,iPad會成為電腦的第二螢幕,你可以享受更高效的多工操作。
在了解了 DeskIn 的遠端延伸功能後,很多使用者仍希望透過傳統方式實現 iPad 外接螢幕,無論是投影到電腦、連接電視,或直接作為第二螢幕使用。下面將介紹三種最常見的連接方式,幫助你選擇最適合的方案。
對於需要穩定輸出和低延遲的使用者,實現 iPad 外接螢幕,通過 HDMI 連接是一個直接且可靠的選擇使用 Apple 原廠或 MFI 認證的 HDMI / USB-C 轉接器,將 iPad 連接到電視、顯示器或投影機。連接後,可以在 iPad 外接顯示器設置 中調整顯示模式,包括全屏顯示或自訂解析度,並根據需求設置 iPad 外接顯示器分辨率和刷新率。
優點:
穩定輸出、低延遲
適合高畫質影片播放、遊戲及精確多工
支援顯示模式調整,包括 iPad 外接顯示器全屏 或延伸模式
缺點:
需要額外的轉接器和連接線
部分顯示器僅支援鏡像模式,不支援延伸桌面
若發生 iPad 接 HDMI 沒反應 或 iPad 外接顯示器沒反應,需要檢查連接線和顯示器設置
配備 USB-C 埠的 iPad 機型:
iPad Pro(M4)
iPad Pro 11 吋(第 1 代、第 2 代、第 3 代或第 4 代)
iPad Pro 12.9 吋(第 3 代、第 4 代、第 5 代或第 6 代)
iPad Air(M2 和 M3)
iPad Air(第 4 代或第 5 代)
iPad mini(A17 Pro)
iPad mini(第 6 代)
iPad(A16)
iPad(第 10 代)
如果你希望避免這些常見問題,或者尋求更靈活的跨平台解決方案,DeskIn 提供免線材、即時延伸並支援高解析度的遠端桌面方案。
了解更多詳情,可以參考:
如何使用 USB-C 連接器實現 iPad 外接螢幕
確認 iPad 配備 USB-C 連接器 首先,確保你的 iPad 是配備 USB-C 連接器 的機型。這將允許你將 iPad 直接連接到顯示器、電視或投影機。
使用 USB-C 顯示器轉接器 如果顯示器、電視或投影機的連接埠不與 iPad 的充電端口兼容,請使用 USB-C 顯示器 AV 轉接器 或 USB-C VGA 多埠轉接器。將轉接器插入 iPad 的充電埠。
連接 HDMI 或 VGA 線 使用 HDMI 或 VGA 連接線,將一端插入轉接器,另一端插入顯示器、電視或投影機的相應端口。
調整視訊來源 如有需要,請在顯示器、電視或投影機上切換到正確的視訊來源,確保 iPad 的畫面能顯示出來。
這樣,你就能夠使用 USB-C 連接器將 iPad 外接為顯示器,無論是工作還是娛樂,讓多工處理更加高效。
如果你是 Mac 使用者,Apple 提供的 Sidecar(並行顯示) 功能,是最方便的官方方案之一。 只要你的 Mac 與 iPad 登入相同的 Apple ID,並開啟藍牙與 Wi-Fi,就能讓 iPad 成為 Mac 的第二螢幕,支援鏡像顯示與延伸桌面兩種模式。
使用步驟:
確保 Mac 和 iPad 登入相同的 Apple ID,並開啟藍牙與 Wi-Fi。
在 Mac 上點擊「控制中心」>「螢幕鏡像輸出」> 選擇你的 iPad 名稱。
選擇「鏡像顯示」或「使用作為獨立顯示器」即可。
優點:
官方整合度高,連接速度快、畫質清晰。
可直接使用 Apple Pencil 在 iPad 上標註或繪圖。
支援無線與有線連接兩種方式,靈活度高。
缺點:
僅限於 macOS Catalina 以後 + iPadOS 13 以後 的新機型使用。
不支援 Windows 系統,跨平台使用受限。
延遲較明顯,特別是無線模式下。
部分應用無法正確延伸至 iPad 螢幕。
如果你同時擁有 Windows 電腦與 iPad,Sidecar 無法使用。此時可改用 DeskIn 這類跨系統延伸螢幕工具,不僅支援 iPad 延伸 Mac,也支援 iPad 延伸 Windows,甚至 Android 平板延伸 Mac/Windows,功能完全免費。
對於希望快速將 iPad 投影到電腦或 iPad 投影到電視的使用者,AirPlay 是一個方便的無線鏡像方案。使用者只需確保 iPad 和目標裝置(如 電視、電腦)連接至同一 Wi-Fi 網絡。在 iPad 上選擇要投影的內容,點擊 AirPlay 圖示後,選擇目標設備,即可實現畫面投影。
優點:
操作簡單:無需額外硬體設備,快速連接。
無線連接:不需要線材,移動方便。
缺點:
延遲較高:受到 Wi-Fi 網絡穩定性的影響,可能會有延遲。
兼容性低:適用於支持 AirPlay 的 電視、Mac 電腦等設備。
解析度限制:與有線連接相比,畫質和解析度可能會有損失。
範圍限制:需要與接收設備處於同一 Wi-Fi 網絡,範圍有限。
如果你希望避免以上限制,並且需要更高的畫質和流暢度,DeskIn 提供了更為靈活的延伸螢幕功能,適合需要跨平台使用的用戶。
了解更多詳情,請參考:
如何使用 AirPlay 實現 iPad 外接螢幕
連接到相同 Wi-Fi 網路 確保你的 iPad 與要進行擴展螢幕的設備連接到相同的 Wi-Fi 網路,這是使用 AirPlay 鏡像投影的前提。
開啟控制中心 從 iPad 螢幕的右上角向下滑動,打開「控制中心」。
選擇螢幕鏡像輸出 在控制中心中,點擊「螢幕鏡像輸出」(Screen Mirroring) 按鈕。
選擇你的設備 系統會顯示可用的 AirPlay 裝置清單,從中選擇你的設備名稱。這樣就可以開始將 iPad 的畫面投影到設備上。
如果是首次投影,某些裝置會要求驗證。如果你的電視畫面顯示了一組 AirPlay 驗證碼,只需在 iPad 上輸入該碼即可完成連接。
這樣,你就可以通過 AirPlay 無線將 iPad 的畫面鏡像輸出到電視,方便分享內容或觀看影片。
鏡像輸出和延伸螢幕主要區別在於它們的用途和顯示方式:
鏡像輸出:將 iPad 螢幕畫面同步投影到外接顯示器或電視,適合用來展示演示、影片播放或簡單的內容共享。這樣做的好處是簡單快捷,但iPad 外接顯示器會僅顯示相同內容,無法提供額外的操作空間。
延伸螢幕:將外接螢幕視為 iPad 的延伸,適合用於多工操作、繪圖、文書處理等需要更多工作空間的場景。此時,iPad 和外接顯示器會顯示不同的內容,可以實現真正的多屏操作,提升工作效率。
此外,iPadOS 的 Stage Manager 功能讓分屏體驗更進一步,支持多視窗管理,實現更靈活的操作界面。若你希望將 iPad 外接顯示器擴展以便更有效率地工作,這些功能都能提供更強大的支持。
了解如何在不同設備間設置雙螢幕,請參考:
如果 iPad 外接顯示器沒反應,首先檢查連接線或轉接器是否正確插入。如果問題依舊,試著重新啟動設備,並確保使用的是 Apple 原廠或認證的轉接器。若你希望更穩定的連接體驗,DeskIn 作為跨平台遠端桌面工具,可幫助避免顯示器無法連接或遲滯等問題,提供更加流暢的操作體驗。
當只顯示鏡像畫面而無法實現 iPad 外接顯示器擴展,請檢查設置中的顯示模式。進入 iPad 設定 > 顯示與亮度,選擇“延伸螢幕”而非“鏡像顯示”。如果你的工作需求需要更高的延伸螢幕功能,DeskIn 可以作為最佳解決方案,讓你的 iPad 和電腦之間輕鬆實現高效的多屏操作。
如果顯示比例或解析度出現問題,可以進入 iPad 顯示設置,調整顯示的解析度。如果依然無法解決,建議檢查顯示器的 刷新率 和 解析度設置,確保其與 iPad 相容。若你需要無縫、高解析度的顯示,DeskIn 支援修改分辨率以匹配各類電腦螢幕,讓 iPad 外接顯示器的解析度 完美適配各種顯示需求,並且提供穩定無延遲的顯示效果。
若 iPad 連接顯示器息屏或出現閃爍,可以檢查連接的穩定性和轉接器是否有故障。此外,調整顯示器的亮度和刷新率,或使用 DeskIn 等專業工具,能提供更穩定的連接體驗,無需擔心螢幕閃爍或延遲,讓你更輕鬆地實現多工作業。
無論是通過 HDMI 連接、AirPlay 投影,還是 DeskIn 這種跨平台的遠端桌面解決方案,每種方法都能滿足不同使用者的需求。然而,DeskIn 在 iPad 延伸螢幕 的表現上,提供了無與倫比的優勢:
跨系統支援:無論是 Mac、Windows 還是 iPad,都能無縫協作。
低延遲,穩定輸出:無需擔心延遲問題,工作更加高效。
真正的延伸螢幕功能:不僅是鏡像顯示,真正實現多屏操作。
立即下載並體驗 DeskIn,讓 iPad 成為你的高效雙螢幕工具,提升工作與娛樂效率!


如何把iPad變成電腦的第二螢幕?(Mac/Windows完整教學)
想找個 App 或軟體,可以用自己的 iPad 當第二螢幕,而且要有最好的解析度和畫面更新率?在日常學習生活中,通常一台筆電或許就能完成所有的工作。但面臨剪輯、設計、寫程式、資料校對等需要多視窗作業的工作時,多一塊顯示器真的能大大提升效率。如果你是居家辦公者、或是學生,沒有條件或是不想購入多一個螢幕,其實可以透過DeskIn遠端桌面、蘋果内建「Sidecar」功能以及Duet Display將 iPad 作爲延伸螢幕。本文也會同步說明 DeskIn 目前的螢幕鏡像/延伸方案限制,避免設定前產生誤解。
💻立即下載DeskIn遠端桌面,將iPad變成電腦的第二螢幕,提升工作效率!
iPad 當延伸螢幕後,可以把主要工作放在電腦,副螢幕放置參考資料或工具軟體,複製、拖曳更順暢,不必再來回切換。
例如:寫程式時在電腦編碼、iPad顯示需求文檔;剪輯影片時電腦進行剪輯、iPad顯示素材;製作簡報時,電腦處理內容、iPad展示資料。兩塊螢幕分工明確,效率大幅提升。
iPad 的螢幕解析度高、色彩表現好,比部分便宜的外接螢幕更適合設計相關工作。
多數人家裡已有 iPad,出門攜帶也方便。把它當成副螢幕,不僅能節省購買顯示器的成本,也讓移動辦公更靈活。
方法 | 支援平台 | 連接方式 | 免費/付費 | 適用情境 | 備註 |
Windows / Mac | 無線 | 任一付费方案包含 | iPad 延伸螢幕 Windows 或 Mac | 支援跨系統,操作簡單 | |
Apple Sidecar | Mac | 無線 / USB | 免費(需Mac/iPad) | Mac iPad 雙螢幕 | 需同一 Apple ID,僅限 Mac/iPad |
Duet Display | Windows / Mac | USB 有線(付費) | 付費 | iPad 當第二螢幕 | 適合喜歡有線連接的用戶 |
DeskIn 遠端桌面跨平台支援螢幕鏡像和延伸,而且高清、零延遲,是最好用的把iPad作爲電腦延伸螢幕的應用程式。它支援最高4K 解析度、60FPS,無需同一個網路就可以進行螢幕延伸,而且無論是Windows還是MacOS都可以。要使用DeskIn
DeskIn 除了支援延伸螢幕,還同時支援更多進階互動功能,將你的iPad與電腦串聯,例如用iPad遠端操控電腦、iPad與電腦之間進行檔案傳輸、掃碼投影、甚至遠端相機功能。DeskIn是iPad必裝的生產力工具和延伸螢幕工具,非常安全,而且畫面直覺,簡單易用。
💻立即下載DeskIn遠端桌面并升级方案,將iPad變成電腦的第二螢幕,提升工作效率!
📖相關文章推薦:
必學6個雙螢幕效率提升技巧!把iPad/安卓平板變成電腦的“第二螢幕”
💡優點:
跨平台支援,無論是MacOS還是Windows,一個軟體輕鬆搞定
高畫質延伸螢幕,最高支援 4K 60FPS,無感延遲
就算不在同一網絡下,也可以進行螢幕延伸
無需複雜設定,界面直覺
步驟二:在電腦端DeskIn上點擊左邊菜單「鏡像屏/擴展屏」>>「立刻進行螢幕擴展」,在選單中點選你的iPad,并點擊「開始螢幕擴展」即可
步驟三(非必須):若進行螢幕擴充後,您發現iPad只是鏡像電腦螢幕上的内容,請前往系統顯示器修改設定
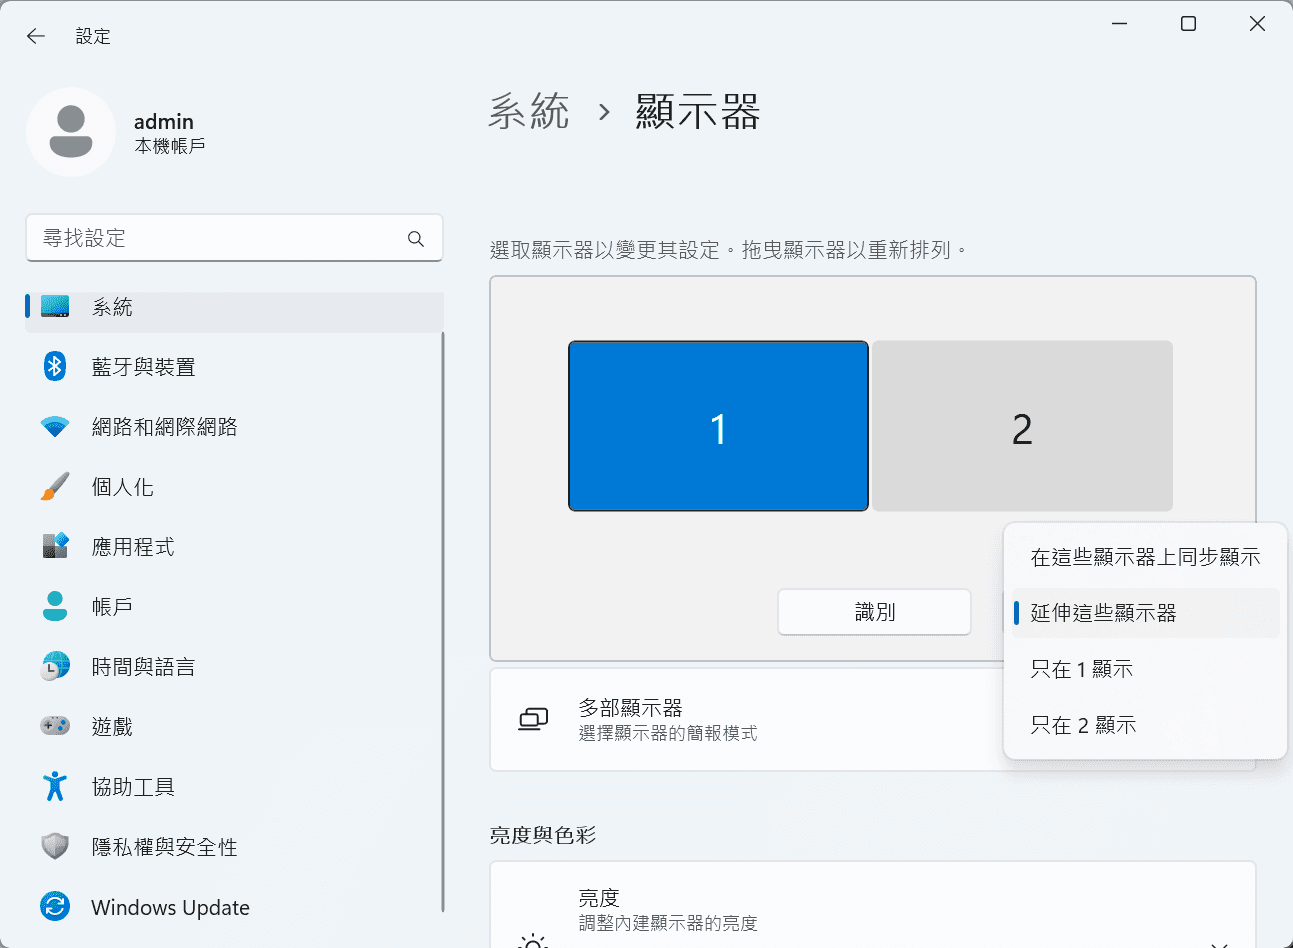
Windows:前往系統設定>>顯示器設定,將螢幕選項設定為「延伸這些顯示器」,你還可以根據您的使用習慣,透過拖拽修改1、2兩塊螢幕的左右順序。
MacOS:進入系統設置 >> 顯示設置,選擇 DeskIn 螢幕,並將螢幕選項改為"擴展顯示"。您也可以點擊"排列…"來調整兩個螢幕的位置。

蘋果本身自帶的Apple sidecar,「並行」功能支援將iPad用作Mac電腦的外部延伸顯示器。
步驟一:打開mac系統設定,點選側邊欄的「顯示器」進入設定,點擊「+」號,選中您的iPad。

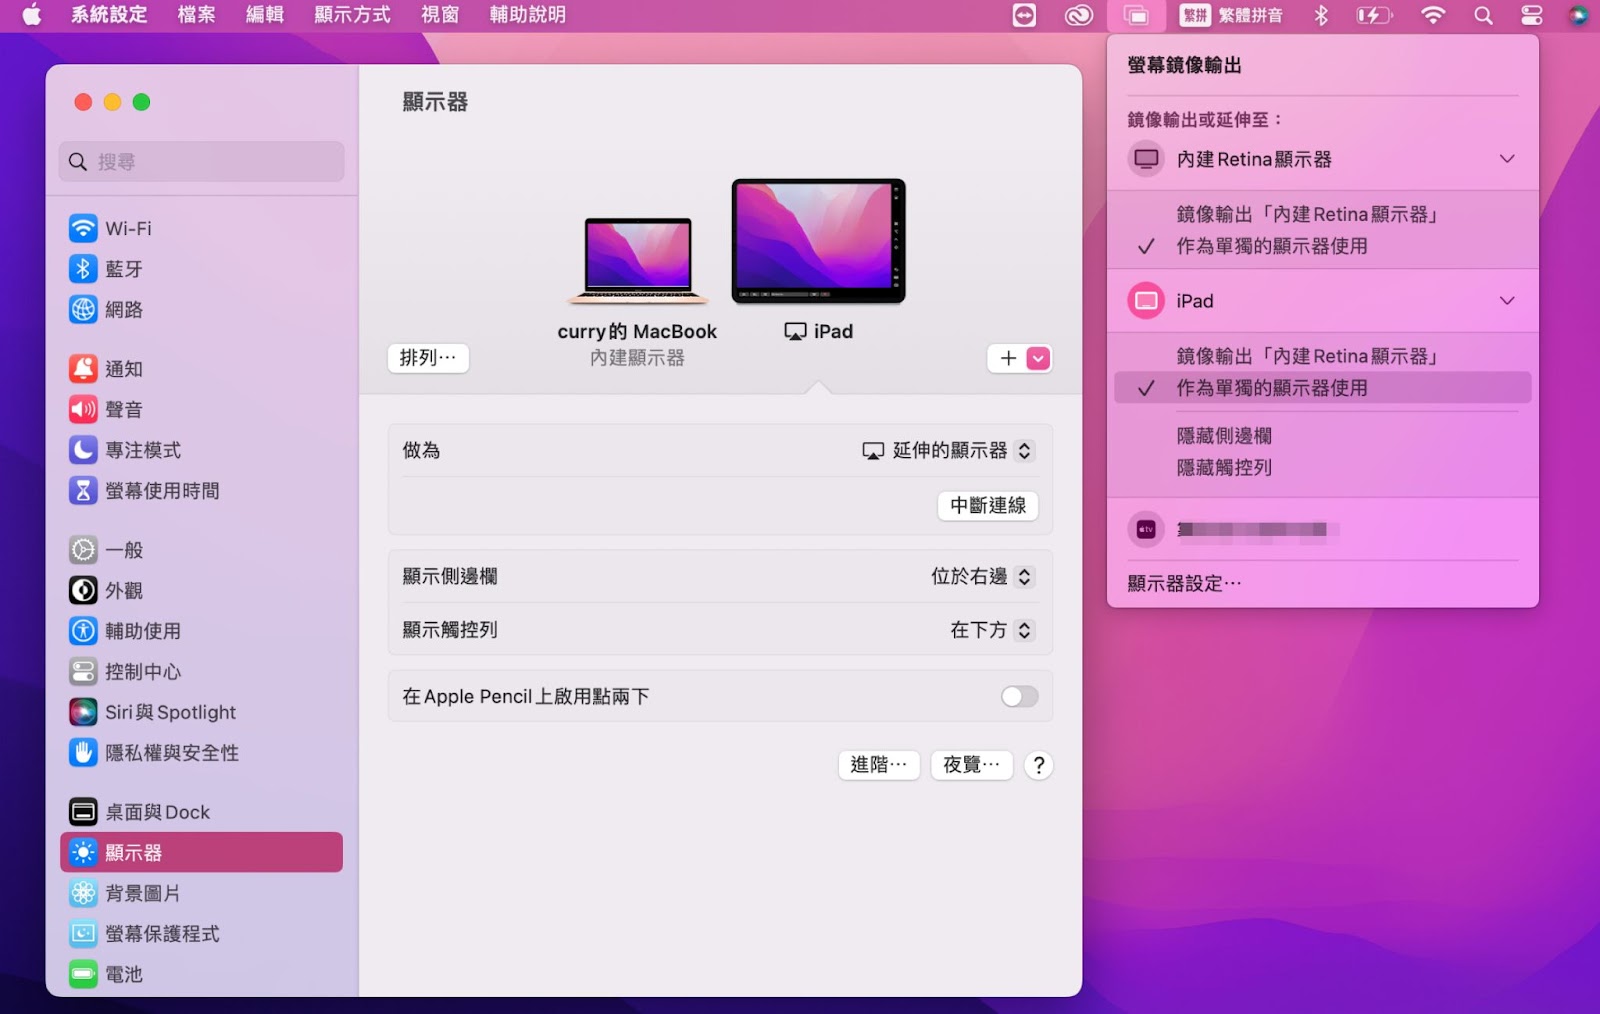
步驟二:選中iPad,選擇它做爲「延伸的顯示器」,並檢查mac頂部工具列的Airplay設定,將iPad的選項設定為「作爲單獨的顯示器使用」即可。iPad的側邊欄還有一些快捷按鍵可以使用,你也可以在mac上設定這個側邊欄的位置或是直接將其隱藏
❗局限性:
兩台裝置已經登入同一個Apple ID,或在同一網絡下。
兩台裝置都已經開啓藍牙、Wi-Fi和「sidecar」功能,而且距離不能超過10公尺(大約10米)。
只適用2016年之後推出的mac和iPadOS13以上版本使用,其他蘋果裝置和Windows都無法用。
📖相關文章推薦:
Duet Display 是一款付費應用,可以將 iPad 延伸螢幕 Windows 或 Mac,實現 iPad 雙螢幕 的工作體驗。它支援 有線 USB 連接(低延遲、高畫質)以及 無線 Wi-Fi 連接(需 Duet Air / Pro 訂閱),讓你把 iPad 當外接螢幕 使用,提升多任務辦公效率。
在 iPad App Store 下載 Duet Display,並在電腦端安裝對應軟體(支援 Windows / Mac)。開啟這兩個裝置的Duet Display。
使用 USB 或 Wi-Fi 連接 iPad 與電腦,開啟兩端應用程式,系統會自動偵測。
Windows:右鍵桌面 →「顯示設定」→選「延伸這些顯示器」。 Mac:系統偏好設定 → 顯示器 → 排列 iPad 作為第二螢幕。

完成後,你就可以把 iPad 當螢幕 或 iPad 當第二螢幕 使用,輕鬆實現螢幕延伸,提高工作效率。
📖相關文章推薦:
可以,iPad 透過 Apple Sidecar 功能或第三方工具(如 DeskIn)即可延伸成電腦的副螢幕。這樣能提升多工效率,例如同時瀏覽文件與視訊,或將軟體工具面板移到 iPad,讓主螢幕更專注於主要工作。
可以,iPad 不僅能當副螢幕,還支援 Split View 與 Slide Over 多工顯示模式。使用這些功能時,能同時在 iPad 螢幕上開啟兩個 App 或浮動視窗,達到雙螢幕效果,讓工作與娛樂的效率更高。
DeskIn 透過遠端連線,能將電腦畫面延伸到 iPad 或其他裝置,模擬成第二螢幕。安裝 DeskIn 並登入帳號後,選擇擴展模式即可使用,操作簡單且跨平台支援,適合需要高效多螢幕作業的使用者。
DeskIn 是一款跨平台遠端桌面軟體,支援 Windows、macOS、iOS、Android 及 Web。它提供高畫質低延遲連線,能遠端操控電腦、檔案存取與螢幕擴展,適合遠距辦公、線上教學、設計與多工場景。DeskIn提供了不同的付費方案,滿足不同專業化場景的使用需求。
本文介紹了如何把iPad變成Mac和Windows電腦的“第二螢幕”,以提升辦公效率,這對於需要同時處理多項任務,或是使用多視窗辦公的人來説非常有用。您可以將工作分配到多個螢幕上,從而減少混亂並提高效率。最推薦使用遠端生產力工具DeskIn遠端桌面軟體要進行iPad螢幕延伸,因爲它簡單易用,而且支援將iPad變成Mac和Windows電腦的擴充螢幕,能照顧到更多的日常使用情境,立即下載DeskIn!

Top 6 RustDesk Alternative Tools for Faster, Easier Remote Access
Remote access should feel like flipping a light switch, not decoding a control panel. Yet many users exploring RustDesk eventually run into friction: connection IDs, server setup, or occasional lag. While RustDesk is powerful, it’s not always the easiest or smoothest option, especially for non-technical users.
That’s why more people are actively searching for a reliable RustDesk alternative that combines performance, simplicity, and flexibility. Whether you want a plug-and-play solution or something more advanced, this guide will help you find the best fit.
RustDesk stands out as a privacy-friendly, self-hosted remote desktop tool. However, real-world usage reveals a few common challenges:
Complicated setup for the RustDesk self-hosted environments
Manual connection steps requiring IDs and passwords
Occasional latency or unstable connections
Limited user-friendly features out of the box
For many users, especially those helping family or managing multiple devices, simplicity matters just as much as control.
When evaluating a RustDesk alternative, focus on these key factors:
Ease of use: Quick setup without technical overhead
Performance: Smooth, low-latency remote sessions
Compatibility: Support for Windows, macOS, Linux, and mobile
Security: Strong encryption and access controls
Flexibility: Options ranging from cloud-based to open source
The ideal tool strikes a balance between power and convenience, something many modern solutions now deliver better than traditional setups.
Here’s a quick breakdown of the top tools and where they shine:
DeskIn – Best all-in-one RustDesk alternative for performance and ease of use
AnyDesk – Best lightweight tool for fast connections
TeamViewer – Best for enterprise-grade remote support
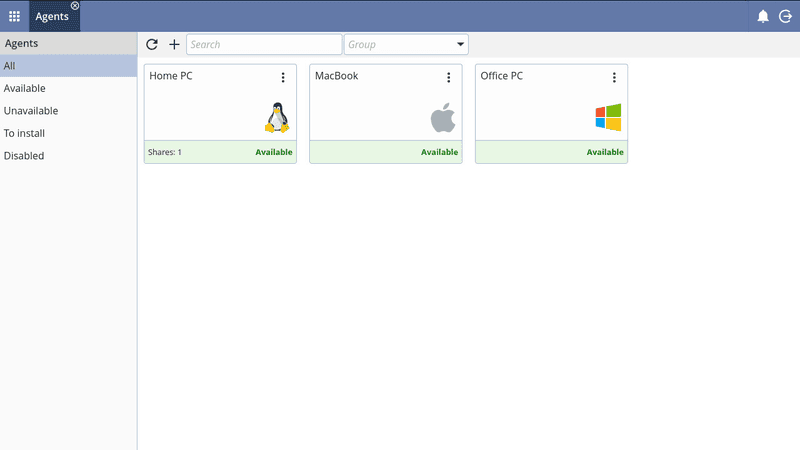
MeshCentral – Best open-source and self-hosted solution
DWService – Best free browser-based tool
Chrome Remote Desktop – Best simple, no-frills option
Ultra-low latency with smooth high-frame-rate streaming
No complex setup or server deployment required
Cross-platform including Rustdesk alternative for Android
Secure with encryption and device control features
Built-in file transfer and multi-device management
Smaller awareness than legacy competitors
Best for: Users who want a powerful yet simple remote desktop solution
DeskIn removes the friction that often comes with remote access tools. Instead of relying on IDs or manual configurations, it offers a streamlined connection experience that works right out of the box. This makes it especially valuable for users supporting non-technical family members or managing multiple remote devices.
Performance is where DeskIn truly distinguishes itself. Compared to RustDesk, which can sometimes struggle with latency, DeskIn delivers consistently smooth sessions with minimal lag. It also eliminates the need for self-hosting, making it a strong free RustDesk alternative option for users who want powerful features without the complexity.
For those exploring options beyond the RustDesk alternative GitHub projects, DeskIn provides a polished, ready-to-use experience that balances simplicity with professional-grade performance.
Lightweight and fast installation
Good performance on low bandwidth
Cross-platform support
Easy-to-use interface
Performance may drop during long sessions
File transfer can be inconsistent
Best for: Users needing quick and simple remote access
AnyDesk is often considered a natural step up from RustDesk for users who want something easier to deploy. It offers a lightweight application that connects quickly and performs well under normal conditions. This makes it suitable for quick troubleshooting or occasional remote access.
However, performance consistency can be an issue. Users frequently report lag or instability during extended sessions or when handling more demanding tasks. While AnyDesk is a solid option for basic needs, it may not fully satisfy users looking for a more robust, all-in-one solution.
👀 You may also be interested in: |
|---|
Enterprise-grade security with encryption and 2FA
Stable performance across global networks
Rich features like file transfer and session recording
Broad device compatibility
Expensive for commercial use
Free version has limitations
Heavier resource usage on some systems
Best for: Businesses and IT teams managing multiple endpoints
TeamViewer has long been a dominant player in the remote desktop space, offering a comprehensive suite of features designed for enterprise environments. It excels in reliability and global connectivity, making it a popular choice for IT support teams.
That said, its pricing model is a major drawback for many users. Frequent users may quickly encounter licensing restrictions, and costs can escalate for businesses. Additionally, its heavier footprint can impact performance on lower-end devices. DeskIn offers a more modern alternative by delivering similar performance and essential features without the same cost barriers. For users who want enterprise-level capabilities with better efficiency, it presents a compelling option.
👀 You may also be interested in: |
|---|
Fully RustDesk alternative open source solution
Web-based management dashboard
Supports multi-device environments
Strong customization and control
Complex setup and maintenance
Requires technical expertise
Best for: Advanced users needing a Rustdesk alternative self-hosted
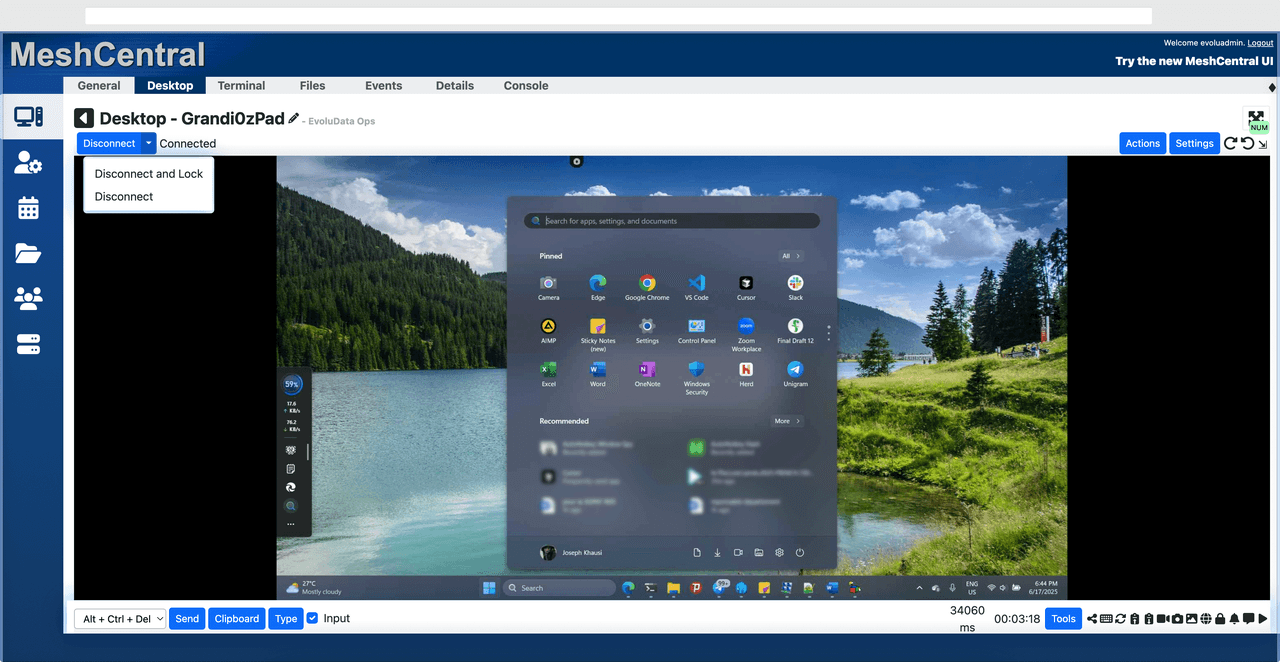
MeshCentral is a powerful open-source platform designed for users who want full control over their remote access infrastructure. It supports multiple devices and provides a centralized dashboard for management, making it attractive for IT professionals.
However, this flexibility comes with complexity. Setting up and maintaining a MeshCentral server requires technical knowledge, which can be a barrier for many users. Compared to this, DeskIn offers a much simpler deployment process while still delivering strong performance and security. For users who prioritize ease of use over full control, modern solutions like DeskIn provide a more accessible alternative.
Completely free
Browser-based access
Open-source foundation
Simple setup
Limited performance
Basic feature set
Best for: Users looking for a simple, free RustDesk alternative
DWService offers a browser-based approach to remote access with no heavy installation, making it convenient for quick connections in restricted environments. It supports both desktop access and file management across major platforms.
However, performance often feels sluggish, especially on demanding tasks, and features remain basic; lacking session recording, smooth multi-monitor support, or advanced security controls. While suitable for occasional personal use, it falls short for professional or high-performance scenarios.
Free and easy to use
Browser-based setup
Cross-platform compatibility
Very limited features
No advanced management or collaboration tools
Best for: Casual users needing basic remote access

Chrome Remote Desktop is one of the simplest remote access tools available. It’s easy to set up and works across devices, making it a convenient choice for occasional use.
However, it lacks many essential features such as file transfer, session management, and advanced security controls. For users with more demanding needs, it quickly becomes insufficient. Compared to Chrome Remote Desktop, DeskIn provides a much more complete experience without sacrificing ease of use, making it a better long-term solution.
👀 You may also be interested in: |
|---|
RustDesk is powerful but can be difficult to set up and manage, especially with self-hosting. Many users prefer tools that offer similar performance without technical complexity. DeskIn simplifies remote access while maintaining strong performance and security.
Several tools qualify as a free RustDesk alternative, including DWService and Chrome Remote Desktop. However, DeskIn stands out by offering better performance and usability even in its free version.
Yes, tools like MeshCentral and DWService are considered RustDesk alternative open source options. They provide flexibility and control but often require technical expertise to set up and maintain.
Beginners should choose tools with a simple setup and intuitive interfaces. DeskIn is an excellent option because it removes the need for manual configuration while still delivering advanced features.
RustDesk is a powerful starting point, but it’s not always the easiest or most efficient tool for everyday use. From setup complexity to performance limitations, many users eventually look for a better RustDesk alternative.
Among all the options, DeskIn stands out as the most balanced solution. It combines speed, simplicity, and cross-platform support into one seamless experience. If you’re ready to move beyond technical friction and enjoy truly smooth remote access, DeskIn is a choice that simply works.

Top 7 RDP Alternative Tools for Faster, Safer Remote Access
Remote desktop access used to feel like a solid bridge. Now, for many users, traditional RDP feels more like a creaky rope ladder. With performance issues, security concerns, and limited cross-platform support, it's no surprise that more people are actively searching for a better RDP alternative that actually keeps up with modern workflows.
If you're managing multiple servers, working across devices, or just tired of unstable connections, this guide will walk you through the best tools worth switching to.
RDP (Remote Desktop Protocol) is a proprietary protocol developed by Microsoft that allows users to connect to another computer over a network. It's widely used for accessing Windows servers, virtual machines, and remote workstations.
While powerful in controlled environments, RDP is often tied to Windows systems and requires configuration like port forwarding or VPNs. Compared to newer tools, it can feel rigid and outdated.
You may also be interested in: |
|---|
RDP still works, but it comes with trade-offs that many users find frustrating:
Security risks if not properly configured
Complex setup for remote or external access
Limited cross-platform compatibility
Performance issues over unstable networks
Many IT teams are now actively replacing it, especially when looking for a Windows RDP client alternative or something that works seamlessly across macOS, Linux, and mobile devices. That's where modern Remote Desktop alternatives shine.
Choosing the right tool is like picking the right vehicle. Some are built for speed, others for heavy-duty enterprise work. Here's a quick snapshot:
DeskIn – Best all-in-one RDP alternative for performance and cross-platform use
TeamViewer – Best for enterprise remote support
AnyDesk – Best lightweight option for fast connections
RustDesk – Best Windows RDP alternative open-source solution
Remmina – Best RDP alternative for Linux users
Chrome Remote Desktop – Best simple browser-based tool
Splashtop – Best for high-performance business environments
Ultra-low latency with smooth high-frame-rate streaming
Works across Windows, macOS, Linux, iOS, and Android
Strong encryption and secure access controls
Built-in file transfer and multi-session support
Newer compared to legacy brands
Best for: Users who want a powerful, flexible RDP alternative

DeskIn feels less like remote access and more like teleportation for your desktop. Whether you're managing servers, supporting clients, or working remotely, it delivers consistently smooth performance without the usual lag spikes seen in traditional RDP setups.
Unlike many tools, DeskIn eliminates the need for complex configurations. You don't need to wrestle with firewalls or VPNs just to connect. It also works seamlessly across platforms, making it a strong alternative to Microsoft Remote Desktop for Mac and mobile users alike.
For teams juggling multiple systems, DeskIn provides a unified experience that replaces fragmented workflows. It's also a strong free RDP alternative option with premium-level capabilities, making it ideal for both individuals and businesses.
Enterprise-grade security and compliance
Extensive feature set including collaboration tools
Cross-platform compatibility
Reliable global performance
Expensive licensing
Can be overkill for individuals
Best for: Enterprises needing secure and scalable remote access
TeamViewer is a comprehensive remote desktop platform widely adopted by IT teams, support professionals, and enterprises. Its feature set extends far beyond simple screen sharing—it includes robust device management, remote printing, file transfer, session recording, and even augmented reality support for field service. TeamViewer's security architecture relies on AES‑256 encryption, two‑factor authentication, and whitelisting, making it suitable for organizations with strict compliance requirements. It runs on virtually every operating system and mobile platform.
The main trade‑off is its pricing: licenses are subscription‑based and can become expensive for small teams or individual users, especially as TeamViewer aggressively flags personal use as commercial, leading to session restrictions.
Fast and responsive
Lightweight installation
Works well on low bandwidth
Easy to use
File transfer can be inconsistent
Lag during longer sessions
Best for: Users needing quick, simple remote access
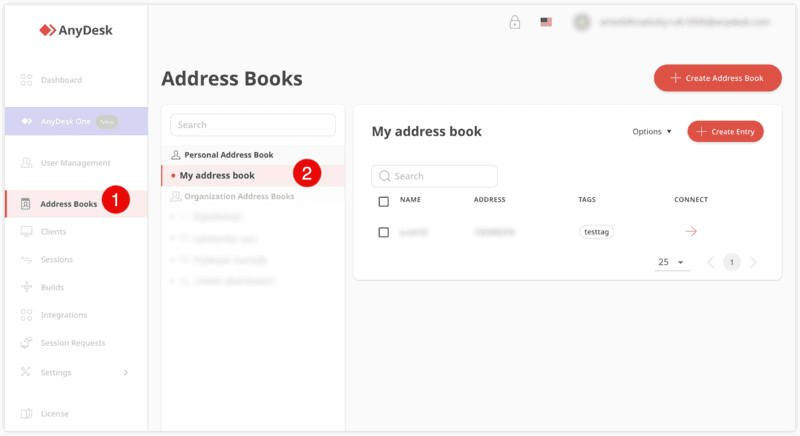
AnyDesk is a lightweight remote desktop application prized for its speed and efficiency, often recommended as a fast alternative to Microsoft's native Remote Desktop on Windows 10 and Android. It uses a proprietary video codec, DeskRT, to achieve low latency even on limited bandwidth, making it ideal for quick support sessions and accessing devices over mobile networks. The interface is clean and minimalist, with features like address book management, file transfer, and session recording available.
However, users frequently report instability during extended sessions; performance can degrade over time, and file transfers may slow considerably compared to competitors. While its free version is generous for personal use, professional users often find the performance ceiling limits its suitability for continuous, demanding workloads. DeskIn, by contrast, maintains consistent performance even during extended use, making it better suited for professional workloads.
You may also be interested in: |
|---|
Free and open-source
Self-hosting for full control
Strong privacy protection
Active community
Technical setup required
Limited user-friendly features
Best for: Developers and privacy-focused users
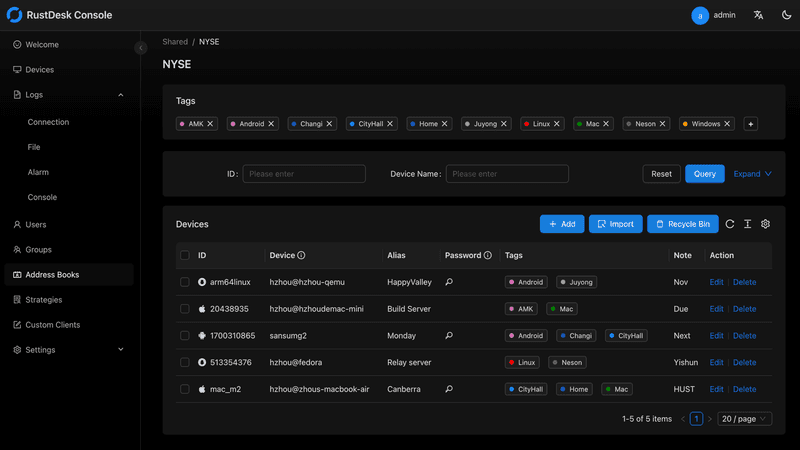
RustDesk has emerged as a leading open‑source remote desktop alternative, appealing to developers and organizations that require full control over their data. It allows users to self‑host the relay and rendezvous servers, meaning no third‑party infrastructure handles connection metadata. Built with Rust, it offers a modern codebase with cross‑platform clients (Windows, macOS, Linux, Android, iOS) and supports essential features such as file transfer, TCP tunneling, and customizable address books.
The major barrier is its complexity: deploying a self‑hosted environment requires technical expertise to configure firewalls, SSL certificates, and ongoing server maintenance. For those using the public relay, performance can be inconsistent depending on server load and geographic proximity.
You may also be interested in: Top RustDesk Alternatives for Better Performance, Security & Ease of Use |
|---|
Open-source and free
Supports multiple protocols including RDP and VNC
Lightweight and flexible
Native to Linux environments
Limited features compared to modern tools
UI can feel outdated
Best for: Linux users looking for a traditional RDP alternative Linux
Remmina is a beloved open‑source remote desktop client for Linux, supporting multiple protocols (RDP, VNC, SSH, SPICE, and others) in a single unified interface. It is frequently chosen by system administrators and Linux enthusiasts who need a flexible, lightweight tool to manage diverse environments. Remmina offers tabbed sessions, quick‑connect profiles, and a plugin system that extends its capabilities.
However, its strength - protocol flexibility, also highlights its limitations. As a frontend client rather than a full remote access solution, it lacks features like unattended access, centralized account management, or robust session recording out of the box. Performance can vary by protocol, and the user experience lags behind more polished commercial tools, particularly for users seeking a plug‑and‑play setup.
Free and easy to use
Browser-based setup
Cross-platform access
Very limited features
No advanced management tools
Best for: Casual users needing basic remote access
Chrome Remote Desktop is a free, browser‑based remote access tool from Google that requires nothing more than a Chrome browser and a Google account. It excels in simplicity: installation takes seconds, and connections are mediated through Google's infrastructure, eliminating complex firewall configurations. For occasional use—such as helping a family member or quickly accessing a home computer—it works reliably across Windows, macOS, Linux, and even ChromeOS.
The trade‑off is its minimal feature set. There is no native file transfer, multi‑session management, remote printing, or granular permission controls. Collaboration tools are absent, and the reliance on a Google account for authentication can be a limitation in professional environments. It remains a convenient entry‑level tool but struggles to meet the needs of power users or IT teams.
You may also be interested in: |
|---|
High-quality streaming performance
Strong security features
Good for business environments
Reliable connections
Subscription-based pricing
Limited free version
Best for: Businesses needing performance-focused remote access
Splashtop is a high‑performance remote desktop solution frequently adopted by creative professionals, educational institutions, and enterprises that prioritize fluid interaction. It delivers low‑latency streaming with support for high‑frame‑rate displays, making it suitable for video editing, CAD work, and other graphics‑intensive tasks. Splashtop offers a range of editions—from Business Access to SOS for on‑demand support—all of which include robust security (AES‑256, device authentication) and features like file transfer, remote printing, and multi‑monitor navigation. Its performance over local networks and the internet is consistently praised.
The primary drawback is cost: while competitive, the subscription model can accumulate quickly for users needing access to multiple devices or advanced features, especially when compared to similarly capable tools with more flexible pricing structures. DeskIn offers similar performance benefits with a more flexible pricing structure, making it a compelling alternative.
You may also be interested in: |
|---|
RDP can be difficult to configure, less secure if exposed, and limited outside Windows environments. Modern tools like DeskIn provide better performance, security, and ease of use.
The best RDP alternative depends on your needs, but DeskIn stands out for its balance of speed, security, and cross-platform compatibility.
Yes, several tools qualify as an RDP alternative free, including RustDesk and Chrome Remote Desktop. DeskIn also offers a free tier with advanced capabilities.
Microsoft is evolving its remote desktop ecosystem, but traditional RDP isn't disappearing overnight. However, many users are already transitioning to more modern solutions like DeskIn for better reliability and flexibility.
RDP has served its purpose, but the digital world has outgrown its limitations. Whether you need better performance, stronger security, or true cross-platform access, switching to a modern RDP alternative is no longer optional, it's inevitable.
Among all the options, DeskIn stands out as a future-ready solution. It combines speed, simplicity, and power into one seamless experience, helping you leave behind the friction of traditional remote desktop tools and step into something far more efficient.
如何把iPad變成電腦的第二螢幕?(Mac/Windows完整教學)
想找個 App 或軟體,可以用自己的 iPad 當第二螢幕,而且要有最好的解析度和畫面更新率?在日常學習生活中,通常一台筆電或許就能完成所有的工作。但面臨剪輯、設計、寫程式、資料校對等需要多視窗作業的工作時,多一塊顯示器真的能大大提升效率。如果你是居家辦公者、或是學生,沒有條件或是不想購入多一個螢幕,其實可以透過DeskIn遠端桌面、蘋果内建「Sidecar」功能以及Duet Display將 iPad 作爲延伸螢幕。本文也會同步說明 DeskIn 目前的螢幕鏡像/延伸方案限制,避免設定前產生誤解。
💻立即下載DeskIn遠端桌面,將iPad變成電腦的第二螢幕,提升工作效率!
iPad 當延伸螢幕後,可以把主要工作放在電腦,副螢幕放置參考資料或工具軟體,複製、拖曳更順暢,不必再來回切換。
例如:寫程式時在電腦編碼、iPad顯示需求文檔;剪輯影片時電腦進行剪輯、iPad顯示素材;製作簡報時,電腦處理內容、iPad展示資料。兩塊螢幕分工明確,效率大幅提升。
iPad 的螢幕解析度高、色彩表現好,比部分便宜的外接螢幕更適合設計相關工作。
多數人家裡已有 iPad,出門攜帶也方便。把它當成副螢幕,不僅能節省購買顯示器的成本,也讓移動辦公更靈活。
方法 | 支援平台 | 連接方式 | 免費/付費 | 適用情境 | 備註 |
Windows / Mac | 無線 | 任一付费方案包含 | iPad 延伸螢幕 Windows 或 Mac | 支援跨系統,操作簡單 | |
Apple Sidecar | Mac | 無線 / USB | 免費(需Mac/iPad) | Mac iPad 雙螢幕 | 需同一 Apple ID,僅限 Mac/iPad |
Duet Display | Windows / Mac | USB 有線(付費) | 付費 | iPad 當第二螢幕 | 適合喜歡有線連接的用戶 |
DeskIn 遠端桌面跨平台支援螢幕鏡像和延伸,而且高清、零延遲,是最好用的把iPad作爲電腦延伸螢幕的應用程式。它支援最高4K 解析度、60FPS,無需同一個網路就可以進行螢幕延伸,而且無論是Windows還是MacOS都可以。要使用DeskIn
DeskIn 除了支援延伸螢幕,還同時支援更多進階互動功能,將你的iPad與電腦串聯,例如用iPad遠端操控電腦、iPad與電腦之間進行檔案傳輸、掃碼投影、甚至遠端相機功能。DeskIn是iPad必裝的生產力工具和延伸螢幕工具,非常安全,而且畫面直覺,簡單易用。
💻立即下載DeskIn遠端桌面并升级方案,將iPad變成電腦的第二螢幕,提升工作效率!
📖相關文章推薦:
必學6個雙螢幕效率提升技巧!把iPad/安卓平板變成電腦的“第二螢幕”
💡優點:
跨平台支援,無論是MacOS還是Windows,一個軟體輕鬆搞定
高畫質延伸螢幕,最高支援 4K 60FPS,無感延遲
就算不在同一網絡下,也可以進行螢幕延伸
無需複雜設定,界面直覺
步驟二:在電腦端DeskIn上點擊左邊菜單「鏡像屏/擴展屏」>>「立刻進行螢幕擴展」,在選單中點選你的iPad,并點擊「開始螢幕擴展」即可
步驟三(非必須):若進行螢幕擴充後,您發現iPad只是鏡像電腦螢幕上的内容,請前往系統顯示器修改設定
Windows:前往系統設定>>顯示器設定,將螢幕選項設定為「延伸這些顯示器」,你還可以根據您的使用習慣,透過拖拽修改1、2兩塊螢幕的左右順序。
MacOS:進入系統設置 >> 顯示設置,選擇 DeskIn 螢幕,並將螢幕選項改為"擴展顯示"。您也可以點擊"排列…"來調整兩個螢幕的位置。
蘋果本身自帶的Apple sidecar,「並行」功能支援將iPad用作Mac電腦的外部延伸顯示器。
步驟一:打開mac系統設定,點選側邊欄的「顯示器」進入設定,點擊「+」號,選中您的iPad。
步驟二:選中iPad,選擇它做爲「延伸的顯示器」,並檢查mac頂部工具列的Airplay設定,將iPad的選項設定為「作爲單獨的顯示器使用」即可。iPad的側邊欄還有一些快捷按鍵可以使用,你也可以在mac上設定這個側邊欄的位置或是直接將其隱藏
❗局限性:
兩台裝置已經登入同一個Apple ID,或在同一網絡下。
兩台裝置都已經開啓藍牙、Wi-Fi和「sidecar」功能,而且距離不能超過10公尺(大約10米)。
只適用2016年之後推出的mac和iPadOS13以上版本使用,其他蘋果裝置和Windows都無法用。
📖相關文章推薦:
Duet Display 是一款付費應用,可以將 iPad 延伸螢幕 Windows 或 Mac,實現 iPad 雙螢幕 的工作體驗。它支援 有線 USB 連接(低延遲、高畫質)以及 無線 Wi-Fi 連接(需 Duet Air / Pro 訂閱),讓你把 iPad 當外接螢幕 使用,提升多任務辦公效率。
在 iPad App Store 下載 Duet Display,並在電腦端安裝對應軟體(支援 Windows / Mac)。開啟這兩個裝置的Duet Display。
使用 USB 或 Wi-Fi 連接 iPad 與電腦,開啟兩端應用程式,系統會自動偵測。
Windows:右鍵桌面 →「顯示設定」→選「延伸這些顯示器」。 Mac:系統偏好設定 → 顯示器 → 排列 iPad 作為第二螢幕。
完成後,你就可以把 iPad 當螢幕 或 iPad 當第二螢幕 使用,輕鬆實現螢幕延伸,提高工作效率。
📖相關文章推薦:
可以,iPad 透過 Apple Sidecar 功能或第三方工具(如 DeskIn)即可延伸成電腦的副螢幕。這樣能提升多工效率,例如同時瀏覽文件與視訊,或將軟體工具面板移到 iPad,讓主螢幕更專注於主要工作。
可以,iPad 不僅能當副螢幕,還支援 Split View 與 Slide Over 多工顯示模式。使用這些功能時,能同時在 iPad 螢幕上開啟兩個 App 或浮動視窗,達到雙螢幕效果,讓工作與娛樂的效率更高。
DeskIn 透過遠端連線,能將電腦畫面延伸到 iPad 或其他裝置,模擬成第二螢幕。安裝 DeskIn 並登入帳號後,選擇擴展模式即可使用,操作簡單且跨平台支援,適合需要高效多螢幕作業的使用者。
DeskIn 是一款跨平台遠端桌面軟體,支援 Windows、macOS、iOS、Android 及 Web。它提供高畫質低延遲連線,能遠端操控電腦、檔案存取與螢幕擴展,適合遠距辦公、線上教學、設計與多工場景。DeskIn提供了不同的付費方案,滿足不同專業化場景的使用需求。
本文介紹了如何把iPad變成Mac和Windows電腦的“第二螢幕”,以提升辦公效率,這對於需要同時處理多項任務,或是使用多視窗辦公的人來説非常有用。您可以將工作分配到多個螢幕上,從而減少混亂並提高效率。最推薦使用遠端生產力工具DeskIn遠端桌面軟體要進行iPad螢幕延伸,因爲它簡單易用,而且支援將iPad變成Mac和Windows電腦的擴充螢幕,能照顧到更多的日常使用情境,立即下載DeskIn!
Top 6 RustDesk Alternative Tools for Faster, Easier Remote Access
Remote access should feel like flipping a light switch, not decoding a control panel. Yet many users exploring RustDesk eventually run into friction: connection IDs, server setup, or occasional lag. While RustDesk is powerful, it’s not always the easiest or smoothest option, especially for non-technical users.
That’s why more people are actively searching for a reliable RustDesk alternative that combines performance, simplicity, and flexibility. Whether you want a plug-and-play solution or something more advanced, this guide will help you find the best fit.
RustDesk stands out as a privacy-friendly, self-hosted remote desktop tool. However, real-world usage reveals a few common challenges:
Complicated setup for the RustDesk self-hosted environments
Manual connection steps requiring IDs and passwords
Occasional latency or unstable connections
Limited user-friendly features out of the box
For many users, especially those helping family or managing multiple devices, simplicity matters just as much as control.
When evaluating a RustDesk alternative, focus on these key factors:
Ease of use: Quick setup without technical overhead
Performance: Smooth, low-latency remote sessions
Compatibility: Support for Windows, macOS, Linux, and mobile
Security: Strong encryption and access controls
Flexibility: Options ranging from cloud-based to open source
The ideal tool strikes a balance between power and convenience, something many modern solutions now deliver better than traditional setups.
Here’s a quick breakdown of the top tools and where they shine:
DeskIn – Best all-in-one RustDesk alternative for performance and ease of use
AnyDesk – Best lightweight tool for fast connections
TeamViewer – Best for enterprise-grade remote support
MeshCentral – Best open-source and self-hosted solution
DWService – Best free browser-based tool
Chrome Remote Desktop – Best simple, no-frills option
Ultra-low latency with smooth high-frame-rate streaming
No complex setup or server deployment required
Cross-platform including Rustdesk alternative for Android
Secure with encryption and device control features
Built-in file transfer and multi-device management
Smaller awareness than legacy competitors
Best for: Users who want a powerful yet simple remote desktop solution
DeskIn removes the friction that often comes with remote access tools. Instead of relying on IDs or manual configurations, it offers a streamlined connection experience that works right out of the box. This makes it especially valuable for users supporting non-technical family members or managing multiple remote devices.
Performance is where DeskIn truly distinguishes itself. Compared to RustDesk, which can sometimes struggle with latency, DeskIn delivers consistently smooth sessions with minimal lag. It also eliminates the need for self-hosting, making it a strong free RustDesk alternative option for users who want powerful features without the complexity.
For those exploring options beyond the RustDesk alternative GitHub projects, DeskIn provides a polished, ready-to-use experience that balances simplicity with professional-grade performance.
Lightweight and fast installation
Good performance on low bandwidth
Cross-platform support
Easy-to-use interface
Performance may drop during long sessions
File transfer can be inconsistent
Best for: Users needing quick and simple remote access
AnyDesk is often considered a natural step up from RustDesk for users who want something easier to deploy. It offers a lightweight application that connects quickly and performs well under normal conditions. This makes it suitable for quick troubleshooting or occasional remote access.
However, performance consistency can be an issue. Users frequently report lag or instability during extended sessions or when handling more demanding tasks. While AnyDesk is a solid option for basic needs, it may not fully satisfy users looking for a more robust, all-in-one solution.
👀 You may also be interested in: |
|---|
Enterprise-grade security with encryption and 2FA
Stable performance across global networks
Rich features like file transfer and session recording
Broad device compatibility
Expensive for commercial use
Free version has limitations
Heavier resource usage on some systems
Best for: Businesses and IT teams managing multiple endpoints
TeamViewer has long been a dominant player in the remote desktop space, offering a comprehensive suite of features designed for enterprise environments. It excels in reliability and global connectivity, making it a popular choice for IT support teams.
That said, its pricing model is a major drawback for many users. Frequent users may quickly encounter licensing restrictions, and costs can escalate for businesses. Additionally, its heavier footprint can impact performance on lower-end devices. DeskIn offers a more modern alternative by delivering similar performance and essential features without the same cost barriers. For users who want enterprise-level capabilities with better efficiency, it presents a compelling option.
👀 You may also be interested in: |
|---|
Fully RustDesk alternative open source solution
Web-based management dashboard
Supports multi-device environments
Strong customization and control
Complex setup and maintenance
Requires technical expertise
Best for: Advanced users needing a Rustdesk alternative self-hosted
MeshCentral is a powerful open-source platform designed for users who want full control over their remote access infrastructure. It supports multiple devices and provides a centralized dashboard for management, making it attractive for IT professionals.
However, this flexibility comes with complexity. Setting up and maintaining a MeshCentral server requires technical knowledge, which can be a barrier for many users. Compared to this, DeskIn offers a much simpler deployment process while still delivering strong performance and security. For users who prioritize ease of use over full control, modern solutions like DeskIn provide a more accessible alternative.
Completely free
Browser-based access
Open-source foundation
Simple setup
Limited performance
Basic feature set
Best for: Users looking for a simple, free RustDesk alternative
DWService offers a browser-based approach to remote access with no heavy installation, making it convenient for quick connections in restricted environments. It supports both desktop access and file management across major platforms.
However, performance often feels sluggish, especially on demanding tasks, and features remain basic; lacking session recording, smooth multi-monitor support, or advanced security controls. While suitable for occasional personal use, it falls short for professional or high-performance scenarios.
Free and easy to use
Browser-based setup
Cross-platform compatibility
Very limited features
No advanced management or collaboration tools
Best for: Casual users needing basic remote access
Chrome Remote Desktop is one of the simplest remote access tools available. It’s easy to set up and works across devices, making it a convenient choice for occasional use.
However, it lacks many essential features such as file transfer, session management, and advanced security controls. For users with more demanding needs, it quickly becomes insufficient. Compared to Chrome Remote Desktop, DeskIn provides a much more complete experience without sacrificing ease of use, making it a better long-term solution.
👀 You may also be interested in: |
|---|
RustDesk is powerful but can be difficult to set up and manage, especially with self-hosting. Many users prefer tools that offer similar performance without technical complexity. DeskIn simplifies remote access while maintaining strong performance and security.
Several tools qualify as a free RustDesk alternative, including DWService and Chrome Remote Desktop. However, DeskIn stands out by offering better performance and usability even in its free version.
Yes, tools like MeshCentral and DWService are considered RustDesk alternative open source options. They provide flexibility and control but often require technical expertise to set up and maintain.
Beginners should choose tools with a simple setup and intuitive interfaces. DeskIn is an excellent option because it removes the need for manual configuration while still delivering advanced features.
RustDesk is a powerful starting point, but it’s not always the easiest or most efficient tool for everyday use. From setup complexity to performance limitations, many users eventually look for a better RustDesk alternative.
Among all the options, DeskIn stands out as the most balanced solution. It combines speed, simplicity, and cross-platform support into one seamless experience. If you’re ready to move beyond technical friction and enjoy truly smooth remote access, DeskIn is a choice that simply works.
聯絡我們
電子郵件: support@deskin.io
總部: 991D Alexandra Road #02-17, Singapore 119972
聯絡我們
電子郵件: support@deskin.io
總部: 991D Alexandra Road #02-17, Singapore 119972
聯絡我們
support@deskin.io
991D Alexandra Road #02-17, Singapore 119972

