生産性
生産性
/
7 Mins
/
7 Mins
GA
更新済み
更新済み
更新済み
Your new PC is ready, but all your files are still trapped in the old one. USB‑C won't talk to USB‑A, 1TB of data won't fit on a dusty 16GB flash drive, and that transfer cable you bought ships with a driver CD—but new PC doesn't even have a disc drive. These aren't one‑off headaches; they're the exact scenarios real users describe when they search for how to transfer files from PC to PC:
"I have a PC with a Type C port and another PC with a Type A port.
When I connect these, I am unable to transfer files."
"My new computer does not have a CD-ROM drive. How do I install the driver?"
"How do I get everything on my old PC on my new PC?"
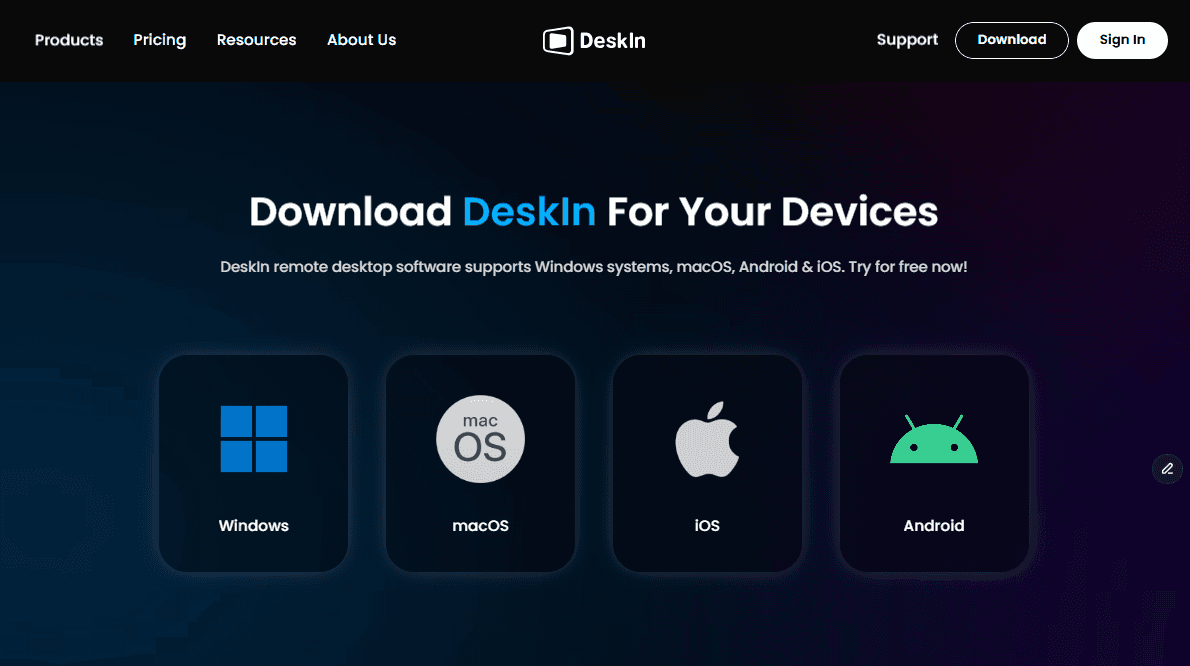
Six methods exist. One of them is wireless, free to start, and completely independent of whether your computers run Windows, macOS, or other USB languages. Let's find yours!
Method | Best For | Hardware Needed | Speed | Skill Level |
|---|---|---|---|---|
DeskIn | Users with mismatched ports, mixed Windows/Mac, or anyone who hates cables | None
| Fast | Beginner |
External Hard Drive | One‑time, massive transfers (1 TB+) where the internet is slow | USB drive/ SSD | Very fast | Beginner |
USB Transfer Cable | Offline wired transfer; both PCs on the same desk | Special bridging cable | Fast | Intermediate (driver hunt) |
Local Network | Home/office users with both PCs on the same router | None | Medium | Intermediate |
Cloud Storage | Ongoing sync; files needed on multiple devices | None | Slow | Beginner |
PC Migration Software | Full system migration, including apps and settings | None | Medium‑Fast | Advanced / IT pro |
No cables, no adapters, no driver CDs – works entirely over Wi-Fi
Compatible with both Windows and macOS – easy cross-platform transfer
No file size limits – send 100GB+ videos or backups without splitting
Direct peer-to-peer transfer – files never touch a third-party cloud server
Drag-and-drop simplicity – no network discovery or drive mapping required
AES-256 encryption – your files are secure
Free tier available – no credit card required to start
Requires both PCs to be on the internet
Mismatched ports and missing drivers are the most common reasons PC-to-PC transfers fail. DeskIn removes both problems. No cable. No adapter. No installation media required. The application establishes a direct, encrypted peer-to-peer connection over Wi-Fi. It works on both Windows and macOS, and port types don’t matter.
DeskIn bypasses the physical layer entirely: No dongles, no "driver not found" errors, no expensive docks. This is also the only consumer‑friendly tool on this list that lets you transfer files between Windows and Mac wirelessly without any technical setup. Your old Windows workhorse and your new MacBook Air? They shake hands instantly.
Visit DeskIn Personal Download and install it on both devices. Create and log in to your account on both devices. DeskIn offers a free trial, and you can start using it immediately.

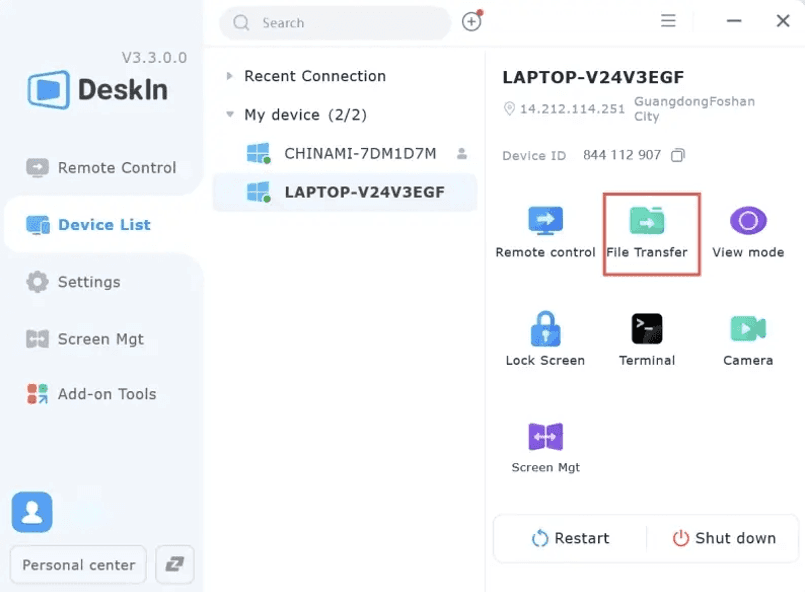
Navigate to the Device List, find the target PC, click the File Transfer button, and enter the Password (Remote Control).
Note: If your two devices are not logged into the same account, you will also need to enter the device code.
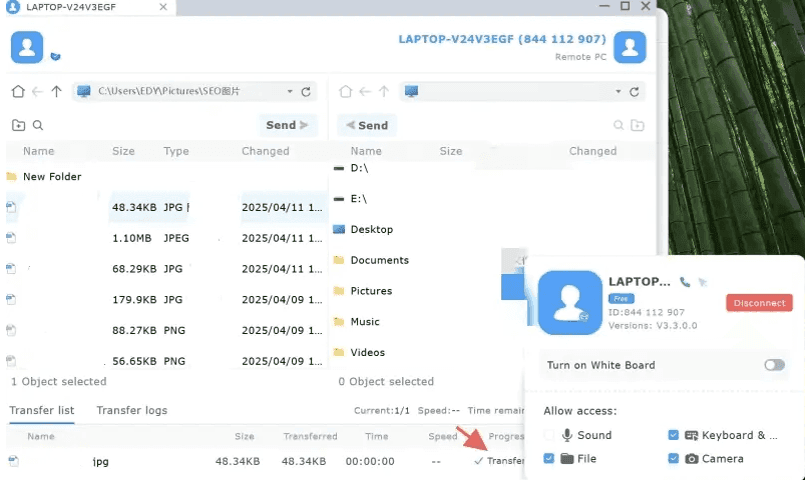
Simply drag and drop files between your computers. DeskIn will transfer files at 12MB/s. At the bottom of the page, you can track the progress of the file transfer. After a successful transfer, you can see the transferred files in your folder.
Note: DeskIn supports cross-system file transfers of unlimited size, type, and number.
That's it. Your files move directly - no cloud staging, no size limits on the free tier for transfers, and no waiting for uploads to finish before downloads can start.
You may also like:
No internet required; works anywhere
One‑time hardware cost; no subscriptions
Total physical control: Are files directly on my computer at all times
A physical device can be lost, stolen, or dropped
No built‑in encryption; data is exposed if the drive is misplaced
You must own a drive large enough to hold all your data
The Reddit user facing a terabyte of data wasn't exaggerating: "I want to transfer about 1TB of data. It's mostly just in a few folders." When you're moving that much information, cloud uploads can take days. External drives are still the fastest option for moving large amounts of data.
Connect the external hard drive to your old PC
Open your file explorer and drag the files or folders you want to transfer into the drive
Safely eject the hard drive and connect it to your new PC
Open the drive in your File Explorer and move the files to their new location
Pro tip: If you are moving your files directly to Windows system folders (like the entire C:\Users directory), you may need administrator permissions. Copy what you can; use DeskIn for the rest.
You may also like:
Faster than external HDDs for thousands of small files
No router or Wi‑Fi needed
Often includes simple transfer software
Requires a specialized USB cable transfer files — not a standard USB cord
PCs must be within cable length (usually 1–2 meters)
Driver CDs are often included; new PCs may lack optical drives
Cable becomes e‑waste after one use
The Reddit user who asked about bridging cables hit the exact pain point: "I've read about USB bridging cables, but you seem to need to install software from a CD. My new computer does not have a CD-ROM drive." This method works—if you can solve the driver dependency before your old PC is packed away.
Connect the cable to both PCs using the appropriate USB ports
Launch the software that came with the cable (usually auto-installs)
Select the files or folders you want to transfer and begin the process
Can you use an HDMI cable?
No. This question appears in forums constantly. HDMI carries video and audio. It does not carry your documents.
No new hardware to buy
Good for ongoing, recurring transfers
Works wirelessly; no cables between PCs
Speed is capped by your router and Wi‑Fi congestion
Both PCs must be powered on and on the same network
Initial setup requires navigating Windows Settings
If you frequently ask how to move downloads from one laptop to another in the same household, network sharing is the easiest ongoing option. Once set up, it works like moving files between folders on one computer — no speed limits, no USB sticks.
Connect both PCs to the same Wi‑Fi or wired network.
On the source PC, open Settings > Network & Internet > Ethernet (or Wi‑Fi) and ensure the network profile is set to Private.
Go to Control Panel > Network and Sharing Center > Advanced sharing settings.
Turn on Network discovery and File and printer sharing.
Right‑click the folder you want to share → Properties → Sharing → Share.
On the destination PC, open File Explorer, click Network in the sidebar, and double‑click the source PC's name.
For remote workers: You can also transfer files over remote desktop by connecting to the office PC and mapping local drives in the Remote Desktop session—ideal for pulling specific files while travelling.
Files are encrypted in transit and at rest
Accessible from any device, anywhere
No physical media to lose or damage
Requires a paid subscription for large volumes
Upload then = double the time
Speed is entirely dependent on your internet pipe
Not everyone is doing a one-time migration. Some users want their files to live in the cloud permanently—available on their phone, tablet, and laptop simultaneously. Cloud storage is less a "transfer method" and more a permanent relocation.
Install your preferred cloud provider's desktop app (Google Drive, OneDrive, Dropbox) on the old PC.
Sign in. Choose which folders to sync to the cloud.
Wait for the upload to complete. (For 1TB of data on average U.S. broadband, plan for roughly 48 hours of uninterrupted upload.)
On the new PC, install the same app and sign in with the same account.
The files will sync down to the new machine.
Heads up: If you delete a synced file on one device while both are signed in, it will be deleted everywhere. Always sign out of your old PC before wiping it.
Transfers applications, settings, and user profiles — not just files
High security (SFTP, AES‑256) for regulated industries
Can schedule transfers during off‑peak hours
Expensive (often enterprise licensing)
Steep learning curve
Massive overkill for most home users
The Reddit user asking "How do I get everything on my old PC on my new PC?" might not realize that "everything" includes application configurations, saved login sessions, and system tweaks accumulated over the years. Regular tools move your files. Migration software moves everything, including your apps, settings, and saved sessions.
Install the migration software on both PCs.
Choose a transfer type: network, direct cable, or external media.
Select which system elements to migrate (files, apps, settings).
Follow the vendor's wizard to complete the transfer.
When you actually need this: If you are moving your files directly on Windows system folders that Windows locks during normal operation, or if you are migrating an entire domain‑joined corporate machine, consumer tools won't cut it. This is a job for IT.
You may also like:
For personal files: Use DeskIn for a fast, wireless transfer—it's free for up to 2 GB and inexpensive for larger volumes. Unlike a bridging cable, you don't need to hunt down drivers or worry about whether your new PC has a CD-ROM drive.
For system settings: Use the built‑in Windows Backup app (Settings > Accounts > Windows Backup) to sync your preferences to your Microsoft account. Restore them during Windows 11 setup.
DeskIn requires zero configuration beyond installing and logging in to the app. Both PCs discover each other automatically: no network sharing settings to toggle, no folder permissions to configure. If you prefer native tools, Windows Nearby Sharing works when both devices are on the same Wi‑Fi, but it can be finicky with large folders. DeskIn handles bulk transfers more reliably.
This is the exact situation DeskIn was built for. The Reddit user with "a PC with a Type C port and another PC with a Type A port" doesn't need an adapter, a dongle, or a special cable. Use a wireless method. DeskIn or local network sharing means port types don’t matter at all. Your files move over Wi-Fi instead.
Yes, absolutely — if you plan to sell, recycle, or give it away. Deleting files and emptying the Recycle Bin is not enough. On Windows 10 or 11: go to Settings > System > Recovery, click Reset this PC, and select Remove everything. This ensures your personal data is unrecoverable. Before you wipe it, double-check that DeskIn (or your chosen transfer method) successfully moved everything. Once you reset, there's no going back.
No single method works for everyone — only the right one for your situation. External drives are fastest for large data. Windows Sharing works well at home. Migration software is for IT pros. But if you're dealing with mismatched ports, missing CD-ROM drives, or transferring between Windows and Mac, DeskIn is the only tool that skips all those problems. No cables, no drivers, no frustration. DeskIn also works for ongoing remote access, not just one-time transfers.
Start your free DeskIn backup today. No credit card required.
Your new PC is ready, but all your files are still trapped in the old one. USB‑C won't talk to USB‑A, 1TB of data won't fit on a dusty 16GB flash drive, and that transfer cable you bought ships with a driver CD—but new PC doesn't even have a disc drive. These aren't one‑off headaches; they're the exact scenarios real users describe when they search for how to transfer files from PC to PC:
"I have a PC with a Type C port and another PC with a Type A port.
When I connect these, I am unable to transfer files."
"My new computer does not have a CD-ROM drive. How do I install the driver?"
"How do I get everything on my old PC on my new PC?"
Six methods exist. One of them is wireless, free to start, and completely independent of whether your computers run Windows, macOS, or other USB languages. Let's find yours!
Method | Best For | Hardware Needed | Speed | Skill Level |
|---|---|---|---|---|
DeskIn | Users with mismatched ports, mixed Windows/Mac, or anyone who hates cables | None
| Fast | Beginner |
External Hard Drive | One‑time, massive transfers (1 TB+) where the internet is slow | USB drive/ SSD | Very fast | Beginner |
USB Transfer Cable | Offline wired transfer; both PCs on the same desk | Special bridging cable | Fast | Intermediate (driver hunt) |
Local Network | Home/office users with both PCs on the same router | None | Medium | Intermediate |
Cloud Storage | Ongoing sync; files needed on multiple devices | None | Slow | Beginner |
PC Migration Software | Full system migration, including apps and settings | None | Medium‑Fast | Advanced / IT pro |
No cables, no adapters, no driver CDs – works entirely over Wi-Fi
Compatible with both Windows and macOS – easy cross-platform transfer
No file size limits – send 100GB+ videos or backups without splitting
Direct peer-to-peer transfer – files never touch a third-party cloud server
Drag-and-drop simplicity – no network discovery or drive mapping required
AES-256 encryption – your files are secure
Free tier available – no credit card required to start
Requires both PCs to be on the internet
Mismatched ports and missing drivers are the most common reasons PC-to-PC transfers fail. DeskIn removes both problems. No cable. No adapter. No installation media required. The application establishes a direct, encrypted peer-to-peer connection over Wi-Fi. It works on both Windows and macOS, and port types don’t matter.
DeskIn bypasses the physical layer entirely: No dongles, no "driver not found" errors, no expensive docks. This is also the only consumer‑friendly tool on this list that lets you transfer files between Windows and Mac wirelessly without any technical setup. Your old Windows workhorse and your new MacBook Air? They shake hands instantly.
Visit DeskIn Personal Download and install it on both devices. Create and log in to your account on both devices. DeskIn offers a free trial, and you can start using it immediately.
Navigate to the Device List, find the target PC, click the File Transfer button, and enter the Password (Remote Control).
Note: If your two devices are not logged into the same account, you will also need to enter the device code.
Simply drag and drop files between your computers. DeskIn will transfer files at 12MB/s. At the bottom of the page, you can track the progress of the file transfer. After a successful transfer, you can see the transferred files in your folder.
Note: DeskIn supports cross-system file transfers of unlimited size, type, and number.
That's it. Your files move directly - no cloud staging, no size limits on the free tier for transfers, and no waiting for uploads to finish before downloads can start.
You may also like:
No internet required; works anywhere
One‑time hardware cost; no subscriptions
Total physical control: Are files directly on my computer at all times
A physical device can be lost, stolen, or dropped
No built‑in encryption; data is exposed if the drive is misplaced
You must own a drive large enough to hold all your data
The Reddit user facing a terabyte of data wasn't exaggerating: "I want to transfer about 1TB of data. It's mostly just in a few folders." When you're moving that much information, cloud uploads can take days. External drives are still the fastest option for moving large amounts of data.
Connect the external hard drive to your old PC
Open your file explorer and drag the files or folders you want to transfer into the drive
Safely eject the hard drive and connect it to your new PC
Open the drive in your File Explorer and move the files to their new location
Pro tip: If you are moving your files directly to Windows system folders (like the entire C:\Users directory), you may need administrator permissions. Copy what you can; use DeskIn for the rest.
You may also like:
Faster than external HDDs for thousands of small files
No router or Wi‑Fi needed
Often includes simple transfer software
Requires a specialized USB cable transfer files — not a standard USB cord
PCs must be within cable length (usually 1–2 meters)
Driver CDs are often included; new PCs may lack optical drives
Cable becomes e‑waste after one use
The Reddit user who asked about bridging cables hit the exact pain point: "I've read about USB bridging cables, but you seem to need to install software from a CD. My new computer does not have a CD-ROM drive." This method works—if you can solve the driver dependency before your old PC is packed away.
Connect the cable to both PCs using the appropriate USB ports
Launch the software that came with the cable (usually auto-installs)
Select the files or folders you want to transfer and begin the process
Can you use an HDMI cable?
No. This question appears in forums constantly. HDMI carries video and audio. It does not carry your documents.
No new hardware to buy
Good for ongoing, recurring transfers
Works wirelessly; no cables between PCs
Speed is capped by your router and Wi‑Fi congestion
Both PCs must be powered on and on the same network
Initial setup requires navigating Windows Settings
If you frequently ask how to move downloads from one laptop to another in the same household, network sharing is the easiest ongoing option. Once set up, it works like moving files between folders on one computer — no speed limits, no USB sticks.
Connect both PCs to the same Wi‑Fi or wired network.
On the source PC, open Settings > Network & Internet > Ethernet (or Wi‑Fi) and ensure the network profile is set to Private.
Go to Control Panel > Network and Sharing Center > Advanced sharing settings.
Turn on Network discovery and File and printer sharing.
Right‑click the folder you want to share → Properties → Sharing → Share.
On the destination PC, open File Explorer, click Network in the sidebar, and double‑click the source PC's name.
For remote workers: You can also transfer files over remote desktop by connecting to the office PC and mapping local drives in the Remote Desktop session—ideal for pulling specific files while travelling.
Files are encrypted in transit and at rest
Accessible from any device, anywhere
No physical media to lose or damage
Requires a paid subscription for large volumes
Upload then = double the time
Speed is entirely dependent on your internet pipe
Not everyone is doing a one-time migration. Some users want their files to live in the cloud permanently—available on their phone, tablet, and laptop simultaneously. Cloud storage is less a "transfer method" and more a permanent relocation.
Install your preferred cloud provider's desktop app (Google Drive, OneDrive, Dropbox) on the old PC.
Sign in. Choose which folders to sync to the cloud.
Wait for the upload to complete. (For 1TB of data on average U.S. broadband, plan for roughly 48 hours of uninterrupted upload.)
On the new PC, install the same app and sign in with the same account.
The files will sync down to the new machine.
Heads up: If you delete a synced file on one device while both are signed in, it will be deleted everywhere. Always sign out of your old PC before wiping it.
Transfers applications, settings, and user profiles — not just files
High security (SFTP, AES‑256) for regulated industries
Can schedule transfers during off‑peak hours
Expensive (often enterprise licensing)
Steep learning curve
Massive overkill for most home users
The Reddit user asking "How do I get everything on my old PC on my new PC?" might not realize that "everything" includes application configurations, saved login sessions, and system tweaks accumulated over the years. Regular tools move your files. Migration software moves everything, including your apps, settings, and saved sessions.
Install the migration software on both PCs.
Choose a transfer type: network, direct cable, or external media.
Select which system elements to migrate (files, apps, settings).
Follow the vendor's wizard to complete the transfer.
When you actually need this: If you are moving your files directly on Windows system folders that Windows locks during normal operation, or if you are migrating an entire domain‑joined corporate machine, consumer tools won't cut it. This is a job for IT.
You may also like:
For personal files: Use DeskIn for a fast, wireless transfer—it's free for up to 2 GB and inexpensive for larger volumes. Unlike a bridging cable, you don't need to hunt down drivers or worry about whether your new PC has a CD-ROM drive.
For system settings: Use the built‑in Windows Backup app (Settings > Accounts > Windows Backup) to sync your preferences to your Microsoft account. Restore them during Windows 11 setup.
DeskIn requires zero configuration beyond installing and logging in to the app. Both PCs discover each other automatically: no network sharing settings to toggle, no folder permissions to configure. If you prefer native tools, Windows Nearby Sharing works when both devices are on the same Wi‑Fi, but it can be finicky with large folders. DeskIn handles bulk transfers more reliably.
This is the exact situation DeskIn was built for. The Reddit user with "a PC with a Type C port and another PC with a Type A port" doesn't need an adapter, a dongle, or a special cable. Use a wireless method. DeskIn or local network sharing means port types don’t matter at all. Your files move over Wi-Fi instead.
Yes, absolutely — if you plan to sell, recycle, or give it away. Deleting files and emptying the Recycle Bin is not enough. On Windows 10 or 11: go to Settings > System > Recovery, click Reset this PC, and select Remove everything. This ensures your personal data is unrecoverable. Before you wipe it, double-check that DeskIn (or your chosen transfer method) successfully moved everything. Once you reset, there's no going back.
No single method works for everyone — only the right one for your situation. External drives are fastest for large data. Windows Sharing works well at home. Migration software is for IT pros. But if you're dealing with mismatched ports, missing CD-ROM drives, or transferring between Windows and Mac, DeskIn is the only tool that skips all those problems. No cables, no drivers, no frustration. DeskIn also works for ongoing remote access, not just one-time transfers.
Start your free DeskIn backup today. No credit card required.


MacからWindowsを操作!Chromeリモートデスクトップの設定方法と注意点 | DeskIn
Macユーザーが直面する大きな課題の「壁」、それはWindows専用ソフトの使用です。
CADや会計ソフト、あるいはWindowsでしか動作しないPCゲームなど、特定のソフトウェアを動かすためだけに、わざわざWindows機を買い足す必要はありません。Googleが提供する無料ツール「Chrome リモート デスクトップ」を使えば、今手元にあるMacから、遠隔地にあるWindowsを驚くほど簡単に操作できるようになります。
本記事では、MacからWindowsへ接続するための最短設定ガイドと、実際に使ってわかったクロスプラットフォーム(Mac-Win間)ならではの「見落としがちな注意点」を詳しく解説します。
Chrome リモート デスクトップの設定は非常にシンプルですが、操作される側(Windows)と操作する側(Mac)の両方で準備が必要です。最短で接続を完了させるための手順を解説します。
まずは、操作される側の Windows パソコンでリモートアクセスを許可する設定を行います。
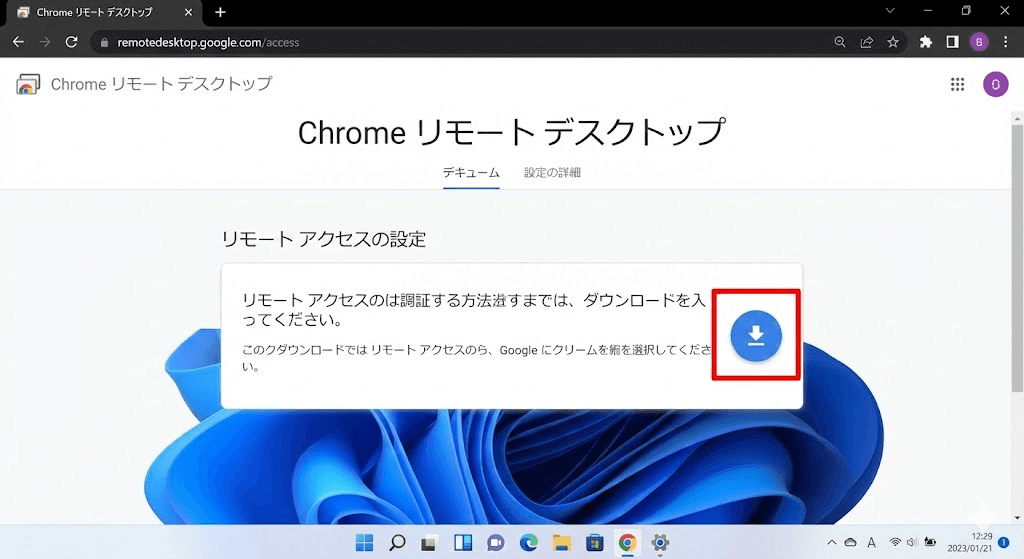
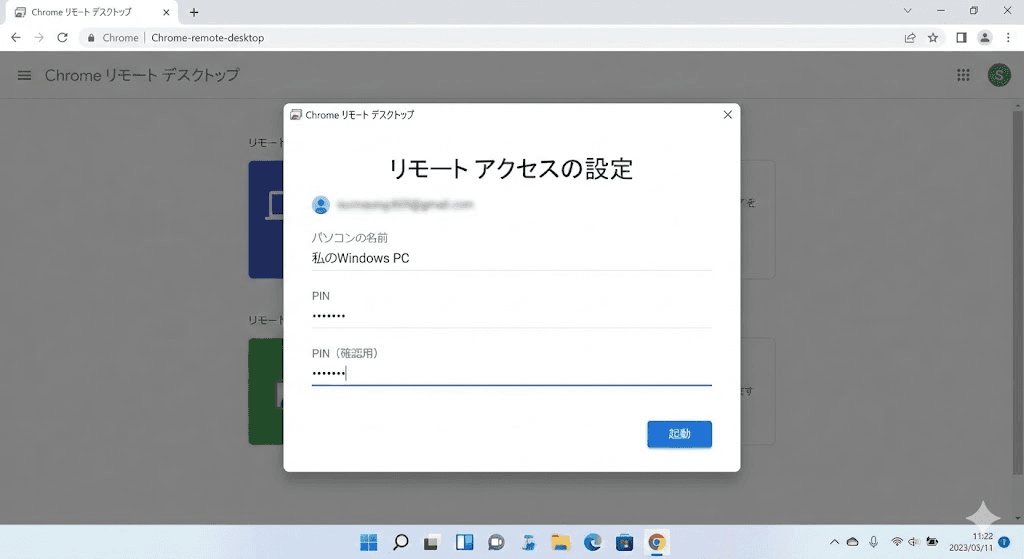
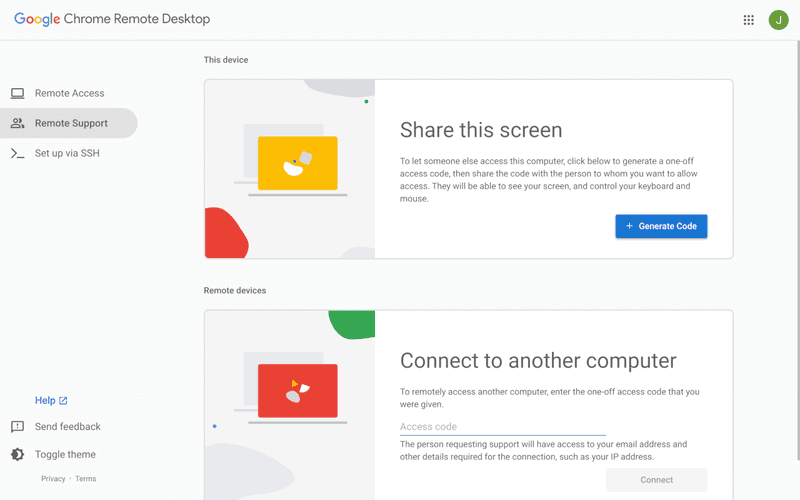
拡張機能とインストーラーの導入 Chrome ブラウザでChrome リモート デスクトップのアクセス設定ページを開き、「リモートアクセスの設定」から青色のダウンロードアイコンをクリックします。指示に従って Chrome 拡張機能を追加し、インストーラー(.msiファイル)を実行してください。
パソコンの名前と PIN コードの設定 インストール完了後、Windows パソコンに任意の名前を付けます。次に、6桁以上の PIN コード(暗証番号)を設定します。この PIN は Mac から接続する際に毎回必要になるため、忘れないようにメモしておきましょう。
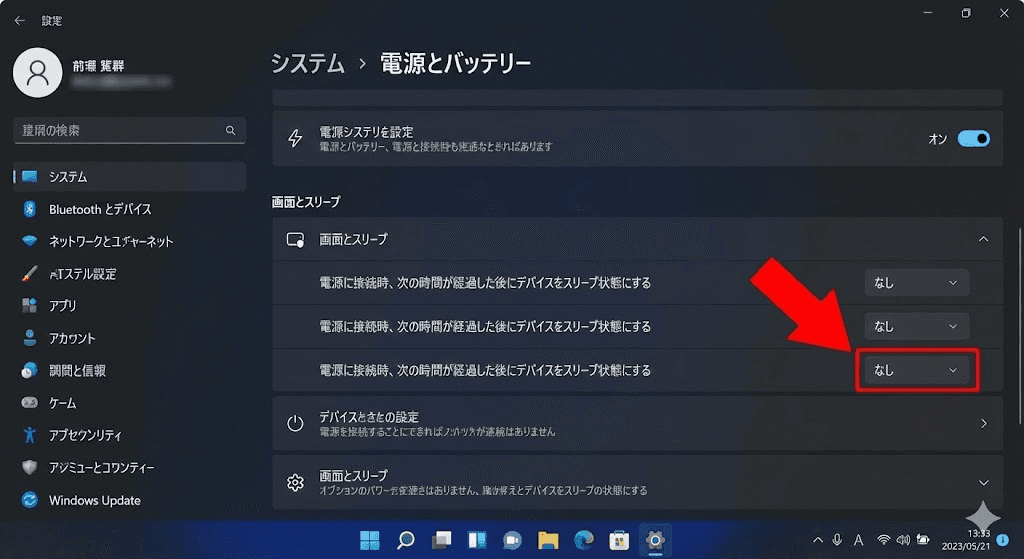
【重要】注意点:スリープモードの解除 ここが最も見落としやすいポイントです。Windows がスリープ状態になると、Mac から接続できなくなります。
「設定」>「システム」>「電源とバッテリー」を選択します。
「画面とスリープ」の設定で、電源接続時に「次の時間が経過後、デバイスをスリープ状態にする」を「なし」に変更してください。
Windows 側の設定が終われば、あとは Mac からアクセスするだけです。
アクセスサイトへログイン
Mac の Chrome ブラウザで同じアクセス設定ページを開きます。Windows 側で使用したのと同じ Google アカウントでログインしていることを確認してください。
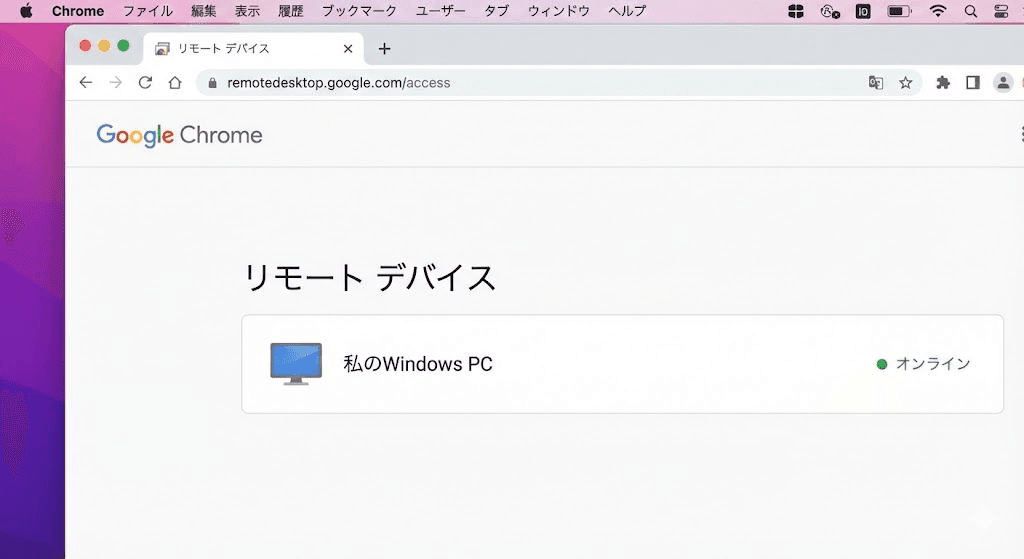
ターゲットの選択と認証
「リモートデバイス」の一覧に、先ほど設定した Windows パソコンの名前が表示されます。それをクリックすると PIN コードの入力画面が表示されます。
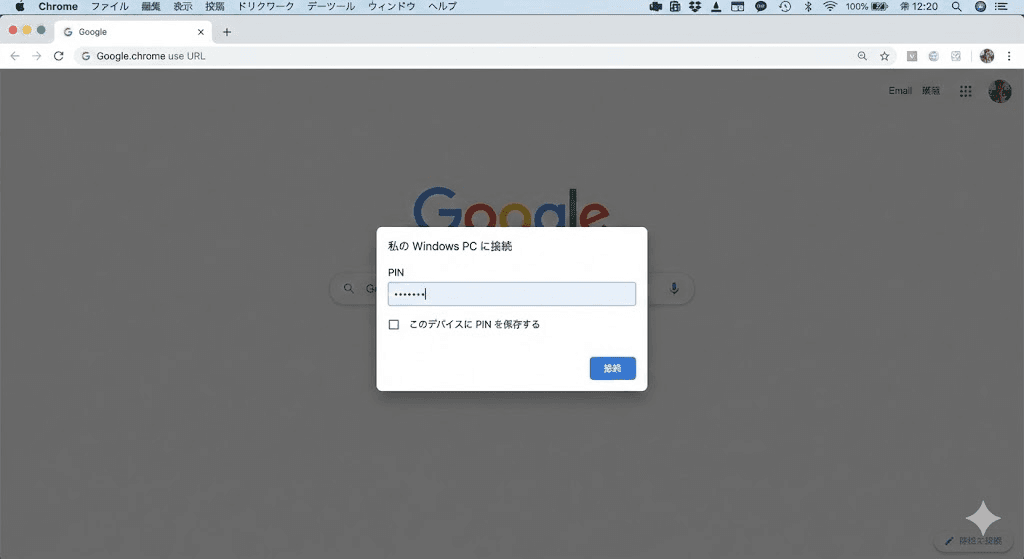
接続完了
正しい PIN を入力すれば、Mac のブラウザ内に Windows のデスクトップ画面が表示されます。これで、Mac のキーボードとマウスを使って Windows を操作できるようになります。
ヒント: よりスムーズにアクセスしたい場合は、Chrome の「アプリとしてインストール」機能を使って、Dock に Chrome リモート デスクトップを登録しておくのがおすすめです。
Chrome リモート デスクトップは導入こそ簡単ですが、実際に Mac から Windows を操作し始めると、「OS の違い」に起因するいくつかの課題が出てきます。これらは作業効率に直結するため、あらかじめ理解しておく必要があります。
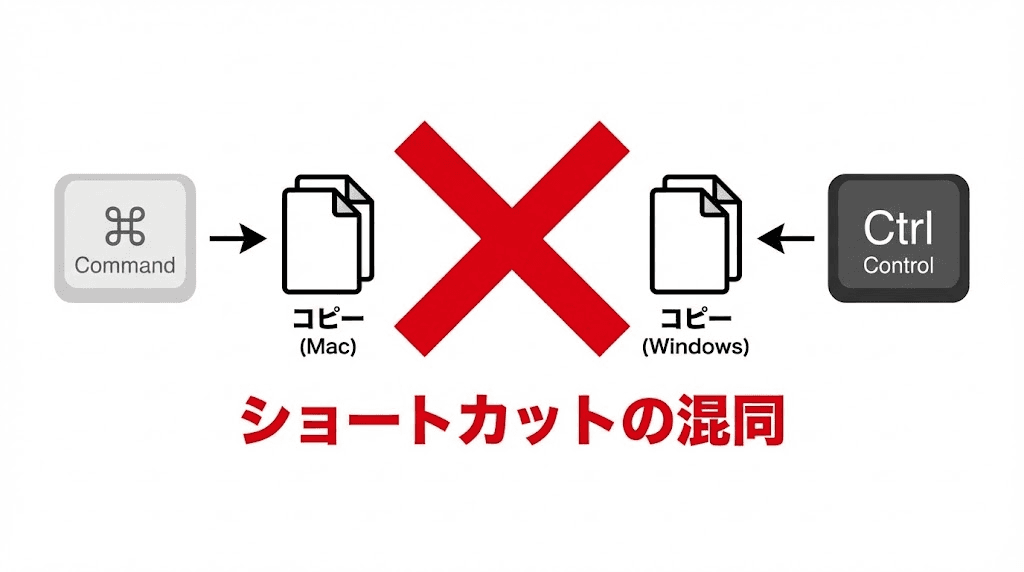
H3: キーボードマッピングの競合
Mac ユーザーにとって最もストレスを感じるのが、「修飾キー」の違いです。
Command キー vs Control キー: Mac でのコピーは Command + C ですが、リモート先の Windows では Control + C が基本です。Mac の Command キーが Windows の Windows キーとして認識されることもあり、指が覚えているショートカットが全く通用しない場面が多々あります。
ショートカットキーの誤作動: 最も注意すべきは Command + Q です。Windows 上のアプリを終了させようとしてこのキーを押すと、Mac 側のブラウザ(Chrome)自体が終了してしまい、リモート接続が切断されるという事態が頻発します。
リモートデスクトップの運用において、非常に致命的な制限があります。
Wake on LAN (WoL) 非対応: Chrome リモート デスクトップは、電源が切れている(またはスリープ状態の)パソコンを遠隔から起動する「リモート喚起」機能を持っていません。
24時間稼働の必要性: つまり、外出先や別室から接続するためには、自宅の Windows PC を常に電源オンの状態で放置しておかなければなりません。これは電気代の無駄だけでなく、PC パーツの寿命を縮める原因にもなります。
もうキー入力や電源管理で悩まない。Macユーザーに最適な操作感を。 [DeskIn(デスクイン)を無料でインストール]
Mac の魅力である「滑らかな操作感」が、リモート環境では損なわれがちです。
ジェスチャーの喪失: Mac 特有の「指3本でのスワイプ(デスクトップ切り替え)」や「ピンチイン・アウト」などのジェスチャーは、リモート先の Windows には正しく伝わりません。
スクロールの不自然さ: Mac の慣性スクロールが Windows 上ではカクついたり、右クリックの反応が一瞬遅れたりと、繊細な操作を求めるほど「手元の感覚」とのズレがストレスに変わります。
ブラウザベースで動作するツールである以上、通信速度や描画性能には限界があります。
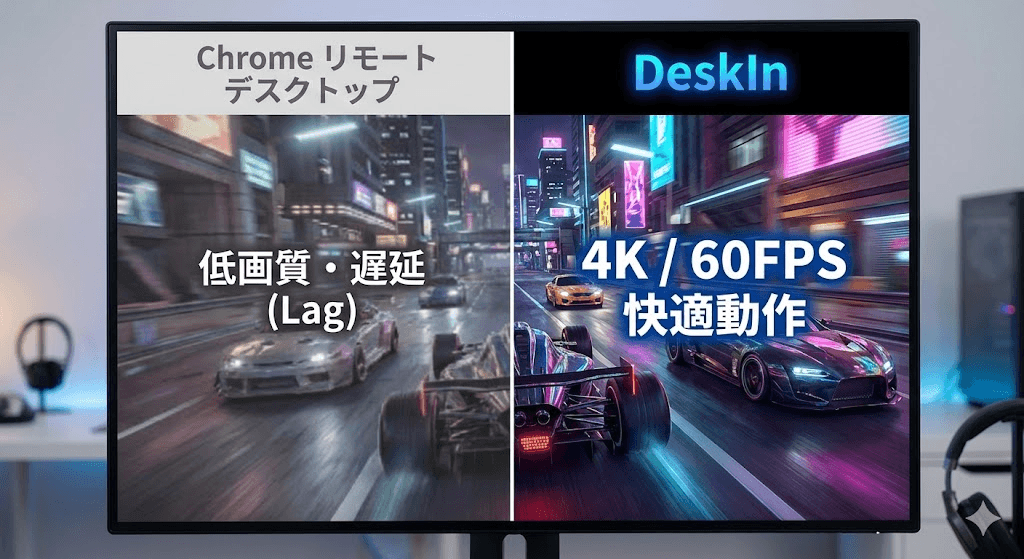
フレームレートの制限: Chrome リモート デスクトップは通常 30FPS 程度に制限されています。通常の文書作成なら問題ありませんが、画面の動きが激しい作業では残像感やカクつきが目立ちます。
高負荷作業には不向き: 動画編集でタイムラインを細かく動かしたり、FPS ゲームをプレイしたりといった、コンマ数秒のレスポンスが求められる用途には、遅延(レイテンシ)が大きすぎるため実用的とは言えません。
ここまで解説してきた通り、Chrome リモート デスクトップは「手軽さ」と「無料」という点では非常に優秀ですが、性能や操作性には明確な限界があります。
あなたの利用シーンが以下のどちらに当てはまるか、導入前のチェックリストとして活用してください。
推奨:このようなシーンには最適です
短時間のファイル確認: 外出先から自宅の PC にあるドキュメントを少しだけ閲覧・転送したい。
たまに行う設定変更: サーバーの再起動や、ソフトウェアの簡単なアップデート作業。
ライトな事務作業: ブラウザ上での簡単なデータ入力や、メールの送受信など、スピードを重視しない作業。
コストをかけたくない: 性能よりも、とにかく「無料で繋がること」を最優先したい。
長時間の業務・テレワーク: 毎日数時間以上、リモート環境でメイン業務を行う場合。キーボードの違和感やカクつきが大きなストレスになります。
クリエイティブな作業: 動画編集、デザイン、CAD など。正確なマウス操作と色の再現性、そして滑らかな描画が求められる作業には力不足です。
遅延を嫌う操作(ゲームなど): コンマ数秒の遅延が命取りになる PC ゲームや、リアルタイムのレスポンスが必要な操作。
生産性を追求するプロフェッショナル: 「接続できる」ことではなく、「手元のパソコンと同じ感覚で動く」ことを求める方。
まとめると: Chrome リモート デスクトップは、いわば「非常用の予備ツール」です。もしあなたが「非推奨」の項目に一つでも当てはまり、リモート環境での生産性を妥協したくないのであれば、より高度な機能を持つ専門ツールの検討をおすすめします。
「とりあえず繋がる」という段階を卒業し、「リモート先であることを忘れるほどの快適さ」を求めるなら、無料ツールの限界を超えたプロ仕様の選択肢を検討するタイミングです。
特に、「PCをつけっぱなしにするのが不安」「キー入力が直感的でない」「画面の動きがカクつく」といったストレスを日常的に感じ始めたら、それはリモートデスクトップ環境をアップグレードすべきサインです。
そこでおすすめなのが、Macユーザーのニーズを徹底的に研究して開発された「DeskIn(デスクイン)」です。
DeskIn(デスクイン)の最大の特徴の一つは、OS 間の違いをインテリジェントに吸収する「スマートキーマッピング」です。
Chrome リモート デスクトップで多くのユーザーを悩ませていた「Command と Control の押し間違い」や「Cmd+Q でブラウザが閉じてしまう問題」を解決。Mac のキーボードレイアウトを維持したまま、Windows を直感的に操作できるため、ブラインドタッチのスピードを落とすことなく作業に没頭できます。
「外出先から繋ぎたいけれど、自宅の PC を一日中つけておくのは抵抗がある……」。そんな悩みも DeskIn なら解決できます。
Wake on LAN(リモート起動)機能に対応しているため、Windows PC がスリープ状態やシャットダウン状態であっても、必要な時に Mac から遠隔から電源を入れることが可能です。電気代の節約はもちろん、ハードウェアへの負荷も最小限に抑えられる、スマートな運用を実現します。
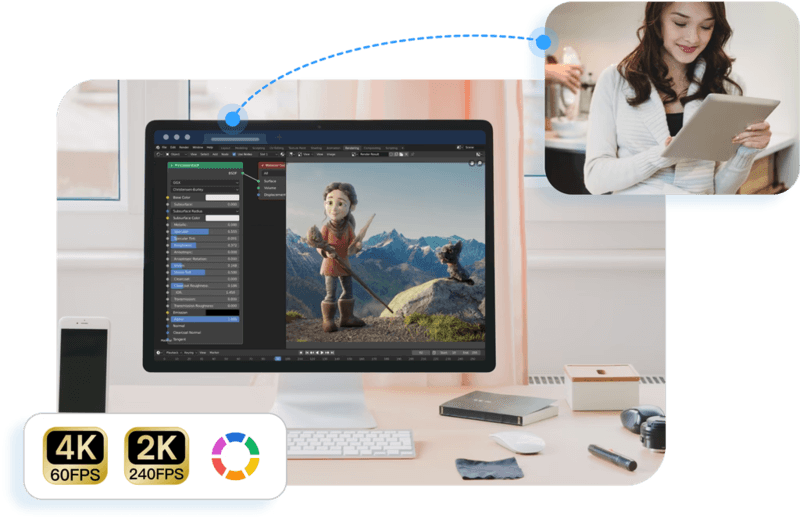
ブラウザベースのツールでは到達できない、4Kの高解像度と 60FPS の高フレームレートでのストリーミングに対応しています。
まるで手元の Mac 上で Windows アプリが直接動いているかのような、吸い付くような操作感を実現。動画編集の繊細なシーク操作や、一瞬の判断が求められる PC ゲームでも、遅延を気にすることなく快適にプレイ・作業が可能です。
DeskIn は Mac だけでなく、iPad やスマートフォンからの操作性も極限まで高められています。
iPad を使った「サブディスプレイ化」や、マウス・キーボードを接続しての「完全リモートワーク」など、モバイルデバイスを真の生産性ツールへと変貌させます。専用アプリならではのジェスチャー最適化により、移動中のちょっとした修正もストレスフリーに行えます。
機能・特性 | Chrome リモート デスクトップ | DeskIn(デスクイン) |
主な用途 | 簡易的な操作・緊急用 | ビジネス・クリエイティブ・ゲーム |
画質・フレームレート | 最大 30FPS(カクつきあり) | 4K / 60〜144FPS(極めて滑らか) |
キーボードマッピング | 基本のみ(Cmd/Ctrl 競合あり) | Mac/Win 自動最適化(競合なし) |
リモート起動 (WoL) | 非対応(PCの常時起動が必要) | 対応(必要な時だけ遠隔起動) |
操作感 | 遅延あり・直感的でない | 低遅延・Macネイティブな操作感 |
導入コスト | 無料 | 無料版あり / 高機能有料版あり |
Chrome リモート デスクトップは、その圧倒的な手軽さとコストパフォーマンスにおいて、リモートデスクトップの「入り口」として非常に優秀なツールです。ちょっとしたファイル確認や、たまに発生する軽作業であれば、これほど便利なものはありません。
しかし、毎日数時間に及ぶ業務や、1分1秒を争うクリエイティブな作業、あるいは Mac と Windows の操作性の違いにストレスを感じているのであれば、無料ツールの限界を超える時が来ているのかもしれません。
これらを手に入れることで、あなたのリモートワーク体験は劇的に進化するはずです。まずは一度、DeskIn が提供する無料版の快適さを体験してみてはいかがでしょうか

DeskIn vs Chrome Remote Desktop: Which One Fits Your Workflow Best?
When it comes to remote access tools, the comparison between DeskIn and Chrome Remote Desktop often comes down to one simple question: do you just need quick access, or do you need performance and control?
Both tools are reliable, secure, and widely used. But they are built for very different types of users. Chrome Remote Desktop focuses on simplicity and accessibility, while DeskIn is designed for users who need high performance, stability, and advanced features across multiple devices.
If you're deciding between the two, this guide breaks down not just what they offer, but which one actually fits your workflow.
Feature | DeskIn | Chrome Remote Desktop |
|---|---|---|
Performance | Up to 4K 60FPS/2K 240FPS, low latency | Standard performance |
Ease of Use | Requires app installation | Browser-based, very simple |
Device Support | Windows, macOS, iOS, Android | Works via Chrome browser |
File Transfer | Fast and stable | Limited |
Multi-device Management | Yes | No |
Mobile Experience | Optimized for iPad & iPhone | Basic |
Security | Privacy screens and granular black/whitelists | Basic |
Price | Free + paid plans | Completely free |
In short, Chrome Remote Desktop is great for quick, lightweight access, while DeskIn is built for users who expect more from their remote desktop experience.
Chrome Remote Desktop is one of the simplest remote access tools available. It runs directly through the Chrome browser and requires only a Google account to get started. This makes it especially popular among casual users and those already working within the Google ecosystem.
It works particularly well on devices like Chromebooks, where everything is already browser-based. It's also accessible across platforms, including mobile devices like iPhone and iPad, though the experience on mobile can feel limited compared to desktop use.
If you're wondering how to use Chrome Remote Desktop, the process is straightforward. You install the Chrome extension, sign in with your Google account, set up a PIN on the host device, and then connect from another device using the same account. The entire setup usually takes just a few minutes.
That said, simplicity comes with trade-offs. Chrome Remote Desktop lacks advanced features like high frame rate streaming, multi-monitor control, or professional-grade file transfer. For occasional access, it works well. But for more demanding tasks, users often start to feel its limitations.
👀You may also be interested in:
If Chrome Remote Desktop is a lightweight sketch, DeskIn is a full workstation painted in high resolution. DeskIn focuses on performance, stability, and flexibility. It supports up to 4K 60FPS streaming, making it suitable for tasks where visual clarity and responsiveness matter, such as design work, video editing, or even gaming.
As a Chrome remote desktop alternative, unlike browser-based tools, DeskIn is a dedicated remote desktop application. While this requires installation, it unlocks a much more stable and feature-rich experience. Users can manage multiple devices, transfer large files efficiently, and enjoy smoother control across different platforms.
DeskIn is also optimized for mobile workflows. Whether you're using an iPad or smartphone, the interaction feels more responsive and closer to a desktop experience, rather than a simplified viewer. For users who find Chrome Remote Desktop "good enough" at first but limiting over time, DeskIn often becomes the natural upgrade path.
The real difference between these two tools becomes clear when you look at how they perform in everyday scenarios.
If you only need to check files on your home computer or help a friend troubleshoot something quickly, Chrome Remote Desktop is more than enough. It's free, easy to set up, and doesn't require installing extra software beyond Chrome. In this case, DeskIn may feel like overkill.
For professionals working remotely on a daily basis, stability and efficiency matter much more. This is where DeskIn starts to stand out.
Tasks like editing documents, managing multiple screens, or transferring files between devices become smoother and faster. Chrome Remote Desktop can handle basic workflows, but it often struggles with responsiveness and lacks the tools needed for a seamless work environment.
This is where the gap becomes impossible to ignore. DeskIn's support for high resolution and high frame rates makes it suitable for visually demanding work. Whether you're editing videos, working with design software, or running simulations, performance consistency is critical. Chrome Remote Desktop, on the other hand, is not designed for these scenarios. It works, but not comfortably.
If you rely heavily on Google services or use a Chromebook, Chrome Remote Desktop integrates naturally into your workflow. It's lightweight, requires no additional setup, and feels like an extension of the browser itself. In this scenario, it remains a very practical choice.
Mobile usage highlights another important difference. While remote desktop Chrome iPhone, and Chrome Remote Desktop iPad are functional, they often feel like simplified versions of the desktop experience. Controls can be less intuitive, and performance may vary depending on the connection.
DeskIn, by contrast, is designed with cross-device interaction in mind, offering a smoother and more responsive mobile experience.
👀 You may also be interested in:
Yes. Tools like DeskIn offer better performance, more features, and improved stability, especially for professional use cases.
No, Chrome Remote Desktop is still actively maintained by Google. It continues to receive security updates and remains available for users needing simple, free remote access.
Yes, DeskIn is a legitimate remote desktop solution. It uses encryption to secure connections and provides access controls, making it safe for both personal and professional use.
When comparing DeskIn vs Chrome Remote Desktop, the choice depends on how demanding your remote access needs are. Chrome Remote Desktop is simple, free, and ideal for occasional use, especially if you just need quick access to a device without extra setup.
As your workflow becomes more intensive, the limitations start to surface. DeskIn offers a smoother, more stable experience with better performance and control, making it a strong long-term Chrome remote desktop alternative for users who rely on remote access every day.

8 Best Remote Desktops for Video Editing in 2026
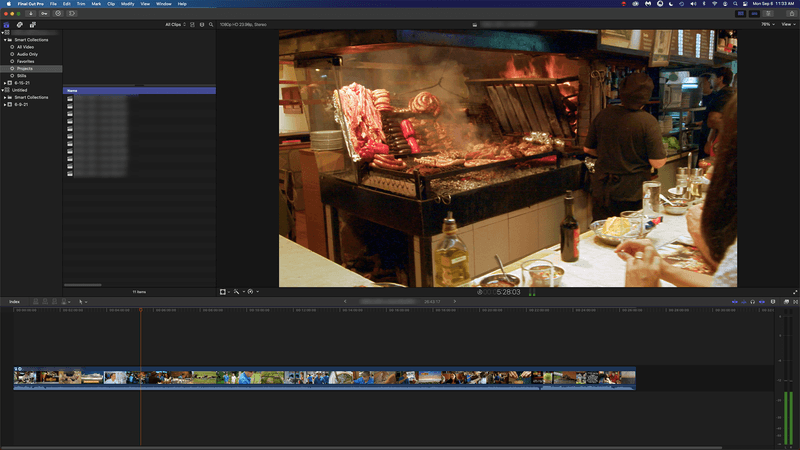
Remote video editing is no longer a compromise; it's a workflow upgrade. Whether you're working in Adobe Premiere Pro, After Effects, or DaVinci Resolve, the right remote desktop can turn your laptop into a high-performance editing station.
But not all tools are built for remote video editing collaboration. Lag, poor color accuracy, and unstable connections can ruin productivity. In this guide, we'll break down the best remote desktop for video editing tools so that you can edit smoothly from anywhere.
Modern creators are no longer tied to a single workstation. With remote work software, you can access your powerful desktop from anywhere without investing in an expensive laptop. For many editors, especially freelancers and small teams, this solves a real problem: you already have a high-performance PC, but mobility is limited. Instead of duplicating hardware, video editing remote desktop tools let you stream your workflow in real time.
Another key benefit is remote collaboration. Teams can work on the same project across different locations, review edits instantly, and avoid large file transfers via remote collaboration tools. However, this only works if your remote desktop software supports high frame rates, low latency, and stable connections. Otherwise, editing becomes frustrating.
Here's a quick overview of the best tools and who they're for:
DeskIn – Best overall for performance + affordability + multi-device workflows
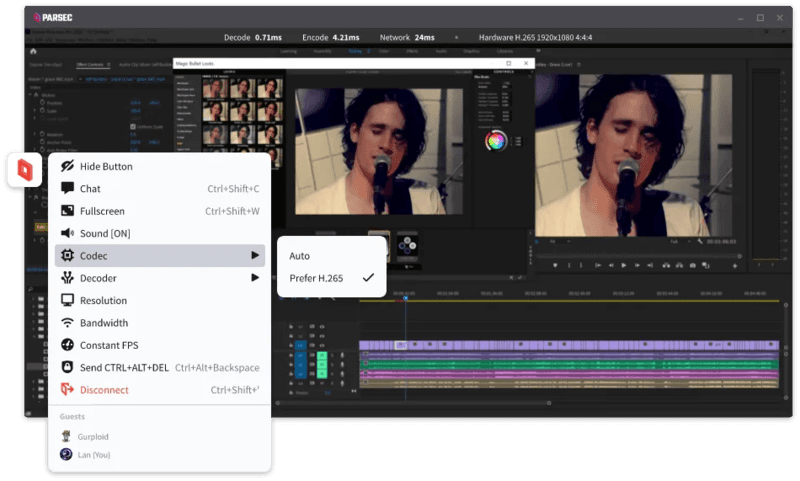
Parsec – Best for ultra-low latency editing
Splashtop – Best for high-resolution streaming
HP Anyware – Best for enterprise-level workflows
Jump Desktop – Best for Mac users
AnyDesk – Best lightweight remote access
Chrome Remote Desktop – Best free basic option
RustDesk – Best open-source alternative
Up to 4K 60FPS / 2K 240FPS performance
Ultra-low latency for smooth editing timelines
Multi-device support (PC, Mac, iPad, Android)
Affordable pricing with free plan available
Smaller brand awareness compared to legacy tools
DeskIn stands out as the best remote desktop for video editing by balancing performance, stability, and accessibility. Unlike many traditional remote support tools, it is designed for high-frame-rate tasks, making timeline scrubbing, preview playback, and effects editing feel responsive and fluid.
For creators working across devices, DeskIn enables seamless remote video editing collaboration. You can access your main editing PC from a laptop, tablet, or even a secondary workstation without noticeable lag. Compared to tools like Chrome Remote Desktop, which struggle with video-heavy workloads, DeskIn maintains consistent quality and responsiveness—making it a practical choice for both solo editors and distributed teams.
Extremely low latency
High frame rate streaming
Popular among creative professionals
Limited collaboration features
Setup can be complex for beginners
Parsec is widely recognized as a top choice for remote video editing, especially when latency is your biggest concern. Its streaming technology is optimized for real-time responsiveness, which makes it ideal for tasks like timeline scrubbing and motion graphics work in After Effects.
However, while Parsec excels in performance, it lacks some features needed for full remote video editing collaboration. Multi-user workflows and advanced access control are not as robust as some newer tools. For users who need both performance and flexibility, alternatives like DeskIn may provide a more balanced solution.
Supports 4K streaming
Strong color accuracy
Reliable for creative tasks
Higher cost for advanced features
Can experience latency over long distances

Splashtop is a solid option for editors who prioritize visual fidelity. Its support for high-resolution streaming and 4:4:4 color makes it suitable for color grading and detailed editing work.
That said, performance consistency can vary depending on network conditions. Some users report lag when working outside local networks. Compared to more optimized remote work software like DeskIn, Splashtop may require a stronger connection to maintain the same level of smoothness.
Industry-grade performance
Secure and scalable
Used in professional studios
Expensive
Complex setup
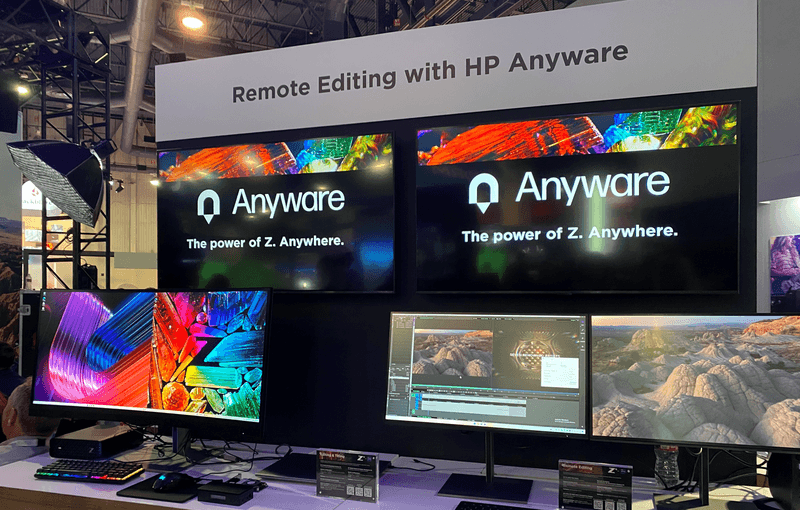
HP Anyware (formerly Teradici) is designed for high-end production environments. It uses advanced protocols to deliver excellent performance and security, making it a common choice in the media and entertainment industries.
However, for small teams or individual creators, it may be overkill. The cost and setup complexity make it less accessible compared to modern remote desktops for video editing tools that offer similar performance with easier deployment. The high cost and technical complexity create barriers that modern remote desktop solutions have eliminated, like DeskIn, offering comparable performance with far simpler deployment.
Great macOS integration
Smooth performance
Easy to use
Limited advanced features
Not ideal for heavy collaboration
Jump Desktop has earned a loyal following among Mac users seeking a straightforward, efficient remote desktop for video editing. Its Fluid Remote Desktop protocol provides smooth, responsive performance for most editing tasks without unnecessary complexity.
Where it falls short is in collaboration. Jump Desktop is built for individual use, lacking the team-oriented features that creative groups need. For solo professionals, it works well, but teams will quickly miss real-time collaboration tools found on other platforms.
Pros
Fast and lightweight
Easy to set up
Works on multiple devices
Cons
Limited performance for video editing
Lower visual quality

AnyDesk has built its reputation on lightweight design and remarkable ease of use for general remote access. It handles everyday tasks competently, connecting quickly and running smoothly on modest hardware.
The limitations become apparent with demanding creative work. Remote video editing requires consistent frame rates and crystal-clear visuals—areas where AnyDesk struggles. For professional editors who need precision, the performance gap becomes impossible to ignore.
Completely free
Easy browser-based setup
Works on any device
Poor performance for editing
Limited features
Chrome Remote Desktop is one of the most accessible remote support tools, offering a simple way to access your computer from anywhere. It's free, requires almost no setup, and lets you access your computer from anywhere with just a browser. For basic technical support or quick file grabs, it gets the job done.
However, it is not built for remote video editing. Users often experience lag, compression artifacts, and low frame rates. If you're working on professional projects, upgrading to a more capable solution is highly recommended.
Open-source
Self-hosting available
Free to use
Requires technical setup
Performance can vary
RustDesk appeals to users who prioritize open-source philosophy and want complete control over their remote access infrastructure. The flexibility to self-host and customize is genuinely valuable for privacy-conscious users. RustDesk is an interesting option for users who prefer open-source remote desktop not working alternatives or want full control over their infrastructure.
Performance, however, depends entirely on your configuration skills. Without technical expertise, achieving the smooth, low-latency experience required for professional editing is challenging. It's powerful for those who know how to tune it, but not plug-and-play.
Yes, with the right remote desktop for video editing, you can edit videos smoothly from anywhere. Tools like DeskIn and Parsec provide low latency and high frame rates for professional workflows.
Free options like Chrome Remote Desktop exist, but they lack performance. DeskIn offers a free plan with better performance, making it a stronger choice for real editing work.
Yes, Parsec is excellent for low-latency editing. However, it may lack collaboration features needed for team workflows.
Common issues include poor network connection, low bandwidth, or software limitations. Choosing optimized remote work software like DeskIn can significantly improve performance.
Choosing the best remote desktop for video editing depends on your workflow, budget, and performance needs. While tools like Parsec and Splashtop excel in specific areas, many solutions struggle to balance performance, stability, and usability.
If you're looking for a well-rounded solution, DeskIn offers a strong combination of high performance, smooth streaming, and cross-device flexibility. Whether you're working solo or collaborating remotely, it provides a reliable foundation for modern remote video editing workflows.
MacからWindowsを操作!Chromeリモートデスクトップの設定方法と注意点 | DeskIn
Macユーザーが直面する大きな課題の「壁」、それはWindows専用ソフトの使用です。
CADや会計ソフト、あるいはWindowsでしか動作しないPCゲームなど、特定のソフトウェアを動かすためだけに、わざわざWindows機を買い足す必要はありません。Googleが提供する無料ツール「Chrome リモート デスクトップ」を使えば、今手元にあるMacから、遠隔地にあるWindowsを驚くほど簡単に操作できるようになります。
本記事では、MacからWindowsへ接続するための最短設定ガイドと、実際に使ってわかったクロスプラットフォーム(Mac-Win間)ならではの「見落としがちな注意点」を詳しく解説します。
Chrome リモート デスクトップの設定は非常にシンプルですが、操作される側(Windows)と操作する側(Mac)の両方で準備が必要です。最短で接続を完了させるための手順を解説します。
まずは、操作される側の Windows パソコンでリモートアクセスを許可する設定を行います。
拡張機能とインストーラーの導入 Chrome ブラウザでChrome リモート デスクトップのアクセス設定ページを開き、「リモートアクセスの設定」から青色のダウンロードアイコンをクリックします。指示に従って Chrome 拡張機能を追加し、インストーラー(.msiファイル)を実行してください。
パソコンの名前と PIN コードの設定 インストール完了後、Windows パソコンに任意の名前を付けます。次に、6桁以上の PIN コード(暗証番号)を設定します。この PIN は Mac から接続する際に毎回必要になるため、忘れないようにメモしておきましょう。
【重要】注意点:スリープモードの解除 ここが最も見落としやすいポイントです。Windows がスリープ状態になると、Mac から接続できなくなります。
「設定」>「システム」>「電源とバッテリー」を選択します。
「画面とスリープ」の設定で、電源接続時に「次の時間が経過後、デバイスをスリープ状態にする」を「なし」に変更してください。
Windows 側の設定が終われば、あとは Mac からアクセスするだけです。
アクセスサイトへログイン
Mac の Chrome ブラウザで同じアクセス設定ページを開きます。Windows 側で使用したのと同じ Google アカウントでログインしていることを確認してください。
ターゲットの選択と認証
「リモートデバイス」の一覧に、先ほど設定した Windows パソコンの名前が表示されます。それをクリックすると PIN コードの入力画面が表示されます。
接続完了
正しい PIN を入力すれば、Mac のブラウザ内に Windows のデスクトップ画面が表示されます。これで、Mac のキーボードとマウスを使って Windows を操作できるようになります。
ヒント: よりスムーズにアクセスしたい場合は、Chrome の「アプリとしてインストール」機能を使って、Dock に Chrome リモート デスクトップを登録しておくのがおすすめです。
Chrome リモート デスクトップは導入こそ簡単ですが、実際に Mac から Windows を操作し始めると、「OS の違い」に起因するいくつかの課題が出てきます。これらは作業効率に直結するため、あらかじめ理解しておく必要があります。
H3: キーボードマッピングの競合
Mac ユーザーにとって最もストレスを感じるのが、「修飾キー」の違いです。
Command キー vs Control キー: Mac でのコピーは Command + C ですが、リモート先の Windows では Control + C が基本です。Mac の Command キーが Windows の Windows キーとして認識されることもあり、指が覚えているショートカットが全く通用しない場面が多々あります。
ショートカットキーの誤作動: 最も注意すべきは Command + Q です。Windows 上のアプリを終了させようとしてこのキーを押すと、Mac 側のブラウザ(Chrome)自体が終了してしまい、リモート接続が切断されるという事態が頻発します。
リモートデスクトップの運用において、非常に致命的な制限があります。
Wake on LAN (WoL) 非対応: Chrome リモート デスクトップは、電源が切れている(またはスリープ状態の)パソコンを遠隔から起動する「リモート喚起」機能を持っていません。
24時間稼働の必要性: つまり、外出先や別室から接続するためには、自宅の Windows PC を常に電源オンの状態で放置しておかなければなりません。これは電気代の無駄だけでなく、PC パーツの寿命を縮める原因にもなります。
もうキー入力や電源管理で悩まない。Macユーザーに最適な操作感を。 [DeskIn(デスクイン)を無料でインストール]
Mac の魅力である「滑らかな操作感」が、リモート環境では損なわれがちです。
ジェスチャーの喪失: Mac 特有の「指3本でのスワイプ(デスクトップ切り替え)」や「ピンチイン・アウト」などのジェスチャーは、リモート先の Windows には正しく伝わりません。
スクロールの不自然さ: Mac の慣性スクロールが Windows 上ではカクついたり、右クリックの反応が一瞬遅れたりと、繊細な操作を求めるほど「手元の感覚」とのズレがストレスに変わります。
ブラウザベースで動作するツールである以上、通信速度や描画性能には限界があります。
フレームレートの制限: Chrome リモート デスクトップは通常 30FPS 程度に制限されています。通常の文書作成なら問題ありませんが、画面の動きが激しい作業では残像感やカクつきが目立ちます。
高負荷作業には不向き: 動画編集でタイムラインを細かく動かしたり、FPS ゲームをプレイしたりといった、コンマ数秒のレスポンスが求められる用途には、遅延(レイテンシ)が大きすぎるため実用的とは言えません。
ここまで解説してきた通り、Chrome リモート デスクトップは「手軽さ」と「無料」という点では非常に優秀ですが、性能や操作性には明確な限界があります。
あなたの利用シーンが以下のどちらに当てはまるか、導入前のチェックリストとして活用してください。
推奨:このようなシーンには最適です
短時間のファイル確認: 外出先から自宅の PC にあるドキュメントを少しだけ閲覧・転送したい。
たまに行う設定変更: サーバーの再起動や、ソフトウェアの簡単なアップデート作業。
ライトな事務作業: ブラウザ上での簡単なデータ入力や、メールの送受信など、スピードを重視しない作業。
コストをかけたくない: 性能よりも、とにかく「無料で繋がること」を最優先したい。
長時間の業務・テレワーク: 毎日数時間以上、リモート環境でメイン業務を行う場合。キーボードの違和感やカクつきが大きなストレスになります。
クリエイティブな作業: 動画編集、デザイン、CAD など。正確なマウス操作と色の再現性、そして滑らかな描画が求められる作業には力不足です。
遅延を嫌う操作(ゲームなど): コンマ数秒の遅延が命取りになる PC ゲームや、リアルタイムのレスポンスが必要な操作。
生産性を追求するプロフェッショナル: 「接続できる」ことではなく、「手元のパソコンと同じ感覚で動く」ことを求める方。
まとめると: Chrome リモート デスクトップは、いわば「非常用の予備ツール」です。もしあなたが「非推奨」の項目に一つでも当てはまり、リモート環境での生産性を妥協したくないのであれば、より高度な機能を持つ専門ツールの検討をおすすめします。
「とりあえず繋がる」という段階を卒業し、「リモート先であることを忘れるほどの快適さ」を求めるなら、無料ツールの限界を超えたプロ仕様の選択肢を検討するタイミングです。
特に、「PCをつけっぱなしにするのが不安」「キー入力が直感的でない」「画面の動きがカクつく」といったストレスを日常的に感じ始めたら、それはリモートデスクトップ環境をアップグレードすべきサインです。
そこでおすすめなのが、Macユーザーのニーズを徹底的に研究して開発された「DeskIn(デスクイン)」です。
DeskIn(デスクイン)の最大の特徴の一つは、OS 間の違いをインテリジェントに吸収する「スマートキーマッピング」です。
Chrome リモート デスクトップで多くのユーザーを悩ませていた「Command と Control の押し間違い」や「Cmd+Q でブラウザが閉じてしまう問題」を解決。Mac のキーボードレイアウトを維持したまま、Windows を直感的に操作できるため、ブラインドタッチのスピードを落とすことなく作業に没頭できます。
「外出先から繋ぎたいけれど、自宅の PC を一日中つけておくのは抵抗がある……」。そんな悩みも DeskIn なら解決できます。
Wake on LAN(リモート起動)機能に対応しているため、Windows PC がスリープ状態やシャットダウン状態であっても、必要な時に Mac から遠隔から電源を入れることが可能です。電気代の節約はもちろん、ハードウェアへの負荷も最小限に抑えられる、スマートな運用を実現します。
ブラウザベースのツールでは到達できない、4Kの高解像度と 60FPS の高フレームレートでのストリーミングに対応しています。
まるで手元の Mac 上で Windows アプリが直接動いているかのような、吸い付くような操作感を実現。動画編集の繊細なシーク操作や、一瞬の判断が求められる PC ゲームでも、遅延を気にすることなく快適にプレイ・作業が可能です。
DeskIn は Mac だけでなく、iPad やスマートフォンからの操作性も極限まで高められています。
iPad を使った「サブディスプレイ化」や、マウス・キーボードを接続しての「完全リモートワーク」など、モバイルデバイスを真の生産性ツールへと変貌させます。専用アプリならではのジェスチャー最適化により、移動中のちょっとした修正もストレスフリーに行えます。
機能・特性 | Chrome リモート デスクトップ | DeskIn(デスクイン) |
主な用途 | 簡易的な操作・緊急用 | ビジネス・クリエイティブ・ゲーム |
画質・フレームレート | 最大 30FPS(カクつきあり) | 4K / 60〜144FPS(極めて滑らか) |
キーボードマッピング | 基本のみ(Cmd/Ctrl 競合あり) | Mac/Win 自動最適化(競合なし) |
リモート起動 (WoL) | 非対応(PCの常時起動が必要) | 対応(必要な時だけ遠隔起動) |
操作感 | 遅延あり・直感的でない | 低遅延・Macネイティブな操作感 |
導入コスト | 無料 | 無料版あり / 高機能有料版あり |
Chrome リモート デスクトップは、その圧倒的な手軽さとコストパフォーマンスにおいて、リモートデスクトップの「入り口」として非常に優秀なツールです。ちょっとしたファイル確認や、たまに発生する軽作業であれば、これほど便利なものはありません。
しかし、毎日数時間に及ぶ業務や、1分1秒を争うクリエイティブな作業、あるいは Mac と Windows の操作性の違いにストレスを感じているのであれば、無料ツールの限界を超える時が来ているのかもしれません。
これらを手に入れることで、あなたのリモートワーク体験は劇的に進化するはずです。まずは一度、DeskIn が提供する無料版の快適さを体験してみてはいかがでしょうか
DeskIn vs Chrome Remote Desktop: Which One Fits Your Workflow Best?
When it comes to remote access tools, the comparison between DeskIn and Chrome Remote Desktop often comes down to one simple question: do you just need quick access, or do you need performance and control?
Both tools are reliable, secure, and widely used. But they are built for very different types of users. Chrome Remote Desktop focuses on simplicity and accessibility, while DeskIn is designed for users who need high performance, stability, and advanced features across multiple devices.
If you're deciding between the two, this guide breaks down not just what they offer, but which one actually fits your workflow.
Feature | DeskIn | Chrome Remote Desktop |
|---|---|---|
Performance | Up to 4K 60FPS/2K 240FPS, low latency | Standard performance |
Ease of Use | Requires app installation | Browser-based, very simple |
Device Support | Windows, macOS, iOS, Android | Works via Chrome browser |
File Transfer | Fast and stable | Limited |
Multi-device Management | Yes | No |
Mobile Experience | Optimized for iPad & iPhone | Basic |
Security | Privacy screens and granular black/whitelists | Basic |
Price | Free + paid plans | Completely free |
In short, Chrome Remote Desktop is great for quick, lightweight access, while DeskIn is built for users who expect more from their remote desktop experience.
Chrome Remote Desktop is one of the simplest remote access tools available. It runs directly through the Chrome browser and requires only a Google account to get started. This makes it especially popular among casual users and those already working within the Google ecosystem.
It works particularly well on devices like Chromebooks, where everything is already browser-based. It's also accessible across platforms, including mobile devices like iPhone and iPad, though the experience on mobile can feel limited compared to desktop use.
If you're wondering how to use Chrome Remote Desktop, the process is straightforward. You install the Chrome extension, sign in with your Google account, set up a PIN on the host device, and then connect from another device using the same account. The entire setup usually takes just a few minutes.
That said, simplicity comes with trade-offs. Chrome Remote Desktop lacks advanced features like high frame rate streaming, multi-monitor control, or professional-grade file transfer. For occasional access, it works well. But for more demanding tasks, users often start to feel its limitations.
👀You may also be interested in:
If Chrome Remote Desktop is a lightweight sketch, DeskIn is a full workstation painted in high resolution. DeskIn focuses on performance, stability, and flexibility. It supports up to 4K 60FPS streaming, making it suitable for tasks where visual clarity and responsiveness matter, such as design work, video editing, or even gaming.
As a Chrome remote desktop alternative, unlike browser-based tools, DeskIn is a dedicated remote desktop application. While this requires installation, it unlocks a much more stable and feature-rich experience. Users can manage multiple devices, transfer large files efficiently, and enjoy smoother control across different platforms.
DeskIn is also optimized for mobile workflows. Whether you're using an iPad or smartphone, the interaction feels more responsive and closer to a desktop experience, rather than a simplified viewer. For users who find Chrome Remote Desktop "good enough" at first but limiting over time, DeskIn often becomes the natural upgrade path.
The real difference between these two tools becomes clear when you look at how they perform in everyday scenarios.
If you only need to check files on your home computer or help a friend troubleshoot something quickly, Chrome Remote Desktop is more than enough. It's free, easy to set up, and doesn't require installing extra software beyond Chrome. In this case, DeskIn may feel like overkill.
For professionals working remotely on a daily basis, stability and efficiency matter much more. This is where DeskIn starts to stand out.
Tasks like editing documents, managing multiple screens, or transferring files between devices become smoother and faster. Chrome Remote Desktop can handle basic workflows, but it often struggles with responsiveness and lacks the tools needed for a seamless work environment.
This is where the gap becomes impossible to ignore. DeskIn's support for high resolution and high frame rates makes it suitable for visually demanding work. Whether you're editing videos, working with design software, or running simulations, performance consistency is critical. Chrome Remote Desktop, on the other hand, is not designed for these scenarios. It works, but not comfortably.
If you rely heavily on Google services or use a Chromebook, Chrome Remote Desktop integrates naturally into your workflow. It's lightweight, requires no additional setup, and feels like an extension of the browser itself. In this scenario, it remains a very practical choice.
Mobile usage highlights another important difference. While remote desktop Chrome iPhone, and Chrome Remote Desktop iPad are functional, they often feel like simplified versions of the desktop experience. Controls can be less intuitive, and performance may vary depending on the connection.
DeskIn, by contrast, is designed with cross-device interaction in mind, offering a smoother and more responsive mobile experience.
👀 You may also be interested in:
Yes. Tools like DeskIn offer better performance, more features, and improved stability, especially for professional use cases.
No, Chrome Remote Desktop is still actively maintained by Google. It continues to receive security updates and remains available for users needing simple, free remote access.
Yes, DeskIn is a legitimate remote desktop solution. It uses encryption to secure connections and provides access controls, making it safe for both personal and professional use.
When comparing DeskIn vs Chrome Remote Desktop, the choice depends on how demanding your remote access needs are. Chrome Remote Desktop is simple, free, and ideal for occasional use, especially if you just need quick access to a device without extra setup.
As your workflow becomes more intensive, the limitations start to surface. DeskIn offers a smoother, more stable experience with better performance and control, making it a strong long-term Chrome remote desktop alternative for users who rely on remote access every day.
連絡先
メール: support@deskin.io
オフィスの住所:
991D Alexandra Road #02-17
シンガポール 119972
著作権 © 2026 Zuler Technology PTE. LTD. 無断複写・転載を禁じます。
お問い合わせ
Eメール: support@deskin.io
本社: 991D Alexandra Road #02-17, シンガポール 119972
著作権 © 2026 Zuler Technology PTE. LTD. 無断複写・転載を禁じます。
連絡先
support@deskin.io
991D Alexandra Road #02-17
シンガポール 119972
著作権 © 2026 Zuler Technology PTE. LTD. 無断複写・転載を禁じます。

