10 นาที
·
·
ประสิทธิภาพ
·
·
Updated on
Updated on
It's 2026, and you'd think moving files between devices would be seamless by now. Yet here we are: Google's official Android File Transfer still crashes on macOS Sequoia. Quick Share discovers devices only half the time. And Bluetooth? Best reserved for a single contact card—not your 4GB vacation video.
The reality is that file transfer software for Android has fragmented into specialized tools. Some excel at local speed. Others unlock remote access. A few even let you access files on a computer from Android while you're 3,000 miles away.
You may also like:
Overview of Android File Transfer Apps
Tool | Best For | Platforms | Connection | Price |
|---|---|---|---|---|
DeskIn
| Remote file access & cross‑platform management | Win, Mac, iOS, Android, Web | P2P / Relay | Free / Paid |
MobiKin Assistant for Android | Android data backup & transfer (contacts, files, etc.) | Win, Mac ↔ Android | USB / Wi‑Fi | Freemium |
Quick Share | Instant nearby sharing (Android ↔ Win) | Android, Win, ChromeOS | Wi‑Fi Direct + BT | Free |
Send Anywhere | Sending huge files via 6‑digit code | All major OS | Wi‑Fi / Cellular | Free / Paid |
MacDroid
| Reliable Android ↔ Mac USB/ Wi‑Fi | Mac ↔ Android | USB / Wi‑Fi | Freemium |
AirDroid | Remote Android management & control | Web, Win, Mac, Android | Wi‑Fi / Remote | Freemium |
Phone Link | Windows‑Android easy integration | Win, Android | Wi‑Fi / BT | Free |
Smart Switch | Samsung device migration | Samsung, iOS, Android | USB / Wi‑Fi | Free |
LocalSend | Privacy‑friendly local network transfers | All major OS | LAN (Wi‑Fi) | Free (Open source) |
iReaShare Android Manager | Full‑featured Android data management | Win, Mac ↔ Android | USB / Wi‑Fi | Freemium |
Here is the detailed reviews for 10 best Android file transfer applications.
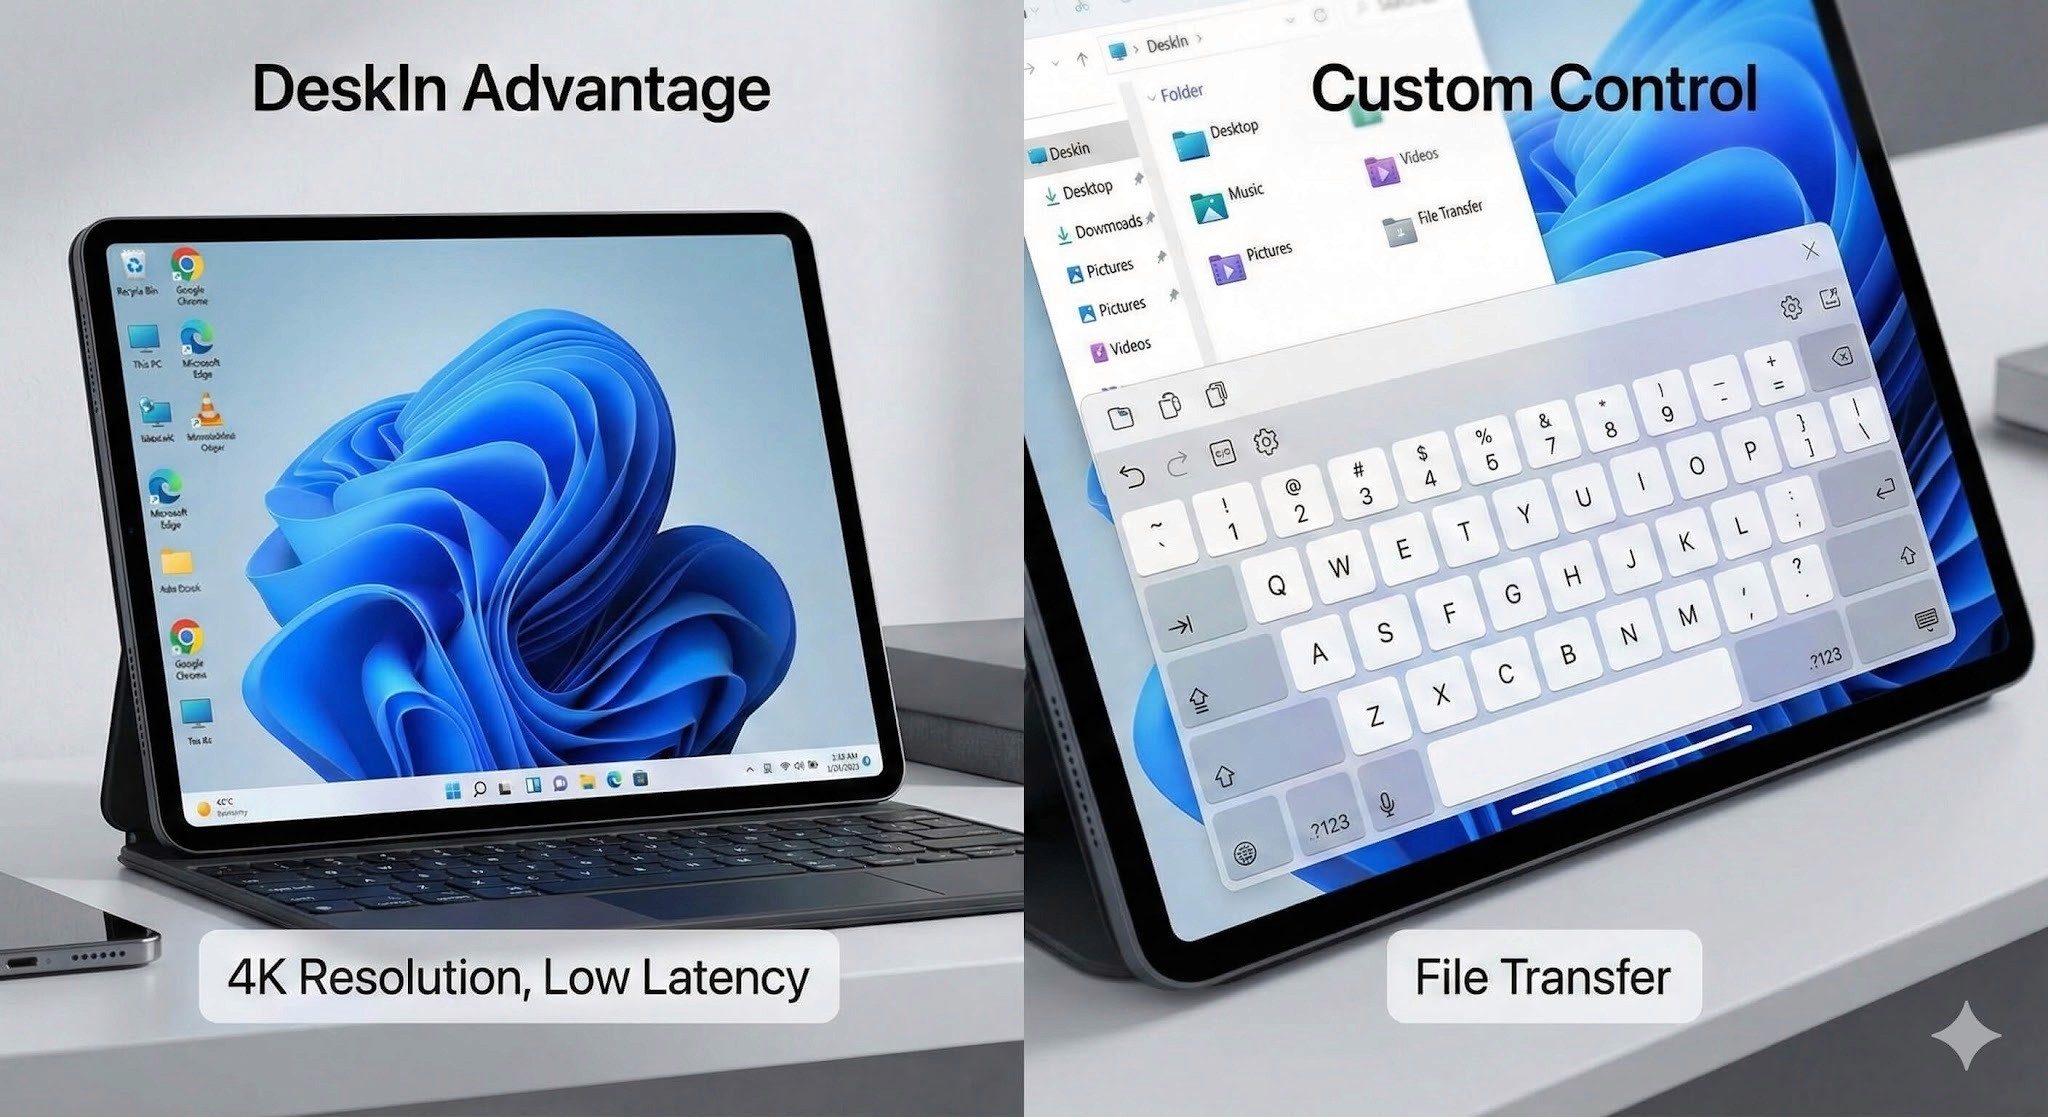
1. DeskIn: Best for Remote File Access and Cross‑Platform Management

Pros
Unattended remote access to PC files from any device (Android, iOS, Web)
High‑speed P2P file transfer (up to 12MB/s) with auto‑resume
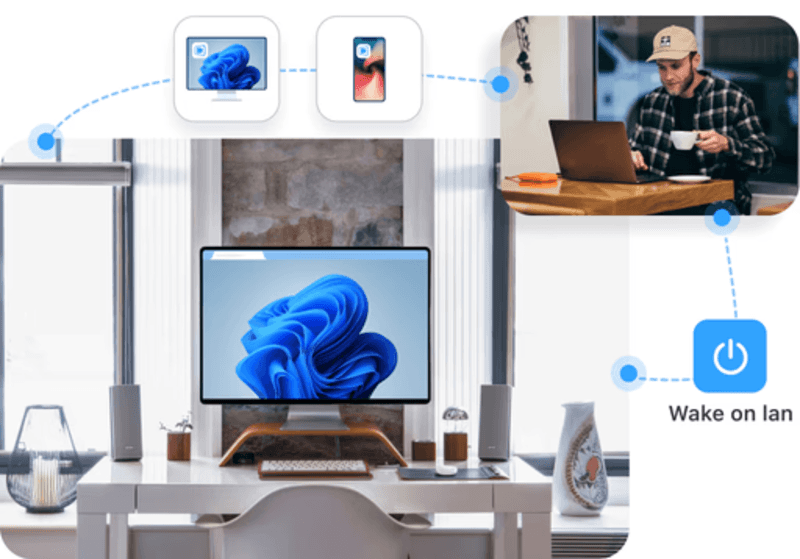
Cross‑platform: control Windows/Mac from Android, transfer files between Android and Windows PC wirelessly
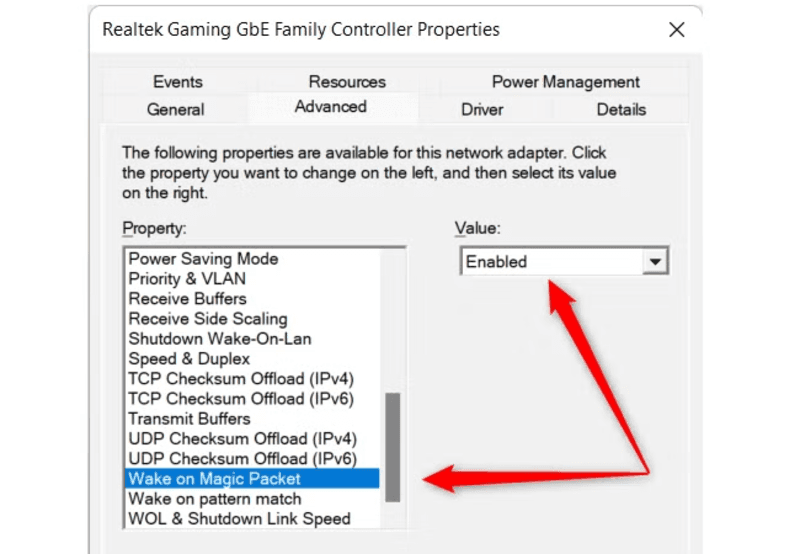
Built‑in Wake‑on‑LAN – power on a remote PC from a phone
Free tier supports 3 devices, no file size limits
Cons
Requires app installation on both ends
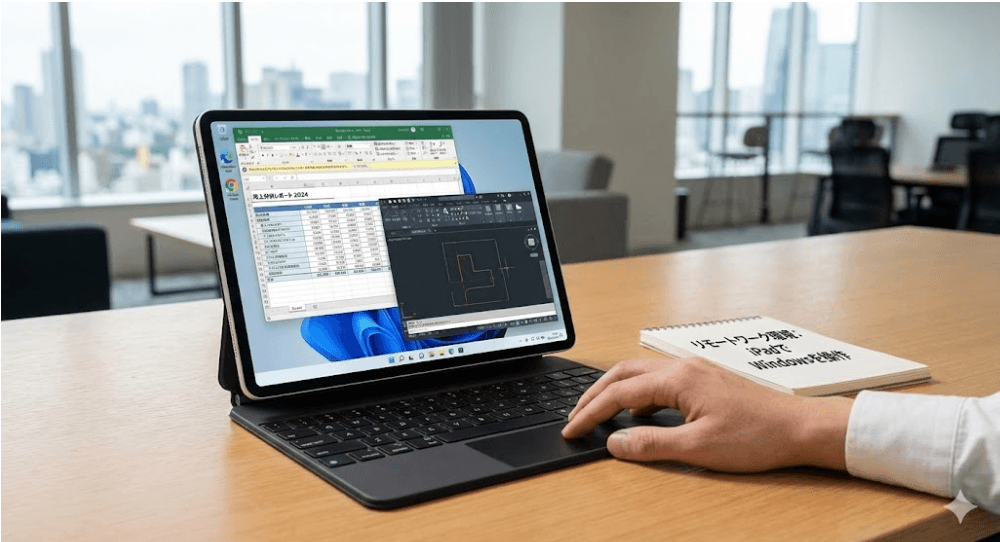
DeskIn stands apart from other file transfer software for Android tools by letting you access files on your PC from your Android phone even when you’re far away. DeskIn lets you also access files on your computer from Android even when you're miles away.
Need a contract from your office PC while at the airport? Simply open DeskIn on your Android, browse the remote desktop, and drag the file to your phone. The connection is secured with AES‑256 + TLS 1.3, and transfers automatically resume if the network drops.
Beyond one‑off transfers, DeskIn is great for transferring files between Android and Windows PC daily. You can push screenshots from your Android to your Windows desktop with a single click, or pull design assets from your Mac to your Android tablet. For users who juggle multiple platforms and need both Android file transfer software for Windows and Android file transfer software for Mac, DeskIn is the one tool that works across all your devices and platforms.
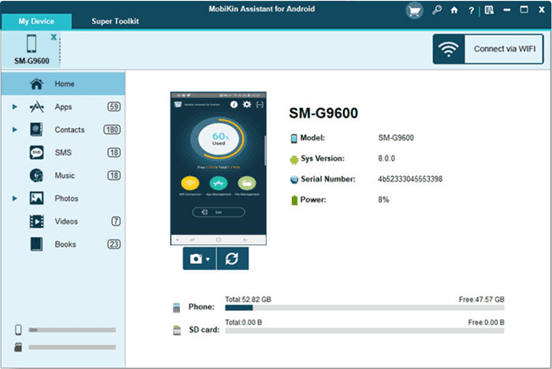
2. Best for Mac Users Who Need a Reliable Android File Transfer Tool: MobiKin Assistant for Android
Pros
Native support for both Windows and macOS
USB and Wi-Fi transfer options
Two-way transfers – Android to Mac and Mac to Android
Manages contacts, SMS, apps, photos, videos, and more
One-click backup and restore
Cons
Paid software – full version from $29.95
Free trial has limitations
Requires USB debugging setup
If you're a Mac user frustrated by Google's abandoned Android File Transfer for Mac, which crashes constantly and hasn't been updated in years, MobiKin Assistant for Android is the reliable replacement you need. It mounts your Android device for fast USB transfers, but also adds Wi-Fi connectivity, two-way file moving, and deep data management.
You can export SMS threads, edit contacts in bulk, install apps, and create full device backups with one click. No cloud, no privacy concerns, no connection drops.
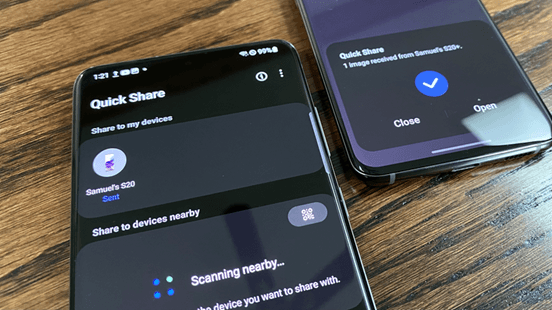
3. Best for Instant Wireless Sharing Between Android and Windows - Quick Share
Pros
Pre‑installed on most Android phones (Android 6+)
Uses Wi‑Fi Direct + Bluetooth – no mobile data
Windows app is available for cross‑platform
Cons
Windows version requires 64‑bit Windows 10/11
Older Android devices may lack support
Quick Share is Google's answer to AirDrop, and it works surprisingly well for local transfers. If you're looking for efficient Bluetooth file transfer software for Android, Quick Share automatically switches between Bluetooth (for device discovery) and Wi‑Fi Direct (for high‑speed data). Sending a 4K video to a nearby Windows laptop takes seconds, with no cables or cloud uploads.
The Windows client (available from Samsung or Google's site) makes Quick Share a viable option for transferring files between Android and Windows PC without any dongles. It's perfect for quick, on‑the‑spot sharing at home or in the office. The main limitation is range: both devices must be within Bluetooth range (~10m). For remote access, you'll still need a tool like DeskIn.
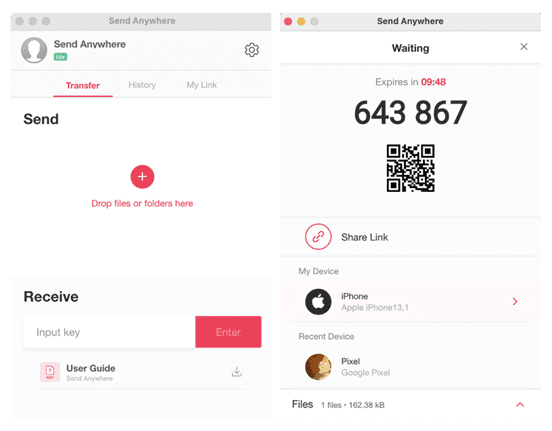
4. Best for Sending Large Files via Temporary Code: Send Anywhere
Pros
No file size limit
6‑digit key system – no account needed
Truly cross‑platform: Android, iOS, Windows, Mac, Linux, Web
Cons
Keys expire in 10 minutes – stressful for slow recipients
Speeds depend on the server relay
Send Anywhere stands out for its simplicity: you select a file, the app generates a 6‑digit code, and the recipient enters it on any device to download. It doesn't matter if they're on Android, iPhone, or a Windows PC – the file travels through Send Anywhere's servers (encrypted) and is then deleted. This makes it ideal for transferring photos from Android to iPhone when switching ecosystems, or for sending a large video to a client who isn't tech‑savvy.
Because there's no file size cap, you can even send 100GB+ files (though speeds may vary). The free version is fully functional; the paid plan adds cloud storage and link control. However, it requires an internet connection on both sides, and the 10‑minute expiry can be problematic.
For high-speed transfers between your devices (phones, tablets, and laptops) without an internet connection, LocalSend is the better choice. Quick Share works great for Android-to-Android transfers, but requires an internet connection when sharing with iPhones.
5. Best for Reliable Android ↔ Mac USB/Wireless Transfers: MacDroid
Pros
Mounter – mounts Android as a native macOS volume
Supports both USB and Wi‑Fi
Edit files directly on an Android device
Cons
Free version only allows Android → Mac transfers
The pro version is subscription‑based
MacDroid solves the biggest frustration of Android‑on‑Mac: unreliable MTP connections. It mounts your Android device as a standard disk drive in Finder, so you can drag files both ways, rename folders, or even open documents directly from your phone. The USB transfer speed is stable and much faster than Android File Transfer. If you frequently move large video files between your Android phone and MacBook, MacDroid is the best option.
The wireless mode works over the local network, giving you cable‑free convenience at home. However, the free version severely restricts outgoing transfers, pushing you toward a $19.99/year subscription. For users who only need occasional Android file transfer software for Mac, Android File Transfer (free) might suffice. If you need more than just basic photo transfers—like accessing system files or drag-and-drop management—MacDroid is worth the investment. Alternatively, DeskIn offers remote transfer without any device‑side mounting issues.
6. Best for Remote Android Management and File Transfer: AirDroid
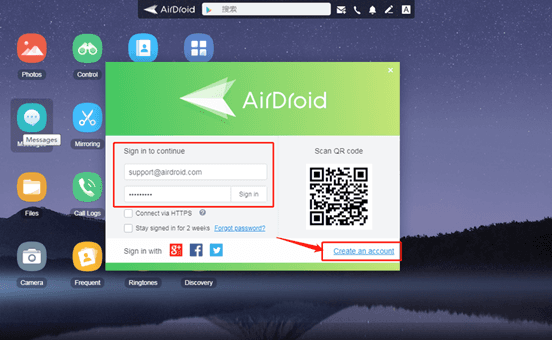
Pros
Wireless file transfer via web browser or desktop client
Remote control of the Android screen (for support)
SMS, notification mirroring
Cons
Privacy concerns; data goes through AirDroid servers
The free version has transfer caps
AirDroid is more than a file transfer app. It's a full remote management suite. You can access your Android phone's files from any web browser, transfer photos wirelessly, and even send SMS from your PC. This makes it a powerful tool for accessing files on a computer from Android in reverse: you can push files from your PC to your phone just by dragging them into the browser window.
The downside is that most features rely on AirDroid's cloud servers, which raises privacy questions and can slow down large transfers. The free tier limits data to 200MB/month.
AirDroid remains popular among IT support technicians who need to troubleshoot family members' devices, but for pure file transfer, DeskIn or LocalSend are more direct and private.
7. Best for Seamless Windows‑Android Integration: Phone Link
Pros
Built into Windows 10/11
Drag‑and‑drop photo transfer
View notifications, take calls
Cons
Only transfers photos (no documents, music, etc.)
Requires a Microsoft account and the Link to Windows app
Phone Link (formerly Your Phone) is Microsoft's official solution to connect Android and Windows. It excels at integrating your phone's communication features – messages, calls, notifications – directly on your PC. For file transfer, however, it's strictly limited to photos. You can drag photos from your Android gallery to a Windows folder, but you cannot transfer PDFs, APKs, music, or any other file type.
If your primary need is how to transfer files from pc to pc, Phone Link won't help; it's phone‑to‑PC only. For Android users who mainly want to back up camera shots to their Windows computer, it's convenient and pre‑installed. But anyone needing universal file transfer software for Android will quickly hit a wall. Pair it with DeskIn for full document access.
8. Best for Samsung Users Migrating Data: Samsung Smart Switch
Pros
All‑in‑one data migration (contacts, messages, apps, photos)
Works with iOS as well (cable or wireless)
Free and reliable
Cons
Primarily for device setup, not daily transfers
Smart Switch is Samsung's official tool to move data from an old phone (Android or iPhone) to a new Samsung Galaxy device. It's not designed for day‑to‑day file shuffling, but it performs one task exceptionally well: complete phone migration. You can use a USB‑C to USB‑C cable for a 20‑minute full restore, or go wireless if you don't have the cable.
For Samsung loyalists, Smart Switch is indispensable. It transfers almost everything, including WhatsApp chats (from Android) and iMessage history (from iPhone). However, it's not a general‑purpose Android file transfer software for Windows – you can't selectively copy a single document to your PC. That's where tools like DeskIn or iReaShare come in.
9. Best for Privacy‑Focused Local Network Transfers: LocalSend
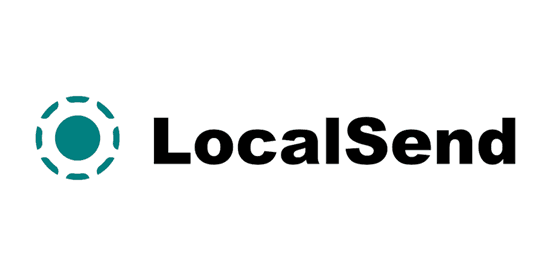
Pros
Open source, no servers, no tracking
Works on all platforms: Android, iOS, Windows, Mac, Linux
No internet is required – use LAN
Cons
Both devices must be on the same Wi‑Fi
The interface is basic and lacks advanced features
LocalSend has gained massive popularity on Reddit as the anti‑"spyware" alternative to SHAREit and Xender. It's completely open source, sends files directly over your local network (no cloud servers), and requires no account or internet connection. For privacy-conscious users, this is the gold standard for transferring files between an Android and windows PC when both are at home.
While it lacks remote access (you must be on the same Wi‑Fi), LocalSend is incredibly fast and reliable. It also works offline, making it perfect for campus environments or offices with restricted internet. The app is free with no ads or paid tiers. If you need to transfer photos from Android to iPhone across the same network, LocalSend does it instantly without compressing quality.
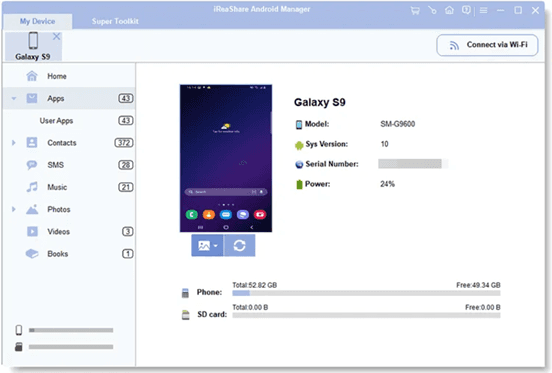
10. Best for Comprehensive Android Data Management: iReaShare Android Manager
Pros
Complete management: contacts, messages, apps, photos, videos
High‑speed USB & Wi‑Fi transfer
Backup & restore functionality
Cons
Free trial limited; full version paid
Windows/Mac only – no mobile app for receiving
iReaShare Android Manager is a desktop‑based app that gives you full control of your Android device from your computer. Unlike simple transfer apps, it lets you view, edit, add, and delete contacts, send/receive SMS from your PC, install/uninstall apps in bulk, and, of course, transfer any media file. It supports both USB and Wi‑Fi connections, and the transfer speed is consistently high – up to 12MB/s.
The software is particularly useful for users who want to access files on a computer from Android in reverse: you can push files from your PC to your phone just as easily as pulling them. The free trial allows you to test the features, but advanced functions require a license. For users who regularly manage large photo libraries or need to back up text messages, iReaShare is a capable, all‑in‑one alternative to Google's built-in tools.
FAQs
1. What is the fastest way to transfer files from Android to PC?
Wired USB 3.0 connections still win for pure speed, but DeskIn delivers the best balance of convenience and performance, especially when you're not near your computer. The speed of transfers files at up to 12MB/s over any distance, with automatic resumes for unstable connections. For local wireless speed, LocalSend maxes out your Wi-Fi speed.
2. How do I transfer photos from Android to iPhone wirelessly?
Send Anywhere is the simplest: generate a 6‑digit code on Android, enter it on iPhone, and transfer photos without quality loss. DeskIn also works for cross‑platform file moves.
3. Can I access files on my computer from Android when I'm away?
Absolutely. DeskIn is built for this. It lets you wake a sleeping PC remotely, browse folders, and download files directly to your phone. No router configuration is required. AirDroid offers similar remote access but with transfer caps on the free tier.
Conclusion – DeskIn First, Others Second
No single file transfer software for Android does it all. But one does most of it. DeskIn is the only tool that lets you access files on a computer from Android remotely, transfer cross-platform, and even learn how to transfer files from pc to pc—all with AES‑256 + TLS 1.3 encryption. Keep LocalSend for private local sharing and Send Anywhere for emergencies.
But start with DeskIn. Stop searching for Android file transfer software for Windows or Mac. One app. All your devices.

It's 2026, and you'd think moving files between devices would be seamless by now. Yet here we are: Google's official Android File Transfer still crashes on macOS Sequoia. Quick Share discovers devices only half the time. And Bluetooth? Best reserved for a single contact card—not your 4GB vacation video.
The reality is that file transfer software for Android has fragmented into specialized tools. Some excel at local speed. Others unlock remote access. A few even let you access files on a computer from Android while you're 3,000 miles away.
You may also like:
Overview of Android File Transfer Apps
Tool | Best For | Platforms | Connection | Price |
|---|---|---|---|---|
DeskIn
| Remote file access & cross‑platform management | Win, Mac, iOS, Android, Web | P2P / Relay | Free / Paid |
MobiKin Assistant for Android | Android data backup & transfer (contacts, files, etc.) | Win, Mac ↔ Android | USB / Wi‑Fi | Freemium |
Quick Share | Instant nearby sharing (Android ↔ Win) | Android, Win, ChromeOS | Wi‑Fi Direct + BT | Free |
Send Anywhere | Sending huge files via 6‑digit code | All major OS | Wi‑Fi / Cellular | Free / Paid |
MacDroid
| Reliable Android ↔ Mac USB/ Wi‑Fi | Mac ↔ Android | USB / Wi‑Fi | Freemium |
AirDroid | Remote Android management & control | Web, Win, Mac, Android | Wi‑Fi / Remote | Freemium |
Phone Link | Windows‑Android easy integration | Win, Android | Wi‑Fi / BT | Free |
Smart Switch | Samsung device migration | Samsung, iOS, Android | USB / Wi‑Fi | Free |
LocalSend | Privacy‑friendly local network transfers | All major OS | LAN (Wi‑Fi) | Free (Open source) |
iReaShare Android Manager | Full‑featured Android data management | Win, Mac ↔ Android | USB / Wi‑Fi | Freemium |
Here is the detailed reviews for 10 best Android file transfer applications.
1. DeskIn: Best for Remote File Access and Cross‑Platform Management
Pros
Unattended remote access to PC files from any device (Android, iOS, Web)
High‑speed P2P file transfer (up to 12MB/s) with auto‑resume
Cross‑platform: control Windows/Mac from Android, transfer files between Android and Windows PC wirelessly
Built‑in Wake‑on‑LAN – power on a remote PC from a phone
Free tier supports 3 devices, no file size limits
Cons
Requires app installation on both ends
DeskIn stands apart from other file transfer software for Android tools by letting you access files on your PC from your Android phone even when you’re far away. DeskIn lets you also access files on your computer from Android even when you're miles away.
Need a contract from your office PC while at the airport? Simply open DeskIn on your Android, browse the remote desktop, and drag the file to your phone. The connection is secured with AES‑256 + TLS 1.3, and transfers automatically resume if the network drops.
Beyond one‑off transfers, DeskIn is great for transferring files between Android and Windows PC daily. You can push screenshots from your Android to your Windows desktop with a single click, or pull design assets from your Mac to your Android tablet. For users who juggle multiple platforms and need both Android file transfer software for Windows and Android file transfer software for Mac, DeskIn is the one tool that works across all your devices and platforms.
2. Best for Mac Users Who Need a Reliable Android File Transfer Tool: MobiKin Assistant for Android
Pros
Native support for both Windows and macOS
USB and Wi-Fi transfer options
Two-way transfers – Android to Mac and Mac to Android
Manages contacts, SMS, apps, photos, videos, and more
One-click backup and restore
Cons
Paid software – full version from $29.95
Free trial has limitations
Requires USB debugging setup
If you're a Mac user frustrated by Google's abandoned Android File Transfer for Mac, which crashes constantly and hasn't been updated in years, MobiKin Assistant for Android is the reliable replacement you need. It mounts your Android device for fast USB transfers, but also adds Wi-Fi connectivity, two-way file moving, and deep data management.
You can export SMS threads, edit contacts in bulk, install apps, and create full device backups with one click. No cloud, no privacy concerns, no connection drops.
3. Best for Instant Wireless Sharing Between Android and Windows - Quick Share
Pros
Pre‑installed on most Android phones (Android 6+)
Uses Wi‑Fi Direct + Bluetooth – no mobile data
Windows app is available for cross‑platform
Cons
Windows version requires 64‑bit Windows 10/11
Older Android devices may lack support
Quick Share is Google's answer to AirDrop, and it works surprisingly well for local transfers. If you're looking for efficient Bluetooth file transfer software for Android, Quick Share automatically switches between Bluetooth (for device discovery) and Wi‑Fi Direct (for high‑speed data). Sending a 4K video to a nearby Windows laptop takes seconds, with no cables or cloud uploads.
The Windows client (available from Samsung or Google's site) makes Quick Share a viable option for transferring files between Android and Windows PC without any dongles. It's perfect for quick, on‑the‑spot sharing at home or in the office. The main limitation is range: both devices must be within Bluetooth range (~10m). For remote access, you'll still need a tool like DeskIn.
4. Best for Sending Large Files via Temporary Code: Send Anywhere
Pros
No file size limit
6‑digit key system – no account needed
Truly cross‑platform: Android, iOS, Windows, Mac, Linux, Web
Cons
Keys expire in 10 minutes – stressful for slow recipients
Speeds depend on the server relay
Send Anywhere stands out for its simplicity: you select a file, the app generates a 6‑digit code, and the recipient enters it on any device to download. It doesn't matter if they're on Android, iPhone, or a Windows PC – the file travels through Send Anywhere's servers (encrypted) and is then deleted. This makes it ideal for transferring photos from Android to iPhone when switching ecosystems, or for sending a large video to a client who isn't tech‑savvy.
Because there's no file size cap, you can even send 100GB+ files (though speeds may vary). The free version is fully functional; the paid plan adds cloud storage and link control. However, it requires an internet connection on both sides, and the 10‑minute expiry can be problematic.
For high-speed transfers between your devices (phones, tablets, and laptops) without an internet connection, LocalSend is the better choice. Quick Share works great for Android-to-Android transfers, but requires an internet connection when sharing with iPhones.
5. Best for Reliable Android ↔ Mac USB/Wireless Transfers: MacDroid
Pros
Mounter – mounts Android as a native macOS volume
Supports both USB and Wi‑Fi
Edit files directly on an Android device
Cons
Free version only allows Android → Mac transfers
The pro version is subscription‑based
MacDroid solves the biggest frustration of Android‑on‑Mac: unreliable MTP connections. It mounts your Android device as a standard disk drive in Finder, so you can drag files both ways, rename folders, or even open documents directly from your phone. The USB transfer speed is stable and much faster than Android File Transfer. If you frequently move large video files between your Android phone and MacBook, MacDroid is the best option.
The wireless mode works over the local network, giving you cable‑free convenience at home. However, the free version severely restricts outgoing transfers, pushing you toward a $19.99/year subscription. For users who only need occasional Android file transfer software for Mac, Android File Transfer (free) might suffice. If you need more than just basic photo transfers—like accessing system files or drag-and-drop management—MacDroid is worth the investment. Alternatively, DeskIn offers remote transfer without any device‑side mounting issues.
6. Best for Remote Android Management and File Transfer: AirDroid
Pros
Wireless file transfer via web browser or desktop client
Remote control of the Android screen (for support)
SMS, notification mirroring
Cons
Privacy concerns; data goes through AirDroid servers
The free version has transfer caps
AirDroid is more than a file transfer app. It's a full remote management suite. You can access your Android phone's files from any web browser, transfer photos wirelessly, and even send SMS from your PC. This makes it a powerful tool for accessing files on a computer from Android in reverse: you can push files from your PC to your phone just by dragging them into the browser window.
The downside is that most features rely on AirDroid's cloud servers, which raises privacy questions and can slow down large transfers. The free tier limits data to 200MB/month.
AirDroid remains popular among IT support technicians who need to troubleshoot family members' devices, but for pure file transfer, DeskIn or LocalSend are more direct and private.
7. Best for Seamless Windows‑Android Integration: Phone Link
Pros
Built into Windows 10/11
Drag‑and‑drop photo transfer
View notifications, take calls
Cons
Only transfers photos (no documents, music, etc.)
Requires a Microsoft account and the Link to Windows app
Phone Link (formerly Your Phone) is Microsoft's official solution to connect Android and Windows. It excels at integrating your phone's communication features – messages, calls, notifications – directly on your PC. For file transfer, however, it's strictly limited to photos. You can drag photos from your Android gallery to a Windows folder, but you cannot transfer PDFs, APKs, music, or any other file type.
If your primary need is how to transfer files from pc to pc, Phone Link won't help; it's phone‑to‑PC only. For Android users who mainly want to back up camera shots to their Windows computer, it's convenient and pre‑installed. But anyone needing universal file transfer software for Android will quickly hit a wall. Pair it with DeskIn for full document access.
8. Best for Samsung Users Migrating Data: Samsung Smart Switch
Pros
All‑in‑one data migration (contacts, messages, apps, photos)
Works with iOS as well (cable or wireless)
Free and reliable
Cons
Primarily for device setup, not daily transfers
Smart Switch is Samsung's official tool to move data from an old phone (Android or iPhone) to a new Samsung Galaxy device. It's not designed for day‑to‑day file shuffling, but it performs one task exceptionally well: complete phone migration. You can use a USB‑C to USB‑C cable for a 20‑minute full restore, or go wireless if you don't have the cable.
For Samsung loyalists, Smart Switch is indispensable. It transfers almost everything, including WhatsApp chats (from Android) and iMessage history (from iPhone). However, it's not a general‑purpose Android file transfer software for Windows – you can't selectively copy a single document to your PC. That's where tools like DeskIn or iReaShare come in.
9. Best for Privacy‑Focused Local Network Transfers: LocalSend
Pros
Open source, no servers, no tracking
Works on all platforms: Android, iOS, Windows, Mac, Linux
No internet is required – use LAN
Cons
Both devices must be on the same Wi‑Fi
The interface is basic and lacks advanced features
LocalSend has gained massive popularity on Reddit as the anti‑"spyware" alternative to SHAREit and Xender. It's completely open source, sends files directly over your local network (no cloud servers), and requires no account or internet connection. For privacy-conscious users, this is the gold standard for transferring files between an Android and windows PC when both are at home.
While it lacks remote access (you must be on the same Wi‑Fi), LocalSend is incredibly fast and reliable. It also works offline, making it perfect for campus environments or offices with restricted internet. The app is free with no ads or paid tiers. If you need to transfer photos from Android to iPhone across the same network, LocalSend does it instantly without compressing quality.
10. Best for Comprehensive Android Data Management: iReaShare Android Manager
Pros
Complete management: contacts, messages, apps, photos, videos
High‑speed USB & Wi‑Fi transfer
Backup & restore functionality
Cons
Free trial limited; full version paid
Windows/Mac only – no mobile app for receiving
iReaShare Android Manager is a desktop‑based app that gives you full control of your Android device from your computer. Unlike simple transfer apps, it lets you view, edit, add, and delete contacts, send/receive SMS from your PC, install/uninstall apps in bulk, and, of course, transfer any media file. It supports both USB and Wi‑Fi connections, and the transfer speed is consistently high – up to 12MB/s.
The software is particularly useful for users who want to access files on a computer from Android in reverse: you can push files from your PC to your phone just as easily as pulling them. The free trial allows you to test the features, but advanced functions require a license. For users who regularly manage large photo libraries or need to back up text messages, iReaShare is a capable, all‑in‑one alternative to Google's built-in tools.
FAQs
1. What is the fastest way to transfer files from Android to PC?
Wired USB 3.0 connections still win for pure speed, but DeskIn delivers the best balance of convenience and performance, especially when you're not near your computer. The speed of transfers files at up to 12MB/s over any distance, with automatic resumes for unstable connections. For local wireless speed, LocalSend maxes out your Wi-Fi speed.
2. How do I transfer photos from Android to iPhone wirelessly?
Send Anywhere is the simplest: generate a 6‑digit code on Android, enter it on iPhone, and transfer photos without quality loss. DeskIn also works for cross‑platform file moves.
3. Can I access files on my computer from Android when I'm away?
Absolutely. DeskIn is built for this. It lets you wake a sleeping PC remotely, browse folders, and download files directly to your phone. No router configuration is required. AirDroid offers similar remote access but with transfer caps on the free tier.
Conclusion – DeskIn First, Others Second
No single file transfer software for Android does it all. But one does most of it. DeskIn is the only tool that lets you access files on a computer from Android remotely, transfer cross-platform, and even learn how to transfer files from pc to pc—all with AES‑256 + TLS 1.3 encryption. Keep LocalSend for private local sharing and Send Anywhere for emergencies.
But start with DeskIn. Stop searching for Android file transfer software for Windows or Mac. One app. All your devices.