比較
比較
/
10分間
/
10分間
W. ティング
更新済み
更新済み
更新済み
Microsoft Remote Desktop(マイクロソフト リモート デスクトップ)は素晴らしいです!なにしろ無料で、Windowsに組み込まれており、どこからでもシームレスにコンピュータにアクセスできることを約束します。しかし、ネットワークを越えて最初に接続しようとすると、そのプロセスはデジタルエスケープルームを解決するような感覚になります。IPアドレスを見つけ、ファイアウォール設定を確認します。「なぜRDCが接続しないのか!?」とか「助けて!接続エラー」といった質問が毎日Reddit上で爆発しているのも不思議ではありません。もうフラストレーションは十分です。
このガイドでは、すべてのクリック、設定を段階的に説明しながら、遭遇するかもしれない一般的な問題に対処し、RDCをWindowsで使用できない方に強力な代替策 (ネタバレ: DeskIn) を紹介します。この手順に従えば、15分以内にPCを遠隔操作できるようになります!
ご存知ですか:Microsoft RDCがWindowsアプリとして正式に登場
RDCは誰にでも適しているわけではありません。Windows Homeを使用しているユーザーや、リモートでアクセスしたいコンピュータの管理者権限を持っていないユーザーには利用できません。これらの制限を超えて、安定したインターネット接続が必要です。ですので、始める前に次のチェックリストを確認して、成功するセットアップを確保してください。
RDC使用前のクイックチェックリスト:T
ホストデバイスはWindows 10/11 Pro または Enterpriseを使用しています
両方のデバイスが接続されています - 同じLAN推奨、それ以外はVPN/公開IP
ホストPCがオンで起動しています
ファイアウォールでポート3389が開かれています
IPアドレスとログイン資格情報を知っている
「リモートデスクトップ」機能を手動でオンにする
リモートデスクトップの設定は少し複雑な場合があります。より簡単で迅速な方法はDeskInを使用することかもしれません。使いやすく、より多くのリモートアクセス機能を提供し、外観も良好です。詳細については方法3を参照してください!
システム要件を満たしていることが確認できたら、Windows 10/11でリモートデスクトップ接続を設定する手順を説明しましょう。この方法は互換性のあるWindowsエディションを使用していて、リモートデバイスへのアクセス資格情報を持っている場合に最適です。
Macを使用している場合、次のパートで特定のソリューションをご覧いただけます。プラットフォームごとの指示にスキップしても構いません。
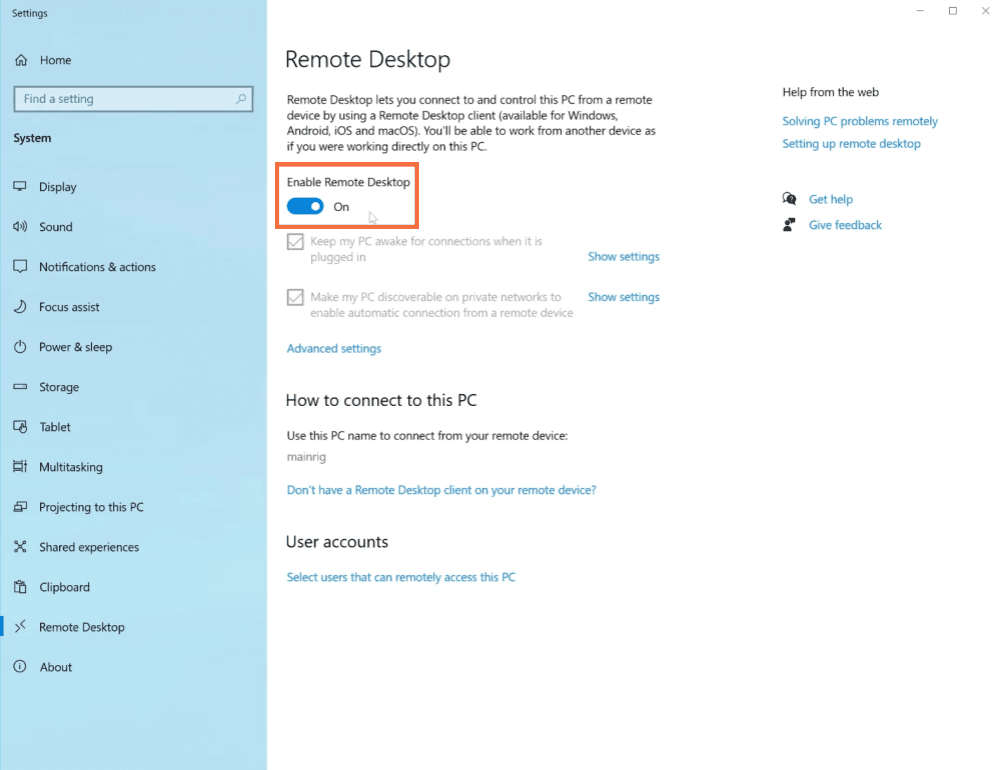
ステップ1. ホストPCでリモートデスクトップを有効にする
はじめに、Win + Iを押して設定アプリを開きます。システム > リモートデスクトップに移動し、リモートデスクトップを有効にするをトグルして、プロンプトを確認します。
注: リモートデスクトップ接続機能にはシステム要件があります。Windows Home ユーザーの場合、有効にできないかもしれません。同様の問題に遭遇した場合、以下の記事を読んでみてください。
リモートデスクトップを有効にする方法:簡単ガイド&エラーフィックス
[究極のガイド] Windows 10/11を画面共有する2つの簡単な方法
ステップ2. ローカルデバイスでリモートデスクトップ接続を起動する
ローカルコンピュータ(Windows PC、Mac、またはその他のデバイスのいずれか)で、リモートデスクトップ接続アプリケーションを開く必要があります。Windowsの場合、「Win + R」を押して実行ダイアログを開き、「mstsc」と入力してEnterキーを押すことで行います。あるいは、スタートメニューでリモートデスクトップ接続を検索することもできます。
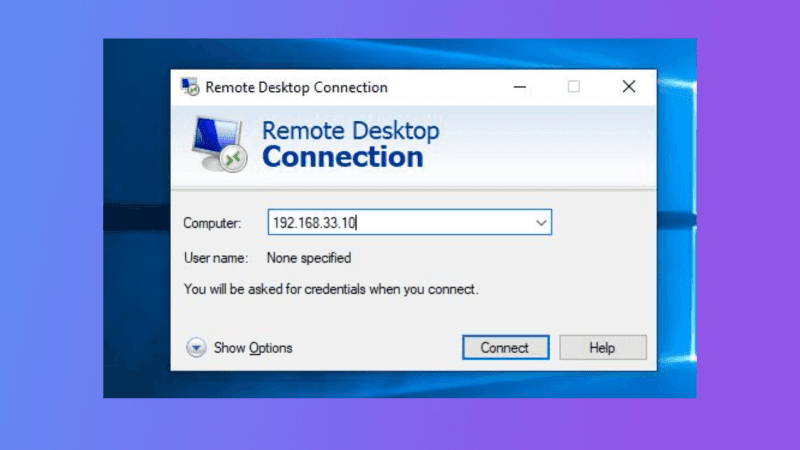
ステップ3. リモートコンピュータのアドレスを入力する
開いたリモートデスクトップ接続ウィンドウで、接続したいリモートPCのIPアドレスまたはコンピュータ名を入力するよう求められます。
この情報は、前のセクション(設定 > システム > About > デバイス名)に従うことでリモートPCで見つけることができます。正しい詳細を入力したら、「接続」をクリックします。
ステップ4. リモートデバイスにログインする
「接続」をクリックすると、ログインプロンプトが表示されます。ターゲットPCでリモートアクセス権限を持つアカウントのユーザー名とパスワードを入力します。これには管理者アカウントまたはアクセスを許可された任意のユーザーアカウントが含まれます。
ログインすると、リモートWindowsデスクトップがローカル画面に表示され、まるでその場に座っているかのようにPCを操作できます。
それでも複雑すぎますか?もっとシンプルな代替策が必要ですか?
安全で簡単なクロスプラットフォームのリモートコントロールを探しているなら、DeskInはエンタープライズグレードのパフォーマンスをゼロファイアウォールで提供します。PCを接続するためにわずか3つの簡単なステップが必要です。
リモートデスクトップ接続(RDC)はWindowsマシンの接続に強力なツールですが、Macにはネイティブには利用できません。これはRDCが特にWindows環境用に設計されており、Appleのオペレーティングシステムが直接サポートしていないためです。
しかし、良いニュースは、Windowsリモートデスクトッププロトコル(RDP)を介してMacに接続し続けることができることで、(。
RDPは多用途のプロトコルで、Macを含むさまざまなデバイスからWindowsマシンに接続可能です。以下は、macOSデバイスからWindowsへのリモートデスクトップ接続方法を示すステップバイステップガイドです。
ステップ1. Mac用のMicrosoft Windows Appプログラムを入手する
ローカルにインストールされているRDPクライアント(RDPが有効なWindowsコンピュータに接続できるプログラム)が必要です。持っていない場合は、Mac App StoreからWindows Appを入手することをお勧めします。インストールが完了したら、続行できます。
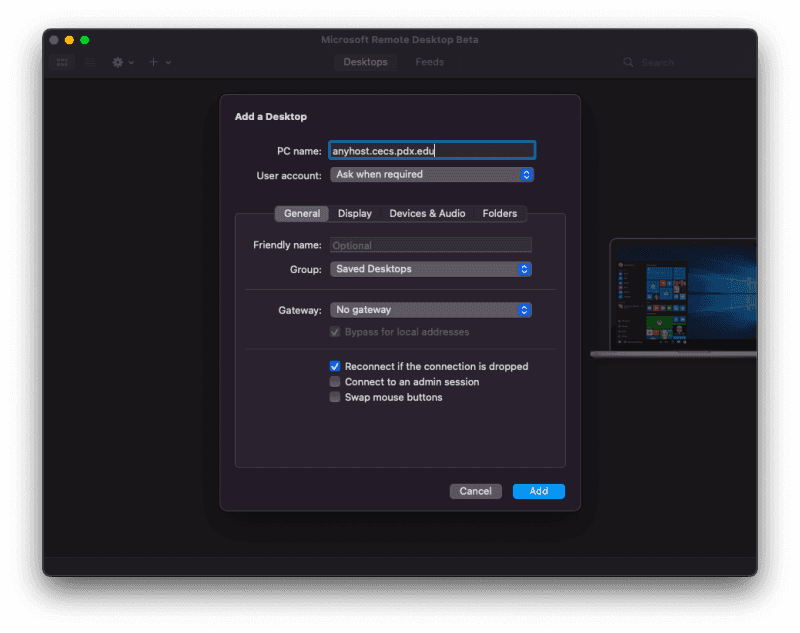
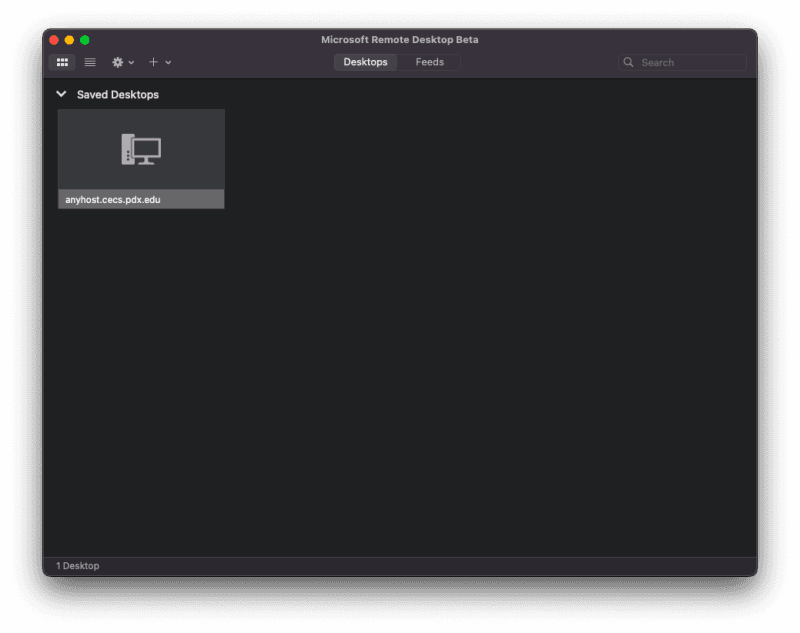
ステップ2. Windows Appを開く
「+」を押して、新しい接続を設定するために「デスクトップ」を選択します。
ステップ3. 接続情報を入力する
「フレンドリーネーム」フィールドに接続名を入力します。RDP経由で接続するWindowsコンピュータの完全修飾ドメイン名を指定します。「追加」を押してデスクトップ接続を追加します。
ステップ4. RDP接続を開始する
次に、ダブルクリックして接続します。ユーザー名とパスワードの入力を求められます。MCECSのユーザー名を「cecs\ユーザー名」として入力します。ユーザー名の前にある"cecs\"を忘れないでください。
Windows向けのリモートデスクトップ接続アプリを使用して2台のコンピュータを接続しようとしているが、セッションが開始されない場合は、次の解決策を試してください:
ファイアウォール設定を確認する: コントロールパネルを開き、Windows Defender ファイアウォール> ファイアウォールを通じてアプリを許可するに移動し、「リモートデスクトップ」が有効になっていることを確認します。
リモートデスクトップサービスの確認: スタートメニューで「サービス」を検索し、「リモートデスクトップサービス」を見つけ、実行していない場合は開始します。
コンピュータのIPアドレスを使用する: リモートPCでipconfigを実行してIPを取得し、そのIPをRDP接続にホスト名の代わりに使用します。
TCP/IPv6を無効にする: ネットワークと共有センター> アダプターの設定を変更するに移動し、接続を右クリックしてプロパティを開き、「インターネット プロトコル バージョン6」をオフにして、OKをクリックします。
ローカルアカウントに切り替える: 設定> アカウント> 家族とその他のユーザーに移動して新しいローカル管理者アカウントを作成し、そのアカウントで接続を試みます。
より安定した簡単なリモートデスクトップ体験をお求めなら、DeskInを試してください。スピードと使い勝手の面で、デフォルトのリモートデスクトップ接続アプリに代わる最高の選択肢になる可能性があります。従来のRDPやRDCとは異なり、DeskInは公開IPアドレスや複雑なルーター設定なしで都市や異なるネットワーク間の接続を可能にします。
このリモートデスクトップソフトウェアはシームレスなクロスプラットフォームの互換性を提供し、MacやモバイルデバイスからWindows PCを簡単に制御できます。他のコンピュータに接続する際には、ファイル転送、音声通話、ホワイトボードコラボレーションなどをサポートしており、リモートワーク、技術サポート、または遠隔学習に最適です。
日常利用のための最高のリモートデスクトッププログラムを探す際や、プロフェッショナルな機能を備えた無料のリモートデスクトップソフトウェアをお探しの場合、DeskInは接続を簡単、安全、かつ迅速にします — わずか3分以内で利用可能です。
高い安定性と超低遅延: 200以上のグローバルアクセラレーションノードを持つDeskInは、大陸を越えても安定した高速リモート接続を保証します。弱いネットワークでしばしばラグを発生させるリモートデスクトップ接続とは異なり、DeskInはあらゆる環境で操作をスムーズかつ反応的に保ちます。
公開IPや複雑なセットアップは不要: ポートフォワードやVPN、公開IPアドレスを忘れてください。DeskInはすべてを単純化します:ただアプリをインストールし、ログインしてPCを制御するだけで、技術的な障壁はありません。
パソコン、モバイル、タブレットからいつでもアクセス可能: DeskInはWindows、macOS、iOS、Androidに対応し、どのデバイスからもフルコントロールを可能にします。リモートデスクトップ接続と比べて、DeskInのモバイルアクセスはより高速で簡単で、追加の設定は不要です。
商業利用も無料: DeskInの無料プランでは、3台までのデバイスをリモート制御でき、ビジネスニーズにも対応 — 使用するWindowsエディションに依存して追加のライセンスを必要とするかもしれないリモートデスクトップに対し、大きな利点です。
あらゆるシナリオに最適: リモートワーク、ゲーム、クライアントサポート、またはファイル転送など、DeskInは容易に適応します。自動解像度調整、セッションの再接続、強力な暗号化による安全なアクセスなど、インテリジェントな機能を提供します。
どこからでも3分以内にPCを完全にコントロールしたいですか?DeskInは、それを簡単にし、初めてのユーザーでも簡単に利用できます。こちらがDeskInを使用したコンピュータへのリモート接続方法です:
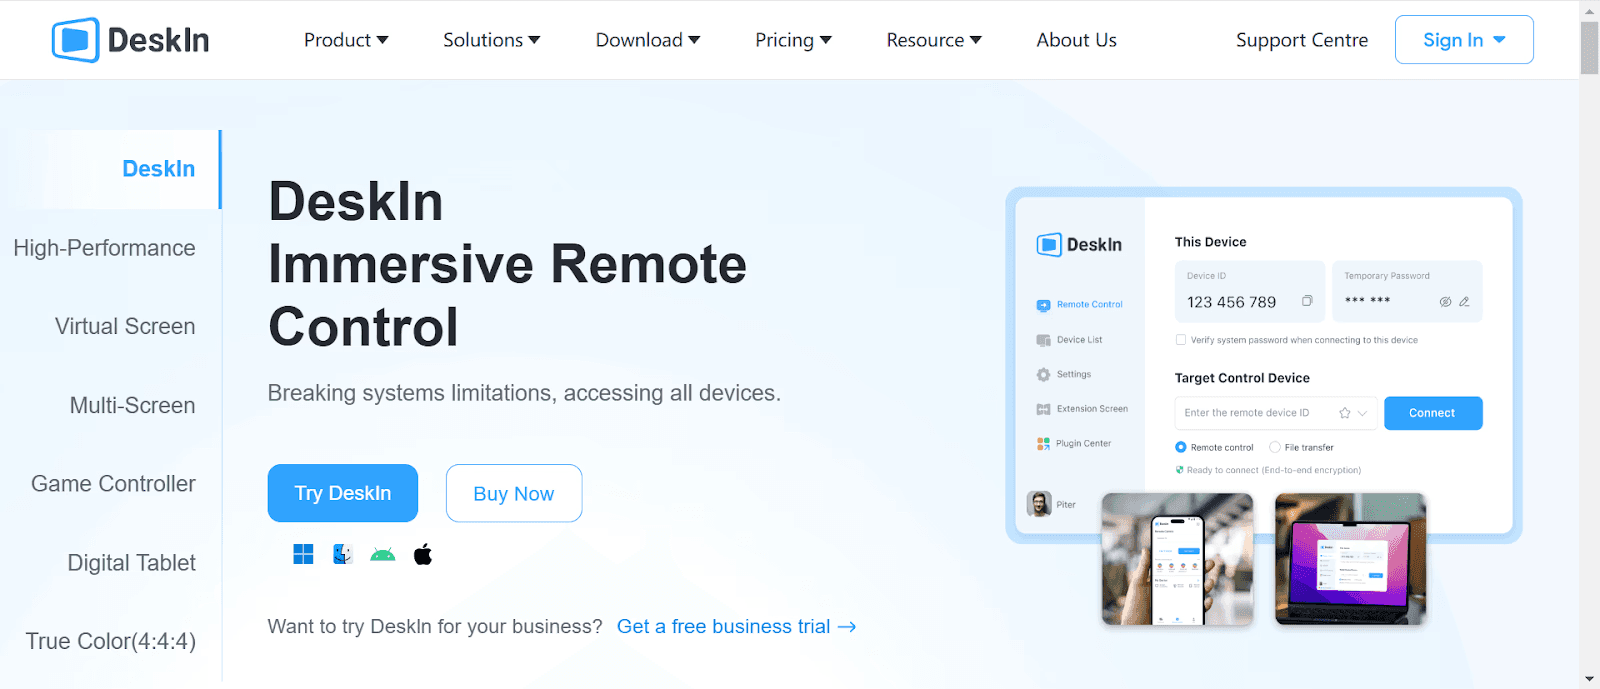
ステップ1. まず、DeskInの公式ウェブサイトにアクセスし、デバイスに適したバージョンをダウンロードします — Windows、macOS、iOS、Androidのいずれでもかまいません。ダウンロード後、画面上の指示に従ってアプリをインストールします。
ステップ2. インストール後、DeskInアプリケーションを開きます。すでにアカウントを持っている場合は、資格情報でログインします。新しいユーザーの場合、数分でアカウントをすばやく作成できます — 完全に無料です。

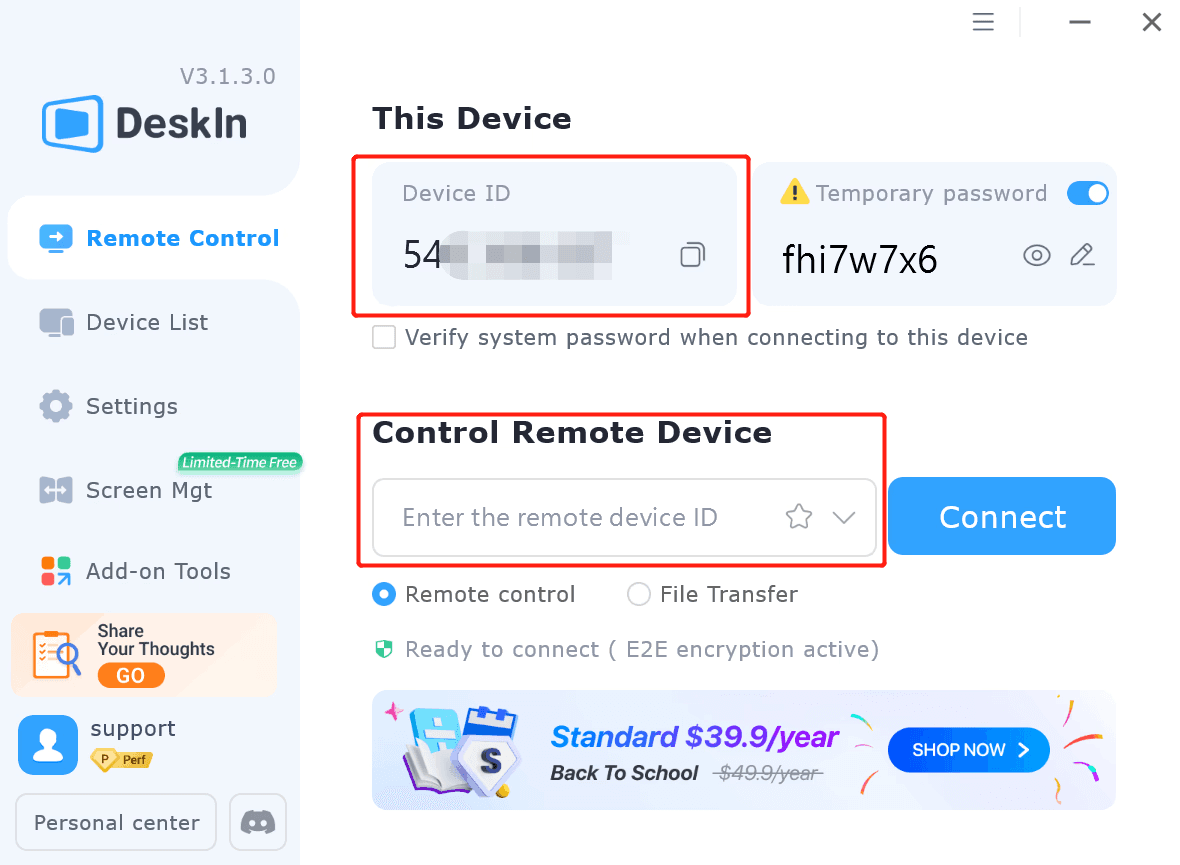
ステップ3. ログイン後、ターゲットPCのデバイスIDとパスワードを使用して接続します。その後、コントロールしたいWindows PCを選択し、接続を開始します。すると、完全なリモートアクセスを取得し、どこにいても作業、ファイル管理、問題解決が可能になります。
おすすめの記事:
Microsoftのリモートデスクトップアプリは追加インストールを必要とせず、深いシステム統合と無料を提供し、特にITプロフェッショナルや企業ユーザーに実用的です。対照的に、DeskInはポートフォワードと公開IPニーズを排除し、非技術者がすぐに開始できるようにします。低速のネットワークでもリモート効率が高く、リモートサポート、トレーニング、コラボレーションシーンを単純なリモートコントロールを超えてサポートします。
以下の表でこれらのリモートデスクトップ接続ソフトウェアの詳細な比較をご覧いただき、デバイスからのWindowsへのリモートアクセスについてより多くを学ぶことができます。
機能 | DeskIn接続 | リモートデスクトップ接続 |
|---|---|---|
接続の安定性 | 非常に安定しており、高い可用性 | 弱いネットワークでの中断が発生する可能性がある |
互換性 | Windows、macOS、iOS、Androidをサポート | Windows PCのみ利用可能 |
モバイルサポート | フルモバイル/タブレットサポート | 限られたモバイル/タブレットオプション |
セットアップ | 簡単、公開IP不要 | ネットワーク構成と公開IPが必要 |
使いやすさ | インストールして簡単に接続 | システム設定とファイアウォールルールの有効化が必要 |
商業利用無料版 | はい、3台まで | 限定的であり、Windowsエディションに応じたライセンスが必要 |
DeskInはWindowsに最適な安全なリモートデスクトッププログラムです。それは3段階のセットアップとクロスプラットフォーム互換性で際立っています。DeskInはまた、公開IPや複雑なセットアップなしでのクロスネットワーク接続を容易にします。それに加え、Windows用のリモートデスクトップソフトウェアはファイル転送、ホワイトボード、音声通話などのリモート接続のための機能を提供し、多様な用途に対応します。
Windowsリモートデスクトップ接続(RDC)は本質的に安全ではありません。多くのユーザーはRDCを公共ネットワークに公開し、弱いパスワードを繰り返し使用しており、ハッカーが割って不正アクセスしやすくしています。リスクを回避し、解決策を得るためには、当社のガイドをご覧ください:
結論として、Windowsのリモートデスクトップ接続を選ぶか、DeskInのようなより高度なツールに切り替えるかによって、両方の選択肢がリモートデスクトップ体験を向上させ、より効果的かつアクセスしやすくします。
リモートデスクトップ接続が基本的なリモートアクセスに信頼性のあるソリューションである一方で、DeskInは高い安定性、デバイス間の互換性の向上、およびさまざまな使用シナリオにおいてよりシームレスな接続を提供します。ニーズに基づいて適切なツールを選択することで、よりスムーズで生産的なリモートワーク体験を楽しむことができます。
Microsoft Remote Desktop(マイクロソフト リモート デスクトップ)は素晴らしいです!なにしろ無料で、Windowsに組み込まれており、どこからでもシームレスにコンピュータにアクセスできることを約束します。しかし、ネットワークを越えて最初に接続しようとすると、そのプロセスはデジタルエスケープルームを解決するような感覚になります。IPアドレスを見つけ、ファイアウォール設定を確認します。「なぜRDCが接続しないのか!?」とか「助けて!接続エラー」といった質問が毎日Reddit上で爆発しているのも不思議ではありません。もうフラストレーションは十分です。
このガイドでは、すべてのクリック、設定を段階的に説明しながら、遭遇するかもしれない一般的な問題に対処し、RDCをWindowsで使用できない方に強力な代替策 (ネタバレ: DeskIn) を紹介します。この手順に従えば、15分以内にPCを遠隔操作できるようになります!
ご存知ですか:Microsoft RDCがWindowsアプリとして正式に登場
RDCは誰にでも適しているわけではありません。Windows Homeを使用しているユーザーや、リモートでアクセスしたいコンピュータの管理者権限を持っていないユーザーには利用できません。これらの制限を超えて、安定したインターネット接続が必要です。ですので、始める前に次のチェックリストを確認して、成功するセットアップを確保してください。
RDC使用前のクイックチェックリスト:T
ホストデバイスはWindows 10/11 Pro または Enterpriseを使用しています
両方のデバイスが接続されています - 同じLAN推奨、それ以外はVPN/公開IP
ホストPCがオンで起動しています
ファイアウォールでポート3389が開かれています
IPアドレスとログイン資格情報を知っている
「リモートデスクトップ」機能を手動でオンにする
リモートデスクトップの設定は少し複雑な場合があります。より簡単で迅速な方法はDeskInを使用することかもしれません。使いやすく、より多くのリモートアクセス機能を提供し、外観も良好です。詳細については方法3を参照してください!
システム要件を満たしていることが確認できたら、Windows 10/11でリモートデスクトップ接続を設定する手順を説明しましょう。この方法は互換性のあるWindowsエディションを使用していて、リモートデバイスへのアクセス資格情報を持っている場合に最適です。
Macを使用している場合、次のパートで特定のソリューションをご覧いただけます。プラットフォームごとの指示にスキップしても構いません。
ステップ1. ホストPCでリモートデスクトップを有効にする
はじめに、Win + Iを押して設定アプリを開きます。システム > リモートデスクトップに移動し、リモートデスクトップを有効にするをトグルして、プロンプトを確認します。
注: リモートデスクトップ接続機能にはシステム要件があります。Windows Home ユーザーの場合、有効にできないかもしれません。同様の問題に遭遇した場合、以下の記事を読んでみてください。
リモートデスクトップを有効にする方法:簡単ガイド&エラーフィックス
[究極のガイド] Windows 10/11を画面共有する2つの簡単な方法
ステップ2. ローカルデバイスでリモートデスクトップ接続を起動する
ローカルコンピュータ(Windows PC、Mac、またはその他のデバイスのいずれか)で、リモートデスクトップ接続アプリケーションを開く必要があります。Windowsの場合、「Win + R」を押して実行ダイアログを開き、「mstsc」と入力してEnterキーを押すことで行います。あるいは、スタートメニューでリモートデスクトップ接続を検索することもできます。
ステップ3. リモートコンピュータのアドレスを入力する
開いたリモートデスクトップ接続ウィンドウで、接続したいリモートPCのIPアドレスまたはコンピュータ名を入力するよう求められます。
この情報は、前のセクション(設定 > システム > About > デバイス名)に従うことでリモートPCで見つけることができます。正しい詳細を入力したら、「接続」をクリックします。
ステップ4. リモートデバイスにログインする
「接続」をクリックすると、ログインプロンプトが表示されます。ターゲットPCでリモートアクセス権限を持つアカウントのユーザー名とパスワードを入力します。これには管理者アカウントまたはアクセスを許可された任意のユーザーアカウントが含まれます。
ログインすると、リモートWindowsデスクトップがローカル画面に表示され、まるでその場に座っているかのようにPCを操作できます。
それでも複雑すぎますか?もっとシンプルな代替策が必要ですか?
安全で簡単なクロスプラットフォームのリモートコントロールを探しているなら、DeskInはエンタープライズグレードのパフォーマンスをゼロファイアウォールで提供します。PCを接続するためにわずか3つの簡単なステップが必要です。
リモートデスクトップ接続(RDC)はWindowsマシンの接続に強力なツールですが、Macにはネイティブには利用できません。これはRDCが特にWindows環境用に設計されており、Appleのオペレーティングシステムが直接サポートしていないためです。
しかし、良いニュースは、Windowsリモートデスクトッププロトコル(RDP)を介してMacに接続し続けることができることで、(。
RDPは多用途のプロトコルで、Macを含むさまざまなデバイスからWindowsマシンに接続可能です。以下は、macOSデバイスからWindowsへのリモートデスクトップ接続方法を示すステップバイステップガイドです。
ステップ1. Mac用のMicrosoft Windows Appプログラムを入手する
ローカルにインストールされているRDPクライアント(RDPが有効なWindowsコンピュータに接続できるプログラム)が必要です。持っていない場合は、Mac App StoreからWindows Appを入手することをお勧めします。インストールが完了したら、続行できます。
ステップ2. Windows Appを開く
「+」を押して、新しい接続を設定するために「デスクトップ」を選択します。
ステップ3. 接続情報を入力する
「フレンドリーネーム」フィールドに接続名を入力します。RDP経由で接続するWindowsコンピュータの完全修飾ドメイン名を指定します。「追加」を押してデスクトップ接続を追加します。
ステップ4. RDP接続を開始する
次に、ダブルクリックして接続します。ユーザー名とパスワードの入力を求められます。MCECSのユーザー名を「cecs\ユーザー名」として入力します。ユーザー名の前にある"cecs\"を忘れないでください。
Windows向けのリモートデスクトップ接続アプリを使用して2台のコンピュータを接続しようとしているが、セッションが開始されない場合は、次の解決策を試してください:
ファイアウォール設定を確認する: コントロールパネルを開き、Windows Defender ファイアウォール> ファイアウォールを通じてアプリを許可するに移動し、「リモートデスクトップ」が有効になっていることを確認します。
リモートデスクトップサービスの確認: スタートメニューで「サービス」を検索し、「リモートデスクトップサービス」を見つけ、実行していない場合は開始します。
コンピュータのIPアドレスを使用する: リモートPCでipconfigを実行してIPを取得し、そのIPをRDP接続にホスト名の代わりに使用します。
TCP/IPv6を無効にする: ネットワークと共有センター> アダプターの設定を変更するに移動し、接続を右クリックしてプロパティを開き、「インターネット プロトコル バージョン6」をオフにして、OKをクリックします。
ローカルアカウントに切り替える: 設定> アカウント> 家族とその他のユーザーに移動して新しいローカル管理者アカウントを作成し、そのアカウントで接続を試みます。
より安定した簡単なリモートデスクトップ体験をお求めなら、DeskInを試してください。スピードと使い勝手の面で、デフォルトのリモートデスクトップ接続アプリに代わる最高の選択肢になる可能性があります。従来のRDPやRDCとは異なり、DeskInは公開IPアドレスや複雑なルーター設定なしで都市や異なるネットワーク間の接続を可能にします。
このリモートデスクトップソフトウェアはシームレスなクロスプラットフォームの互換性を提供し、MacやモバイルデバイスからWindows PCを簡単に制御できます。他のコンピュータに接続する際には、ファイル転送、音声通話、ホワイトボードコラボレーションなどをサポートしており、リモートワーク、技術サポート、または遠隔学習に最適です。
日常利用のための最高のリモートデスクトッププログラムを探す際や、プロフェッショナルな機能を備えた無料のリモートデスクトップソフトウェアをお探しの場合、DeskInは接続を簡単、安全、かつ迅速にします — わずか3分以内で利用可能です。
高い安定性と超低遅延: 200以上のグローバルアクセラレーションノードを持つDeskInは、大陸を越えても安定した高速リモート接続を保証します。弱いネットワークでしばしばラグを発生させるリモートデスクトップ接続とは異なり、DeskInはあらゆる環境で操作をスムーズかつ反応的に保ちます。
公開IPや複雑なセットアップは不要: ポートフォワードやVPN、公開IPアドレスを忘れてください。DeskInはすべてを単純化します:ただアプリをインストールし、ログインしてPCを制御するだけで、技術的な障壁はありません。
パソコン、モバイル、タブレットからいつでもアクセス可能: DeskInはWindows、macOS、iOS、Androidに対応し、どのデバイスからもフルコントロールを可能にします。リモートデスクトップ接続と比べて、DeskInのモバイルアクセスはより高速で簡単で、追加の設定は不要です。
商業利用も無料: DeskInの無料プランでは、3台までのデバイスをリモート制御でき、ビジネスニーズにも対応 — 使用するWindowsエディションに依存して追加のライセンスを必要とするかもしれないリモートデスクトップに対し、大きな利点です。
あらゆるシナリオに最適: リモートワーク、ゲーム、クライアントサポート、またはファイル転送など、DeskInは容易に適応します。自動解像度調整、セッションの再接続、強力な暗号化による安全なアクセスなど、インテリジェントな機能を提供します。
どこからでも3分以内にPCを完全にコントロールしたいですか?DeskInは、それを簡単にし、初めてのユーザーでも簡単に利用できます。こちらがDeskInを使用したコンピュータへのリモート接続方法です:
ステップ1. まず、DeskInの公式ウェブサイトにアクセスし、デバイスに適したバージョンをダウンロードします — Windows、macOS、iOS、Androidのいずれでもかまいません。ダウンロード後、画面上の指示に従ってアプリをインストールします。
ステップ2. インストール後、DeskInアプリケーションを開きます。すでにアカウントを持っている場合は、資格情報でログインします。新しいユーザーの場合、数分でアカウントをすばやく作成できます — 完全に無料です。
ステップ3. ログイン後、ターゲットPCのデバイスIDとパスワードを使用して接続します。その後、コントロールしたいWindows PCを選択し、接続を開始します。すると、完全なリモートアクセスを取得し、どこにいても作業、ファイル管理、問題解決が可能になります。
おすすめの記事:
Microsoftのリモートデスクトップアプリは追加インストールを必要とせず、深いシステム統合と無料を提供し、特にITプロフェッショナルや企業ユーザーに実用的です。対照的に、DeskInはポートフォワードと公開IPニーズを排除し、非技術者がすぐに開始できるようにします。低速のネットワークでもリモート効率が高く、リモートサポート、トレーニング、コラボレーションシーンを単純なリモートコントロールを超えてサポートします。
以下の表でこれらのリモートデスクトップ接続ソフトウェアの詳細な比較をご覧いただき、デバイスからのWindowsへのリモートアクセスについてより多くを学ぶことができます。
機能 | DeskIn接続 | リモートデスクトップ接続 |
|---|---|---|
接続の安定性 | 非常に安定しており、高い可用性 | 弱いネットワークでの中断が発生する可能性がある |
互換性 | Windows、macOS、iOS、Androidをサポート | Windows PCのみ利用可能 |
モバイルサポート | フルモバイル/タブレットサポート | 限られたモバイル/タブレットオプション |
セットアップ | 簡単、公開IP不要 | ネットワーク構成と公開IPが必要 |
使いやすさ | インストールして簡単に接続 | システム設定とファイアウォールルールの有効化が必要 |
商業利用無料版 | はい、3台まで | 限定的であり、Windowsエディションに応じたライセンスが必要 |
DeskInはWindowsに最適な安全なリモートデスクトッププログラムです。それは3段階のセットアップとクロスプラットフォーム互換性で際立っています。DeskInはまた、公開IPや複雑なセットアップなしでのクロスネットワーク接続を容易にします。それに加え、Windows用のリモートデスクトップソフトウェアはファイル転送、ホワイトボード、音声通話などのリモート接続のための機能を提供し、多様な用途に対応します。
Windowsリモートデスクトップ接続(RDC)は本質的に安全ではありません。多くのユーザーはRDCを公共ネットワークに公開し、弱いパスワードを繰り返し使用しており、ハッカーが割って不正アクセスしやすくしています。リスクを回避し、解決策を得るためには、当社のガイドをご覧ください:
結論として、Windowsのリモートデスクトップ接続を選ぶか、DeskInのようなより高度なツールに切り替えるかによって、両方の選択肢がリモートデスクトップ体験を向上させ、より効果的かつアクセスしやすくします。
リモートデスクトップ接続が基本的なリモートアクセスに信頼性のあるソリューションである一方で、DeskInは高い安定性、デバイス間の互換性の向上、およびさまざまな使用シナリオにおいてよりシームレスな接続を提供します。ニーズに基づいて適切なツールを選択することで、よりスムーズで生産的なリモートワーク体験を楽しむことができます。


WindowsとMacコンピュータをiPadでセカンドモニターに!
マルチタスクをこなすにとっ社員にとって、セカンドモニターを使用することは生産性を大幅に向上させることができます。ホームオフィスの方やデュアルスクリーンを持っていない学生の方へ。使用していないiPadを簡単にコンピュータのセカンドモニターに変える方法をご紹介します。
1. 画面スペースを増やして同時により多く表示できます。マルチタスクユーザーは、ウィンドウの切り替えを避けることで時間を節約できます。
2. 各画面が独立して動作するため、作業スペースがより整理されます。
ビデオ編集では、一つの画面を編集に、もう一つの画面を素材置き場に。論文を書く場合、片方の画面で執筆、もう片方で情報を検索などです。
3. iPadの画面サイズは十分大きく、表示品質も非常に良好です。デザイン作業のニーズがあるユーザーやMacBookユーザーにとって、追加のスクリーンを購入するよりもコスト効率が高く、色差の問題もありません。
4. 多くの人が家にiPadを持っています。この手持ちのデバイスをデュアルスクリーンとして使用することで、別のスクリーンを購入するコストや置くスペースを節約できます。
Appleのネイティブ機能であるApple Sidecarを使用すると、iPadをMacBookやiMacの外部ディスプレイとして使用できます。簡単な設定を行うだけで、iPadとコンピュータ間のシームレスな接続が可能です。
注意:Apple Sidecarを使用するには、2台のデバイスが同じApple IDにログインしているか、同じネットワークに接続していることが必要です。両方のデバイスにBluetooth、Wi-Fiがオンになっており、距離は10メートル以内である必要があります。
Macシステム設定を開き、サイドバーの「ディスプレイ」クリック >> 右側の「+」ポップアップメニューをクリックし、iPadを選択します。
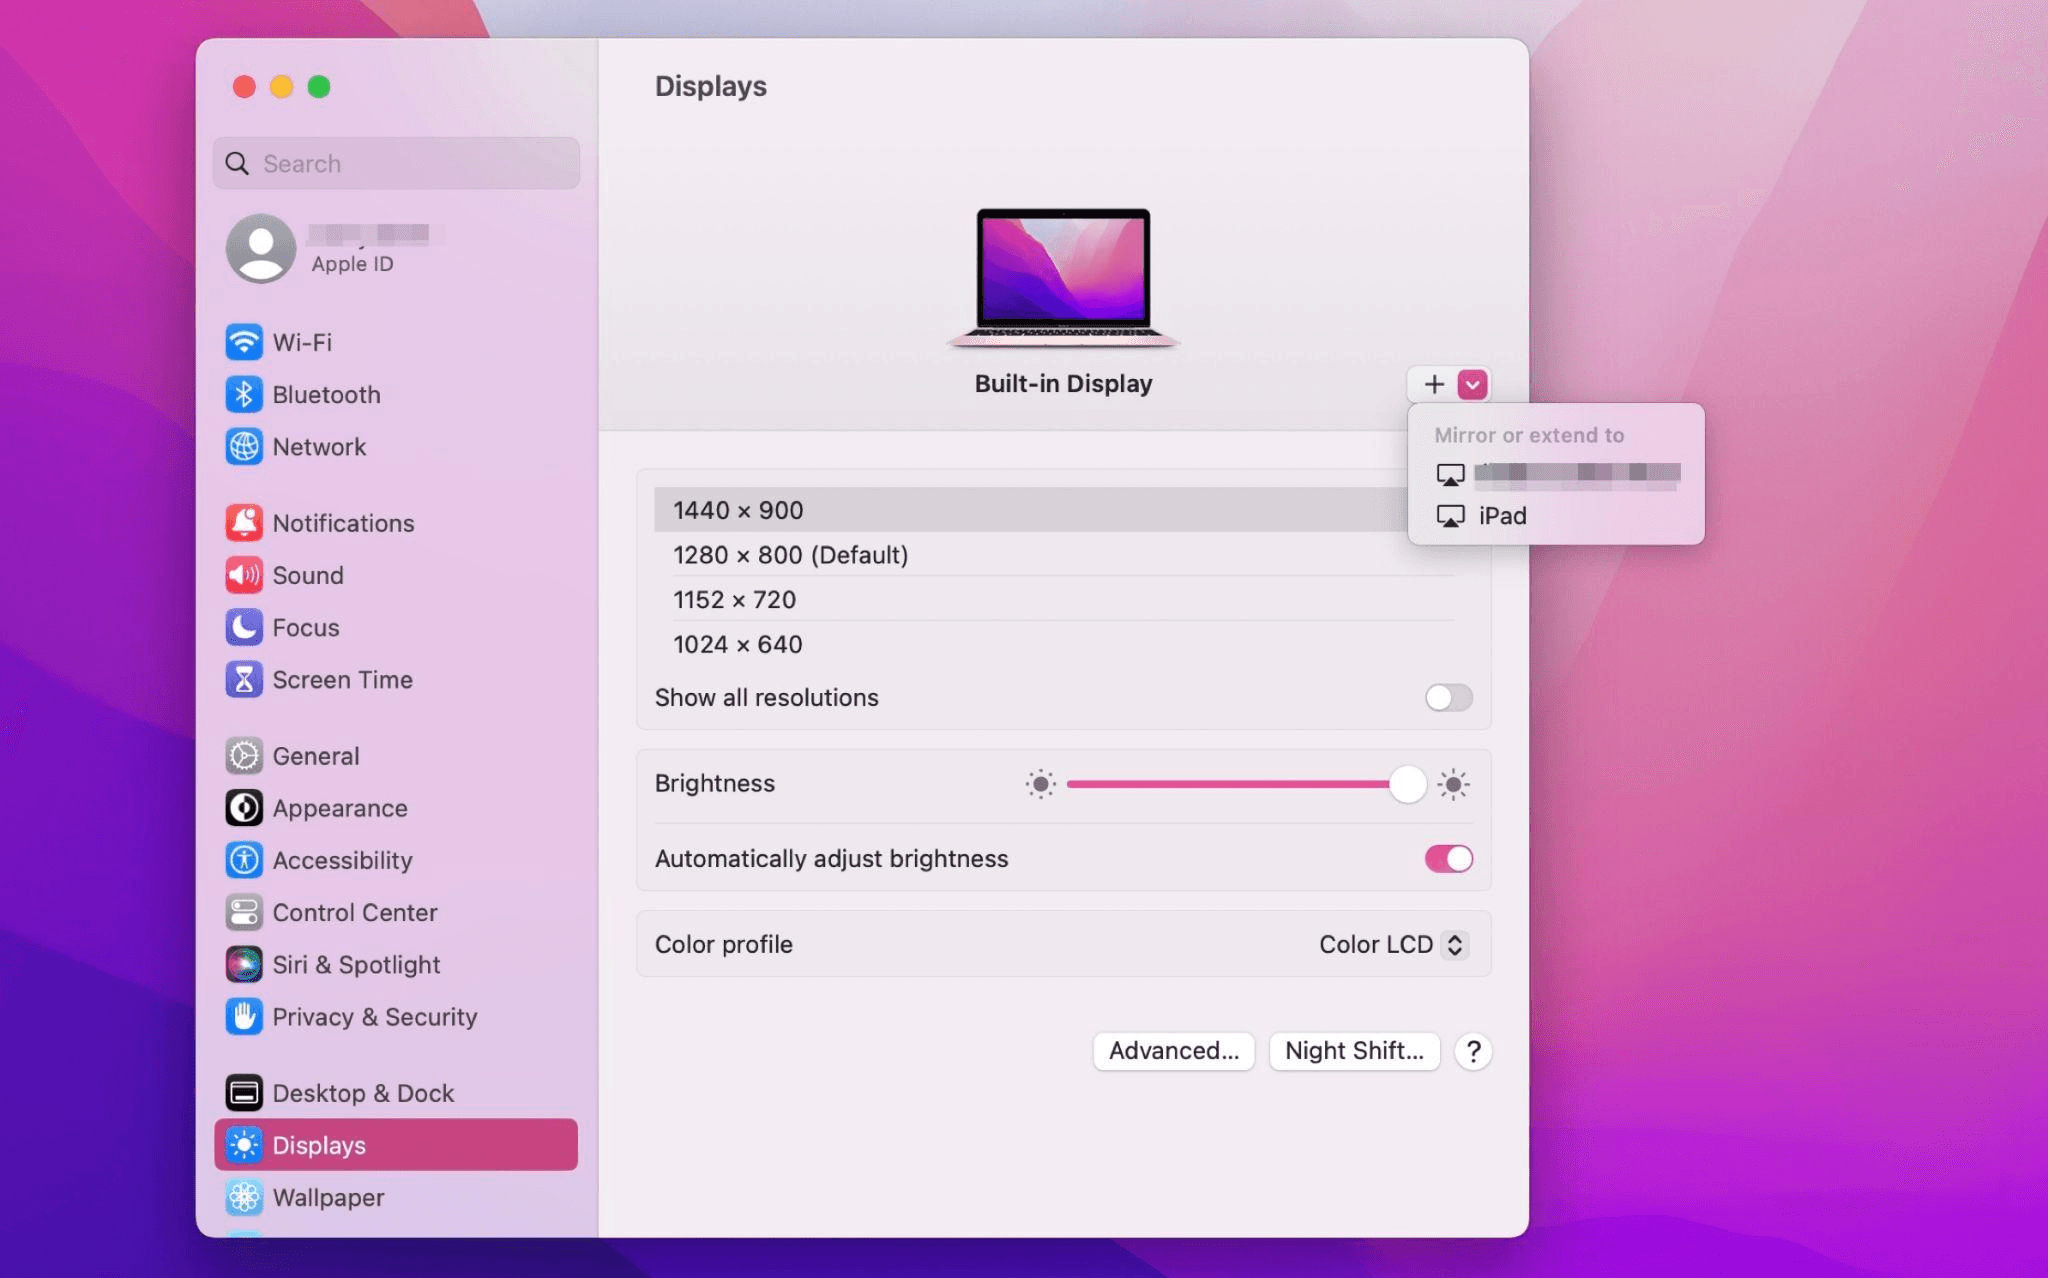
iPadを選択し、使用設定を「拡張ディスプレイ」に変更します。Macの上部ツールバーのAirplay設定を確認し、iPadを「別のディスプレイとして使用」に設定します。
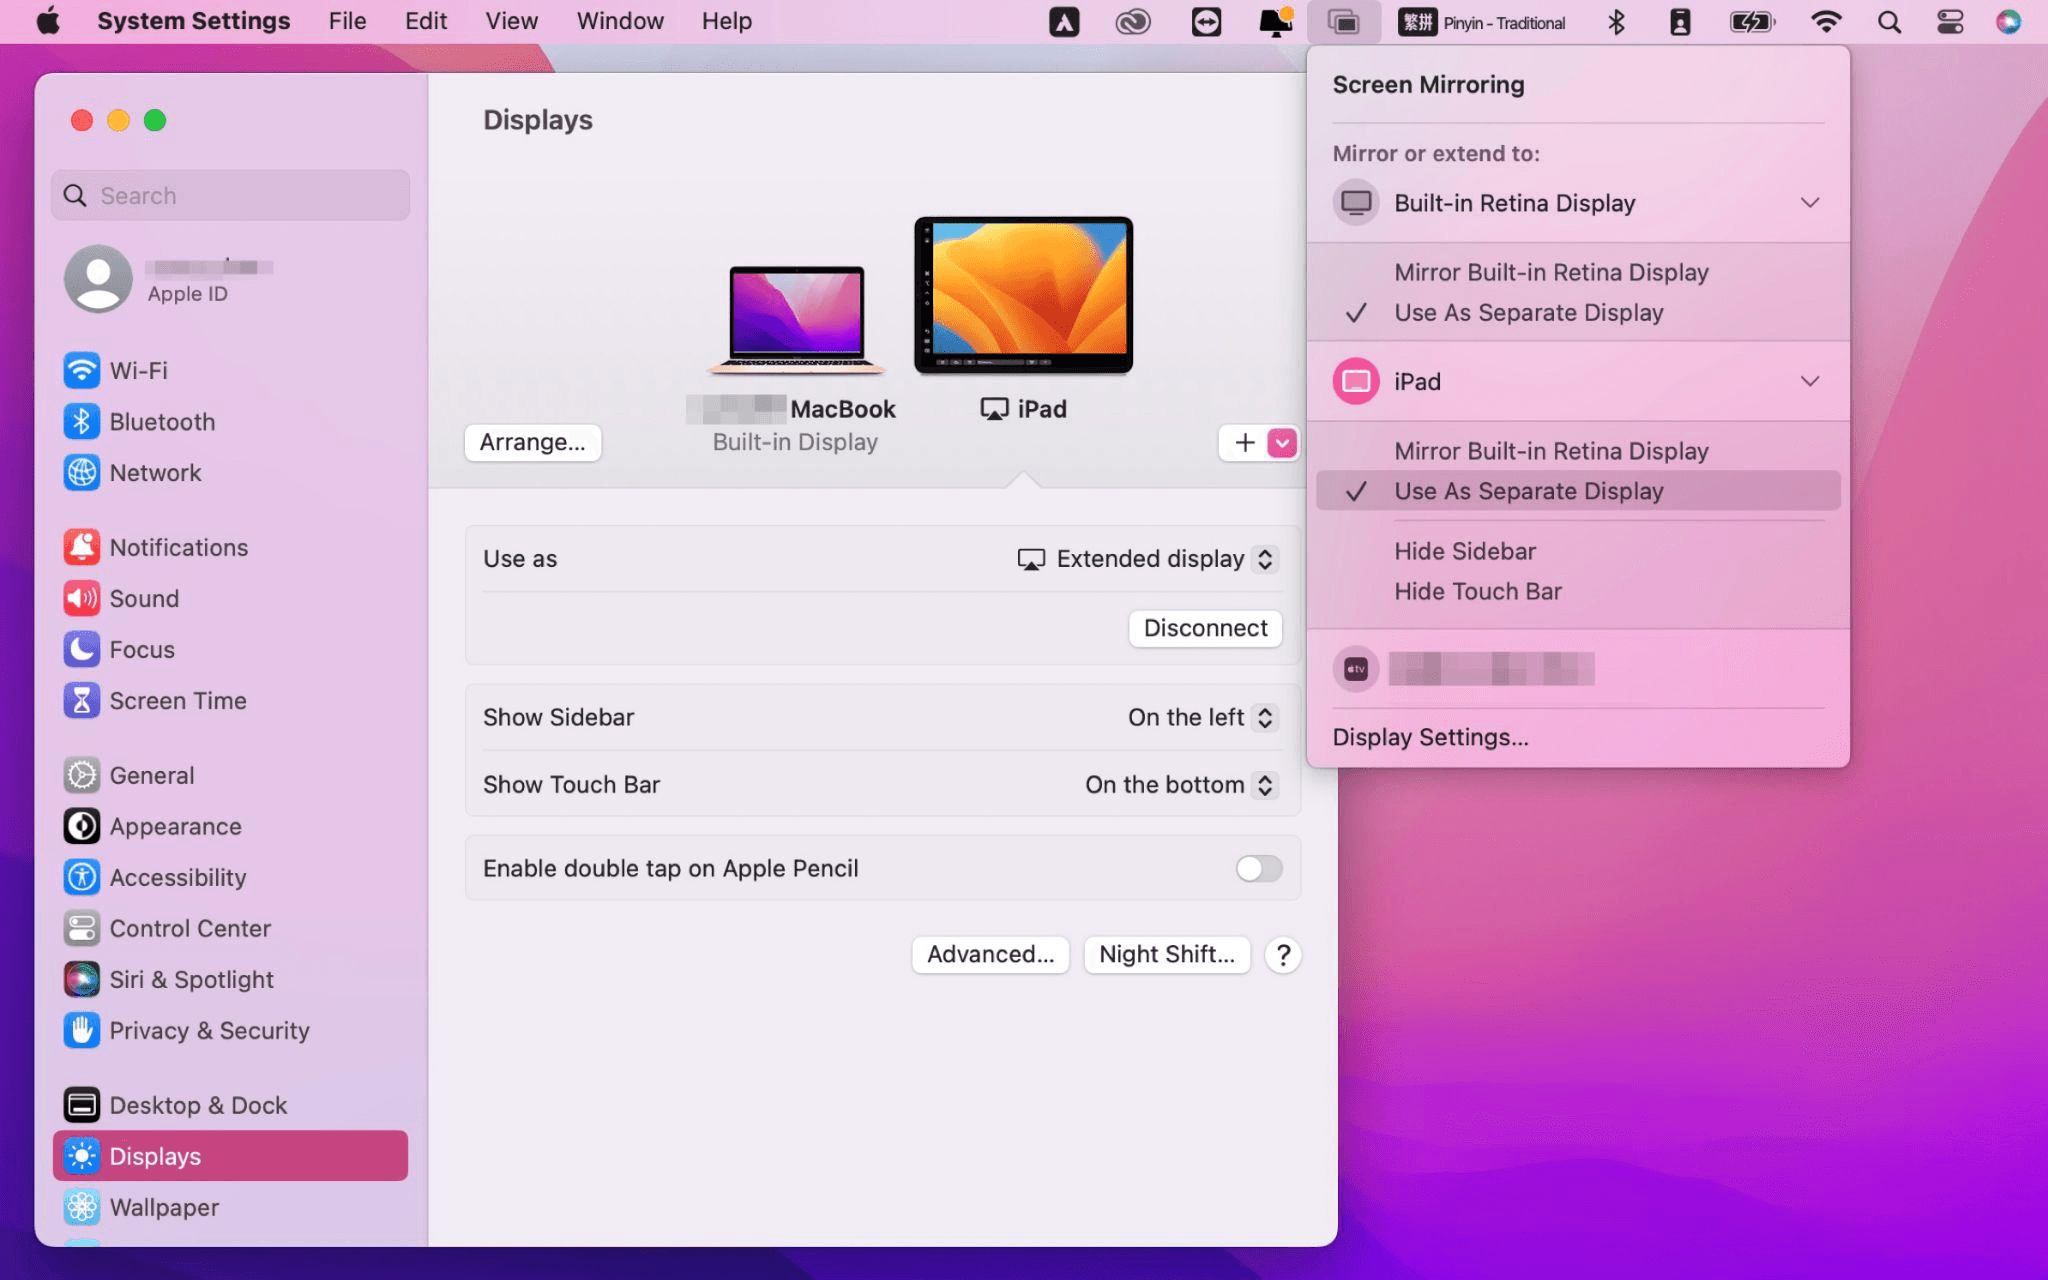
設定が完了すると、iPadがMacのセカンドディスプレイとなります。MacからiPadにウィンドウをスムーズにドラッグすることができます。また、iPadのサイドバーを使用したり、システムディスプレイ設定でサイドバーの位置を変更したりできます。
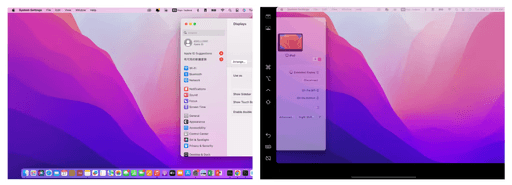
MacBookスクリーン(左)とiPadスクリーン(右)
Apple Sidecarは、2016年以降に発売されたMacとiPadOS13以上のみをサポートします。古いAppleデバイスやWindowsデバイスを使用している場合でも、DeskInリモートソフトウェアを利用して画面拡張を行うことができます。iPadをMacやWindowsのセカンドディスプレイとして使用でき、その滑らかさはSidecarに劣りません。
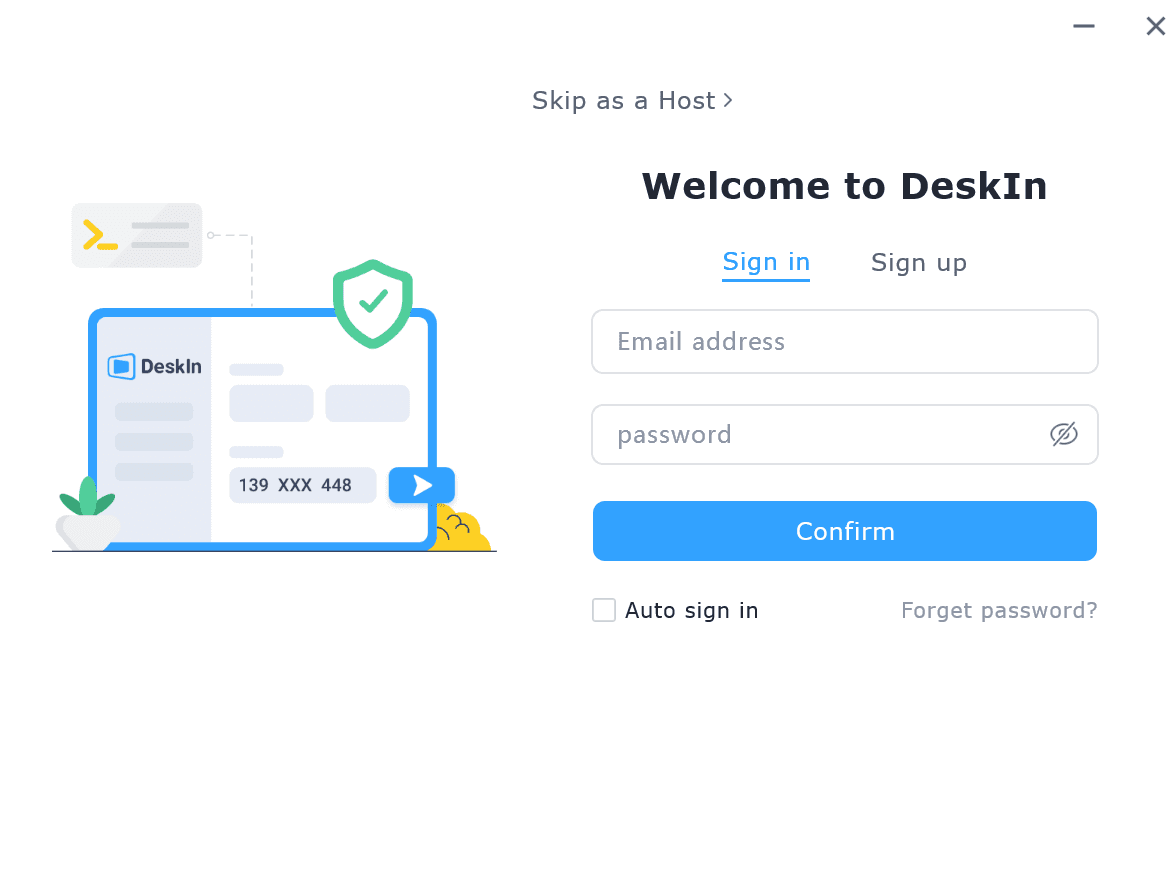
コンピューターとiPadにDeskInをダウンロードし、無料アカウントを登録して別々にログインします。
注意: 新しいデバイスに初めてログインする際には、アカウントのセキュリティを保護するためにメール認証を完了する必要があります。
Windows/MacコンピュータでDeskInアプリを開き、「スクリーン管理」タブに行き、「画面を拡張する」をクリックします。
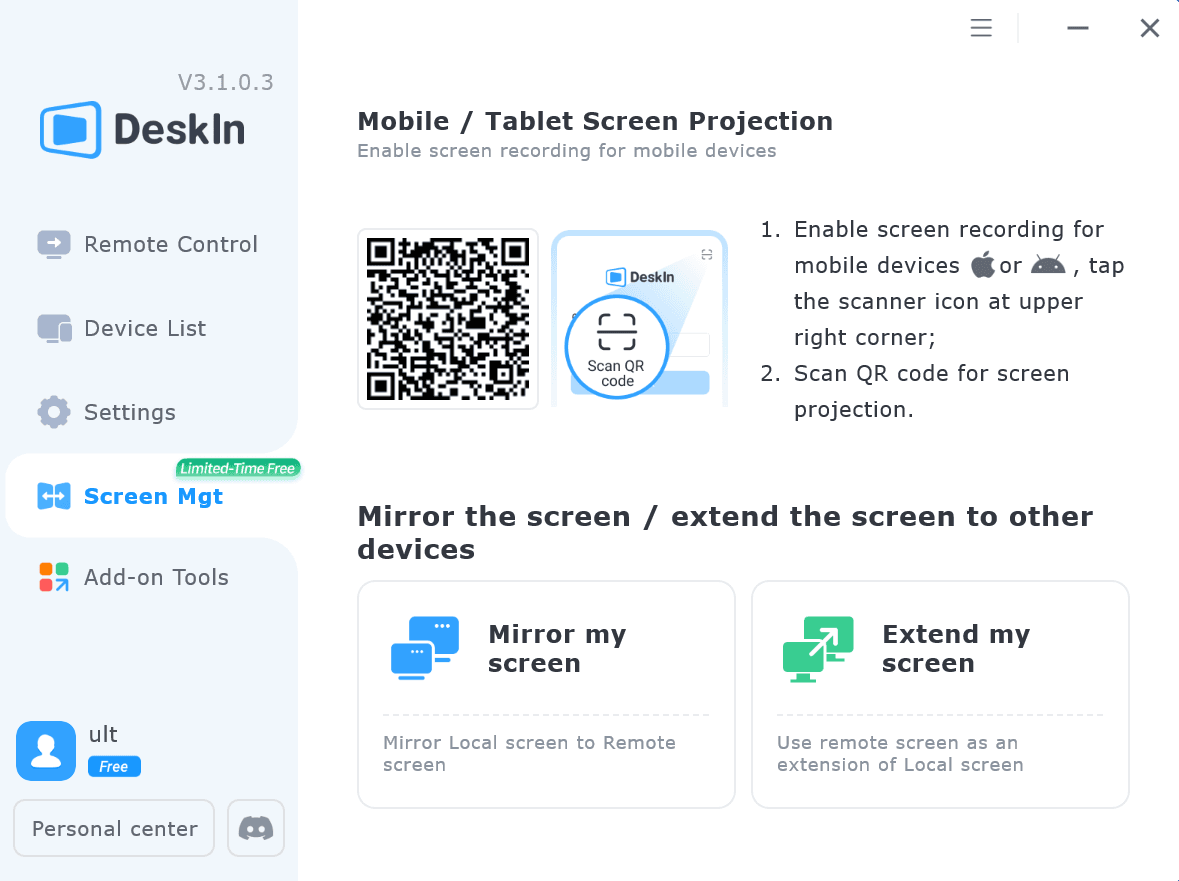
iPadを選択し、「拡張を開始」をクリックします。接続が完了すると、iPadはWindows/Macコンピューターのセカンドディスプレイとなり、2つのスクリーンを1つのもののようにウィンドウを移動できます。
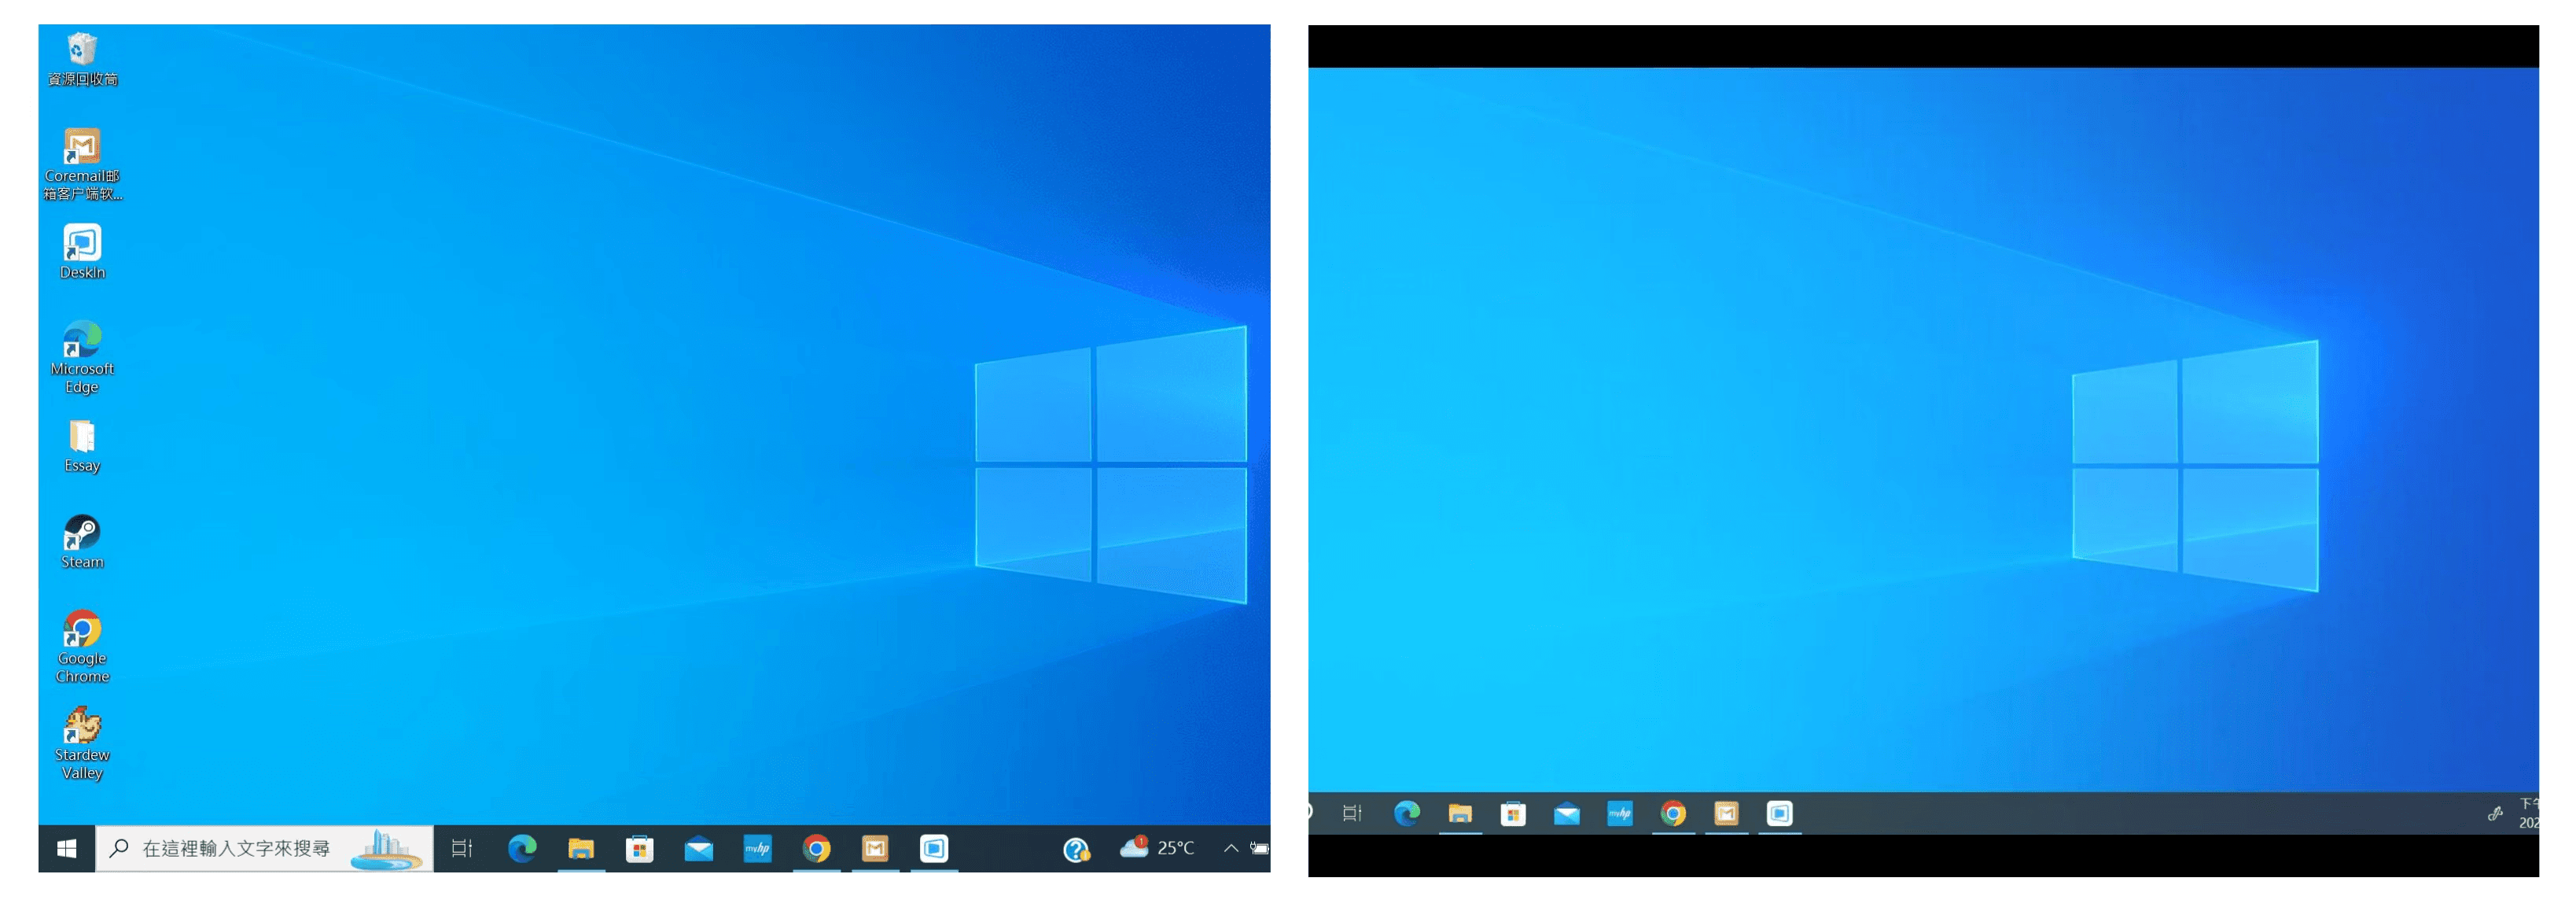
コンピュータスクリーン(左)とiPadスクリーン(右)
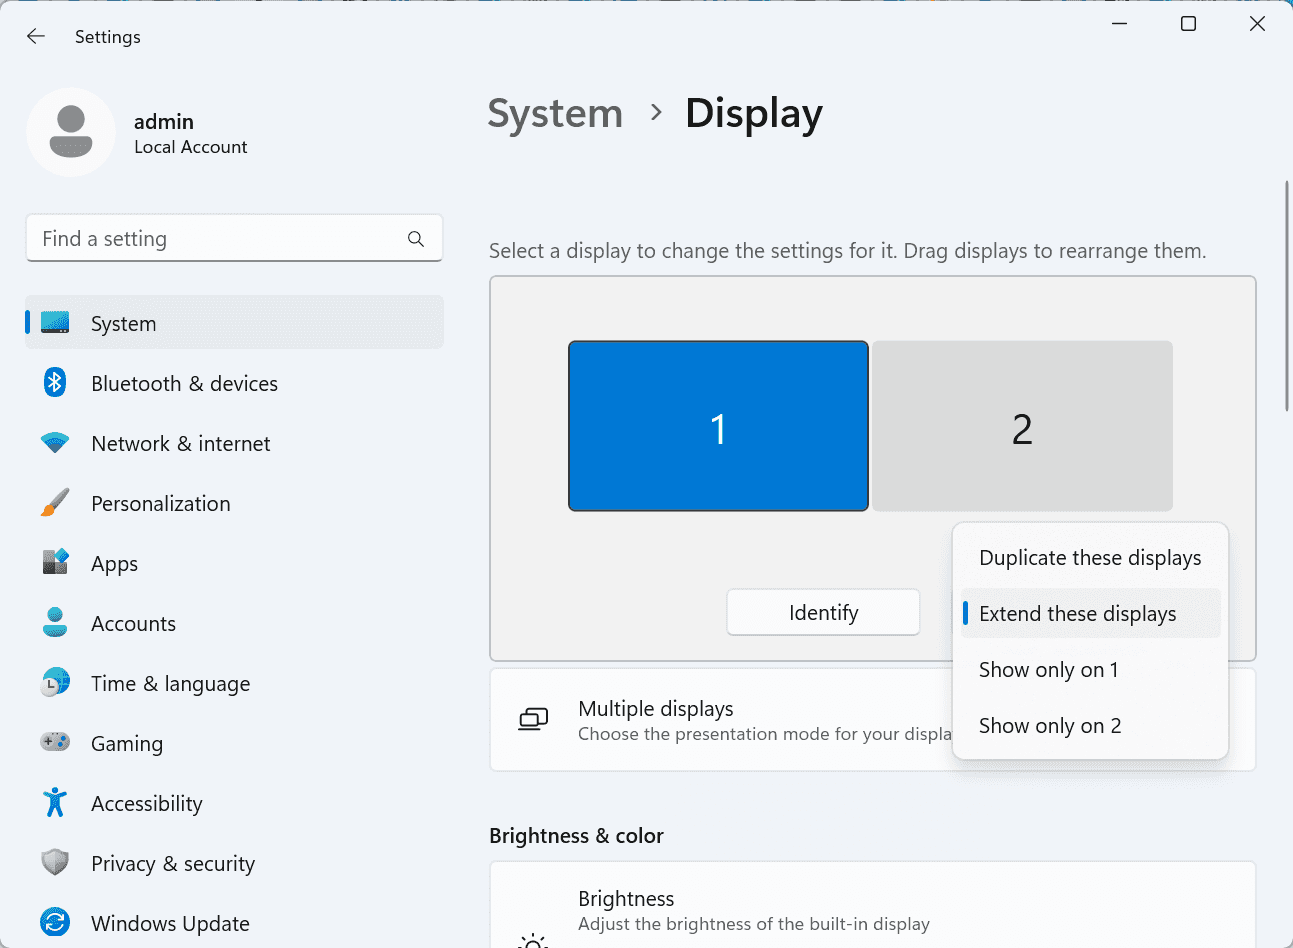
拡張後、iPadがコンピュータ画面の内容をミラーリングしているだけの場合はWindowsシステム設定 >>ディスプレイ設定に行き、「これらのディスプレイを拡張」を選択してください。2つの画面をドラッグして画面の位置を変更することもできます。
この記事では、DeskInリモートデスクトップソフトウェアを使用してiPadをMacおよびWindowsコンピューターの「セカンドスクリーン」にする方法を紹介します。これは、同時に複数のタスクを処理し、生産性を向上させたい方に特に有用です。MacBook、iPad、Androidタブレット、およびWindows PCで動作する画面拡張ツールを探している場合、DeskInリモートデスクトップは最適なソリューションです。DeskInをダウンロードして、ぜひお試しください!

Top 6 RustDesk Alternative Tools for Faster, Easier Remote Access
Remote access should feel like flipping a light switch, not decoding a control panel. Yet many users exploring RustDesk eventually run into friction: connection IDs, server setup, or occasional lag. While RustDesk is powerful, it’s not always the easiest or smoothest option, especially for non-technical users.
That’s why more people are actively searching for a reliable RustDesk alternative that combines performance, simplicity, and flexibility. Whether you want a plug-and-play solution or something more advanced, this guide will help you find the best fit.
RustDesk stands out as a privacy-friendly, self-hosted remote desktop tool. However, real-world usage reveals a few common challenges:
Complicated setup for the RustDesk self-hosted environments
Manual connection steps requiring IDs and passwords
Occasional latency or unstable connections
Limited user-friendly features out of the box
For many users, especially those helping family or managing multiple devices, simplicity matters just as much as control.
When evaluating a RustDesk alternative, focus on these key factors:
Ease of use: Quick setup without technical overhead
Performance: Smooth, low-latency remote sessions
Compatibility: Support for Windows, macOS, Linux, and mobile
Security: Strong encryption and access controls
Flexibility: Options ranging from cloud-based to open source
The ideal tool strikes a balance between power and convenience, something many modern solutions now deliver better than traditional setups.
Here’s a quick breakdown of the top tools and where they shine:
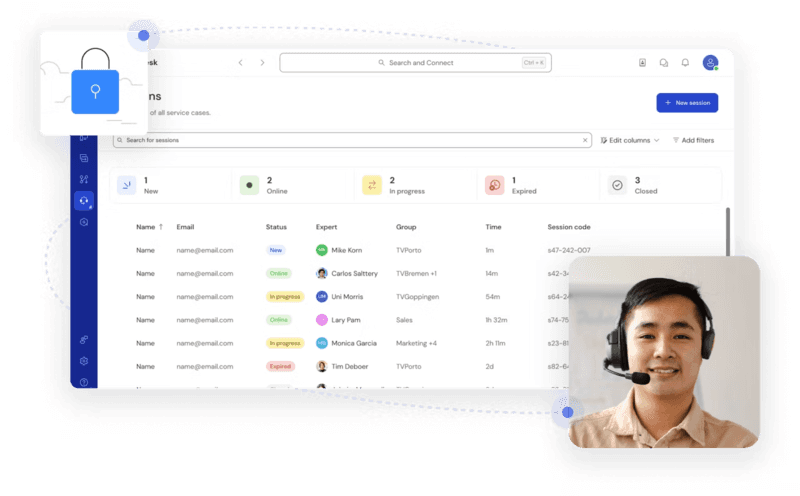
DeskIn – Best all-in-one RustDesk alternative for performance and ease of use
AnyDesk – Best lightweight tool for fast connections
TeamViewer – Best for enterprise-grade remote support
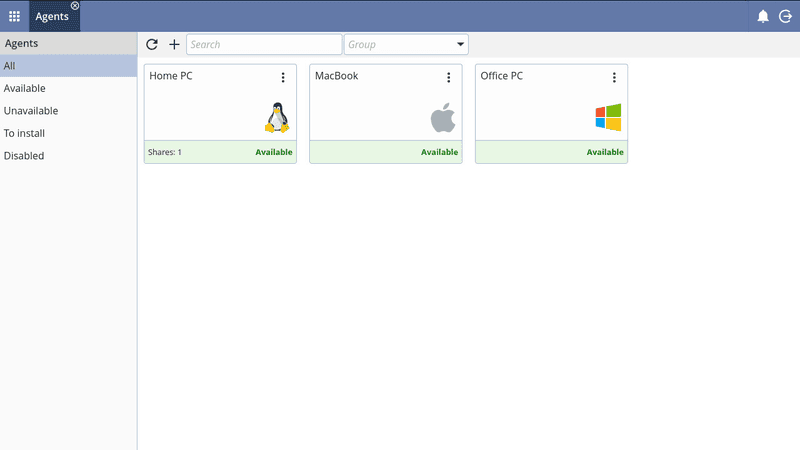
MeshCentral – Best open-source and self-hosted solution
DWService – Best free browser-based tool
Chrome Remote Desktop – Best simple, no-frills option
Ultra-low latency with smooth high-frame-rate streaming
No complex setup or server deployment required
Cross-platform including Rustdesk alternative for Android
Secure with encryption and device control features
Built-in file transfer and multi-device management
Smaller awareness than legacy competitors
Best for: Users who want a powerful yet simple remote desktop solution
DeskIn removes the friction that often comes with remote access tools. Instead of relying on IDs or manual configurations, it offers a streamlined connection experience that works right out of the box. This makes it especially valuable for users supporting non-technical family members or managing multiple remote devices.
Performance is where DeskIn truly distinguishes itself. Compared to RustDesk, which can sometimes struggle with latency, DeskIn delivers consistently smooth sessions with minimal lag. It also eliminates the need for self-hosting, making it a strong free RustDesk alternative option for users who want powerful features without the complexity.
For those exploring options beyond the RustDesk alternative GitHub projects, DeskIn provides a polished, ready-to-use experience that balances simplicity with professional-grade performance.
Lightweight and fast installation
Good performance on low bandwidth
Cross-platform support
Easy-to-use interface
Performance may drop during long sessions
File transfer can be inconsistent
Best for: Users needing quick and simple remote access
AnyDesk is often considered a natural step up from RustDesk for users who want something easier to deploy. It offers a lightweight application that connects quickly and performs well under normal conditions. This makes it suitable for quick troubleshooting or occasional remote access.
However, performance consistency can be an issue. Users frequently report lag or instability during extended sessions or when handling more demanding tasks. While AnyDesk is a solid option for basic needs, it may not fully satisfy users looking for a more robust, all-in-one solution.
👀 You may also be interested in: |
|---|
Enterprise-grade security with encryption and 2FA
Stable performance across global networks
Rich features like file transfer and session recording
Broad device compatibility
Expensive for commercial use
Free version has limitations
Heavier resource usage on some systems
Best for: Businesses and IT teams managing multiple endpoints
TeamViewer has long been a dominant player in the remote desktop space, offering a comprehensive suite of features designed for enterprise environments. It excels in reliability and global connectivity, making it a popular choice for IT support teams.
That said, its pricing model is a major drawback for many users. Frequent users may quickly encounter licensing restrictions, and costs can escalate for businesses. Additionally, its heavier footprint can impact performance on lower-end devices. DeskIn offers a more modern alternative by delivering similar performance and essential features without the same cost barriers. For users who want enterprise-level capabilities with better efficiency, it presents a compelling option.
👀 You may also be interested in: |
|---|
Fully RustDesk alternative open source solution
Web-based management dashboard
Supports multi-device environments
Strong customization and control
Complex setup and maintenance
Requires technical expertise
Best for: Advanced users needing a Rustdesk alternative self-hosted
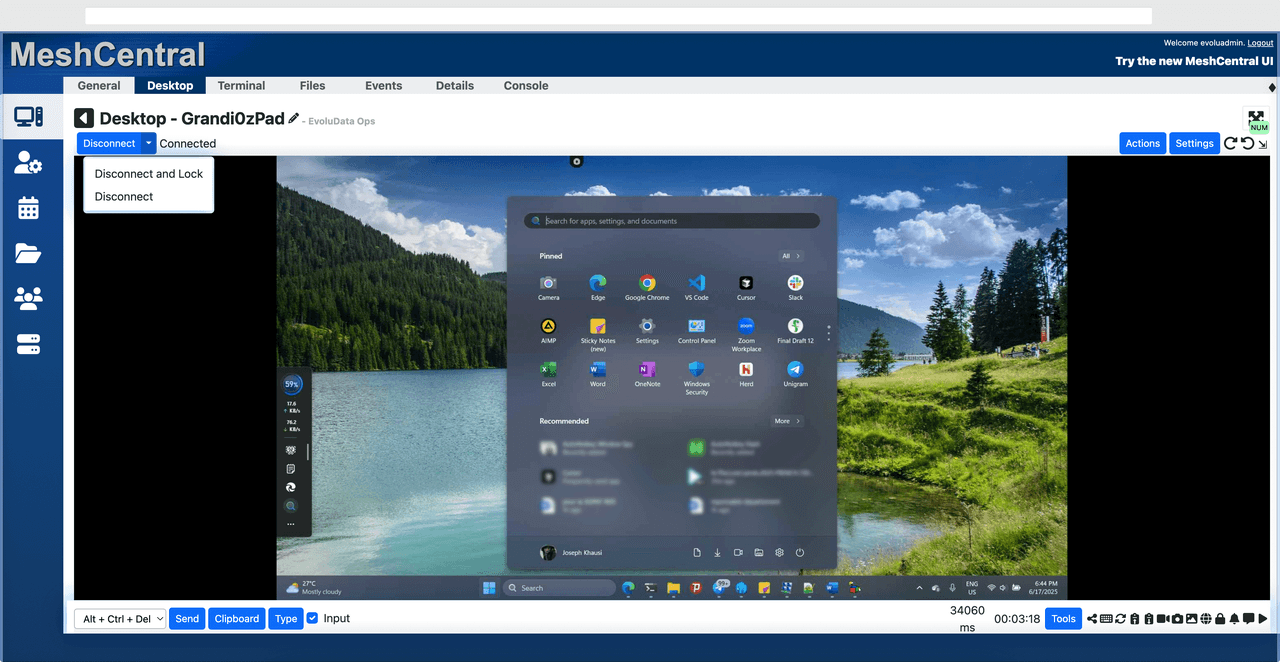
MeshCentral is a powerful open-source platform designed for users who want full control over their remote access infrastructure. It supports multiple devices and provides a centralized dashboard for management, making it attractive for IT professionals.
However, this flexibility comes with complexity. Setting up and maintaining a MeshCentral server requires technical knowledge, which can be a barrier for many users. Compared to this, DeskIn offers a much simpler deployment process while still delivering strong performance and security. For users who prioritize ease of use over full control, modern solutions like DeskIn provide a more accessible alternative.
Completely free
Browser-based access
Open-source foundation
Simple setup
Limited performance
Basic feature set
Best for: Users looking for a simple, free RustDesk alternative
DWService offers a browser-based approach to remote access with no heavy installation, making it convenient for quick connections in restricted environments. It supports both desktop access and file management across major platforms.
However, performance often feels sluggish, especially on demanding tasks, and features remain basic; lacking session recording, smooth multi-monitor support, or advanced security controls. While suitable for occasional personal use, it falls short for professional or high-performance scenarios.
Free and easy to use
Browser-based setup
Cross-platform compatibility
Very limited features
No advanced management or collaboration tools
Best for: Casual users needing basic remote access

Chrome Remote Desktop is one of the simplest remote access tools available. It’s easy to set up and works across devices, making it a convenient choice for occasional use.
However, it lacks many essential features such as file transfer, session management, and advanced security controls. For users with more demanding needs, it quickly becomes insufficient. Compared to Chrome Remote Desktop, DeskIn provides a much more complete experience without sacrificing ease of use, making it a better long-term solution.
👀 You may also be interested in: |
|---|
RustDesk is powerful but can be difficult to set up and manage, especially with self-hosting. Many users prefer tools that offer similar performance without technical complexity. DeskIn simplifies remote access while maintaining strong performance and security.
Several tools qualify as a free RustDesk alternative, including DWService and Chrome Remote Desktop. However, DeskIn stands out by offering better performance and usability even in its free version.
Yes, tools like MeshCentral and DWService are considered RustDesk alternative open source options. They provide flexibility and control but often require technical expertise to set up and maintain.
Beginners should choose tools with a simple setup and intuitive interfaces. DeskIn is an excellent option because it removes the need for manual configuration while still delivering advanced features.
RustDesk is a powerful starting point, but it’s not always the easiest or most efficient tool for everyday use. From setup complexity to performance limitations, many users eventually look for a better RustDesk alternative.
Among all the options, DeskIn stands out as the most balanced solution. It combines speed, simplicity, and cross-platform support into one seamless experience. If you’re ready to move beyond technical friction and enjoy truly smooth remote access, DeskIn is a choice that simply works.

Top 7 RDP Alternative Tools for Faster, Safer Remote Access
Remote desktop access used to feel like a solid bridge. Now, for many users, traditional RDP feels more like a creaky rope ladder. With performance issues, security concerns, and limited cross-platform support, it's no surprise that more people are actively searching for a better RDP alternative that actually keeps up with modern workflows.
If you're managing multiple servers, working across devices, or just tired of unstable connections, this guide will walk you through the best tools worth switching to.
RDP (Remote Desktop Protocol) is a proprietary protocol developed by Microsoft that allows users to connect to another computer over a network. It's widely used for accessing Windows servers, virtual machines, and remote workstations.
While powerful in controlled environments, RDP is often tied to Windows systems and requires configuration like port forwarding or VPNs. Compared to newer tools, it can feel rigid and outdated.
You may also be interested in: |
|---|
RDP still works, but it comes with trade-offs that many users find frustrating:
Security risks if not properly configured
Complex setup for remote or external access
Limited cross-platform compatibility
Performance issues over unstable networks
Many IT teams are now actively replacing it, especially when looking for a Windows RDP client alternative or something that works seamlessly across macOS, Linux, and mobile devices. That's where modern Remote Desktop alternatives shine.
Choosing the right tool is like picking the right vehicle. Some are built for speed, others for heavy-duty enterprise work. Here's a quick snapshot:
DeskIn – Best all-in-one RDP alternative for performance and cross-platform use
TeamViewer – Best for enterprise remote support
AnyDesk – Best lightweight option for fast connections
RustDesk – Best Windows RDP alternative open-source solution
Remmina – Best RDP alternative for Linux users
Chrome Remote Desktop – Best simple browser-based tool
Splashtop – Best for high-performance business environments
Ultra-low latency with smooth high-frame-rate streaming
Works across Windows, macOS, Linux, iOS, and Android
Strong encryption and secure access controls
Built-in file transfer and multi-session support
Newer compared to legacy brands
Best for: Users who want a powerful, flexible RDP alternative

DeskIn feels less like remote access and more like teleportation for your desktop. Whether you're managing servers, supporting clients, or working remotely, it delivers consistently smooth performance without the usual lag spikes seen in traditional RDP setups.
Unlike many tools, DeskIn eliminates the need for complex configurations. You don't need to wrestle with firewalls or VPNs just to connect. It also works seamlessly across platforms, making it a strong alternative to Microsoft Remote Desktop for Mac and mobile users alike.
For teams juggling multiple systems, DeskIn provides a unified experience that replaces fragmented workflows. It's also a strong free RDP alternative option with premium-level capabilities, making it ideal for both individuals and businesses.
Enterprise-grade security and compliance
Extensive feature set including collaboration tools
Cross-platform compatibility
Reliable global performance
Expensive licensing
Can be overkill for individuals
Best for: Enterprises needing secure and scalable remote access
TeamViewer is a comprehensive remote desktop platform widely adopted by IT teams, support professionals, and enterprises. Its feature set extends far beyond simple screen sharing—it includes robust device management, remote printing, file transfer, session recording, and even augmented reality support for field service. TeamViewer's security architecture relies on AES‑256 encryption, two‑factor authentication, and whitelisting, making it suitable for organizations with strict compliance requirements. It runs on virtually every operating system and mobile platform.
The main trade‑off is its pricing: licenses are subscription‑based and can become expensive for small teams or individual users, especially as TeamViewer aggressively flags personal use as commercial, leading to session restrictions.
Fast and responsive
Lightweight installation
Works well on low bandwidth
Easy to use
File transfer can be inconsistent
Lag during longer sessions
Best for: Users needing quick, simple remote access
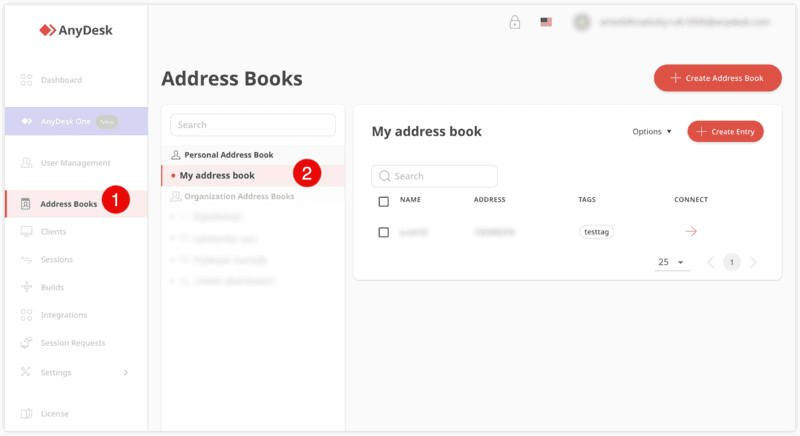
AnyDesk is a lightweight remote desktop application prized for its speed and efficiency, often recommended as a fast alternative to Microsoft's native Remote Desktop on Windows 10 and Android. It uses a proprietary video codec, DeskRT, to achieve low latency even on limited bandwidth, making it ideal for quick support sessions and accessing devices over mobile networks. The interface is clean and minimalist, with features like address book management, file transfer, and session recording available.
However, users frequently report instability during extended sessions; performance can degrade over time, and file transfers may slow considerably compared to competitors. While its free version is generous for personal use, professional users often find the performance ceiling limits its suitability for continuous, demanding workloads. DeskIn, by contrast, maintains consistent performance even during extended use, making it better suited for professional workloads.
You may also be interested in: |
|---|
Free and open-source
Self-hosting for full control
Strong privacy protection
Active community
Technical setup required
Limited user-friendly features
Best for: Developers and privacy-focused users
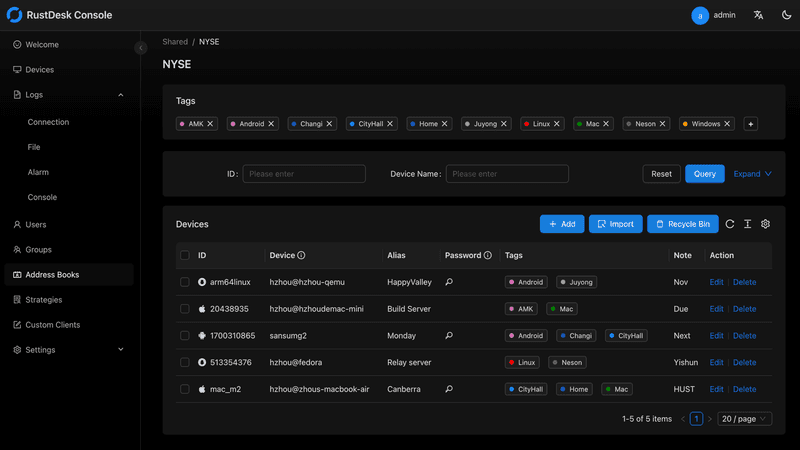
RustDesk has emerged as a leading open‑source remote desktop alternative, appealing to developers and organizations that require full control over their data. It allows users to self‑host the relay and rendezvous servers, meaning no third‑party infrastructure handles connection metadata. Built with Rust, it offers a modern codebase with cross‑platform clients (Windows, macOS, Linux, Android, iOS) and supports essential features such as file transfer, TCP tunneling, and customizable address books.
The major barrier is its complexity: deploying a self‑hosted environment requires technical expertise to configure firewalls, SSL certificates, and ongoing server maintenance. For those using the public relay, performance can be inconsistent depending on server load and geographic proximity.
You may also be interested in: Top RustDesk Alternatives for Better Performance, Security & Ease of Use |
|---|
Open-source and free
Supports multiple protocols including RDP and VNC
Lightweight and flexible
Native to Linux environments
Limited features compared to modern tools
UI can feel outdated
Best for: Linux users looking for a traditional RDP alternative Linux
Remmina is a beloved open‑source remote desktop client for Linux, supporting multiple protocols (RDP, VNC, SSH, SPICE, and others) in a single unified interface. It is frequently chosen by system administrators and Linux enthusiasts who need a flexible, lightweight tool to manage diverse environments. Remmina offers tabbed sessions, quick‑connect profiles, and a plugin system that extends its capabilities.
However, its strength - protocol flexibility, also highlights its limitations. As a frontend client rather than a full remote access solution, it lacks features like unattended access, centralized account management, or robust session recording out of the box. Performance can vary by protocol, and the user experience lags behind more polished commercial tools, particularly for users seeking a plug‑and‑play setup.
Free and easy to use
Browser-based setup
Cross-platform access
Very limited features
No advanced management tools
Best for: Casual users needing basic remote access
Chrome Remote Desktop is a free, browser‑based remote access tool from Google that requires nothing more than a Chrome browser and a Google account. It excels in simplicity: installation takes seconds, and connections are mediated through Google's infrastructure, eliminating complex firewall configurations. For occasional use—such as helping a family member or quickly accessing a home computer—it works reliably across Windows, macOS, Linux, and even ChromeOS.
The trade‑off is its minimal feature set. There is no native file transfer, multi‑session management, remote printing, or granular permission controls. Collaboration tools are absent, and the reliance on a Google account for authentication can be a limitation in professional environments. It remains a convenient entry‑level tool but struggles to meet the needs of power users or IT teams.
You may also be interested in: |
|---|
High-quality streaming performance
Strong security features
Good for business environments
Reliable connections
Subscription-based pricing
Limited free version
Best for: Businesses needing performance-focused remote access
Splashtop is a high‑performance remote desktop solution frequently adopted by creative professionals, educational institutions, and enterprises that prioritize fluid interaction. It delivers low‑latency streaming with support for high‑frame‑rate displays, making it suitable for video editing, CAD work, and other graphics‑intensive tasks. Splashtop offers a range of editions—from Business Access to SOS for on‑demand support—all of which include robust security (AES‑256, device authentication) and features like file transfer, remote printing, and multi‑monitor navigation. Its performance over local networks and the internet is consistently praised.
The primary drawback is cost: while competitive, the subscription model can accumulate quickly for users needing access to multiple devices or advanced features, especially when compared to similarly capable tools with more flexible pricing structures. DeskIn offers similar performance benefits with a more flexible pricing structure, making it a compelling alternative.
You may also be interested in: |
|---|
RDP can be difficult to configure, less secure if exposed, and limited outside Windows environments. Modern tools like DeskIn provide better performance, security, and ease of use.
The best RDP alternative depends on your needs, but DeskIn stands out for its balance of speed, security, and cross-platform compatibility.
Yes, several tools qualify as an RDP alternative free, including RustDesk and Chrome Remote Desktop. DeskIn also offers a free tier with advanced capabilities.
Microsoft is evolving its remote desktop ecosystem, but traditional RDP isn't disappearing overnight. However, many users are already transitioning to more modern solutions like DeskIn for better reliability and flexibility.
RDP has served its purpose, but the digital world has outgrown its limitations. Whether you need better performance, stronger security, or true cross-platform access, switching to a modern RDP alternative is no longer optional, it's inevitable.
Among all the options, DeskIn stands out as a future-ready solution. It combines speed, simplicity, and power into one seamless experience, helping you leave behind the friction of traditional remote desktop tools and step into something far more efficient.
WindowsとMacコンピュータをiPadでセカンドモニターに!
マルチタスクをこなすにとっ社員にとって、セカンドモニターを使用することは生産性を大幅に向上させることができます。ホームオフィスの方やデュアルスクリーンを持っていない学生の方へ。使用していないiPadを簡単にコンピュータのセカンドモニターに変える方法をご紹介します。
1. 画面スペースを増やして同時により多く表示できます。マルチタスクユーザーは、ウィンドウの切り替えを避けることで時間を節約できます。
2. 各画面が独立して動作するため、作業スペースがより整理されます。
ビデオ編集では、一つの画面を編集に、もう一つの画面を素材置き場に。論文を書く場合、片方の画面で執筆、もう片方で情報を検索などです。
3. iPadの画面サイズは十分大きく、表示品質も非常に良好です。デザイン作業のニーズがあるユーザーやMacBookユーザーにとって、追加のスクリーンを購入するよりもコスト効率が高く、色差の問題もありません。
4. 多くの人が家にiPadを持っています。この手持ちのデバイスをデュアルスクリーンとして使用することで、別のスクリーンを購入するコストや置くスペースを節約できます。
Appleのネイティブ機能であるApple Sidecarを使用すると、iPadをMacBookやiMacの外部ディスプレイとして使用できます。簡単な設定を行うだけで、iPadとコンピュータ間のシームレスな接続が可能です。
注意:Apple Sidecarを使用するには、2台のデバイスが同じApple IDにログインしているか、同じネットワークに接続していることが必要です。両方のデバイスにBluetooth、Wi-Fiがオンになっており、距離は10メートル以内である必要があります。
Macシステム設定を開き、サイドバーの「ディスプレイ」クリック >> 右側の「+」ポップアップメニューをクリックし、iPadを選択します。
iPadを選択し、使用設定を「拡張ディスプレイ」に変更します。Macの上部ツールバーのAirplay設定を確認し、iPadを「別のディスプレイとして使用」に設定します。
設定が完了すると、iPadがMacのセカンドディスプレイとなります。MacからiPadにウィンドウをスムーズにドラッグすることができます。また、iPadのサイドバーを使用したり、システムディスプレイ設定でサイドバーの位置を変更したりできます。
MacBookスクリーン(左)とiPadスクリーン(右)
Apple Sidecarは、2016年以降に発売されたMacとiPadOS13以上のみをサポートします。古いAppleデバイスやWindowsデバイスを使用している場合でも、DeskInリモートソフトウェアを利用して画面拡張を行うことができます。iPadをMacやWindowsのセカンドディスプレイとして使用でき、その滑らかさはSidecarに劣りません。
コンピューターとiPadにDeskInをダウンロードし、無料アカウントを登録して別々にログインします。
注意: 新しいデバイスに初めてログインする際には、アカウントのセキュリティを保護するためにメール認証を完了する必要があります。
Windows/MacコンピュータでDeskInアプリを開き、「スクリーン管理」タブに行き、「画面を拡張する」をクリックします。
iPadを選択し、「拡張を開始」をクリックします。接続が完了すると、iPadはWindows/Macコンピューターのセカンドディスプレイとなり、2つのスクリーンを1つのもののようにウィンドウを移動できます。
コンピュータスクリーン(左)とiPadスクリーン(右)
拡張後、iPadがコンピュータ画面の内容をミラーリングしているだけの場合はWindowsシステム設定 >>ディスプレイ設定に行き、「これらのディスプレイを拡張」を選択してください。2つの画面をドラッグして画面の位置を変更することもできます。
この記事では、DeskInリモートデスクトップソフトウェアを使用してiPadをMacおよびWindowsコンピューターの「セカンドスクリーン」にする方法を紹介します。これは、同時に複数のタスクを処理し、生産性を向上させたい方に特に有用です。MacBook、iPad、Androidタブレット、およびWindows PCで動作する画面拡張ツールを探している場合、DeskInリモートデスクトップは最適なソリューションです。DeskInをダウンロードして、ぜひお試しください!
Top 6 RustDesk Alternative Tools for Faster, Easier Remote Access
Remote access should feel like flipping a light switch, not decoding a control panel. Yet many users exploring RustDesk eventually run into friction: connection IDs, server setup, or occasional lag. While RustDesk is powerful, it’s not always the easiest or smoothest option, especially for non-technical users.
That’s why more people are actively searching for a reliable RustDesk alternative that combines performance, simplicity, and flexibility. Whether you want a plug-and-play solution or something more advanced, this guide will help you find the best fit.
RustDesk stands out as a privacy-friendly, self-hosted remote desktop tool. However, real-world usage reveals a few common challenges:
Complicated setup for the RustDesk self-hosted environments
Manual connection steps requiring IDs and passwords
Occasional latency or unstable connections
Limited user-friendly features out of the box
For many users, especially those helping family or managing multiple devices, simplicity matters just as much as control.
When evaluating a RustDesk alternative, focus on these key factors:
Ease of use: Quick setup without technical overhead
Performance: Smooth, low-latency remote sessions
Compatibility: Support for Windows, macOS, Linux, and mobile
Security: Strong encryption and access controls
Flexibility: Options ranging from cloud-based to open source
The ideal tool strikes a balance between power and convenience, something many modern solutions now deliver better than traditional setups.
Here’s a quick breakdown of the top tools and where they shine:
DeskIn – Best all-in-one RustDesk alternative for performance and ease of use
AnyDesk – Best lightweight tool for fast connections
TeamViewer – Best for enterprise-grade remote support
MeshCentral – Best open-source and self-hosted solution
DWService – Best free browser-based tool
Chrome Remote Desktop – Best simple, no-frills option
Ultra-low latency with smooth high-frame-rate streaming
No complex setup or server deployment required
Cross-platform including Rustdesk alternative for Android
Secure with encryption and device control features
Built-in file transfer and multi-device management
Smaller awareness than legacy competitors
Best for: Users who want a powerful yet simple remote desktop solution
DeskIn removes the friction that often comes with remote access tools. Instead of relying on IDs or manual configurations, it offers a streamlined connection experience that works right out of the box. This makes it especially valuable for users supporting non-technical family members or managing multiple remote devices.
Performance is where DeskIn truly distinguishes itself. Compared to RustDesk, which can sometimes struggle with latency, DeskIn delivers consistently smooth sessions with minimal lag. It also eliminates the need for self-hosting, making it a strong free RustDesk alternative option for users who want powerful features without the complexity.
For those exploring options beyond the RustDesk alternative GitHub projects, DeskIn provides a polished, ready-to-use experience that balances simplicity with professional-grade performance.
Lightweight and fast installation
Good performance on low bandwidth
Cross-platform support
Easy-to-use interface
Performance may drop during long sessions
File transfer can be inconsistent
Best for: Users needing quick and simple remote access
AnyDesk is often considered a natural step up from RustDesk for users who want something easier to deploy. It offers a lightweight application that connects quickly and performs well under normal conditions. This makes it suitable for quick troubleshooting or occasional remote access.
However, performance consistency can be an issue. Users frequently report lag or instability during extended sessions or when handling more demanding tasks. While AnyDesk is a solid option for basic needs, it may not fully satisfy users looking for a more robust, all-in-one solution.
👀 You may also be interested in: |
|---|
Enterprise-grade security with encryption and 2FA
Stable performance across global networks
Rich features like file transfer and session recording
Broad device compatibility
Expensive for commercial use
Free version has limitations
Heavier resource usage on some systems
Best for: Businesses and IT teams managing multiple endpoints
TeamViewer has long been a dominant player in the remote desktop space, offering a comprehensive suite of features designed for enterprise environments. It excels in reliability and global connectivity, making it a popular choice for IT support teams.
That said, its pricing model is a major drawback for many users. Frequent users may quickly encounter licensing restrictions, and costs can escalate for businesses. Additionally, its heavier footprint can impact performance on lower-end devices. DeskIn offers a more modern alternative by delivering similar performance and essential features without the same cost barriers. For users who want enterprise-level capabilities with better efficiency, it presents a compelling option.
👀 You may also be interested in: |
|---|
Fully RustDesk alternative open source solution
Web-based management dashboard
Supports multi-device environments
Strong customization and control
Complex setup and maintenance
Requires technical expertise
Best for: Advanced users needing a Rustdesk alternative self-hosted
MeshCentral is a powerful open-source platform designed for users who want full control over their remote access infrastructure. It supports multiple devices and provides a centralized dashboard for management, making it attractive for IT professionals.
However, this flexibility comes with complexity. Setting up and maintaining a MeshCentral server requires technical knowledge, which can be a barrier for many users. Compared to this, DeskIn offers a much simpler deployment process while still delivering strong performance and security. For users who prioritize ease of use over full control, modern solutions like DeskIn provide a more accessible alternative.
Completely free
Browser-based access
Open-source foundation
Simple setup
Limited performance
Basic feature set
Best for: Users looking for a simple, free RustDesk alternative
DWService offers a browser-based approach to remote access with no heavy installation, making it convenient for quick connections in restricted environments. It supports both desktop access and file management across major platforms.
However, performance often feels sluggish, especially on demanding tasks, and features remain basic; lacking session recording, smooth multi-monitor support, or advanced security controls. While suitable for occasional personal use, it falls short for professional or high-performance scenarios.
Free and easy to use
Browser-based setup
Cross-platform compatibility
Very limited features
No advanced management or collaboration tools
Best for: Casual users needing basic remote access
Chrome Remote Desktop is one of the simplest remote access tools available. It’s easy to set up and works across devices, making it a convenient choice for occasional use.
However, it lacks many essential features such as file transfer, session management, and advanced security controls. For users with more demanding needs, it quickly becomes insufficient. Compared to Chrome Remote Desktop, DeskIn provides a much more complete experience without sacrificing ease of use, making it a better long-term solution.
👀 You may also be interested in: |
|---|
RustDesk is powerful but can be difficult to set up and manage, especially with self-hosting. Many users prefer tools that offer similar performance without technical complexity. DeskIn simplifies remote access while maintaining strong performance and security.
Several tools qualify as a free RustDesk alternative, including DWService and Chrome Remote Desktop. However, DeskIn stands out by offering better performance and usability even in its free version.
Yes, tools like MeshCentral and DWService are considered RustDesk alternative open source options. They provide flexibility and control but often require technical expertise to set up and maintain.
Beginners should choose tools with a simple setup and intuitive interfaces. DeskIn is an excellent option because it removes the need for manual configuration while still delivering advanced features.
RustDesk is a powerful starting point, but it’s not always the easiest or most efficient tool for everyday use. From setup complexity to performance limitations, many users eventually look for a better RustDesk alternative.
Among all the options, DeskIn stands out as the most balanced solution. It combines speed, simplicity, and cross-platform support into one seamless experience. If you’re ready to move beyond technical friction and enjoy truly smooth remote access, DeskIn is a choice that simply works.
連絡先
メール: support@deskin.io
オフィスの住所:
991D Alexandra Road #02-17
シンガポール 119972
著作権 © 2026 Zuler Technology PTE. LTD. 無断複写・転載を禁じます。
お問い合わせ
Eメール: support@deskin.io
本社: 991D Alexandra Road #02-17, シンガポール 119972
著作権 © 2026 Zuler Technology PTE. LTD. 無断複写・転載を禁じます。
連絡先
support@deskin.io
991D Alexandra Road #02-17
シンガポール 119972
著作権 © 2026 Zuler Technology PTE. LTD. 無断複写・転載を禁じます。

