Pagiging produktibo
Pagiging produktibo
/
2 minuto ang nakalipas
/
2 minuto ang nakalipas
Karly Chan
Na-update
Na-update
Na-update
Ang pagbabahagi ng screen sa isang Mac ay maaaring maging labis na kapaki-pakinabang, kahit na ikaw ay nakikipagtulungan sa isang proyekto, nagsusuri ng isang teknikal na isyu, o nagbibigay ng mabilis na tutorial sa isang katrabaho o kaibigan. Ngunit kung ikaw ay bagong user ng macOS o lumilipat mula sa ibang sistema, ang pag-unawa kung paano simulan ang pagbabahagi ng screen ay maaaring nakakalito.
Ang gabay na ito ay naglalakad sa iyo sa pamamagitan ng 3 pinakamadaling paraan kasama ang mga karaniwang solusyon sa erro, upang ibahagi ang iyong screen sa isang MacBook Air, MacBook Pro, o iMac nang hindi kinakailangang magkaroon ng teknikal na kaalaman. Mula sa mga nakabuilt-in na tools hanggang sa mas matalino at pangatlong bahagi na mga opsyon tulad ng DeskIn, makikita mo ang metodong pinakamainam para sa iyong mga pangangailangan.
I-click dito upang i-download ang DeskIn
👀 Higit Pa Tungkol sa Mac Screen Share:
Nangungunang 6 Pinakamahusay na Screen Mirroring Apps sa 2025 [Libre & Bayad na Mga Opsyon]
Paano Ikonekta ang Mac sa PC Remote Desktop Screen Share [3 Paraan]
Kung kailangan mong ibahagi ang screen ng iyong Mac sa ibang Mac sa parehong lokal na network, ang nakabuilt-in na Screen Sharing na app ng Apple ay nag-aalok ng isang simpleng at epektibong solusyon. Ito ay lalong kapaki-pakinabang para sa suporta sa teknolohiya, pakikipagtulungan, o remote access sa loob ng mga tahanan o opisina, na walang kinakailangang third-party software.
Na sinabi, ang metodong ito ay umiiral lamang sa Mac-to-Mac at kailangang parehong mga device ay nasa parehong network, na ginagawa itong perpekto para sa mabilis, lokal na mga senaryo ng pagbabahagi. Kung ito ay angkop para sa iyong sitwasyon, sundin ang mga hakbang na ito upang makapagsimula.
Hakbang 1. Pumunta sa "Apple menu > System Settings > General > Sharing".
Hakbang 2. I-toggle ang "Screen Sharing". Sa ilalim ng "Payagan ang access para sa," pumili ng Lahat ng gumagamit o Tanging ang mga gumagamit na ito, batay sa iyong pangangailangan.
Hakbang 3. Sa kabilang Mac, buksan ang Finder, pagkatapos ay pumunta sa "Network", o buksan ang Screen Sharing app sa pamamagitan ng Launchpad.
Hakbang 4. Piliin ang Mac na nais mong ikonekta, o ipasok ang IP address o hostname nito, pagkatapos ay i-click ang "Connect".
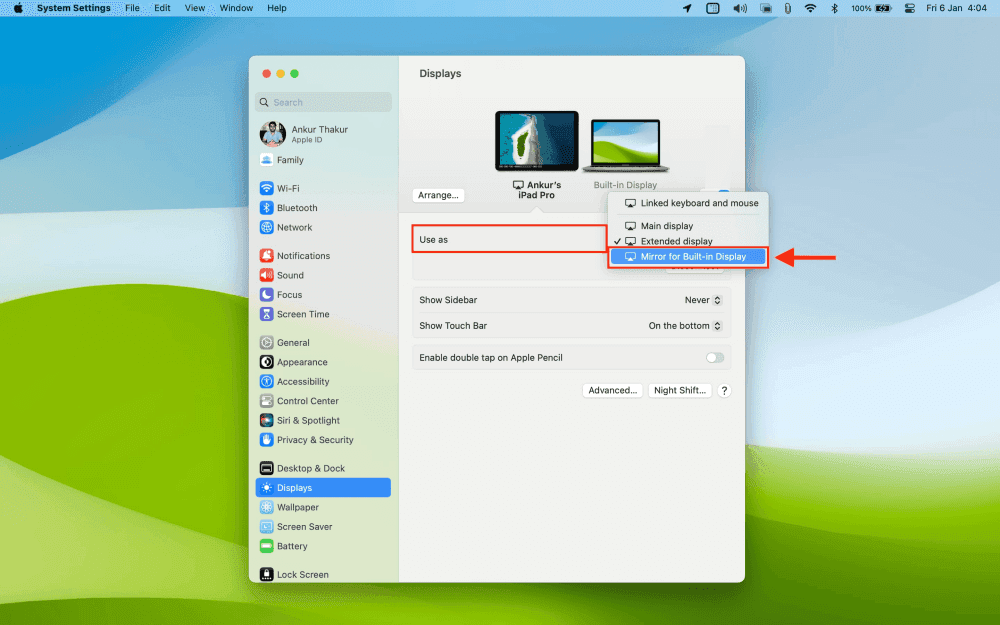
Hakbang 5. Sa wakas, hanapin ang target na computer sa Mac sa ilalim ng "Settings > Display", at ibalik ang iyong screen ng Mac dito.
💡 Mga Bagay na Dapat Tandaan:
Ang parehong Macs ay dapat na naka-on at nakakonex sa parehong network.
Kung ang Firewall ay nakabukas, siguraduhing pinapayagan nito ang mga papasok na koneksyon sa Screen Sharing.
Maaaring mag-iba ang pagganap depende sa iyong bilis ng network at mga mapagkukunan ng system.
Kung ikaw ay tumatakbo sa macOS Sonoma o mas bago, nagbibigay na ngayon ang FaceTime ng isang nakabuilt-in na tampok ng pagbabahagi ng screen upang ipakita ang iyong screen sa panahon ng isang video call, na nag-aalok ng isang madaliang paraan upang ibahagi ang iyong screen sa isang iMac, MacBook, o anumang device ng macOS. Ito ay lalong nakakatulong para sa mabilis na demonstrasyon, collaborative discussions, o pagtulong sa mga kaibigan at pamilya na malutas ang mga isyu, nang hindi kinakailangan ng anumang karagdagang apps o setup.
Ang metodong ito ay pinakamainam para sa pansamantalang pagbabahagi ng screen ng Mac sa panahon ng mga real-time na pag-uusap, lalo na kapag nakikipag-usap sa isang tao sa ibang Mac o iOS device. Gayunpaman, mahalagang tandaan na ang pagbabahagi ng screen sa FaceTime ay hindi nagpapahintulot ng remote control, at samakatuwid hindi angkop para sa suporta sa antas ng IT o secure access. Upang ibahagi ang iyong screen sa panahon ng isang tawag sa FaceTime, sundin ang mga hakbang na ito.
Hakbang 1. Simulan o sumali sa isang tawag sa FaceTime kasama ang taong nais mong ibahagi ang iyong screen.
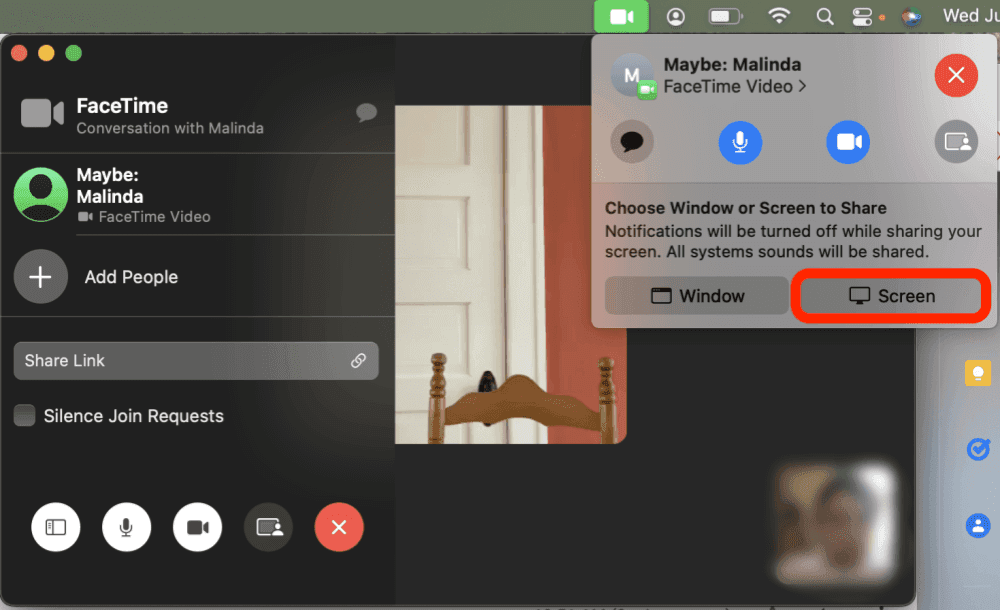
Hakbang 2. I-click ang "Share Screen" na button (isang rektanggulo na may icon ng tao) sa control bar ng FaceTime.
Hakbang 3. Pumili ng "Buong Screen" o "Partikular na Bintana", depende sa kung ano ang nais mong ipakita.
Hakbang 4. Upang itigil ang pagbabahagi, i-click muli ang "screen sharing" icon, o lumipat sa ibang bintana kung kinakailangan.
Magbasa nang Higit Pa:
Kung kailangan mong ibahagi ang iyong Mac screen nang secure sa iba't ibang network o platform, o kahit na kunin ang buong remote control ng ibang device, DeskIn ay isang makapangyarihan at madaling gamitin na alternatibo sa mga tradisyunal na pamamaraan. Ito ay dinisenyo para sa mga gumagamit na nangangailangan ng higit pa sa simpleng pagbabahagi ng screen, perpekto para sa remote work, IT support, o virtual collaboration.
Kabaligtaran ng mga nakabuilt-in na tools ng Apple, ang DeskIn ay hindi nangangailangan ng public IP address o port forwarding, salamat sa matalino nitong NAT traversal. Lahat ng koneksyon ay end-to-end encrypted, na tinitiyak na ang iyong data ay mananatiling pribado at protektado. Bilang karagdagan sa pagbabahagi ng screen, sinusuportahan din ng DeskIn ang file transfers, real-time control, at cross-platform compatibility, na nangangahulugang maaari mong i-remote access ang iyong Mac mula sa iPhone, Android, o Windows PC, at tamasahin ang lahat ng advanced features nang walang abala.
I-click dito upang i-download ang DeskIn
👍 Mga Pangunahing Tampok ng DeskIn:
Walang Kinakailangang Public IP - Madaling kumonekta nang hindi kinakailangang i-configure ang mga network ports o firewalls.
End-to-End Encryption - Lahat ng session ng pagbabahagi ng screen ay ligtas na naka-encrypt upang protektahan ang sensitibong data.
Cross-Platform Compatibility - Magagamit sa macOS, Windows, Linux, iOS, at Android.
Higit Pa sa Simpleng Pagbabahagi ng Screen - Suporta para sa remote control, file transfers, at real-time collaboration.
Simple Access Methods - Kumonekta gamit ang mga pansamantalang access codes o mag-set ng custom passwords para sa madalas na koneksyon.
Narito kung paano ibahagi nang secure ang screen ng isang Mac, at kahit na isaayos ang iyong ibang computer na Mac gamit ang DeskIn.
Hakbang 1. I-download at i-install ang DeskIn app sa parehong sa host (nagbabahagi) at viewer (control) devices.
I-click dito upang i-download ang DeskIn
Hakbang 2. Magrehistro o mag-log in sa iyong DeskIn account.
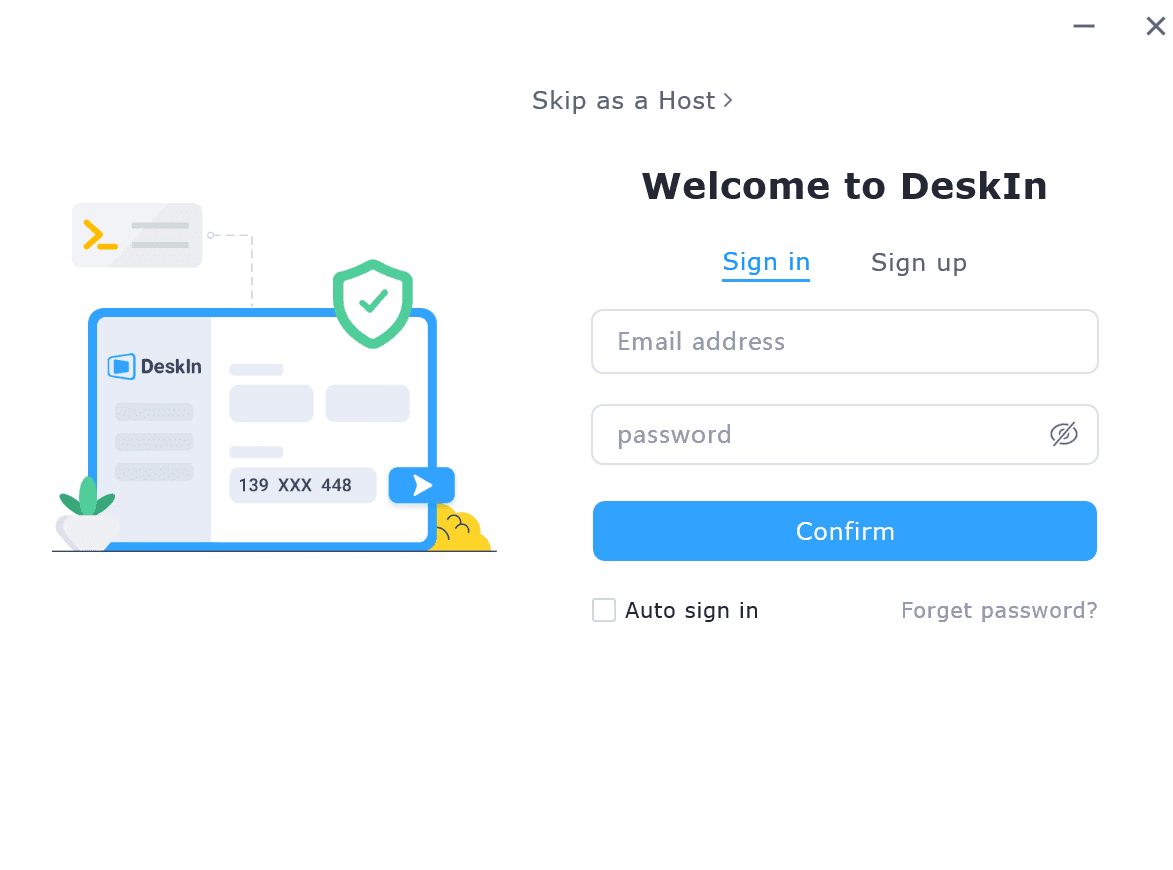
Hakbang 3. Sa host device (Mac), bumuo ng pansamantalang connection code o mag-set ng permanenteng access password.
Hakbang 4. Sa viewer device, ipasok ang code o credentials, at agad kang magkakaroon ng access sa ibinahaging screen, na may opsyonal na kontrol.
Kung ikaw ay tumutulong sa isang kliyente, nakikipagtulungan sa isang proyekto, o namamahala sa isang remote desktop setup, DeskIn ay nag-aalok ng ligtas, tuluy-tuloy, at mahusay na screen-sharing karanasan para sa lahat ng senaryo.
Sa panahon ng iyong paggamit, maaari kang makatagpo ng mga problema, tulad ng hindi gumagana ang pagbabahagi ng screen sa Mac, o hindi makapagbahagi ng iyong Mac. Kahit na gumagamit ka ng built-in na Screen Sharing app o sinusubukang magbahagi sa isang tawag sa FaceTime, mayroong ilang mga karaniwang dahilan kung bakit maaaring hindi ito gumana ayon sa inaasahan.
Narito kung paano tukuyin at ayusin ang mga pinakakaraniwang isyu:
Ang mga Device ay Hindi Nasa Parehong Network: Ang built-in na Screen Sharing app ay gumagana lamang kapag ang parehong Macs ay nakakakonekta sa parehong lokal na network. Kung ikaw ay sumusubok na kumonekta nang remote, ang metodong ito ay hindi gumagana.
Ang Firewall ay Nagbabara sa RDP o VNC Ports: Maaaring hadlangan ng mga firewall ng macOS o mga setting ng seguridad ng network ang mga port na ginagamit para sa pagbabahagi ng screen. Tiyakin na ang port 5900 (VNC) ay pinapayagan sa iyong firewall.
Ang mga Pahintulot sa Pagbabahagi ng Screen ay Hindi Pinagana: Pumunta sa System Settings > General > Sharing, at siguraduhing naka-on ang Screen Sharing. Gayundin, suriin na ang mga tamang gumagamit ay aprubado sa ilalim ng seksyong "Payagan ang access para sa".
Walang Access Rights ang User Account: Kung ang user na sumusubok na kumonekta ay hindi pinahintulutan sa host Mac, hindi mag-uumpisa ang pagbabahagi ng screen. Maaaring kailanganin mong idagdag sila sa approved list.
Incompatible o Luma ang mga bersyon ng macOS: Ang ilang mga tampok, tulad ng pagbabahagi ng screen sa FaceTime, ay available lamang sa macOS Sonoma at bagong bersyon. Kung ang isang device ay tumatakbo sa mas lumang bersyon, maaaring magkaroon ng mga isyu sa pagkakatugma.
📌 Mga Tip: Kung kailangan mong ibahagi ang iyong screen sa pagitan ng iba't ibang network o sa iba't ibang platform, isaalang-alang ang paggamit ng DeskIn. Hindi ito nangangailangan na ang parehong mga device ay nasa parehong network at awtomatikong hinaharap ang firewall/NAT traversal. Sa end-to-end encryption at suporta sa multi-platform, ito ay isang maaasahang workaround kapag ang mga katutubong macOS tools ay hindi nakakapagbigay.
I-click dito upang i-download ang DeskIn
Ang pagbabahagi ng screen ay hindi lamang isang tech-savvy feature; ito ay isang praktikal na tool na ginagawang mas madali ang pang-araw-araw na pakikipagtulungan. Kung ikaw ay nagtatrabaho mula sa bahay, tumutulong sa isang miyembro ng pamilya na lutasin ang kanilang Mac, o nagho-host ng isang virtual na sesyon ng pagsasanay, ang pagbabahagi ng screen ay nagpapahintulot sa iba na makita ang eksaktong kung ano ang nangyayari sa iyong screen sa real time.
Narito ang ilang mga karaniwang senaryo kung saan ang pagbabahagi ng iyong screen sa isang Mac ay maaaring maging kapaki-pakinabang:
Remote presentations sa mga kliyente o miyembro ng koponan.
Live technical support kapag ang isang tao ay kailangang tulungan ka sa isang isyu (o kabaligtaran).
Online classes o training sessions kung saan ang visual na paliwanag ay susi.
Collaborative document editing o design review na nakikinabang mula sa ibinahaging visual.
Sa kabuuan, ang pagbabahagi ng screen sa Mac ay maaaring madaling gawin gamit ang built-in na Screen Sharing app para sa mga lokal na network, FaceTime para sa mabilis, pansamantalang pagbabahagi, o DeskIn para sa ligtas, cross-platform na pakikipagtulungan. Para sa walang putol at secure na pagbabahagi ng screen, DeskIn ay nag-aalok ng pinakamagandang solusyon, lalo na kapag nagtatrabaho sa malayo o sa iba't ibang device. Pumili ng metodong pinakamainam para sa iyong mga pangangailangan, at para sa pinahusay na seguridad at kakayahang umangkop, isaalang-alang ang pag-download ng DeskIn para sa remote desktop at pagbabahagi ng screen!
Ang pagbabahagi ng screen sa isang Mac ay maaaring maging labis na kapaki-pakinabang, kahit na ikaw ay nakikipagtulungan sa isang proyekto, nagsusuri ng isang teknikal na isyu, o nagbibigay ng mabilis na tutorial sa isang katrabaho o kaibigan. Ngunit kung ikaw ay bagong user ng macOS o lumilipat mula sa ibang sistema, ang pag-unawa kung paano simulan ang pagbabahagi ng screen ay maaaring nakakalito.
Ang gabay na ito ay naglalakad sa iyo sa pamamagitan ng 3 pinakamadaling paraan kasama ang mga karaniwang solusyon sa erro, upang ibahagi ang iyong screen sa isang MacBook Air, MacBook Pro, o iMac nang hindi kinakailangang magkaroon ng teknikal na kaalaman. Mula sa mga nakabuilt-in na tools hanggang sa mas matalino at pangatlong bahagi na mga opsyon tulad ng DeskIn, makikita mo ang metodong pinakamainam para sa iyong mga pangangailangan.
I-click dito upang i-download ang DeskIn
👀 Higit Pa Tungkol sa Mac Screen Share:
Nangungunang 6 Pinakamahusay na Screen Mirroring Apps sa 2025 [Libre & Bayad na Mga Opsyon]
Paano Ikonekta ang Mac sa PC Remote Desktop Screen Share [3 Paraan]
Kung kailangan mong ibahagi ang screen ng iyong Mac sa ibang Mac sa parehong lokal na network, ang nakabuilt-in na Screen Sharing na app ng Apple ay nag-aalok ng isang simpleng at epektibong solusyon. Ito ay lalong kapaki-pakinabang para sa suporta sa teknolohiya, pakikipagtulungan, o remote access sa loob ng mga tahanan o opisina, na walang kinakailangang third-party software.
Na sinabi, ang metodong ito ay umiiral lamang sa Mac-to-Mac at kailangang parehong mga device ay nasa parehong network, na ginagawa itong perpekto para sa mabilis, lokal na mga senaryo ng pagbabahagi. Kung ito ay angkop para sa iyong sitwasyon, sundin ang mga hakbang na ito upang makapagsimula.
Hakbang 1. Pumunta sa "Apple menu > System Settings > General > Sharing".
Hakbang 2. I-toggle ang "Screen Sharing". Sa ilalim ng "Payagan ang access para sa," pumili ng Lahat ng gumagamit o Tanging ang mga gumagamit na ito, batay sa iyong pangangailangan.
Hakbang 3. Sa kabilang Mac, buksan ang Finder, pagkatapos ay pumunta sa "Network", o buksan ang Screen Sharing app sa pamamagitan ng Launchpad.
Hakbang 4. Piliin ang Mac na nais mong ikonekta, o ipasok ang IP address o hostname nito, pagkatapos ay i-click ang "Connect".
Hakbang 5. Sa wakas, hanapin ang target na computer sa Mac sa ilalim ng "Settings > Display", at ibalik ang iyong screen ng Mac dito.
💡 Mga Bagay na Dapat Tandaan:
Ang parehong Macs ay dapat na naka-on at nakakonex sa parehong network.
Kung ang Firewall ay nakabukas, siguraduhing pinapayagan nito ang mga papasok na koneksyon sa Screen Sharing.
Maaaring mag-iba ang pagganap depende sa iyong bilis ng network at mga mapagkukunan ng system.
Kung ikaw ay tumatakbo sa macOS Sonoma o mas bago, nagbibigay na ngayon ang FaceTime ng isang nakabuilt-in na tampok ng pagbabahagi ng screen upang ipakita ang iyong screen sa panahon ng isang video call, na nag-aalok ng isang madaliang paraan upang ibahagi ang iyong screen sa isang iMac, MacBook, o anumang device ng macOS. Ito ay lalong nakakatulong para sa mabilis na demonstrasyon, collaborative discussions, o pagtulong sa mga kaibigan at pamilya na malutas ang mga isyu, nang hindi kinakailangan ng anumang karagdagang apps o setup.
Ang metodong ito ay pinakamainam para sa pansamantalang pagbabahagi ng screen ng Mac sa panahon ng mga real-time na pag-uusap, lalo na kapag nakikipag-usap sa isang tao sa ibang Mac o iOS device. Gayunpaman, mahalagang tandaan na ang pagbabahagi ng screen sa FaceTime ay hindi nagpapahintulot ng remote control, at samakatuwid hindi angkop para sa suporta sa antas ng IT o secure access. Upang ibahagi ang iyong screen sa panahon ng isang tawag sa FaceTime, sundin ang mga hakbang na ito.
Hakbang 1. Simulan o sumali sa isang tawag sa FaceTime kasama ang taong nais mong ibahagi ang iyong screen.
Hakbang 2. I-click ang "Share Screen" na button (isang rektanggulo na may icon ng tao) sa control bar ng FaceTime.
Hakbang 3. Pumili ng "Buong Screen" o "Partikular na Bintana", depende sa kung ano ang nais mong ipakita.
Hakbang 4. Upang itigil ang pagbabahagi, i-click muli ang "screen sharing" icon, o lumipat sa ibang bintana kung kinakailangan.
Magbasa nang Higit Pa:
Kung kailangan mong ibahagi ang iyong Mac screen nang secure sa iba't ibang network o platform, o kahit na kunin ang buong remote control ng ibang device, DeskIn ay isang makapangyarihan at madaling gamitin na alternatibo sa mga tradisyunal na pamamaraan. Ito ay dinisenyo para sa mga gumagamit na nangangailangan ng higit pa sa simpleng pagbabahagi ng screen, perpekto para sa remote work, IT support, o virtual collaboration.
Kabaligtaran ng mga nakabuilt-in na tools ng Apple, ang DeskIn ay hindi nangangailangan ng public IP address o port forwarding, salamat sa matalino nitong NAT traversal. Lahat ng koneksyon ay end-to-end encrypted, na tinitiyak na ang iyong data ay mananatiling pribado at protektado. Bilang karagdagan sa pagbabahagi ng screen, sinusuportahan din ng DeskIn ang file transfers, real-time control, at cross-platform compatibility, na nangangahulugang maaari mong i-remote access ang iyong Mac mula sa iPhone, Android, o Windows PC, at tamasahin ang lahat ng advanced features nang walang abala.
I-click dito upang i-download ang DeskIn
👍 Mga Pangunahing Tampok ng DeskIn:
Walang Kinakailangang Public IP - Madaling kumonekta nang hindi kinakailangang i-configure ang mga network ports o firewalls.
End-to-End Encryption - Lahat ng session ng pagbabahagi ng screen ay ligtas na naka-encrypt upang protektahan ang sensitibong data.
Cross-Platform Compatibility - Magagamit sa macOS, Windows, Linux, iOS, at Android.
Higit Pa sa Simpleng Pagbabahagi ng Screen - Suporta para sa remote control, file transfers, at real-time collaboration.
Simple Access Methods - Kumonekta gamit ang mga pansamantalang access codes o mag-set ng custom passwords para sa madalas na koneksyon.
Narito kung paano ibahagi nang secure ang screen ng isang Mac, at kahit na isaayos ang iyong ibang computer na Mac gamit ang DeskIn.
Hakbang 1. I-download at i-install ang DeskIn app sa parehong sa host (nagbabahagi) at viewer (control) devices.
I-click dito upang i-download ang DeskIn
Hakbang 2. Magrehistro o mag-log in sa iyong DeskIn account.
Hakbang 3. Sa host device (Mac), bumuo ng pansamantalang connection code o mag-set ng permanenteng access password.
Hakbang 4. Sa viewer device, ipasok ang code o credentials, at agad kang magkakaroon ng access sa ibinahaging screen, na may opsyonal na kontrol.
Kung ikaw ay tumutulong sa isang kliyente, nakikipagtulungan sa isang proyekto, o namamahala sa isang remote desktop setup, DeskIn ay nag-aalok ng ligtas, tuluy-tuloy, at mahusay na screen-sharing karanasan para sa lahat ng senaryo.
Sa panahon ng iyong paggamit, maaari kang makatagpo ng mga problema, tulad ng hindi gumagana ang pagbabahagi ng screen sa Mac, o hindi makapagbahagi ng iyong Mac. Kahit na gumagamit ka ng built-in na Screen Sharing app o sinusubukang magbahagi sa isang tawag sa FaceTime, mayroong ilang mga karaniwang dahilan kung bakit maaaring hindi ito gumana ayon sa inaasahan.
Narito kung paano tukuyin at ayusin ang mga pinakakaraniwang isyu:
Ang mga Device ay Hindi Nasa Parehong Network: Ang built-in na Screen Sharing app ay gumagana lamang kapag ang parehong Macs ay nakakakonekta sa parehong lokal na network. Kung ikaw ay sumusubok na kumonekta nang remote, ang metodong ito ay hindi gumagana.
Ang Firewall ay Nagbabara sa RDP o VNC Ports: Maaaring hadlangan ng mga firewall ng macOS o mga setting ng seguridad ng network ang mga port na ginagamit para sa pagbabahagi ng screen. Tiyakin na ang port 5900 (VNC) ay pinapayagan sa iyong firewall.
Ang mga Pahintulot sa Pagbabahagi ng Screen ay Hindi Pinagana: Pumunta sa System Settings > General > Sharing, at siguraduhing naka-on ang Screen Sharing. Gayundin, suriin na ang mga tamang gumagamit ay aprubado sa ilalim ng seksyong "Payagan ang access para sa".
Walang Access Rights ang User Account: Kung ang user na sumusubok na kumonekta ay hindi pinahintulutan sa host Mac, hindi mag-uumpisa ang pagbabahagi ng screen. Maaaring kailanganin mong idagdag sila sa approved list.
Incompatible o Luma ang mga bersyon ng macOS: Ang ilang mga tampok, tulad ng pagbabahagi ng screen sa FaceTime, ay available lamang sa macOS Sonoma at bagong bersyon. Kung ang isang device ay tumatakbo sa mas lumang bersyon, maaaring magkaroon ng mga isyu sa pagkakatugma.
📌 Mga Tip: Kung kailangan mong ibahagi ang iyong screen sa pagitan ng iba't ibang network o sa iba't ibang platform, isaalang-alang ang paggamit ng DeskIn. Hindi ito nangangailangan na ang parehong mga device ay nasa parehong network at awtomatikong hinaharap ang firewall/NAT traversal. Sa end-to-end encryption at suporta sa multi-platform, ito ay isang maaasahang workaround kapag ang mga katutubong macOS tools ay hindi nakakapagbigay.
I-click dito upang i-download ang DeskIn
Ang pagbabahagi ng screen ay hindi lamang isang tech-savvy feature; ito ay isang praktikal na tool na ginagawang mas madali ang pang-araw-araw na pakikipagtulungan. Kung ikaw ay nagtatrabaho mula sa bahay, tumutulong sa isang miyembro ng pamilya na lutasin ang kanilang Mac, o nagho-host ng isang virtual na sesyon ng pagsasanay, ang pagbabahagi ng screen ay nagpapahintulot sa iba na makita ang eksaktong kung ano ang nangyayari sa iyong screen sa real time.
Narito ang ilang mga karaniwang senaryo kung saan ang pagbabahagi ng iyong screen sa isang Mac ay maaaring maging kapaki-pakinabang:
Remote presentations sa mga kliyente o miyembro ng koponan.
Live technical support kapag ang isang tao ay kailangang tulungan ka sa isang isyu (o kabaligtaran).
Online classes o training sessions kung saan ang visual na paliwanag ay susi.
Collaborative document editing o design review na nakikinabang mula sa ibinahaging visual.
Sa kabuuan, ang pagbabahagi ng screen sa Mac ay maaaring madaling gawin gamit ang built-in na Screen Sharing app para sa mga lokal na network, FaceTime para sa mabilis, pansamantalang pagbabahagi, o DeskIn para sa ligtas, cross-platform na pakikipagtulungan. Para sa walang putol at secure na pagbabahagi ng screen, DeskIn ay nag-aalok ng pinakamagandang solusyon, lalo na kapag nagtatrabaho sa malayo o sa iba't ibang device. Pumili ng metodong pinakamainam para sa iyong mga pangangailangan, at para sa pinahusay na seguridad at kakayahang umangkop, isaalang-alang ang pag-download ng DeskIn para sa remote desktop at pagbabahagi ng screen!



How to Play MapleStory Classic World on Mac
A lot of the players who are most excited about MapleStory Classic World grew up on 2005-era MapleStory — and a large share of that generation now does its computing on a MacBook. Nexon clearly knows this: a native macOS client was on the feature list for the second Closed Online Test, which ran August 4–12, 2026, alongside Ossyria and third job advancement. But as of this writing, that Mac client is still in development, not publicly available, and there's still no confirmed public launch date for the game itself.
So if you want to play MapleStory Classic World on a Mac right now — or want a reliable plan for when the game does launch — you've got two real options: run Windows in a virtual machine, or use DeskIn remote desktop to control an actual Windows PC from your Mac. This guide covers both, including a login-conflict issue that catches a lot of virtual machine users off guard.
Not yet, publicly. Nexon's May 2026 roadmap update confirmed macOS support is in development, and it appeared as a testable feature in the second Closed Online Test. Windows PC remains the confirmed launch platform, and Nexon hasn't said whether the Mac client will be ready at launch or arrive afterward. The game hasn't had a full public release on any platform — Nexon has said one more test is planned before launch.
Given that, Mac players currently have two ways in: a Windows virtual machine, or remote desktop software that connects to a real Windows PC.
Classic World is exclusive to GMS (Global MapleStory), covering North America, Europe, and most other regions without a local Nexon partner. Markets with their own official MapleStory service — Korea, China, Japan, Taiwan/Hong Kong, and Southeast Asia — aren't GMS-eligible, so Mac players in those regions would need a VPN to reach Classic World, which isn't recommended. Whether NA and EU will run as separate worlds hasn't been confirmed.
Tools like Parallels Desktop or VMware Fusion let you run a full Windows install inside macOS, and then install MapleStory Classic World the way a Windows user would. It works, but it asks a lot of your Mac's hardware.
RAM: 16GB minimum recommended; 8GB is genuinely tight, since macOS and Windows are both running at once and macOS alone can eat most of that before Windows gets a share. For a comfortable setup with guides or Discord open on the side, aim for 32GB.
CPU/GPU: Virtual machines can't pass hardware through at 100%; graphics get software-emulated, which typically costs 20–30% of the performance you'd get on native Windows hardware.
Thermals: Running two full operating systems under load generates real heat, and laptop-class Macs with limited cooling can throttle during longer grinding sessions.
Apple Silicon translation overhead: M-series Macs can only run Windows on ARM in a VM. If Classic World ships as an x86/x64 build, it needs an extra translation layer to run at all, stacking on top of the virtualization overhead already mentioned.
Anti-cheat compatibility is a real unknown: the original MapleStory has historically been hostile to virtualized environments because of its anti-cheat system, and Nexon hasn't said how Classic World's anti-cheat will treat VMs. Treat virtualization as a maybe, not a guaranteed plan.
There's also the practical overhead: setting up a VM means downloading a Windows image, allocating dozens of gigabytes of disk space, installing display drivers, and — on Apple Silicon — dealing with ARM compatibility quirks that don't show up on a real x86 PC. Keyboard shortcuts can also conflict, since macOS system shortcuts (Control, Option, Command) don't always play nicely with a Windows game's default keybinds.
Instead of building a Windows environment inside your Mac, DeskIn lets you connect directly to a Windows PC you already have — your desktop at home, a work machine, or a spare laptop — and control it from your Mac in real time. The game runs on genuine Windows hardware the whole time, so there's no emulation tax, no ARM translation layer, and no anti-cheat guessing game.
A virtual machine makes sense if:
You don't have access to any Windows PC at all, so a Mac VM is your only option.
Your Mac has strong specs — 16GB+ RAM, ideally 32GB, and a higher-end M-series chip that can absorb the performance loss.
You're comfortable with a fairly technical setup process.
You rarely need to switch between devices, so the single-login limitation isn't a practical issue for you.
DeskIn makes more sense if:
You already have a Windows PC (or another Mac) that can run MapleStory Classic World, and you just want to reach it from your MacBook.
You're traveling or away from your desk often and want to pick up where you left off without re-downloading anything.
You don't want to deal with logging out of one device every time you switch to another.
Your Mac has more modest specs, and you'd rather not risk stutters, crashes, or a game that won't launch at all.
If you already own a Windows machine, DeskIn is generally the lower-effort, lower-risk choice. A VM is really a fallback for players with no Windows access and a Mac powerful enough to absorb the overhead.
Step 1: Set up the Windows PC. Install MapleStory Classic World on a Windows PC and create your character, then install DeskIn on that same PC, sign in, and enable unattended access with a connection password so you can reach it later without anyone at the keyboard.
Step 2: Install DeskIn on your Mac. Download the macOS version of DeskIn, sign in with the same account, and your Windows PC will appear in your device list.
Step 3: Connect. Select the PC, enter the connection password, and you'll get a live view of the Windows desktop that you control with your Mac's mouse and trackpad — the same session, the same login, no conflicts.
Step 4: Tune quality for your connection. On a stable connection, push quality up to enjoy Classic World's remastered pixel art in full detail; on the road, prioritize smoothness to cut down on input lag.
Step 5: Log in and play. Open the game inside the remote session and log in as usual — grinding, party quests, and shopping all work exactly as they would sitting at the PC directly.
Resolution and quality: Free-tier users should start around 720p/30fps for a stable baseline; paid-tier users can push up to 4K 60FPS or 2K 240FPS on a strong connection to get the most out of Classic World's art.
Screen scaling: If your Mac and Windows PC have very different display sizes, use DeskIn's automatic scaling option in the toolbar, or adjust the remote PC's resolution to match your Mac's screen more closely.
Keyboard and mouse mapping: DeskIn maps your Mac's keyboard directly to the remote PC. Turning on Game Mouse mode prevents the keyboard from getting locked mid-session.
Controller support: If Mac keyboard controls feel awkward, pair a controller to your Mac and enable controller mapping from the toolbar — DeskIn will pass those inputs straight through to the remote PC.
Simple Setup:No Windows installation required — connect and start playing within minutes.
Doesn't tax your Mac's hardware. All the actual computation happens on the remote Windows PC; your Mac just displays the stream and sends inputs.
Performance and compatibility match native Windows, because that's exactly what's running — no ARM translation layer to worry about.
No account login conflicts, since DeskIn connects to the same existing session instead of creating a new device.
Cross-device flexibility. The same account lets you connect from Mac, iPhone, iPad, or Android, and it's always the same underlying session — no juggling logins between devices.
Not publicly yet. Nexon has confirmed a macOS client is in development and tested it in the second Closed Online Test, but Windows remains the confirmed launch platform and no public Mac release has shipped.
Yes. DeskIn uses end-to-end encryption and two-factor login, and since you're remotely operating a PC you already control, your credentials never pass through a third party.
Technically you can install one, but the experience will be rough. With 8GB split between macOS and Windows, there's very little left over for Windows, and stutters or crashes become likely during longer sessions. DeskIn is the more stable option here, since the remote PC handles all the processing — your Mac's RAM isn't a bottleneck.
Real-world performance depends on both ends' network quality, but since DeskIn connects to native Windows hardware with no virtualization overhead, and its low-latency streaming keeps end-to-end delay under 40ms on a good connection, it typically feels smoother than a resource-constrained VM.
No. DeskIn controls the same PC and the same already-active session rather than logging in as a new device, so it doesn't trigger MapleStory's single-session login limit — this is exactly the conflict that trips up VM users switching between two separate Windows installs.
DeskIn needs a Windows (or other supported platform) machine to connect to. If you don't have one, consider borrowing access to a friend's or family member's PC, or renting a cloud Windows machine as your connection target.
DeskIn supports Windows, macOS, iOS, and Android. A Mac can connect to a Windows PC, and a Windows PC can just as easily connect to and control a Mac.
MapleStory Classic World doesn't have a public Mac client yet, but that doesn't mean Mac players have to gamble on a resource-hungry virtual machine and hope the anti-cheat cooperates. If you already have access to a Windows PC that can run the game — or even another Mac — connecting to it through DeskIn gets you native Windows performance, none of the virtualization overhead, and none of the account-login headaches that come with running a second "device." Set it up once, and you'll be ready to log in the moment Classic World opens its doors.

How to Play MapleStory Classic World on Mobile Before the Official App Arrives
MapleStory Classic World has turned into one of the most-searched topics in the MapleStory community this year. Nexon's pre-Big Bang server pulled in roughly 5,000 players for its first Closed Online Test back in April 2026, and thousands more signed up for the second test that ran August 4–12, 2026. With Ossyria, third job advancement, and controller support now confirmed, interest has never been higher — and a lot of that interest is coming from players who want to know one thing: can you play MapleStory Classic World on your phone?
Short answer: not with an official app, not yet. This guide breaks down exactly what Nexon has confirmed about platforms so far, then walks through how DeskIn remote desktop lets you play MapleStory Classic World on mobile right now, without waiting on an app that hasn't been announced.
As of this writing, Nexon has not announced a mobile or console version of MapleStory Classic World. The confirmed platforms are Windows PC and macOS — macOS support was specifically added as a testable feature during the second Closed Online Test in August 2026, alongside Ossyria and third job advancement, but it's still listed as "in development" rather than publicly available.
There's also no full public launch date yet. Nexon has run two Closed Online Tests so far and has said one more test is planned before release, so most community trackers currently estimate a launch window in late 2026 or early 2027 — but that's community speculation, not an official date.
Put simply: if you want to play MapleStory Classic World on a phone or tablet today, a native app isn't an option. The only practical route is streaming the PC version from a Windows machine you already have access to.
Classic World is exclusive to GMS (Global MapleStory), Nexon's English-language service for North America, Europe, and most other regions without a local Nexon partner. Players in markets with their own official MapleStory service — Korea, China, Japan, Taiwan/Hong Kong, and Southeast Asia — aren't eligible for GMS accounts, so Classic World isn't accessible there without a VPN, which isn't recommended. It's not yet confirmed whether NA and EU will run as separate worlds within Classic World.
DeskIn is a cross-platform remote desktop app built specifically with PC gaming in mind, and it maps well onto exactly the problem MapleStory Classic World mobile players are trying to solve.
Stable, low-latency connections. DeskIn's ZeroSync® engine keeps end-to-end latency under 40ms on a good connection and automatically reroutes around congested paths, so grinding, dodging, and skill combos in Classic World's classic-era combat don't feel delayed.
Up to 4K 60FPS / 2K 240FPS streaming. Classic World's remastered pixel art holds up well when it isn't compressed into mush — DeskIn's streaming keeps text and sprites sharp even on a phone screen.
You're connecting to your own PC, not emulating one. DeskIn doesn't run Windows inside your phone; it streams the display of a Windows computer you control and sends your inputs back in real time. That means full compatibility and full performance — no emulation layer to fight with.
End-to-end encryption and two-factor login. Sessions are encrypted end-to-end, and you can set an allowlist of authorized devices, so only you can connect to your own PC.
Flexible, per-character keybinds. Classic World's Warrior, Magician, Bowman, and Thief classes each use very different skill layouts. DeskIn's on-screen game keyboard lets you build a custom key layout and save it as its own profile, so you can switch between characters without re-mapping keys every time.
Built-in virtual mouse. In pointer mode, DeskIn adds virtual left/right mouse buttons over the stream, which makes precise UI clicks — inventory, cash shop, trade windows — far easier than tapping blindly on a touchscreen.
Once you're connected, mobile play through DeskIn covers pretty much everything you'd do sitting at your PC:
Daily quests and login rewards — knock these out on your commute instead of waiting until you're home.
Cash shop browsing — scroll and preview cosmetics with touch gestures just like any shopping app.
Grinding and leveling — use the virtual directional pad and skill-key layout to keep training in familiar maps.
Party quests — latency low enough to keep up with a party's pacing on runs like Kerning City PQ.
Trading and the marketplace — check prices and list items using the virtual mouse for precise clicks.
Guild chat and messaging — reply to your guild or party the moment something comes up.
Step 1: Set up DeskIn on the Windows PC running Classic World. Install DeskIn on the PC where you've registered for testing (or where the game is installed once it launches), sign in, and turn on unattended access so the PC can be reached without anyone sitting in front of it.
Step 2: Install the DeskIn app on your phone. Download DeskIn from the App Store or Google Play, sign in with the same account, and your PC will show up in the device list.
Step 3: Connect and switch to pointer mode. Tap your PC to connect, then switch the control mode from touch to pointer — this unlocks the customizable virtual keyboard and virtual mouse.
Step 4: Browsing the cash shop. Drag to move the cursor and tap the virtual mouse buttons to click through menus and item previews, exactly like using a mouse on a desktop.
Step 5: Grinding. Open the game keyboard menu, build a layout with your movement keys and skill keys, and save it as a profile. Pull it up any time you start a grinding session.
Step 6: Pick the right streaming quality for your connection. On mobile data, prioritize smoothness over resolution to cut down on input delay; on Wi-Fi, bump the quality up to enjoy Classic World's remastered art at full clarity.
A tablet's bigger screen is a natural fit for content that needs either more reading room or more precision — daily quest text and boss encounters both qualify.
Step 1: Same setup as mobile. Install DeskIn on your iPad or Android tablet and sign in — connection steps are identical to the phone app.
Step 2: Daily quests. The larger display makes quest text, item descriptions, and map markers easier to read at a glance, so you're less likely to misread an objective mid-run.
Step 3: Boss fights. Bosses demand precise dodges and timing that touch controls alone can struggle with — pair your tablet with a Bluetooth keyboard and mouse, or a controller (see below), instead of relying on the virtual keyboard.
Step 4: Bump the frame rate for boss content. Choose a higher refresh setting in DeskIn's connection options so skill telegraphs and boss patterns read clearly in real time.
Step 5: Use split-screen for guide lookups. Run DeskIn alongside a browser or notes app in split view to check attack patterns without leaving the fight.
If virtual buttons don't feel precise enough, DeskIn supports Bluetooth controllers, including Xbox, PlayStation, and several third-party pads.
Step 1: Pair the controller with your phone. Use your phone's Bluetooth settings to pair the controller first.
Step 2: Connect through DeskIn. Once connected to your PC, DeskIn automatically detects the paired controller — no extra driver install needed.
Step 3: Test your inputs. Head into a training map first and confirm movement, attacks, and skills map to the buttons you expect before jumping into content that matters.
Step 4: Favor smoothness for fast-paced play. When you're actively grinding or fighting with a controller, prioritize DeskIn's smoothness setting over max resolution for the most responsive feel.
Running a Warrior and a Bowman means running two very different skill bars. Here's how to keep them separate in DeskIn instead of re-mapping keys every login:
Step 1: Switch to pointer mode and open the game keyboard menu. After connecting, switch to pointer mode and open DeskIn's game keyboard settings.
Step 2: Create a new keyboard layout. Tap "New Keyboard" and add your movement pad, skill keys, and item keys to match your current character's build.
Step 3: Name it by character or class. Label the layout something identifiable — "Bowman" or "Main Warrior" — and save it.
Step 4: Load the right profile when you switch characters. Before logging into a different character, select its saved layout from the game keyboard menu instead of rebuilding it from scratch.
Step 5: Update layouts as skills change. When a class gets rebalanced or you unlock new skills after a job advancement, go back into that profile and add the new keys.
No. Nexon has not announced a mobile or console version. Confirmed platforms are Windows, with a macOS client currently in development.
Nexon hasn't announced a public release date. Two Closed Online Tests have run so far (April 16–24 and August 4–12, 2026), with one more test planned before launch. Community estimates point to late 2026 or early 2027, but that isn't official.
No. DeskIn remotely operates your own PC and sends the same mouse and keyboard input you'd normally use — it isn't a macro, bot, or memory-editing tool, so it doesn't behave like the automation that anti-cheat systems are built to catch.
DeskIn's low-latency streaming keeps things playable on a stable connection, generally noticeably smoother than trying to force a browser workaround. Real-world latency still depends on both ends' network quality, so Wi-Fi is recommended over cellular when possible.
For checking dailies or browsing the shop occasionally, the free plan typically covers it. If you plan to grind for long sessions, use a controller regularly, or manage several devices, a paid plan unlocks higher streaming quality and additional features.
Setup and connection steps are identical. The difference is screen size — phones are handy for quick, single-hand tasks like dailies and the shop, while tablets are better suited to boss fights and content where you want a controller or external keyboard.
Until Nexon ships a mobile client — if one ever gets announced — DeskIn is the most practical way to keep playing MapleStory Classic World away from your desk. Install it on both your gaming PC and your phone or tablet, set up a keybind profile per character, and you can knock out dailies, grind, and even tackle boss fights without being tied to a monitor.

Gawing Pangalawang Monitor ang iPad Para sa Windows at Mac Computers
Para sa mga multitasking na manggagawa, ang pagkakaroon ng pangalawang monitor ay maaaring greatly increase ng productivity. Kung ikaw ay isang tao sa home office o isang estudyante na walang dual screen. Narito kung paano mo madaling gawing pangalawang monitor ang iyong idle iPad para sa iyong computer.
1. Taasan ang espasyo ng screen upang ipakita ang higit pa sa parehong oras. Para sa mga multi-task users, maiiwasan nilang magpalipat-lipat ng mga bintana, na nakakatipid ng oras.
2. Ang bawat screen ay gumagana nang hiwalay, ginagawang mas organisado ang workspace.
Kapag nag-e-edit ng mga video, isang screen ang ginagamit para sa pag-e-edit at ang isa para sa paglalagay ng mga materyales. Kapag sumusulat ng papel, isang screen para sa pagsusulat, ang isa para sa paghahanap ng impormasyon atbp.
3. Ang laki ng screen ng iPad ay sapat na malaki, at ang kalidad ng display ay medyo maganda. Para sa mga gumagamit na may mga pangangailangan sa disenyo o gumagamit ng MacBook, mas nagiging cost-effective ito kaysa sa pagbili ng karagdagang screen, at wala nang problema sa pagkakaiba ng kulay.
4. Maraming tao ang may mga iPad sa bahay. Sa pamamagitan ng paggamit ng device na mayroon ka bilang isang dual screen, nakakatipid ka sa gastos ng pagbili ng isa pang screen at ng espasyong ilalagay ito.
Ang sariling tampok ng Apple na Apple Sidecar ay nagbibigay-daan sa iyo na gamitin ang iPad bilang isang external display para sa MacBook at iMac. Gumawa lamang ng ilang simpleng setting at maaari mong makamit ang seamless connection sa pagitan ng iyong iPad at computer.
Paalala: Upang magamit ang Apple Sidecar, ang dalawang device ay dapat nakalog sa parehong Apple ID o nasa parehong network. Dapat i-on ang Bluetooth at Wi-Fi sa parehong device, at hindi dapat lumagpas ang distansya ng 10 meters (tungkol sa 10 meters).
Buksan ang Mac System Settings >> I-click ang "Display" sa sidebar >> I-click ang "+" pop up menu sa kanan at piliin ang iyong iPad.
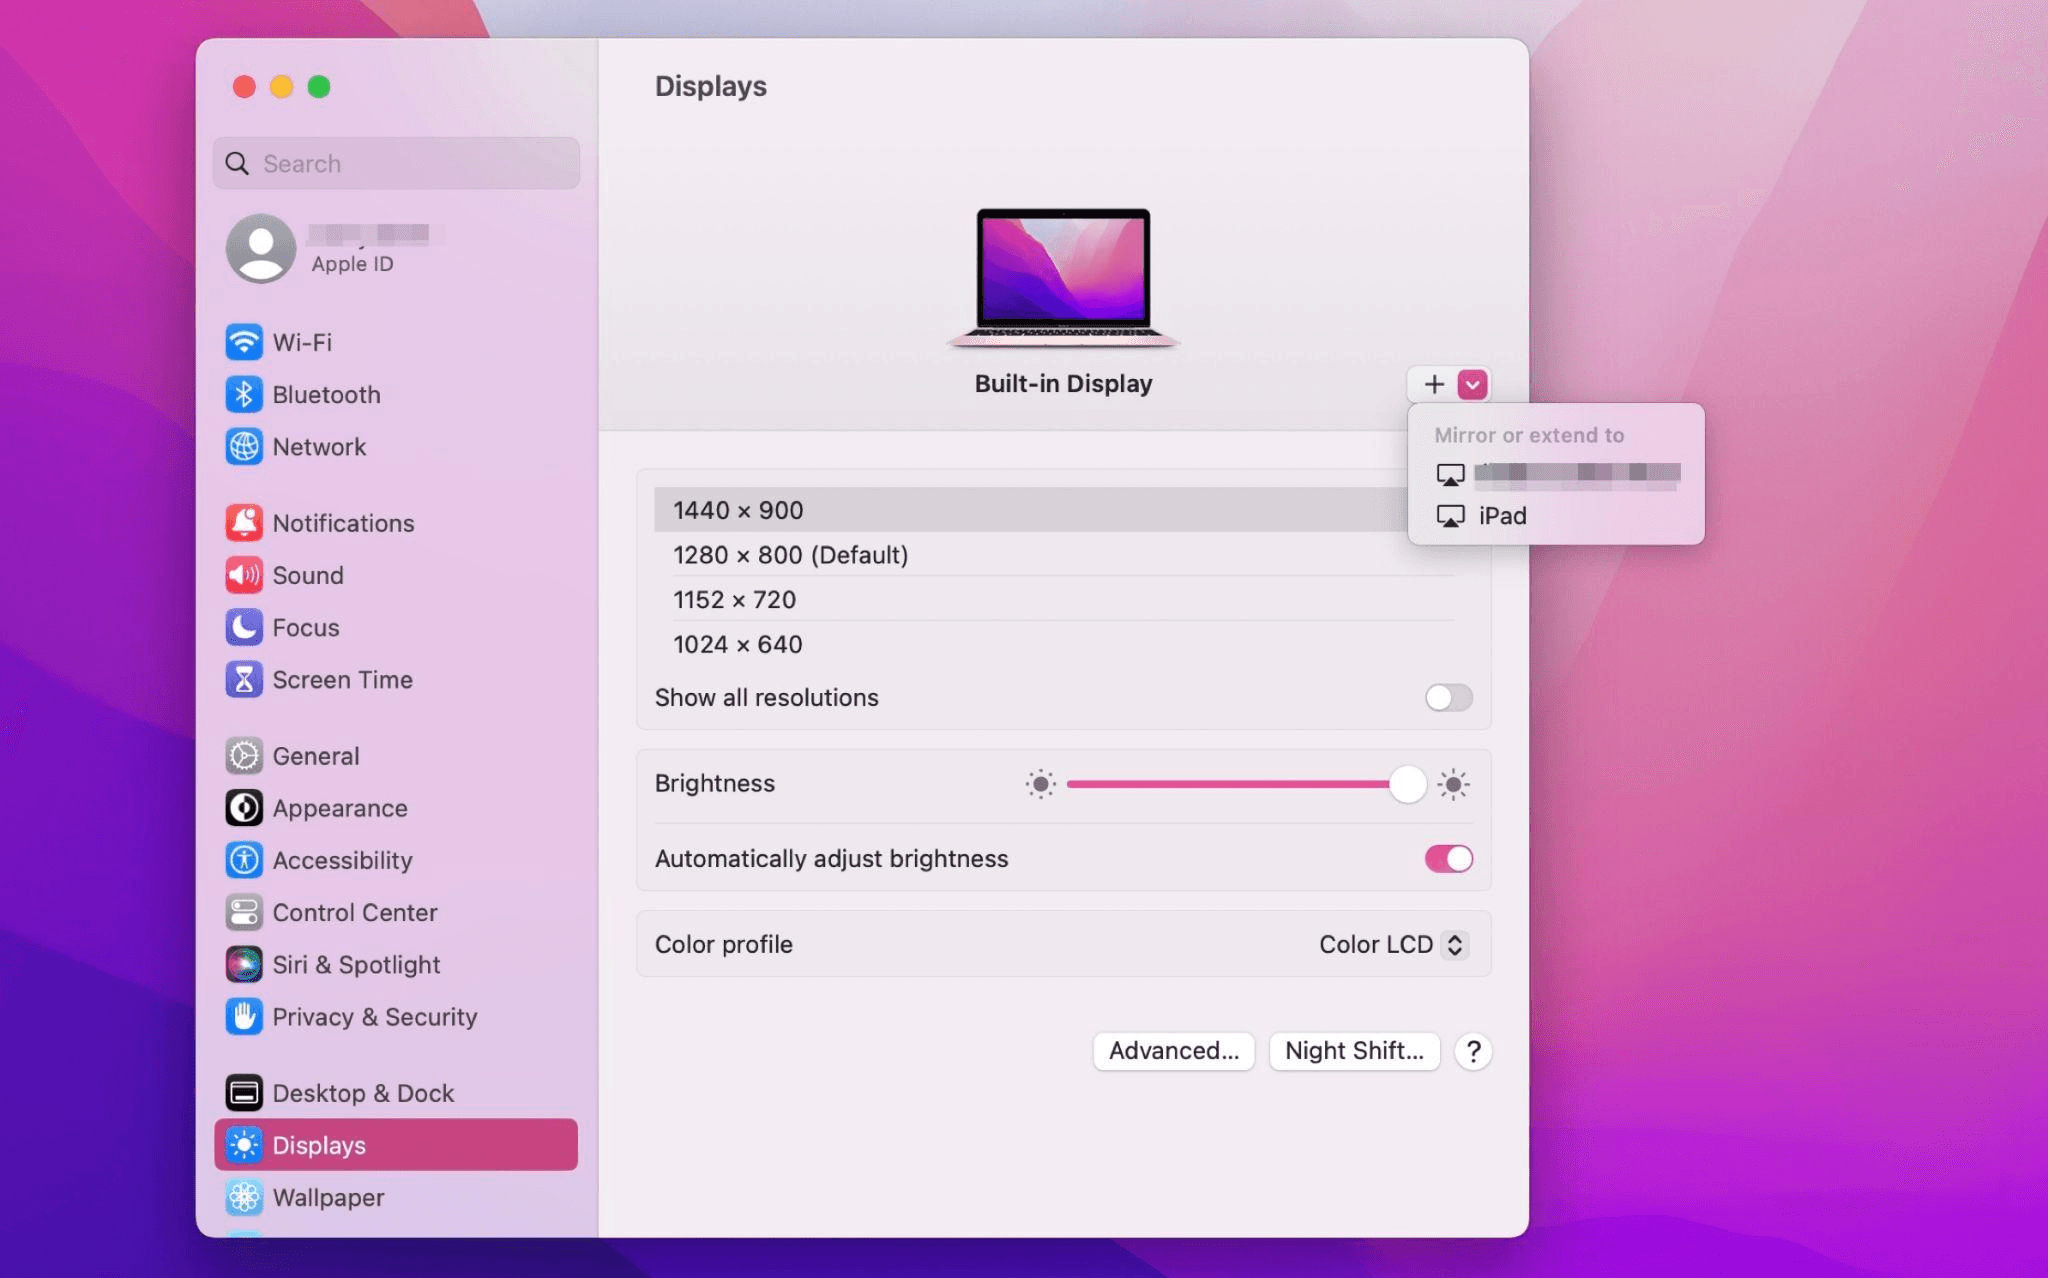
Piliin ang iPad, baguhin ang Use as settings sa "Extended Display". Suriin ang Airplay settings sa itaas na toolbar ng Mac at itakda ang iPad bilang "Use As Separate Display".
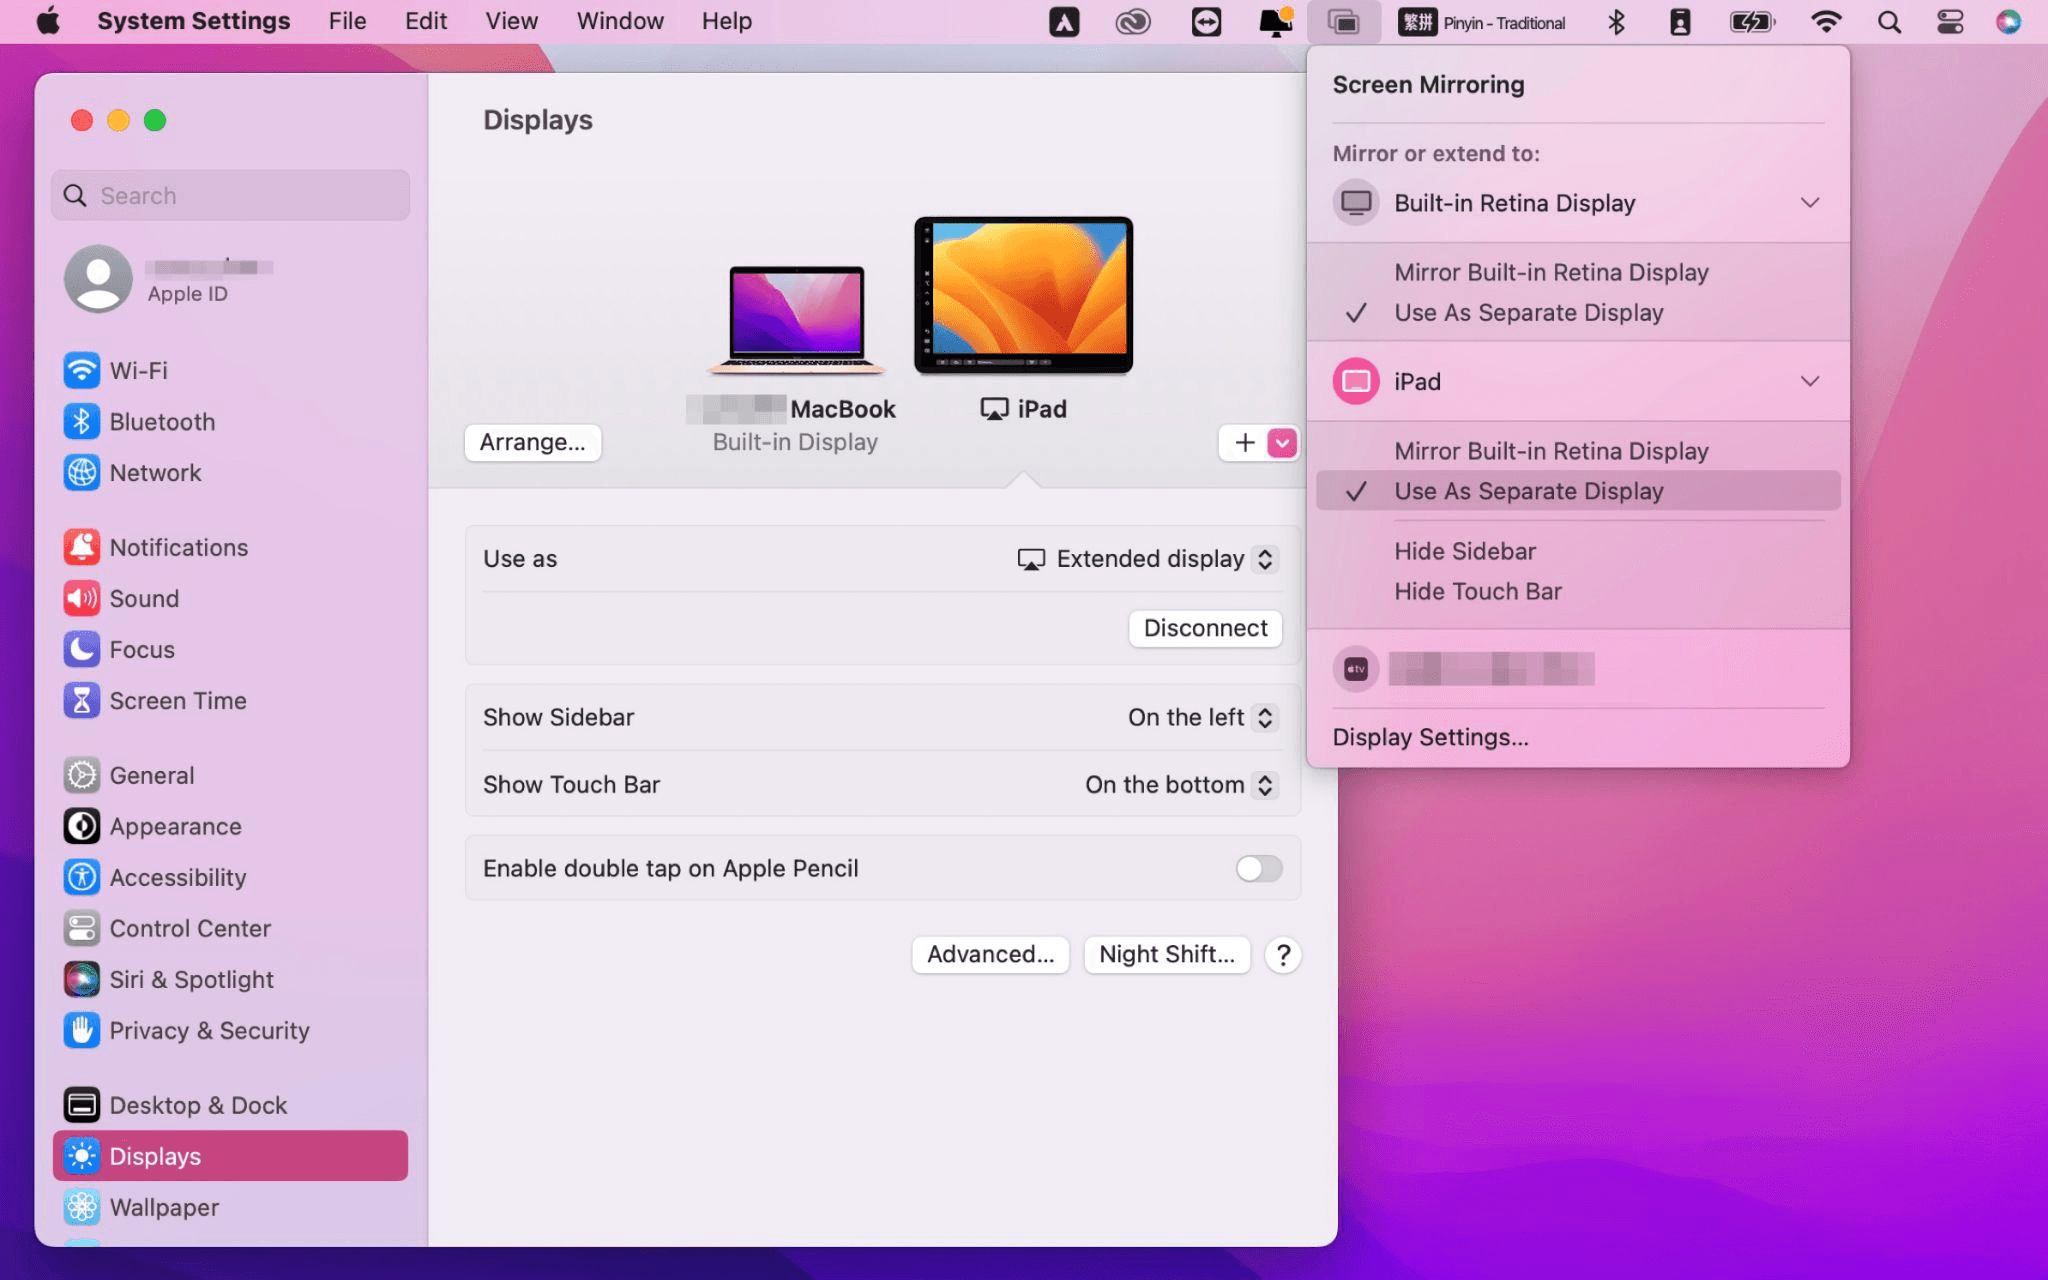
Matapos makumpleto ang mga setting, ang iyong iPad ay magiging pangalawang display para sa iyong Mac. Maaari mong ilipat ang mga bintana mula sa iyong Mac papunta sa iyong iPad nang maayos. Maaari mo ring gamitin ang sidebar sa iPad o baguhin ang posisyon ng sidebar sa system display settings.
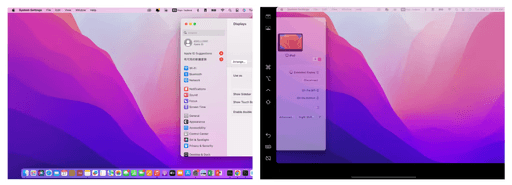
MacBook Screen (Kaliwa) at iPad Screen (Kanan)
Ang Apple Sidecar ay sumusuporta lamang sa mga Mac na inilabas pagkatapos ng 2016 at iPadOS13 o bago. Kung gumagamit ka ng lumang Apple device o Windows device, maaari mo pa ring gamitin ang DeskIn remote software upang gawin ang screen extension. Sinusuportahan nito ang paggamit ng iPad bilang pangalawang display para sa Mac at Windows, at ang smoothness ay hindi mas mababa sa sidecar.
I-download ang DeskIn sa iyong computer at iPad, magrehistro para sa isang libreng account at mag-log in nang hiwalay.

Paalala: Sa iyong unang pag-log in sa isang bagong device, kailangan mong kumpletuhin ang email verification, na naglalayong protektahan ang seguridad ng iyong account.
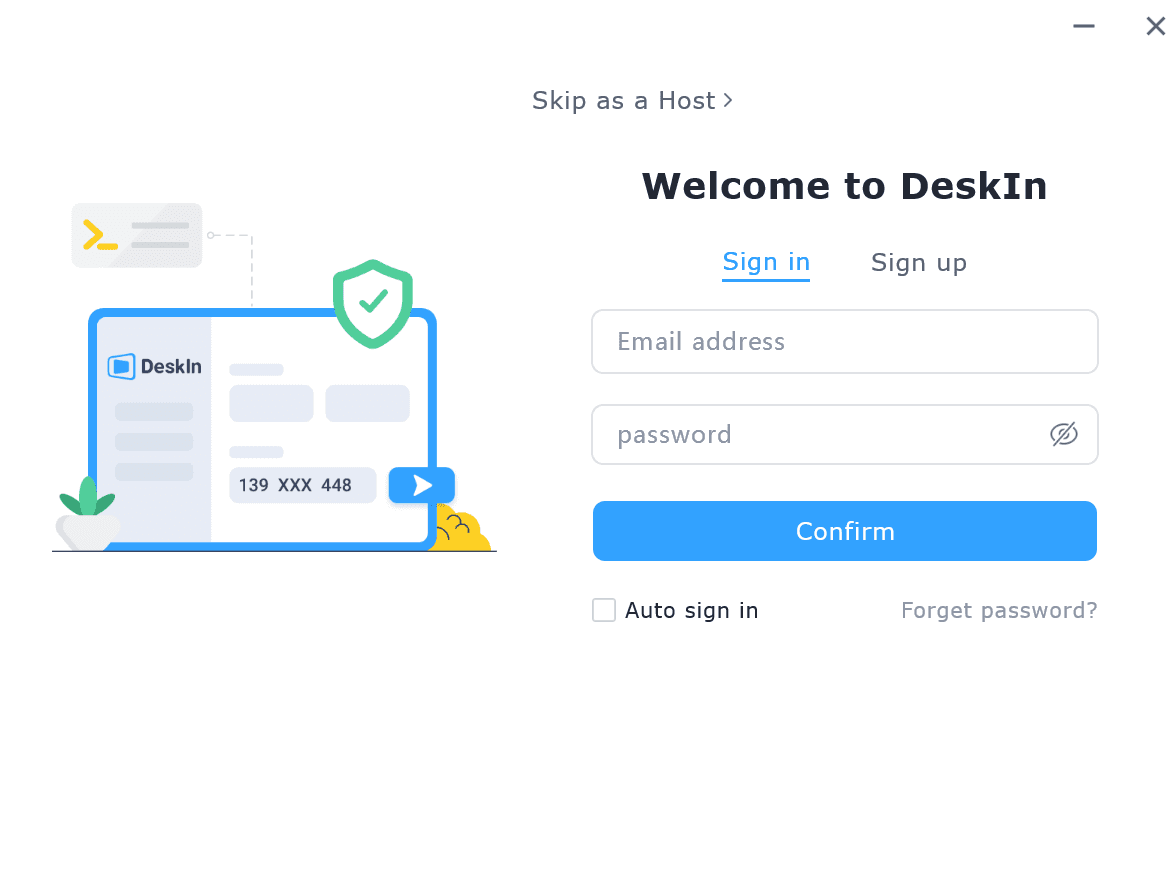
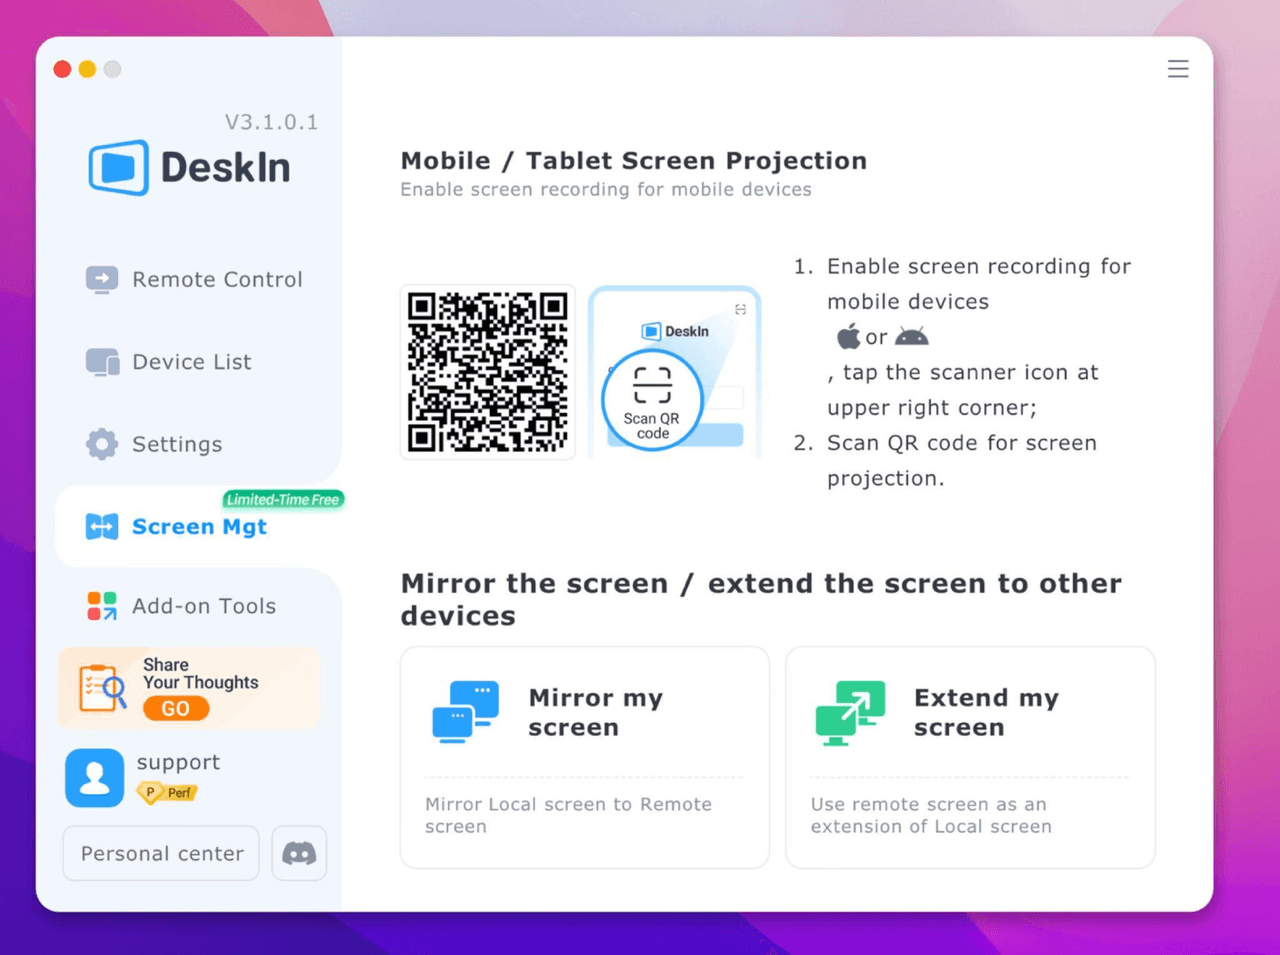
Buksan ang DeskIn app sa iyong Windows/Mac computer >> Pumunta sa "Screen Mgt" Tab >> I-click ang "Extend my screen"
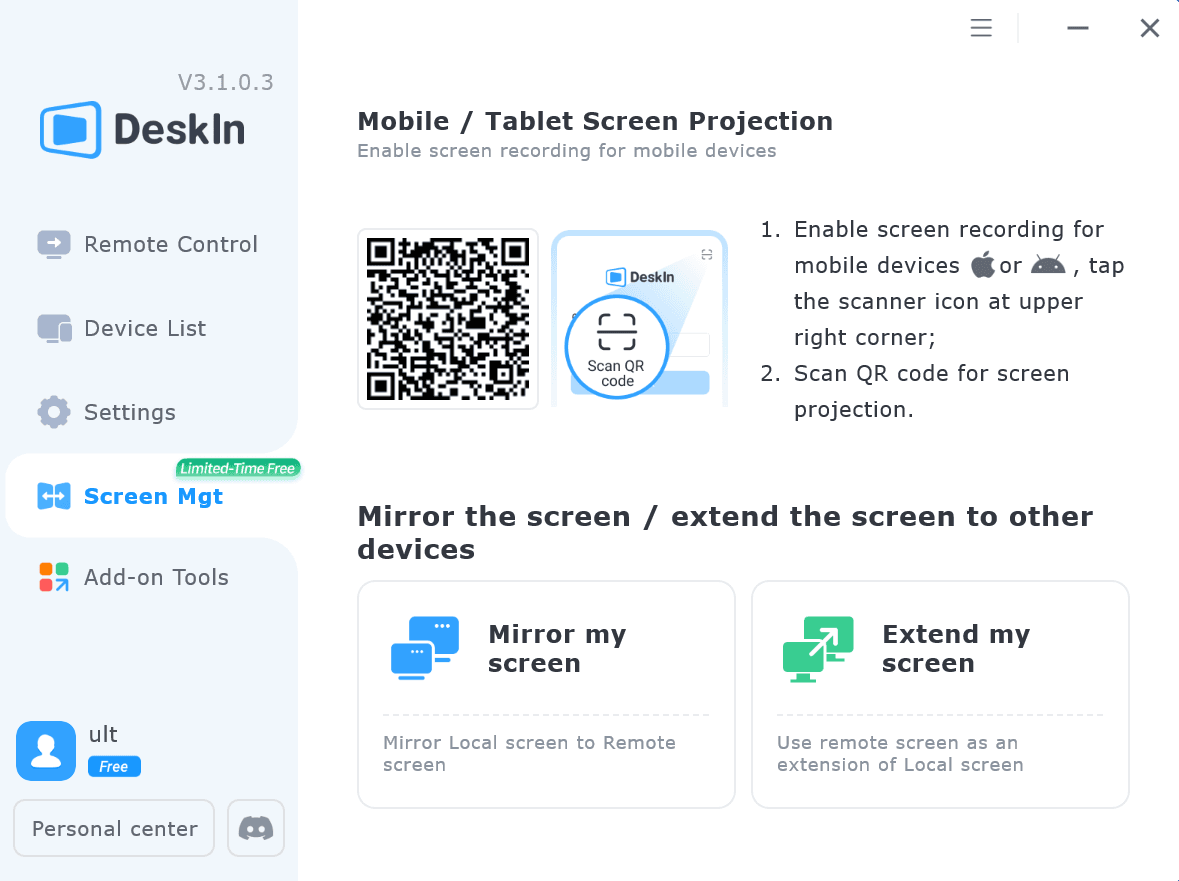
Piliin ang iyong iPad, at i-click ang "Start Extending". Kapag nakakonekta, ang iyong iPad ay magiging pangalawang display ng iyong Windows/Mac computer, maaari mong ilipat ang mga bintana sa pagitan ng dalawang screen na para bang nasa isa lamang ito.
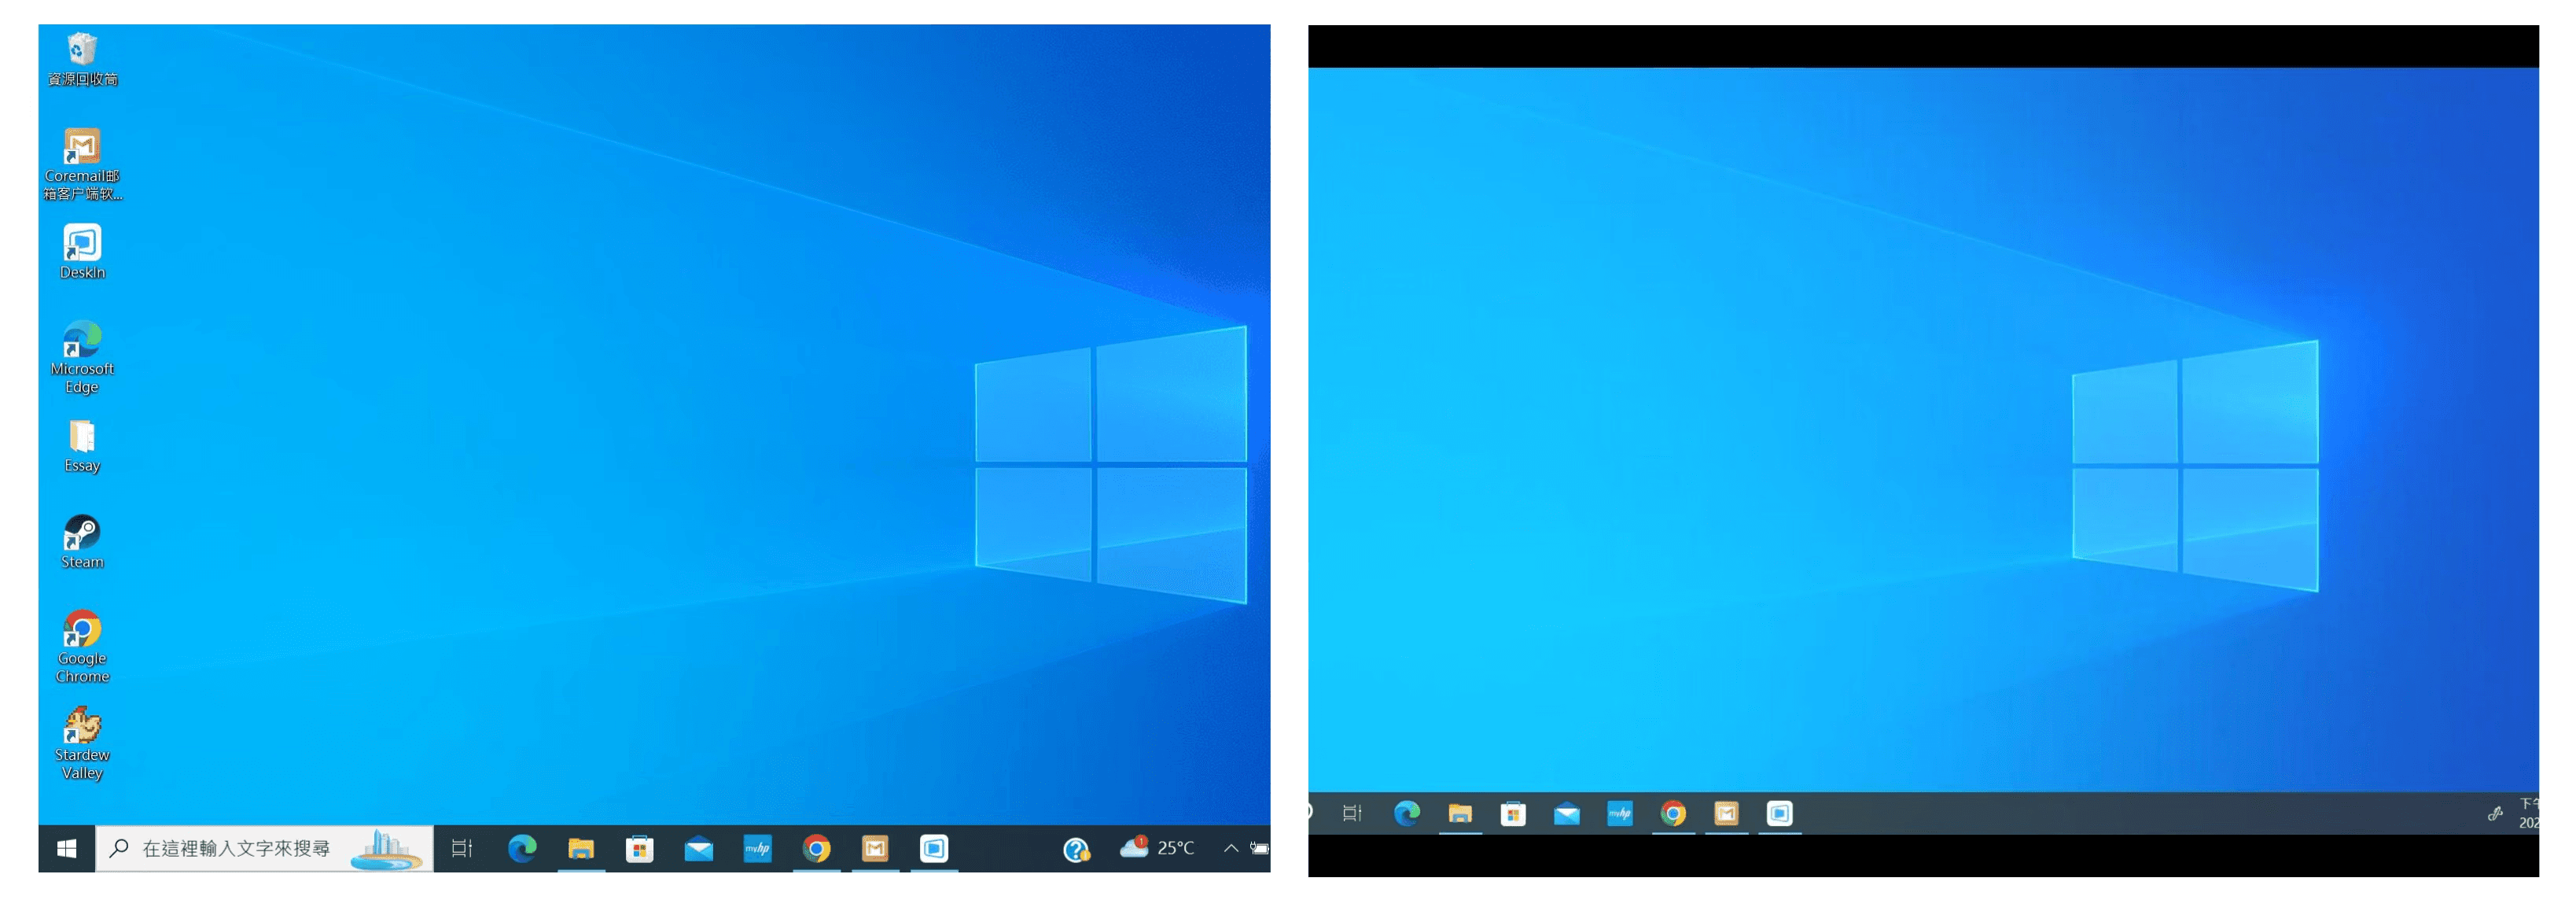
Computer Screen (Kaliwa) at iPad Screen (Kanan)
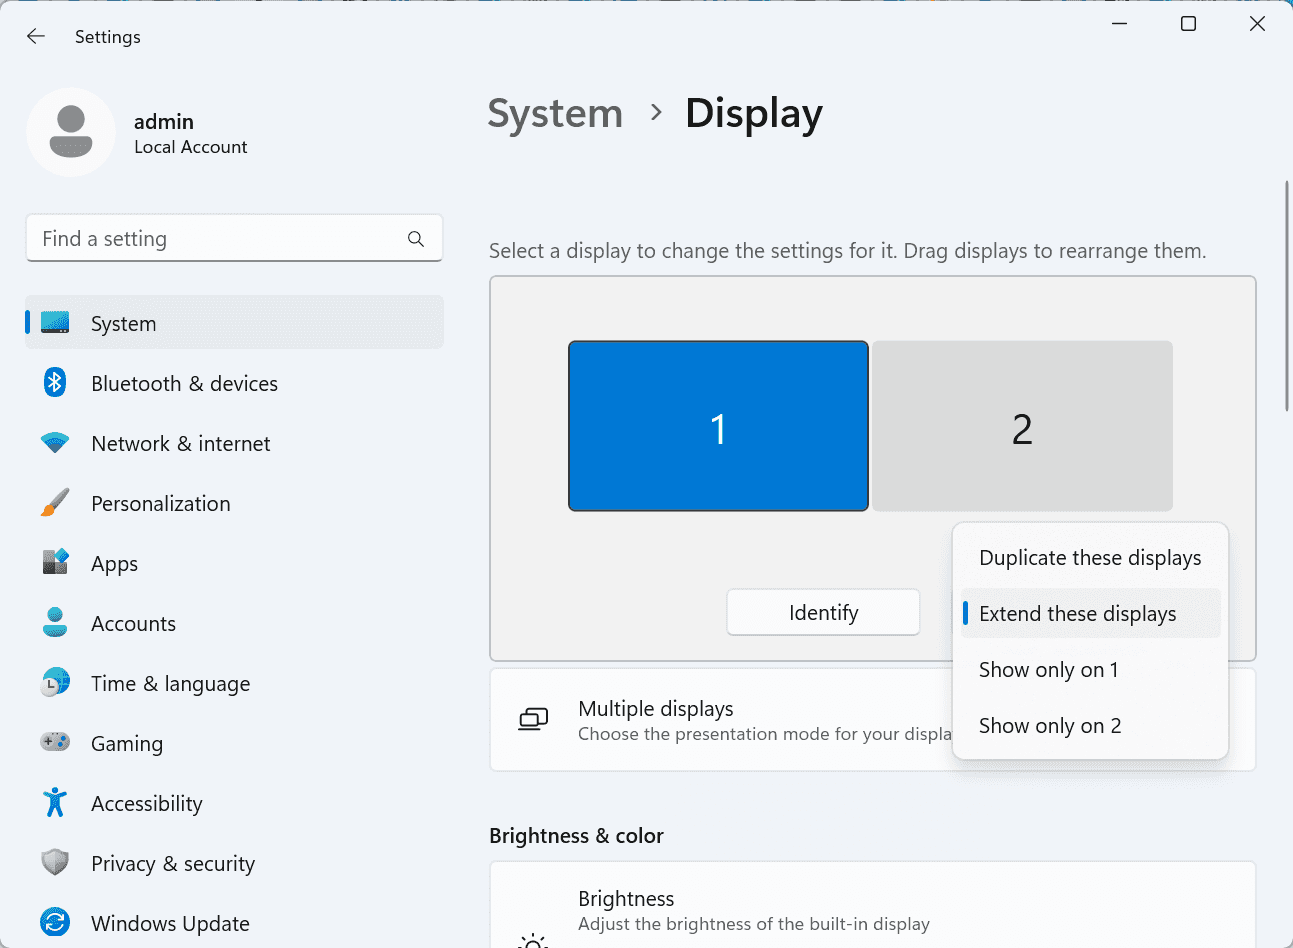
Matapos ang extension, kung napansin mong ang iyong iPad ay nagmi-mirror lamang ng nilalaman sa iyong computer screen, mangyaring pumunta sa Windows System Settings >> Display Settings at baguhin ang screen option sa "Extend these displays". Maaari mo ring baguhin ang posisyon ng screen sa pamamagitan ng pag-drag ng 2 screens.
Ang artikulong ito ay nagpapakita kung paano gamitin ang DeskIn remote desktop software upang gawing "pangalawang screen" ang isang iPad para sa Mac at Windows computers. Ito ay lalong kapaki-pakinabang para sa mga tao na kailangang hawakan ang maraming gawain nang sabay-sabay at nais na mapabuti ang productivity. Kung naghahanap ka ng screen extension tool na gumagana sa iyong MacBook, iPad, Android Tablet at Windows PC, ang DeskIn remote desktop ay ang pinakamainam na solusyon para sa iyo. I-download ang DeskIn at subukan ito ngayon!
How to Play MapleStory Classic World on Mac
A lot of the players who are most excited about MapleStory Classic World grew up on 2005-era MapleStory — and a large share of that generation now does its computing on a MacBook. Nexon clearly knows this: a native macOS client was on the feature list for the second Closed Online Test, which ran August 4–12, 2026, alongside Ossyria and third job advancement. But as of this writing, that Mac client is still in development, not publicly available, and there's still no confirmed public launch date for the game itself.
So if you want to play MapleStory Classic World on a Mac right now — or want a reliable plan for when the game does launch — you've got two real options: run Windows in a virtual machine, or use DeskIn remote desktop to control an actual Windows PC from your Mac. This guide covers both, including a login-conflict issue that catches a lot of virtual machine users off guard.
Not yet, publicly. Nexon's May 2026 roadmap update confirmed macOS support is in development, and it appeared as a testable feature in the second Closed Online Test. Windows PC remains the confirmed launch platform, and Nexon hasn't said whether the Mac client will be ready at launch or arrive afterward. The game hasn't had a full public release on any platform — Nexon has said one more test is planned before launch.
Given that, Mac players currently have two ways in: a Windows virtual machine, or remote desktop software that connects to a real Windows PC.
Classic World is exclusive to GMS (Global MapleStory), covering North America, Europe, and most other regions without a local Nexon partner. Markets with their own official MapleStory service — Korea, China, Japan, Taiwan/Hong Kong, and Southeast Asia — aren't GMS-eligible, so Mac players in those regions would need a VPN to reach Classic World, which isn't recommended. Whether NA and EU will run as separate worlds hasn't been confirmed.
Tools like Parallels Desktop or VMware Fusion let you run a full Windows install inside macOS, and then install MapleStory Classic World the way a Windows user would. It works, but it asks a lot of your Mac's hardware.
RAM: 16GB minimum recommended; 8GB is genuinely tight, since macOS and Windows are both running at once and macOS alone can eat most of that before Windows gets a share. For a comfortable setup with guides or Discord open on the side, aim for 32GB.
CPU/GPU: Virtual machines can't pass hardware through at 100%; graphics get software-emulated, which typically costs 20–30% of the performance you'd get on native Windows hardware.
Thermals: Running two full operating systems under load generates real heat, and laptop-class Macs with limited cooling can throttle during longer grinding sessions.
Apple Silicon translation overhead: M-series Macs can only run Windows on ARM in a VM. If Classic World ships as an x86/x64 build, it needs an extra translation layer to run at all, stacking on top of the virtualization overhead already mentioned.
Anti-cheat compatibility is a real unknown: the original MapleStory has historically been hostile to virtualized environments because of its anti-cheat system, and Nexon hasn't said how Classic World's anti-cheat will treat VMs. Treat virtualization as a maybe, not a guaranteed plan.
There's also the practical overhead: setting up a VM means downloading a Windows image, allocating dozens of gigabytes of disk space, installing display drivers, and — on Apple Silicon — dealing with ARM compatibility quirks that don't show up on a real x86 PC. Keyboard shortcuts can also conflict, since macOS system shortcuts (Control, Option, Command) don't always play nicely with a Windows game's default keybinds.
Instead of building a Windows environment inside your Mac, DeskIn lets you connect directly to a Windows PC you already have — your desktop at home, a work machine, or a spare laptop — and control it from your Mac in real time. The game runs on genuine Windows hardware the whole time, so there's no emulation tax, no ARM translation layer, and no anti-cheat guessing game.
A virtual machine makes sense if:
You don't have access to any Windows PC at all, so a Mac VM is your only option.
Your Mac has strong specs — 16GB+ RAM, ideally 32GB, and a higher-end M-series chip that can absorb the performance loss.
You're comfortable with a fairly technical setup process.
You rarely need to switch between devices, so the single-login limitation isn't a practical issue for you.
DeskIn makes more sense if:
You already have a Windows PC (or another Mac) that can run MapleStory Classic World, and you just want to reach it from your MacBook.
You're traveling or away from your desk often and want to pick up where you left off without re-downloading anything.
You don't want to deal with logging out of one device every time you switch to another.
Your Mac has more modest specs, and you'd rather not risk stutters, crashes, or a game that won't launch at all.
If you already own a Windows machine, DeskIn is generally the lower-effort, lower-risk choice. A VM is really a fallback for players with no Windows access and a Mac powerful enough to absorb the overhead.
Step 1: Set up the Windows PC. Install MapleStory Classic World on a Windows PC and create your character, then install DeskIn on that same PC, sign in, and enable unattended access with a connection password so you can reach it later without anyone at the keyboard.
Step 2: Install DeskIn on your Mac. Download the macOS version of DeskIn, sign in with the same account, and your Windows PC will appear in your device list.
Step 3: Connect. Select the PC, enter the connection password, and you'll get a live view of the Windows desktop that you control with your Mac's mouse and trackpad — the same session, the same login, no conflicts.
Step 4: Tune quality for your connection. On a stable connection, push quality up to enjoy Classic World's remastered pixel art in full detail; on the road, prioritize smoothness to cut down on input lag.
Step 5: Log in and play. Open the game inside the remote session and log in as usual — grinding, party quests, and shopping all work exactly as they would sitting at the PC directly.
Resolution and quality: Free-tier users should start around 720p/30fps for a stable baseline; paid-tier users can push up to 4K 60FPS or 2K 240FPS on a strong connection to get the most out of Classic World's art.
Screen scaling: If your Mac and Windows PC have very different display sizes, use DeskIn's automatic scaling option in the toolbar, or adjust the remote PC's resolution to match your Mac's screen more closely.
Keyboard and mouse mapping: DeskIn maps your Mac's keyboard directly to the remote PC. Turning on Game Mouse mode prevents the keyboard from getting locked mid-session.
Controller support: If Mac keyboard controls feel awkward, pair a controller to your Mac and enable controller mapping from the toolbar — DeskIn will pass those inputs straight through to the remote PC.
Simple Setup:No Windows installation required — connect and start playing within minutes.
Doesn't tax your Mac's hardware. All the actual computation happens on the remote Windows PC; your Mac just displays the stream and sends inputs.
Performance and compatibility match native Windows, because that's exactly what's running — no ARM translation layer to worry about.
No account login conflicts, since DeskIn connects to the same existing session instead of creating a new device.
Cross-device flexibility. The same account lets you connect from Mac, iPhone, iPad, or Android, and it's always the same underlying session — no juggling logins between devices.
Not publicly yet. Nexon has confirmed a macOS client is in development and tested it in the second Closed Online Test, but Windows remains the confirmed launch platform and no public Mac release has shipped.
Yes. DeskIn uses end-to-end encryption and two-factor login, and since you're remotely operating a PC you already control, your credentials never pass through a third party.
Technically you can install one, but the experience will be rough. With 8GB split between macOS and Windows, there's very little left over for Windows, and stutters or crashes become likely during longer sessions. DeskIn is the more stable option here, since the remote PC handles all the processing — your Mac's RAM isn't a bottleneck.
Real-world performance depends on both ends' network quality, but since DeskIn connects to native Windows hardware with no virtualization overhead, and its low-latency streaming keeps end-to-end delay under 40ms on a good connection, it typically feels smoother than a resource-constrained VM.
No. DeskIn controls the same PC and the same already-active session rather than logging in as a new device, so it doesn't trigger MapleStory's single-session login limit — this is exactly the conflict that trips up VM users switching between two separate Windows installs.
DeskIn needs a Windows (or other supported platform) machine to connect to. If you don't have one, consider borrowing access to a friend's or family member's PC, or renting a cloud Windows machine as your connection target.
DeskIn supports Windows, macOS, iOS, and Android. A Mac can connect to a Windows PC, and a Windows PC can just as easily connect to and control a Mac.
MapleStory Classic World doesn't have a public Mac client yet, but that doesn't mean Mac players have to gamble on a resource-hungry virtual machine and hope the anti-cheat cooperates. If you already have access to a Windows PC that can run the game — or even another Mac — connecting to it through DeskIn gets you native Windows performance, none of the virtualization overhead, and none of the account-login headaches that come with running a second "device." Set it up once, and you'll be ready to log in the moment Classic World opens its doors.
How to Play MapleStory Classic World on Mobile Before the Official App Arrives
MapleStory Classic World has turned into one of the most-searched topics in the MapleStory community this year. Nexon's pre-Big Bang server pulled in roughly 5,000 players for its first Closed Online Test back in April 2026, and thousands more signed up for the second test that ran August 4–12, 2026. With Ossyria, third job advancement, and controller support now confirmed, interest has never been higher — and a lot of that interest is coming from players who want to know one thing: can you play MapleStory Classic World on your phone?
Short answer: not with an official app, not yet. This guide breaks down exactly what Nexon has confirmed about platforms so far, then walks through how DeskIn remote desktop lets you play MapleStory Classic World on mobile right now, without waiting on an app that hasn't been announced.
As of this writing, Nexon has not announced a mobile or console version of MapleStory Classic World. The confirmed platforms are Windows PC and macOS — macOS support was specifically added as a testable feature during the second Closed Online Test in August 2026, alongside Ossyria and third job advancement, but it's still listed as "in development" rather than publicly available.
There's also no full public launch date yet. Nexon has run two Closed Online Tests so far and has said one more test is planned before release, so most community trackers currently estimate a launch window in late 2026 or early 2027 — but that's community speculation, not an official date.
Put simply: if you want to play MapleStory Classic World on a phone or tablet today, a native app isn't an option. The only practical route is streaming the PC version from a Windows machine you already have access to.
Classic World is exclusive to GMS (Global MapleStory), Nexon's English-language service for North America, Europe, and most other regions without a local Nexon partner. Players in markets with their own official MapleStory service — Korea, China, Japan, Taiwan/Hong Kong, and Southeast Asia — aren't eligible for GMS accounts, so Classic World isn't accessible there without a VPN, which isn't recommended. It's not yet confirmed whether NA and EU will run as separate worlds within Classic World.
DeskIn is a cross-platform remote desktop app built specifically with PC gaming in mind, and it maps well onto exactly the problem MapleStory Classic World mobile players are trying to solve.
Stable, low-latency connections. DeskIn's ZeroSync® engine keeps end-to-end latency under 40ms on a good connection and automatically reroutes around congested paths, so grinding, dodging, and skill combos in Classic World's classic-era combat don't feel delayed.
Up to 4K 60FPS / 2K 240FPS streaming. Classic World's remastered pixel art holds up well when it isn't compressed into mush — DeskIn's streaming keeps text and sprites sharp even on a phone screen.
You're connecting to your own PC, not emulating one. DeskIn doesn't run Windows inside your phone; it streams the display of a Windows computer you control and sends your inputs back in real time. That means full compatibility and full performance — no emulation layer to fight with.
End-to-end encryption and two-factor login. Sessions are encrypted end-to-end, and you can set an allowlist of authorized devices, so only you can connect to your own PC.
Flexible, per-character keybinds. Classic World's Warrior, Magician, Bowman, and Thief classes each use very different skill layouts. DeskIn's on-screen game keyboard lets you build a custom key layout and save it as its own profile, so you can switch between characters without re-mapping keys every time.
Built-in virtual mouse. In pointer mode, DeskIn adds virtual left/right mouse buttons over the stream, which makes precise UI clicks — inventory, cash shop, trade windows — far easier than tapping blindly on a touchscreen.
Once you're connected, mobile play through DeskIn covers pretty much everything you'd do sitting at your PC:
Daily quests and login rewards — knock these out on your commute instead of waiting until you're home.
Cash shop browsing — scroll and preview cosmetics with touch gestures just like any shopping app.
Grinding and leveling — use the virtual directional pad and skill-key layout to keep training in familiar maps.
Party quests — latency low enough to keep up with a party's pacing on runs like Kerning City PQ.
Trading and the marketplace — check prices and list items using the virtual mouse for precise clicks.
Guild chat and messaging — reply to your guild or party the moment something comes up.
Step 1: Set up DeskIn on the Windows PC running Classic World. Install DeskIn on the PC where you've registered for testing (or where the game is installed once it launches), sign in, and turn on unattended access so the PC can be reached without anyone sitting in front of it.
Step 2: Install the DeskIn app on your phone. Download DeskIn from the App Store or Google Play, sign in with the same account, and your PC will show up in the device list.
Step 3: Connect and switch to pointer mode. Tap your PC to connect, then switch the control mode from touch to pointer — this unlocks the customizable virtual keyboard and virtual mouse.
Step 4: Browsing the cash shop. Drag to move the cursor and tap the virtual mouse buttons to click through menus and item previews, exactly like using a mouse on a desktop.
Step 5: Grinding. Open the game keyboard menu, build a layout with your movement keys and skill keys, and save it as a profile. Pull it up any time you start a grinding session.
Step 6: Pick the right streaming quality for your connection. On mobile data, prioritize smoothness over resolution to cut down on input delay; on Wi-Fi, bump the quality up to enjoy Classic World's remastered art at full clarity.
A tablet's bigger screen is a natural fit for content that needs either more reading room or more precision — daily quest text and boss encounters both qualify.
Step 1: Same setup as mobile. Install DeskIn on your iPad or Android tablet and sign in — connection steps are identical to the phone app.
Step 2: Daily quests. The larger display makes quest text, item descriptions, and map markers easier to read at a glance, so you're less likely to misread an objective mid-run.
Step 3: Boss fights. Bosses demand precise dodges and timing that touch controls alone can struggle with — pair your tablet with a Bluetooth keyboard and mouse, or a controller (see below), instead of relying on the virtual keyboard.
Step 4: Bump the frame rate for boss content. Choose a higher refresh setting in DeskIn's connection options so skill telegraphs and boss patterns read clearly in real time.
Step 5: Use split-screen for guide lookups. Run DeskIn alongside a browser or notes app in split view to check attack patterns without leaving the fight.
If virtual buttons don't feel precise enough, DeskIn supports Bluetooth controllers, including Xbox, PlayStation, and several third-party pads.
Step 1: Pair the controller with your phone. Use your phone's Bluetooth settings to pair the controller first.
Step 2: Connect through DeskIn. Once connected to your PC, DeskIn automatically detects the paired controller — no extra driver install needed.
Step 3: Test your inputs. Head into a training map first and confirm movement, attacks, and skills map to the buttons you expect before jumping into content that matters.
Step 4: Favor smoothness for fast-paced play. When you're actively grinding or fighting with a controller, prioritize DeskIn's smoothness setting over max resolution for the most responsive feel.
Running a Warrior and a Bowman means running two very different skill bars. Here's how to keep them separate in DeskIn instead of re-mapping keys every login:
Step 1: Switch to pointer mode and open the game keyboard menu. After connecting, switch to pointer mode and open DeskIn's game keyboard settings.
Step 2: Create a new keyboard layout. Tap "New Keyboard" and add your movement pad, skill keys, and item keys to match your current character's build.
Step 3: Name it by character or class. Label the layout something identifiable — "Bowman" or "Main Warrior" — and save it.
Step 4: Load the right profile when you switch characters. Before logging into a different character, select its saved layout from the game keyboard menu instead of rebuilding it from scratch.
Step 5: Update layouts as skills change. When a class gets rebalanced or you unlock new skills after a job advancement, go back into that profile and add the new keys.
No. Nexon has not announced a mobile or console version. Confirmed platforms are Windows, with a macOS client currently in development.
Nexon hasn't announced a public release date. Two Closed Online Tests have run so far (April 16–24 and August 4–12, 2026), with one more test planned before launch. Community estimates point to late 2026 or early 2027, but that isn't official.
No. DeskIn remotely operates your own PC and sends the same mouse and keyboard input you'd normally use — it isn't a macro, bot, or memory-editing tool, so it doesn't behave like the automation that anti-cheat systems are built to catch.
DeskIn's low-latency streaming keeps things playable on a stable connection, generally noticeably smoother than trying to force a browser workaround. Real-world latency still depends on both ends' network quality, so Wi-Fi is recommended over cellular when possible.
For checking dailies or browsing the shop occasionally, the free plan typically covers it. If you plan to grind for long sessions, use a controller regularly, or manage several devices, a paid plan unlocks higher streaming quality and additional features.
Setup and connection steps are identical. The difference is screen size — phones are handy for quick, single-hand tasks like dailies and the shop, while tablets are better suited to boss fights and content where you want a controller or external keyboard.
Until Nexon ships a mobile client — if one ever gets announced — DeskIn is the most practical way to keep playing MapleStory Classic World away from your desk. Install it on both your gaming PC and your phone or tablet, set up a keybind profile per character, and you can knock out dailies, grind, and even tackle boss fights without being tied to a monitor.
Products
Download
Resources
Contact Us
Email: support@deskin.io
Office: 991D Alexandra Road #02-17, Singapore 119972
Copyright © 2026 Zuler Technology PTE. LTD. All rights reserved.
Contact Us
Email: support@deskin.io
Office: 991D Alexandra Road #02-17, Singapore 119972
Products
Download
Resources
Copyright © 2026 Zuler Technology PTE. LTD. All rights reserved.
Products
Download
Resources
Contact Us
support@deskin.io
991D Alexandra Road #02-17
Singapore 119972
Copyright © 2026 Zuler Technology PTE. LTD. All rights reserved.
【New User Special Offer】
Save
Extra 20%
on your first order|4K60FPS
Extra
20% Off
|For
New Users
【New User Special Offer】
Save
Extra 20%
on first order


