ประสิทธิภาพ
ประสิทธิภาพ
·
10 นาที
·
10 นาที
ดับเบิลยู ทิง
Published on
Updated on
Updated on
รู้สึกลำบากในการช่วยเพื่อนหรือครอบครัวเกี่ยวกับปัญหา PC เมื่อคุณใช้ Mac อยู่หรือไม่? ไม่ว่าจะเป็นการจัดการไฟล์ ตรวจสอบการตั้งค่าเครือข่าย หรือการปรับเปลี่ยนการกำหนดค่าของระบบ การเข้าถึงระยะไกลข้ามแพลตฟอร์มมักหมายถึงการต่อสู้กับการเชื่อมต่อที่ช้าหรือการตั้งค่าที่ยากลำบาก ความหน่วงที่น่าหงุดหงิดเมื่อย้ายหน้าต่างหรือพิมพ์คำสั่งทำให้การแก้ปัญหาเบื้องต้นดูเหมือนจะเป็นไปไม่ได้ คุณต้องการวิธีที่ราบรื่นในการเข้าถึง PC ระยะไกลจาก Mac โดยไม่ต้องปวดหัว
ในคำแนะนำนี้ เราจะ สำรวจเครื่องมือที่เชื่อถือได้ 6 รายการที่ออกแบบมาเพื่อการควบคุม Mac-to-PC ที่ราบรื่น
แต่ละรายการมีจุดเด่นเฉพาะตัว ตั้งแต่เครื่องมือฟรีไปจนถึงโซลูชันที่ได้รับการปรับประสิทธิภาพ คุณจะพบตัวเลือกสำหรับการช่วยเหลือเฮลป์เดสก์ง่ายๆ งานที่ใช้กราฟิกหนัก และการสนับสนุนระดับองค์กร อ่านต่อเพื่อหาคู่ที่เหมาะสมสำหรับการเข้าถึง< a id="1"> Windows ระยะไกลจากอุปกรณ์ของคุณโดยง่ายดาย
< แต่ละรายการมีจุดเด่นเฉพาะตัว ตั้งแต่เครื่องมือฟรีไปจนถึงโซลูชันที่ได้รับการปรับประสิทธิภาพ คุณจะพบตัวเลือกสำหรับการช่วยเหลือเฮลป์เดสก์ง่ายๆ งานที่ใช้กราฟิกหนัก และการสนับสนุนระดับองค์กร อ่านต่อเพื่อหาคู่ที่เหมาะสมสำหรับการเข้าถึง>
👀 ค้นพบเพิ่มเติม:
รีโมทเดสก์ท็อปจาก Mac ถึง Windows—DeskIn เป็นลูกค้าซอฟต์แวร์รีโมทเดสก์ท็อปข้ามแพลตฟอร์มที่อนุญาตให้คุณ ควบคุม PC Windows ของคุณจาก MacBook หรือ iMac ได้ตลอดเวลา ไม่ว่าจะทำงานอยู่ที่บ้าน หรือกำลังเดินทาง หรือช่วยเพื่อน มันให้การเชื่อมต่อที่ราบรื่นและปลอดภัยพร้อมกับข้อกำหนดการตั้งค่าที่ต่ำกว่าอุปกรณ์ระยะไกลแบบดั้งเดิม ด้วยอินเทอร์เฟซที่ใช้ง่ายและชุดคุณสมบัติขั้นสูง มันคือซอฟต์แวร์รีโมทที่ดีที่สุดสำหรับการเข้าถึงไฟล์หรือซอฟต์แวร์ การโอนย้ายไฟล์ การเล่นเกม PC จาก Mac เป็นต้น
👀 คุณสมบัติเด่นของ DeskIn สำหรับการเข้าถึง Mac-to-Windows:
ความเข้ากันได้ข้ามแพลตฟอร์ม - เชื่อมต่อ Mac ของคุณกับอุปกรณ์ Windows ใดๆ
การเข้าถึงโดยไม่มีผู้ดูแล & หน้าจอความเป็นส่วนตัว - รับประกันการเข้าถึง PC Windows ของคุณอย่างปลอดภัยโดยไม่ต้องมีการโต้ตอบกับผู้ใช้
ช่วงเวลาการเชื่อมต่อต่ำ - เสนอคุณสมบัติที่ได้รับการปรับประสิทธิภาพสำหรับการป้อนข้อมูลและผลตอบกลับทางภาพที่ราบรื่น
การโอนย้ายไฟล์ไกล - โอนย้ายไฟล์ระหว่าง Mac และ PC ได้โดยไม่มีข้อจำกัดขนาด/ประเภท
การสตรีม 4K และสูงกว่า FPS - สูงสุดถึง 4K/60FPS หรือ 2K/144FPS สำหรับภาพเคลื่อนไหวที่ราบรื่น
หน้าจอสะท้อน & หน้าจอเสมือน - สะท้อน Windows ไปที่ Mac หรือ ขยายการแสดงผล
ตอนนี้ มาดูขั้นตอนการปฏิบัติการด้วย DeskIn เพื่อเข้าถึง PC จาก Mac ของคุณ!
ขั้นตอนที่ 1. ดาวน์โหลดและติดตั้ง DeskIn สำหรับทั้ง Mac และ PC Windows ของคุณ สร้างบัญชี DeskIn ฟรีโดยใช้อีเมลของคุณและทำกระบวนการยืนยันให้เสร็จสิ้น ล็อกอินเข้าสู่บัญชีเดียวกันบนทั้ง Mac และ PC Windows เป้าหมาย

ขั้นตอนที่ 2. บน Mac ของคุณ เรียกใช้ DeskIn, ป้อนรหัสอุปกรณ์และรหัสผ่านที่แสดงบนอินเทอร์เฟซของ DeskIn บน PC ของคุณ และคลิกปุ่ม "Connect" เพื่อเริ่มการเชื่อมต่อ คุณจะสามารถโต้ตอบกับเดสก์ท็อป Windows ของคุณได้ทันทีในเวลาจริง
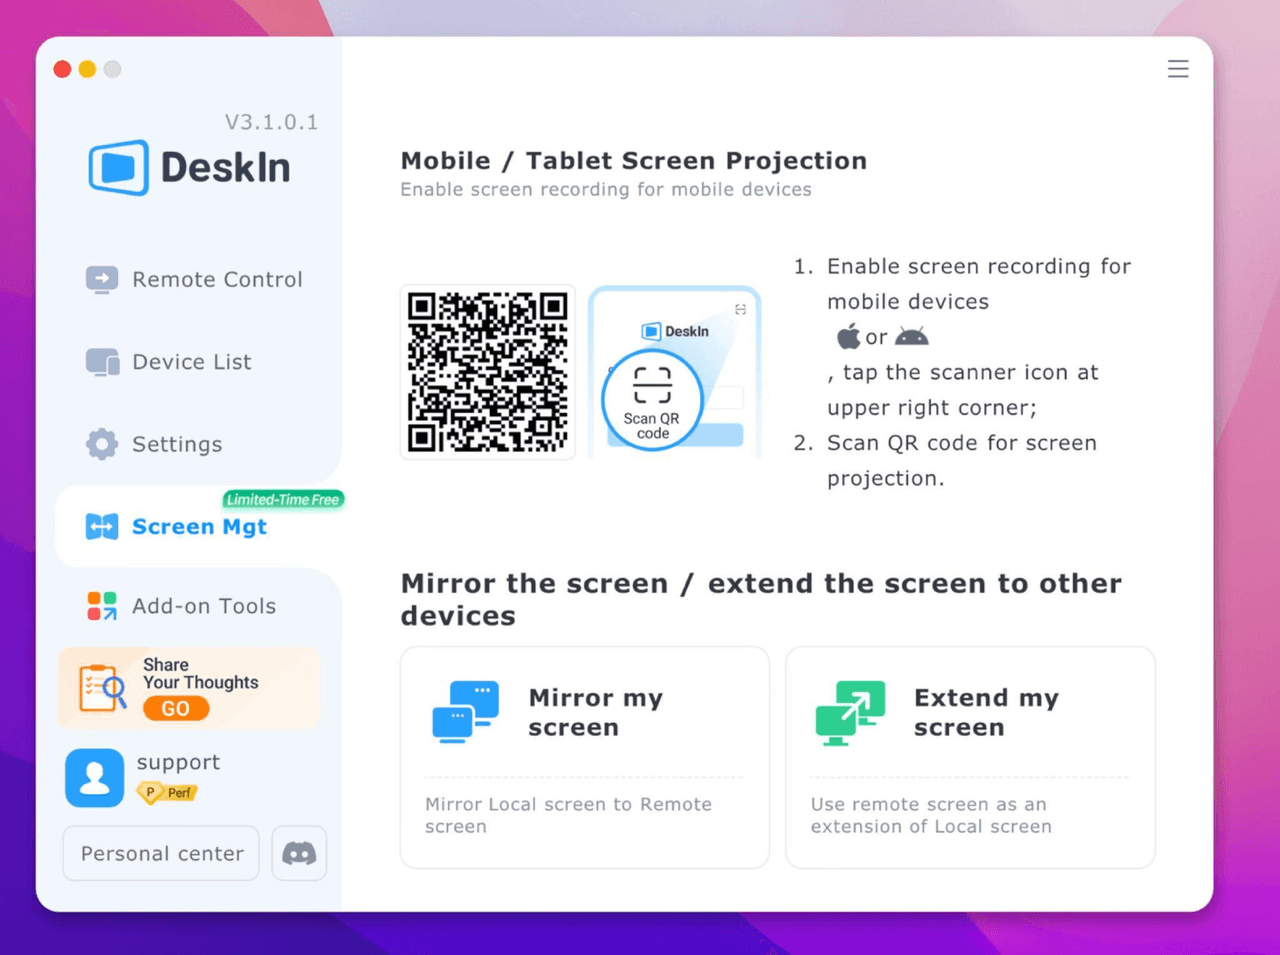
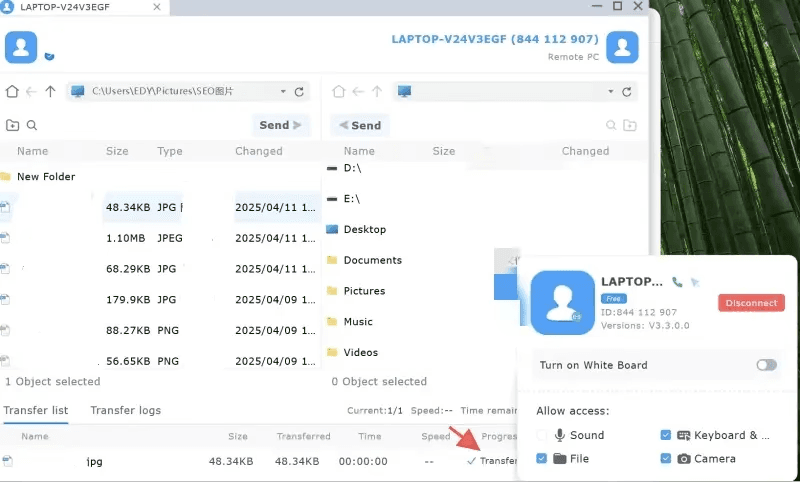
ขั้นตอนที่ 3. ขณะที่อยู่ในการเชื่อมต่อ, สำรวจคุณสมบัติ DeskIn เช่น การโอนย้ายไฟล์, การแชร์หน้าจอ, รองรับเกมแพด และการควบคุมหลายจอภาพจากอินเทอร์เฟซโดยตรง คุณยังสามารถสลับตัวเลือก เช่น โหมดความเป็นส่วนตัวหรือสลับระหว่างโหมดควบคุมและโหมดดูอย่างเดียวได้ตามต้องการ
ด้วย DeskIn, ไม่จำเป็นต้องตั้งค่า VPN, การกำหนดค่า IP หรือกังวลเกี่ยวกับฉบับ Windows ทำให้มันเป็นเครื่องมือที่สามารถเข้าถึงได้สูงสำหรับผู้ใช้ทุกวันและผู้เชี่ยวชาญ
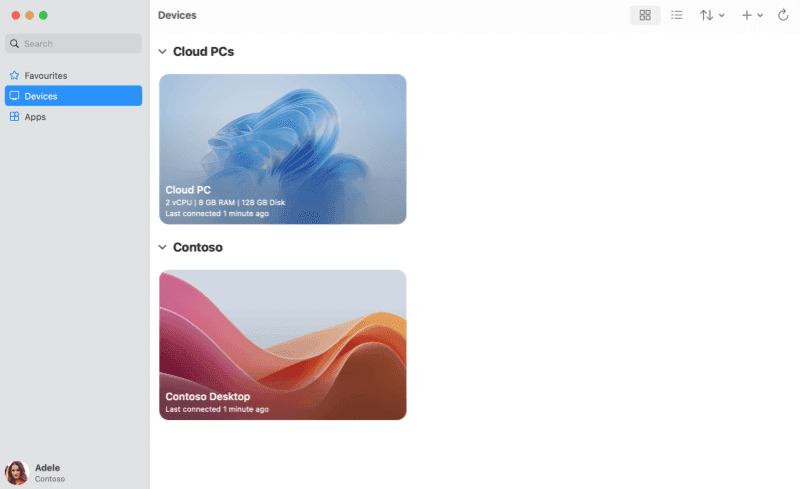
วิธีการอย่างเป็นทางการที่สุดในการเข้าถึง PC จาก Mac ระยะไกลคือการใช้ Microsoft Remote Desktop, ตอนนี้ถูกเรียกว่า Windows App บน macOS ซึ่งเป็นเครื่องมือฟรีที่ฝังอยู่จาก Microsoft ที่อนุญาตให้เข้าถึงระยะไกลจาก MacBook หรือ iMac ของคุณถึง PC Windows บน เครือข่ายเดียวกันผ่านการนำทาง VPN หรืออินเทอร์เน็ต
Windows App รองรับการควบคุมเมาส์และคีย์บอร์ดอย่างเต็มที่ การเพิ่มประสิทธิภาพจอแสดงผล Retina การสนับสนุนหลายจอภาพ การเปลี่ยนเสียงและวิดีโอ และการแชร์คลิปบอร์ด นอกจากนี้ยังอนุญาตการนำทางไฟล์พื้นฐานและการเข้าถึงสภาพแวดล้อมทางธุรกิจ เช่น Remote Desktop Services, Windows 365 และ Azure Virtual Desktop ซึ่งทำให้เป็นตัวเลือกที่ดีสำหรับผู้เชี่ยวชาญและทีม IT Support
ข้อจำกัดเมื่อใช้ Windows App:
ต้องใช้ Windows รุ่น Pro, Enterprise, หรือ Education จะ ไม่ทำงานกับ Windows รุ่น Home.
การตั้งค่าเครือข่าย (เช่น, VPN หรือการกำหนดพอร์ต) อาจจำเป็นสำหรับการเชื่อมต่อภายนอกไซต์
ขาดคุณสมบัติขั้นสูงเช่น การโอนย้ายไฟล์ลากและวาง หรือ ระยะไกลตื่น.
ประสิทธิภาพอาจแตกต่างกันกับ เครือข่ายที่ไม่เสถียร, โดยเฉพาะถ้า Mac เข้าโหมดสลีป
คุณอาจพบการขัดขวางเซสชันใน สภาพแวดล้อมทางธุรกิจ เนื่องจากนโยบาย IT เข้มงวด
ถ้าคุณลักษณะด้านบนเหมาะสมกับความต้องการของคุณ และข้อจำกัดไม่รบกวนคุณ ให้ทำตามขั้นตอนด้านล่างเพื่อเริ่มต้น สำหรับวิธีการทีละขั้นตอนอย่างละเอียด, โปรดดูคำแนะนำเต็มเกี่ยวกับ การใช้ Microsoft Remote Desktop บน Mac.
ขั้นตอนที่ 1: ดาวน์โหลด Microsoft Remote Desktop (ตอนนี้เรียกว่า Windows App) จาก Mac App Store และเปิดแอป
ขั้นตอนที่ 2: บน PC Windows ของคุณ ไปที่ "Settings > System > Remote Desktop" และเปิดใช้งานการเข้าถึงระยะไกล ค้นหาชื่อ PC ของคุณใน "Settings > System > About" หรือใช้ "ipconfig" ใน Command Prompt เพื่อรับที่อยู่ IP
ขั้นตอนที่ 3: ในแอป Remote Desktop บน Mac ของคุณ คลิก "+ Add PC", และป้อนชื่อ PC หรือ IP จากนั้นเข้าสู่ระบบด้วยข้อมูลประจำตัว Windows ของคุณ
ขั้นตอนที่ 4: ปรับการแสดงผลและการตั้งค่าเสียงตามความจำเป็น จากนั้นคลิก "Connect" เพื่อเริ่มเซสชันของคุณ
หากคุณมองหาการตั้งค่าที่เร็วขึ้นหรือประสิทธิภาพที่ลื่นไหล — โดยเฉพาะนอกเครือข่ายบ้านของคุณ — คุณอาจพบว่ากระบวนการแรก, DeskIn, มีประสิทธิภาพมากกว่า
ถ้าคุณ ไม่สามารถเข้าถึง PC ระยะไกลโดยใช้ Microsoft Remote Desktop, สาเหตุทั่วไปได้แก่ การตั้งค่าระยะไกลที่ปิดชั่วคราวใน PC เป้าหมาย, บล็อกไฟร์วอลล์, หรือปัญหาเครือข่าย. การล้มเหลวของบริการและสิทธิ์ที่ไม่ถูกต้องยังมักสร้างปัญหาการเชื่อมต่อ เราจะระบุการแก้ไขหลักเพื่อเรียกคืนการควบคุม PC ระยะไกล
9 สาเหตุ & การแก้ไขปัญหาในประโยคเดียว:
การเข้าถึงระยะไกลถูกปิดใช้งาน: เปิดใช้งาน "Remote Desktop" ในการตั้งค่าระบบของ Windows.
ไฟร์วอลล์บล็อก: อนุญาต Remote Desktop ผ่าน Windows Firewall (พอร์ต 3389).
การขัดข้องของเครือข่าย: ตรวจสอบการเชื่อมต่อผ่าน ping และอัปเดตไดรฟ์เวอร์เครือข่าย.
การบริการหยุด: เริ่มต้น "Remote Desktop Services" ใน services.msc ใหม่.
ปัญหา DNS: ฟลัชแคช DNS (ipconfig /flushdns) หรือกำหนด IP ที่คงที่.
ข้อจำกัดนโยบายกลุ่ม: กำหนดค่า Group Policy Editor (gpedit.msc) เพื่ออนุญาต Remote Desktop.
ความขัดแย้งของ NLA: ปิดการใช้งานชั่วคราวสำหรับการยืนยันระดับเครือข่ายในการตั้งค่า PC เป้าหมาย.
ความขัดแย้งในการอัปเดต: ยกเลิกการอัปเดต Windows ที่เพิ่งติดตั้งซึ่งทำให้ไม่เสถียร.
ข้อผิดพลาดของสิทธิ์: เพิ่มบัญชีผู้ใช้ของคุณใน "Remote Desktop Users" บน PC เป้าหมาย
คุณอาจชอบ: Microsoft Remote Desktop ปิดทำงาน
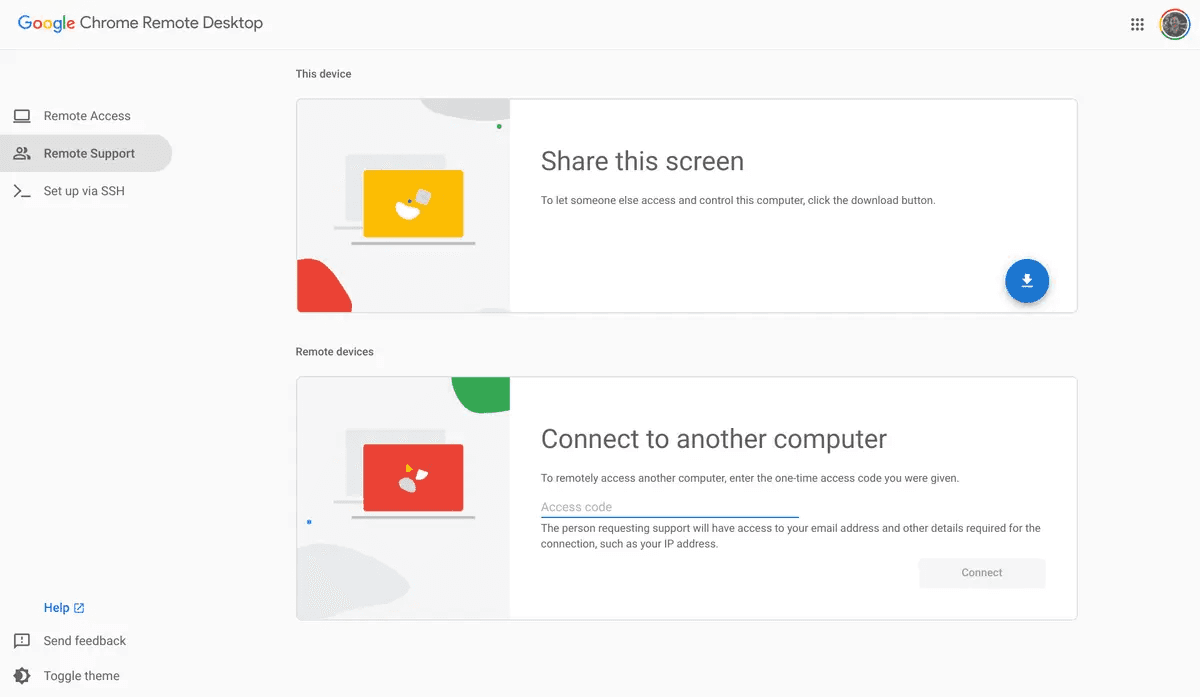
บูรณาการโดยตรงใน Chrome, Chrome Remote Desktop ลดการติดตั้งซอฟต์แวร์แยกส่วน, ใช้ประโยชน์จากเบราว์เซอร์ที่มีอยู่ของคุณสำหรับการเข้าถึงข้ามแพลตฟอร์มโดยทันที เหมาะสำหรับผู้ใช้ Chrome ทุกวันที่ต้องการโซลูชั่นที่เบาและตามความต้องการในการควบคุมคอมพิวเตอร์เครื่องอื่นระยะไกลบนอุปกรณ์ Mac หรือ Windows การตั้งค่าใช้เวลาน้อยกว่า 2 นาที, ต้องการเพียงบัญชี Google และเบราว์เซอร์ Chrome
ขั้นตอนในการเข้าถึง PC ผ่าน Chrome Remote Desktop:
ข้อกำหนดเบื้องต้น:
ติดตั้งเบราว์เซอร์ Chrome บนคอมพิวเตอร์ทั้งสองเครื่อง
ลงชื่อเข้าใช้งานบัญชี Google เดียวกันบนทั้งสองอุปกรณ์
ขั้นตอน 1: เปิดใช้งานการเข้าถึงระยะไกลบน PC เป้าหมาย
เปิด Chrome ไปยัง
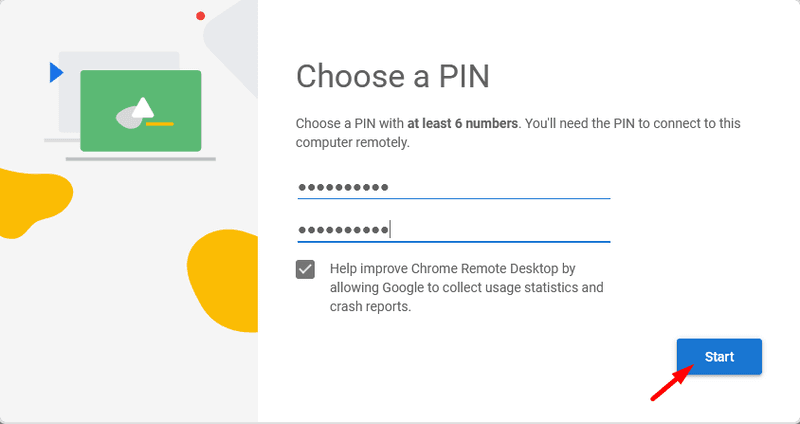
remotedesktop.google.com/access > คลิกดาวน์โหลด > ติดตั้งโฮสต์คอมโพเนนท์ > ตั้งชื่อ PC ของคุณและตั้งค่า PIN ที่ปลอดภัย
ขั้นตอน 2: มอบใบอนุญาตความปลอดภัย (เฉพาะ Mac)
ถ้าตั้งค่าโฮสต์ Mac, ป้อนรหัสผ่านระบบของคุณเมื่อถูกต้องการเพื่อให้สิทธิ์การเข้าถึงการเคลื่อนไหว ปรับการตั้งค่าความปลอดภัยและความเป็นส่วนตัวถ้าจำเป็น
ขั้นตอน 3: เริ่มการเชื่อมต่อจาก Mac
บน Mac ของคุณ เยี่ยมชม remotedesktop.google.com/access → เลือก PC เป้าหมายภายใต้อุปกรณ์ระยะไกล → ป้อน PIN
ขั้นตอน 4: เซสชันการควบคุมระยะไกล
ใช้แถบเครื่องมือบนหน้าจอเพื่อส่ง Ctrl+Alt+Del, ปรับความละเอียด หรือเปิดโหมดเต็มหน้าจอ หน้าจอของ PC ระยะไกลจะปรากฏในแท็บ Chrome ของคุณโดยตรง
ขั้นตอน 5: สิ้นสุดเซสชัน
ปิดแท็บ Chrome หรือคลิก DisConnect ในแถบเครื่องมือเซสชัน เพื่อยกเลิกการเข้าถึง ให้ลบ PC ออกจากรายการอุปกรณ์ของคุณที่ remotedesktop.google.com/access.
นอกเหนือจากวิธีหลักเหล่านี้, เราจะสำรวจเครื่องมือที่มีประสิทธิภาพอีกสามรายการเพื่อควบคุม PC จาก Mac ของคุณ: Supremo, Parsec, และ AnyDesk. แต่ละคนเก่งในสถานการณ์ที่ไม่ซ้ำกัน—จากการแชร์หน้าจอที่ง่ายดายไปจนถึงการทำงานของกราฟิกหนักและการควบคุมทางธุรกิจขนาดใหญ่ อ่านต่อไปเพื่อค้นพบว่าเครื่องมือใดสอดคล้องกับความต้องการการเข้าถึงระยะไกลของคุณได้ดีที่สุด
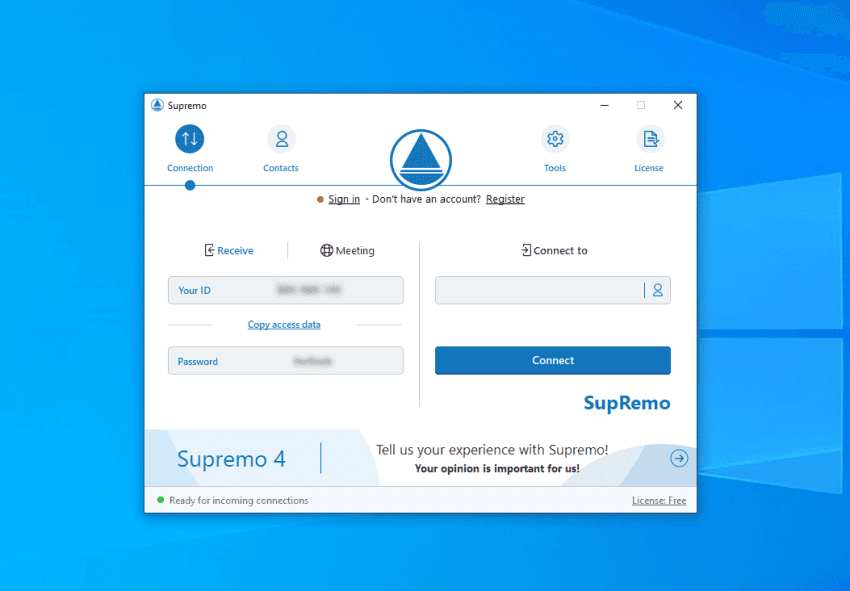
Supremo ให้การเข้าถึงระยะไกลโดยไม่มีการกำหนดค่าเราเตอร์ ทำให้เหมาะสำหรับการเข้าถึง PC จาก Mac บนเครือข่ายที่แตกต่างกัน การรวมหนังสือที่อยู่ทีมออนไลน์เข้าเป็นเอกภาพและการแช็ต ในขณะที่ แผนฟรีและจ่ายราคาที่สามารถเข้าถึงได้ (เริ่มต้นจาก €5/เดือน) เหมาะกับผู้ใช้ทั่วไป อย่างไรก็ตาม, ต้องคาดหวังข้อจำกัด: ไม่มีการซิงค์คลิปบอร์ด (แม้แต่ในแช็ต), ความหน่วงที่มองเห็นได้, การหลุดเซสชันหากหน้าจอเข้าสู่การนอนหลับ, และข้อผิดพลาดในอินเทอร์เฟซระหว่างการหมุนหน้าจอ
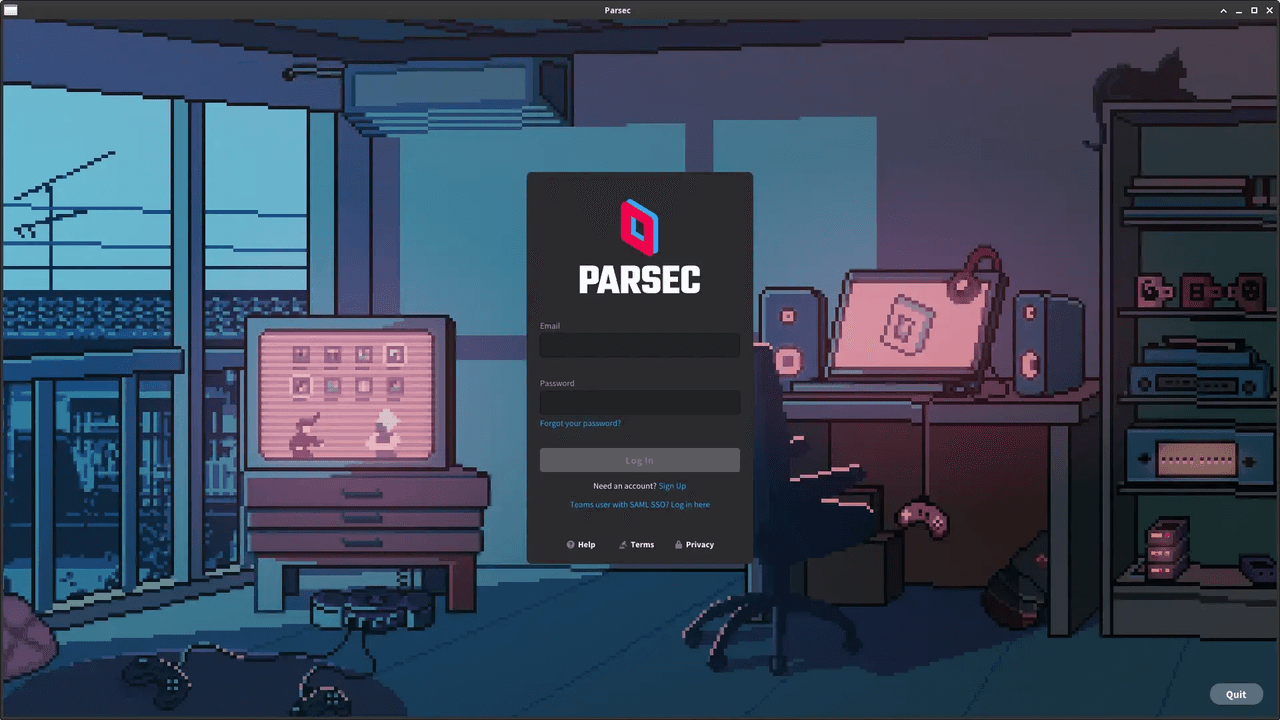
ออกแบบมาเพื่อการทำงานของกราฟิกที่ต้องการมาก Parsec ให้การสตรีมวิดีโอที่ 60FPS ultra-HD ที่ลื่นไหล—สมบูรณ์แบบสำหรับ IT, การออกแบบที่สร้างสรรค์, หรือการเล่นเกมเมื่อคุณใช้การเข้าถึงระยะไกลเข้าสู่ Mac หรือ PC ของผู้อื่น การเชื่อมต่อทั้งหมดใช้การเข้ารหัสแบบเพียร์ทูเพียร์ เพื่อให้มั่นใจว่าไม่มีการเปิดเผยข้อมูลกับบุคคลที่สาม เพียงติดตั้ง, คู่การตั้งค่าอุปกรณ์, และครองงานที่ใช้ทรัพยากรสูงด้วยการตอบสนองระดับเดสก์ท็อปแบบพื้นเมือง
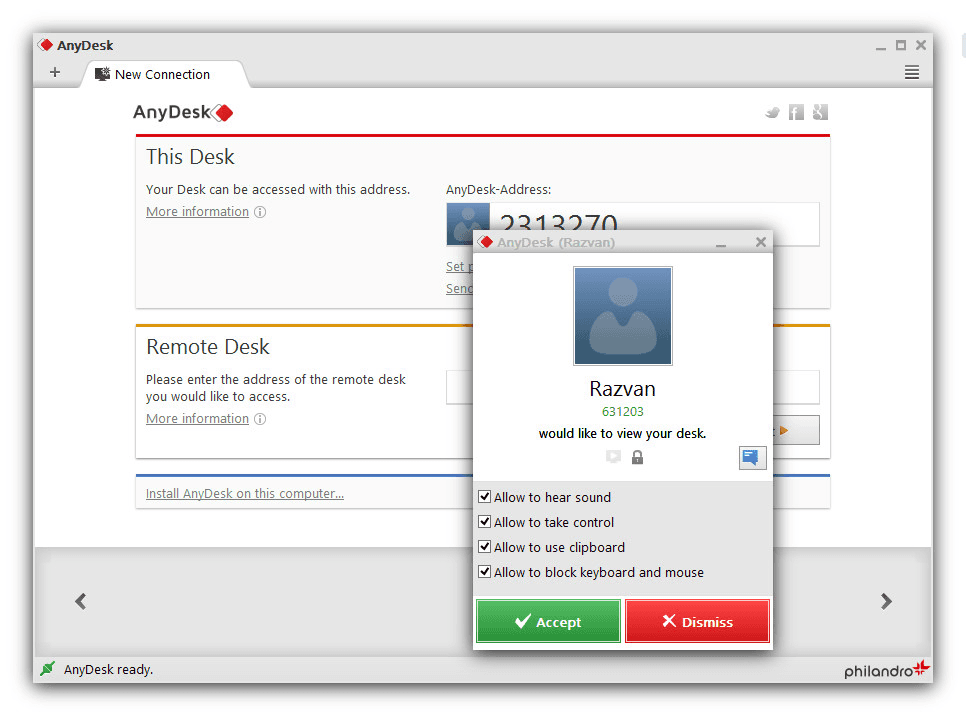
เมื่อคุณต้องการรีโมทจาก Mac เข้าไปยัง PC, AnyDesk ให้ฟีเจอร์ที่ทรงพลังอย่างเช่น การโอนย้ายไฟล์ที่เรียบง่าย การพิมพ์ทางไกล การเข้าถึงโดยไม่มีผู้ดูแล การแชร์หน้าจอและไวท์บอร์ดร่วม. การออกแบบที่เบา (2MB) ช่วยให้การตั้งค่าเสร็จเร็วโดยไม่จำเป็นต้องลงทะเบียน อย่างไรก็ตาม, เวอร์ชันฟรีจำกัดการจัดการอุปกรณ์ที่ 3 อุปกรณ์ สร้างป๊อปอัพการใช้งานเชิงพาณิชย์บ่อย ๆ เมื่อใช้เซสชันบ่อย ๆ และอาจบล็อกการเชื่อมต่อหากสงสัยกิจกรรมทางธุรกิจ
หลังจากสำรวจเครื่องมือเหล่านี้, หากคุณไม่รู้ว่าจะเปรียบเทียบ วิธีที่ DeskIn และ Microsoft Remote Desktop (Windows App) ทำงาน, และซอฟต์แวร์อื่นๆ ในพื้นที่สำคัญต่างๆ, เราสรุปไว้ที่นี่ให้คุณ
นี่คือการเปรียบเทียบด้านข้างเพื่อช่วยคุณเลือกโซลูชันที่ดีที่สุดตามความต้องการของคุณ:
DeskIn: ให้ความหน่วงต่ำ น้อยกว่า 40 มิลลิวินาที สำหรับการควบคุมที่ราบรื่นและ การเข้ารหัสแบบ 256 บิตระดับทหาร เพื่อปกป้องข้อมูลส่วนตัวของคุณระหว่างการเข้าถึงระยะไกล
Microsoft Remote Desktop: เสนอการผสานฟรีที่ฝังอยู่ใน Windows (ไม่นับรุ่น Home) การปรับความละเอียดหน้าจอและการสนับสนุนหลายจอสำหรับการทำงานที่มีความยืดหยุ่น
Chrome Remote Desktop: ไม่ต้องมีการติดตั้งและทำงานทั้งหมดภายใน Chrome ทำให้การเข้าถึงข้ามแพลตฟอร์มง่ายดายสำหรับผู้ใช้ทุกวัน
Supremo: ทำให้การจัดการทีมง่ายดายด้วยหนังสือที่อยู่ทีมออนไลน์ (การติดต่อ/แช็ต) และรายงานการเชื่อมต่อเพื่อความถูกต้องในการคิดเงิน/การตรวจสอบ
Parsec: สตรีมวิดีโออัลตร้า-HD ที่ 60FPS แบบที่ไม่มีการหยุด ควบคุม Mac ของคุณเป็นเหมือนเสาหลักสำหรับการเล่นเกม PC หรือการทำงานกราฟิกที่หนัก
AnyDesk: ขยายการควบคุมที่ไร้รอยต่อในอุปกรณ์ Mac/Windows ที่หลากหลายด้วยฟีเจอร์ทางธุรกิจเช่นการโอนย้ายไฟล์และการพิมพ์ระยะไกลเพื่อความร่วมมือของทีม
หากท่านต้องการเครื่องมือที่ง่ายสำหรับงานออฟฟิศเล็กๆ Microsoft Remote Desktop ทำงานได้ดี แต่สำหรับผู้ใช้มืออาชีพ, นักเล่นเกม, หรือทีมรีโมทที่มองหาความยืดหยุ่นและประสิทธิภาพ, DeskIn เป็นโซลูชันที่ทันสมัยและเต็มด้วยฟีเจอร์.
กับ Windows App, ปกติต้องอยู่ในเครือข่ายท้องถิ่นเดียวกันหรือใช้งาน VPN เพื่อจำลองสภาพแวดล้อมนั้น; ไม่เช่นนั้นการเชื่อมต่ออาจล้มเหลวหรือต้องการการกำหนดพอร์ตซึ่งไม่เป็นมิตรต่อผู้เริ่มต้น
ในด้านอื่น, DeskIn ใช้เซิร์ฟเวอร์รีเลย์ที่ทำงานบนเมฆเพื่อให้การเชื่อมต่อข้ามเครือข่ายโดยค่าเริ่มต้น ทำให้มันสะดวกกว่าสำหรับผู้ที่ทำงานจากระยะไกลในสถานที่หรือเครือข่ายที่ต่างกัน
Windows App รองรับการนำทางไฟล์พื้นฐาน แต่เฉพาะจากโฟลเดอร์ที่ระบุล่วงหน้าและมีความสามารถในการจัดการไฟล์ที่ จำกัด มันเหมาะสำหรับการเข้าถึงไฟล์เบา ๆ ไม่ใช่การโอนย้ายแบบไดนามิก
DeskIn ให้การโอนย้ายไฟล์ด้วยการลากและวางในเวลาจริงด้วยความเร็วสูงสุด 12MB/s โดยไม่คำนึงถึงรูปแบบไฟล์ นอกจากนี้ยังสนับสนับการซิงค์คลิปบอร์ดและการแชร์โฟลเดอร์
Windows App ไม่ได้ออกแบบมาสำหรับงานที่ต้องประสิทธิภาพสูงเช่นการเล่นเกม ความล่าช้าของอินพุต FPS ที่จำกัด และขาดการสนับสนุนตัวควบคุมเกมทำให้มันไม่เหมาะสำหรับเนื้อหาเชิงโต้ตอบ
DeskIn, อย่างไรก็ตาม, เสนอการสตรีม 60FPS, การป้อนข้อมูลที่ความล่าช้าต่ำ, การสนับสนุนการส่งต่อเกมแพด และการปรับแต่งแป้นพิมพ์/เมาส์ แม้ว่าไม่ใช่แพลตฟอร์มการสตรีมเกมเต็มรูปแบบ แต่ก็เหมาะสำหรับการเล่นเกมรีโมทหรือการเล่นที่ต้องการไม่มาก
โซลูชั่นที่เหมาะที่สุดของคุณในการรีโมทเข้า PC จาก Mac ขึ้นอยู่กับลำดับความสำคัญ: เลือก Chrome RD สำหรับความเรียบง่ายไม่ต้องติดตั้ง, หรือ Parsec สำหรับการเล่นเกมแบบไร้ความล่าช้า Supremo เหมาะสำหรับทีมที่เชื่อมต่อบ่อยๆ AnyDesk ให้ขยายการสนับสนุนสำหรับการร่วมมือ, ขณะที่ Microsoft RD อาศัยการผสาน Windows โดยตรง เราแนะนำให้ทดลอง 1-2 ตัวเลือกที่ตรงกันเพื่อการทำงานหลักของคุณ
อย่างไรก็ดี, หากคุณต้องการประสบการณ์รีโมทเดสก์ท็อปที่หลากหลายกว่า เต็มไปด้วยฟีเจอร์ที่มีความเป็นมิตรกับผู้ใช้มากกว่า, DeskIn โดดเด่น มันกำจัดอุปสรรคทางเทคนิค สนับสนุนกรณีการใช้งานที่หลากหลาย ตั้งแต่งานไปจนถึงความบันเทิง และรวมเครื่องมือที่ทรงพลังเช่น การโอนย้ายไฟล์, การสะท้อนหน้าจอ, และการสตรีม 4K แม้ในเวอร์ชันฟรี
รู้สึกลำบากในการช่วยเพื่อนหรือครอบครัวเกี่ยวกับปัญหา PC เมื่อคุณใช้ Mac อยู่หรือไม่? ไม่ว่าจะเป็นการจัดการไฟล์ ตรวจสอบการตั้งค่าเครือข่าย หรือการปรับเปลี่ยนการกำหนดค่าของระบบ การเข้าถึงระยะไกลข้ามแพลตฟอร์มมักหมายถึงการต่อสู้กับการเชื่อมต่อที่ช้าหรือการตั้งค่าที่ยากลำบาก ความหน่วงที่น่าหงุดหงิดเมื่อย้ายหน้าต่างหรือพิมพ์คำสั่งทำให้การแก้ปัญหาเบื้องต้นดูเหมือนจะเป็นไปไม่ได้ คุณต้องการวิธีที่ราบรื่นในการเข้าถึง PC ระยะไกลจาก Mac โดยไม่ต้องปวดหัว
ในคำแนะนำนี้ เราจะ สำรวจเครื่องมือที่เชื่อถือได้ 6 รายการที่ออกแบบมาเพื่อการควบคุม Mac-to-PC ที่ราบรื่น
แต่ละรายการมีจุดเด่นเฉพาะตัว ตั้งแต่เครื่องมือฟรีไปจนถึงโซลูชันที่ได้รับการปรับประสิทธิภาพ คุณจะพบตัวเลือกสำหรับการช่วยเหลือเฮลป์เดสก์ง่ายๆ งานที่ใช้กราฟิกหนัก และการสนับสนุนระดับองค์กร อ่านต่อเพื่อหาคู่ที่เหมาะสมสำหรับการเข้าถึง< a id="1"> Windows ระยะไกลจากอุปกรณ์ของคุณโดยง่ายดาย
< แต่ละรายการมีจุดเด่นเฉพาะตัว ตั้งแต่เครื่องมือฟรีไปจนถึงโซลูชันที่ได้รับการปรับประสิทธิภาพ คุณจะพบตัวเลือกสำหรับการช่วยเหลือเฮลป์เดสก์ง่ายๆ งานที่ใช้กราฟิกหนัก และการสนับสนุนระดับองค์กร อ่านต่อเพื่อหาคู่ที่เหมาะสมสำหรับการเข้าถึง>
👀 ค้นพบเพิ่มเติม:
รีโมทเดสก์ท็อปจาก Mac ถึง Windows—DeskIn เป็นลูกค้าซอฟต์แวร์รีโมทเดสก์ท็อปข้ามแพลตฟอร์มที่อนุญาตให้คุณ ควบคุม PC Windows ของคุณจาก MacBook หรือ iMac ได้ตลอดเวลา ไม่ว่าจะทำงานอยู่ที่บ้าน หรือกำลังเดินทาง หรือช่วยเพื่อน มันให้การเชื่อมต่อที่ราบรื่นและปลอดภัยพร้อมกับข้อกำหนดการตั้งค่าที่ต่ำกว่าอุปกรณ์ระยะไกลแบบดั้งเดิม ด้วยอินเทอร์เฟซที่ใช้ง่ายและชุดคุณสมบัติขั้นสูง มันคือซอฟต์แวร์รีโมทที่ดีที่สุดสำหรับการเข้าถึงไฟล์หรือซอฟต์แวร์ การโอนย้ายไฟล์ การเล่นเกม PC จาก Mac เป็นต้น
👀 คุณสมบัติเด่นของ DeskIn สำหรับการเข้าถึง Mac-to-Windows:
ความเข้ากันได้ข้ามแพลตฟอร์ม - เชื่อมต่อ Mac ของคุณกับอุปกรณ์ Windows ใดๆ
การเข้าถึงโดยไม่มีผู้ดูแล & หน้าจอความเป็นส่วนตัว - รับประกันการเข้าถึง PC Windows ของคุณอย่างปลอดภัยโดยไม่ต้องมีการโต้ตอบกับผู้ใช้
ช่วงเวลาการเชื่อมต่อต่ำ - เสนอคุณสมบัติที่ได้รับการปรับประสิทธิภาพสำหรับการป้อนข้อมูลและผลตอบกลับทางภาพที่ราบรื่น
การโอนย้ายไฟล์ไกล - โอนย้ายไฟล์ระหว่าง Mac และ PC ได้โดยไม่มีข้อจำกัดขนาด/ประเภท
การสตรีม 4K และสูงกว่า FPS - สูงสุดถึง 4K/60FPS หรือ 2K/144FPS สำหรับภาพเคลื่อนไหวที่ราบรื่น
หน้าจอสะท้อน & หน้าจอเสมือน - สะท้อน Windows ไปที่ Mac หรือ ขยายการแสดงผล
ตอนนี้ มาดูขั้นตอนการปฏิบัติการด้วย DeskIn เพื่อเข้าถึง PC จาก Mac ของคุณ!
ขั้นตอนที่ 1. ดาวน์โหลดและติดตั้ง DeskIn สำหรับทั้ง Mac และ PC Windows ของคุณ สร้างบัญชี DeskIn ฟรีโดยใช้อีเมลของคุณและทำกระบวนการยืนยันให้เสร็จสิ้น ล็อกอินเข้าสู่บัญชีเดียวกันบนทั้ง Mac และ PC Windows เป้าหมาย
ขั้นตอนที่ 2. บน Mac ของคุณ เรียกใช้ DeskIn, ป้อนรหัสอุปกรณ์และรหัสผ่านที่แสดงบนอินเทอร์เฟซของ DeskIn บน PC ของคุณ และคลิกปุ่ม "Connect" เพื่อเริ่มการเชื่อมต่อ คุณจะสามารถโต้ตอบกับเดสก์ท็อป Windows ของคุณได้ทันทีในเวลาจริง
ขั้นตอนที่ 3. ขณะที่อยู่ในการเชื่อมต่อ, สำรวจคุณสมบัติ DeskIn เช่น การโอนย้ายไฟล์, การแชร์หน้าจอ, รองรับเกมแพด และการควบคุมหลายจอภาพจากอินเทอร์เฟซโดยตรง คุณยังสามารถสลับตัวเลือก เช่น โหมดความเป็นส่วนตัวหรือสลับระหว่างโหมดควบคุมและโหมดดูอย่างเดียวได้ตามต้องการ
ด้วย DeskIn, ไม่จำเป็นต้องตั้งค่า VPN, การกำหนดค่า IP หรือกังวลเกี่ยวกับฉบับ Windows ทำให้มันเป็นเครื่องมือที่สามารถเข้าถึงได้สูงสำหรับผู้ใช้ทุกวันและผู้เชี่ยวชาญ
วิธีการอย่างเป็นทางการที่สุดในการเข้าถึง PC จาก Mac ระยะไกลคือการใช้ Microsoft Remote Desktop, ตอนนี้ถูกเรียกว่า Windows App บน macOS ซึ่งเป็นเครื่องมือฟรีที่ฝังอยู่จาก Microsoft ที่อนุญาตให้เข้าถึงระยะไกลจาก MacBook หรือ iMac ของคุณถึง PC Windows บน เครือข่ายเดียวกันผ่านการนำทาง VPN หรืออินเทอร์เน็ต
Windows App รองรับการควบคุมเมาส์และคีย์บอร์ดอย่างเต็มที่ การเพิ่มประสิทธิภาพจอแสดงผล Retina การสนับสนุนหลายจอภาพ การเปลี่ยนเสียงและวิดีโอ และการแชร์คลิปบอร์ด นอกจากนี้ยังอนุญาตการนำทางไฟล์พื้นฐานและการเข้าถึงสภาพแวดล้อมทางธุรกิจ เช่น Remote Desktop Services, Windows 365 และ Azure Virtual Desktop ซึ่งทำให้เป็นตัวเลือกที่ดีสำหรับผู้เชี่ยวชาญและทีม IT Support
ข้อจำกัดเมื่อใช้ Windows App:
ต้องใช้ Windows รุ่น Pro, Enterprise, หรือ Education จะ ไม่ทำงานกับ Windows รุ่น Home.
การตั้งค่าเครือข่าย (เช่น, VPN หรือการกำหนดพอร์ต) อาจจำเป็นสำหรับการเชื่อมต่อภายนอกไซต์
ขาดคุณสมบัติขั้นสูงเช่น การโอนย้ายไฟล์ลากและวาง หรือ ระยะไกลตื่น.
ประสิทธิภาพอาจแตกต่างกันกับ เครือข่ายที่ไม่เสถียร, โดยเฉพาะถ้า Mac เข้าโหมดสลีป
คุณอาจพบการขัดขวางเซสชันใน สภาพแวดล้อมทางธุรกิจ เนื่องจากนโยบาย IT เข้มงวด
ถ้าคุณลักษณะด้านบนเหมาะสมกับความต้องการของคุณ และข้อจำกัดไม่รบกวนคุณ ให้ทำตามขั้นตอนด้านล่างเพื่อเริ่มต้น สำหรับวิธีการทีละขั้นตอนอย่างละเอียด, โปรดดูคำแนะนำเต็มเกี่ยวกับ การใช้ Microsoft Remote Desktop บน Mac.
ขั้นตอนที่ 1: ดาวน์โหลด Microsoft Remote Desktop (ตอนนี้เรียกว่า Windows App) จาก Mac App Store และเปิดแอป
ขั้นตอนที่ 2: บน PC Windows ของคุณ ไปที่ "Settings > System > Remote Desktop" และเปิดใช้งานการเข้าถึงระยะไกล ค้นหาชื่อ PC ของคุณใน "Settings > System > About" หรือใช้ "ipconfig" ใน Command Prompt เพื่อรับที่อยู่ IP
ขั้นตอนที่ 3: ในแอป Remote Desktop บน Mac ของคุณ คลิก "+ Add PC", และป้อนชื่อ PC หรือ IP จากนั้นเข้าสู่ระบบด้วยข้อมูลประจำตัว Windows ของคุณ
ขั้นตอนที่ 4: ปรับการแสดงผลและการตั้งค่าเสียงตามความจำเป็น จากนั้นคลิก "Connect" เพื่อเริ่มเซสชันของคุณ
หากคุณมองหาการตั้งค่าที่เร็วขึ้นหรือประสิทธิภาพที่ลื่นไหล — โดยเฉพาะนอกเครือข่ายบ้านของคุณ — คุณอาจพบว่ากระบวนการแรก, DeskIn, มีประสิทธิภาพมากกว่า
ถ้าคุณ ไม่สามารถเข้าถึง PC ระยะไกลโดยใช้ Microsoft Remote Desktop, สาเหตุทั่วไปได้แก่ การตั้งค่าระยะไกลที่ปิดชั่วคราวใน PC เป้าหมาย, บล็อกไฟร์วอลล์, หรือปัญหาเครือข่าย. การล้มเหลวของบริการและสิทธิ์ที่ไม่ถูกต้องยังมักสร้างปัญหาการเชื่อมต่อ เราจะระบุการแก้ไขหลักเพื่อเรียกคืนการควบคุม PC ระยะไกล
9 สาเหตุ & การแก้ไขปัญหาในประโยคเดียว:
การเข้าถึงระยะไกลถูกปิดใช้งาน: เปิดใช้งาน "Remote Desktop" ในการตั้งค่าระบบของ Windows.
ไฟร์วอลล์บล็อก: อนุญาต Remote Desktop ผ่าน Windows Firewall (พอร์ต 3389).
การขัดข้องของเครือข่าย: ตรวจสอบการเชื่อมต่อผ่าน ping และอัปเดตไดรฟ์เวอร์เครือข่าย.
การบริการหยุด: เริ่มต้น "Remote Desktop Services" ใน services.msc ใหม่.
ปัญหา DNS: ฟลัชแคช DNS (ipconfig /flushdns) หรือกำหนด IP ที่คงที่.
ข้อจำกัดนโยบายกลุ่ม: กำหนดค่า Group Policy Editor (gpedit.msc) เพื่ออนุญาต Remote Desktop.
ความขัดแย้งของ NLA: ปิดการใช้งานชั่วคราวสำหรับการยืนยันระดับเครือข่ายในการตั้งค่า PC เป้าหมาย.
ความขัดแย้งในการอัปเดต: ยกเลิกการอัปเดต Windows ที่เพิ่งติดตั้งซึ่งทำให้ไม่เสถียร.
ข้อผิดพลาดของสิทธิ์: เพิ่มบัญชีผู้ใช้ของคุณใน "Remote Desktop Users" บน PC เป้าหมาย
คุณอาจชอบ: Microsoft Remote Desktop ปิดทำงาน
บูรณาการโดยตรงใน Chrome, Chrome Remote Desktop ลดการติดตั้งซอฟต์แวร์แยกส่วน, ใช้ประโยชน์จากเบราว์เซอร์ที่มีอยู่ของคุณสำหรับการเข้าถึงข้ามแพลตฟอร์มโดยทันที เหมาะสำหรับผู้ใช้ Chrome ทุกวันที่ต้องการโซลูชั่นที่เบาและตามความต้องการในการควบคุมคอมพิวเตอร์เครื่องอื่นระยะไกลบนอุปกรณ์ Mac หรือ Windows การตั้งค่าใช้เวลาน้อยกว่า 2 นาที, ต้องการเพียงบัญชี Google และเบราว์เซอร์ Chrome
ขั้นตอนในการเข้าถึง PC ผ่าน Chrome Remote Desktop:
ข้อกำหนดเบื้องต้น:
ติดตั้งเบราว์เซอร์ Chrome บนคอมพิวเตอร์ทั้งสองเครื่อง
ลงชื่อเข้าใช้งานบัญชี Google เดียวกันบนทั้งสองอุปกรณ์
ขั้นตอน 1: เปิดใช้งานการเข้าถึงระยะไกลบน PC เป้าหมาย
เปิด Chrome ไปยัง
remotedesktop.google.com/access > คลิกดาวน์โหลด > ติดตั้งโฮสต์คอมโพเนนท์ > ตั้งชื่อ PC ของคุณและตั้งค่า PIN ที่ปลอดภัย
ขั้นตอน 2: มอบใบอนุญาตความปลอดภัย (เฉพาะ Mac)
ถ้าตั้งค่าโฮสต์ Mac, ป้อนรหัสผ่านระบบของคุณเมื่อถูกต้องการเพื่อให้สิทธิ์การเข้าถึงการเคลื่อนไหว ปรับการตั้งค่าความปลอดภัยและความเป็นส่วนตัวถ้าจำเป็น
ขั้นตอน 3: เริ่มการเชื่อมต่อจาก Mac
บน Mac ของคุณ เยี่ยมชม remotedesktop.google.com/access → เลือก PC เป้าหมายภายใต้อุปกรณ์ระยะไกล → ป้อน PIN
ขั้นตอน 4: เซสชันการควบคุมระยะไกล
ใช้แถบเครื่องมือบนหน้าจอเพื่อส่ง Ctrl+Alt+Del, ปรับความละเอียด หรือเปิดโหมดเต็มหน้าจอ หน้าจอของ PC ระยะไกลจะปรากฏในแท็บ Chrome ของคุณโดยตรง
ขั้นตอน 5: สิ้นสุดเซสชัน
ปิดแท็บ Chrome หรือคลิก DisConnect ในแถบเครื่องมือเซสชัน เพื่อยกเลิกการเข้าถึง ให้ลบ PC ออกจากรายการอุปกรณ์ของคุณที่ remotedesktop.google.com/access.
นอกเหนือจากวิธีหลักเหล่านี้, เราจะสำรวจเครื่องมือที่มีประสิทธิภาพอีกสามรายการเพื่อควบคุม PC จาก Mac ของคุณ: Supremo, Parsec, และ AnyDesk. แต่ละคนเก่งในสถานการณ์ที่ไม่ซ้ำกัน—จากการแชร์หน้าจอที่ง่ายดายไปจนถึงการทำงานของกราฟิกหนักและการควบคุมทางธุรกิจขนาดใหญ่ อ่านต่อไปเพื่อค้นพบว่าเครื่องมือใดสอดคล้องกับความต้องการการเข้าถึงระยะไกลของคุณได้ดีที่สุด
Supremo ให้การเข้าถึงระยะไกลโดยไม่มีการกำหนดค่าเราเตอร์ ทำให้เหมาะสำหรับการเข้าถึง PC จาก Mac บนเครือข่ายที่แตกต่างกัน การรวมหนังสือที่อยู่ทีมออนไลน์เข้าเป็นเอกภาพและการแช็ต ในขณะที่ แผนฟรีและจ่ายราคาที่สามารถเข้าถึงได้ (เริ่มต้นจาก €5/เดือน) เหมาะกับผู้ใช้ทั่วไป อย่างไรก็ตาม, ต้องคาดหวังข้อจำกัด: ไม่มีการซิงค์คลิปบอร์ด (แม้แต่ในแช็ต), ความหน่วงที่มองเห็นได้, การหลุดเซสชันหากหน้าจอเข้าสู่การนอนหลับ, และข้อผิดพลาดในอินเทอร์เฟซระหว่างการหมุนหน้าจอ
ออกแบบมาเพื่อการทำงานของกราฟิกที่ต้องการมาก Parsec ให้การสตรีมวิดีโอที่ 60FPS ultra-HD ที่ลื่นไหล—สมบูรณ์แบบสำหรับ IT, การออกแบบที่สร้างสรรค์, หรือการเล่นเกมเมื่อคุณใช้การเข้าถึงระยะไกลเข้าสู่ Mac หรือ PC ของผู้อื่น การเชื่อมต่อทั้งหมดใช้การเข้ารหัสแบบเพียร์ทูเพียร์ เพื่อให้มั่นใจว่าไม่มีการเปิดเผยข้อมูลกับบุคคลที่สาม เพียงติดตั้ง, คู่การตั้งค่าอุปกรณ์, และครองงานที่ใช้ทรัพยากรสูงด้วยการตอบสนองระดับเดสก์ท็อปแบบพื้นเมือง
เมื่อคุณต้องการรีโมทจาก Mac เข้าไปยัง PC, AnyDesk ให้ฟีเจอร์ที่ทรงพลังอย่างเช่น การโอนย้ายไฟล์ที่เรียบง่าย การพิมพ์ทางไกล การเข้าถึงโดยไม่มีผู้ดูแล การแชร์หน้าจอและไวท์บอร์ดร่วม. การออกแบบที่เบา (2MB) ช่วยให้การตั้งค่าเสร็จเร็วโดยไม่จำเป็นต้องลงทะเบียน อย่างไรก็ตาม, เวอร์ชันฟรีจำกัดการจัดการอุปกรณ์ที่ 3 อุปกรณ์ สร้างป๊อปอัพการใช้งานเชิงพาณิชย์บ่อย ๆ เมื่อใช้เซสชันบ่อย ๆ และอาจบล็อกการเชื่อมต่อหากสงสัยกิจกรรมทางธุรกิจ
หลังจากสำรวจเครื่องมือเหล่านี้, หากคุณไม่รู้ว่าจะเปรียบเทียบ วิธีที่ DeskIn และ Microsoft Remote Desktop (Windows App) ทำงาน, และซอฟต์แวร์อื่นๆ ในพื้นที่สำคัญต่างๆ, เราสรุปไว้ที่นี่ให้คุณ
นี่คือการเปรียบเทียบด้านข้างเพื่อช่วยคุณเลือกโซลูชันที่ดีที่สุดตามความต้องการของคุณ:
DeskIn: ให้ความหน่วงต่ำ น้อยกว่า 40 มิลลิวินาที สำหรับการควบคุมที่ราบรื่นและ การเข้ารหัสแบบ 256 บิตระดับทหาร เพื่อปกป้องข้อมูลส่วนตัวของคุณระหว่างการเข้าถึงระยะไกล
Microsoft Remote Desktop: เสนอการผสานฟรีที่ฝังอยู่ใน Windows (ไม่นับรุ่น Home) การปรับความละเอียดหน้าจอและการสนับสนุนหลายจอสำหรับการทำงานที่มีความยืดหยุ่น
Chrome Remote Desktop: ไม่ต้องมีการติดตั้งและทำงานทั้งหมดภายใน Chrome ทำให้การเข้าถึงข้ามแพลตฟอร์มง่ายดายสำหรับผู้ใช้ทุกวัน
Supremo: ทำให้การจัดการทีมง่ายดายด้วยหนังสือที่อยู่ทีมออนไลน์ (การติดต่อ/แช็ต) และรายงานการเชื่อมต่อเพื่อความถูกต้องในการคิดเงิน/การตรวจสอบ
Parsec: สตรีมวิดีโออัลตร้า-HD ที่ 60FPS แบบที่ไม่มีการหยุด ควบคุม Mac ของคุณเป็นเหมือนเสาหลักสำหรับการเล่นเกม PC หรือการทำงานกราฟิกที่หนัก
AnyDesk: ขยายการควบคุมที่ไร้รอยต่อในอุปกรณ์ Mac/Windows ที่หลากหลายด้วยฟีเจอร์ทางธุรกิจเช่นการโอนย้ายไฟล์และการพิมพ์ระยะไกลเพื่อความร่วมมือของทีม
หากท่านต้องการเครื่องมือที่ง่ายสำหรับงานออฟฟิศเล็กๆ Microsoft Remote Desktop ทำงานได้ดี แต่สำหรับผู้ใช้มืออาชีพ, นักเล่นเกม, หรือทีมรีโมทที่มองหาความยืดหยุ่นและประสิทธิภาพ, DeskIn เป็นโซลูชันที่ทันสมัยและเต็มด้วยฟีเจอร์.
กับ Windows App, ปกติต้องอยู่ในเครือข่ายท้องถิ่นเดียวกันหรือใช้งาน VPN เพื่อจำลองสภาพแวดล้อมนั้น; ไม่เช่นนั้นการเชื่อมต่ออาจล้มเหลวหรือต้องการการกำหนดพอร์ตซึ่งไม่เป็นมิตรต่อผู้เริ่มต้น
ในด้านอื่น, DeskIn ใช้เซิร์ฟเวอร์รีเลย์ที่ทำงานบนเมฆเพื่อให้การเชื่อมต่อข้ามเครือข่ายโดยค่าเริ่มต้น ทำให้มันสะดวกกว่าสำหรับผู้ที่ทำงานจากระยะไกลในสถานที่หรือเครือข่ายที่ต่างกัน
Windows App รองรับการนำทางไฟล์พื้นฐาน แต่เฉพาะจากโฟลเดอร์ที่ระบุล่วงหน้าและมีความสามารถในการจัดการไฟล์ที่ จำกัด มันเหมาะสำหรับการเข้าถึงไฟล์เบา ๆ ไม่ใช่การโอนย้ายแบบไดนามิก
DeskIn ให้การโอนย้ายไฟล์ด้วยการลากและวางในเวลาจริงด้วยความเร็วสูงสุด 12MB/s โดยไม่คำนึงถึงรูปแบบไฟล์ นอกจากนี้ยังสนับสนับการซิงค์คลิปบอร์ดและการแชร์โฟลเดอร์
Windows App ไม่ได้ออกแบบมาสำหรับงานที่ต้องประสิทธิภาพสูงเช่นการเล่นเกม ความล่าช้าของอินพุต FPS ที่จำกัด และขาดการสนับสนุนตัวควบคุมเกมทำให้มันไม่เหมาะสำหรับเนื้อหาเชิงโต้ตอบ
DeskIn, อย่างไรก็ตาม, เสนอการสตรีม 60FPS, การป้อนข้อมูลที่ความล่าช้าต่ำ, การสนับสนุนการส่งต่อเกมแพด และการปรับแต่งแป้นพิมพ์/เมาส์ แม้ว่าไม่ใช่แพลตฟอร์มการสตรีมเกมเต็มรูปแบบ แต่ก็เหมาะสำหรับการเล่นเกมรีโมทหรือการเล่นที่ต้องการไม่มาก
โซลูชั่นที่เหมาะที่สุดของคุณในการรีโมทเข้า PC จาก Mac ขึ้นอยู่กับลำดับความสำคัญ: เลือก Chrome RD สำหรับความเรียบง่ายไม่ต้องติดตั้ง, หรือ Parsec สำหรับการเล่นเกมแบบไร้ความล่าช้า Supremo เหมาะสำหรับทีมที่เชื่อมต่อบ่อยๆ AnyDesk ให้ขยายการสนับสนุนสำหรับการร่วมมือ, ขณะที่ Microsoft RD อาศัยการผสาน Windows โดยตรง เราแนะนำให้ทดลอง 1-2 ตัวเลือกที่ตรงกันเพื่อการทำงานหลักของคุณ
อย่างไรก็ดี, หากคุณต้องการประสบการณ์รีโมทเดสก์ท็อปที่หลากหลายกว่า เต็มไปด้วยฟีเจอร์ที่มีความเป็นมิตรกับผู้ใช้มากกว่า, DeskIn โดดเด่น มันกำจัดอุปสรรคทางเทคนิค สนับสนุนกรณีการใช้งานที่หลากหลาย ตั้งแต่งานไปจนถึงความบันเทิง และรวมเครื่องมือที่ทรงพลังเช่น การโอนย้ายไฟล์, การสะท้อนหน้าจอ, และการสตรีม 4K แม้ในเวอร์ชันฟรี
![3 วิธีในการเชื่อมต่อไปยังพีซีจาก Mac ได้อย่างราบรื่น [6 เครื่องมือแนะนำ]](https://framerusercontent.com/images/bhHqhHr5FIpWbkCL03sNgzivifc.jpg?width=1920&height=1080)


เปลี่ยน iPad ให้เป็นจอภาพที่สองสำหรับคอมพิวเตอร์ Windows และ Mac
A second monitor can make everyday work feel much easier, especially when you are switching between research, documents, meetings, design files, or dashboards. If you already own an iPad, you may be able to use it as an extra display instead of buying another monitor.
This guide explains how to use an iPad as a second monitor for Mac with Apple Sidecar, and how Windows or cross-platform users can use DeskIn screen extension on supported paid plans.
Increase screen space so you can view more content at the same time. This helps reduce constant window switching during multitasking.
Keep each screen focused on a different task. For example, you can edit a video on one screen and keep source materials on the other, or write a paper while browsing references side by side.
Use the iPad display you already have. For students, remote workers, and light creative work, an iPad can be a convenient and cost-effective second-screen option.
Save desk space and avoid carrying another external monitor when you work from home, travel, or move between rooms.
Apple Sidecar lets compatible iPads work as an external display for compatible MacBook and iMac devices. It is a good native option if both devices support Sidecar and are signed in with the same Apple ID.
Note: To use Apple Sidecar, your Mac and iPad should use the same Apple ID, have Bluetooth and Wi-Fi turned on, and stay within close wireless range. Sidecar availability depends on Apple device and operating system compatibility.
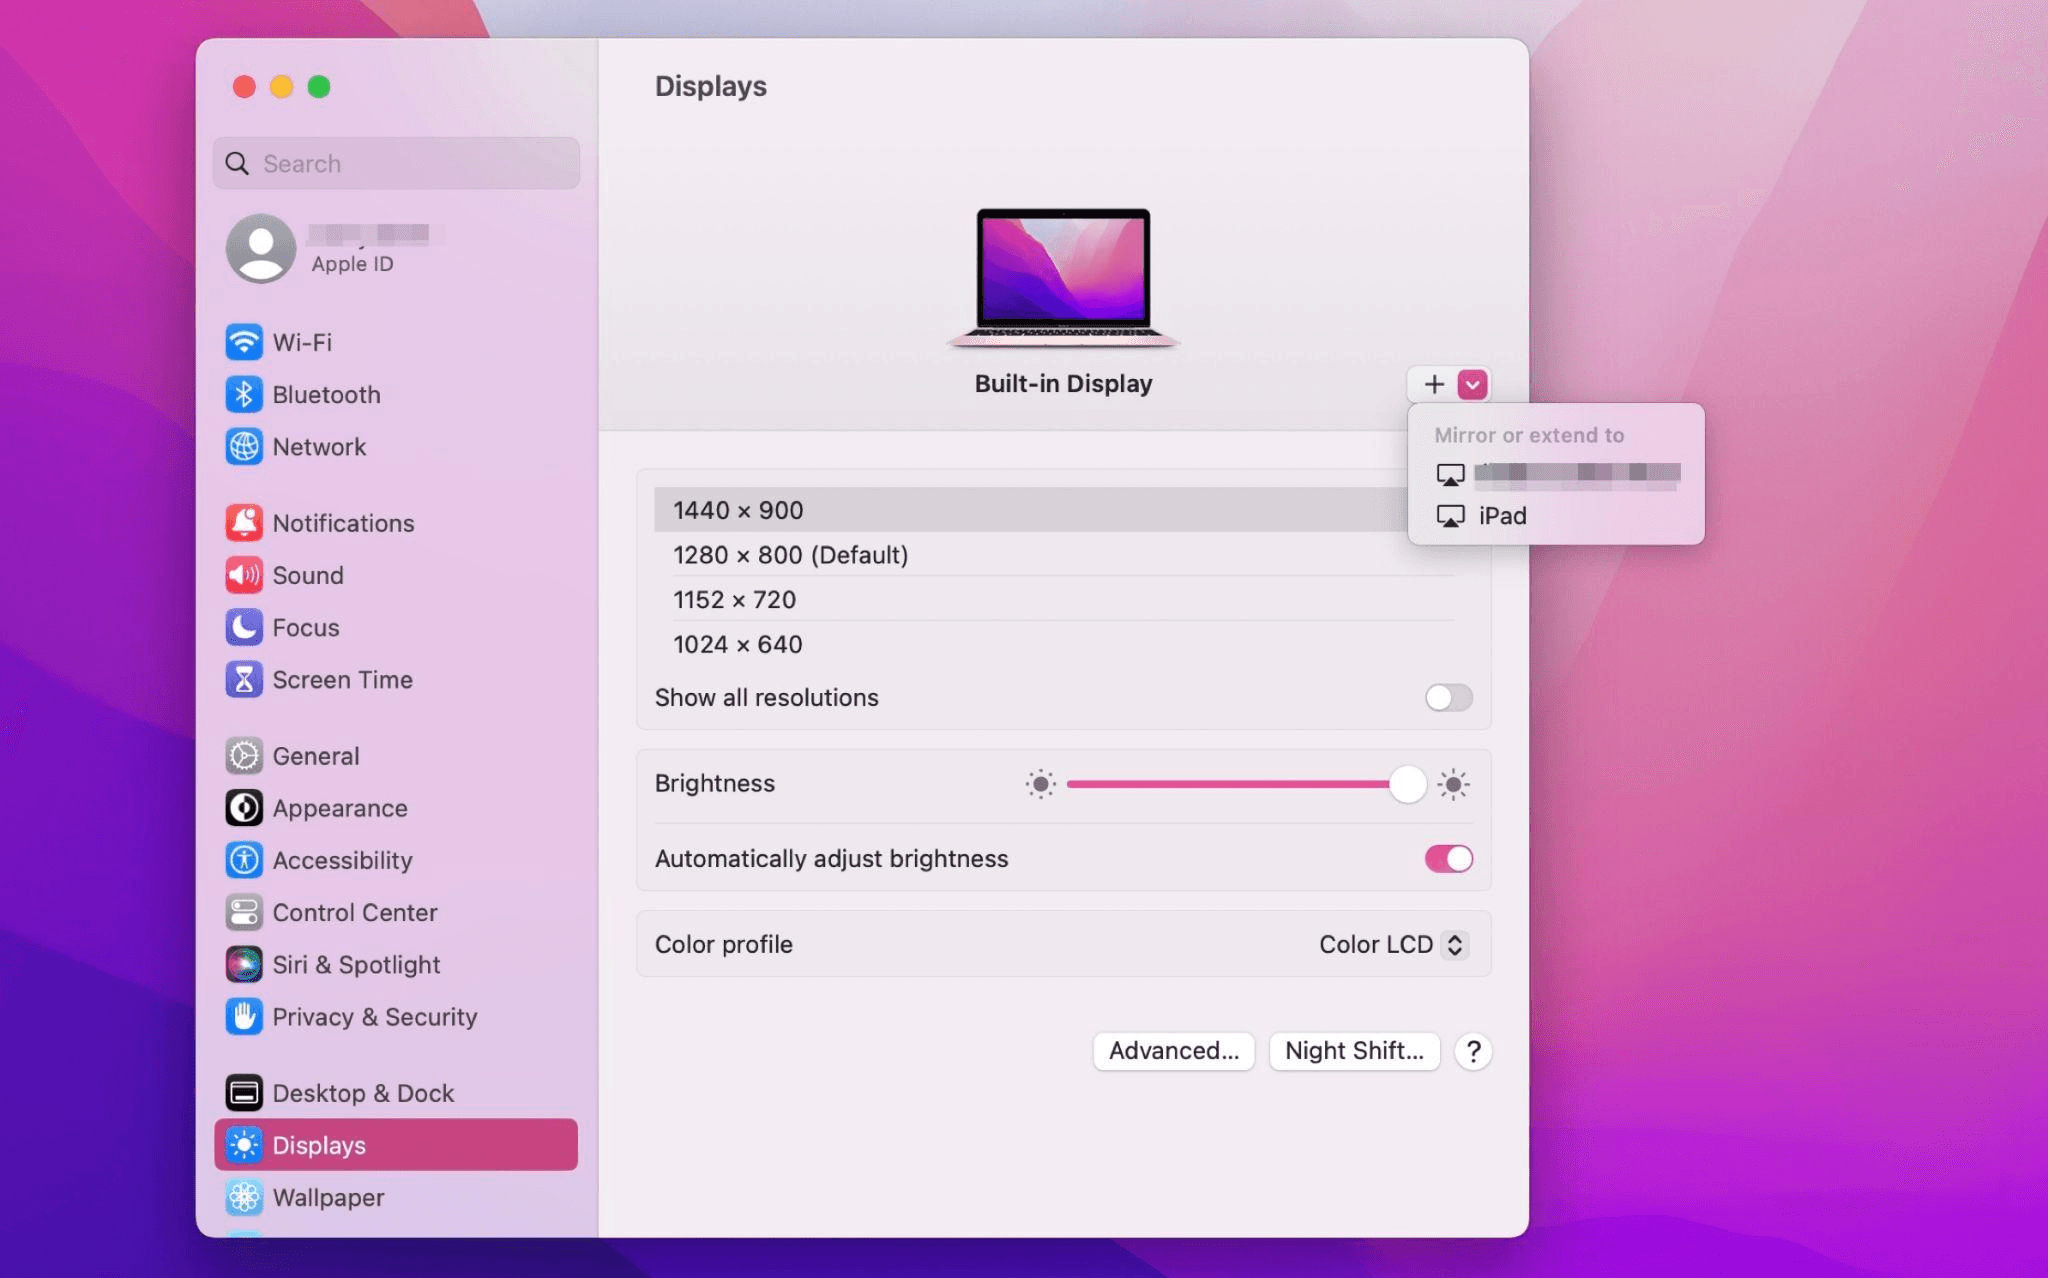
Open the Mac System Settings >> Click "Display" in the sidebar >> Click the "+" pop up menu on the right and choose your iPad.
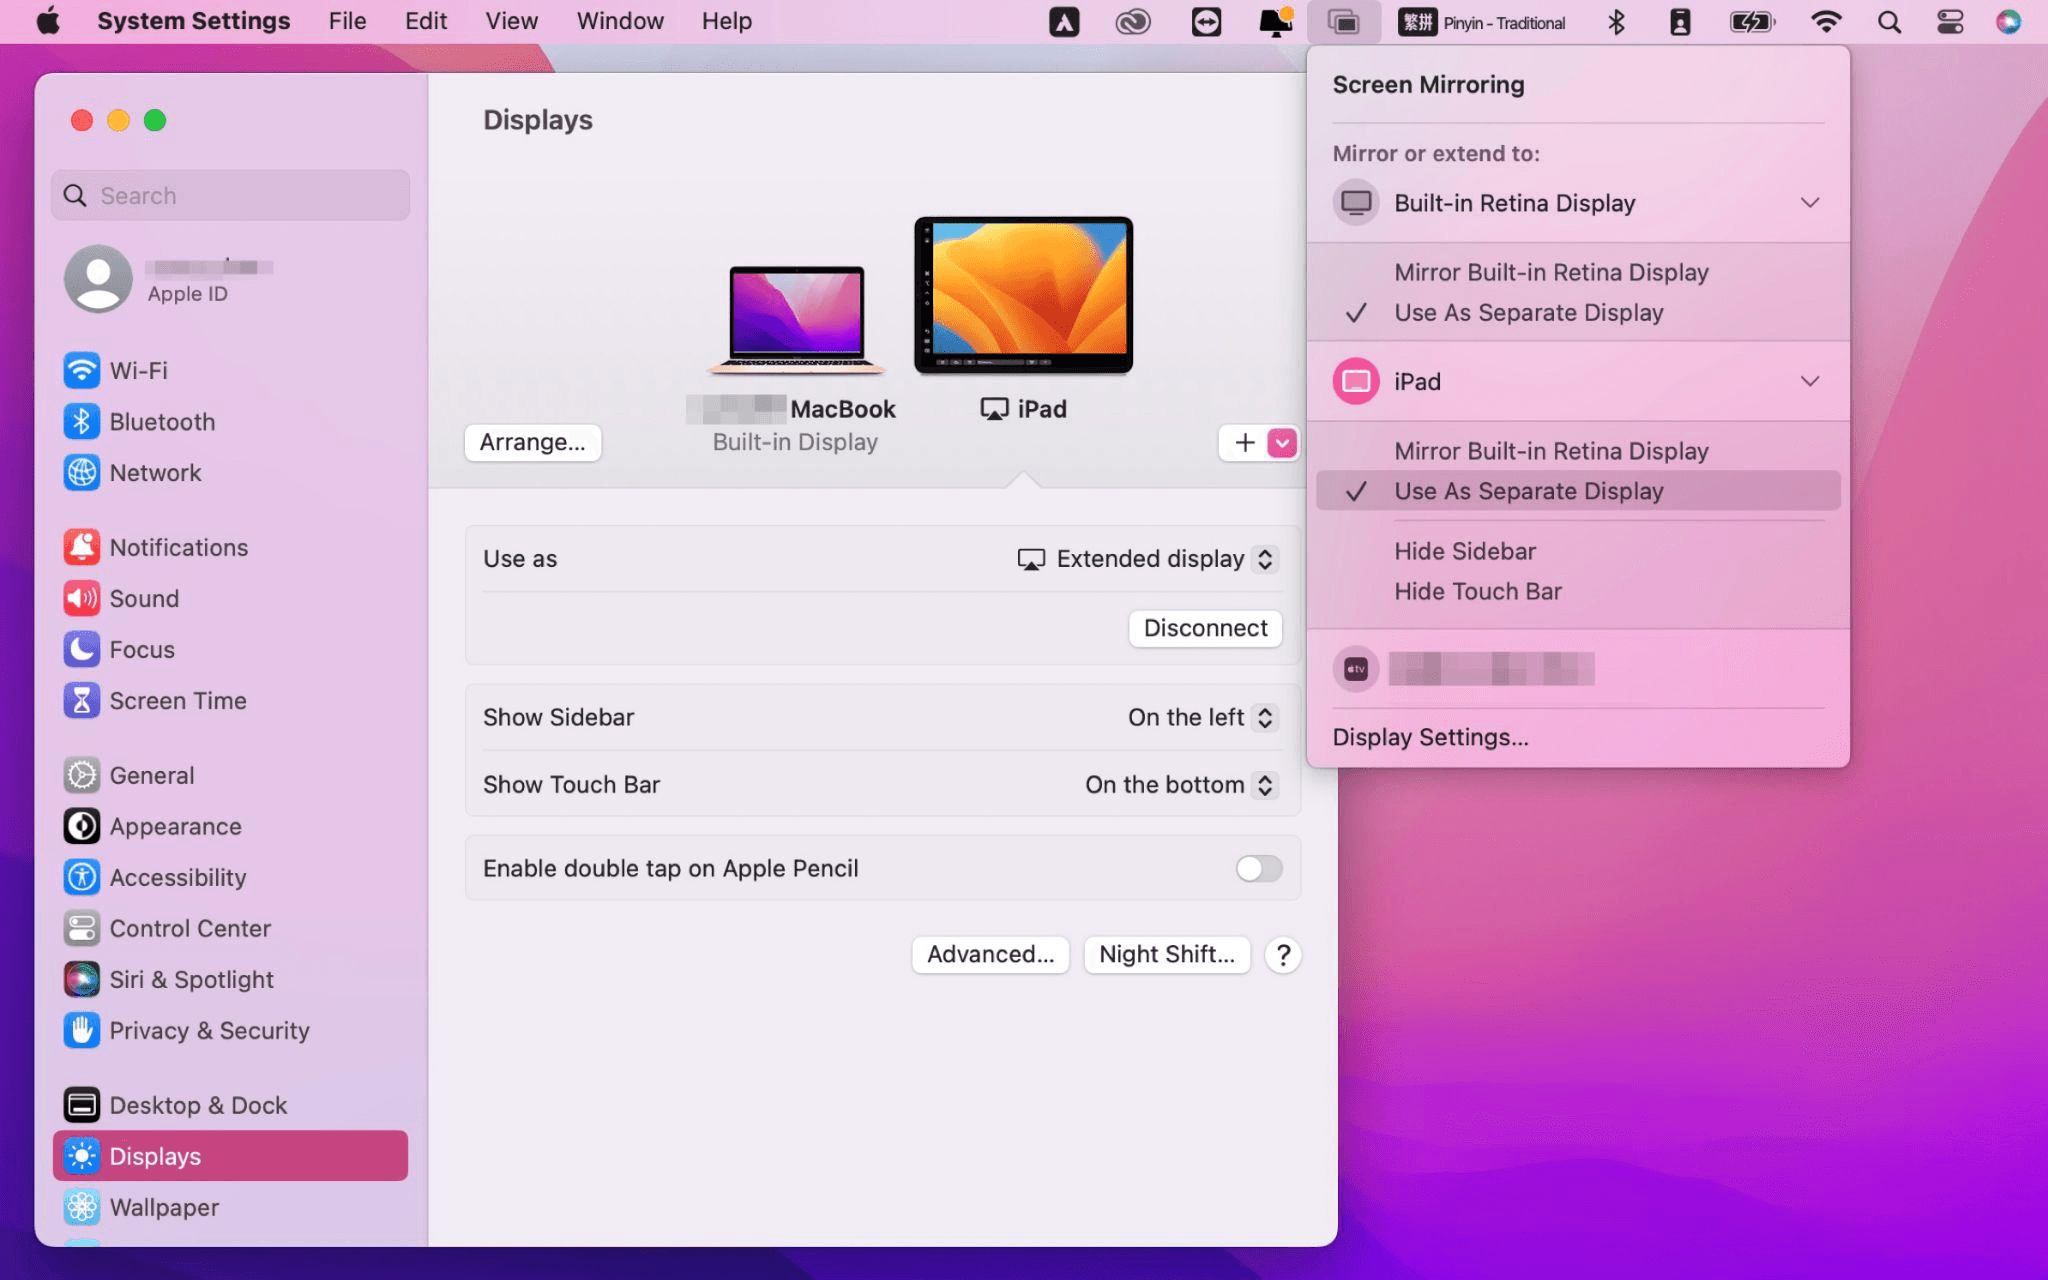
Select the iPad, change the Use as settings to "Extended Display". Check the Airplay settings on the top toolbar of the mac and set iPad as "Use As Separate Display".
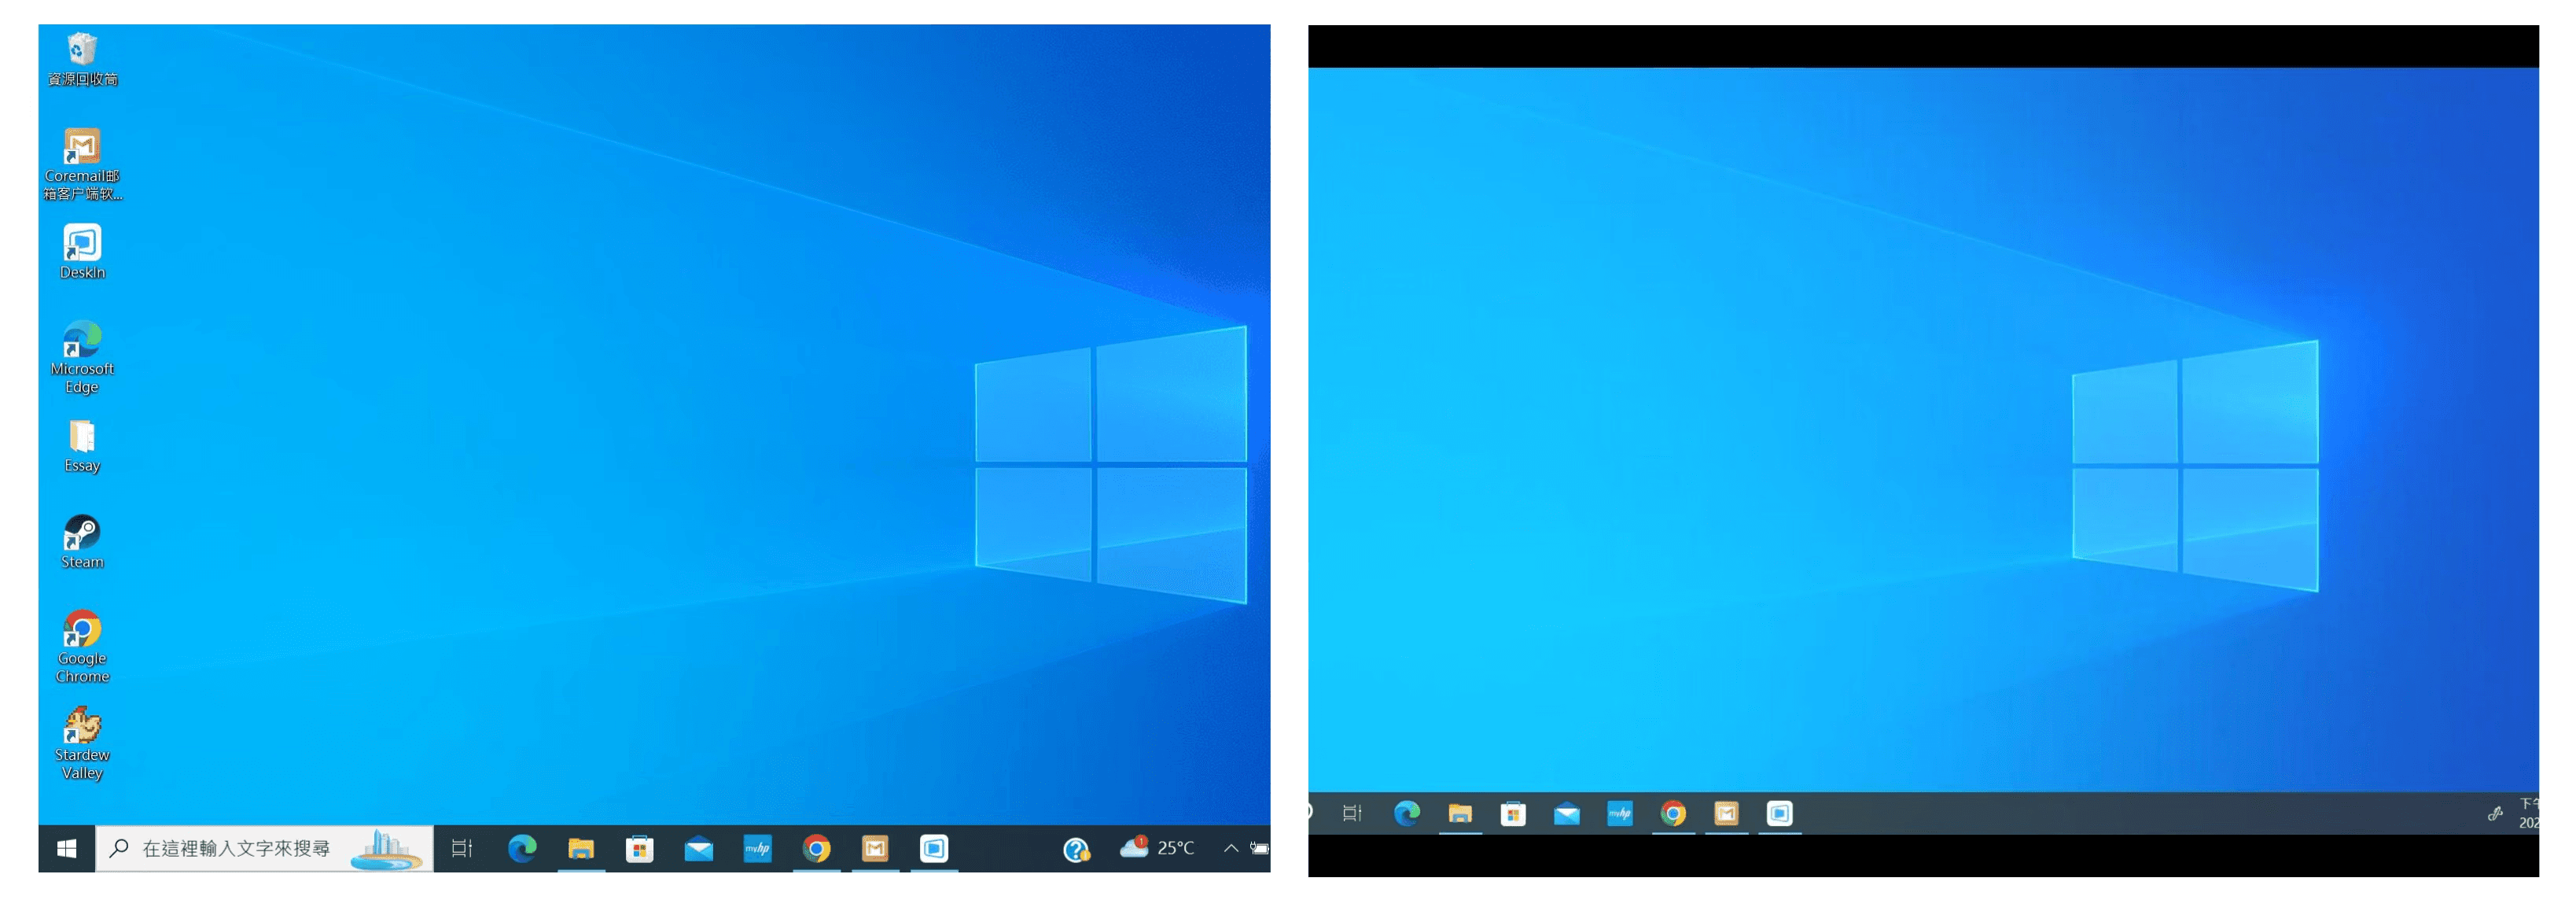
After completing the settings, your iPad will become the second display for your Mac. You can drag windows from your Mac to your iPad smoothly. You can also use the sidebar on the iPad or change the position of the sidebar on the system display settings.
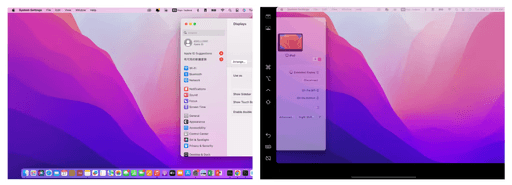
MacBook Screen (Left) and iPad Screen (Right)
Apple Sidecar only supports mac released after 2016 and iPadOS13 or newer. If you are using an old Apple device or a Windows device, you can still use DeskIn remote software to do the screen extension. It supports using iPad as a second display for Mac and Windows, and the smoothness is no worse than sidecar.
Install DeskIn on both your computer and iPad. Sign in to your DeskIn account on each device. When you log in on a new device for the first time, you may need to complete email verification to help protect your account.
To use Screen Extension, you'll need to subscribe to any Premium plan. Click here to view DeskIn plans.
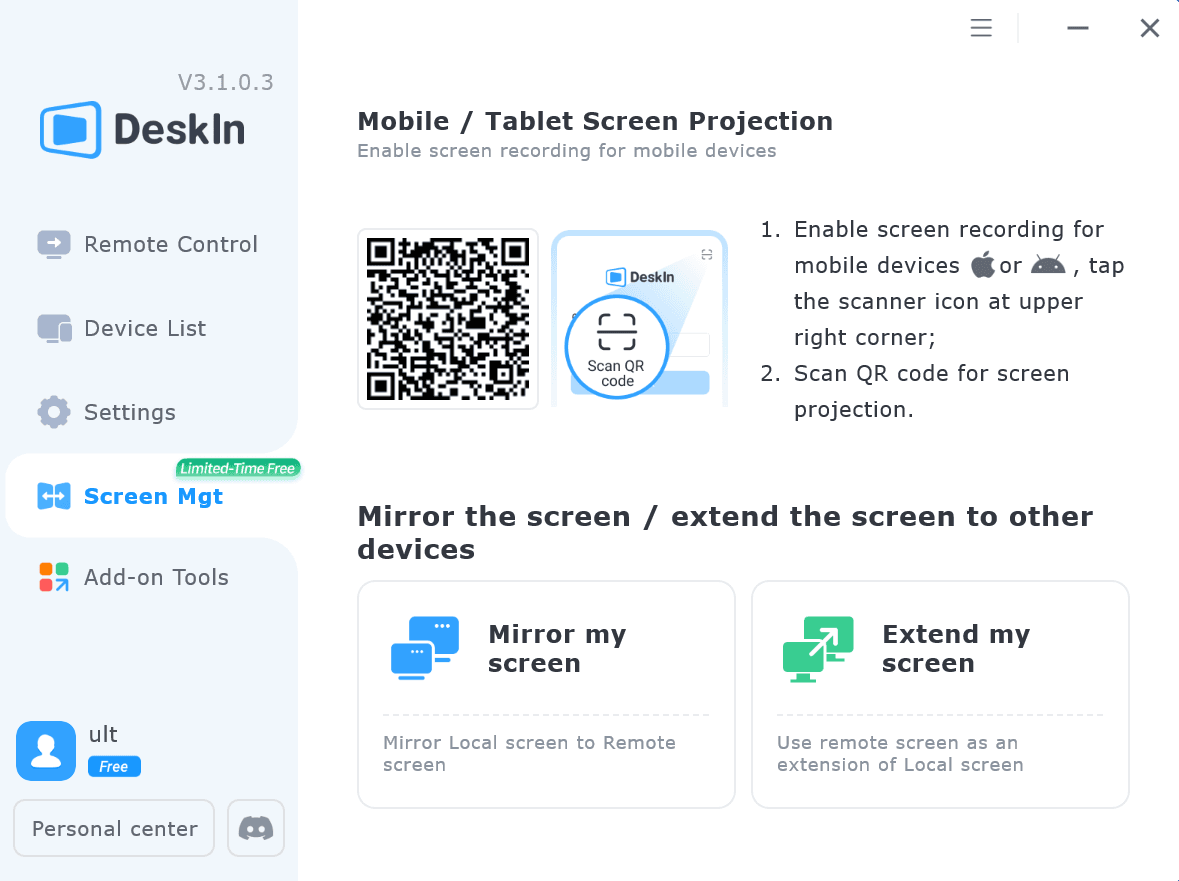
Open DeskIn on your Windows or Mac computer, go to the screen management area, and choose the screen extension option. Select your iPad as the target display and start extending.
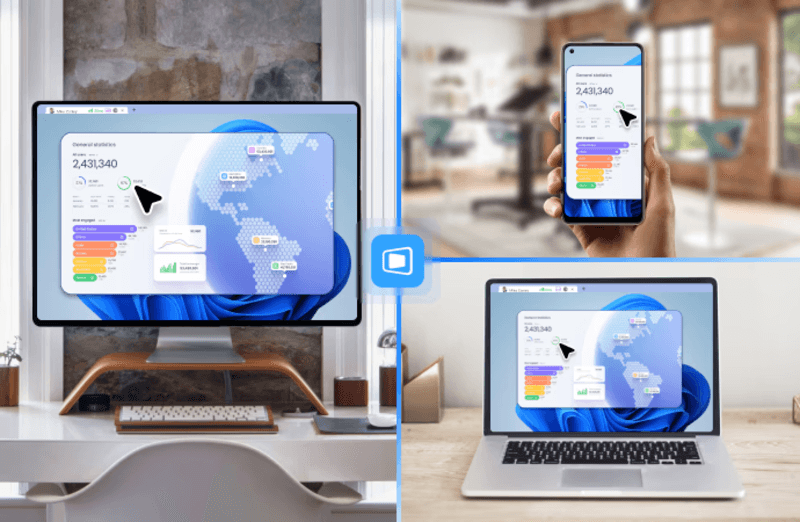
Once connected, your iPad can work as an additional display, letting you move windows between your computer and iPad for a wider workspace.
Computer Screen (Left) and iPad Screen (Right)
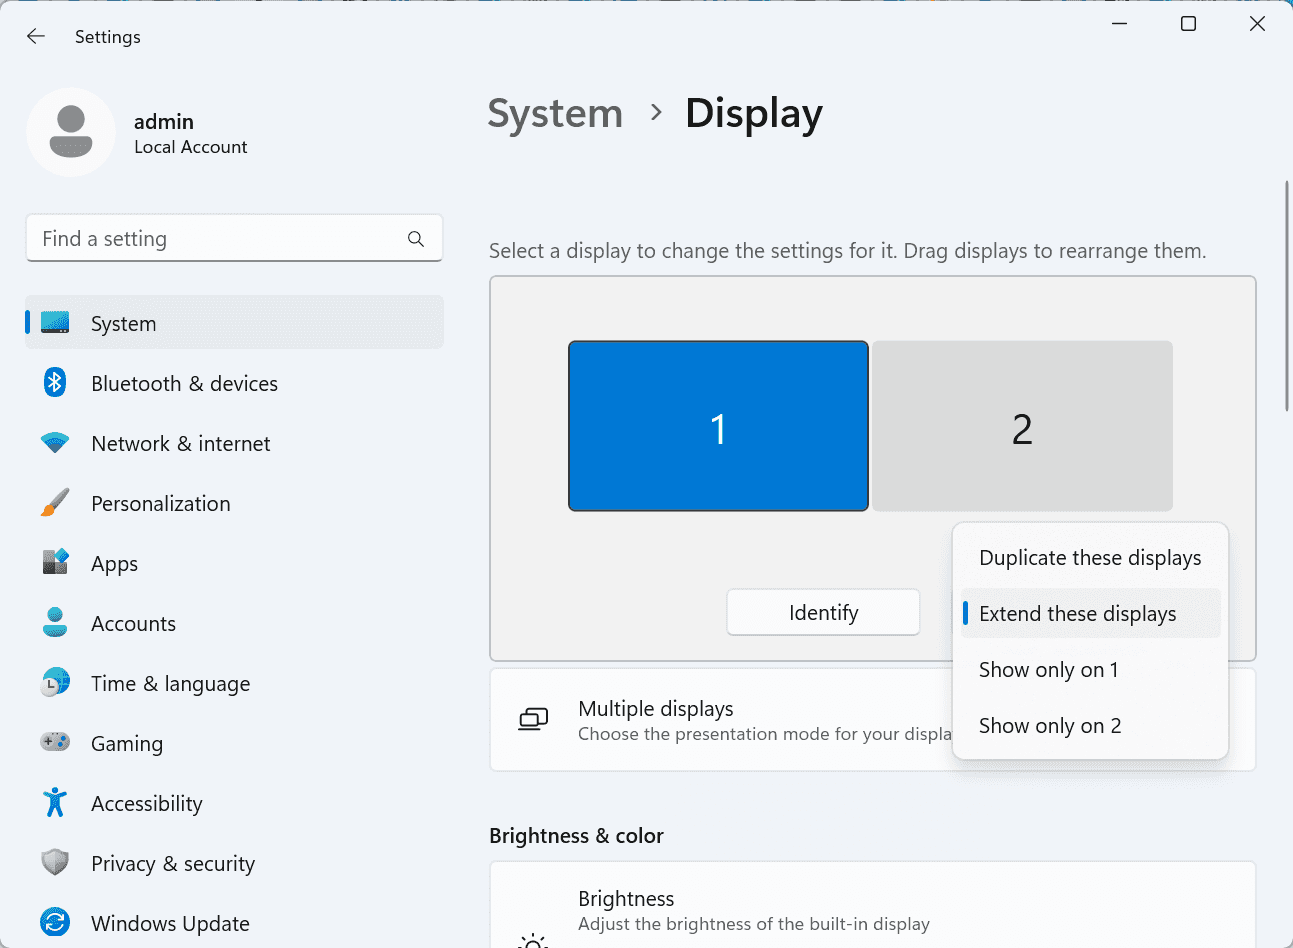
After extension, if you find that your iPad is only mirroring the content on your computer screen, please go to Windows System Settings >> Display Settings and change the screen option to "Extend these displays". You can also modify the screen position by dragging the 2 screens.
Need | Best Option | Why |
Use iPad as a second monitor for a compatible Mac | Apple Sidecar | Built into Apple devices and easy to set up when both devices are compatible. |
Use iPad as a second monitor for Windows | DeskIn | Sidecar does not support Windows, while DeskIn supports cross-platform screen extension on eligible plans. |
Work across Windows, macOS, iPad, Android tablets, and mobile devices | DeskIn | Better suited for users who need cross-platform remote access and flexible device combinations. |
Yes. Windows does not support Apple Sidecar, but you can use DeskIn screen extension on a paid plan that includes this feature to turn your iPad into an additional display for a Windows computer.
DeskIn Screen Extension is included in all paid plans. After subscribing, you can use it across all supported systems with no restrictions.
Yes. DeskIn supports using an iPad as an additional screen with Windows and Mac computers when your plan includes screen mirroring or screen extension.
Using an iPad as a second monitor is a practical way to expand your workspace without buying another display. Mac users with compatible devices can use Apple Sidecar, while Windows and cross-platform users can use DeskIn screen extension on eligible paid plans.
If you want to work across Windows, macOS, iPad, and other devices, DeskIn gives you a flexible way to build a portable multi-screen workspace. Download DeskIn and choose the plan that fits your screen extension and remote access needs.

Top 6 RustDesk Alternative Tools for Faster, Easier Remote Access
Remote access should feel like flipping a light switch, not decoding a control panel. Yet many users exploring RustDesk eventually run into friction: connection IDs, server setup, or occasional lag. While RustDesk is powerful, it’s not always the easiest or smoothest option, especially for non-technical users.
That’s why more people are actively searching for a reliable RustDesk alternative that combines performance, simplicity, and flexibility. Whether you want a plug-and-play solution or something more advanced, this guide will help you find the best fit.
RustDesk stands out as a privacy-friendly, self-hosted remote desktop tool. However, real-world usage reveals a few common challenges:
Complicated setup for the RustDesk self-hosted environments
Manual connection steps requiring IDs and passwords
Occasional latency or unstable connections
Limited user-friendly features out of the box
For many users, especially those helping family or managing multiple devices, simplicity matters just as much as control.
When evaluating a RustDesk alternative, focus on these key factors:
Ease of use: Quick setup without technical overhead
Performance: Smooth, low-latency remote sessions
Compatibility: Support for Windows, macOS, Linux, and mobile
Security: Strong encryption and access controls
Flexibility: Options ranging from cloud-based to open source
The ideal tool strikes a balance between power and convenience, something many modern solutions now deliver better than traditional setups.
Here’s a quick breakdown of the top tools and where they shine:
DeskIn – Best all-in-one RustDesk alternative for performance and ease of use
AnyDesk – Best lightweight tool for fast connections
TeamViewer – Best for enterprise-grade remote support
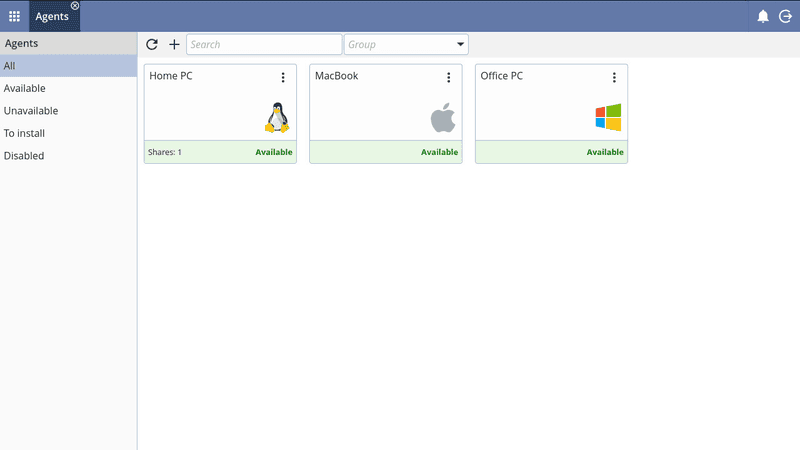
MeshCentral – Best open-source and self-hosted solution
DWService – Best free browser-based tool
Chrome Remote Desktop – Best simple, no-frills option
Ultra-low latency with smooth high-frame-rate streaming
No complex setup or server deployment required
Cross-platform including Rustdesk alternative for Android
Secure with encryption and device control features
Built-in file transfer and multi-device management
Smaller awareness than legacy competitors
Best for: Users who want a powerful yet simple remote desktop solution
DeskIn removes the friction that often comes with remote access tools. Instead of relying on IDs or manual configurations, it offers a streamlined connection experience that works right out of the box. This makes it especially valuable for users supporting non-technical family members or managing multiple remote devices.
Performance is where DeskIn truly distinguishes itself. Compared to RustDesk, which can sometimes struggle with latency, DeskIn delivers consistently smooth sessions with minimal lag. It also eliminates the need for self-hosting, making it a strong free RustDesk alternative option for users who want powerful features without the complexity.
For those exploring options beyond the RustDesk alternative GitHub projects, DeskIn provides a polished, ready-to-use experience that balances simplicity with professional-grade performance.
Lightweight and fast installation
Good performance on low bandwidth
Cross-platform support
Easy-to-use interface
Performance may drop during long sessions
File transfer can be inconsistent
Best for: Users needing quick and simple remote access
AnyDesk is often considered a natural step up from RustDesk for users who want something easier to deploy. It offers a lightweight application that connects quickly and performs well under normal conditions. This makes it suitable for quick troubleshooting or occasional remote access.
However, performance consistency can be an issue. Users frequently report lag or instability during extended sessions or when handling more demanding tasks. While AnyDesk is a solid option for basic needs, it may not fully satisfy users looking for a more robust, all-in-one solution.
👀 You may also be interested in: |
|---|
Enterprise-grade security with encryption and 2FA
Stable performance across global networks
Rich features like file transfer and session recording
Broad device compatibility
Expensive for commercial use
Free version has limitations
Heavier resource usage on some systems
Best for: Businesses and IT teams managing multiple endpoints
TeamViewer has long been a dominant player in the remote desktop space, offering a comprehensive suite of features designed for enterprise environments. It excels in reliability and global connectivity, making it a popular choice for IT support teams.
That said, its pricing model is a major drawback for many users. Frequent users may quickly encounter licensing restrictions, and costs can escalate for businesses. Additionally, its heavier footprint can impact performance on lower-end devices. DeskIn offers a more modern alternative by delivering similar performance and essential features without the same cost barriers. For users who want enterprise-level capabilities with better efficiency, it presents a compelling option.
👀 You may also be interested in: |
|---|
Fully RustDesk alternative open source solution
Web-based management dashboard
Supports multi-device environments
Strong customization and control
Complex setup and maintenance
Requires technical expertise
Best for: Advanced users needing a Rustdesk alternative self-hosted
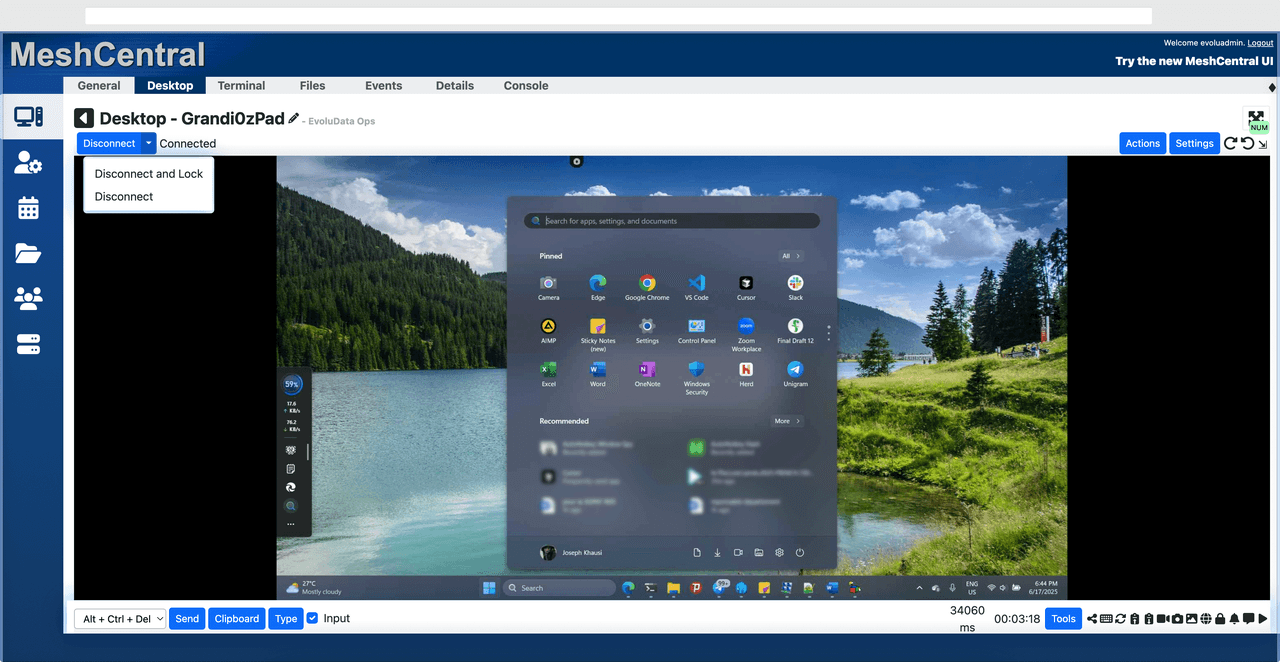
MeshCentral is a powerful open-source platform designed for users who want full control over their remote access infrastructure. It supports multiple devices and provides a centralized dashboard for management, making it attractive for IT professionals.
However, this flexibility comes with complexity. Setting up and maintaining a MeshCentral server requires technical knowledge, which can be a barrier for many users. Compared to this, DeskIn offers a much simpler deployment process while still delivering strong performance and security. For users who prioritize ease of use over full control, modern solutions like DeskIn provide a more accessible alternative.
Completely free
Browser-based access
Open-source foundation
Simple setup
Limited performance
Basic feature set
Best for: Users looking for a simple, free RustDesk alternative
DWService offers a browser-based approach to remote access with no heavy installation, making it convenient for quick connections in restricted environments. It supports both desktop access and file management across major platforms.
However, performance often feels sluggish, especially on demanding tasks, and features remain basic; lacking session recording, smooth multi-monitor support, or advanced security controls. While suitable for occasional personal use, it falls short for professional or high-performance scenarios.
Free and easy to use
Browser-based setup
Cross-platform compatibility
Very limited features
No advanced management or collaboration tools
Best for: Casual users needing basic remote access

Chrome Remote Desktop is one of the simplest remote access tools available. It’s easy to set up and works across devices, making it a convenient choice for occasional use.
However, it lacks many essential features such as file transfer, session management, and advanced security controls. For users with more demanding needs, it quickly becomes insufficient. Compared to Chrome Remote Desktop, DeskIn provides a much more complete experience without sacrificing ease of use, making it a better long-term solution.
👀 You may also be interested in: |
|---|
RustDesk is powerful but can be difficult to set up and manage, especially with self-hosting. Many users prefer tools that offer similar performance without technical complexity. DeskIn simplifies remote access while maintaining strong performance and security.
Several tools qualify as a free RustDesk alternative, including DWService and Chrome Remote Desktop. However, DeskIn stands out by offering better performance and usability even in its free version.
Yes, tools like MeshCentral and DWService are considered RustDesk alternative open source options. They provide flexibility and control but often require technical expertise to set up and maintain.
Beginners should choose tools with a simple setup and intuitive interfaces. DeskIn is an excellent option because it removes the need for manual configuration while still delivering advanced features.
RustDesk is a powerful starting point, but it’s not always the easiest or most efficient tool for everyday use. From setup complexity to performance limitations, many users eventually look for a better RustDesk alternative.
Among all the options, DeskIn stands out as the most balanced solution. It combines speed, simplicity, and cross-platform support into one seamless experience. If you’re ready to move beyond technical friction and enjoy truly smooth remote access, DeskIn is a choice that simply works.

Top 7 RDP Alternative Tools for Faster, Safer Remote Access
Remote desktop access used to feel like a solid bridge. Now, for many users, traditional RDP feels more like a creaky rope ladder. With performance issues, security concerns, and limited cross-platform support, it's no surprise that more people are actively searching for a better RDP alternative that actually keeps up with modern workflows.
If you're managing multiple servers, working across devices, or just tired of unstable connections, this guide will walk you through the best tools worth switching to.
RDP (Remote Desktop Protocol) is a proprietary protocol developed by Microsoft that allows users to connect to another computer over a network. It's widely used for accessing Windows servers, virtual machines, and remote workstations.
While powerful in controlled environments, RDP is often tied to Windows systems and requires configuration like port forwarding or VPNs. Compared to newer tools, it can feel rigid and outdated.
You may also be interested in: |
|---|
RDP still works, but it comes with trade-offs that many users find frustrating:
Security risks if not properly configured
Complex setup for remote or external access
Limited cross-platform compatibility
Performance issues over unstable networks
Many IT teams are now actively replacing it, especially when looking for a Windows RDP client alternative or something that works seamlessly across macOS, Linux, and mobile devices. That's where modern Remote Desktop alternatives shine.
Choosing the right tool is like picking the right vehicle. Some are built for speed, others for heavy-duty enterprise work. Here's a quick snapshot:
DeskIn – Best all-in-one RDP alternative for performance and cross-platform use
TeamViewer – Best for enterprise remote support
AnyDesk – Best lightweight option for fast connections
RustDesk – Best Windows RDP alternative open-source solution
Remmina – Best RDP alternative for Linux users
Chrome Remote Desktop – Best simple browser-based tool
Splashtop – Best for high-performance business environments
Ultra-low latency with smooth high-frame-rate streaming
Works across Windows, macOS, Linux, iOS, and Android
Strong encryption and secure access controls
Built-in file transfer and multi-session support
Newer compared to legacy brands
Best for: Users who want a powerful, flexible RDP alternative

DeskIn feels less like remote access and more like teleportation for your desktop. Whether you're managing servers, supporting clients, or working remotely, it delivers consistently smooth performance without the usual lag spikes seen in traditional RDP setups.
Unlike many tools, DeskIn eliminates the need for complex configurations. You don't need to wrestle with firewalls or VPNs just to connect. It also works seamlessly across platforms, making it a strong alternative to Microsoft Remote Desktop for Mac and mobile users alike.
For teams juggling multiple systems, DeskIn provides a unified experience that replaces fragmented workflows. It's also a strong free RDP alternative option with premium-level capabilities, making it ideal for both individuals and businesses.
Enterprise-grade security and compliance
Extensive feature set including collaboration tools
Cross-platform compatibility
Reliable global performance
Expensive licensing
Can be overkill for individuals
Best for: Enterprises needing secure and scalable remote access
TeamViewer is a comprehensive remote desktop platform widely adopted by IT teams, support professionals, and enterprises. Its feature set extends far beyond simple screen sharing—it includes robust device management, remote printing, file transfer, session recording, and even augmented reality support for field service. TeamViewer's security architecture relies on AES‑256 encryption, two‑factor authentication, and whitelisting, making it suitable for organizations with strict compliance requirements. It runs on virtually every operating system and mobile platform.
The main trade‑off is its pricing: licenses are subscription‑based and can become expensive for small teams or individual users, especially as TeamViewer aggressively flags personal use as commercial, leading to session restrictions.
Fast and responsive
Lightweight installation
Works well on low bandwidth
Easy to use
File transfer can be inconsistent
Lag during longer sessions
Best for: Users needing quick, simple remote access
AnyDesk is a lightweight remote desktop application prized for its speed and efficiency, often recommended as a fast alternative to Microsoft's native Remote Desktop on Windows 10 and Android. It uses a proprietary video codec, DeskRT, to achieve low latency even on limited bandwidth, making it ideal for quick support sessions and accessing devices over mobile networks. The interface is clean and minimalist, with features like address book management, file transfer, and session recording available.
However, users frequently report instability during extended sessions; performance can degrade over time, and file transfers may slow considerably compared to competitors. While its free version is generous for personal use, professional users often find the performance ceiling limits its suitability for continuous, demanding workloads. DeskIn, by contrast, maintains consistent performance even during extended use, making it better suited for professional workloads.
You may also be interested in: |
|---|
Free and open-source
Self-hosting for full control
Strong privacy protection
Active community
Technical setup required
Limited user-friendly features
Best for: Developers and privacy-focused users
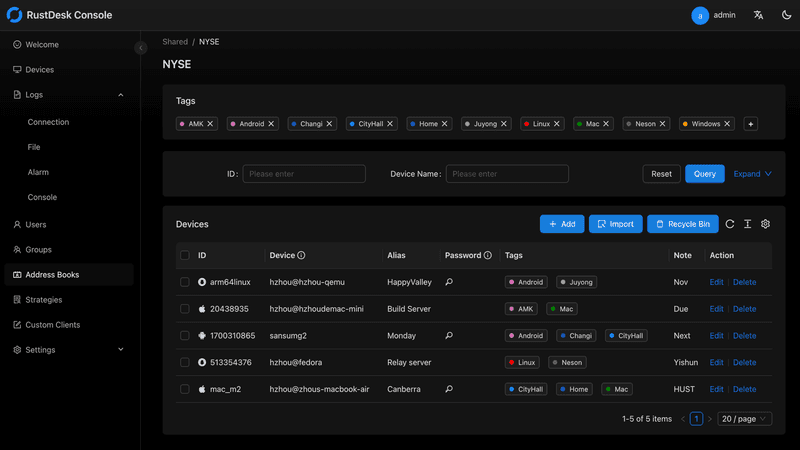
RustDesk has emerged as a leading open‑source remote desktop alternative, appealing to developers and organizations that require full control over their data. It allows users to self‑host the relay and rendezvous servers, meaning no third‑party infrastructure handles connection metadata. Built with Rust, it offers a modern codebase with cross‑platform clients (Windows, macOS, Linux, Android, iOS) and supports essential features such as file transfer, TCP tunneling, and customizable address books.
The major barrier is its complexity: deploying a self‑hosted environment requires technical expertise to configure firewalls, SSL certificates, and ongoing server maintenance. For those using the public relay, performance can be inconsistent depending on server load and geographic proximity.
You may also be interested in: Top RustDesk Alternatives for Better Performance, Security & Ease of Use |
|---|
Open-source and free
Supports multiple protocols including RDP and VNC
Lightweight and flexible
Native to Linux environments
Limited features compared to modern tools
UI can feel outdated
Best for: Linux users looking for a traditional RDP alternative Linux
Remmina is a beloved open‑source remote desktop client for Linux, supporting multiple protocols (RDP, VNC, SSH, SPICE, and others) in a single unified interface. It is frequently chosen by system administrators and Linux enthusiasts who need a flexible, lightweight tool to manage diverse environments. Remmina offers tabbed sessions, quick‑connect profiles, and a plugin system that extends its capabilities.
However, its strength - protocol flexibility, also highlights its limitations. As a frontend client rather than a full remote access solution, it lacks features like unattended access, centralized account management, or robust session recording out of the box. Performance can vary by protocol, and the user experience lags behind more polished commercial tools, particularly for users seeking a plug‑and‑play setup.
Free and easy to use
Browser-based setup
Cross-platform access
Very limited features
No advanced management tools
Best for: Casual users needing basic remote access
Chrome Remote Desktop is a free, browser‑based remote access tool from Google that requires nothing more than a Chrome browser and a Google account. It excels in simplicity: installation takes seconds, and connections are mediated through Google's infrastructure, eliminating complex firewall configurations. For occasional use—such as helping a family member or quickly accessing a home computer—it works reliably across Windows, macOS, Linux, and even ChromeOS.
The trade‑off is its minimal feature set. There is no native file transfer, multi‑session management, remote printing, or granular permission controls. Collaboration tools are absent, and the reliance on a Google account for authentication can be a limitation in professional environments. It remains a convenient entry‑level tool but struggles to meet the needs of power users or IT teams.
You may also be interested in: |
|---|
High-quality streaming performance
Strong security features
Good for business environments
Reliable connections
Subscription-based pricing
Limited free version
Best for: Businesses needing performance-focused remote access
Splashtop is a high‑performance remote desktop solution frequently adopted by creative professionals, educational institutions, and enterprises that prioritize fluid interaction. It delivers low‑latency streaming with support for high‑frame‑rate displays, making it suitable for video editing, CAD work, and other graphics‑intensive tasks. Splashtop offers a range of editions—from Business Access to SOS for on‑demand support—all of which include robust security (AES‑256, device authentication) and features like file transfer, remote printing, and multi‑monitor navigation. Its performance over local networks and the internet is consistently praised.
The primary drawback is cost: while competitive, the subscription model can accumulate quickly for users needing access to multiple devices or advanced features, especially when compared to similarly capable tools with more flexible pricing structures. DeskIn offers similar performance benefits with a more flexible pricing structure, making it a compelling alternative.
You may also be interested in: |
|---|
RDP can be difficult to configure, less secure if exposed, and limited outside Windows environments. Modern tools like DeskIn provide better performance, security, and ease of use.
The best RDP alternative depends on your needs, but DeskIn stands out for its balance of speed, security, and cross-platform compatibility.
Yes, several tools qualify as an RDP alternative free, including RustDesk and Chrome Remote Desktop. DeskIn also offers a free tier with advanced capabilities.
Microsoft is evolving its remote desktop ecosystem, but traditional RDP isn't disappearing overnight. However, many users are already transitioning to more modern solutions like DeskIn for better reliability and flexibility.
RDP has served its purpose, but the digital world has outgrown its limitations. Whether you need better performance, stronger security, or true cross-platform access, switching to a modern RDP alternative is no longer optional, it's inevitable.
Among all the options, DeskIn stands out as a future-ready solution. It combines speed, simplicity, and power into one seamless experience, helping you leave behind the friction of traditional remote desktop tools and step into something far more efficient.
เปลี่ยน iPad ให้เป็นจอภาพที่สองสำหรับคอมพิวเตอร์ Windows และ Mac
A second monitor can make everyday work feel much easier, especially when you are switching between research, documents, meetings, design files, or dashboards. If you already own an iPad, you may be able to use it as an extra display instead of buying another monitor.
This guide explains how to use an iPad as a second monitor for Mac with Apple Sidecar, and how Windows or cross-platform users can use DeskIn screen extension on supported paid plans.
Increase screen space so you can view more content at the same time. This helps reduce constant window switching during multitasking.
Keep each screen focused on a different task. For example, you can edit a video on one screen and keep source materials on the other, or write a paper while browsing references side by side.
Use the iPad display you already have. For students, remote workers, and light creative work, an iPad can be a convenient and cost-effective second-screen option.
Save desk space and avoid carrying another external monitor when you work from home, travel, or move between rooms.
Apple Sidecar lets compatible iPads work as an external display for compatible MacBook and iMac devices. It is a good native option if both devices support Sidecar and are signed in with the same Apple ID.
Note: To use Apple Sidecar, your Mac and iPad should use the same Apple ID, have Bluetooth and Wi-Fi turned on, and stay within close wireless range. Sidecar availability depends on Apple device and operating system compatibility.
Open the Mac System Settings >> Click "Display" in the sidebar >> Click the "+" pop up menu on the right and choose your iPad.
Select the iPad, change the Use as settings to "Extended Display". Check the Airplay settings on the top toolbar of the mac and set iPad as "Use As Separate Display".
After completing the settings, your iPad will become the second display for your Mac. You can drag windows from your Mac to your iPad smoothly. You can also use the sidebar on the iPad or change the position of the sidebar on the system display settings.
MacBook Screen (Left) and iPad Screen (Right)
Apple Sidecar only supports mac released after 2016 and iPadOS13 or newer. If you are using an old Apple device or a Windows device, you can still use DeskIn remote software to do the screen extension. It supports using iPad as a second display for Mac and Windows, and the smoothness is no worse than sidecar.
Install DeskIn on both your computer and iPad. Sign in to your DeskIn account on each device. When you log in on a new device for the first time, you may need to complete email verification to help protect your account.
To use Screen Extension, you'll need to subscribe to any Premium plan. Click here to view DeskIn plans.
Open DeskIn on your Windows or Mac computer, go to the screen management area, and choose the screen extension option. Select your iPad as the target display and start extending.
Once connected, your iPad can work as an additional display, letting you move windows between your computer and iPad for a wider workspace.
Computer Screen (Left) and iPad Screen (Right)
After extension, if you find that your iPad is only mirroring the content on your computer screen, please go to Windows System Settings >> Display Settings and change the screen option to "Extend these displays". You can also modify the screen position by dragging the 2 screens.
Need | Best Option | Why |
Use iPad as a second monitor for a compatible Mac | Apple Sidecar | Built into Apple devices and easy to set up when both devices are compatible. |
Use iPad as a second monitor for Windows | DeskIn | Sidecar does not support Windows, while DeskIn supports cross-platform screen extension on eligible plans. |
Work across Windows, macOS, iPad, Android tablets, and mobile devices | DeskIn | Better suited for users who need cross-platform remote access and flexible device combinations. |
Yes. Windows does not support Apple Sidecar, but you can use DeskIn screen extension on a paid plan that includes this feature to turn your iPad into an additional display for a Windows computer.
DeskIn Screen Extension is included in all paid plans. After subscribing, you can use it across all supported systems with no restrictions.
Yes. DeskIn supports using an iPad as an additional screen with Windows and Mac computers when your plan includes screen mirroring or screen extension.
Using an iPad as a second monitor is a practical way to expand your workspace without buying another display. Mac users with compatible devices can use Apple Sidecar, while Windows and cross-platform users can use DeskIn screen extension on eligible paid plans.
If you want to work across Windows, macOS, iPad, and other devices, DeskIn gives you a flexible way to build a portable multi-screen workspace. Download DeskIn and choose the plan that fits your screen extension and remote access needs.
Top 6 RustDesk Alternative Tools for Faster, Easier Remote Access
Remote access should feel like flipping a light switch, not decoding a control panel. Yet many users exploring RustDesk eventually run into friction: connection IDs, server setup, or occasional lag. While RustDesk is powerful, it’s not always the easiest or smoothest option, especially for non-technical users.
That’s why more people are actively searching for a reliable RustDesk alternative that combines performance, simplicity, and flexibility. Whether you want a plug-and-play solution or something more advanced, this guide will help you find the best fit.
RustDesk stands out as a privacy-friendly, self-hosted remote desktop tool. However, real-world usage reveals a few common challenges:
Complicated setup for the RustDesk self-hosted environments
Manual connection steps requiring IDs and passwords
Occasional latency or unstable connections
Limited user-friendly features out of the box
For many users, especially those helping family or managing multiple devices, simplicity matters just as much as control.
When evaluating a RustDesk alternative, focus on these key factors:
Ease of use: Quick setup without technical overhead
Performance: Smooth, low-latency remote sessions
Compatibility: Support for Windows, macOS, Linux, and mobile
Security: Strong encryption and access controls
Flexibility: Options ranging from cloud-based to open source
The ideal tool strikes a balance between power and convenience, something many modern solutions now deliver better than traditional setups.
Here’s a quick breakdown of the top tools and where they shine:
DeskIn – Best all-in-one RustDesk alternative for performance and ease of use
AnyDesk – Best lightweight tool for fast connections
TeamViewer – Best for enterprise-grade remote support
MeshCentral – Best open-source and self-hosted solution
DWService – Best free browser-based tool
Chrome Remote Desktop – Best simple, no-frills option
Ultra-low latency with smooth high-frame-rate streaming
No complex setup or server deployment required
Cross-platform including Rustdesk alternative for Android
Secure with encryption and device control features
Built-in file transfer and multi-device management
Smaller awareness than legacy competitors
Best for: Users who want a powerful yet simple remote desktop solution
DeskIn removes the friction that often comes with remote access tools. Instead of relying on IDs or manual configurations, it offers a streamlined connection experience that works right out of the box. This makes it especially valuable for users supporting non-technical family members or managing multiple remote devices.
Performance is where DeskIn truly distinguishes itself. Compared to RustDesk, which can sometimes struggle with latency, DeskIn delivers consistently smooth sessions with minimal lag. It also eliminates the need for self-hosting, making it a strong free RustDesk alternative option for users who want powerful features without the complexity.
For those exploring options beyond the RustDesk alternative GitHub projects, DeskIn provides a polished, ready-to-use experience that balances simplicity with professional-grade performance.
Lightweight and fast installation
Good performance on low bandwidth
Cross-platform support
Easy-to-use interface
Performance may drop during long sessions
File transfer can be inconsistent
Best for: Users needing quick and simple remote access
AnyDesk is often considered a natural step up from RustDesk for users who want something easier to deploy. It offers a lightweight application that connects quickly and performs well under normal conditions. This makes it suitable for quick troubleshooting or occasional remote access.
However, performance consistency can be an issue. Users frequently report lag or instability during extended sessions or when handling more demanding tasks. While AnyDesk is a solid option for basic needs, it may not fully satisfy users looking for a more robust, all-in-one solution.
👀 You may also be interested in: |
|---|
Enterprise-grade security with encryption and 2FA
Stable performance across global networks
Rich features like file transfer and session recording
Broad device compatibility
Expensive for commercial use
Free version has limitations
Heavier resource usage on some systems
Best for: Businesses and IT teams managing multiple endpoints
TeamViewer has long been a dominant player in the remote desktop space, offering a comprehensive suite of features designed for enterprise environments. It excels in reliability and global connectivity, making it a popular choice for IT support teams.
That said, its pricing model is a major drawback for many users. Frequent users may quickly encounter licensing restrictions, and costs can escalate for businesses. Additionally, its heavier footprint can impact performance on lower-end devices. DeskIn offers a more modern alternative by delivering similar performance and essential features without the same cost barriers. For users who want enterprise-level capabilities with better efficiency, it presents a compelling option.
👀 You may also be interested in: |
|---|
Fully RustDesk alternative open source solution
Web-based management dashboard
Supports multi-device environments
Strong customization and control
Complex setup and maintenance
Requires technical expertise
Best for: Advanced users needing a Rustdesk alternative self-hosted
MeshCentral is a powerful open-source platform designed for users who want full control over their remote access infrastructure. It supports multiple devices and provides a centralized dashboard for management, making it attractive for IT professionals.
However, this flexibility comes with complexity. Setting up and maintaining a MeshCentral server requires technical knowledge, which can be a barrier for many users. Compared to this, DeskIn offers a much simpler deployment process while still delivering strong performance and security. For users who prioritize ease of use over full control, modern solutions like DeskIn provide a more accessible alternative.
Completely free
Browser-based access
Open-source foundation
Simple setup
Limited performance
Basic feature set
Best for: Users looking for a simple, free RustDesk alternative
DWService offers a browser-based approach to remote access with no heavy installation, making it convenient for quick connections in restricted environments. It supports both desktop access and file management across major platforms.
However, performance often feels sluggish, especially on demanding tasks, and features remain basic; lacking session recording, smooth multi-monitor support, or advanced security controls. While suitable for occasional personal use, it falls short for professional or high-performance scenarios.
Free and easy to use
Browser-based setup
Cross-platform compatibility
Very limited features
No advanced management or collaboration tools
Best for: Casual users needing basic remote access
Chrome Remote Desktop is one of the simplest remote access tools available. It’s easy to set up and works across devices, making it a convenient choice for occasional use.
However, it lacks many essential features such as file transfer, session management, and advanced security controls. For users with more demanding needs, it quickly becomes insufficient. Compared to Chrome Remote Desktop, DeskIn provides a much more complete experience without sacrificing ease of use, making it a better long-term solution.
👀 You may also be interested in: |
|---|
RustDesk is powerful but can be difficult to set up and manage, especially with self-hosting. Many users prefer tools that offer similar performance without technical complexity. DeskIn simplifies remote access while maintaining strong performance and security.
Several tools qualify as a free RustDesk alternative, including DWService and Chrome Remote Desktop. However, DeskIn stands out by offering better performance and usability even in its free version.
Yes, tools like MeshCentral and DWService are considered RustDesk alternative open source options. They provide flexibility and control but often require technical expertise to set up and maintain.
Beginners should choose tools with a simple setup and intuitive interfaces. DeskIn is an excellent option because it removes the need for manual configuration while still delivering advanced features.
RustDesk is a powerful starting point, but it’s not always the easiest or most efficient tool for everyday use. From setup complexity to performance limitations, many users eventually look for a better RustDesk alternative.
Among all the options, DeskIn stands out as the most balanced solution. It combines speed, simplicity, and cross-platform support into one seamless experience. If you’re ready to move beyond technical friction and enjoy truly smooth remote access, DeskIn is a choice that simply works.
Products
ดาวน์โหลด
Resources
ติดต่อเรา
Email: support@deskin.io
Office: 991D Alexandra Road #02-17, Singapore 119972
Copyright © 2026 Zuler Technology PTE. LTD. All rights reserved.
ติดต่อเรา
Email: support@deskin.io
Office: 991D Alexandra Road #02-17, Singapore 119972
Products
ดาวน์โหลด
Resources
Copyright © 2026 Zuler Technology PTE. LTD. All rights reserved.
Products
ดาวน์โหลด
Resources
ติดต่อเรา
support@deskin.io
991D Alexandra Road #02-17
Singapore 119972
Copyright © 2026 Zuler Technology PTE. LTD. All rights reserved.
【New User Special Offer】
Save
Extra 20%
on your first order|4K60FPS
Extra
20% Off
|For
New Users
【New User Special Offer】
Save
Extra 20%
on first order

