Search Docs…
Bạn có thể muốn chiếu phim từ điện thoại lên máy tính hoặc TV, xem trên màn hình lớn hơn. Bạn có thể muốn chia sẻ video với đồng nghiệp khi trình bày công việc. Bài viết này giới thiệu một vài phương pháp chiếu video đơn giản và miễn phí, cho phép bạn phát và chia sẻ video bất cứ lúc nào, hãy xem thử.
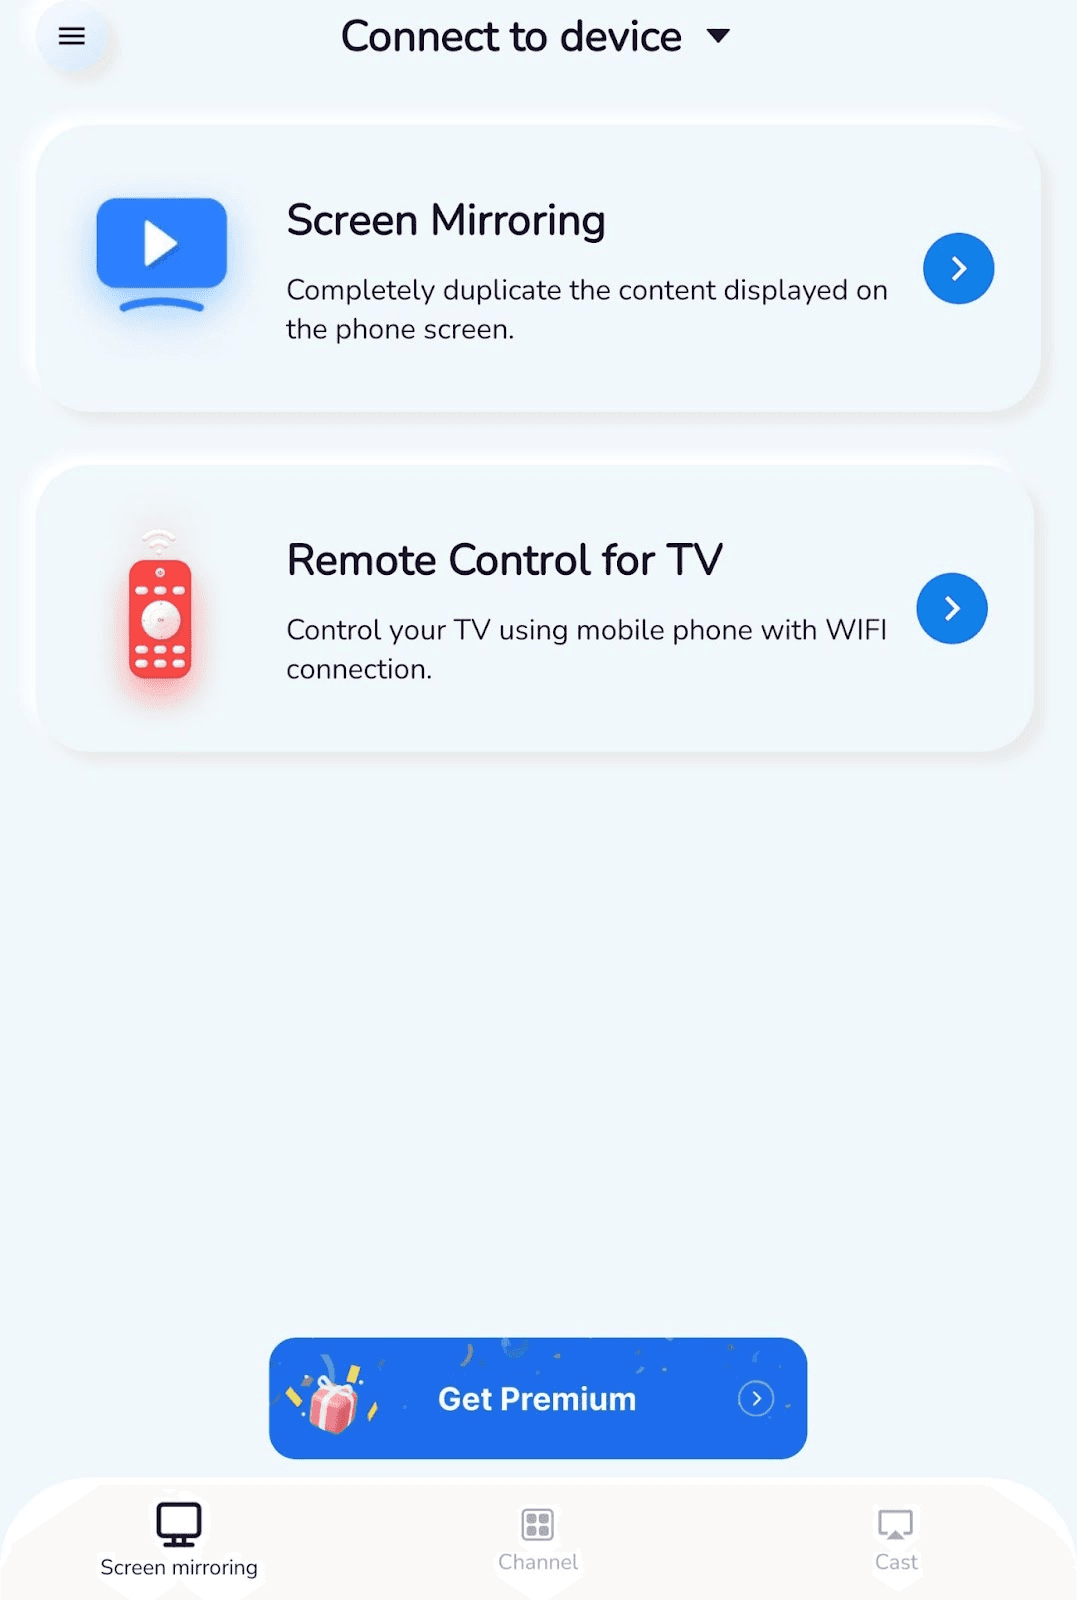
Công cụ phản chiếu màn hình ngang hệ thống: DeskIn
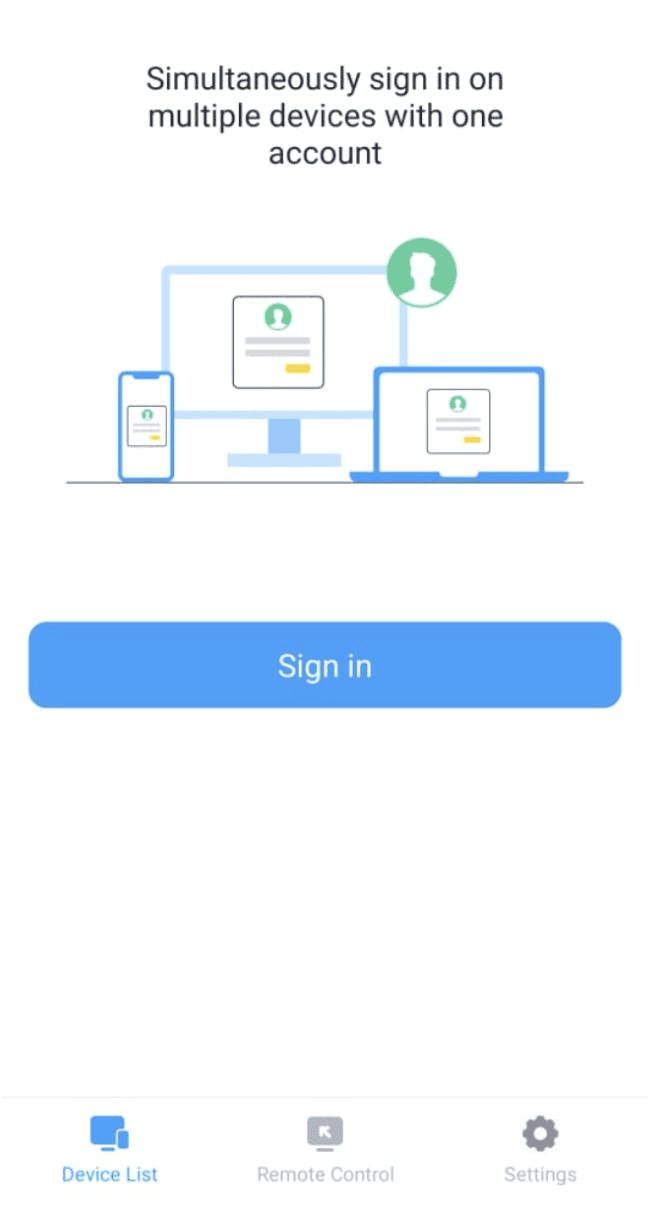
DeskIn là phần mềm máy tính từ xa miễn phí hoạt động trên iOS, Mac, Android và Windows. Nó hỗ trợ phát màn hình ngang hệ thống và chuyển audio từ xa. Bạn có thể sử dụng nó theo 2 cách đơn giản.
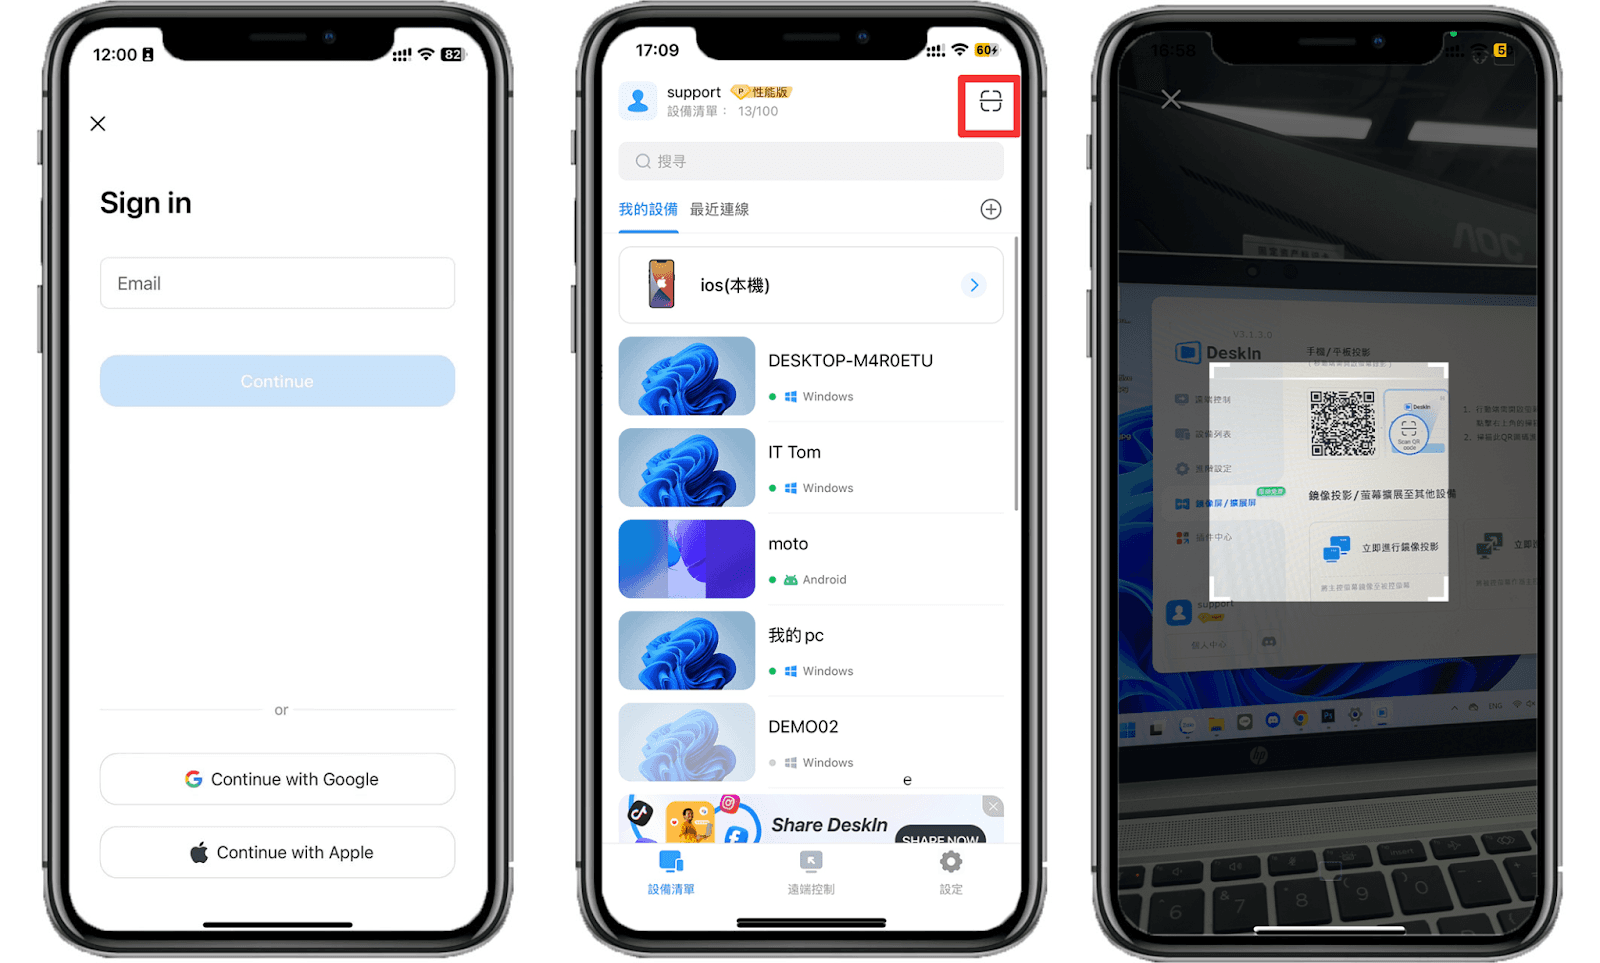
Phương pháp 1: Quét mã QR để phát video di động lên máy tính
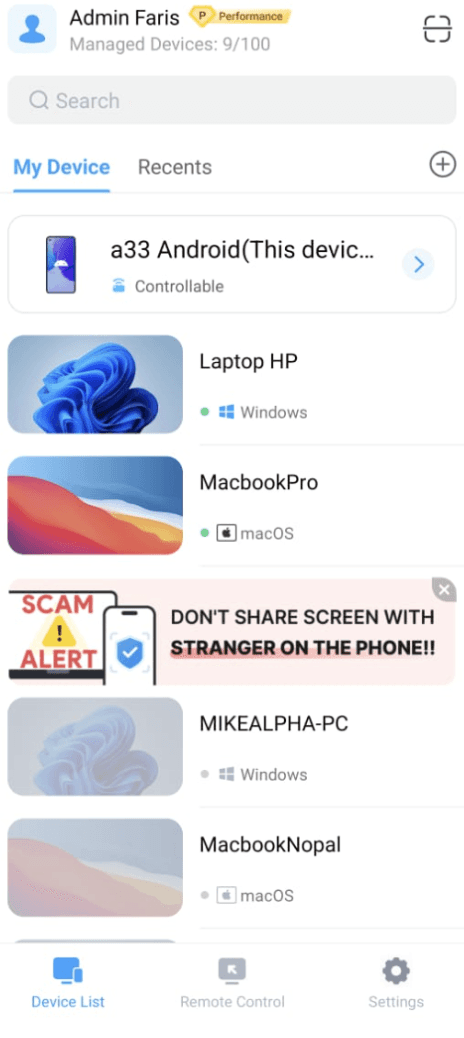
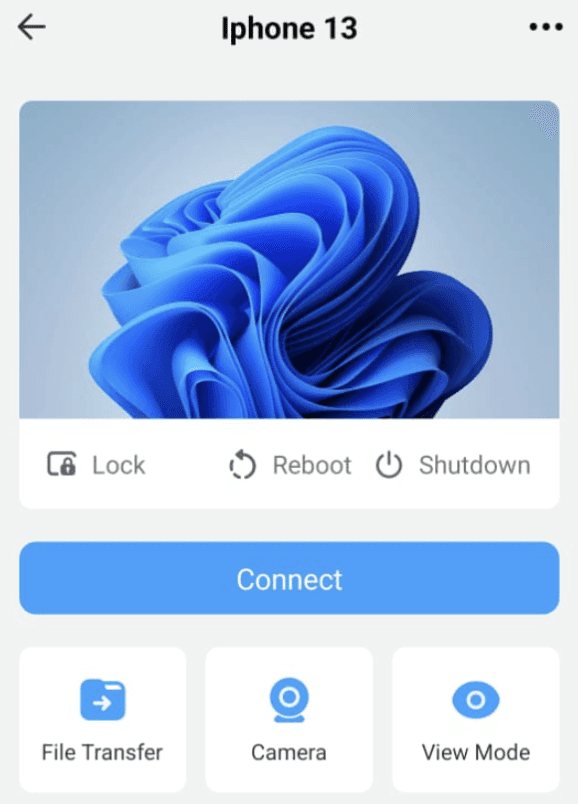
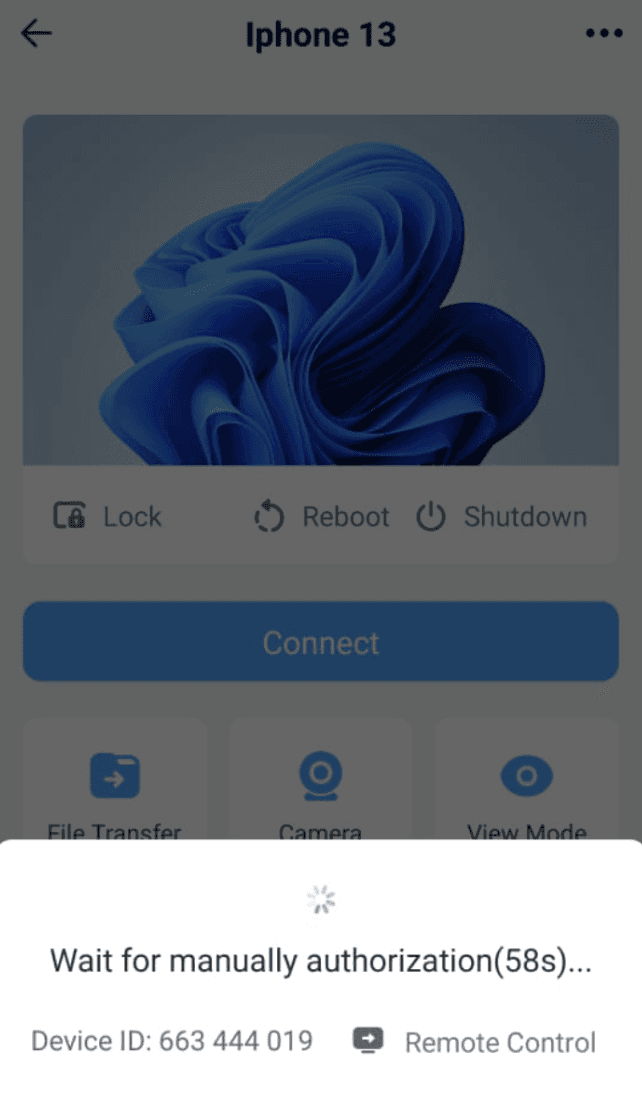
Cài đặt DeskIn trên cả điện thoại và máy tính của bạn, đăng ký một tài khoản và đăng nhập.
Nhấn nút quét trên DeskIn của điện thoại và quét mã QR trên DeskIn của máy tính, sau đó bạn có thể chiếu màn hình điện thoại lên máy tính.
Màn hình được chiếu sẽ tự động điều chỉnh sang hướng ngang hoặc dọc theo điện thoại.
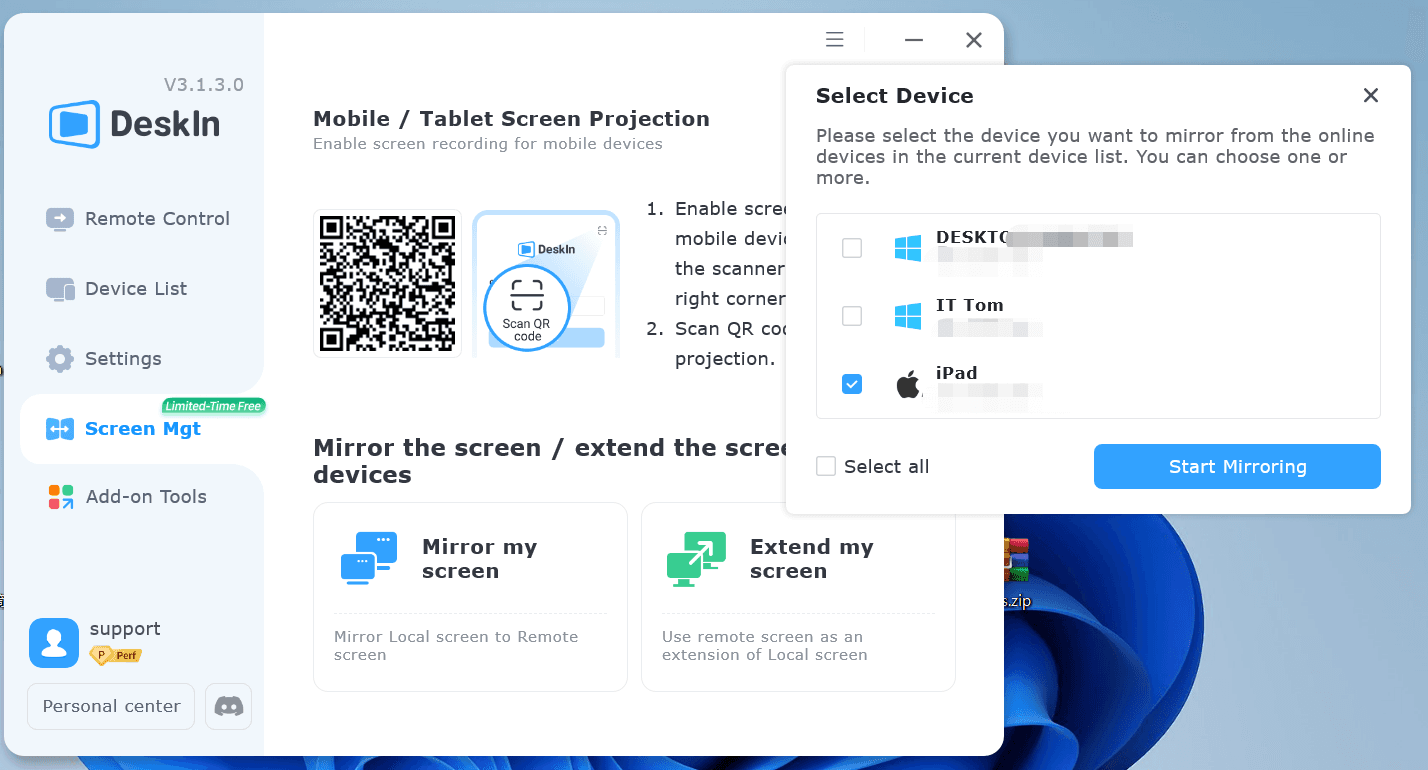
Phương pháp 2: Sử dụng chức năng phản chiếu màn hình để chiếu video từ máy tính lên máy tính/điện thoại di động/tablet của bạn
Cài đặt DeskIn trên thiết bị mà bạn muốn phát video và đăng ký một tài khoản và đăng nhập vào cùng một tài khoản.
Mở DeskIn trên máy tính >> Nhấp vào “Kéo dài màn hình của tôi” trên tab “Quản lý màn hình” >> Chọn thiết bị mà bạn muốn phát video đến và xong.
Sử dụng AirPlay để phát video lên TV/Mac
Tính năng này cho phép bạn phản chiếu video từ iPhone hoặc iPad của bạn lên TV hoặc Mac. Đảm bảo rằng thiết bị iOS và TV hoặc Mac đang trên cùng một mạng WIFI.
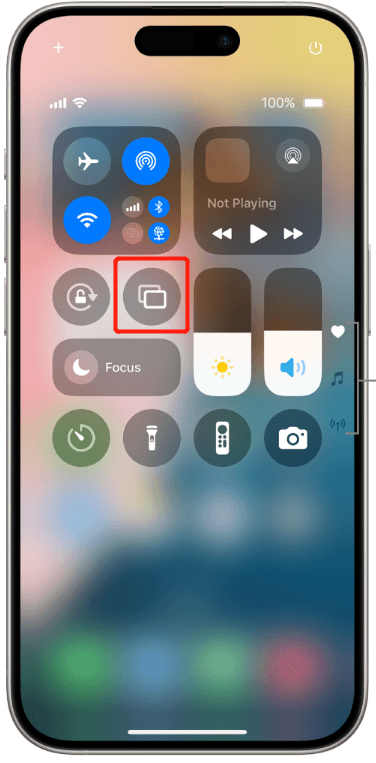
Phương pháp 1: Đầu ra phản chiếu màn hình
Đi đến "Trung tâm điều khiển" bằng cách vuốt lên từ đáy màn hình hoặc vuốt xuống từ góc trên bên phải.
Nhấn vào biểu tượng Airplay, chọn Mac hoặc TV trong danh sách, sau đó bạn có thể phát video di động lên TV hoặc Mac.
Ghi chú: Khi sử dụng phương pháp này, thông báo trên điện thoại cũng sẽ được hiển thị trên TV hoặc Mac. Xem xét các vấn đề về quyền riêng tư, khuyến cáo nên tắt nhắc nhở thông báo trước khi chiếu.
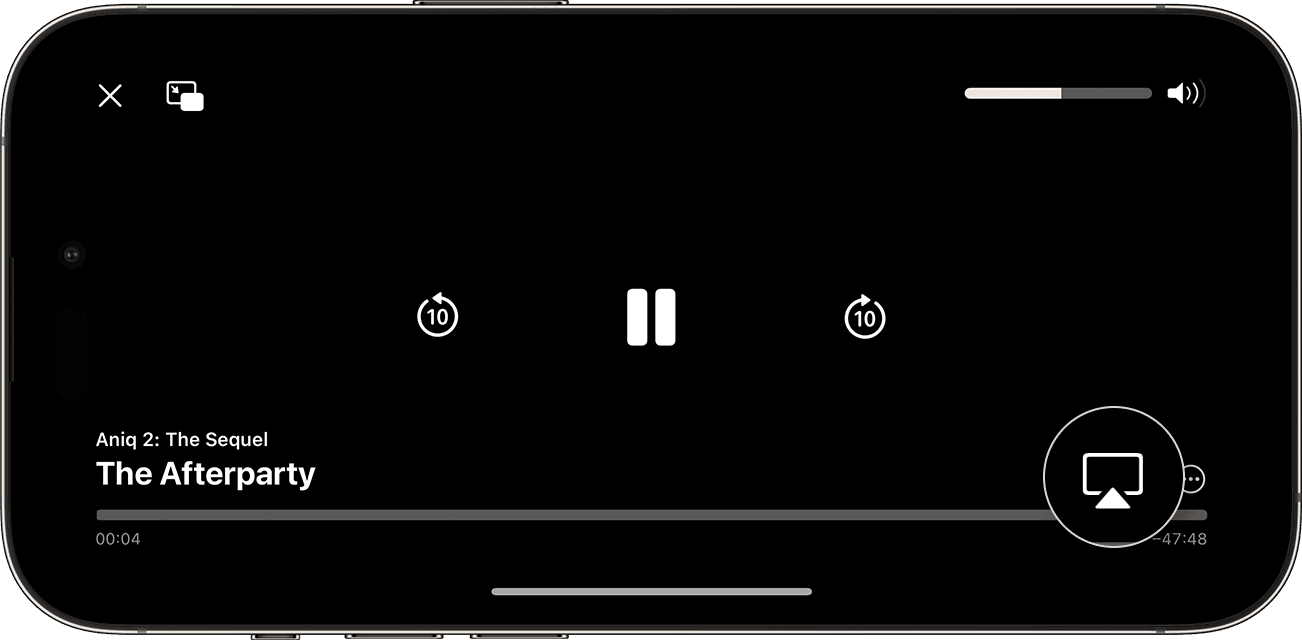
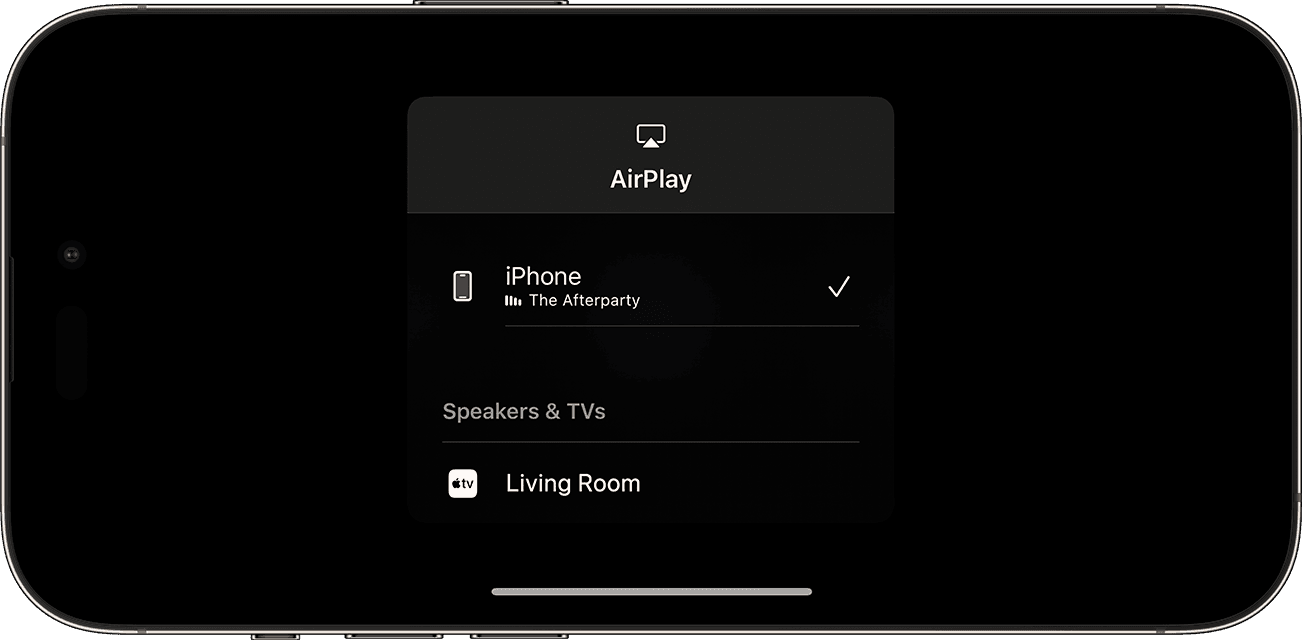
Phương pháp 2: Truyền video bằng tay
Bạn cũng có thể trực tiếp truyền video bằng tay.
Mở video mà bạn muốn chiếu trên thiết bị iOS của bạn, tìm biểu tượng AirPlay (một số ứng dụng có thể yêu cầu bạn nhấn nút chia sẻ trước), chọn các TV thông minh hoặc Macs khác trong danh sách để phát video.
Chiếu video YouTube lên TV
Phương pháp này cho phép bạn chiếu video YouTube trên điện thoại, máy tính hoặc tablet để phát trên TV thông minh của bạn, và điều khiển phát video trên TV từ điện thoại, máy tính hoặc tablet của bạn. Xin lưu ý rằng phương pháp này yêu cầu bạn cài đặt ứng dụng YouTube trên TV thông minh của bạn.
Phương pháp 1: Chiếu video YouTube lên TV trong cùng một mạng
Kết nối điện thoại/máy tính/tablet của bạn với cùng một mạng với TV, mở ứng dụng YouTube trên TV.
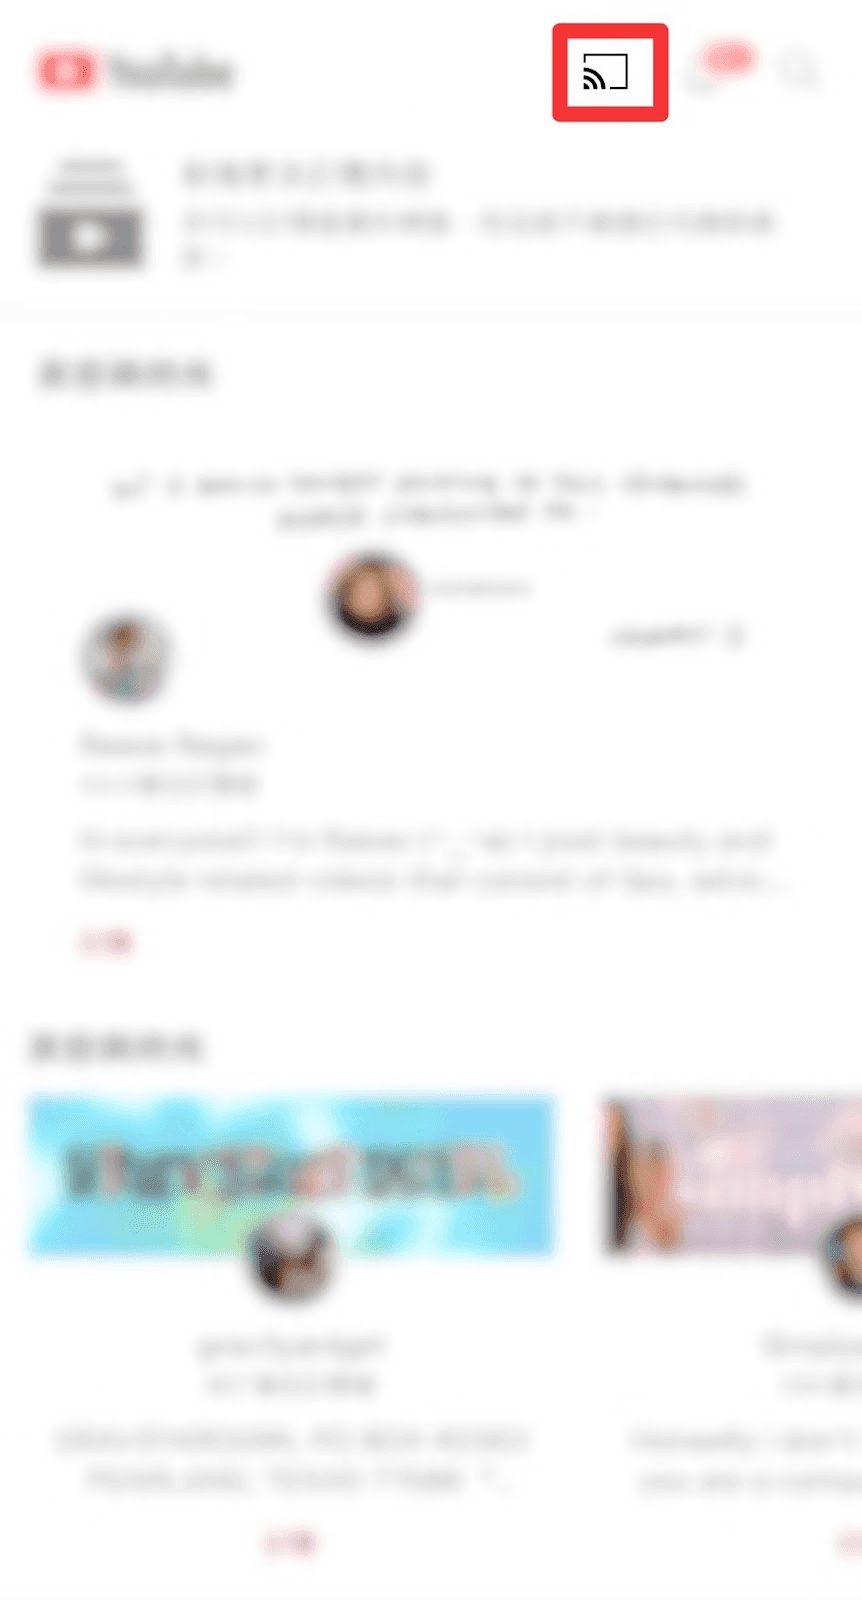
Tìm video hoặc kênh bạn muốn xem trên YouTube trên điện thoại/máy tính/tablet của bạn, và tìm biểu tượng「chiếu」, chọn TV mà bạn muốn chiếu từ danh sách, sau đó chờ kết nối.
Phương pháp 2: Chiếu video YouTube lên TV qua mã TV
Phương pháp này cũng có thể được sử dụng ngay cả khi thiết bị điện thoại/máy tính/tablet của bạn và TV không ở cùng một mạng. Tuy nhiên, nó chỉ áp dụng cho các thiết bị di động và không thể sử dụng trên máy tính.
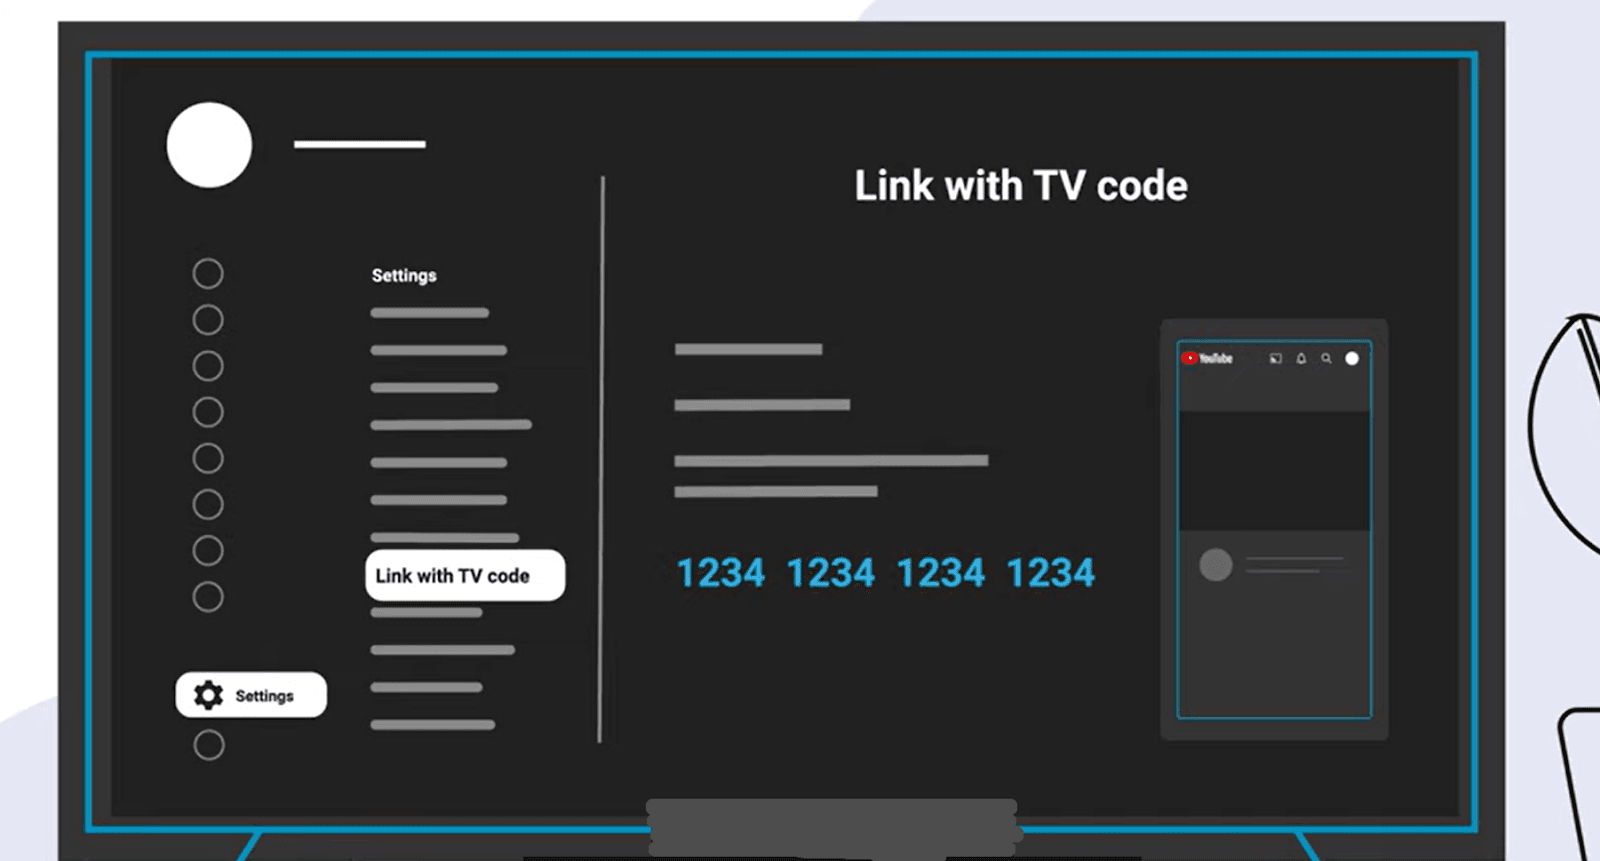
Mở chương trình YouTube trên TV của bạn và vào Cài đặt >> Tìm「Kết nối qua mã TV」, một mã màu xanh sẽ xuất hiện trên TV.
Mở YouTube trên điện thoại của bạn, tìm và nhấp vào biểu tượng "Chiếu", nhấp vào "Liên kết qua mã TV" và nhập mã xanh trên TV, nhấp "Liên kết" để phát.
Sử dụng chương trình chiếu tích hợp của TV hoặc điện thoại
Nhiều thương hiệu TV thông minh cũng có chương trình chiếu riêng của họ, chẳng hạn như LG ThinQ, Samsung SmartThings, v.v. Kiểm tra trang web chính thức của thương hiệu TV của bạn hoặc hỏi dịch vụ khách hàng nếu có các chương trình chiếu tương ứng. Tải xuống trên điện thoại hoặc máy tính của bạn và bạn có thể phát video bất cứ lúc nào. Điều quan trọng nhất là, các phần mềm này thường miễn phí.
Ngoài Airplay của Apple, nhiều thương hiệu Android cũng có chức năng chiếu tích hợp.
Dưới đây là cách sử dụng Samsung SmartView:
Cuộn xuống bảng điều khiển.
Ghi chú: Smart View yêu cầu quyền "Vị trí" và "Thiết bị lân cận". Nhấp "Tiếp tục" có nghĩa là cho phép các quyền này.
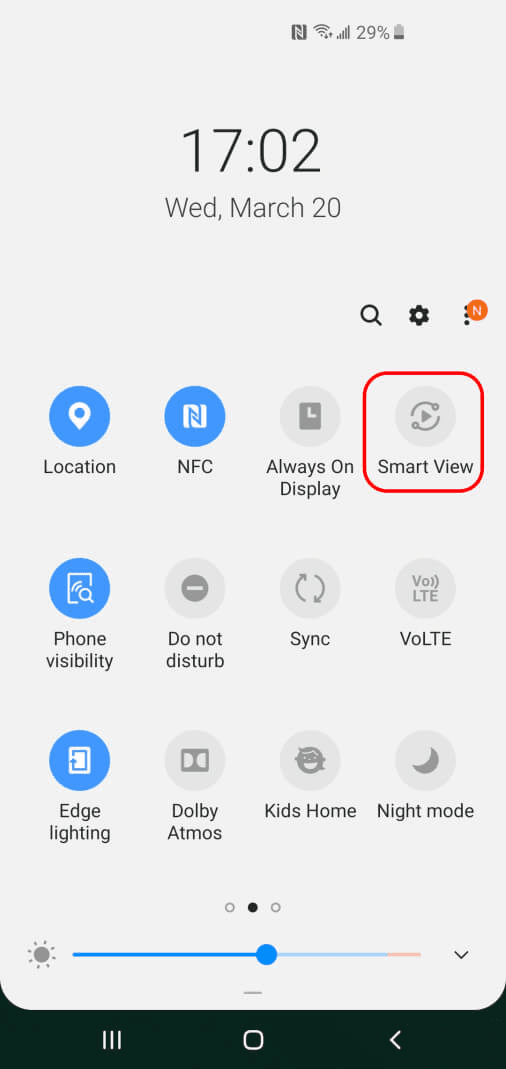
Chọn TV mục tiêu để chiếu và nhấp "Bắt đầu ngay".
Ngoài việc chiếu thiết bị Android lên TV, Smart View cũng có thể chiếu TV lên thiết bị Android.
Sử dụng phần mềm chiếu của bên thứ ba
Ngoài công cụ chiếu tích hợp, vẫn còn nhiều ứng dụng chiếu mà bạn có thể chọn. Ví dụ, Cast for Chromecast/TV Cast for Chromecast. Đây là hai ứng dụng chiếu của Google. TV Cast chỉ dành cho TV. Như nhiều ứng dụng chiếu khác, nó chỉ cung cấp một thử nghiệm ba ngày. Sử dụng lâu dài yêu cầu phải trả phí. Khi sử dụng, hai thiết bị cần phải ở trên cùng một mạng WIFI.
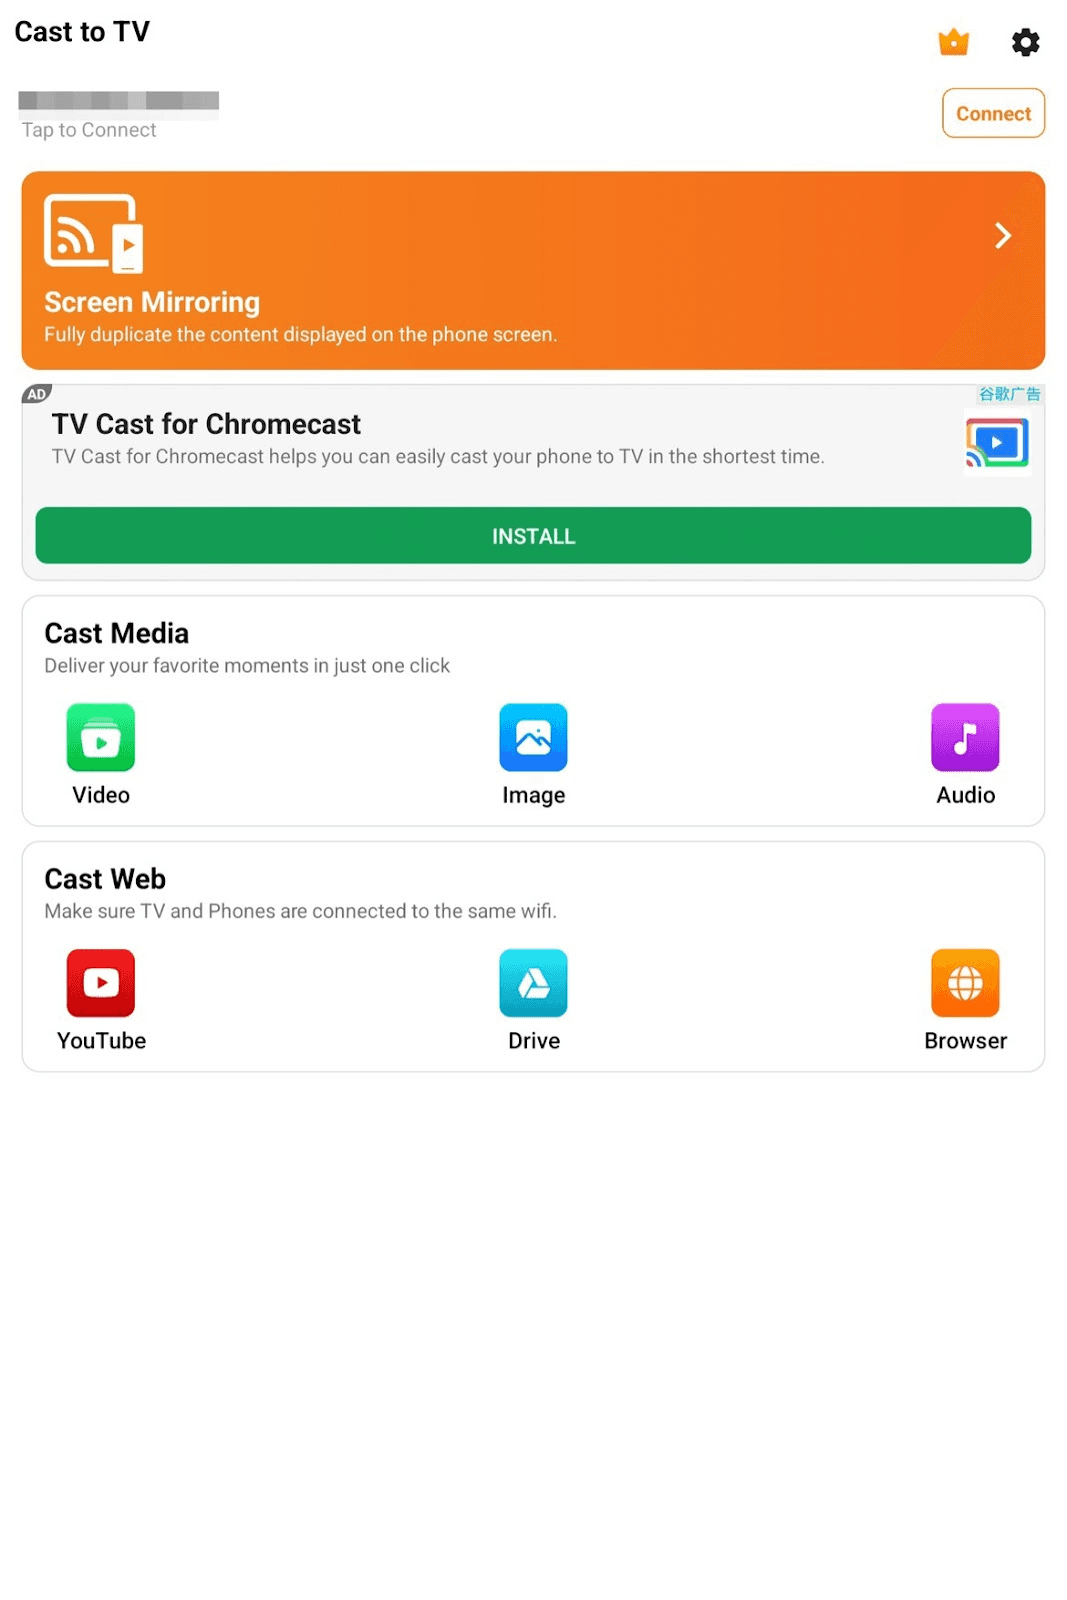
Cast for Chromecast (bên trái) / TV Cast for Chromecast (bên phải)
Kết luận
Sau khi đọc bài viết này, tôi tin rằng bạn đã hiểu rõ một cách nhất định về cách chiếu thiết bị di động lên TV. Các hệ thống iOS có thể sử dụng AirPlay, các hệ thống Android có thể sử dụng chức năng chiếu tích hợp của điện thoại hoặc TV. DeskIn hỗ trợ cả hệ thống iOS và Android. Việc thao tác cũng rất đơn giản. Bạn có thể tải về và thử nghiệm trước~
Bạn có thể muốn chiếu phim từ điện thoại lên máy tính hoặc TV, xem trên màn hình lớn hơn. Bạn có thể muốn chia sẻ video với đồng nghiệp khi trình bày công việc. Bài viết này giới thiệu một vài phương pháp chiếu video đơn giản và miễn phí, cho phép bạn phát và chia sẻ video bất cứ lúc nào, hãy xem thử.
Công cụ phản chiếu màn hình ngang hệ thống: DeskIn
DeskIn là phần mềm máy tính từ xa miễn phí hoạt động trên iOS, Mac, Android và Windows. Nó hỗ trợ phát màn hình ngang hệ thống và chuyển audio từ xa. Bạn có thể sử dụng nó theo 2 cách đơn giản.
Phương pháp 1: Quét mã QR để phát video di động lên máy tính
Cài đặt DeskIn trên cả điện thoại và máy tính của bạn, đăng ký một tài khoản và đăng nhập.
Nhấn nút quét trên DeskIn của điện thoại và quét mã QR trên DeskIn của máy tính, sau đó bạn có thể chiếu màn hình điện thoại lên máy tính.
Màn hình được chiếu sẽ tự động điều chỉnh sang hướng ngang hoặc dọc theo điện thoại.
Phương pháp 2: Sử dụng chức năng phản chiếu màn hình để chiếu video từ máy tính lên máy tính/điện thoại di động/tablet của bạn
Cài đặt DeskIn trên thiết bị mà bạn muốn phát video và đăng ký một tài khoản và đăng nhập vào cùng một tài khoản.
Mở DeskIn trên máy tính >> Nhấp vào “Kéo dài màn hình của tôi” trên tab “Quản lý màn hình” >> Chọn thiết bị mà bạn muốn phát video đến và xong.
Sử dụng AirPlay để phát video lên TV/Mac
Tính năng này cho phép bạn phản chiếu video từ iPhone hoặc iPad của bạn lên TV hoặc Mac. Đảm bảo rằng thiết bị iOS và TV hoặc Mac đang trên cùng một mạng WIFI.
Phương pháp 1: Đầu ra phản chiếu màn hình
Đi đến "Trung tâm điều khiển" bằng cách vuốt lên từ đáy màn hình hoặc vuốt xuống từ góc trên bên phải.
Nhấn vào biểu tượng Airplay, chọn Mac hoặc TV trong danh sách, sau đó bạn có thể phát video di động lên TV hoặc Mac.
Ghi chú: Khi sử dụng phương pháp này, thông báo trên điện thoại cũng sẽ được hiển thị trên TV hoặc Mac. Xem xét các vấn đề về quyền riêng tư, khuyến cáo nên tắt nhắc nhở thông báo trước khi chiếu.
Phương pháp 2: Truyền video bằng tay
Bạn cũng có thể trực tiếp truyền video bằng tay.
Mở video mà bạn muốn chiếu trên thiết bị iOS của bạn, tìm biểu tượng AirPlay (một số ứng dụng có thể yêu cầu bạn nhấn nút chia sẻ trước), chọn các TV thông minh hoặc Macs khác trong danh sách để phát video.
Chiếu video YouTube lên TV
Phương pháp này cho phép bạn chiếu video YouTube trên điện thoại, máy tính hoặc tablet để phát trên TV thông minh của bạn, và điều khiển phát video trên TV từ điện thoại, máy tính hoặc tablet của bạn. Xin lưu ý rằng phương pháp này yêu cầu bạn cài đặt ứng dụng YouTube trên TV thông minh của bạn.
Phương pháp 1: Chiếu video YouTube lên TV trong cùng một mạng
Kết nối điện thoại/máy tính/tablet của bạn với cùng một mạng với TV, mở ứng dụng YouTube trên TV.
Tìm video hoặc kênh bạn muốn xem trên YouTube trên điện thoại/máy tính/tablet của bạn, và tìm biểu tượng「chiếu」, chọn TV mà bạn muốn chiếu từ danh sách, sau đó chờ kết nối.
Phương pháp 2: Chiếu video YouTube lên TV qua mã TV
Phương pháp này cũng có thể được sử dụng ngay cả khi thiết bị điện thoại/máy tính/tablet của bạn và TV không ở cùng một mạng. Tuy nhiên, nó chỉ áp dụng cho các thiết bị di động và không thể sử dụng trên máy tính.
Mở chương trình YouTube trên TV của bạn và vào Cài đặt >> Tìm「Kết nối qua mã TV」, một mã màu xanh sẽ xuất hiện trên TV.
Mở YouTube trên điện thoại của bạn, tìm và nhấp vào biểu tượng "Chiếu", nhấp vào "Liên kết qua mã TV" và nhập mã xanh trên TV, nhấp "Liên kết" để phát.
Sử dụng chương trình chiếu tích hợp của TV hoặc điện thoại
Nhiều thương hiệu TV thông minh cũng có chương trình chiếu riêng của họ, chẳng hạn như LG ThinQ, Samsung SmartThings, v.v. Kiểm tra trang web chính thức của thương hiệu TV của bạn hoặc hỏi dịch vụ khách hàng nếu có các chương trình chiếu tương ứng. Tải xuống trên điện thoại hoặc máy tính của bạn và bạn có thể phát video bất cứ lúc nào. Điều quan trọng nhất là, các phần mềm này thường miễn phí.
Ngoài Airplay của Apple, nhiều thương hiệu Android cũng có chức năng chiếu tích hợp.
Dưới đây là cách sử dụng Samsung SmartView:
Cuộn xuống bảng điều khiển.
Ghi chú: Smart View yêu cầu quyền "Vị trí" và "Thiết bị lân cận". Nhấp "Tiếp tục" có nghĩa là cho phép các quyền này.
Chọn TV mục tiêu để chiếu và nhấp "Bắt đầu ngay".
Ngoài việc chiếu thiết bị Android lên TV, Smart View cũng có thể chiếu TV lên thiết bị Android.
Sử dụng phần mềm chiếu của bên thứ ba
Ngoài công cụ chiếu tích hợp, vẫn còn nhiều ứng dụng chiếu mà bạn có thể chọn. Ví dụ, Cast for Chromecast/TV Cast for Chromecast. Đây là hai ứng dụng chiếu của Google. TV Cast chỉ dành cho TV. Như nhiều ứng dụng chiếu khác, nó chỉ cung cấp một thử nghiệm ba ngày. Sử dụng lâu dài yêu cầu phải trả phí. Khi sử dụng, hai thiết bị cần phải ở trên cùng một mạng WIFI.
Cast for Chromecast (bên trái) / TV Cast for Chromecast (bên phải)
Kết luận
Sau khi đọc bài viết này, tôi tin rằng bạn đã hiểu rõ một cách nhất định về cách chiếu thiết bị di động lên TV. Các hệ thống iOS có thể sử dụng AirPlay, các hệ thống Android có thể sử dụng chức năng chiếu tích hợp của điện thoại hoặc TV. DeskIn hỗ trợ cả hệ thống iOS và Android. Việc thao tác cũng rất đơn giản. Bạn có thể tải về và thử nghiệm trước~