Wake on LAN (WOL) là một tính năng mạnh mẽ cho phép người dùng khởi động máy tính từ xa, nâng cao sự tiện lợi và hiệu quả. Hướng dẫn này giải thích cách DeskIn triển khai WOL, chi tiết về card mạng và các cài đặt BIOS cần thiết, cũng như các cân nhắc quan trọng cho việc khởi động từ xa thành công.
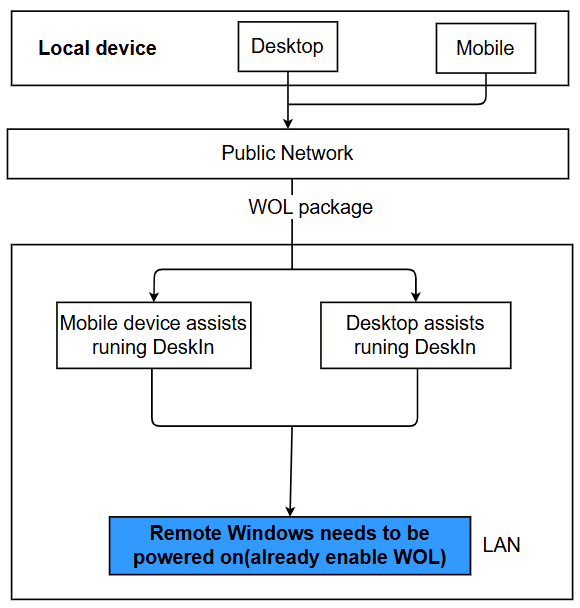
Cách DeskIn WOL hoạt động?
Thông báo:
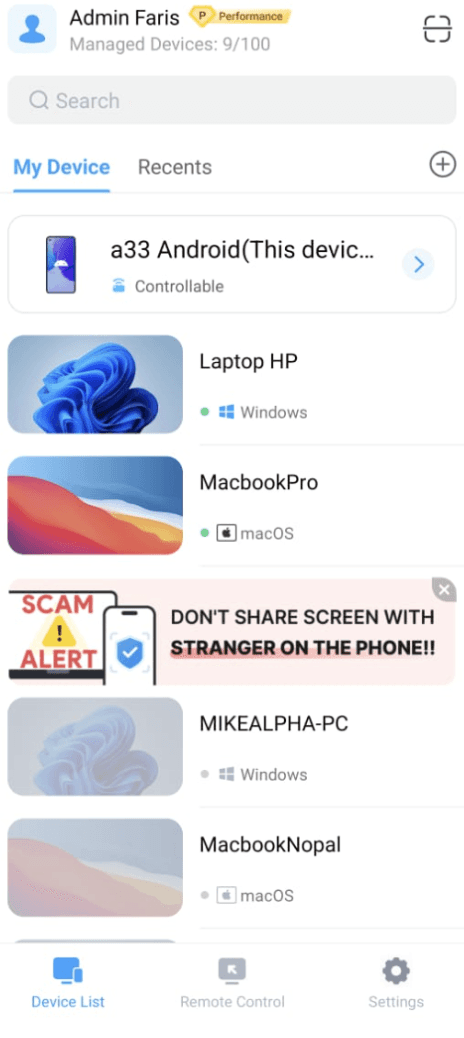
1) Để sử dụng Wake on Lan, cần có một thiết bị chạy DeskIn trên cùng một mạng LAN với máy tính sẽ được đánh thức. Ví dụ, các máy tính khác, điện thoại, máy tính bảng, v.v., sử dụng để hỗ trợ chạy DeskIn.
2) Các thiết bị Linux không hỗ trợ gửi gói WOL, và các thiết bị Mac và Linux không hỗ trợ khởi động từ xa.
3) Các thiết bị ở trạng thái tắt bất thường như màn hình xanh hoặc treo không hỗ trợ khởi động từ xa.
4) Máy tính cần được đánh thức nên hỗ trợ WOL.
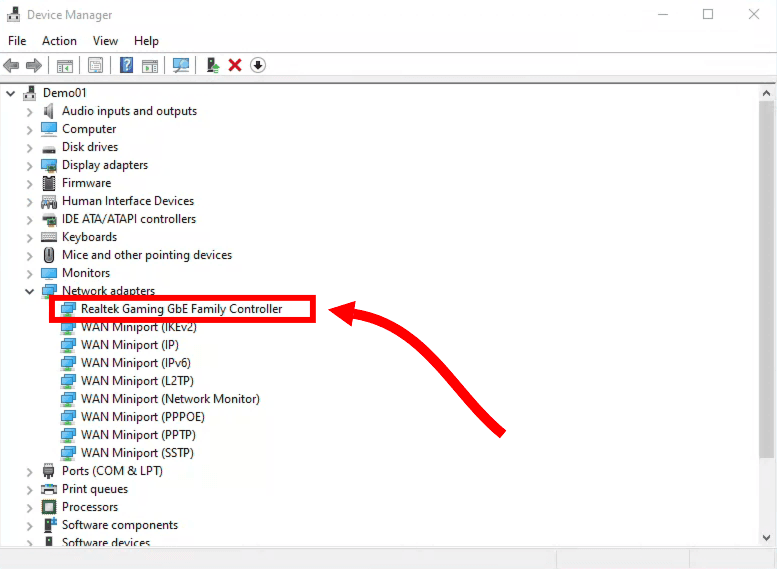
Bước 1: Cài đặt card mạng
1) Mở Trình Quản Lý Thiết Bị trên Windows.
2) Tìm tùy chọn Bộ điều hợp mạng và mở rộng nó.
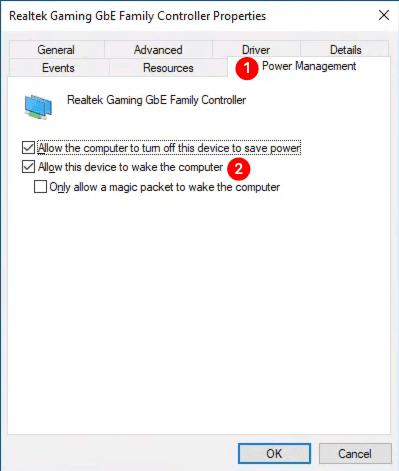
3) Nhấp chuột phải vào Bộ điều khiển Realtek Gaming GbE Family và sau đó nhấp vào Thuộc tính.
4) Trong cửa sổ tiếp theo, điều hướng đến Tab Quản lý Nguồn, và kiểm tra Cho phép thiết bị này đánh thức máy tính.
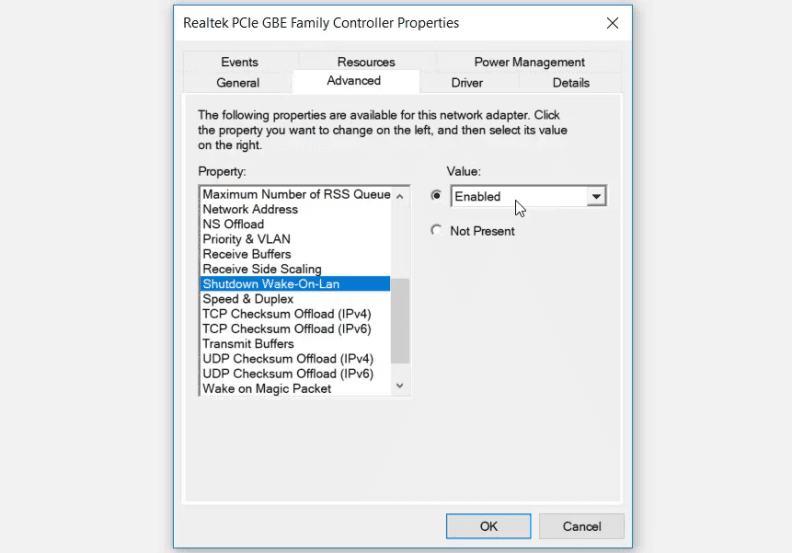
5) Chuyển sang tab Nâng cao và tìm Shutdown Wake-On-Lan và Wake on Magic Packet dưới các tùy chọn Thuộc tính. Nhấp vào menu thả xuống Giá trị ở bên phải và sau đó chọn Đã kích hoạt.
Bước 2. Cài đặt BIOS
Sau khi vào cài đặt BIOS, tìm các tùy chọn sau:
Bật nguồn bởi các thiết bị PCIE/PCI
Bật nguồn bởi LAN tích hợp
Đánh thức trên LAN
Tiếp tục trên LAN
Bật nguồn PME
nhấp vào menu thả xuống ở bên phải và sau đó chọn Đã kích hoạt.
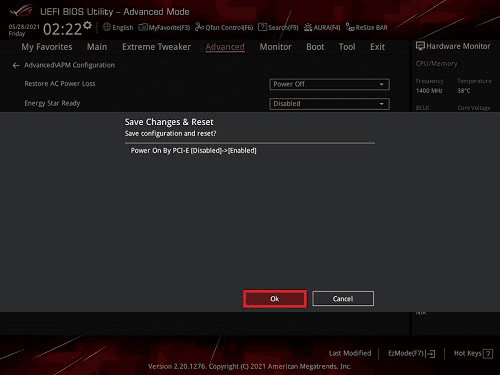
Ghi chú: Các thương hiệu bo mạch khác nhau có những cái tên khác nhau, chủ yếu là những cái ở trên. Lấy một bo mạch ASUS cụ thể làm ví dụ:
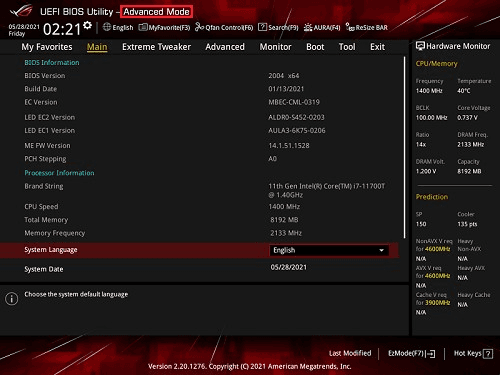
Đi đến tab Nâng cao, nhấp vào Cấu hình APM
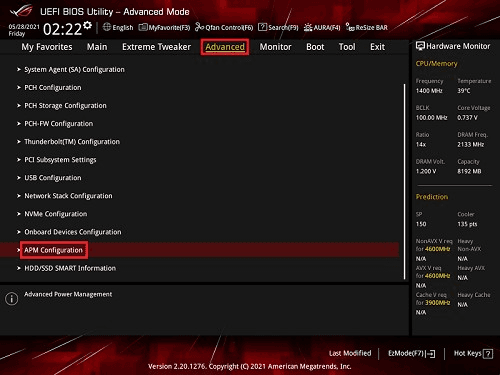
Trong cửa sổ tiếp theo, chọn Bật nguồn Bởi PCI-E và nhấp vào menu thả xuống ở bên phải và sau đó chọn Đã kích hoạt.
Nhấn F10 để lưu cài đặt và khởi động lại
Bước 3. Thực hiện liên kết ARP trên router
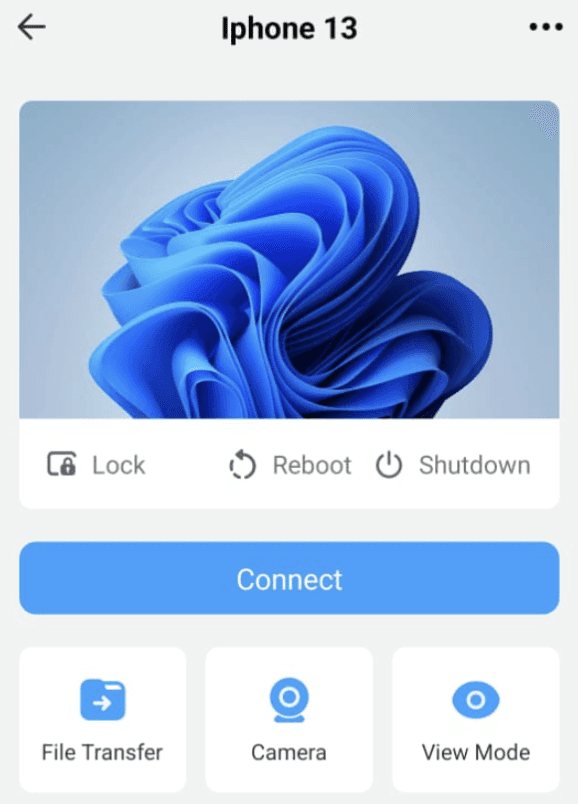
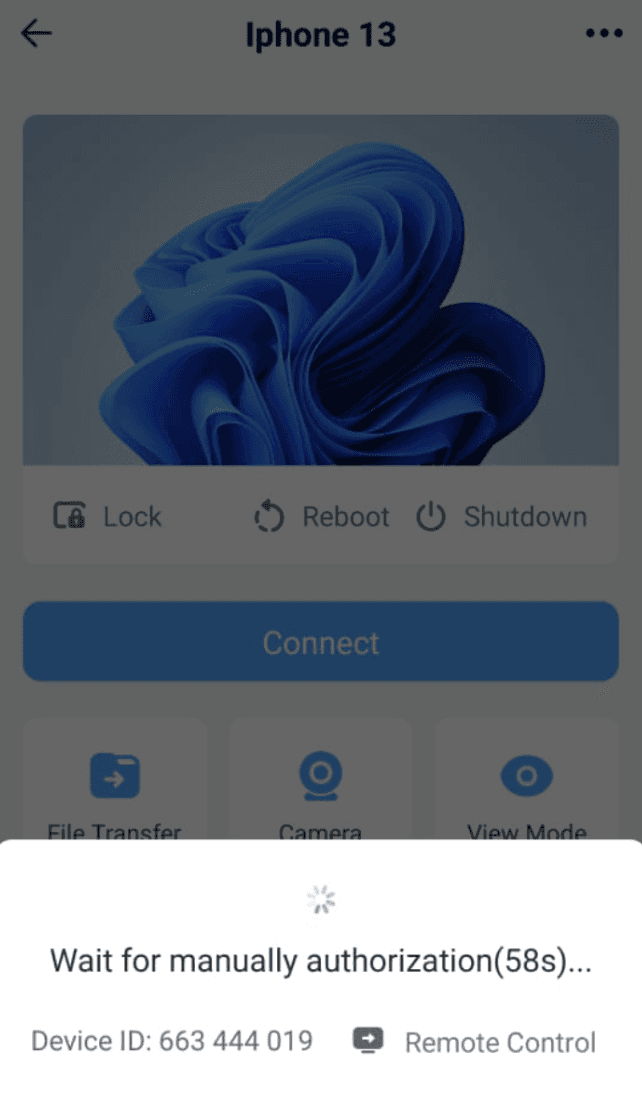
Sau khi hoàn tất cài đặt, bạn có thể thử khởi động thiết bị từ xa.
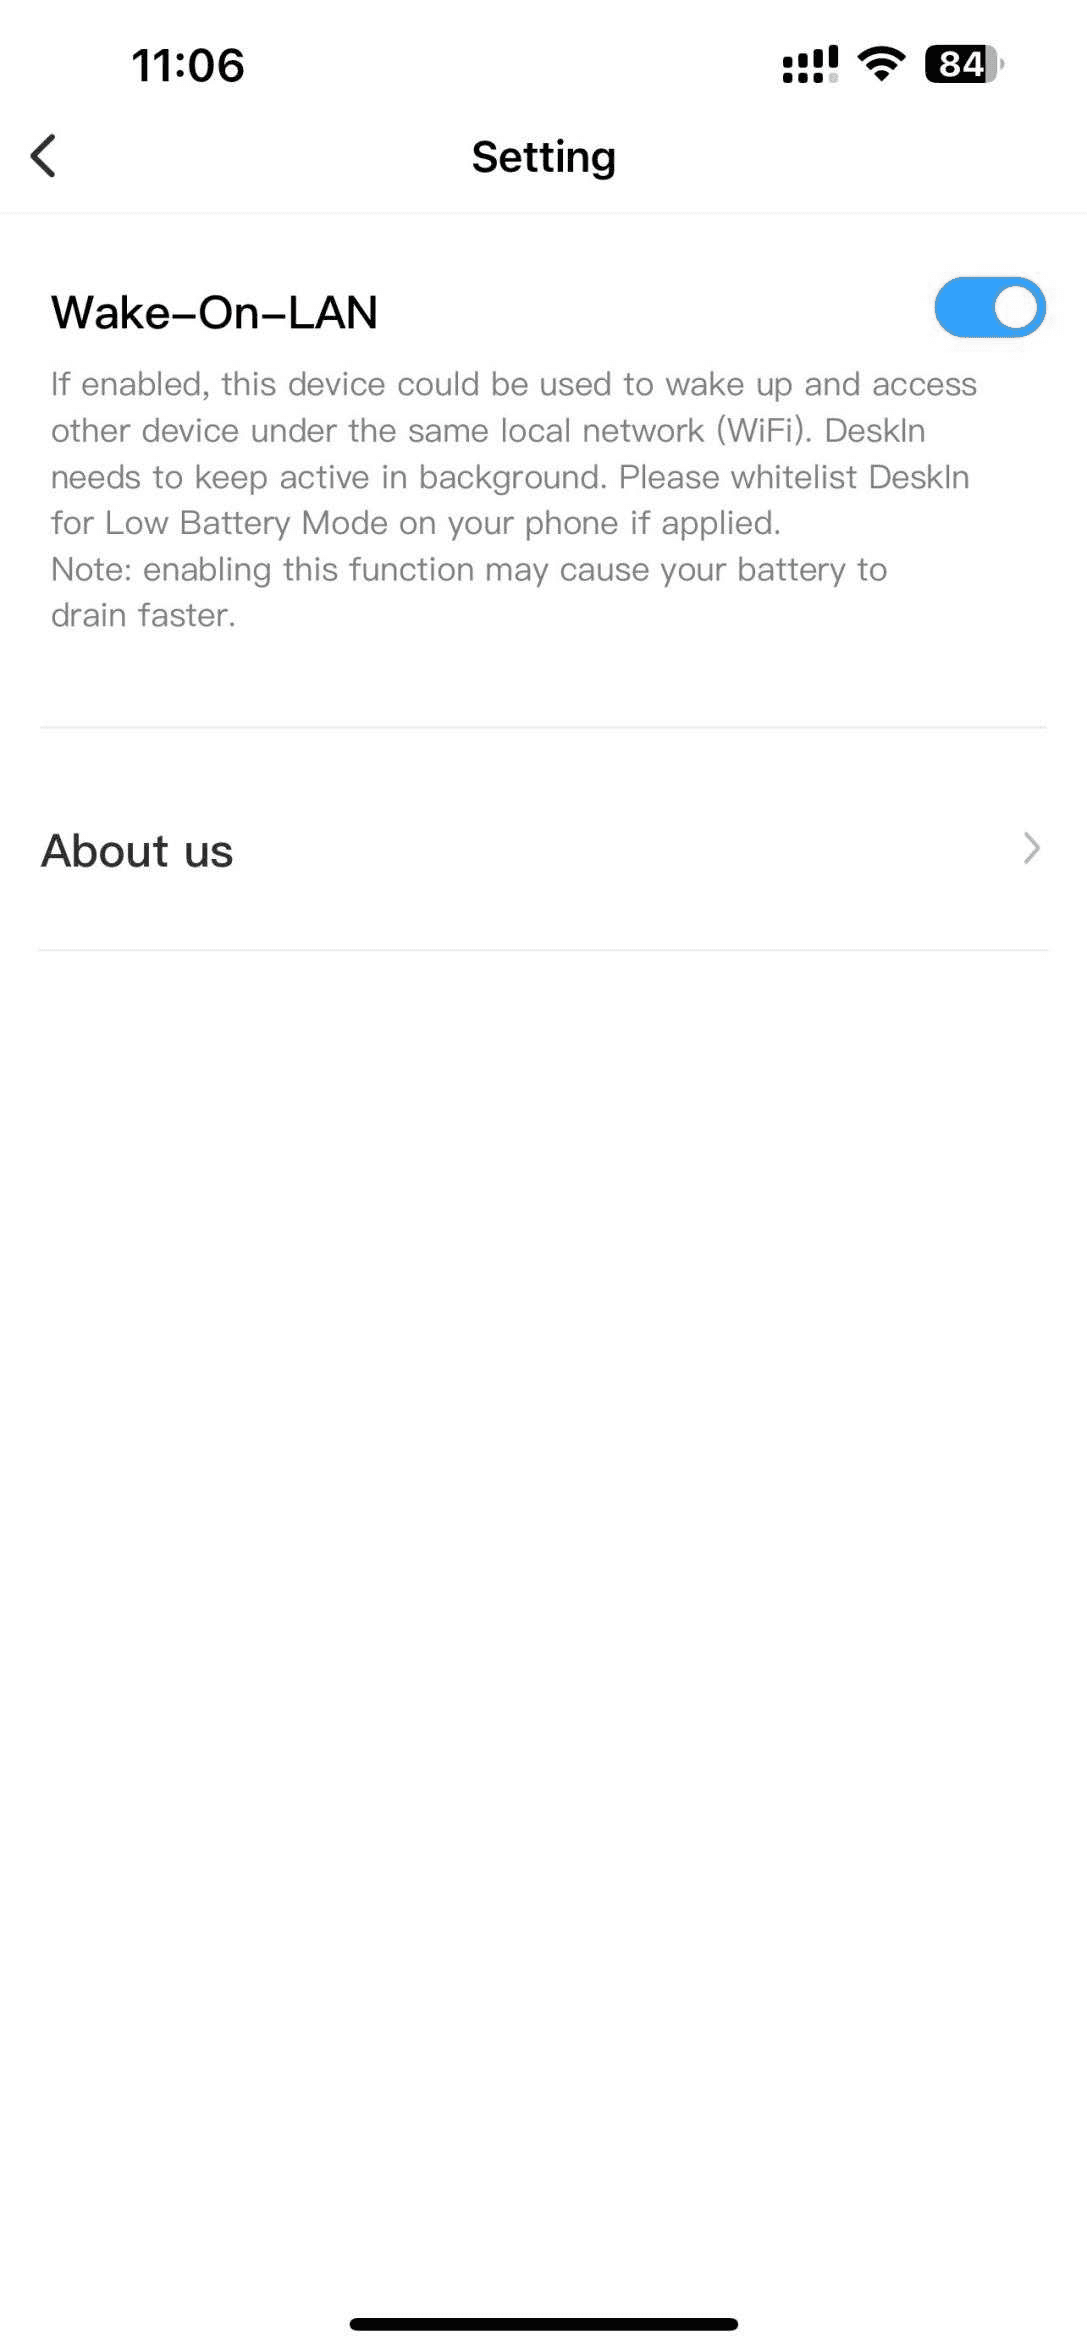
Ghi chú: Đối với điện thoại di động hỗ trợ khởi động, bạn cần bật hỗ trợ khởi động từ xa trong cài đặt DeskIn.
5 Best Free Screen Mirroring Apps for iPhone/Android/PC/TV
While free screen-sharing programs like AirDroid Cast or LetsView save costs, their restrictions hit hard in real-world use — mirroring to just 2 devices max forces awkward workarounds during team demos, intrusive ads pop mid-presentation, and security gaps risk exposing sensitive client data.
Even popular free casting apps struggle with platform mismatches (e.g., Android-to-Mac glitches), forcing users to juggle multiple tools. For professionals, these "free" trade-offs mean blurred CAD diagrams during reviews, frozen Zoom screenshares, or restarting critical training sessions when connections drop.
After testing dozens of screen mirroring tools, we found the best free screen-sharing programs that work seamlessly across iOS, Android, PC, and Mac. Some offer full free access, while others have limited features – perfect whether you need to present slides at work or cast movies to your TV. These free casting apps deliver HD quality with under 40ms lag (no ads!), but each shines in different scenarios: one might excel for team meetings, while another’s better for streaming shows. Check our top picks to match your needs and start mirroring screens hassle-free today!
5 Best Free Screen Mirroring Apps: Which is Best for You
We've tested the most popular tools to bring you the 5 best screen mirroring apps that actually deliver on their promises. Our comparison focuses on cross-platform compatibility, latency performance, and bonus features you didn't know you needed.
Application
User-Friendliness
Compatibility
Latency
Free Trial
Unique Feature
DeskIn
Easy
Android, iOS, Windows, macOS,
Minimal (Under 40ms)
√
Dual-screen control
Whiteboard collaboration
LetsView
Moderate
Android, iOS, Windows, macOS, Android TV
Medium
√
Whiteboard collaboration
AirDroid Cast
Moderate
Android, iOS, Windows, macOS, Linux, ChromeOS, Smart TV
Medium
√
Web browser casting
Screen Mirroring Assistant
Moderate
Windows
Medium
√
Miracast optimized
AnyDesk
Moderate
Windows、Mac、Linux、iOS, Android
Maximum
√
Remote access combo
Top 1. DeskIn - Best for iPhone, Android, and Computer
After rigorously testing the most popular tools, we confirm that DeskIn is the best free screen-sharing software for iPhone, Windows, macOS, and Android. It delivers 97.4% connection success rate and 38ms latency in 4K mode. Whether mirroring iPhone gameplay to a PC or sharing dual screens on Zoom for 4+ hours, DeskIn maintains zero frame drops even on 5 Mbps networks. The free version allows commercial use and supports up to three devices simultaneously, making it ideal for both personal and small team needs.
This screen mirroring app excels for: Remote teams needing stable iPhone-to-PC presentations, Android users seeking to mirror Android to PC for gaming or app debugging, designers requiring 4:4:4 color accuracy for iPad-as-second-screen workflows, and IT teams resolving issues via QR-code access in 15 seconds (no receiver app). Try DeskIn to start sharing the screen in seconds.
📌 What Makes DeskIn Stand Out
Great Features with Free Trial for All Users: Screen share devices with DeskIn's free trial on up to 3 devices.
Cross-Platform Fluency: Mirror seamlessly between iOS, Windows, Android, and macOS—no ecosystem barriers.
High definition: Supports up to HD projection(upgrade to premium plan for up to 2K definition), and the image quality is high and lossless.
Military-Grade Security: 256-bit AES encryption protects mirrored content from interception, no need to worry about leaking customer data, internal documents, passwords, etc.
Zero Setup Hassle: It only takes 3 steps to start mirroring your screen with colleagues or clients.
No Network Constraints: Project screens across devices globally, even on different WiFi or cellular networks.
After knowing the above advantages, let us introduce you to how to use DeskIn to screen mirrors from iPhone to PC!
👉 How to Screen PC from Mac with DeskIn for Free
Step 1: Install DeskIn on your PC and MacInstall DeskIn on your PC and Mac, register for a free account, and sign in. The first time you log in to your new device, you need to complete email verification to protect the security of your account.
On your PC, launch DeskIn, enter the device ID and password that is shown on the DeskIn interface on your Mac, and click the "Connect" button to start the session. You'll instantly be able to interact with your Windows desktop in real time.
Step 3. Start Screen Mirror
While connected, explore DeskIn's features such as file transfer, screen sharing, gamepad support, and multi-monitor controls directly from the interface. You can also toggle options like privacy mode or switch between control and view-only mode as needed.
For Android users, the process is similar: download DeskIn on both devices, scan the QR code, and start mirroring your Android screen to your PC instantly.
For users seeking free screen-sharing software, LetsView delivers one-click wireless casting across Windows, macOS, iOS, and Android, making it a top free screen mirroring app for iPhone that works seamlessly from iPhone 14 Pro to legacy models like iPhone 8. Whether mirroring your iPhone 15 to a Windows PC, Android TV, or even a colleague's iPad, it bypasses cables and mismatched networks. Educators love its browser-based access for instant student joins, while teams use its real-time whiteboard to annotate designs or debug code during calls.
What makes LetsView stand out:
iPhone-to-anything casting: Mirror iPhone SE/XR/Pro models to MacBooks, Chromebooks, or Android tablets in 15 seconds.
Dual modes: Switch between screen sharing and remote control mid-session.
No-hassle cross-platform: Stream iPhone gameplay to Twitch via PC while annotating on a Samsung Galaxy Tab.
Session recording: Save tutorials directly as MP4 – ideal for iOS developers demoing Xcode workflows.
Free Version: Offers 30-minute limits and occasional upgrade prompts; it remains ideal for teachers hosting hybrid classes or startups conducting client demos.
Pros:
Supports 100+ participants viewing.
You can use the drawing feature to highlight what you want.
Max framerate is 30fps.
Cons:
Sudden watermark appearances or connection interruptions.
A purchase of the paid version is required to control the PC.
Top 3. AirDroid Cast
AirDroid Cast is a versatile, free app for screen mirroring designed for seamless cross-device compatibility, supporting Android, iOS, Windows, and smart TVs. Its standout feature is two-way audio, enabling real-time communication during casting—ideal for presentations, remote collaboration, or gaming. The web version and same-Wi-Fi free trial eliminate setup hassles, while high-quality mirroring with minimal latency ensures smooth visuals. It's particularly recommended for Mac users exploring how to screen share on Mac during Zoom calls, professionals needing reliable app demos, or users seeking effortless device control via PC.
Despite its strengths, AirDroid Cast faces occasional lag or audio-video sync issues on older devices or weak networks. A few users note a slight learning curve for interface navigation and intermittent pop-up ads for upgrades. However, its user-friendly design, fullscreen/rotation flexibility, and consistent performance solidify it as a choice for casual users alike.
Free Version: has ads that pop up, and you need to upgrade to get rid of them. It's a great free screen mirroring app for casual users!
Pros:
Cross-platform compatibility: seamlessly mirroring Android, iOS, Windows, and smart TV screens.
Two-way audio feature: perfect for presentations or remote support.
High-quality mirroring: supporting full-screen mode and screen rotation.
Simplicity: free web version and same-WiFi functionality simplify setup, ideal for professionals, educators, or casual users needing reliable screen sharing.
Cons:
Performance dips: Older devices or low-bandwidth networks cause lag or audio-video desynchronization.
Slight learning curve: interface navigation and occasional pop-up ads for upgrades or security features can disrupt the experience.
Top 4. Screen Mirroring Assistant
Screen Mirroring Assistant is a lightweight, Android-focused screen-sharing app that simplifies wireless screen mirroring via Miracast to smart TVs or wireless display adapters. With a tiny 2.72 MB footprint, it runs smoothly even on older devices running Android 4.2 or later. Its plug-and-play design requires no complex configurations, making it ideal for Android users seeking quick, no-frills casting for media streaming or presentations. From this point of view, Screen Mirroring Assistant could be called the best Android mirror screen app for Android.
However, the app is exclusive to Android and relies on TV compatibility with wireless display protocols, limiting its versatility. If you want to use it to mirror the screen from an iPad to a Mac, it may be a bit difficult. Connection stability may vary depending on hardware support, and first-time users might need to troubleshoot device pairing. Despite these constraints, its simplicity and efficiency make it a go-to for hassle-free Android-to-TV mirroring.
Free Version: mainly a free app, with basic features available for free, and is suitable for lightweight users who only need basic Android to TV wireless casting.
Pros:
Designed for Android devices.
Support Miracast protocol casting to Smart TVs or wireless display adapters35.
Compact size (only 2.72 MB), compatible with Android 4.2 and higher systems.
Cons:
Android-only, and requires TV wireless display functionality.
Occasional pairing issues.
Top 5. AnyDesk
AnyDesk is a free casting App for individuals, offering blazing-fast connections with low latency, ideal for IT support, remote work, or cross-device file transfers. This tool makes remote IT support faster and easier. Its instant screen mirroring works smoothly across Windows, Mac, Linux, Android, and iOS devices, even on slow networks. Support teams can quickly fix urgent issues like system crashes, guide coworkers through installations, or solve software problems between different devices – all with clear visuals and quick response times.
The secure encryption keeps data safe, while features like screen drawing and USB-portable access let technicians troubleshoot multiple devices anywhere, without complicated setups. Perfect for helping offices, fixing servers, or supporting teams worldwide, it’s simple enough for beginners but powerful enough for IT professionals.
While free for personal use, advanced features like multi-monitor support or automated mass deployments require a paid subscription. New users might find its array of settings overwhelming initially, and unattended access setup can be tricky for non-technical audiences. Despite these hurdles, its speed and versatility solidify its spot among the top remote tools.
Pros:
Lightning-fast performance: Ideal for real-time tasks like video editing or live server management.
Cross-platform flexibility: Supports Windows, macOS, Linux, Android, iOS, and even Raspberry Pi.
Portable usage: Perfect for on-the-go IT repairs or restricted corporate systems.
Cons:
Premium features are locked behind subscriptions.
The steep learning curve for advanced tools.
Limited customization in the free tier.
Conclusion
For those who need cross-platform screen mirroring, DeskIn is the best free screen mirroring app - with its 38ms ultra-low latency, 4K lossless image quality, and 256-bit encryption, it's perfectly suited for telecommuting, gaming, live streaming, or design collaboration scenarios. For Android-only users who only need to cast to their TV, Screen Mirroring Assistant quickly enables ad-free wireless casting thanks to its lightweight size and Miracast protocol support.
Other tools address niche needs: AirDroid Cast for presentations that require two-way voice communication, LetsView's collaborative whiteboards for education teams, and AnyDesk for blazing-fast remote control. No matter which one you choose, all of these free tools break down device barriers and make cross-screen collaboration a real "zero barrier".
3 Methods to Set up and Screen Share on Mac (Easy & Free)
Screen sharing on a Mac can be incredibly useful, whether you're collaborating on a project, troubleshooting a technical issue, or giving a quick tutorial to a colleague or friend. But if you're new to macOS or switching from another system, figuring out how to start screen sharing can be confusing.
This guide walks you through the 3 easiest ways with common error fixes, to share your screen on a MacBook Air, MacBook Pro, or iMac without a technical background required. From built-in tools to smarter third-party options like DeskIn, you'll find the method that fits your needs best.
Method 1. Use Mac's Free Built-In Screen Sharing Feature
If you need to share your Mac screen with another Mac on the same local network, Apple's built-in Screen Sharing app offers a simple and effective solution. It's especially useful for tech support, collaboration, or remote access within homes or offices, with no third-party software required.
That said, this method only works Mac-to-Mac and requires both devices to be on the same network, which makes it ideal for quick, local sharing scenarios. If that fits your situation, follow these steps to get started.
Step 1. Go to "Apple menu > System Settings > General > Sharing".
Step 2. Toggle on "Screen Sharing". Under "Allow access for," choose All users or Only these users, depending on your needs.
Step 3. On the other Mac, open Finder, then go to "Network", or open the Screen Sharing app via Launchpad.
Step 4. Select the Mac you want to connect to, or enter its IP address or hostname, then click "Connect".
Step 5. Finally, find your target Mac computer under "Settings > Display", and mirror your Mac screen on it.
💡 Things to Keep in Mind:
Both Macs must be powered on and connected to the same network.
If the Firewall is enabled, make sure it allows incoming Screen Sharing connections.
Performance may vary depending on your network speed and system resources.
Method 2. Share Screen via FaceTime on the Latest macOS
If you're running macOS Sonoma or later, FaceTime now provides a built-in screen sharing feature to show your screen during a video call, offering a frictionless way to share your screen on an iMac, MacBook, or any macOS device. It's especially helpful for quick demonstrations, collaborative discussions, or helping friends and family troubleshoot issues, without needing any extra apps or setup.
This method is best suited for temporary Mac screen sharing during real-time conversations, especially when talking to someone on another Mac or iOS device. However, it's important to note that FaceTime screen sharing does not allow remote control, and is therefore not suitable for IT-level support or secure access. To share your screen during a FaceTime call, follow these steps as follows.
Step 1. Start or join a FaceTime call with the person you want to share your screen with.
Step 2. Click the "Share Screen" button (a rectangle with a person icon) in the FaceTime control bar.
Step 3. Choose either "Entire Screen" or "Specific Window", depending on what you want to show.
Step 4. To stop sharing, click the "screen sharing" icon again, or switch to a different window if needed.
Method 3. Use DeskIn for Easy and Cross-Platform Screen Sharing
If you need to share your Mac screen securely across different networks or platforms, or even take full remote control of another device, DeskIn is a powerful and user-friendly alternative to traditional methods. It's designed for users who need more than just basic screen sharing, perfect for remote work, IT support, or virtual collaboration.
Unlike Apple's built-in tools, DeskIn doesn't require a public IP address or port forwarding, thanks to its intelligent NAT traversal. All connections are end-to-end encrypted, ensuring your data remains private and protected. In addition to screen sharing, DeskIn also supports file transfers, real-time control, and cross-platform compatibility, which means you can remote access your Mac from iPhone, Android, or Windows PC, and enjoy all advanced features without hassle.
Step 2. Register or log in to your DeskIn account.
Step 3. On the host device (Mac), generate a temporary connection code or set a permanent access password.
Step 4. On the viewer device, enter the code or credentials, and you'll instantly gain access to the shared screen, with optional control.
Whether you're assisting a client, collaborating on a project, or managing a remote desktop setup, DeskIn offers a secure, seamless, and efficientscreen-sharingexperience for all scenarios.
Troubleshooting: Why Mac Screen Sharing Might Not Work
During your usage, you may come across any trouble, like Mac screen sharing not working,or not being able to share your Mac. Whether you're using the built-in Screen Sharing app or trying to share during a FaceTime call, there are several common reasons why it might not work as expected.
Here's how to identify and fix the most frequent issues:
Devices Are Not on the Same Network: The built-in Screen Sharing app only works when both Macs are connected to the same local network. If you're trying to connect remotely, this method won't work.
Firewall Is Blocking RDP or VNC Ports: macOS firewalls or network security settings might block the ports used for screen sharing. Make sure port 5900 (VNC) is allowed through your firewall.
Screen Sharing Permissions Not Enabled: Go to System Settings > General > Sharing, and ensure Screen Sharing is turned on. Also, verify that the correct users are authorized under the "Allow access for" section.
User Account Lacks Access Rights: If the user trying to connect isn't granted permission on the host Mac, screen sharing won't initiate. You may need to add them to the approved list.
Incompatible or Outdated macOS Versions: Some features, like FaceTime screen sharing, are only available on macOS Sonoma and newer. If one device is running an older version, compatibility issues may occur.
📌 Tips: If you need to share your screen between different networks or across platforms, consider using DeskIn. It doesn't require both devices to be on the same network and automatically handles firewall/NAT traversal. With end-to-end encryption and multi-platform support, it's a reliable workaround when native macOS tools fall short.
Why You Might Need to Screen Share on a Mac Remotely
Screen sharing isn't just a tech-savvy feature; it's a practical tool that makes everyday collaboration smoother. Whether you're working from home, helping a family member troubleshoot their Mac, or hosting a virtual training session, screen sharing lets others see exactly what's happening on your screen in real time.
Here are some common scenarios where sharing your screen on a Mac can come in handy:
Remote presentations to clients or teammates.
Live technical support when someone needs to walk you through an issue (or vice versa).
Online classes or training sessions where visual explanation is key.
Collaborative document editing or design review that benefits from shared visuals.
Conclusion
In summary, screen sharing on Mac can be easily done using the built-in Screen Sharing app for local networks, FaceTime for quick, temporary sharing, or DeskIn for secure, cross-platform collaboration. For seamless and secure screen sharing, DeskIn offers the best solution, especially when working remotely or across different devices. Choose the method that best fits your needs, and for enhanced security and flexibility, consider downloading DeskIn for remote desktop and screen sharing!