Search Docs…
Bảo Mật RDP: Cách Bảo Vệ Kết Nối Máy Tính Từ Xa Của Bạn
Giao thức Máy Tính Từ Xa (RDP) là một công cụ được sử dụng rộng rãi để truy cập từ xa vào máy tính, nhưng nó cũng đã trở thành mục tiêu chính cho các cuộc tấn công mạng. Với sự gia tăng của công việc từ xa và hợp tác xuyên vùng, việc bảo mật các kết nối RDP càng trở nên quan trọng hơn bao giờ hết. Các kết nối RDP không được bảo vệ có thể trở thành cổng cho ransomware, rò rỉ dữ liệu, và truy cập trái phép.
Dù bạn là người sử dụng thông thường hay một quản trị viên IT, việc hiểu cách bảo mật các kết nối RDP là điều cần thiết trong môi trường kỹ thuật số ngày nay. Trong bài viết này, chúng tôi sẽ khám phá cách tăng cường bảo mật RDP, bao gồm mọi thứ từ những mẹo cấu hình cơ bản đến những biện pháp bảo vệ nâng cao hơn. Nếu bạn muốn một lựa chọn thay thế cho RDP truyền thống, chúng tôi cũng sẽ giới thiệu cho bạn DeskIn, một dịch vụ cung cấp truy cập từ xa an toàn, dễ sử dụng.
Bảo Mật RDP Là Gì và Tại Sao Nó Quan Trọng
RDP (Giao thức Máy Tính Từ Xa) là một giao thức của Microsoft cho phép người dùng truy cập từ xa vào một máy tính khác qua kết nối mạng. Nó được quản trị viên IT và những người làm việc từ xa sử dụng rộng rãi để quản lý máy chủ, trạm làm việc và các hệ thống khác. Tuy nhiên, trong khi RDP cung cấp sự thuận tiện, liệu RDP có an toàn không? Câu trả lời là: nó đi kèm với các rủi ro bảo mật đáng kể nếu không được cấu hình đúng cách.
Bảo mật RDP đề cập đến các biện pháp được thực hiện để bảo vệ các kết nối máy tính từ xa khỏi sự truy cập trái phép, rò rỉ dữ liệu và các mối đe dọa mạng khác. Việc đảm bảo bảo mật RDP là rất quan trọng, đặc biệt trong bối cảnh làm việc từ xa, nơi bề mặt tấn công đã mở rộng đáng kể. Nếu không được bảo mật, các kết nối RDP có thể trở thành điểm xâm nhập cho các kẻ tấn công, làm lộ dữ liệu và hệ thống nhạy cảm cho các cuộc tấn công độc hại.
Những Rủi Ro Chính Của Kết Nối RDP Không An Toàn
Mặc dù RDP là một công cụ quý giá cho việc truy cập từ xa, nhưng nó tiềm ẩn những rủi ro đáng kể nếu không được bảo mật đúng cách. Một kết nối RDP không được bảo vệ có thể mở ra cánh cửa cho nhiều mối đe dọa mạng, bao gồm rò rỉ dữ liệu, truy cập trái phép, và thậm chí là các cuộc tấn công ransomware. Vậy, máy tính từ xa có an toàn không mà không có các biện pháp bảo vệ thích hợp? Thực tế là, nó hoàn toàn không an toàn, làm cho việc thực hiện các thực hành tốt nhất để bảo vệ RDP và giảm thiểu những rủi ro này trở nên cần thiết.
Dưới đây là một số rủi ro chính liên quan đến các kết nối RDP không an toàn:
Mật Khẩu Yếu: Các phiên RDP thường bị nhắm đến bởi các cuộc tấn công brute-force, trong đó các kẻ tấn công cố gắng đoán các mật khẩu yếu hoặc phổ biến. Nếu không có mật khẩu mạnh, phức tạp, các kẻ tấn công có thể dễ dàng truy cập vào hệ thống.
Vulnerabilities Trong Mạng Công Cộng: Sử dụng RDP qua các mạng không bảo mật hoặc công cộng (như Wi-Fi miễn phí ở quán cà phê) khiến cho các hacker dễ dàng chặn kết nối của bạn và đánh cắp thông tin nhạy cảm.
Thiếu Mã Hóa: Nếu lưu lượng RDP không được mã hóa, dữ liệu trao đổi giữa máy tính từ xa và máy chủ có thể bị kẻ tấn công chặn lại, dẫn đến các rò rỉ dữ liệu tiềm năng.
Phơi Bày Cổng Mặc Định: RDP thường sử dụng cổng 3389, cổng này thường được để mở cho internet công cộng. Điều này khiến cho tội phạm mạng dễ dàng xác định và nhắm đến các dịch vụ RDP được phơi bày trên internet.
Xác Thực Không Đầy Đủ: Bảo mật RDP có thể bị xâm phạm nếu không bật xác thực nhiều yếu tố (MFA), cho phép các kẻ tấn công truy cập chỉ với mật khẩu.
Phần Mềm Cũ: Phần mềm RDP và hệ điều hành cơ sở có thể chứa các lỗ hổng mà kẻ tấn công có thể khai thác. Việc không áp dụng các bản vá và cập nhật để lại hệ thống bị phơi bày.
Bằng cách nhận diện những rủi ro này và thực hiện các biện pháp bảo mật phù hợp, bạn có thể giảm thiểu đáng kể nguy cơ trở thành nạn nhân của một cuộc tấn công liên quan đến RDP. Quan trọng là phải nhớ rằng mức độ an toàn của máy tính từ xa hoàn toàn phụ thuộc vào cách bạn cấu hình và duy trì kết nối của mình. Nếu những lỗ hổng này không được giải quyết, bạn có thể đang mở cửa cho những cuộc tấn công mạng tàn khốc.
Cách Bảo Mật Các Kết Nối RDP: Các Thực Hành Tốt Nhất
Bảo mật các kết nối RDP (Giao thức Máy Tính Từ Xa) là rất quan trọng để bảo vệ hệ thống của bạn khỏi sự truy cập trái phép và các cuộc tấn công mạng. Bằng cách làm theo một chuỗi các thực hành tốt nhất, bạn có thể tăng cường đáng kể bảo mật của thiết lập RDP của mình, dù bạn đang kết nối từ xa từ nhà hay từ một môi trường văn phòng. Đây là cách bảo mật RDP hiệu quả.
👀 Thêm Nhiều Cái Để Khám Phá:
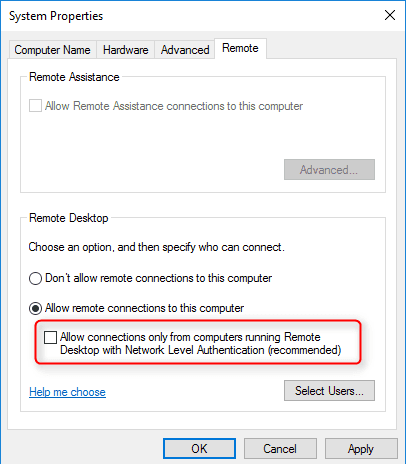
Bật Xác Thực Cấp Mạng (NLA)
Nó thực hiện gì: NLA yêu cầu người dùng xác thực trước khi thiết lập một phiên RDP, đảm bảo rằng chỉ những người dùng được phép mới có thể truy cập vào hệ thống.
Tại sao điều đó quan trọng: Điều này thêm một lớp bảo vệ bổ sung, ngăn chặn các kẻ tấn công truy cập vào hệ thống ngay cả khi họ có thể đoán hoặc bẻ khóa mật khẩu.
Sử Dụng Mật Khẩu Mạnh và Xác Thực Nhiều Yếu Tố (MFA)
Nó thực hiện gì: Một mật khẩu mạnh kết hợp chữ hoa và chữ thường, số và ký hiệu. MFA thêm một lớp bảo mật bằng cách yêu cầu một hình thức xác thực thứ hai (như một mã được gửi đến điện thoại của bạn).
Tại sao điều đó quan trọng: Mật khẩu đơn lẻ thường dễ bị xâm nhập. MFA giảm thiểu đáng kể khả năng truy cập trái phép, biến nó thành một biện pháp bảo mật thiết yếu cho bất kỳ thực hành bảo mật làm việc từ xa nào.
Hạn Chế Truy Cập Đến Địa Chỉ IP Cụ Thể
Nó thực hiện gì: Bằng cách giới hạn quyền truy cập chỉ cho những địa chỉ IP đã biết, bạn có thể ngăn cản các thiết bị không được phép cố gắng kết nối với phiên RDP của mình.
Tại sao điều đó quan trọng: Điều này đảm bảo rằng chỉ những địa điểm đáng tin cậy mới có thể thiết lập một kết nối RDP, giảm thiểu rủi ro từ các cuộc tấn công brute-force và các lỗ hổng khác.
Sử Dụng VPN Để Tăng Cường Bảo Mật
Nó thực hiện gì: Một Mạng Riêng Ảo (VPN) mã hóa lưu lượng truy cập internet của bạn, bao gồm cả các kết nối RDP, và ẩn địa chỉ IP của bạn, khiến cho việc kẻ tấn công chặn thông tin liên lạc của bạn trở nên khó khăn hơn.
Tại sao điều đó quan trọng: Khi truy cập RDP từ nhà hoặc qua các mạng công cộng, việc sử dụng VPN đảm bảo rằng kết nối của bạn vẫn được bảo mật và riêng tư, bảo vệ dữ liệu nhạy cảm khỏi việc có thể bị nghe lén.
Cập Nhật Thường Xuyên Phần Mềm RDP và Hệ Điều Hành Của Bạn
Nó thực hiện gì: Giữ RDP và hệ điều hành của bạn được cập nhật đảm bảo rằng các lỗ hổng đã biết được vá lại và bạn được bảo vệ khỏi các mối đe dọa bảo mật mới nhất.
Tại sao điều đó quan trọng: Tội phạm mạng thường khai thác phần mềm lỗi thời. Cập nhật thường xuyên ngăn chặn các cuộc tấn công như vậy, giữ cho máy tính từ xa của bạn được bảo mật.
Bằng cách thực hiện những bước này, bạn có thể kiểm soát bảo mật RDP của mình và bảo vệ hệ thống khỏi sự truy cập trái phép, rò rỉ dữ liệu và các cuộc tấn công mạng. Dù bạn đang tìm cách bảo mật RDP từ nhà hay trong một môi trường doanh nghiệp, những biện pháp này là rất quan trọng.
Các Biện Pháp Chuyên Nghiệp Khác Để Nâng Cao Bảo Mật RDP
Nếu bạn muốn đưa bảo mật RDP lên một tầm cao mới, có một số biện pháp bổ sung mà bạn có thể thực hiện. Những biện pháp này được thiết kế để cung cấp một sự phòng thủ mạnh mẽ hơn trước các mối đe dọa mạng:
Sử Dụng Tường Lửa Để Kiểm Soát Truy Cập RDP: Chỉ cho phép lưu lượng RDP từ các địa chỉ IP đáng tin cậy, chặn các kết nối trái phép.
Thay Đổi Cổng Mặc Định RDP (3389): Thay đổi cổng mặc định để làm cho kẻ tấn công khó nhắm mục tiêu vào dịch vụ RDP của bạn hơn.
Thực Hiện Chính Sách Khóa Tài Khoản: Tự động khóa tài khoản sau một số lần đăng nhập thất bại để ngăn chặn các cuộc tấn công brute-force.
Giám Sát Nhật Ký Truy Cập RDP: Thường xuyên kiểm tra nhật ký truy cập để phát hiện hoạt động đáng ngờ, chẳng hạn như đăng nhập thất bại hoặc kết nối trái phép.
Đảm Bảo Giao Thức Mã Hóa Mạnh: Đảm bảo RDP sử dụng mã hóa mạnh (ví dụ: TLS) để bảo vệ dữ liệu truyền tải trong các phiên từ xa.
📌 Mẹo: Cách Kiểm Tra Mức Độ Mã Hóa RDP?
Để đảm bảo kết nối RDP của bạn được bảo mật, hãy kiểm tra cài đặt mã hóa của phiên. Xác minh rằng nó sử dụng các giao thức mã hóa mạnh như TLS, mà hiện được khuyến nghị rộng rãi cho các kết nối bảo mật.
Mẹo Thêm: Sử Dụng DeskIn Để Có Truy Cập Từ Xa An Toàn Hơn
Khi các biện pháp bảo mật RDP truyền thống là cần thiết, bạn có thể nâng cao bảo mật truy cập từ xa của mình lên một tầm cao mới với DeskIn. Đây là một giải pháp hiện đại, an toàn, và dễ sử dụng giúp loại bỏ nhiều rủi ro liên quan đến các cấu hình RDP truyền thống. Bằng cách cung cấp một lớp bảo vệ cao hơn và đơn giản hóa quy trình thiết lập, DeskIn đảm bảo rằng truy cập máy tính từ xa của bạn vừa được bảo vệ vừa dễ quản lý.
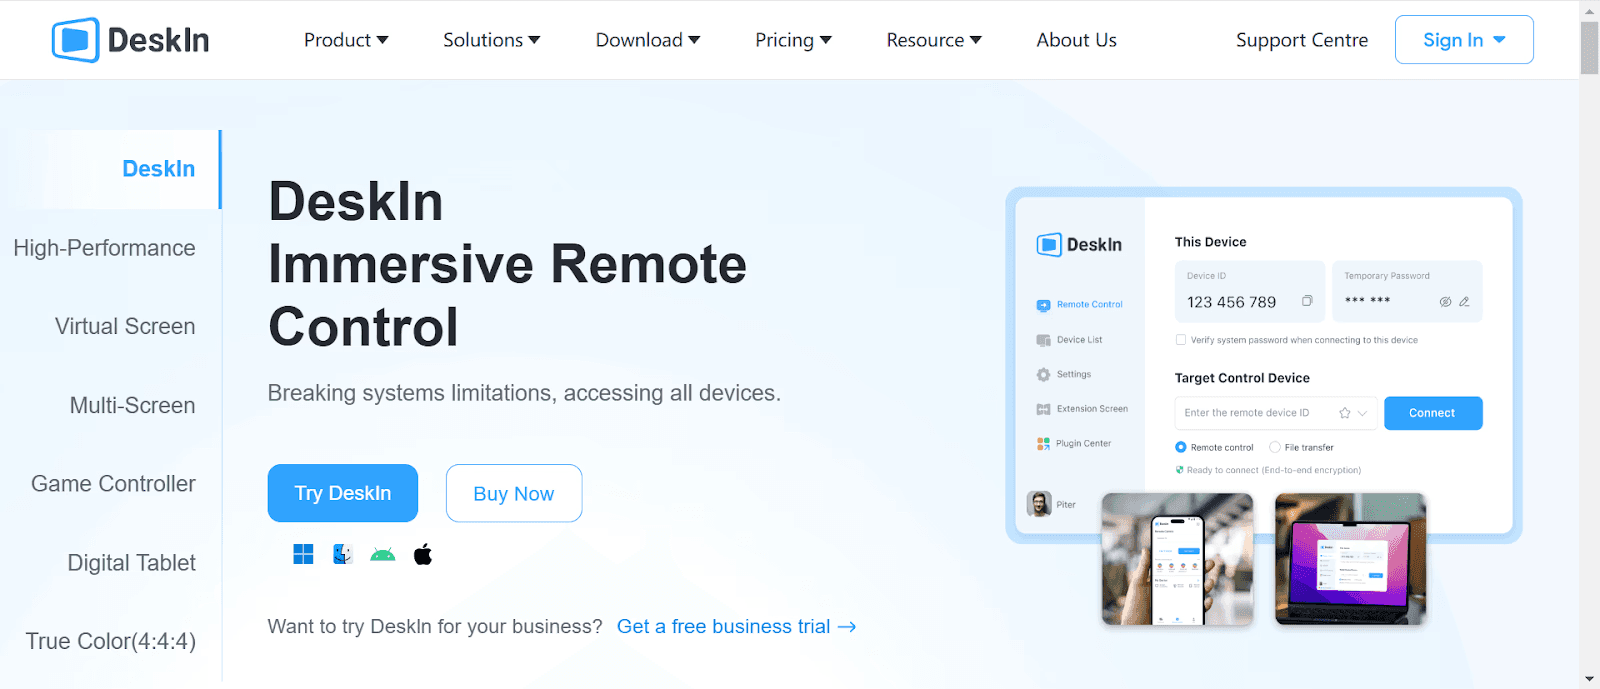
📌 Các Tính Năng Chính Của DeskIn:
Không Cần IP Công Khai Để Truy Cập: Loại bỏ những rủi ro liên quan đến việc phơi bày dịch vụ RDP của bạn trên internet công cộng.
Mã Hóa Điểm Đến Đến và Cơ Chế Kiểm Soát Truy Cập Người Dùng An Toàn: Đảm bảo rằng tất cả các kết nối đều được mã hóa, bảo vệ dữ liệu của bạn.
Hỗ Trợ Đa Nền Tảng + Chuyển Giao Tài Liệu và Cộng Tác: Kết nối từ bất kỳ thiết bị nào và dễ dàng chia sẻ tài liệu hoặc cộng tác theo thời gian thực.
Thiết Lập Dễ Dàng Với Mã Truy Cập Tạm Thời Hoặc Mật Khẩu Được Đặt Sẵn: Thiết lập và bắt đầu sử dụng DeskIn với cấu hình tối thiểu.
Phù Hợp Cho Các Doanh Nghiệp Nhỏ Đến Trung Bình Và Người Làm Việc Từ Xa: Cung cấp một giải pháp an toàn, hiệu quả về chi phí cho các doanh nghiệp và cá nhân làm việc từ xa.
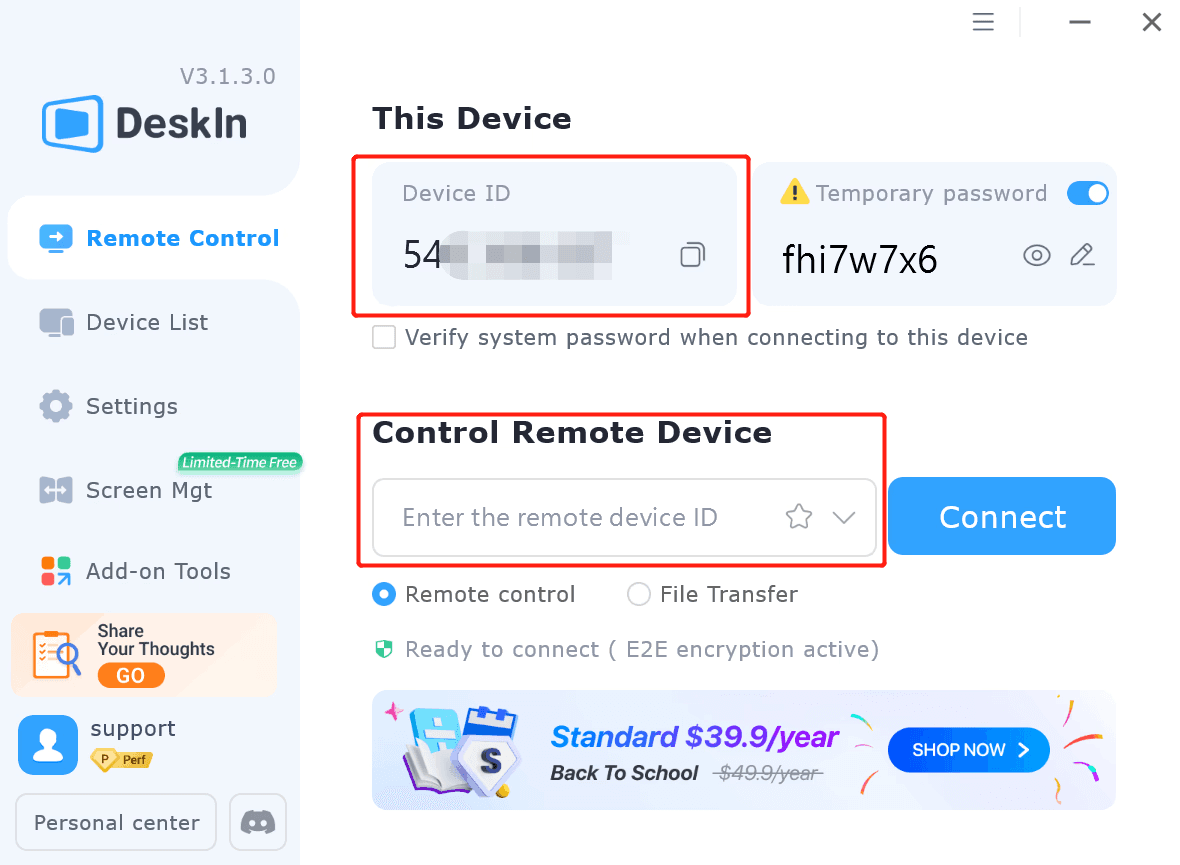
Dưới đây là các bước ngắn gọn để sử dụng DeskIn để điều khiển từ xa các PC khác, đảm bảo bảo mật RDP:
Đăng ký tài khoản DeskIn miễn phí trên trang web chính thức.
Tạo quyền truy cập an toàn bằng cách chọn mã truy cập tạm thời hoặc mật khẩu đã được thiết lập sẵn.
Đảm bảo rằng mã hóa được kích hoạt cho tất cả các phiên từ xa để bảo vệ dữ liệu của bạn.
Tải ứng dụng DeskIn hoặc sử dụng nền tảng web để kết nối với máy tính từ xa của bạn một cách an toàn.
Sử dụng các tính năng chuyển giao tài liệu và cộng tác tích hợp để tăng cường năng suất.
Kết Luận: Tại Sao Bảo Mật RDP Không Thể Bị Bỏ Qua
Bảo vệ các kết nối RDP của bạn là điều cần thiết để bảo vệ dữ liệu nhạy cảm và đảm bảo việc làm việc từ xa an toàn. Nếu không có các biện pháp bảo mật đúng, các kết nối RDP không được bảo vệ có thể phơi bày mạng của bạn trước những mối đe dọa như truy cập trái phép, ransomware và rò rỉ dữ liệu. Bằng cách thực hiện các thực hành tốt nhất như mật khẩu mạnh, Xác thực Cấp Mạng (NLA) và Xác thực Nhiều Yếu Tố (MFA), bạn có thể giảm thiểu đáng kể những rủi ro này và đảm bảo rằng truy cập máy tính từ xa của bạn luôn được bảo mật.
Tuy nhiên, đối với những ai đang tìm kiếm một giải pháp an toàn và dễ sử dụng hơn, DeskIn cung cấp một lựa chọn mạnh mẽ thay thế cho RDP truyền thống. DeskIn đơn giản hóa trải nghiệm máy tính từ xa trong khi cung cấp các tính năng bảo mật nâng cao, chẳng hạn như mã hóa điểm đến đến, không cần phơi bày IP công cộng, và kiểm soát truy cập mạnh mẽ. Dù bạn là một doanh nghiệp nhỏ hay một người làm việc từ xa, DeskIn đảm bảo rằng truy cập từ xa của bạn không chỉ an toàn mà còn hiệu quả và dễ quản lý.
Bảo Mật RDP: Cách Bảo Vệ Kết Nối Máy Tính Từ Xa Của Bạn
Giao thức Máy Tính Từ Xa (RDP) là một công cụ được sử dụng rộng rãi để truy cập từ xa vào máy tính, nhưng nó cũng đã trở thành mục tiêu chính cho các cuộc tấn công mạng. Với sự gia tăng của công việc từ xa và hợp tác xuyên vùng, việc bảo mật các kết nối RDP càng trở nên quan trọng hơn bao giờ hết. Các kết nối RDP không được bảo vệ có thể trở thành cổng cho ransomware, rò rỉ dữ liệu, và truy cập trái phép.
Dù bạn là người sử dụng thông thường hay một quản trị viên IT, việc hiểu cách bảo mật các kết nối RDP là điều cần thiết trong môi trường kỹ thuật số ngày nay. Trong bài viết này, chúng tôi sẽ khám phá cách tăng cường bảo mật RDP, bao gồm mọi thứ từ những mẹo cấu hình cơ bản đến những biện pháp bảo vệ nâng cao hơn. Nếu bạn muốn một lựa chọn thay thế cho RDP truyền thống, chúng tôi cũng sẽ giới thiệu cho bạn DeskIn, một dịch vụ cung cấp truy cập từ xa an toàn, dễ sử dụng.
Bảo Mật RDP Là Gì và Tại Sao Nó Quan Trọng
RDP (Giao thức Máy Tính Từ Xa) là một giao thức của Microsoft cho phép người dùng truy cập từ xa vào một máy tính khác qua kết nối mạng. Nó được quản trị viên IT và những người làm việc từ xa sử dụng rộng rãi để quản lý máy chủ, trạm làm việc và các hệ thống khác. Tuy nhiên, trong khi RDP cung cấp sự thuận tiện, liệu RDP có an toàn không? Câu trả lời là: nó đi kèm với các rủi ro bảo mật đáng kể nếu không được cấu hình đúng cách.
Bảo mật RDP đề cập đến các biện pháp được thực hiện để bảo vệ các kết nối máy tính từ xa khỏi sự truy cập trái phép, rò rỉ dữ liệu và các mối đe dọa mạng khác. Việc đảm bảo bảo mật RDP là rất quan trọng, đặc biệt trong bối cảnh làm việc từ xa, nơi bề mặt tấn công đã mở rộng đáng kể. Nếu không được bảo mật, các kết nối RDP có thể trở thành điểm xâm nhập cho các kẻ tấn công, làm lộ dữ liệu và hệ thống nhạy cảm cho các cuộc tấn công độc hại.
Những Rủi Ro Chính Của Kết Nối RDP Không An Toàn
Mặc dù RDP là một công cụ quý giá cho việc truy cập từ xa, nhưng nó tiềm ẩn những rủi ro đáng kể nếu không được bảo mật đúng cách. Một kết nối RDP không được bảo vệ có thể mở ra cánh cửa cho nhiều mối đe dọa mạng, bao gồm rò rỉ dữ liệu, truy cập trái phép, và thậm chí là các cuộc tấn công ransomware. Vậy, máy tính từ xa có an toàn không mà không có các biện pháp bảo vệ thích hợp? Thực tế là, nó hoàn toàn không an toàn, làm cho việc thực hiện các thực hành tốt nhất để bảo vệ RDP và giảm thiểu những rủi ro này trở nên cần thiết.
Dưới đây là một số rủi ro chính liên quan đến các kết nối RDP không an toàn:
Mật Khẩu Yếu: Các phiên RDP thường bị nhắm đến bởi các cuộc tấn công brute-force, trong đó các kẻ tấn công cố gắng đoán các mật khẩu yếu hoặc phổ biến. Nếu không có mật khẩu mạnh, phức tạp, các kẻ tấn công có thể dễ dàng truy cập vào hệ thống.
Vulnerabilities Trong Mạng Công Cộng: Sử dụng RDP qua các mạng không bảo mật hoặc công cộng (như Wi-Fi miễn phí ở quán cà phê) khiến cho các hacker dễ dàng chặn kết nối của bạn và đánh cắp thông tin nhạy cảm.
Thiếu Mã Hóa: Nếu lưu lượng RDP không được mã hóa, dữ liệu trao đổi giữa máy tính từ xa và máy chủ có thể bị kẻ tấn công chặn lại, dẫn đến các rò rỉ dữ liệu tiềm năng.
Phơi Bày Cổng Mặc Định: RDP thường sử dụng cổng 3389, cổng này thường được để mở cho internet công cộng. Điều này khiến cho tội phạm mạng dễ dàng xác định và nhắm đến các dịch vụ RDP được phơi bày trên internet.
Xác Thực Không Đầy Đủ: Bảo mật RDP có thể bị xâm phạm nếu không bật xác thực nhiều yếu tố (MFA), cho phép các kẻ tấn công truy cập chỉ với mật khẩu.
Phần Mềm Cũ: Phần mềm RDP và hệ điều hành cơ sở có thể chứa các lỗ hổng mà kẻ tấn công có thể khai thác. Việc không áp dụng các bản vá và cập nhật để lại hệ thống bị phơi bày.
Bằng cách nhận diện những rủi ro này và thực hiện các biện pháp bảo mật phù hợp, bạn có thể giảm thiểu đáng kể nguy cơ trở thành nạn nhân của một cuộc tấn công liên quan đến RDP. Quan trọng là phải nhớ rằng mức độ an toàn của máy tính từ xa hoàn toàn phụ thuộc vào cách bạn cấu hình và duy trì kết nối của mình. Nếu những lỗ hổng này không được giải quyết, bạn có thể đang mở cửa cho những cuộc tấn công mạng tàn khốc.
Cách Bảo Mật Các Kết Nối RDP: Các Thực Hành Tốt Nhất
Bảo mật các kết nối RDP (Giao thức Máy Tính Từ Xa) là rất quan trọng để bảo vệ hệ thống của bạn khỏi sự truy cập trái phép và các cuộc tấn công mạng. Bằng cách làm theo một chuỗi các thực hành tốt nhất, bạn có thể tăng cường đáng kể bảo mật của thiết lập RDP của mình, dù bạn đang kết nối từ xa từ nhà hay từ một môi trường văn phòng. Đây là cách bảo mật RDP hiệu quả.
👀 Thêm Nhiều Cái Để Khám Phá:
Bật Xác Thực Cấp Mạng (NLA)
Nó thực hiện gì: NLA yêu cầu người dùng xác thực trước khi thiết lập một phiên RDP, đảm bảo rằng chỉ những người dùng được phép mới có thể truy cập vào hệ thống.
Tại sao điều đó quan trọng: Điều này thêm một lớp bảo vệ bổ sung, ngăn chặn các kẻ tấn công truy cập vào hệ thống ngay cả khi họ có thể đoán hoặc bẻ khóa mật khẩu.
Sử Dụng Mật Khẩu Mạnh và Xác Thực Nhiều Yếu Tố (MFA)
Nó thực hiện gì: Một mật khẩu mạnh kết hợp chữ hoa và chữ thường, số và ký hiệu. MFA thêm một lớp bảo mật bằng cách yêu cầu một hình thức xác thực thứ hai (như một mã được gửi đến điện thoại của bạn).
Tại sao điều đó quan trọng: Mật khẩu đơn lẻ thường dễ bị xâm nhập. MFA giảm thiểu đáng kể khả năng truy cập trái phép, biến nó thành một biện pháp bảo mật thiết yếu cho bất kỳ thực hành bảo mật làm việc từ xa nào.
Hạn Chế Truy Cập Đến Địa Chỉ IP Cụ Thể
Nó thực hiện gì: Bằng cách giới hạn quyền truy cập chỉ cho những địa chỉ IP đã biết, bạn có thể ngăn cản các thiết bị không được phép cố gắng kết nối với phiên RDP của mình.
Tại sao điều đó quan trọng: Điều này đảm bảo rằng chỉ những địa điểm đáng tin cậy mới có thể thiết lập một kết nối RDP, giảm thiểu rủi ro từ các cuộc tấn công brute-force và các lỗ hổng khác.
Sử Dụng VPN Để Tăng Cường Bảo Mật
Nó thực hiện gì: Một Mạng Riêng Ảo (VPN) mã hóa lưu lượng truy cập internet của bạn, bao gồm cả các kết nối RDP, và ẩn địa chỉ IP của bạn, khiến cho việc kẻ tấn công chặn thông tin liên lạc của bạn trở nên khó khăn hơn.
Tại sao điều đó quan trọng: Khi truy cập RDP từ nhà hoặc qua các mạng công cộng, việc sử dụng VPN đảm bảo rằng kết nối của bạn vẫn được bảo mật và riêng tư, bảo vệ dữ liệu nhạy cảm khỏi việc có thể bị nghe lén.
Cập Nhật Thường Xuyên Phần Mềm RDP và Hệ Điều Hành Của Bạn
Nó thực hiện gì: Giữ RDP và hệ điều hành của bạn được cập nhật đảm bảo rằng các lỗ hổng đã biết được vá lại và bạn được bảo vệ khỏi các mối đe dọa bảo mật mới nhất.
Tại sao điều đó quan trọng: Tội phạm mạng thường khai thác phần mềm lỗi thời. Cập nhật thường xuyên ngăn chặn các cuộc tấn công như vậy, giữ cho máy tính từ xa của bạn được bảo mật.
Bằng cách thực hiện những bước này, bạn có thể kiểm soát bảo mật RDP của mình và bảo vệ hệ thống khỏi sự truy cập trái phép, rò rỉ dữ liệu và các cuộc tấn công mạng. Dù bạn đang tìm cách bảo mật RDP từ nhà hay trong một môi trường doanh nghiệp, những biện pháp này là rất quan trọng.
Các Biện Pháp Chuyên Nghiệp Khác Để Nâng Cao Bảo Mật RDP
Nếu bạn muốn đưa bảo mật RDP lên một tầm cao mới, có một số biện pháp bổ sung mà bạn có thể thực hiện. Những biện pháp này được thiết kế để cung cấp một sự phòng thủ mạnh mẽ hơn trước các mối đe dọa mạng:
Sử Dụng Tường Lửa Để Kiểm Soát Truy Cập RDP: Chỉ cho phép lưu lượng RDP từ các địa chỉ IP đáng tin cậy, chặn các kết nối trái phép.
Thay Đổi Cổng Mặc Định RDP (3389): Thay đổi cổng mặc định để làm cho kẻ tấn công khó nhắm mục tiêu vào dịch vụ RDP của bạn hơn.
Thực Hiện Chính Sách Khóa Tài Khoản: Tự động khóa tài khoản sau một số lần đăng nhập thất bại để ngăn chặn các cuộc tấn công brute-force.
Giám Sát Nhật Ký Truy Cập RDP: Thường xuyên kiểm tra nhật ký truy cập để phát hiện hoạt động đáng ngờ, chẳng hạn như đăng nhập thất bại hoặc kết nối trái phép.
Đảm Bảo Giao Thức Mã Hóa Mạnh: Đảm bảo RDP sử dụng mã hóa mạnh (ví dụ: TLS) để bảo vệ dữ liệu truyền tải trong các phiên từ xa.
📌 Mẹo: Cách Kiểm Tra Mức Độ Mã Hóa RDP?
Để đảm bảo kết nối RDP của bạn được bảo mật, hãy kiểm tra cài đặt mã hóa của phiên. Xác minh rằng nó sử dụng các giao thức mã hóa mạnh như TLS, mà hiện được khuyến nghị rộng rãi cho các kết nối bảo mật.
Mẹo Thêm: Sử Dụng DeskIn Để Có Truy Cập Từ Xa An Toàn Hơn
Khi các biện pháp bảo mật RDP truyền thống là cần thiết, bạn có thể nâng cao bảo mật truy cập từ xa của mình lên một tầm cao mới với DeskIn. Đây là một giải pháp hiện đại, an toàn, và dễ sử dụng giúp loại bỏ nhiều rủi ro liên quan đến các cấu hình RDP truyền thống. Bằng cách cung cấp một lớp bảo vệ cao hơn và đơn giản hóa quy trình thiết lập, DeskIn đảm bảo rằng truy cập máy tính từ xa của bạn vừa được bảo vệ vừa dễ quản lý.
📌 Các Tính Năng Chính Của DeskIn:
Không Cần IP Công Khai Để Truy Cập: Loại bỏ những rủi ro liên quan đến việc phơi bày dịch vụ RDP của bạn trên internet công cộng.
Mã Hóa Điểm Đến Đến và Cơ Chế Kiểm Soát Truy Cập Người Dùng An Toàn: Đảm bảo rằng tất cả các kết nối đều được mã hóa, bảo vệ dữ liệu của bạn.
Hỗ Trợ Đa Nền Tảng + Chuyển Giao Tài Liệu và Cộng Tác: Kết nối từ bất kỳ thiết bị nào và dễ dàng chia sẻ tài liệu hoặc cộng tác theo thời gian thực.
Thiết Lập Dễ Dàng Với Mã Truy Cập Tạm Thời Hoặc Mật Khẩu Được Đặt Sẵn: Thiết lập và bắt đầu sử dụng DeskIn với cấu hình tối thiểu.
Phù Hợp Cho Các Doanh Nghiệp Nhỏ Đến Trung Bình Và Người Làm Việc Từ Xa: Cung cấp một giải pháp an toàn, hiệu quả về chi phí cho các doanh nghiệp và cá nhân làm việc từ xa.
Dưới đây là các bước ngắn gọn để sử dụng DeskIn để điều khiển từ xa các PC khác, đảm bảo bảo mật RDP:
Đăng ký tài khoản DeskIn miễn phí trên trang web chính thức.
Tạo quyền truy cập an toàn bằng cách chọn mã truy cập tạm thời hoặc mật khẩu đã được thiết lập sẵn.
Đảm bảo rằng mã hóa được kích hoạt cho tất cả các phiên từ xa để bảo vệ dữ liệu của bạn.
Tải ứng dụng DeskIn hoặc sử dụng nền tảng web để kết nối với máy tính từ xa của bạn một cách an toàn.
Sử dụng các tính năng chuyển giao tài liệu và cộng tác tích hợp để tăng cường năng suất.
Kết Luận: Tại Sao Bảo Mật RDP Không Thể Bị Bỏ Qua
Bảo vệ các kết nối RDP của bạn là điều cần thiết để bảo vệ dữ liệu nhạy cảm và đảm bảo việc làm việc từ xa an toàn. Nếu không có các biện pháp bảo mật đúng, các kết nối RDP không được bảo vệ có thể phơi bày mạng của bạn trước những mối đe dọa như truy cập trái phép, ransomware và rò rỉ dữ liệu. Bằng cách thực hiện các thực hành tốt nhất như mật khẩu mạnh, Xác thực Cấp Mạng (NLA) và Xác thực Nhiều Yếu Tố (MFA), bạn có thể giảm thiểu đáng kể những rủi ro này và đảm bảo rằng truy cập máy tính từ xa của bạn luôn được bảo mật.
Tuy nhiên, đối với những ai đang tìm kiếm một giải pháp an toàn và dễ sử dụng hơn, DeskIn cung cấp một lựa chọn mạnh mẽ thay thế cho RDP truyền thống. DeskIn đơn giản hóa trải nghiệm máy tính từ xa trong khi cung cấp các tính năng bảo mật nâng cao, chẳng hạn như mã hóa điểm đến đến, không cần phơi bày IP công cộng, và kiểm soát truy cập mạnh mẽ. Dù bạn là một doanh nghiệp nhỏ hay một người làm việc từ xa, DeskIn đảm bảo rằng truy cập từ xa của bạn không chỉ an toàn mà còn hiệu quả và dễ quản lý.